Golden Valley


Introduction
Hello, I am Taemoor and I create worlds at TLM (a AAA game development studio) as a Lead Environment Artist.


I recently published a personal project on ArtStation and this is a breakdown article covering some aspects of world-building in general and my project in particular. This article is intended for Junior and Intermediate level environment artists. I am assuming that you already know how to make 3D assets and use Unreal Engine. This is not a step-by-step tutorial. If you are a senior artist you can jump straight to the “Tips and Takeaways” section at the end of this write-up.

I will address the significance of mindset, thought process and storytelling in world-building. I will also touch on some methods and techniques to improve workflow as an environment artist. I hope that this will help someone push through the friction we all face while working on our personal projects.
I started the year 2022 with a resolution of making at least two good-looking environments for my portfolio. I always loved epic, grand, fantasy worlds that are believable and also playable. In addition, I wanted to document everything and manage it like a project. So, one evening, in January this year I wrote down these objectives for my first project in a google doc to kick start my work:
Objectives
1. World Building Demonstration
2. Lighting & Composition
3. Story, Level Design, Gameplay
4. Implementing UE5 new features, Lumen, Nanite, etc.
5. Capturing full progress and process
6. Minimum 30 FPS Gameplay capture
Making a clear list of objectives really helped define the scope of work. So I made a list of deliverables.
Scope of work & deliverables
1. Use free Epic and Quixel assets as often as needed.
2. 2-3 Hero Asset(s). Non-photogrammetry, high poly, textured, nanite meshes.
3. One establishing shot, a still 4k Image.
4. Two establishing sequences 5-10 sec each.
5. Then a 30-sec “gameplay” walking sequence on the path.
6. Few extra shots if time permits from cool angles.
Accountability
This is usually where most of us stop, spend a few days and “move onto” the next project. I know this was my reality a lot of times, but I was fortunate this time to have such amazing seniors/mentors as Jeal Choi and Romain Grolleau at TLM. Jeal was instrumental in helping me develop the process. We had a couple of interesting conversations after work and I found myself fully committed to it.
Romain has been extremely kind to keep me focused and share his valuable comments with me throughout the project.
So the takeaway is, write things down and share them with people around you so they can follow up with you. Make yourself accountable.
Mindset
I must talk about it now because this is often not discussed in most “break down/ How to” articles. As 3d environment artists at the start of our careers, we focus on making individual assets such as props, foliage, etc. It is necessary to have strong fundamentals however there is a downside to it as well. It creates a mindset of an asset/prop artist. Some people love doing it and if that is what they want to do, that is totally fine.
However, as we gain experience we start to work in bigger and more complex environments.
This requires a slightly different mindset. I call it a world builder’s mindset. It may seem trivial but the fact is those good artists are good at switching between these mindsets as needed. Over time it becomes a habit and comes naturally. I highly recommend it to artists who are gaining experience that they practice and apply this switching of mindsets more often. In this project, my number 1 objective was to stay in world-building mode.
So I decided to use generic free Epic and Megascans assets as often as possible. This is why I called it a world-building exercise. I only made custom/hero assets when absolutely necessary.
Story & thought process
I did not take any existing concept for this piece. Instead, I wanted to direct myself as an artist by building it around a narrative. I love telling stories. That is how I started this piece. I forced myself to write a story. I did not settle on any visual aspect before writing it down. This is the key. I will copy it here so it makes sense when I talk about my research and reference board.
“At dusk, she finally arrived at the high gate. Once the entrance to the magnificent castle, this broken arch was now often unguarded. Sun was setting behind the western mountains of the Golden Valley. Calm but vengeful, just like the river below, she was looking for allies in the town once ruled by her khan Baba. She must enter the Creed’s Inn to see that mysterious old man. With his help, she will cross the river at midnight and climb up the castle from the dark side. That is where her plans ended.”
These few lines are in fact the exact moment in the story that I am capturing in this scene. Here is the rest of it.
“They were called the “The Ancients”. People who built these magnificent castles all along the southern frontier of the Pamirian Empire. They were master stone masons and stone they had everywhere in these mountains. Then one night, as legend has it, the earth shook and destroyed the entire chain of castles and the pride of their builders with them. Rivers changed their courses and some small towns completely vanished into the belly of the earth. 600 years after the great Calamity a clan of 11 peasant families took refuge in these mountains. Running from the Ganguls they found solace and refuge in the Golden Valley along the river Hunza. They survived the harsh long winter and built their humble dwellings using whatever they found in the mountains. Long winters, difficult terrain and limited access worked in their favour. They were once farming the fertile lands in the Hunza delta. But here they could only grow a few trees of almonds and apricots wherever there was a patch of land. Most of them hunted wild rabbits and markhors with eagles in the mountains. They became excellent archers over time. Horses, eagles and yaks were their companions. Snow leopards and wolves were their enemies. Astrakhan who led them to this place became their first chief and what a chief he was. He took good care of his people until the day he was poisoned. His only son Musa took his wife and newborn daughter Rania and disappeared the same night. Astrakhan’s brother Bazkhan became the chief and put a bounty on Musa’s head. No one liked Bazkhan but he was the strongest of all able men. Musa was never seen again. Twenty years later…”
These lines informed pretty much all of my artistic decisions throughout the making of this environment.
References
This ties into the research and reference-gathering process. I also wrote a few words to guide my intuition. These are the “visual settings”. High Mountains, Ancient Structures, Last Settlement, Extinct Race, Stone Masons, Megalithic, Natural Cataclysm, Abandoned, Mountain Path, Peasants, Valley, Stronghold, Castle, Bridge, Evening.
As you would imagine, having a story and context makes it super easy to pick only the most relevant images from the internet. Here is my humble reference board

I did not want to make just another European mountainous environment full of foliage and hidden in the fog. For me, clarity and openness were key to achieving the kind of depth and height I was looking for.
I also kept my references to as few as possible to avoid mental clutter. One very important point related to reference gathering and research is trying to stick to the real images. I do not recommend using CG and/or processed images as references. Even when I have the main concept to work with, my reference board consists pretty much always of real-world images. Concepts and CG images can be used as inspirations. For the architectural style of the hero assets, I chose a concept by Robby Johnson
This shape language and scale really fit in my story. I had to choose a different material based on the rocks and mountains surrounding the area.

Blockout
Since this was one of my objectives I made sure to set it up from the start. Here is what I did. I placed a camera and locked the transforms so I do not accidentally move it.

I also added one directional light as my key light or my placeholder sunlight. This was the simple setup before the blockout.
I did my blocking inside the engine. It is about big, medium and small. So I started blocking out the big forms that I had in mind. It had to be a proper game level made with some level design and game design prospects in mind. Here is an hour of work in the first screenshot.

In my process playing the level, again and again, was essential to settle on the composition, lighting, atmosphere, etc. It was an iterative process. Here is a montage of WIP shots.
I can give an important tip to aspiring artists they should spend as much time as possible in the blockout stage before committing to a design. This liberates the artist to experiment and iterate rather quickly.
Composition
It is really hard for me to separate lighting from the composition. Nevertheless, I will try to list the ideas I keep in mind when working on composition throughout the blockout phase. I will talk about the lighting separately.
Foreground, middle ground and background.
For an Epic shot, this was a very important aspect to keep in mind. This really helps add depth and movement to the scene. I established these three rough areas very early in the process.

Straight lines & two height planes
My desired composition, based on the story, required height. However, the position of my camera had to be in the middle of the lowest point and the highest point. This is because I did not want a lot of perspective distortion in the vertical structures by placing the camera too low or too high. I wanted to maintain straight vertical lines in the architecture as much as possible. This adds to the feeling of grandeur and scale to the architectural elements.

This led to the next decision of splitting the “ground” in two. One is used for the player’s path and the other is ground zero, the river. My Story also mentioned “the river below..” so this solution is perfect for me.

Once sorted I knew that I had to use the Landscape asset with the water plugin to create the kind of river I wanted. I wanted to avoid using landscape in UE5 as much as I could but the way the river tool is integrated with the landscape became a dependency. More on this later.
Self critique
During this process, I was giving myself some criticism. Here is one of the screenshots with some notes that will show the thought process. This chicken sketch was in fact a very important step because I was able to identify the strengths of this composition as well as the weaknesses. I also noted down some ideas based on the story. Even though the scene kept evolving, you will see the impact of this sketch on the final composition.

World Building
The River
I started this project in UE5 Early Access 2. The landscape was not supported by Lumen. So I wanted to completely avoid it. Later I switched versions and this problem was resolved but by that time I was already settled on my river. So I never made a complex landscape material and only used 1 tileable material with no blending. I used the water plugin in UE5. There are some nice tutorials available online for those who have not tried it yet. Here is how I did it.
I used a landscape actor as a flat plane with one sandy material from Megascans. I kept enough density so that I could do a bit of sculpting if needed. Also because my rivers had sharp turns and twists.

Then I spent some time drawing the rivers the way I had imagined. In order to branch it, I drew separate river splines. The default water shaders in the engine content were OK for my purpose. I had to play with the material Instance’s parameters a bit to adjust it for my needs. Mostly color and other aesthetic values. The velocity, width and depth of the river as well as the bank slope are controlled within the WaterBodyRiver actor’s details.

Then came the most important step. I took a couple of Megascans, rocky beach meshes and started dressing up the river. This gif is created now after I am done with the scene but it does show the simplicity and effectiveness of this approach for the construction of the river bank and river bed.

This is the most fun part because it tied the bigger mountains to the ground and also provided the river bed. I had to adjust the color of the materials a bit and in the end, these rocks, sand and water gave me the look I needed. I think I was lucky to have found such a simple solution. In the past, I have tried other methods using virtual heightfield, parallax occlusion, etc.
But this with nanite is the best solution in my opinion. I tried to get dynamic water foam but it was way too costly and did not look impressive from a distance. I hope that this will improve over time in the upcoming UE5 releases. For now, the river was not perfect but good enough for me.
So I completed the first iteration like this and moved on.

The entire scene kept evolving but the approach and method remained the same.
The Player’s Path
I used spline mesh actors to create the paths for the player. Since I used a tileable texture on it, that alone was never going to look good.

The same approach is used for the ground next to this path. I did not have to use any complicated landscape material to blend textures and assets together. All I had to do was adjust and normalize the Albedo maps of pretty much all Megascans assets that I used. It was all about choosing the right asset and making sense of it.
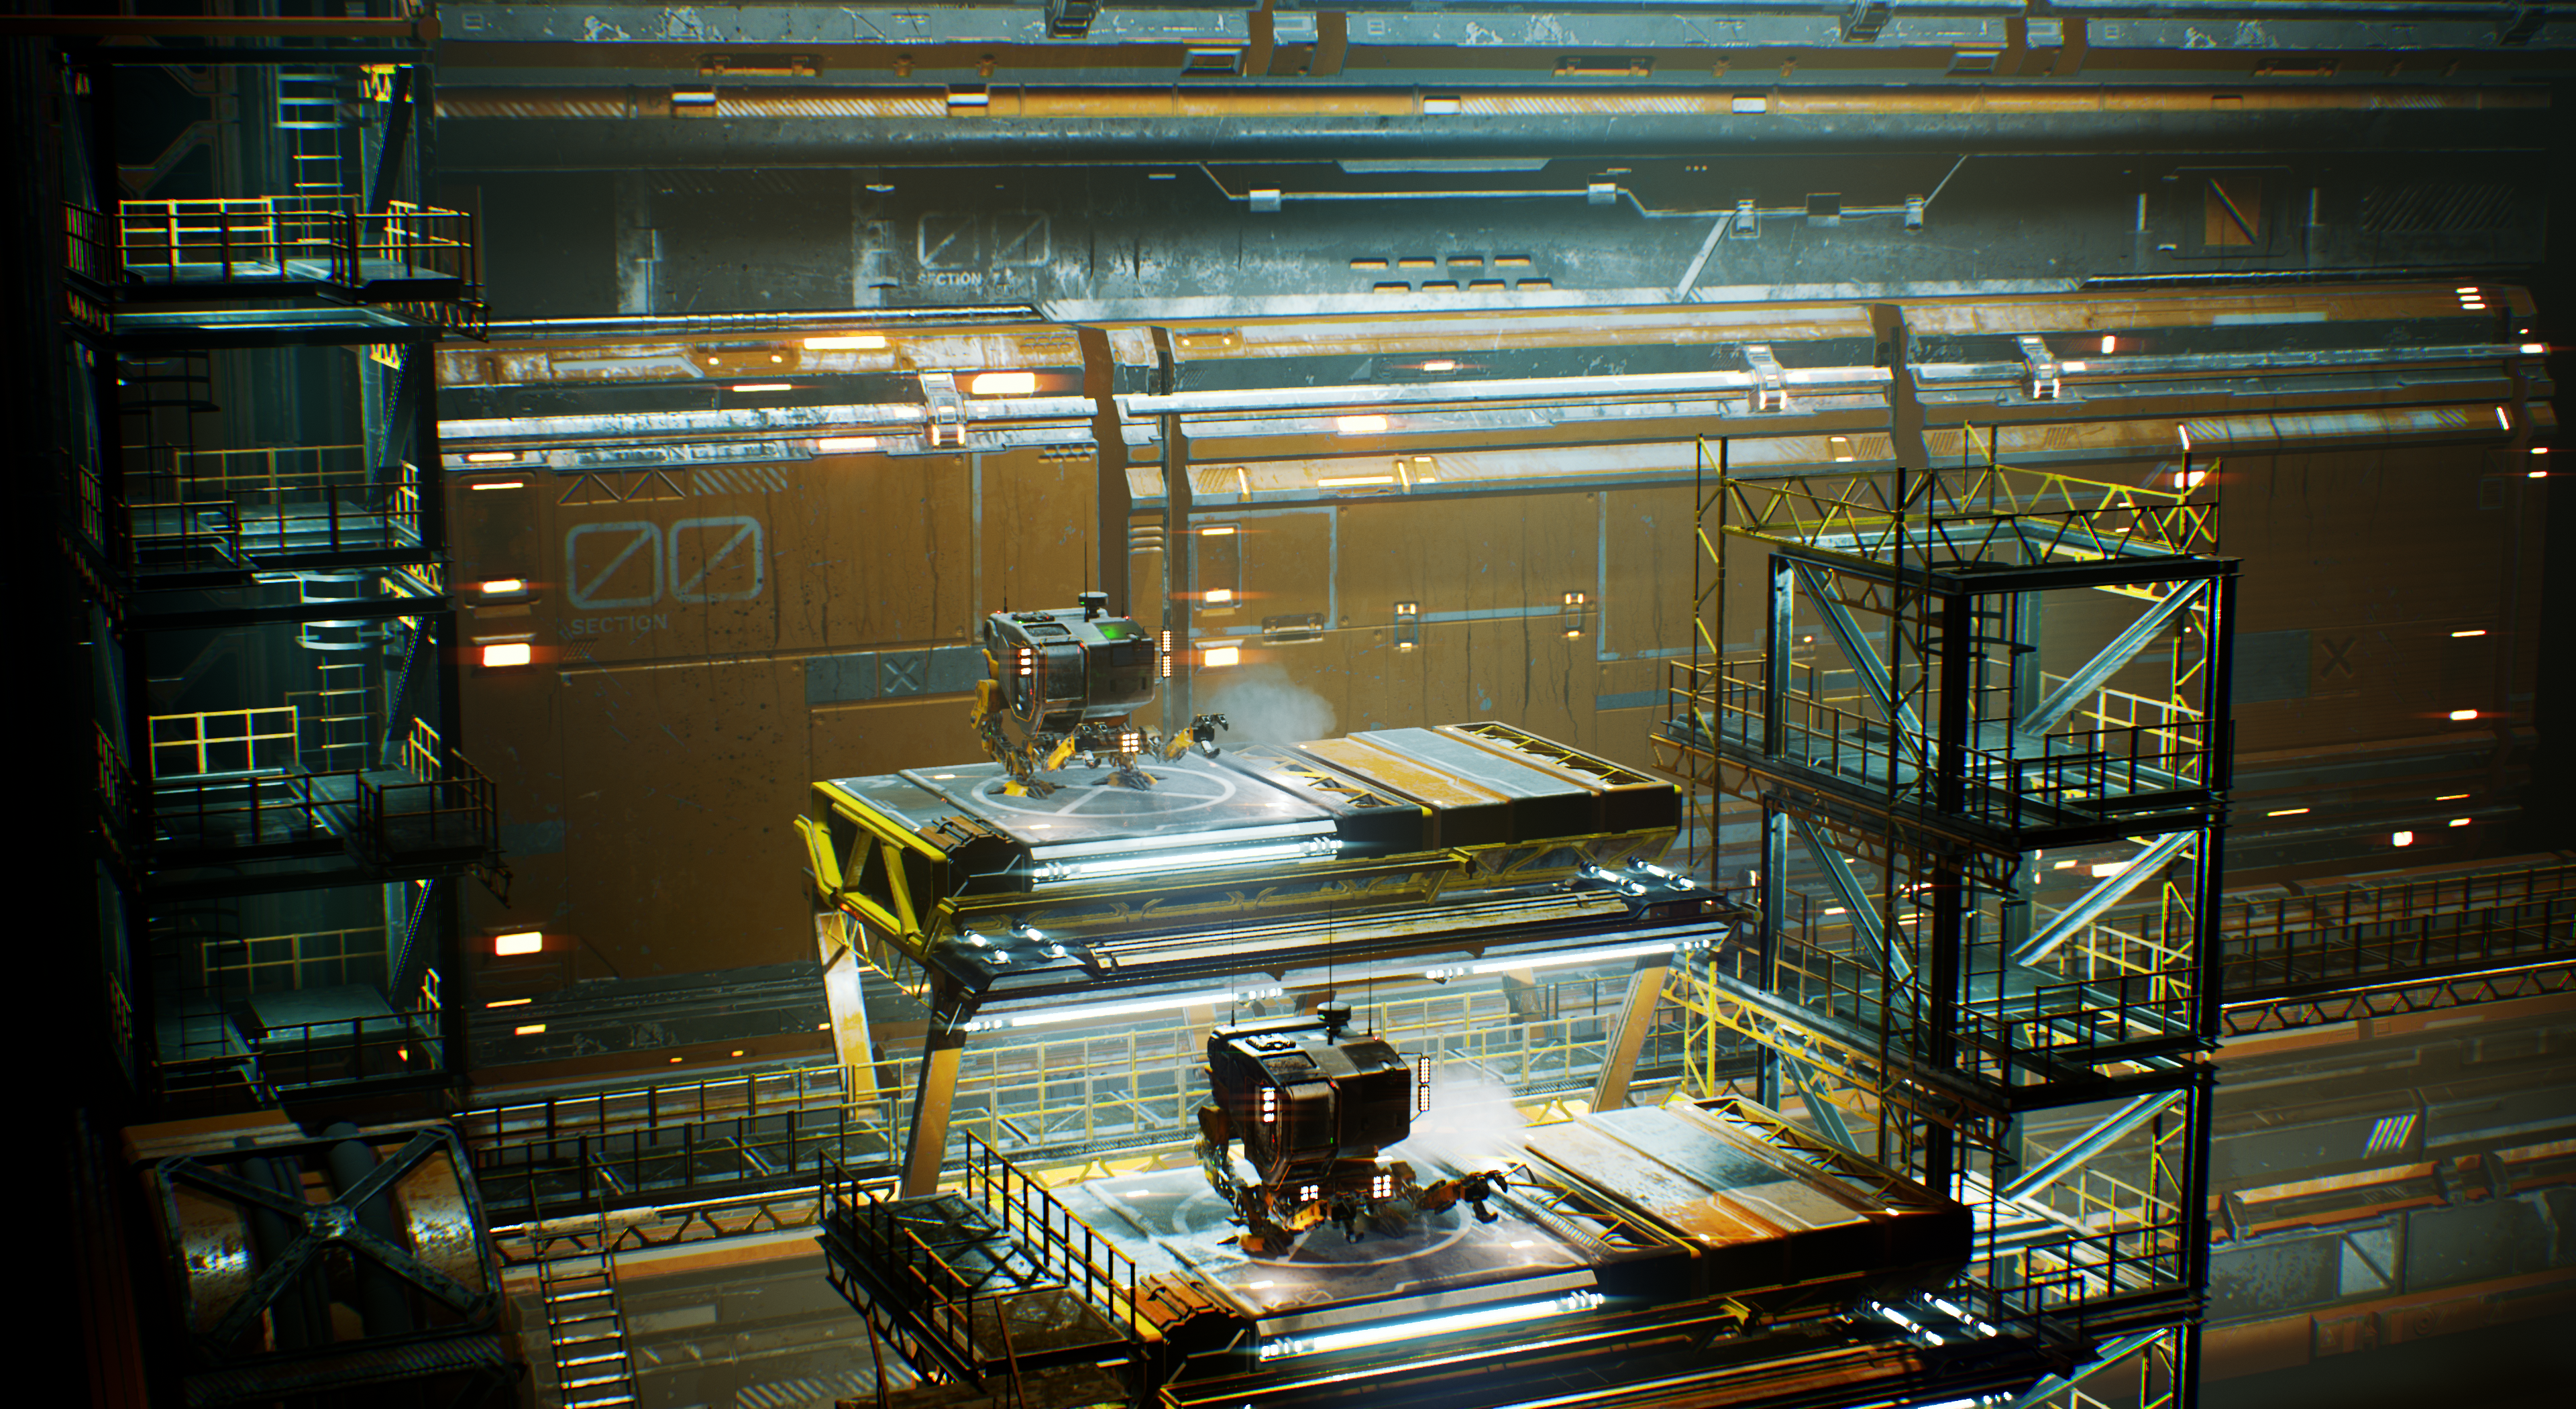
The flocks of birds
Since I don’t have humans in my scene I needed something to give a sense of scale to the viewer. Adding a generic white bird is a wonderful way of doing it.
This is achieved by using one skeletal mesh of a crow from Epic/Quixel’s medieval village environment. I changed it into a white bird. It is a fairly simple mesh with very basic flying animation.

I made a blueprint in which a custom spline works as a path and I can move another blueprint along the spline in a loop. All I needed to expose was speed along the spline. Below is the Follow Spline BP.

The next simple blueprint contains the animated skeletal meshes with one single looping animation. I manually created a flock in the viewport. I can add more or fewer birds and offset their animation as well as adjust the speed of animation.


This setup can be further improved, where I can expose the controls to add or remove the number of birds, customize their position in the flock, a single file or random flight, etc. But I did not need those controls for this project. I am going to make a tool later to implement these ideas. In the end, I was able to get a fully 3D, dynamic shadow-casting flock of birds. Which is pretty cool. In a real game we probably don’t need shadows from birds but for a personal project adding these little details is fun.
The Mountains
Mountains were the key element of my environment and I went through various experiments. I like terrain building software like world machine, Gaea and World Creator, etc. However, the top-down height map approach does not produce a mountain that has full 3d rocks and protruding forms.
In Houdini, we can convert any volume to VDB and use erosion techniques on them. I have seen some amazing results. But in order to get the high fidelity as this one, you will need enormous
amounts of detail and in order to make multiple variations each asset will be unique and that is not good for memory.
So once again, that world-builder mindset comes to the rescue!
I had a couple of generic-looking mountains made with simple height maps that I had placed in the level early on. Later I dressed them up using the same Megascans rocks I used elsewhere. This approach is really helpful because;
● I am creating the silhouette inside Unreal. Very dynamic approach and low maintenance.
● I am saving time by not sculpting and baking outside the engine.
● I am reusing the same rocks dozens of times. It makes them look part of the same biome.
● I can create an unlimited number of unique silhouettes and mountain variations.
I had to create a custom material on the base mountain to blend the additional rocks on it better. Here is how this mountain is made for example:

These are the individual parts that make the mountain.

There are better ways of creating detailed mountains where we can reduce quad overdraw but due to the time restraint, this technique was good for the needs of this project.
Distant mountains are simple one mesh texture mountains, I add detailed normal maps tiled on top to give them the correct scale in the scene, nothing fancy.
The Hero Assets
Working on a hero asset is sometimes overwhelming and people get carried away. However, since I had clearly defined my scope in the beginning, it drastically reduced the amount of work on this asset.
I had a clear location, viewing angle, light direction and time of day for this asset. I never wanted to make it perfect from all sides. I only sculpted the major details in ZBrush on 3 sides. I had to export this a few times to UE in order to check the silhouette & scale etc.
I had already planned to add additional details in UE. Surface details were going to be added via Materials/Normal maps. It was really crucial for me to get out of ZBrush as quickly as possible because the more I sculpt the more I commit to the details and the fewer options I have in the editor.
Once happy I did the first pass UVs in ZBrush and also separated the surface into 4 polygroups. Top, Bottom, damaged and flat.

Then I exported it to 3dsmax. Fixed some obvious mesh issues, Normals, reduced it further to under 400K triangles and refined/repacked the UVs in 4 material IDs.

I was able to reduce the production time even further by not baking any maps. This is not what I would do on a game project. If this had to be in an actual game used in a variety of situations and lighting, I would have taken a different approach. But as you can see in my project I have a very clear scope and a narrow window of time.
I must finish it without making it perfect. There are two materials, one used on the flatter surfaces and the other on damaged parts. Both Megascans materials

I started dressing up the base mesh with some brick assets inside Unreal. I made another material instance of the same material I used on the flat surface and applied it to the individual broken bricks matching the texel density. This is how it all blended together.
I added a few decals for watermarks. A few meshes to add moss in some corners etc. In the end, added a bit of grass in some areas where it could grow. There is enough geo to make the seam of the two textures look acceptable. So here is how it looked on a gym level.

For now this is good enough. Let’s place it in my main level under the actual lighting.


So I move on to the other distant secondary assets. I improvised and designed these assets in the same shape language. With the same technique and mindset. I did not have to maintain a specific texel ratio on these. Since you never get too close to them. The only important thing was the silhouette and readability. As long as it reads well from a distance it is good. So it was rather quick.


These assets fit and look good from the angles I had in mind. Quick and dirty works in this case.
This approach is key if you want to finish your personal world-building projects. Especially of this scale.
The Fog and Light Shafts
Fog plays a very important role in this environment. It works with light and ties everything together. I don’t like to use fog with crazy values. That was never the desired look for this project. When you add this much detail you don’t want to kill it by hiding everything behind a thick layer of fog. In this environment, the river is the source of fog/mist. Also notice that I am only placing my custom fog actors where the light is strong. With a very subtle exponential height fog and many custom fog actors, here is how the environment looks with and without it.

Here is the material applied to the fog cards.

I made a custom plane mesh for light shafts and made a simple material for it. I wanted to keep them very subtle.


The Sky
I tried a lot of methods to make the kind of clouds I wanted. I tried placing custom volumetric cloud actors mentioned by William Foucher in one of his youtube videos. I also tried a custom cloud material shared by Michael Kinsy. These and other methods are wonderful but nothing was making sense in this scene. Eventually, I went back to a less desirable method and added the HDR sky from Epic’s valley of the ancients dark mode. All of a sudden the sky made sense. It had the perfect ambiance, light direction and the kind of lines I wanted in the clouds to compliment my composition.

Lighting
Lighting is the most important element of this project. It was one of my main objectives to push lighting to the next level. It did take me some time to figure it out.
As a rule, there are multiple correct ways of lighting an environment. It depends on what we want to achieve. If performance is the top priority then the approach is slightly different. However, in my case, I wanted an epic fantasy look. The very dramatic and almost surreal atmosphere is reminiscent of Lord of the Rings, God of War, etc. But once again, I have a story that informs all of my artistic decisions.
Gameplay considerations
In this case, the player is entering the realm so the starting point should be in a bit of a darker area. Then there is the first stop where the player has to make an alliance, get a weapon, a horse and stuff. Maybe some dialogues/cinematics etc. So a beam of light is guiding her towards the guild. This is also the location where she can see the entire valley.
The player will savor the moment and will be fully immersed in the environment. Down the road there is a village she will travel through and then there is another post, a mini-battle. After which she walks on the bridge, another cinematic moment perhaps. After that, she climbs up the castle wall and gets to some secret door or something. She reaches the castle and eventually fights the boss and wins. The point is, that lighting must not ignore this progression.

Now the technical part.
I did not use directional light as my main source of sunlight. I did not use light functions and I did not use occluders. Nothing is baked. Everything is dynamic and real-time.
Ambient Light
I am using a dim skylight with real time capture ON. Also a very subtle top down directional light to
enhance the impact of whatever little bit of blue sky is visible through the cloud layer. This directional
light is giving me not so sharp contact shadows. It also adds a slightly brighter “top” surface to
everything. This adds to the definition and readability of geometry.
This setup is my ambient light source.
Lumen does take my albedos and emissives into account. My custom fog is emissive only, so it
automatically adds to the ambient light in those areas. Which is cool.
Mood, Key & Rim Lights
We are not trying to recreate reality. We want to make it believable. So do not look up the Lux values
for evening sun etc. those are for some other situations. 🙂
Now the key light is coming from multiple spotlights loosely set up to imitate the sun’s direction but not
100%. Some of these lights provide the rim light effect on mountain tops and trees. Most of these spot
lights have no shadows. Important for performance. Except where the shadow is visible to the camera.
Lumen is doing a lot but I am still faking/enhancing some of the bounces. Again I am using very subtle
values here without shadows to enhance the bounces. So here is the set up from one angle.
By the way, quality of life tip, I change the actor size in the editor so i can select them without leaving
the Camera frustrum. Even if they are 30000 units away.

Organization
I name my lights for convenience and as you can see the entire world outliner is organized. It can be
further organized by adding colors/subfolders for quicker selection, however this was good enough for
my needs.

This video below shows the exact contribution of each of these lights in a sequential manner. It is fun to watch.
I know that there are some expert lighting gurus cursing me for going this route, but as I said this is one way of achieving the look I wanted.
Rendering
Part of the scope of this project was to produce rendered sequences. From the start, I had a clear frame in my mind. You must decide on your frame ratio otherwise you cannot settle on a composition.
This is my Camera Set up.

As you can see I went with a 1:2 ratio. I also rendered my sequences at 24 FPS and I had a very subtle (0.5) motion blur ON. This gives the cinematic look we all are familiar with. This motion blur was the
only effect other than a subtle vignette that was achieved through Post Process Volume. No color grading, no LUTs, No other adjustment.
This is why you see in real time what you get in the rendered sequence. In order to enhance the scale of this realm, I kept my camera movements to a consistent pace and minimum travel. The camera almost never rotates. These are all conscious decisions. I used Sequencer to add the simple camera animations and used Movie Render Queue to render out the sequences. I used the following settings for anti-aliasing, the rest is the default.

These settings produced faster renders. I put together these sequences in After Effects. There was no effect added on top. Only the blending between the sequences and a music track was added. You can do it in sequencer too but I like After Effects for simple editing/mixing. I rendered the final outputs using adobe media encoder as MP4.
Tips and Takeaways
1. Having an overall method of organizing and finishing a project is very important. I did this by having a list of clear objectives and well-defined scope. Writing these down and making yourself accountable will help stick to them. This is indispensable for the completion of large-scale personal projects.
2. Story/narrative should inform all creative and artistic decisions. I incorporated my story into the world, composition, lighting and atmosphere.
3. Develop the mindset of a world builder and apply it until it becomes a habit.
4. Optimize the amount of work based on what is visible in your final medium of delivery and resist the temptation of making everything to perfection.
5. Spend as much time in the blockout stage as possible before committing to a design or composition.
6. Repeat your process and refine it with every iteration.
7. In the end I must acknowledge that I have benefitted from some of the articles on gamesartist.co.uk in the past. It is a great source of technical knowledge as well as motivation.
I really enjoyed working on this project. My new year resolution was to finish at least two projects in 2022. Wish me luck for the next one!
Read more articles
You might also like these articles.