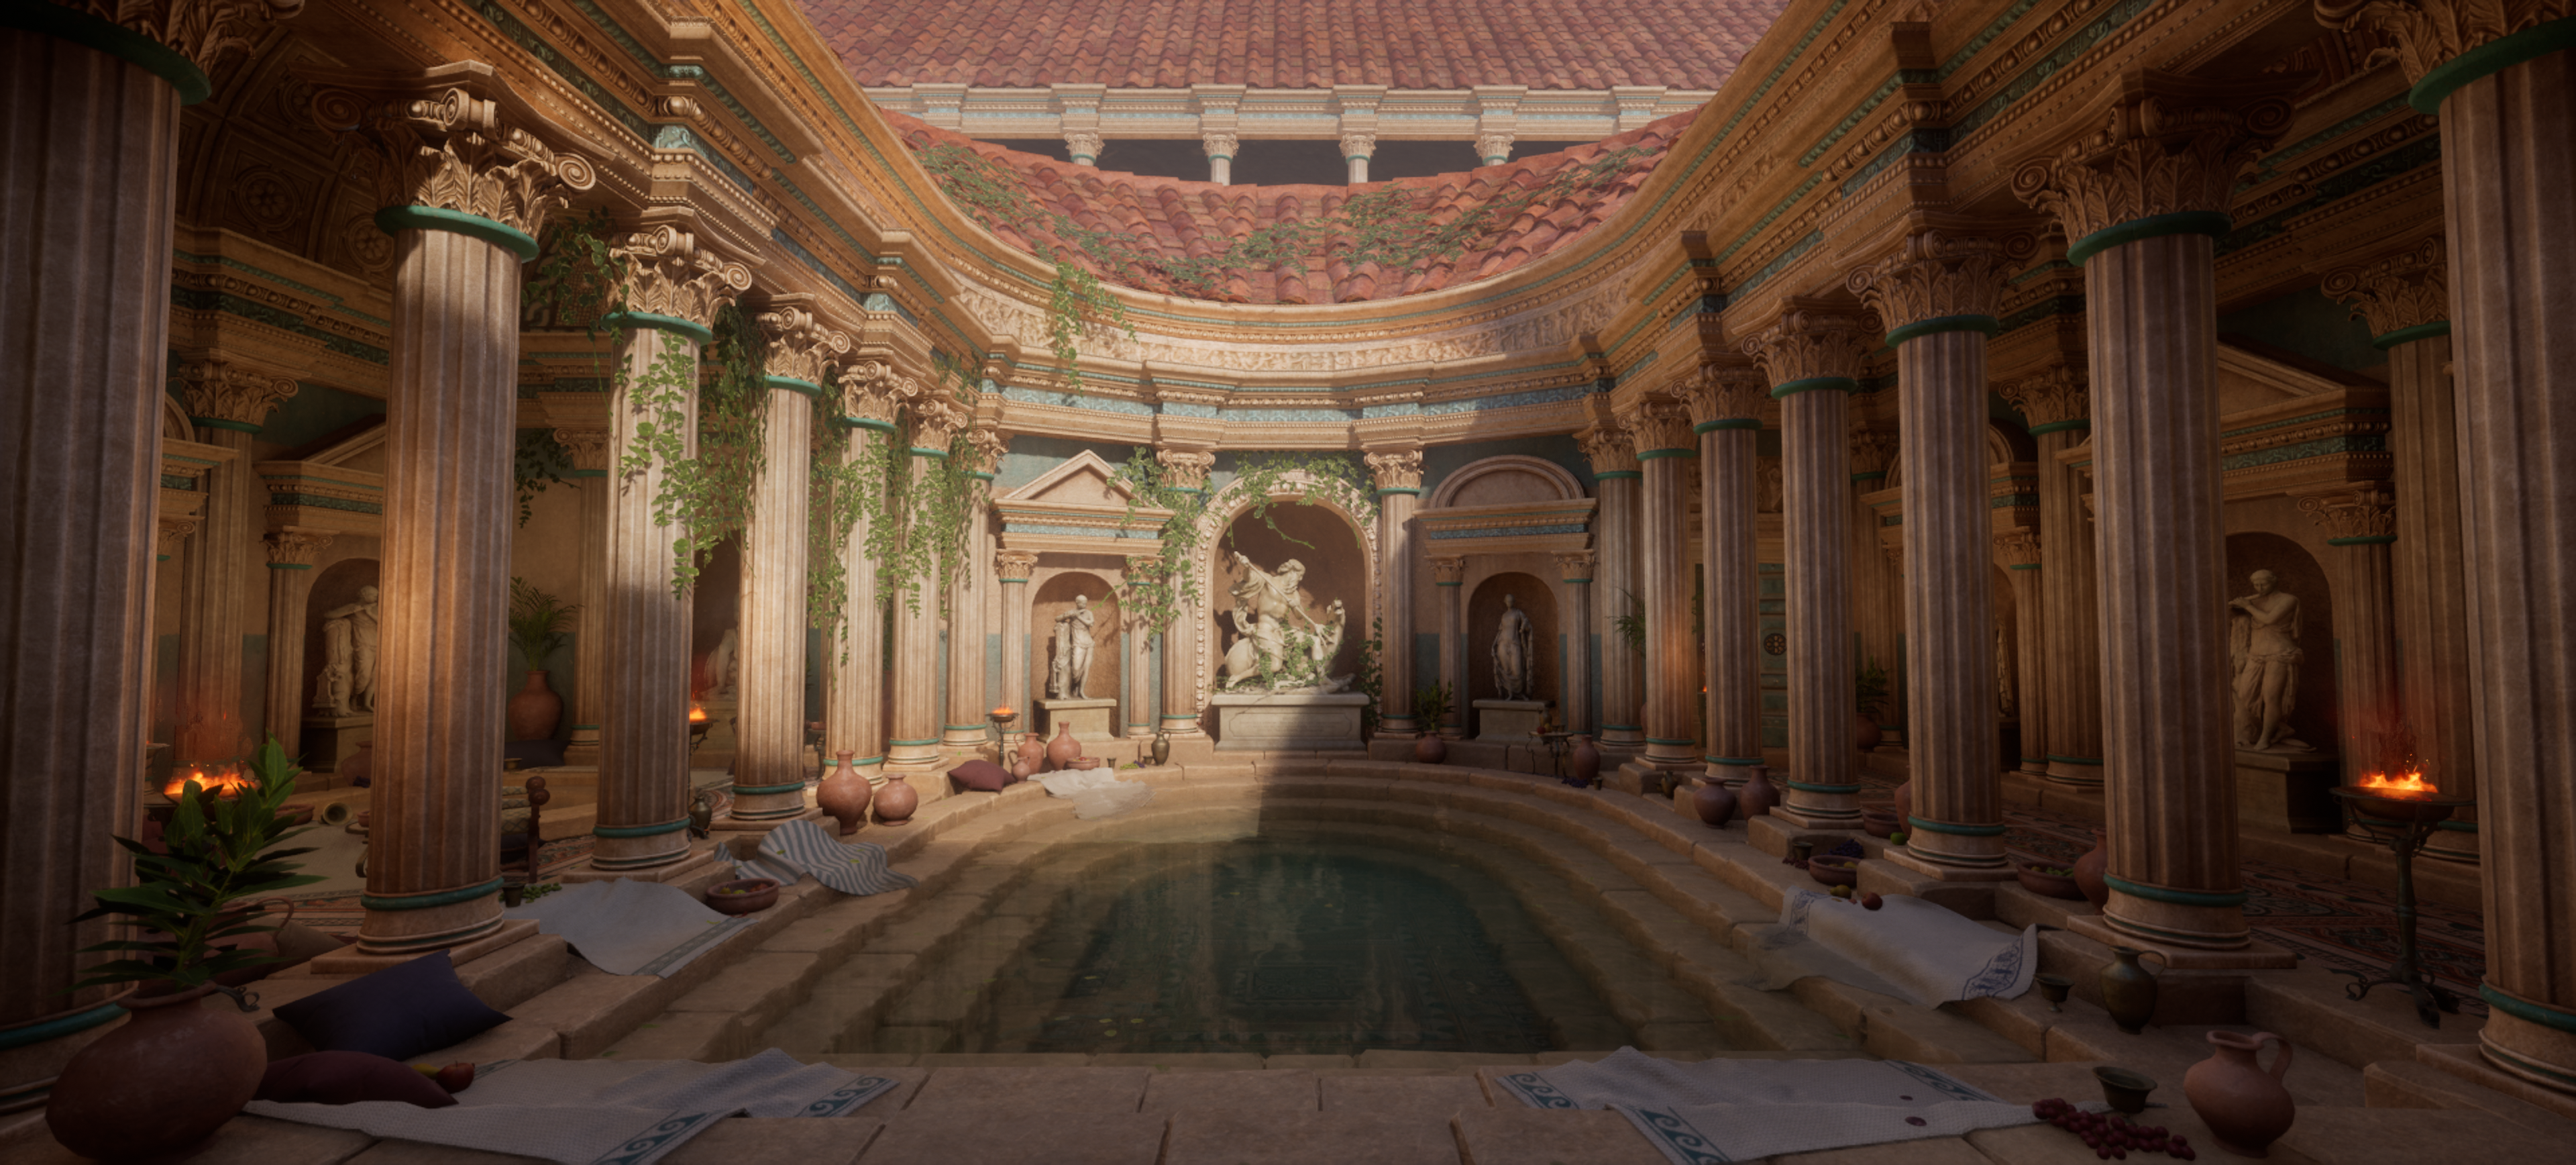
Neptune’s Roman Bath

Introduction
Hello, my name is Alizée.
I am an Environment Artist from Lyon, and I am currently looking for a job in the Video Game Industry.
Software
- Maya
- ZBrush
- Unreal
- Substance Designer
- Substance Painter
- Marmoset Toolbag 4
- Photoshop
- Marvelous Designer
Projects & Goals
This is a project I did as part of an exercise at my school: Gamesup, supervised by Colin Tissot.
We had different subjects and universes to choose from, so I decided to pick the Roman baths. While doing this project, I discovered Roman architecture and all the history behind it, understanding the stories really excited me and helped me a lot during the creation process.
For every good environment, you need a story to base it on, that’s what will make the place come alive and make it realistic. So, I imagined a private bathhouse belonging to an ancient Roman commander, who had built this place in honor of the god Neptune. I really tried to give credibility and coherence to the place. That’s why there are a lot of little details linked to the marine world.
To start, here you can see the evolution of my scene:


Composition
I didn’t start from any concept, I wanted to challenge myself on the composition of the space, it was quite complex because there were only a few references available.
I decided to base it on some architectural schemes, they were very helpful.
I also used several paintings as references representing these places at the time of their use, this was a great help to set the atmosphere in my scene.


For the atmosphere of my scene, I wanted to build a quiet place where you could feel the sacredness of the place dedicated to Neptune.
I also wanted to give the place a general color, so I mixed the blue of the paintings and the water, and the color of the stone to make the place harmonious.

Blockout
The block out was made on Maya. It took me a while to find something I really liked. I based it on the baths of Caracalla thermal baths, where I decided to add an extension with a calmer area with a small hot pool.


Trim Textures
Ornamental
The first thing I made for my environment was my ornamental trim. This is the basis of the architecture of this place.
First, I defined what pattern I would need for my modules, I looked at a lot of references to find what I really wanted. After I knew which patterns I was going to make, I defined the size and how they would fit on the trim. This is a very important step, you need to be able to sculpt later.

I decided to do my trim on ZBrush to be more comfortable with the shapes. Sculpting the different patterns was very satisfying.
Each pattern was made once and then scaled to make a texture that tiled perfectly.

I then baked my high poly on a 1 by 3 plane to see the tilling of my texture in Substance Painter.
I made a small pass on my maps in Photoshop to correct small problems to have them clean in order to begin texturing (tips to solve small problems quickly!)


Once my texture was made, I created my modules by unfolding them on my trim. It was useful in many modules, I saved a lot of time doing this.


Mosaic
My mosaic is made on Substance Designer.
At first, I created my trim sheet with my reference images in Photoshop. Then I used this image as a base to build on Substance Designer.

Then I used the SVG node to be able to draw my patterns. I used the mask to choose my colors, roughness variations and height map.
Here is a little video showing how SVG nodes work on Substance Designer


Once I had my tiles textured, I used them on planes to create patterns.
My pond mosaic is a mix of my trim texture with a foam texture in Unreal.

Relief Atlas
I used 3D scans from My mini factory, thanks to Scan The World for all these scans!
I downloaded all the meshes I needed, then imported them into Maya where I arranged each part on my plane to create a texture atlas. After this step, I created a cube on which I unfolded my UVs where I wanted them on my atlas.


Stone
To get different sizes and shapes, I carved 4 stones in Zbrush. They are all on the same UV map. In all my different basins, I used the same stones.
For the small pond, I went into Maya, took my stones with the UVs unfolded, and bent them to get something round. I did the same for the arc at the bottom of my large pond.


For the stones in my basin, I wanted to add a little bit of detail. So, I decided to add moss according to the depth.
To do so, I used the location information from the “Absolute World Position” node. I then lerped two texture maps together, the first being my basic stone texture, and the second on top of which I added moss on substance painter.

Modular Assets
I mainly used tiling textures. The wall’s texture tiles horizontally to get my paint lines. The repetition is broken up with decals from Megascans.
The roof also uses a tiling texture. I unfolded my mesh on the map and added polygons to have relief. The color variations add more life to the texture. I love to tell stories through my textures.

Water Shader
For my water shader, I used a depth mask. It helped me adjust the opacity and color according to the depth of the water. I added caustics to give details to the water.


Foliage
To make my climbers, I downloaded “Lesser_Periwinkle” from Megascans.
Adding vegetation gives a touch of color and calm to the scene. I also downloaded some Megascans maps to create meshes with leaf textures to add to the ground and water.


Props
The props are very important, they dress up the scene and make it come alive. My goal was to create warm baths where people could meet, drink, eat and relax.
Starting with my towels which are found along my basin. First, I imported in maya a blockout of my stones to be able to make collisions. After getting my highpoly from the simulation, I did a retopology to get my lowpoly and make my textures. I gave a wet effect on the towel touching the water to bind them with the environment.


I needed to fill the space, so I made bigger props. It took me some time to find references so that each asset would fit well together.


Afterward, I worked on the smaller props to add life to the scene, like glasses, fruits, or pots.

Finally, when all the props were added to my scene, I felt something was still missing to make the place warm and comfortable. So, I decided to add rugs and cushions on the floor, this allowed me to add more storytelling, like the spilled wine glass or the fruit peelings.
I made them with Marvelous Designer, packaged my cushions and rugs on the same UV map, and made 3 different color bases to have variations in my environment.

The last important element of my scene is the statues. I got them from Sketchfab. I downloaded scans of the statues which will be used as highpoly. Next, I made the low poly and the texture.
It took me a lot of time to find the perfect statues to put in my scene, I wanted them to fit with my story. In the center, there is Neptune’s statue, the Roman god of the oceans. This is the most critical statue in my environment. Everything is based on Neptune, the colors, the mosaic with the fish reminder, the hippocampus, or the presence of shells in my relief. I needed to link the place together in the same story.
Among other statues, we can find Mars the Roman god of war. The owner of this place being an ancient warrior, decided to pay homage to him. We also find Flora, goddess of flowers and spring as well as Mercury, God of trade and protector of travelers.


Polishing
We are now entering the final stage of creation, the polish. This is not the part that is the most obvious at first look, but it is an essential step.
I started by adding leaves to the ground with the Unreal foliage tool, especially in the places under the climbing plants, in the corners of the walls or even on the water. It would help if you thought about it in a place like that, the wind sweeps leaves and gathers them.
Then, I wanted to add some variation to my mosaic on the floor, so I added some dirt and dust decals downloaded from Megascans. I also added some puddle decals I made on designer around the ponds.
Also, I added cracks to break up the repetition on my walls and make the place come alive.
For even more details, I added ash decals under my braziers, as well as wine stains around the drinking areas.


Lighting
Let’s move on to the essential step to have a great scene, the lighting!
Being on unreal 5.1 I used the lumen system. The lumen light bounces are incredible.
I went step by step. I started by setting the bases with a directional light, a skylight, a sky atmosphere, and a fog to have some depth in the environment.
Then I added light in the areas that were not lit enough particularly under my arches and on my water because it was too dark.
I finished by adding lights above the braziers to give a warm feeling to the scene. I created a BP with a curve function for these lights to oscillate the intensity.
It was vital for me to make my scene animated from the perspective of creating a presenting video of it.


Render
Last but not least, the renderings.
Starting with the camera angles, don’t hesitate to play with the field of view or the ratio of your renders.
Small tips: you can lock your camera to avoid losing your framing (right-click on your camera, transform, and lock actor movement), or you can use the bookmark to save your position and angle of view. It’s beneficial!
Get into the shoes of a photographer who is discovering the place and have fun! I recorded my camera movements with the unreal sequencer to make my video.
Using these camera shots, I could edit my video with Sony Vegas Pro.


Conclusion
I loved working on this project, I learned a lot, especially about the modular and the use of trims. This project took me 3-4 months with 2 full days per week plus evenings after my classes.
Thanks to Games Artist UK for giving me the opportunity to share my work with you!
If you want to see more of my work:
Read more articles
You might also like these articles.


