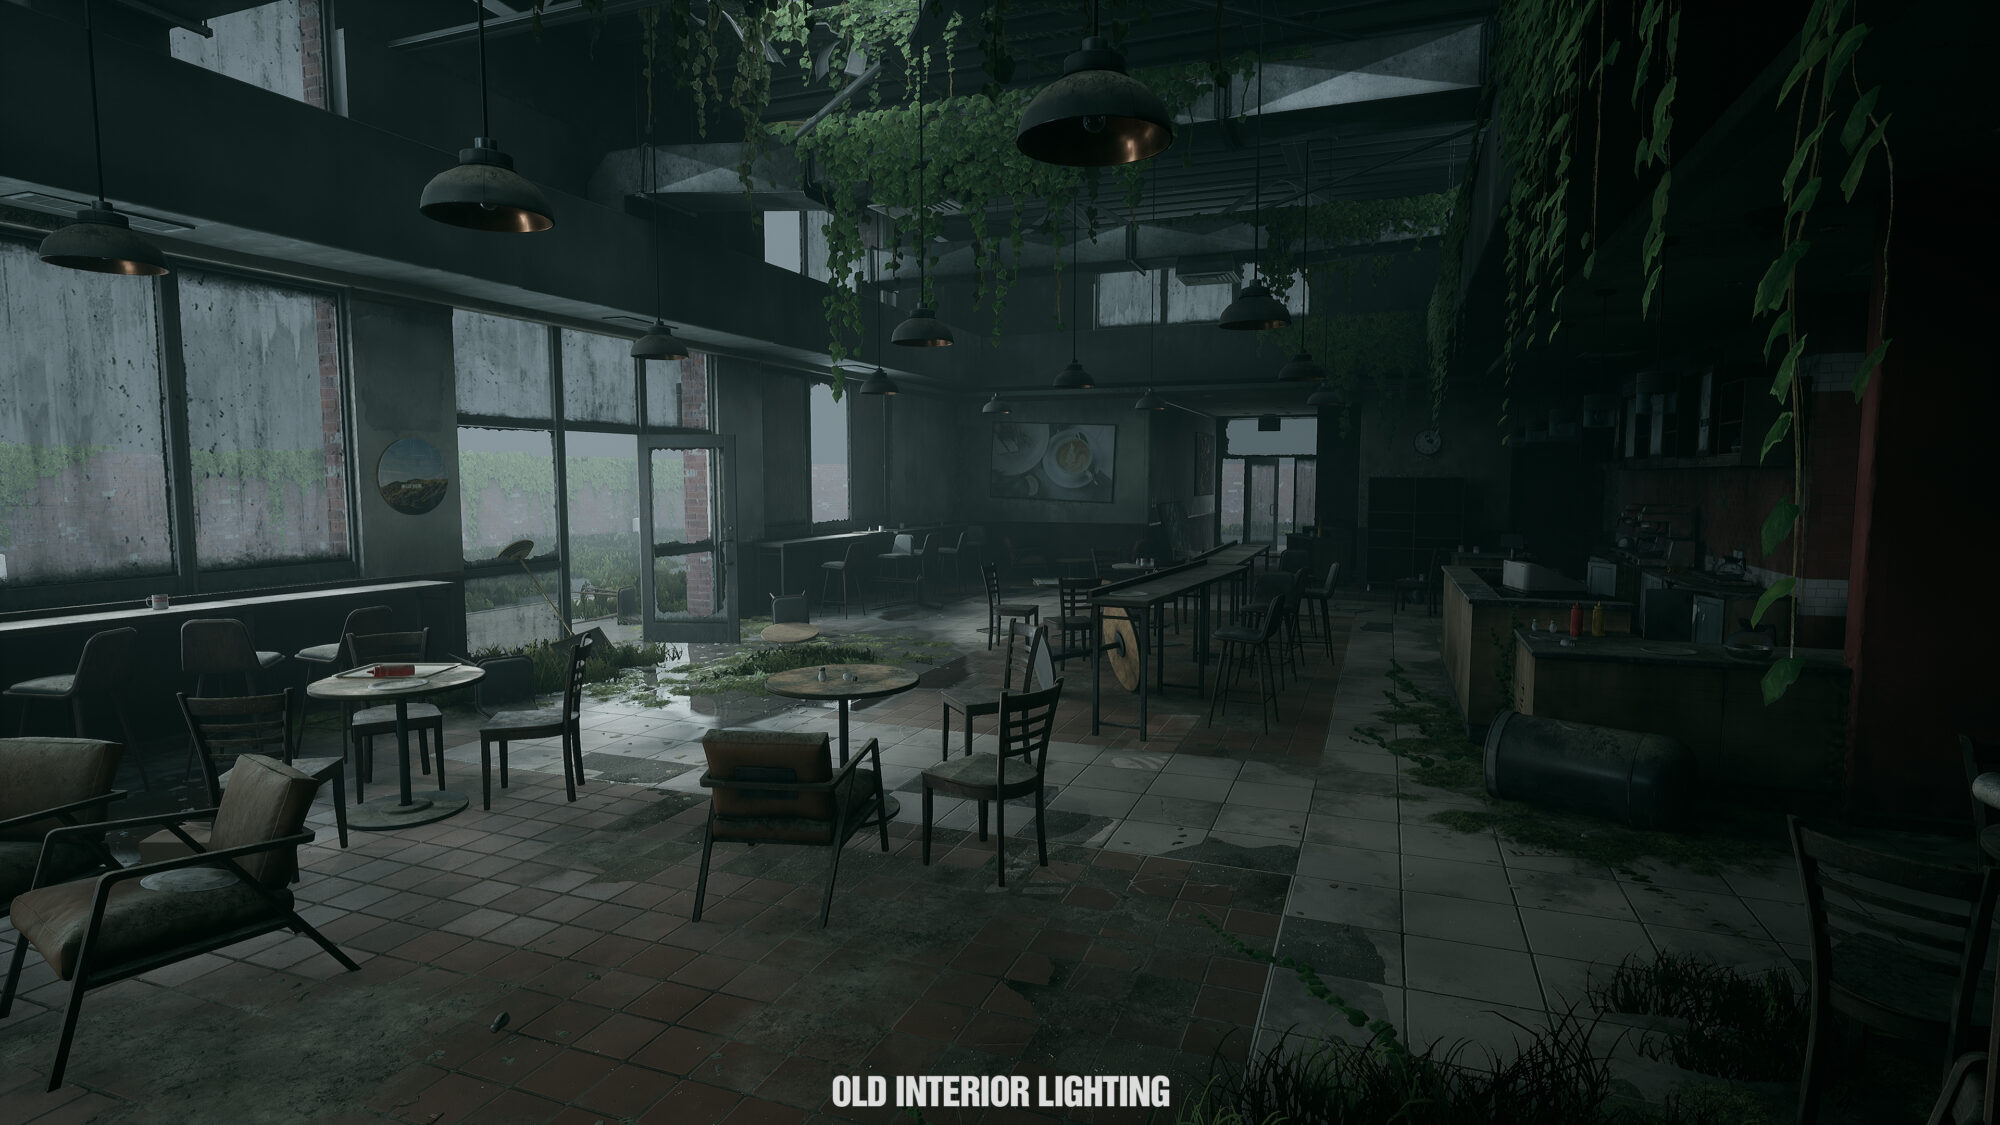
Abandoned Coffee Shop


Introduction
Hello, I’m Neil Gowland, and I’m currently the lead artist of the Environment Team at Sumo Digital Newcastle. I’ve been working in the games industry as an Environment Artist for just over 16 years and have worked on 17 published titles, including Call of Duty: Vanguard, Hood: Outlaws & Legends, Sackboy: A Big Adventure & Tom Clancy’s: The Division.


Pre-Production
Before getting to the main article, if there’s a single piece of information I would love people to take from it, anyone can complete an environment like this without locking themselves away and working endless hours. I have a pretty whole lifestyle.
My job as an Environment Lead can be very demanding; I have two children that are even more demanding, I have hobbies, and I have plenty of time to watch TV or play games with my fiancé.
My secret is small, consistent steps every day. My number one priority outside of professional work is to spend 1 hour working on my projects which I break down into 2x 30 minute completely distraction-free sessions, i.e. the Pomodoro method. I won’t go into detail here, but I highly recommend researching Pomodoro and giving it a go, as it allowed me to achieve more in less time. Try to make this one hour per day non-negotiable, although we’re all human, and you will inevitably miss days.
If you can’t be bothered, you’ll talk yourself out of it. Skipping one day will turn into skipping two days; before you know it, you’ll have gone through a long period without working, and it’ll be much harder to start again.
One additional benefit of following this method is it’s effortless to keep track of how much time you’ve spent on a project if you set up a simple habit tracker. For example, I’ve spent precisely 502 hours working on this Coffee Shop over 15 months.
Five hundred two hours sounds like a lot, but if you were to divide that up into 8 hours, which you’d typically do in a professional setting, it would be around 60 days’ worth of work. This would be a reasonable timescale, considering everything from props to materials to shaders was created from scratch.
Using this same philosophy, artists with more spare time could maybe do two hours a day instead of one hour to complete projects quickly.
Software
Below is a list of all the software that I used for this project:
1. Unreal Engine 4
2. Blender
3. Substance Painter
4. Substance Designer
5. Substance Sampler
6. Pixelogic Zbrush
7. Adobe Photoshop
Project & Goals
When starting any project where you have to commit to it for an extended period, it’s essential to set goals and know what you’ll get out of it to stay motivated right to the end.
Before committing to any environment project, I like to run down a set of questions I ask myself:
1. How far outside of my comfort zone will this project push me?
a. If you pick a project that is almost entirely new learning, it will be a real slog to work on, you’ll constantly feel like you’re making slow progress, and ultimately, you’ll be more inclined to give up. On the flip side, if you pick an environment that is too easy and you’re entirely inside your comfort zone, you won’t learn anything new.
Choosing a project outside your comfort zone but not too far outside is the best way forward. You’ll be able to make good progress daily while coming across challenges along the way that further your learning.
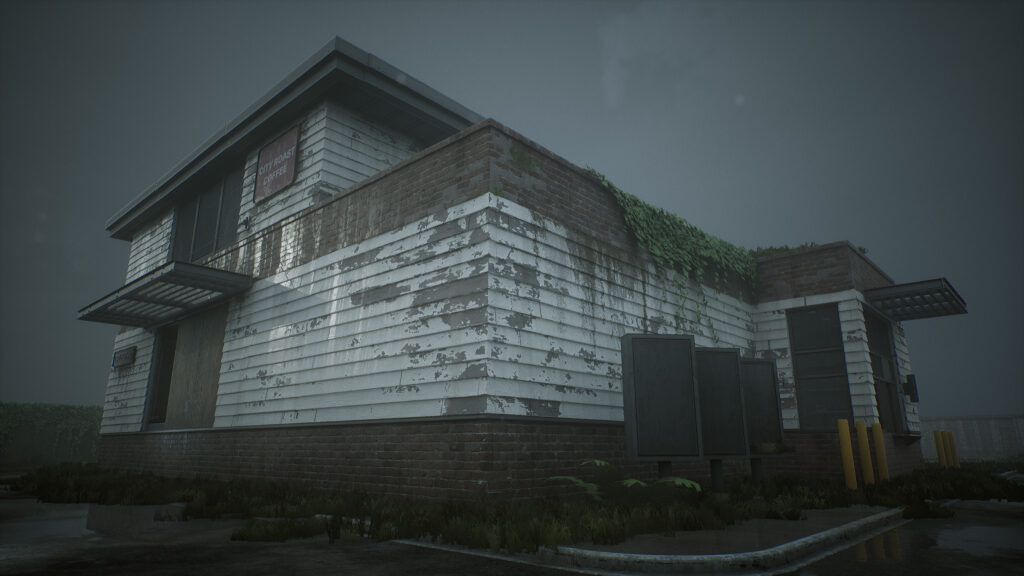
b. Regarding this Coffee Shop, I’ve never created much foliage or post-apocalyptic environments, so this was an opportunity for me to become more proficient in those areas.
2. How long will this project take to complete?
a. Try to gauge how long you think an environment will take before you begin and compare it against how much time you want to devote. In an ideal scenario, I like to spend around a year working in an environment, and I believed this was achievable with this project when I started it.
b. It’s important to note that these projects nearly always take longer than you expect, so add a buffer. 20%-30% is a good margin for error.
3. How excited am I to work on this project?
a. I’ve learned over the years that your excitement and motivation for a project will diminish over time, so it’s imperative that you’re excited about a project at the beginning, as your excitement is more likely to trend downwards rather than upwards once the work starts.
If you’re not enthusiastic about the project and it feels like a chore to work on, you’re more likely to choose other activities, such as playing games or watching a movie.
b. If I’m not enthusiastic about a project, I’ll typically hold off starting anything and start thinking about other ideas that are more appealing.
4. Does this project conflict with anything I’m working on professionally?
a. This one may seem strange, but I always avoid taking on personal projects that have significant similarities to the professional work I’m currently working on. The reason is simple. I’m more likely to get bored doing similar styles. If I’m working on a medieval game at work, I’ll be more inclined to start a Sci-fi project at home.
5. Will this project complement my portfolio when it’s finished?
a. When I choose a project to work on, I like to think about how it will look in my portfolio when finished and what gaps it might fill. For example, my portfolio at the time of creating this environment was relatively clean and well-maintained environments, so I wanted to demonstrate that I could all make dirty and grungy environments.
While projects can provide some perfect answers to the questions above, the more favorable the answers, the more likely I’ll stay motivated for the duration of the project.
Planning & Inspiration
When I start these personal environments, I often don’t have a clear direction in my head, and that’s all right. I let the idea evolve over time.
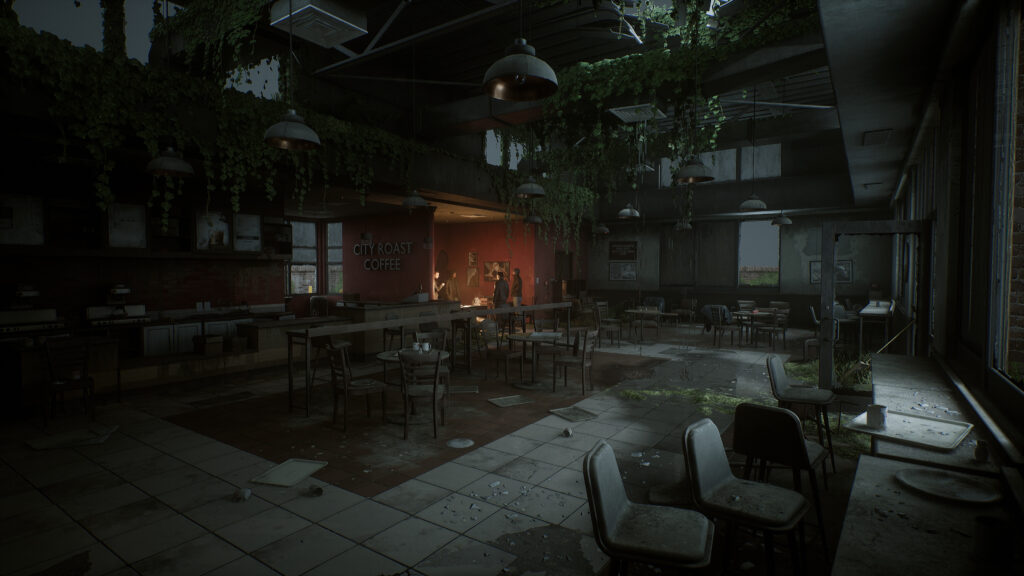
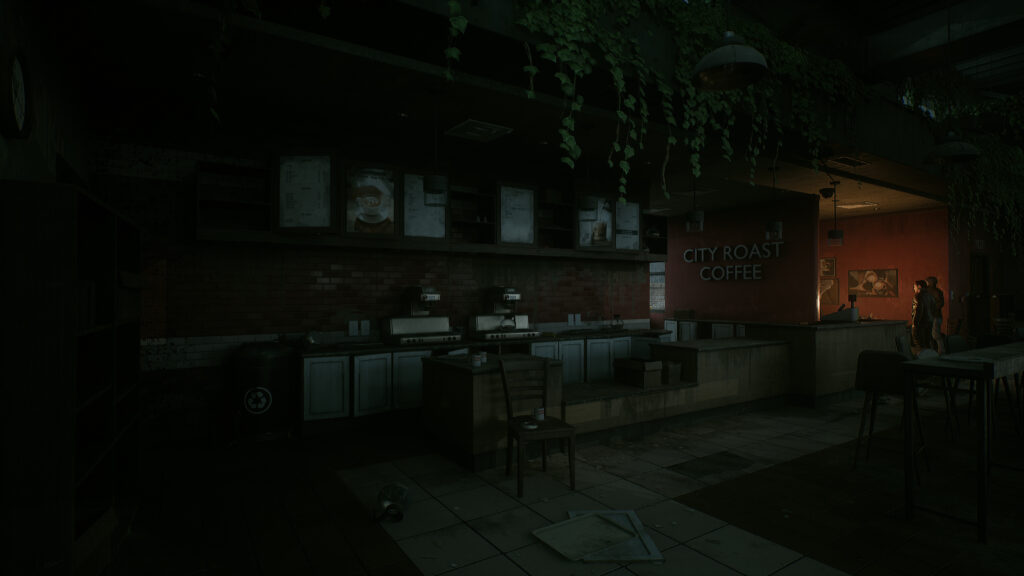
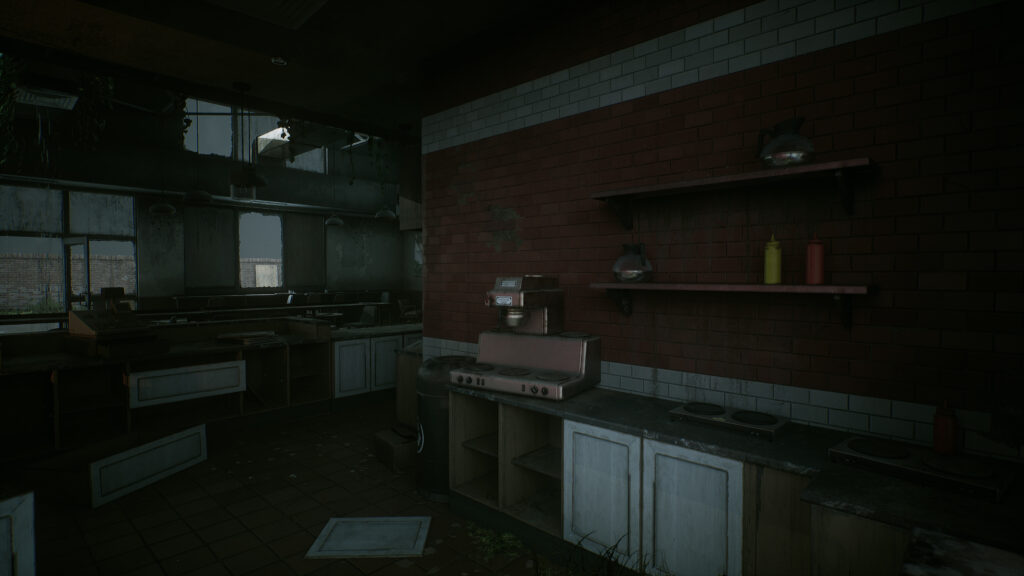
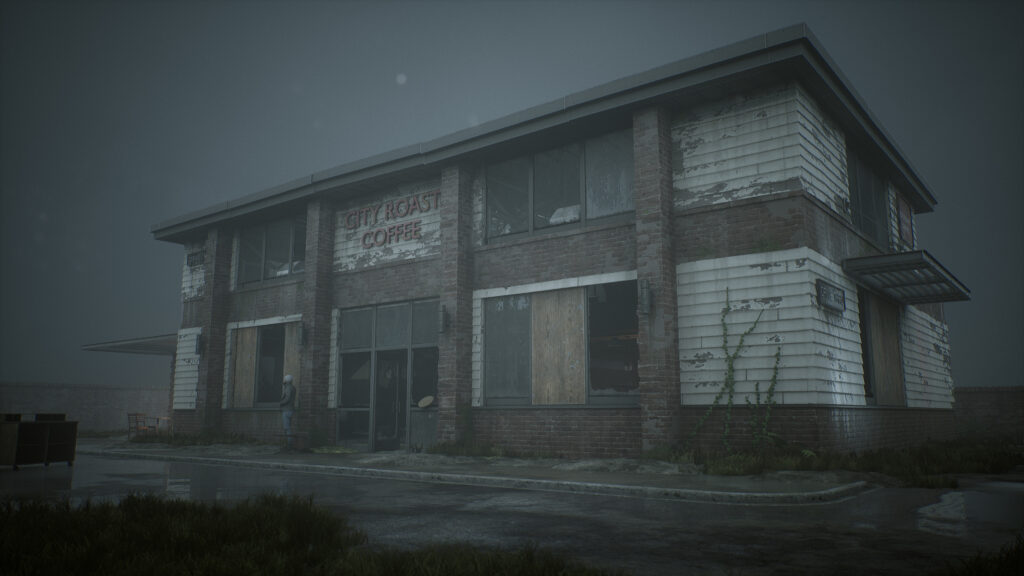
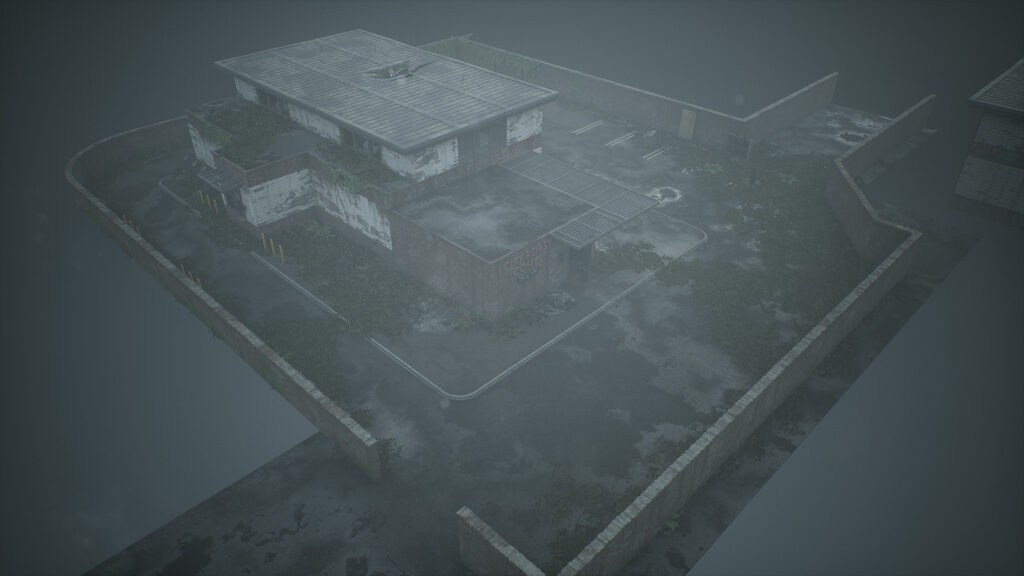
For this environment, I started with one clear goal in mind. Create an Interior/Exterior environment that wouldn’t look out of place in a Last of Us game.
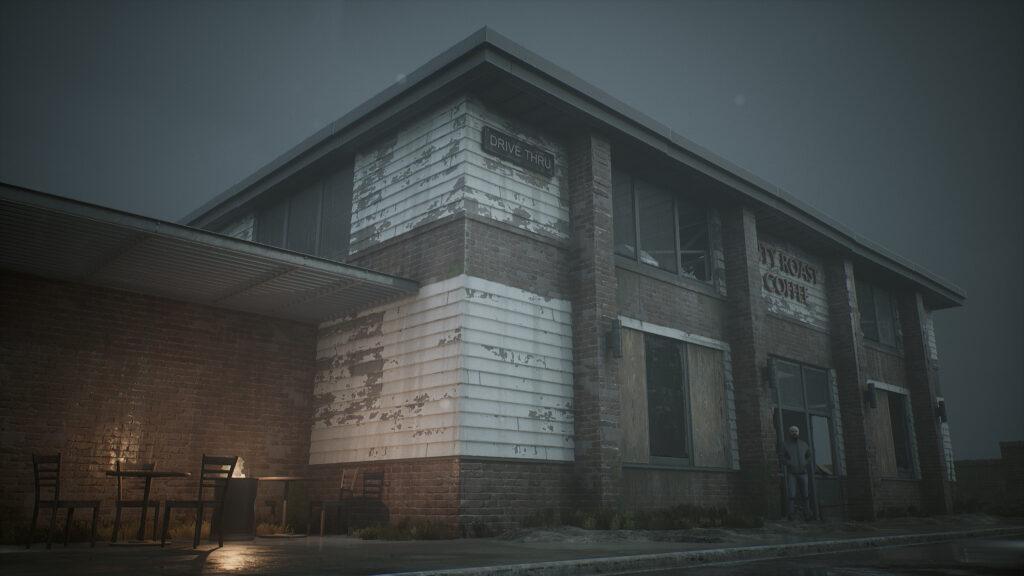
I considered the environments you often see in The Last of Us (Diners, Bars, Shops, and Pharmacies). I settled on a coffee shop because they lend themselves to being singular buildings that don’t have to be attached to other buildings.
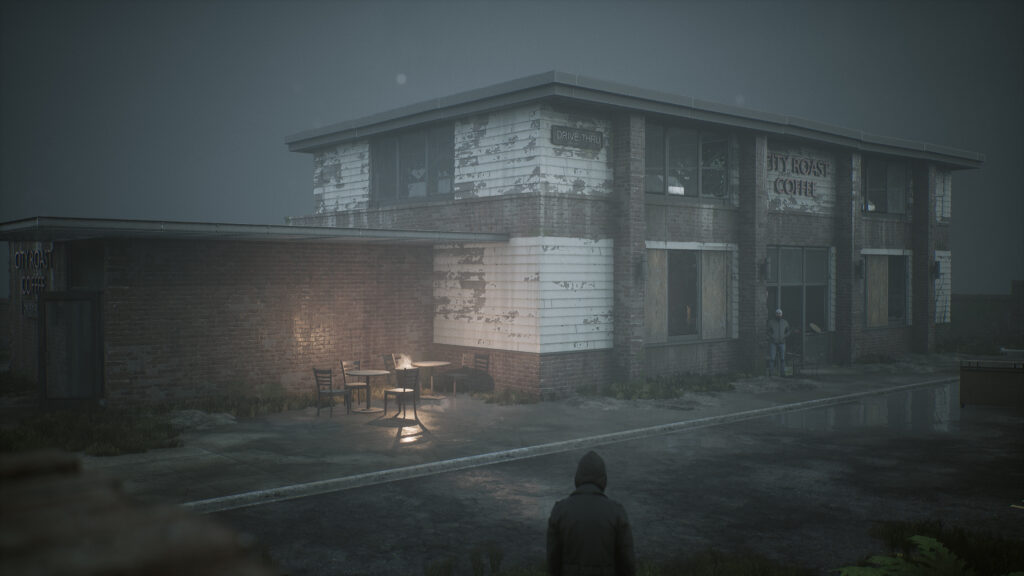
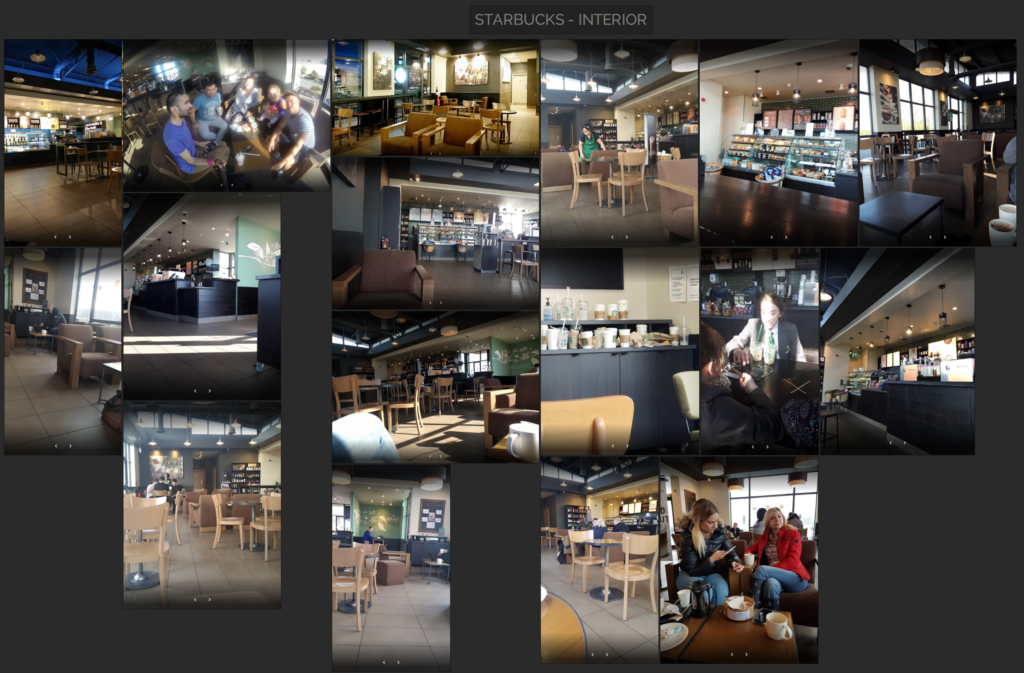
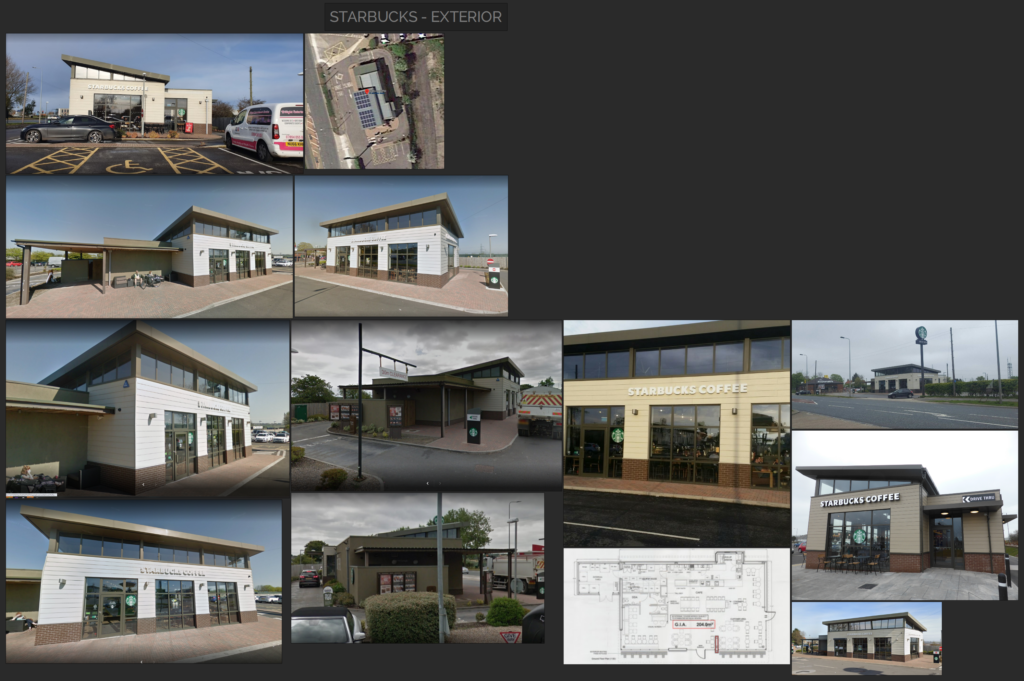
Whenever I’m about to produce a realistic environment, I base it loosely on some real-world reference, so my first task is to find a real-world location as a basis. For this particular environment, I picked a Starbucks close to where I live as inspiration for the interior and exterior building.
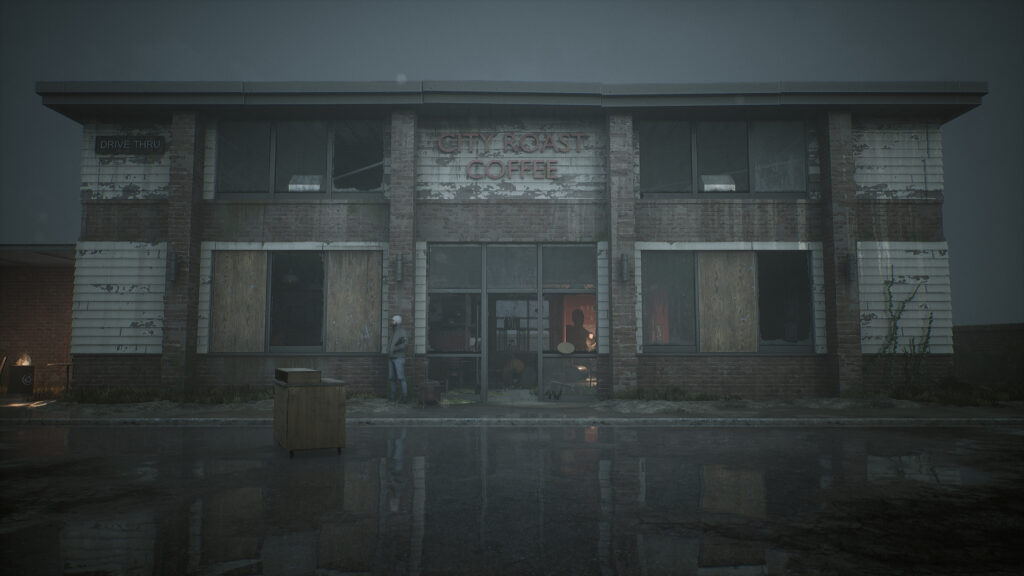
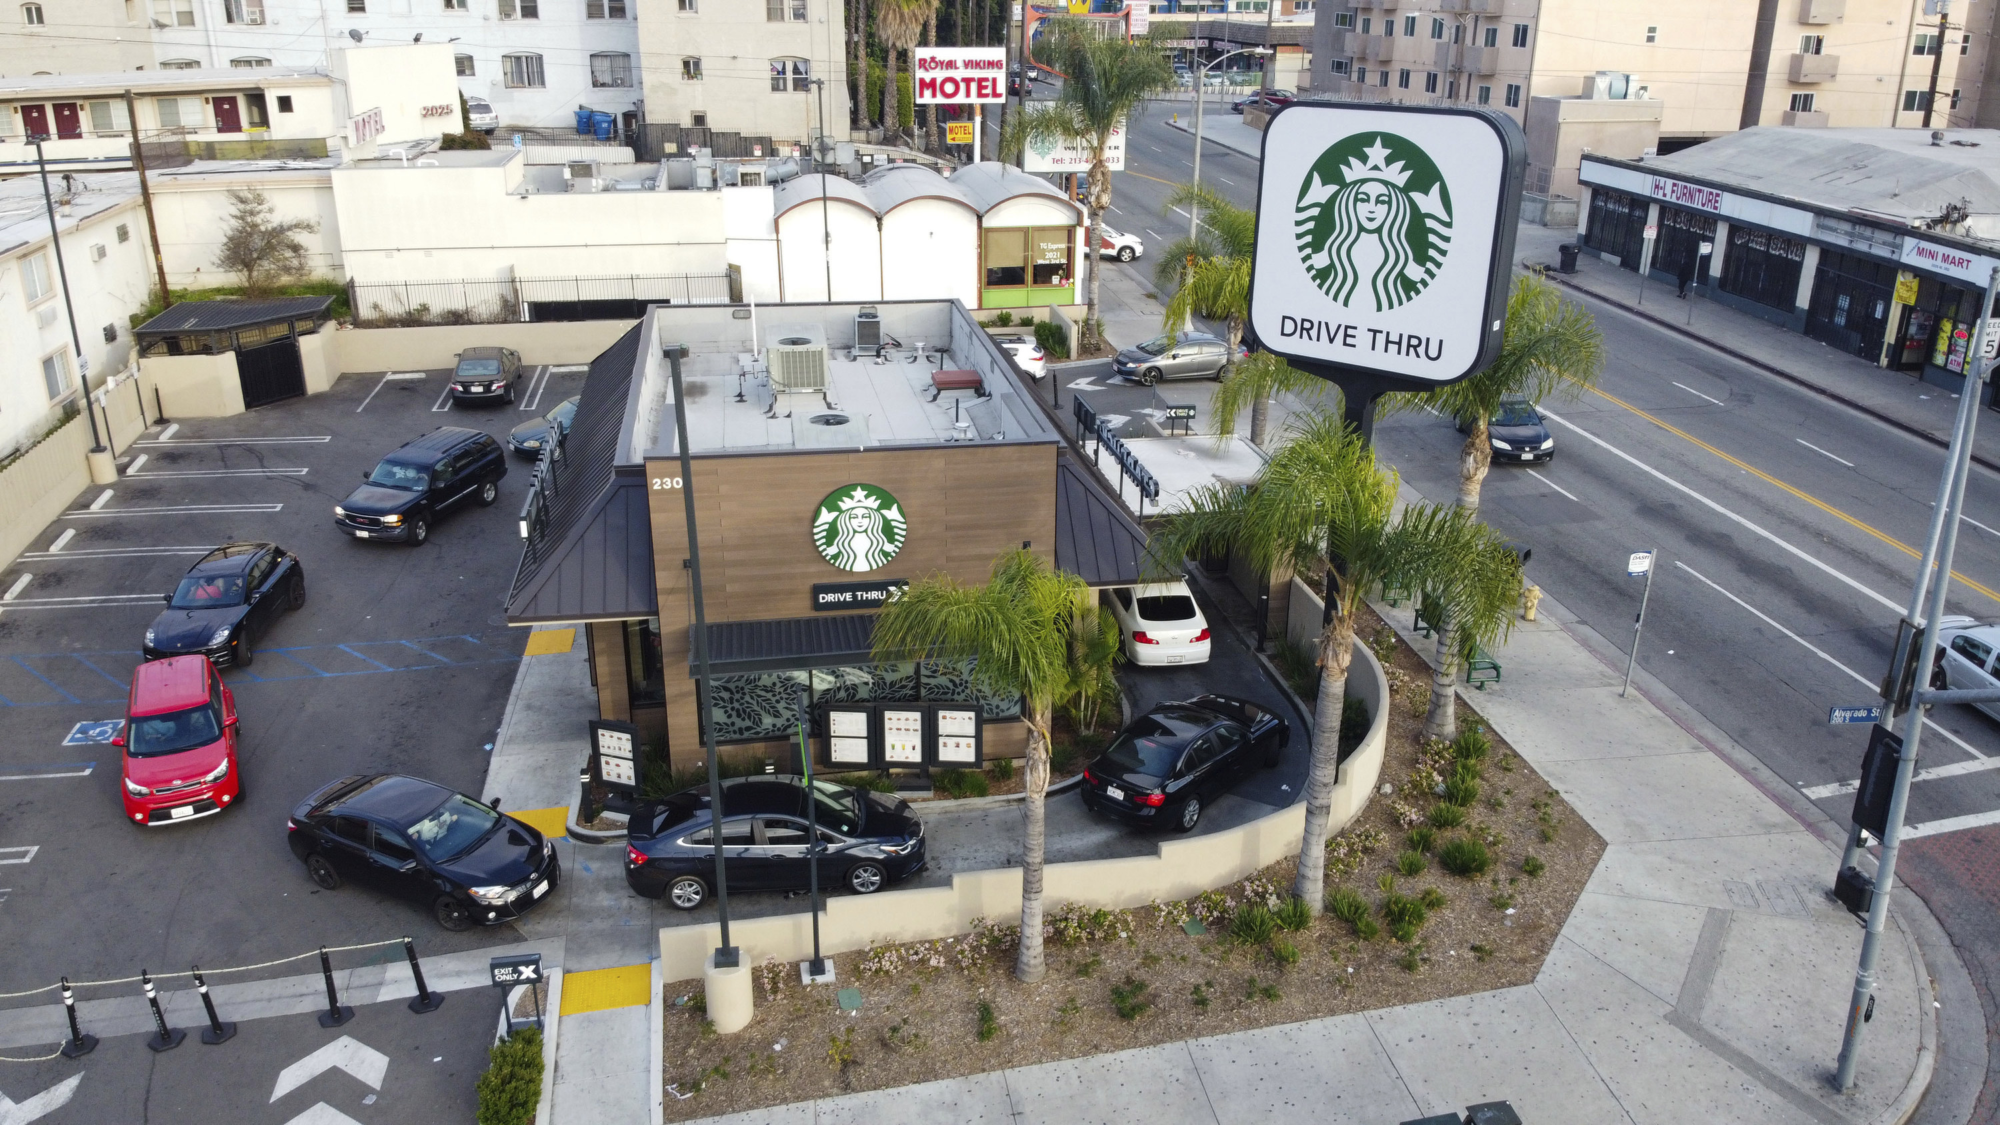
For the exterior part of the environment, i.e. the car park and surrounding area, I settled on another Starbucks restaurant, but this time one, I found in LA. I liked how it felt like a self-contained area that was relatively small, and the boundary walls would be a logical cut-off point for my environment.
You’ll see in my final shots that while I haven’t copied any of these references directly, you can still see where the inspiration comes from.
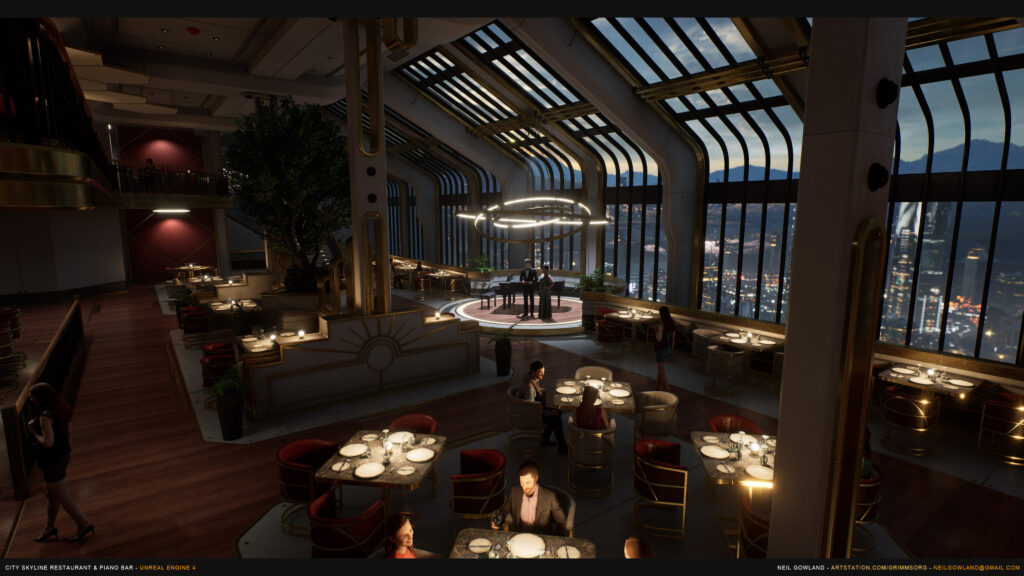
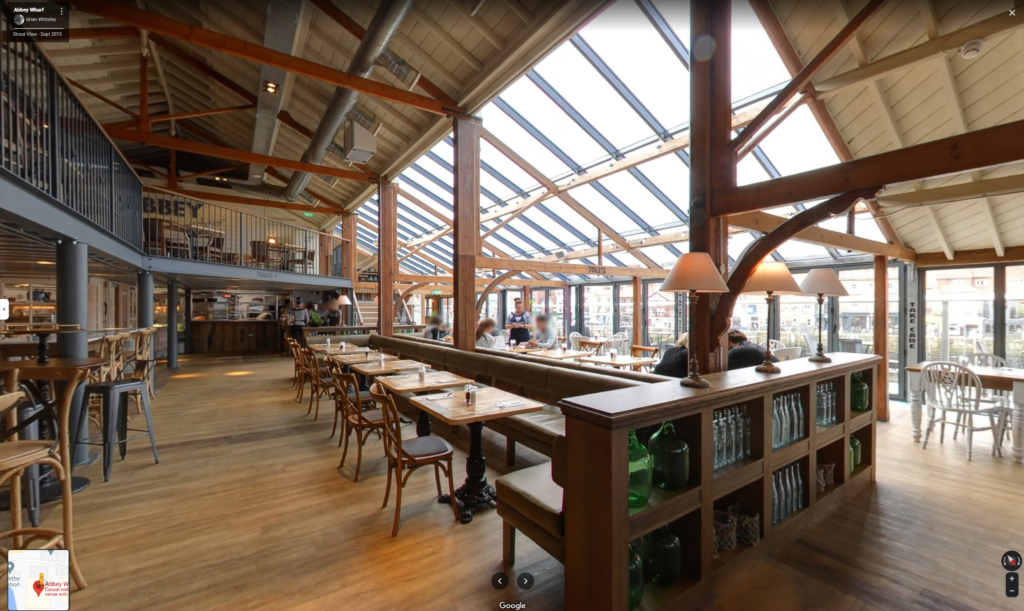
Fun fact, basing an environment on something existing can even help with futuristic settings.
For example, my previous environment – A Sci-Fi inspired restaurant in a future city got its inspiration from a Seafood Restaurant in Whitby, UK, that I visited one summer many years ago.
Once I have these critical real-world locations as a reference, I know what type of environment I will be making. So I devote my attention to gathering as many general reference images as possible, all in a single folder on my machine. Some of the things I mainly look for are:
- Different brands of coffee shops, particularly small independent brands.
- Other games with similar environments.
- Similar environments from other artists.
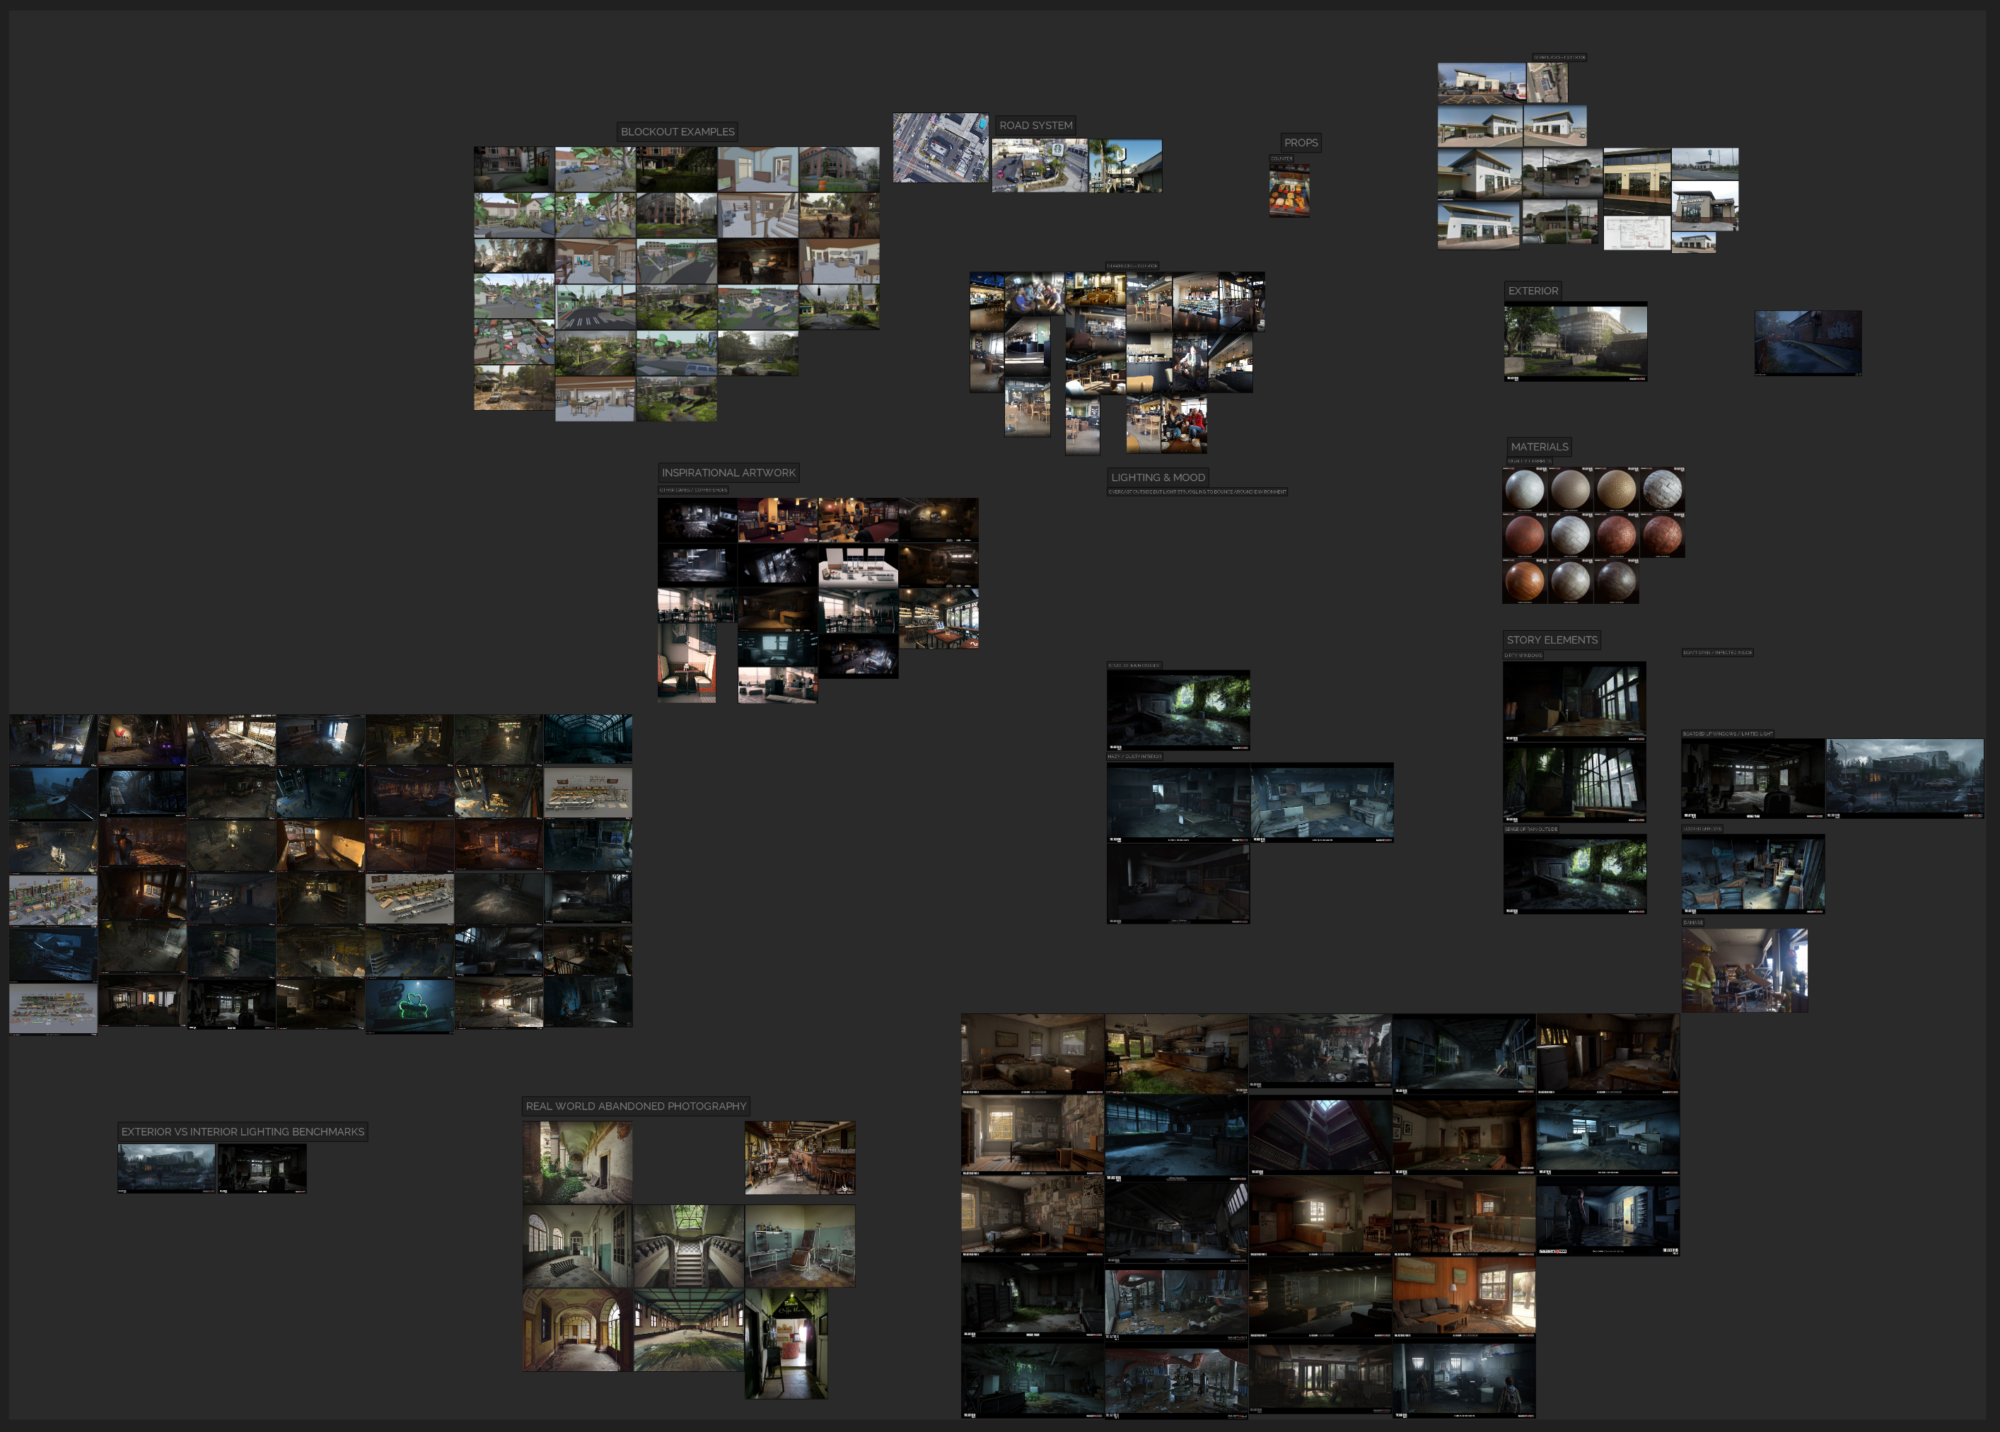
With a folder full of reference images, I set out to make sense of it all by establishing a PureRef board and organizing everything into structured sections.
Now the idea is finally taking shape in my head, and I’m excited to get started, but first, I go through all of my references and list every piece of content I think I will have to make. I would rather have a bloated list than an undercooked one, as it’s easy to cut assets once you see how they’re being used rather than being in the always planning mindset and thinking about new assets that need adding.
I do the planning side of my Environment using Notion. All my asset lists and tasks are on a single page open every time I work. I split my asset lists into five sections:
1. Standard Assets (Assets that will most likely require unique textures)
2. Structural Assets (Modular assets that will have tiling materials applied)
3. Tiling Materials
4. Decals
5. Shaders
I’m ready to move onto the blockout stage with the asset lists complete.
Blockout
When working on an environment, I always create a blockout in my DCC of choice. For this project, I used Blender. I know many artists jump straight to unreal for blockout, which is perfectly fine. But I prefer creating my full blockout in a DCC package for a few reasons:
- Less program swapping – I’m modelling and set dressing in the same file and program.
- Unreal takes a bit of setup to look good. (Interiors will look rubbish without baked lighting or raytracing setting – Granted, this is a UE4 Problem)
- Quicker ‘Look Development’ – Shaders are quicker to set up and apply.
I have a unique way of working on an environment in Blender, something I’ve not seen mentioned in many places, so it’s worth diving into more.
Unlike Max, Blender can contain multiple scenes within a single file. This is great because you can use the main scene as a replicate viewport of unreal, i.e. a viewport where you place assets. You can then create new scenes, as many as you like. I use these additional scenes to house groups of assets under the same name; for example, if I were planning on making five windows, they would all be in a scene called SM_WindowA.
Inside these asset scenes, you can separate each asset using Collections (Essentially a glorified folder). Going back to your main composition scene, if you press Shift+A to add a new asset, you’ll see Collection Instance near the bottom.
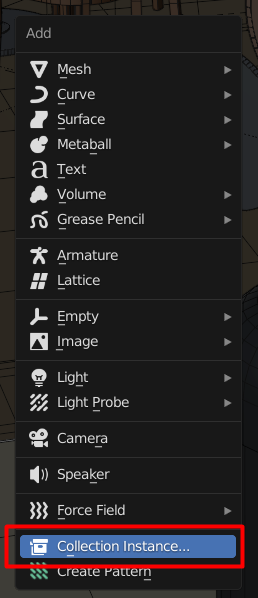
Clicking Collection Instance will give you a list of all the ‘Collections’ in the file; clicking any of these will add the relevant collection to the scene in an ‘instanced’ form. You can’t edit the model from within this viewport, but you can place, scale and rotate it like any static mesh in Unreal.
For me, doing this has several key benefits.
- The assets are placed at 0,0,0 without getting in the way.
- You no longer have to have assets placed off to the side to work on them.
- Because assets are placed at 0,0,0, you don’t have to take additional steps to prepare them for export.
- Unlike traditional instances, Collections can contain multiple meshes.
- They act like instanced meshes, but unlike Max, it’s almost impossible to break the links accidentally.
- You can even place collections within collections, which is excellent if you want to create a selection of assets for easy
placement.
In my main set dressing scene, I always have absolute grid snap turned on, so it’s almost impossible to go off the 1 meter / 10cm grid unless I choose to – perfect for when I reconstruct the scene in Unreal.
My grid settings are at default settings, meaning if I move an object it snaps every 1 meter. While moving an object I can hold shift and the snapping switches to a 10cm grid.
To begin my blockout, I started by going through my standard asset list and modelling everything in a quick and dirty fashion – focusing purely on scale and volume. Creating these Whitebox props gives me an asset library to work with, so I can quickly dress the scene when it’s ready and also helps me build the structure to scale.
I focus on Chairs, Tables & Doors first, as these are the easiest to build to scale, and you then have a reference point for the rest of the assets.
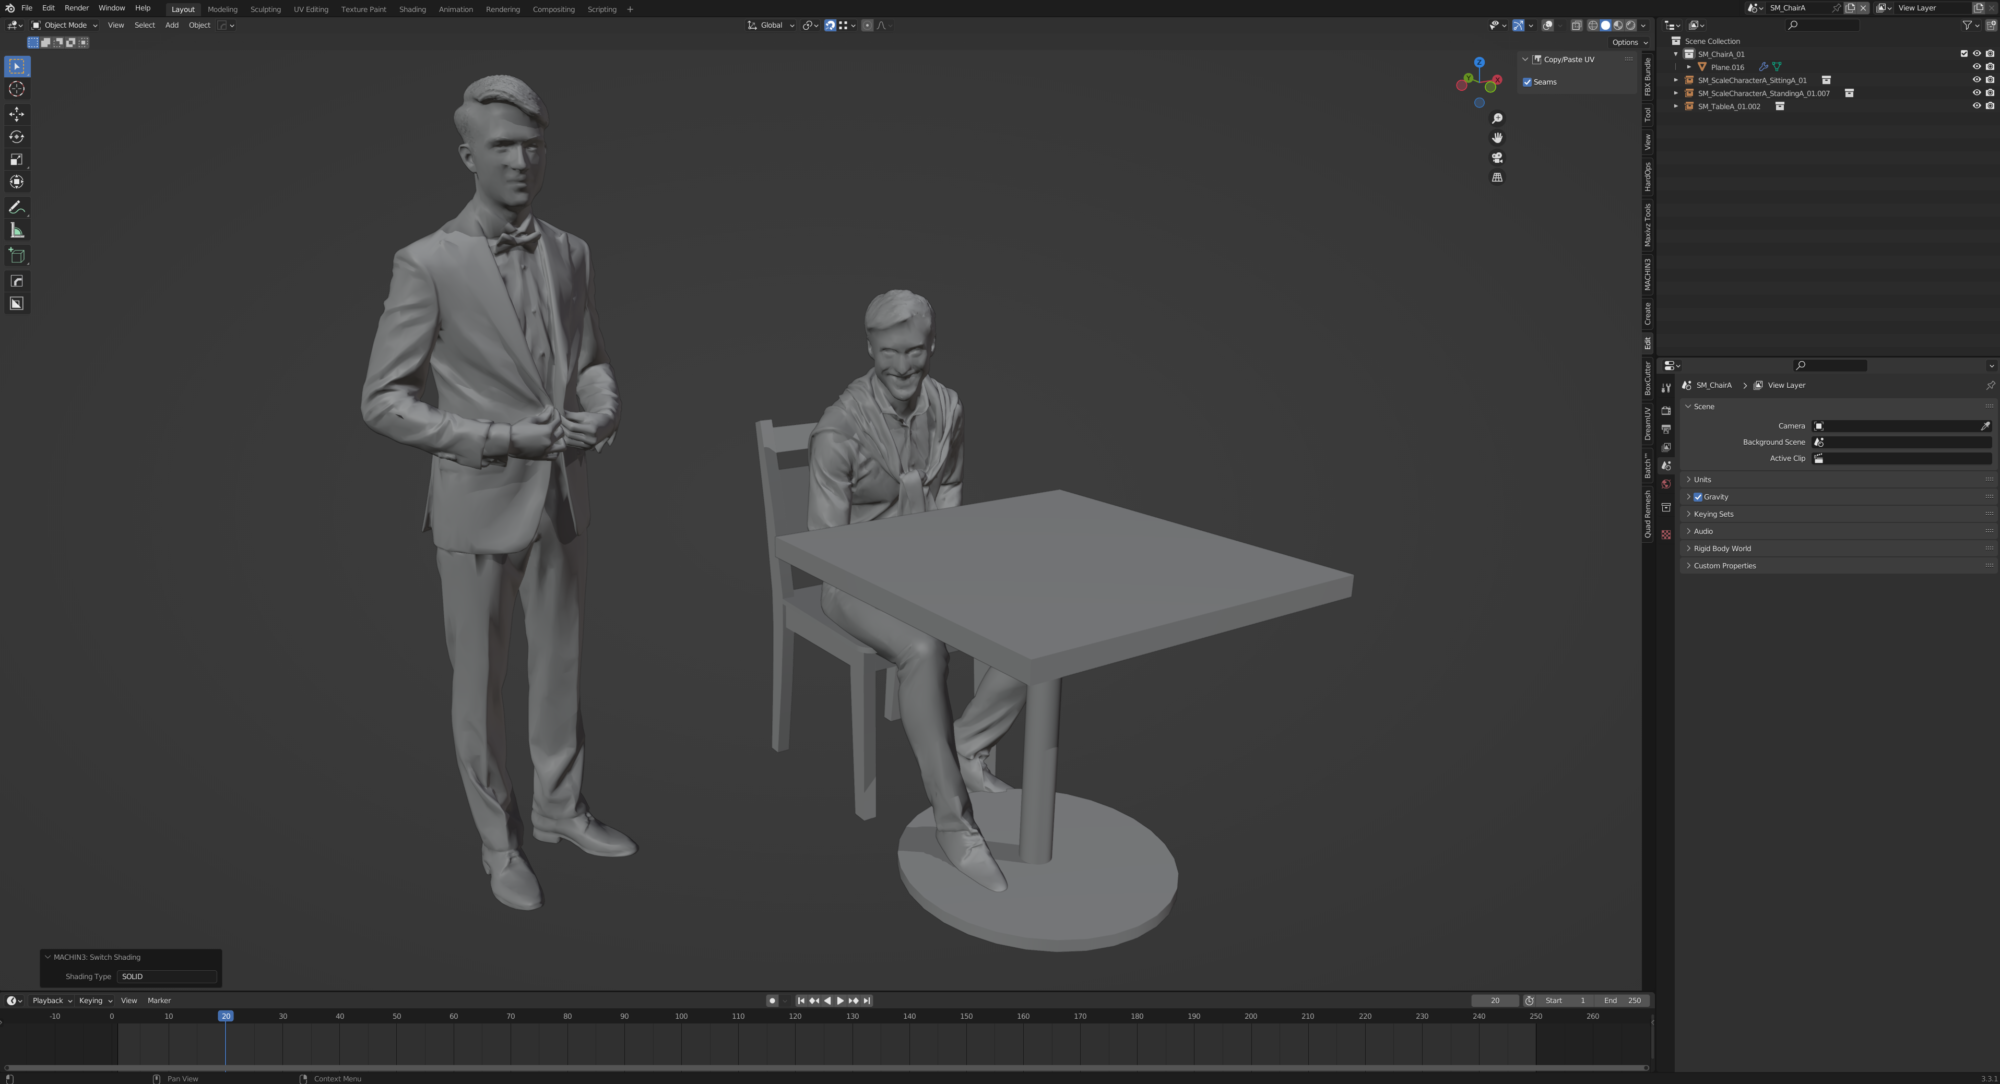
Everything I’m doing at this stage is in Blender Solid Shading viewport, with the same primary grey material applied. So I’m not focusing on colour or texture at this stage.
Once most of the Whitebox assets were modelled, I turned my attention towards the Structural Assets.
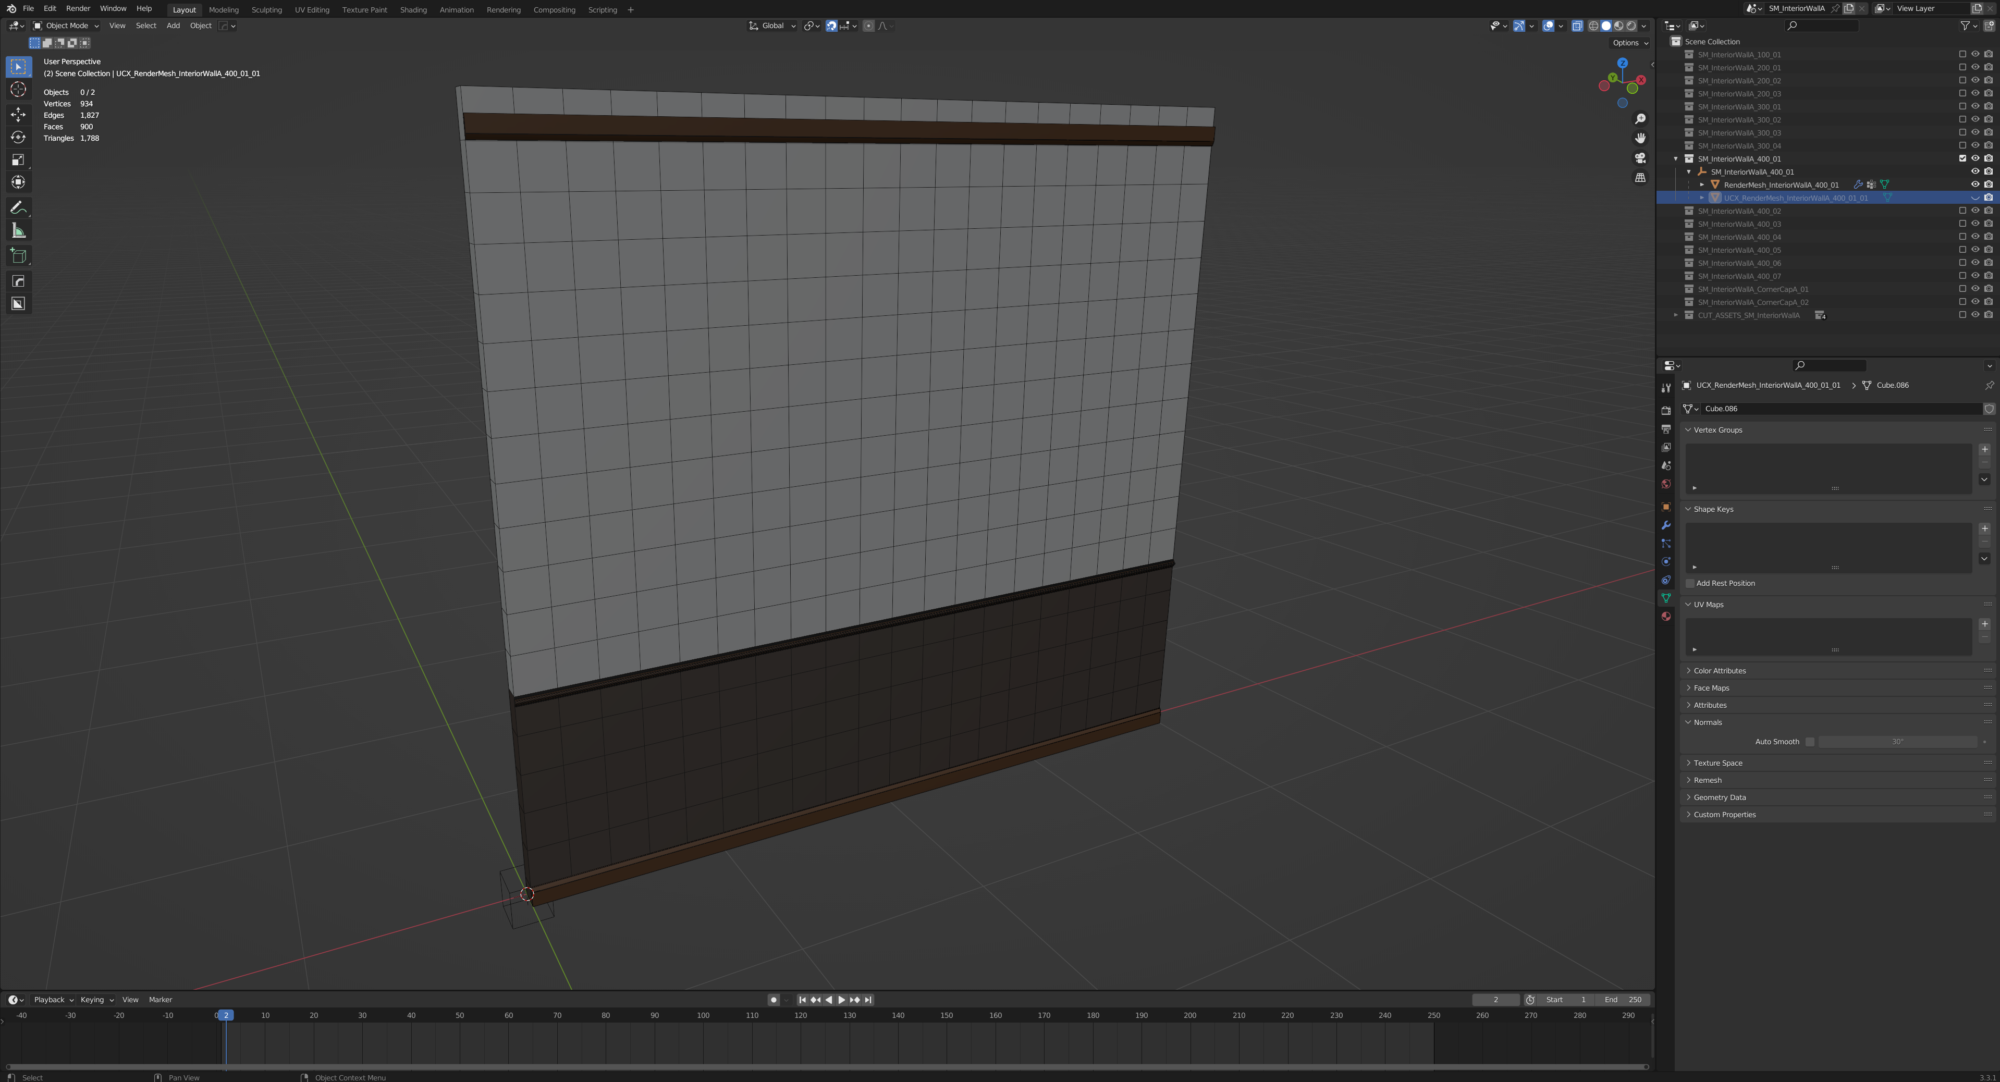
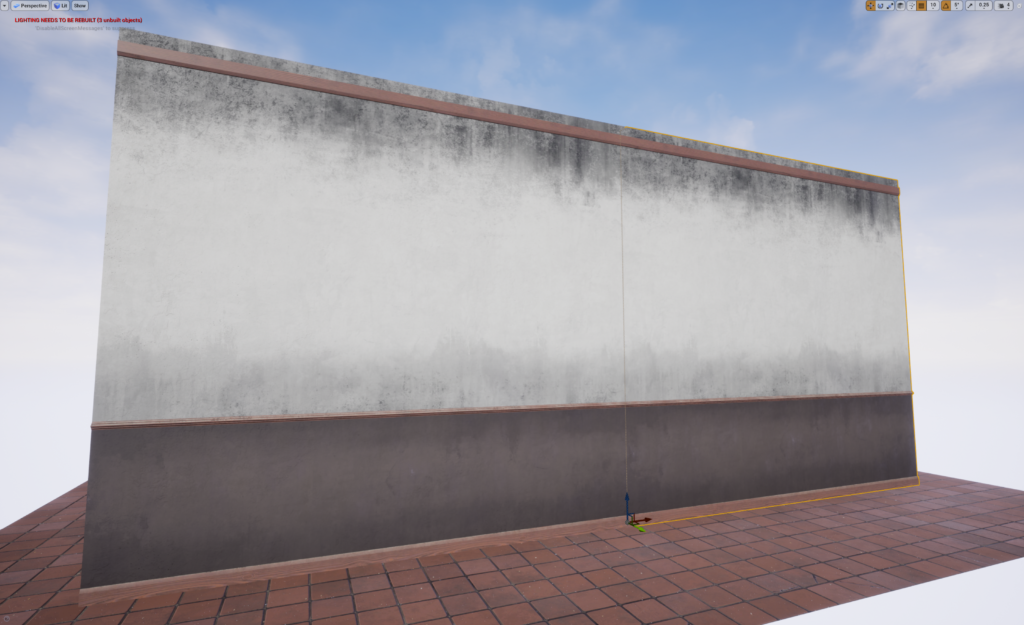
I always try to make my scenes as modular as possible for the structural assets. I always start with an introductory 4m wide wall section to build the scene. If I run into a construction problem that a 4m section can’t solve, I’ll do a 2m piece, then a 1m piece.
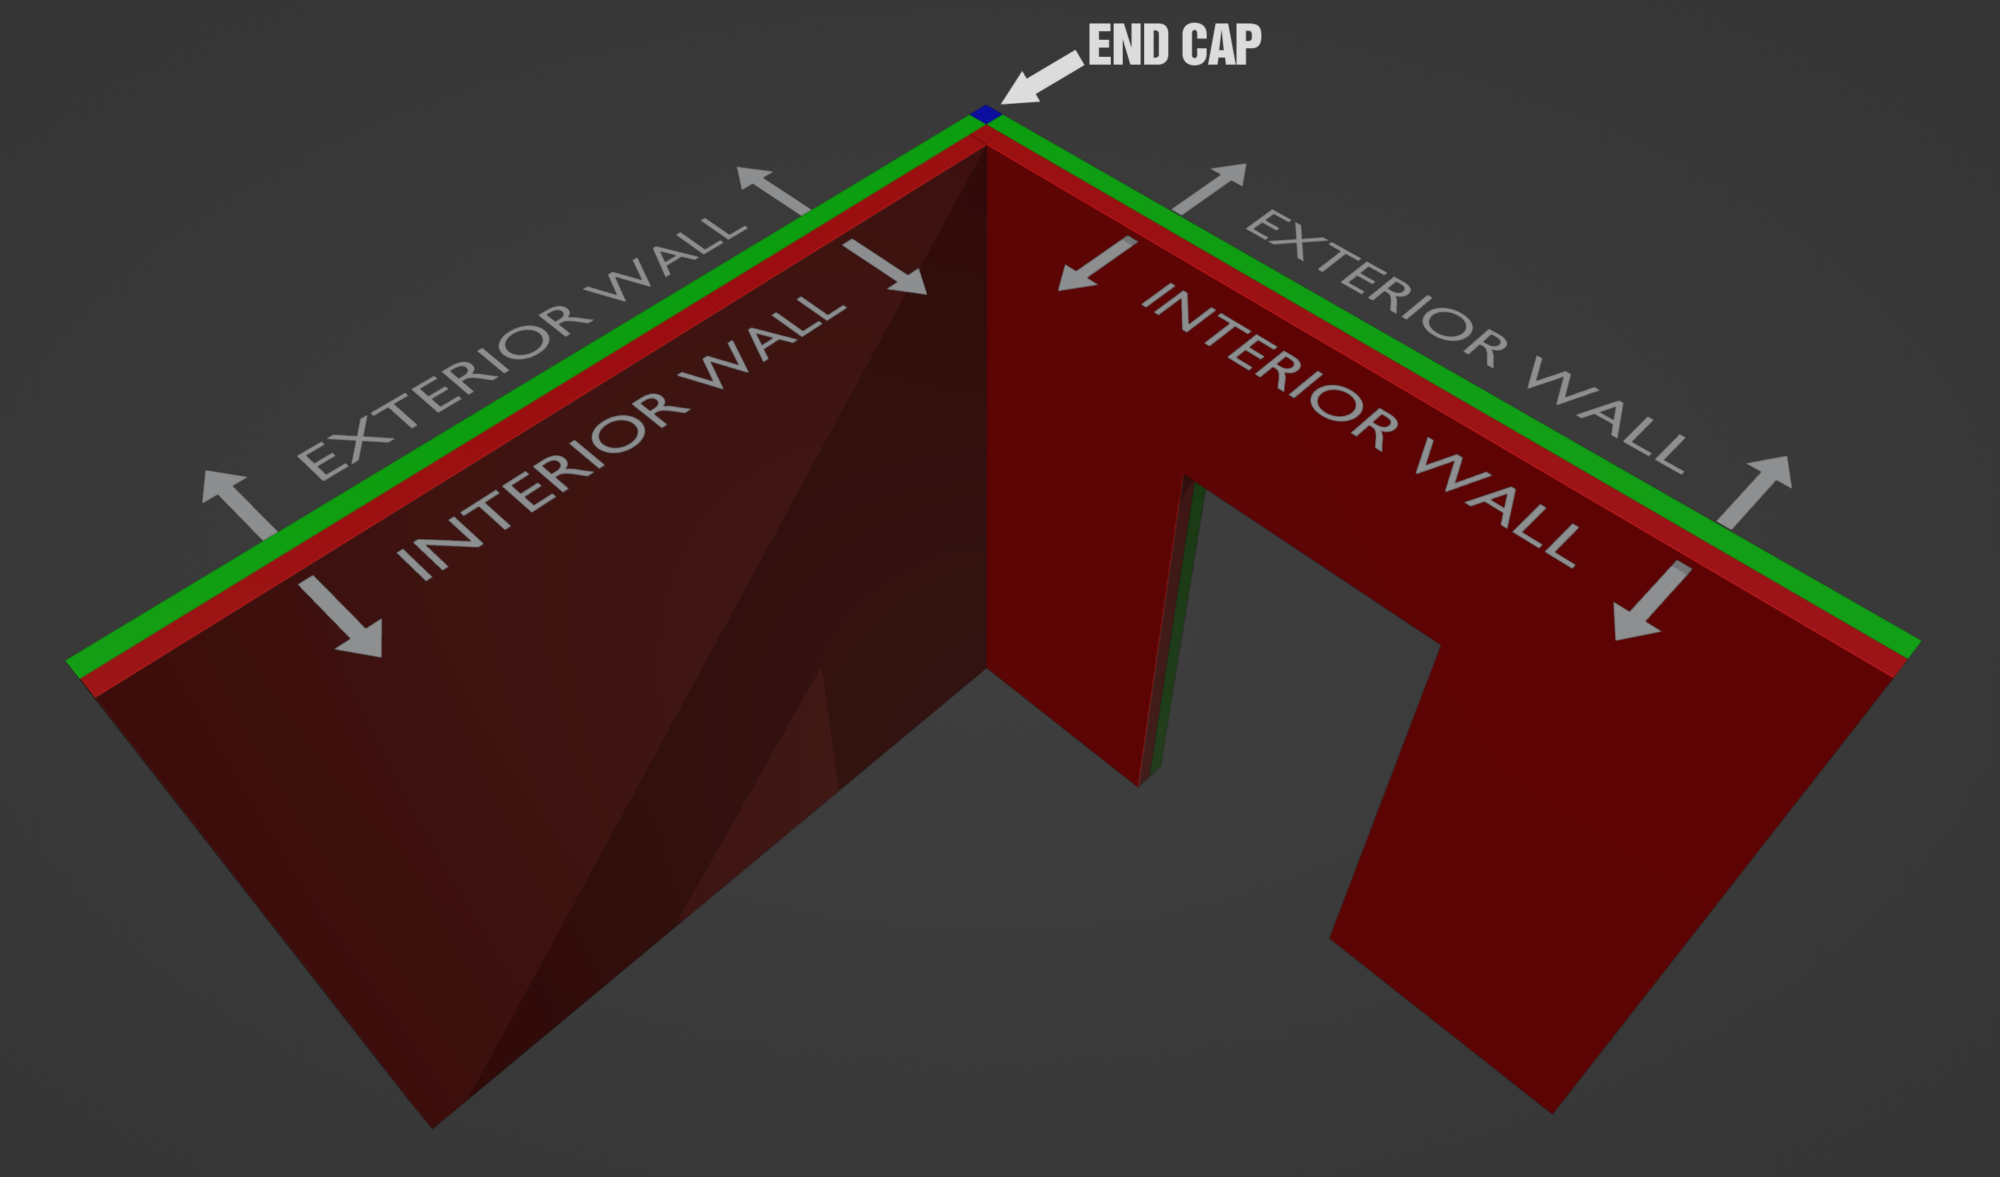
All of my walls are precisely 10cm thick, and the idea is that the walls get placed back to back, so the total wall thickness becomes 20cm, i.e. a 4m interior wall is placed back to back with a 4m exterior wall. Below is an example image of how I arrange my modular assets.
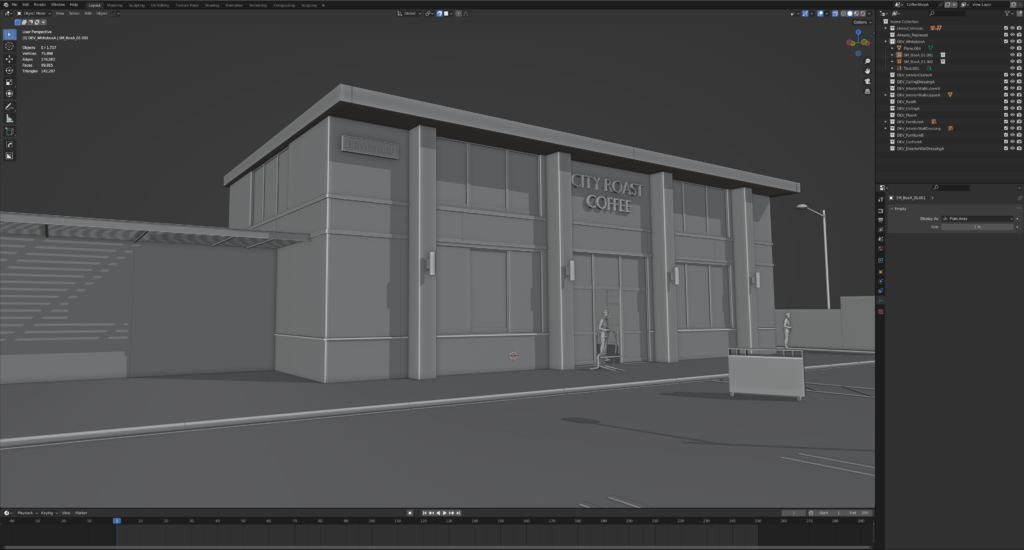
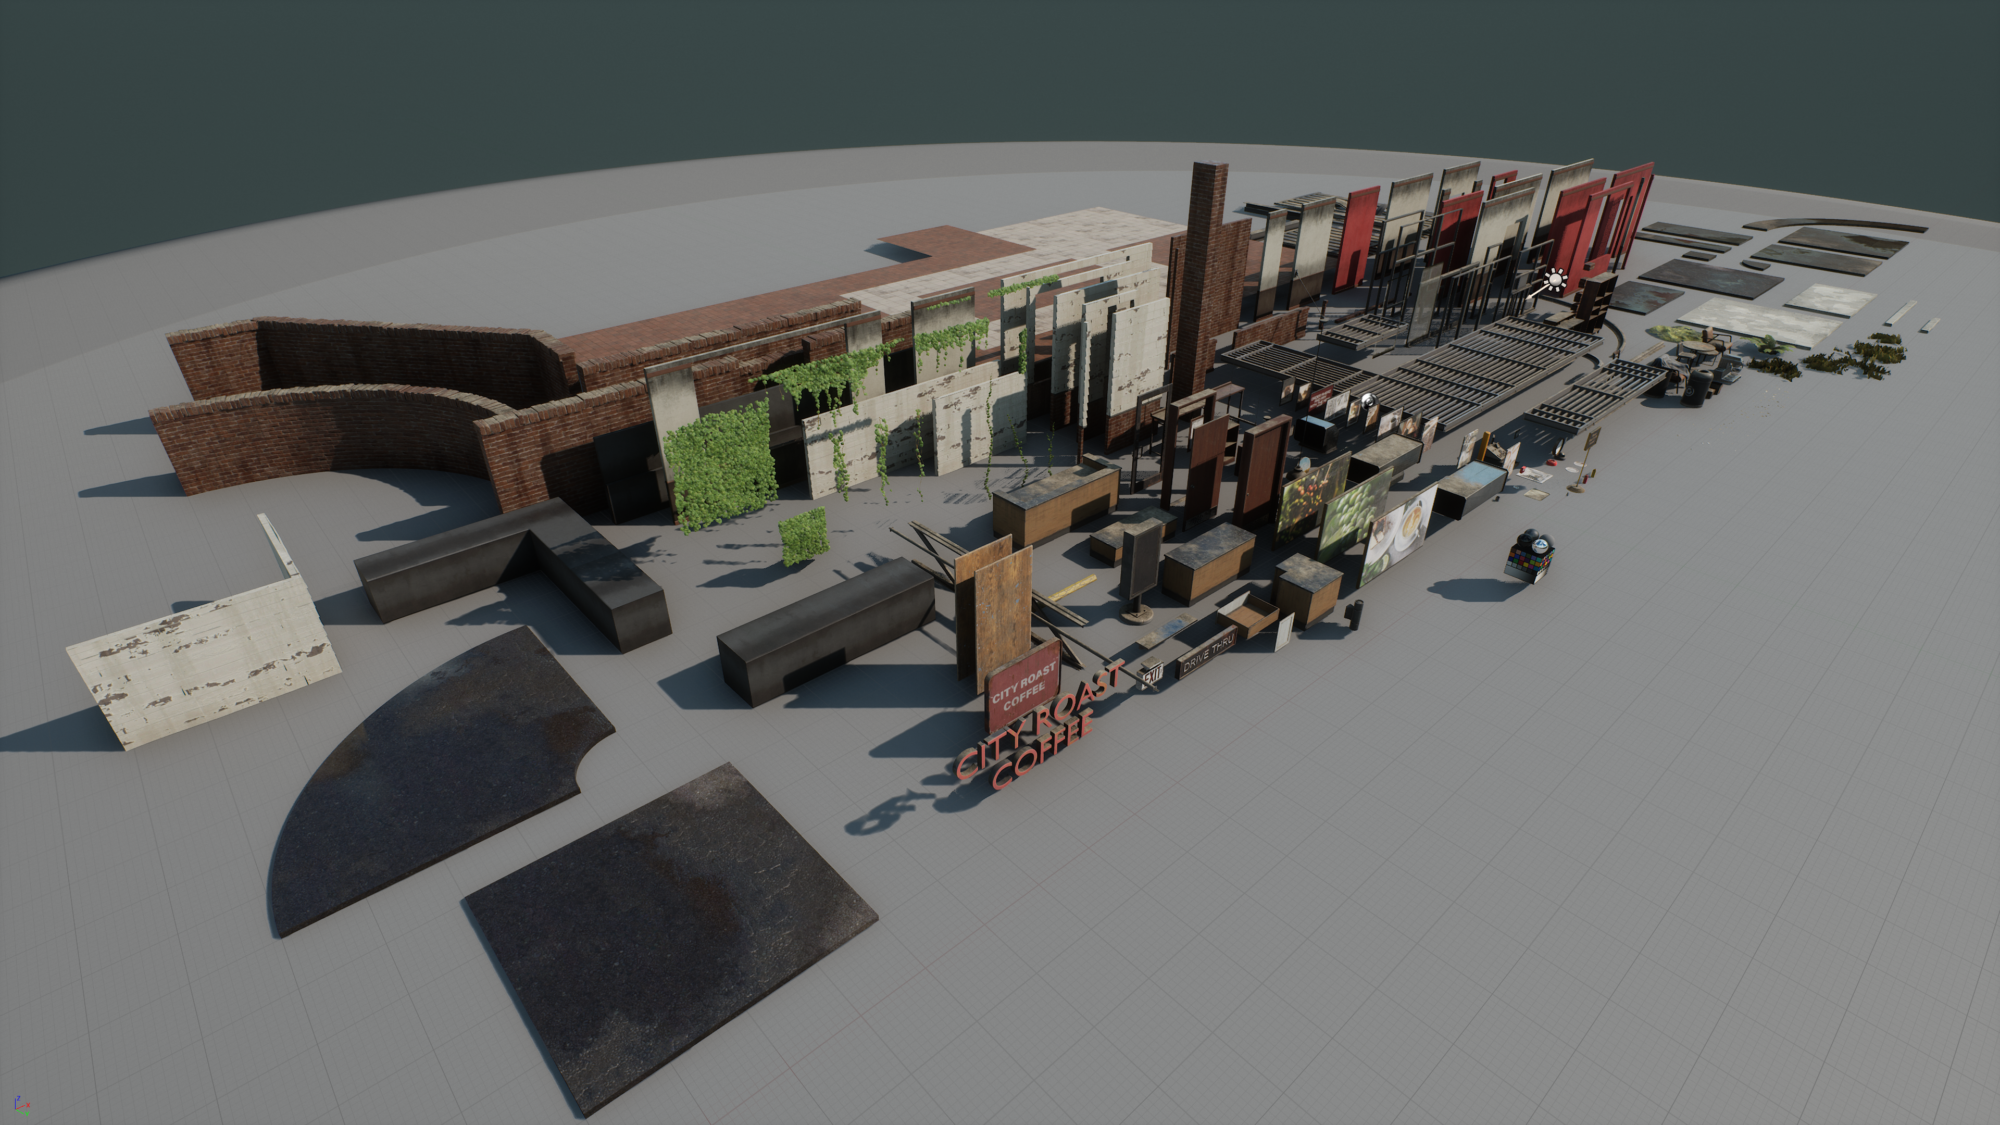
I’m gradually building up the scene in my main composition scene as more assets become online. Below is an image showing my final blockout before heading into production.
While I’m blocking out the scene, I’ll occasionally export the whole scene to Unreal as a single mesh to have a run around in 3rd person view, etc, to sanity-check the scale.

When I’m relatively happy with how the scene is coming along, I do a second pass of all the props & structural assets, where I introduce colour to the scene. I create a Blender Material per colour and adjust the viewport display colour.
Below, I’ve assigned two IDs to the Whitebox chair. One for Wood & one for the cushions.
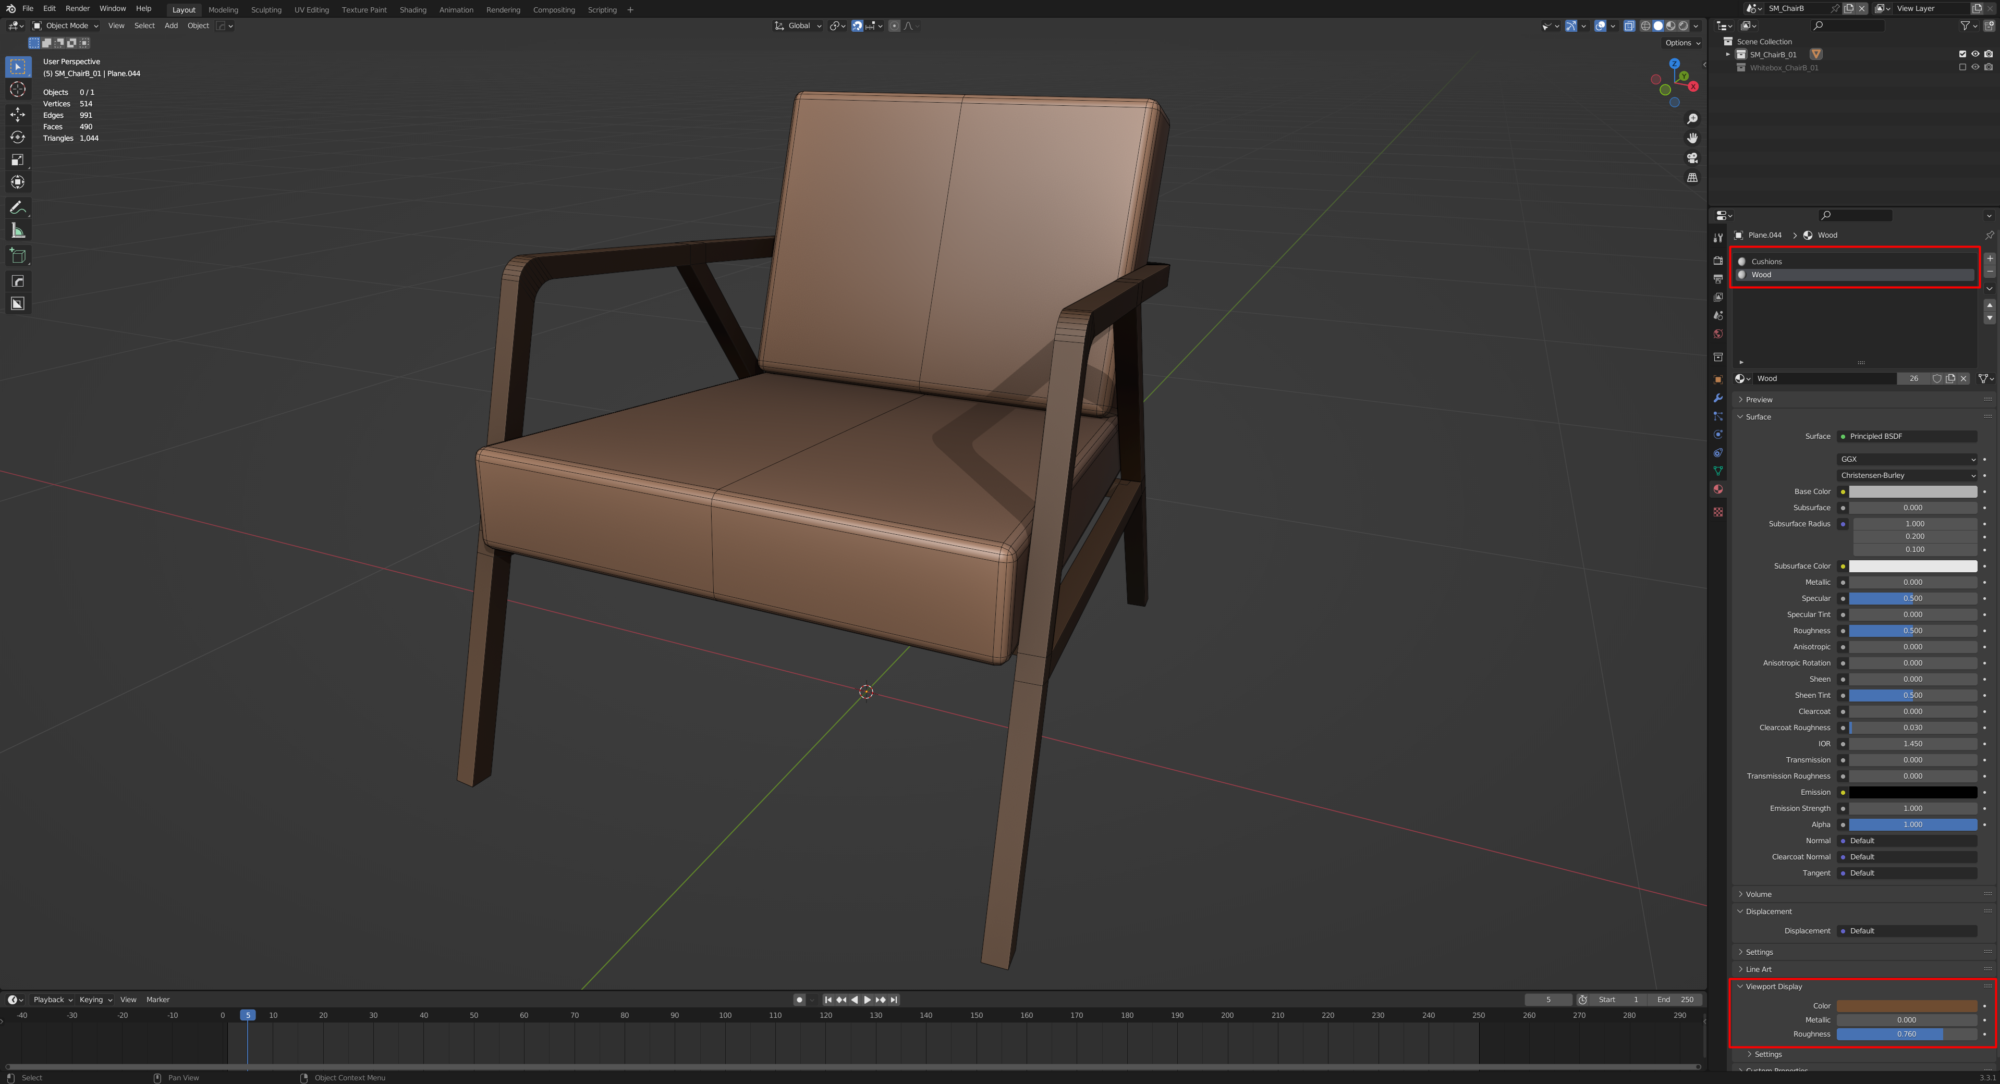
This colour will only be displayed in the ‘Shaded Viewport’ mode.
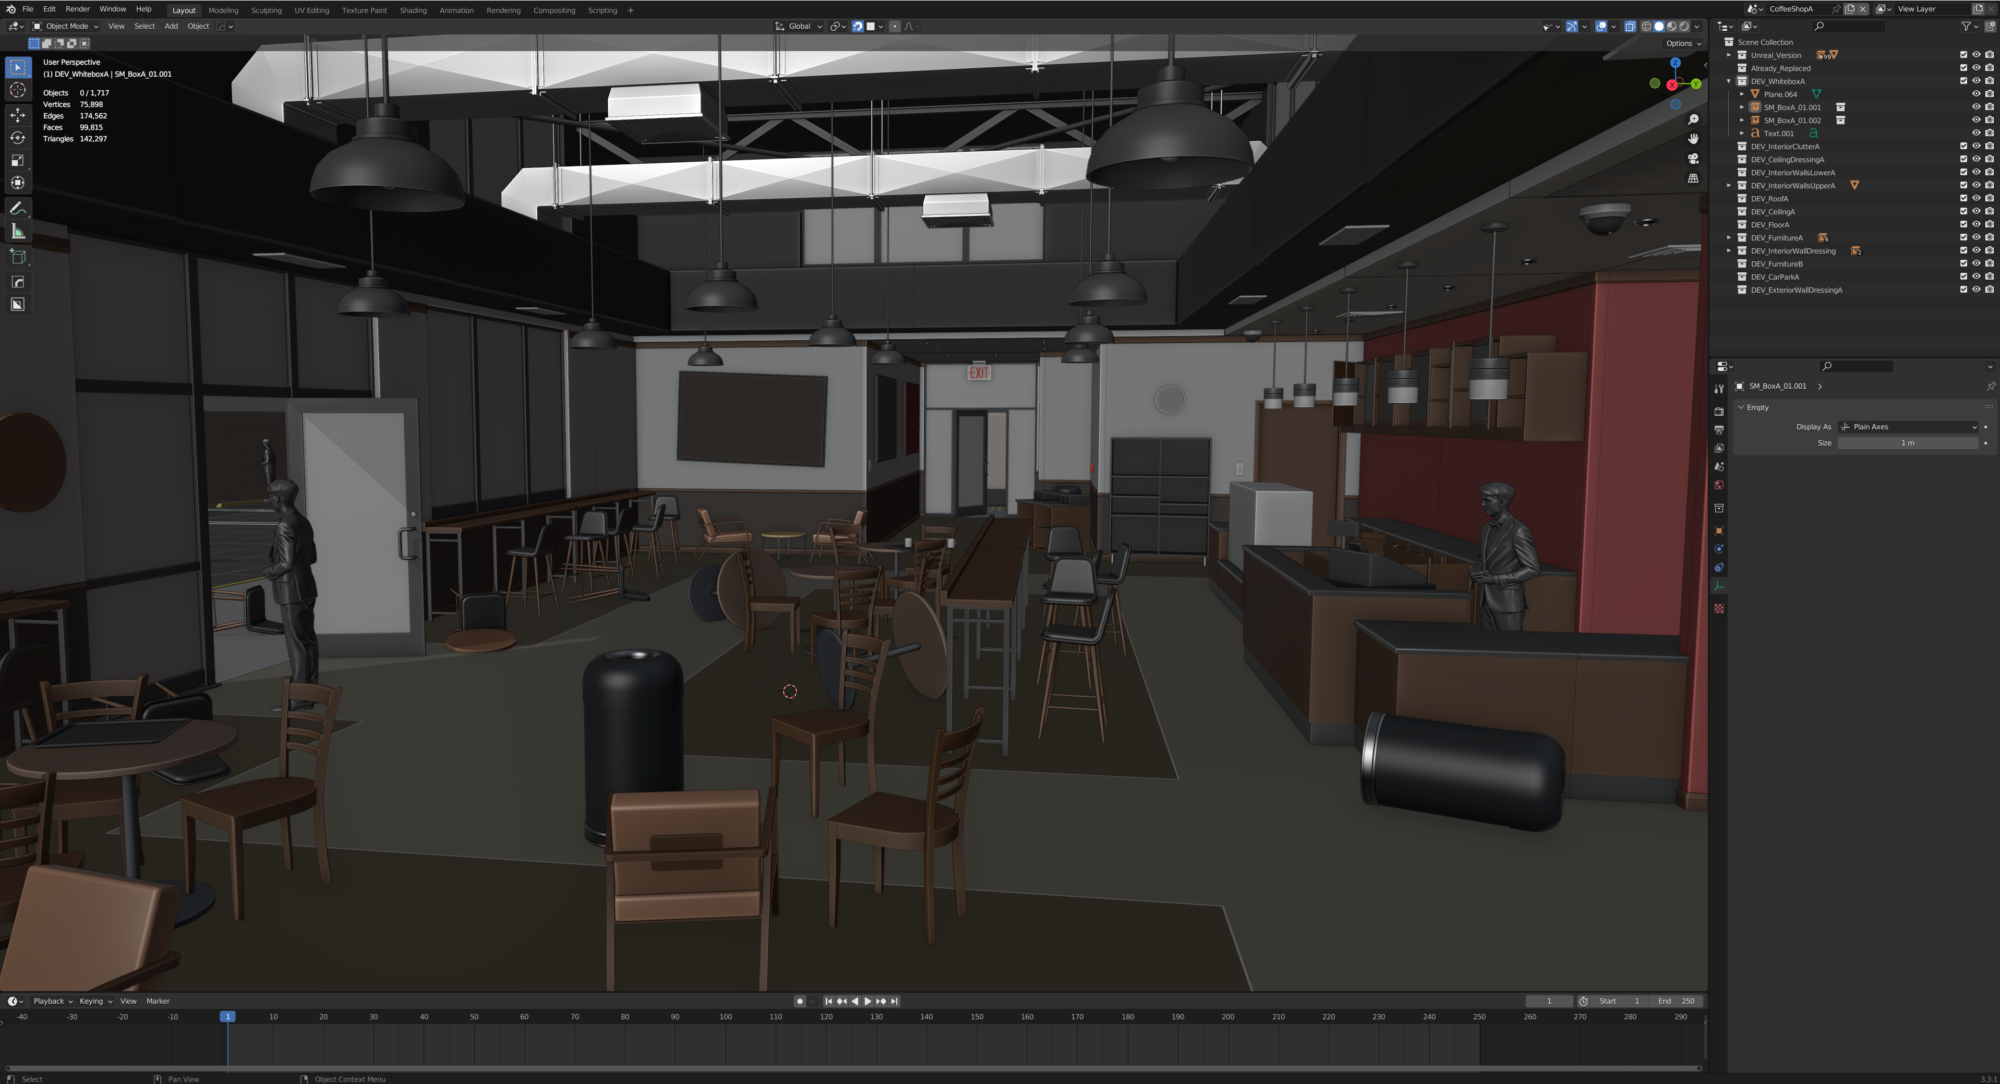
As I worked through the assets, the scene became fully coloured and eventually looked like the image below. Because adjusting these colours is such an easy process, I use this as an opportunity to adapt the art direction of the scene and try out different colour combinations.
As you can see, I spend quite a long time on my blockout – potentially too much, but these are the foundations. Look at buildings in the real world. Architects plan buildings for years before construction starts. Then, when construction does start, they’re usually constructed from start to finish in double quick time. If the foundations aren’t solid – the building collapses.
When I move into production, I have a solid 3D representation of my final scene.
Finally, I export the blockout to Unreal, intending to swap everything out with final quality meshes as and when they become available.
Props
Onto prop creation, 80% of my assets go through a standard asset production of High Poly Model to Low Poly Model baking. Some assets could be created with other more efficient techniques, but for personal environment creation, I find the more repetitive your workflow, the quicker you can get through the assets and get into a rhythm. This is crucial towards the end of an environment when inevitably, you will be sick of seeing it.
I will walk you through one of my typical assets to give you an idea of my process.
The first task of my agenda is to decide whether my original design for the assets was the right choice or, based on further reference, whether I have changed my mind. If I’m happy to proceed, I will start converting the blockout model into a model ready for ZBrush. My high poly models start pretty simple as I let ZBrush do the heavy lifting, as I’ll discuss further on, but for now, my process of getting a model into ZBrush consists of the following things:
- Separating the asset into multiples pieces – i.e. subtools
- Making sure there is the right amount of polys in any curved surfaces which will make life easier in the long run
- Removing any Ngons – Zbrush doesn’t like them.
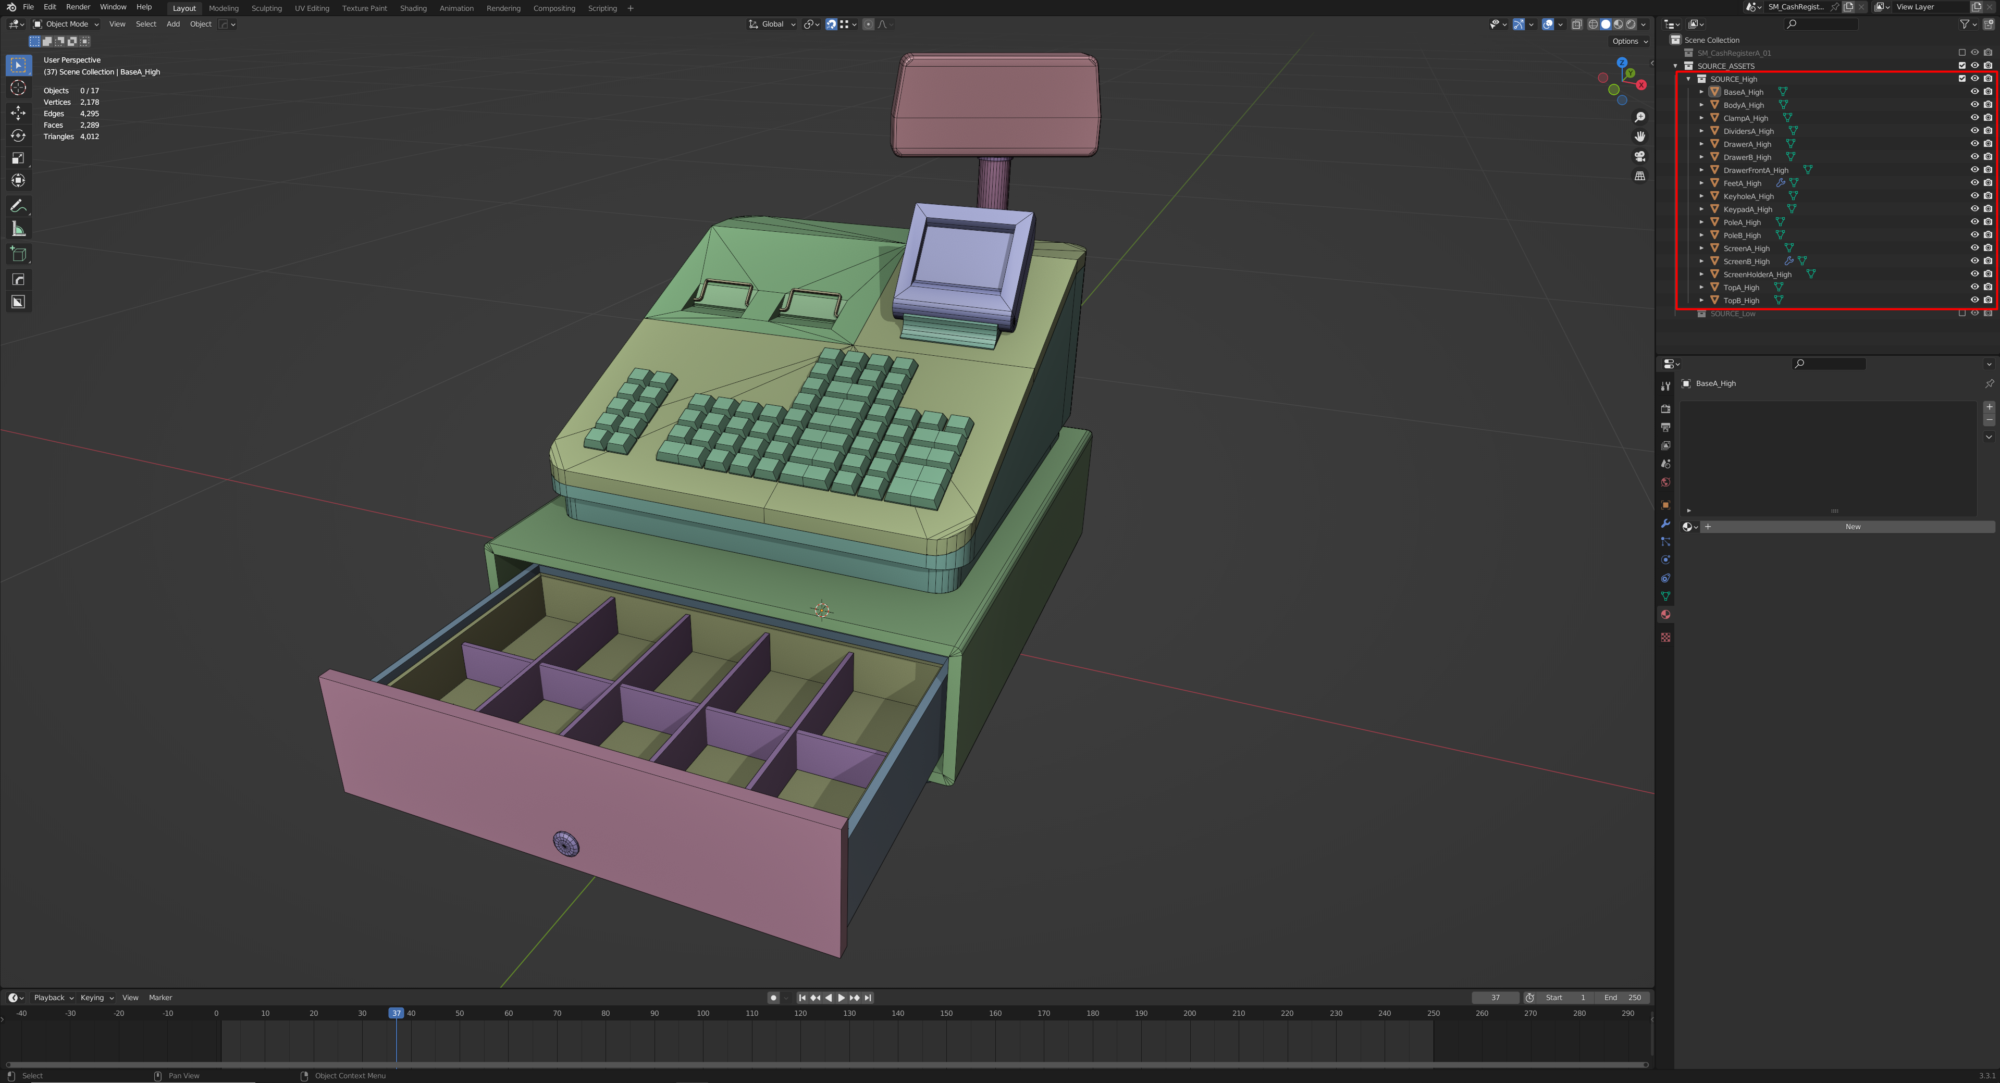
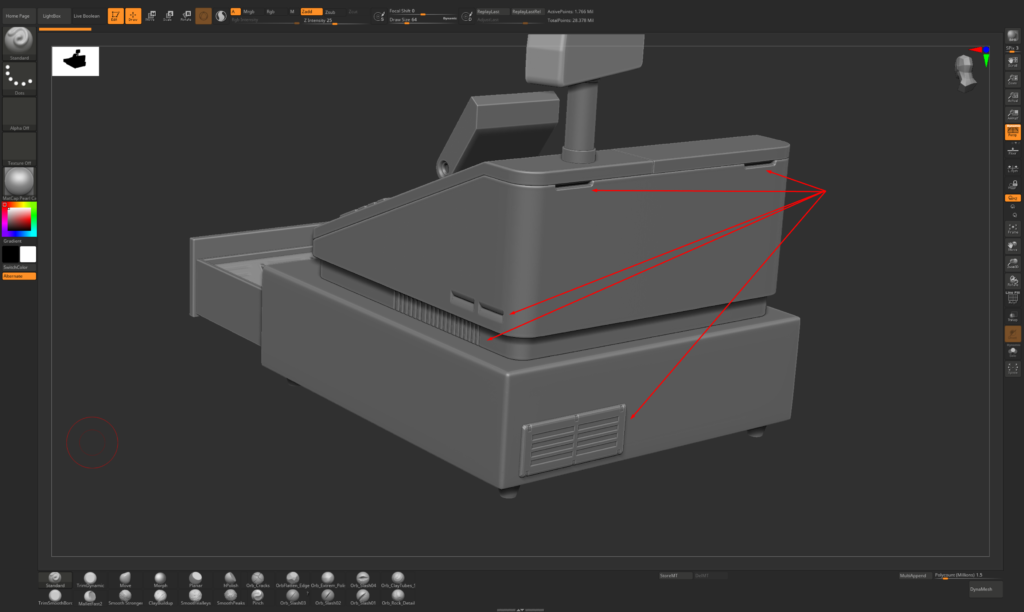
With the asset broken down into multiple pieces, I bring them into ZBrush as multiple sub-tools. I then go through each subtool and dynamesh them to a high density, followed by Deformation > Polish.
Polish will give all of your edges a smooth beveled look which is what we want for baking a normal map. When using Polish, there are no set values that I use, and it’s a case judging by eye and keep polishing till it’s aesthetically pleasing. You can also mask out areas to apply different strengths of polish.

For Dynameshing – I highly recommend downloading Dynamesh Master from the ZBrush Central website. It’s quite an old plugin, but it still works perfectly with newer versions of ZBrush. The Dynamesh Master plugin allows you to set target polycounts for Dynamesh Meshes rather than using an arbitrary number.
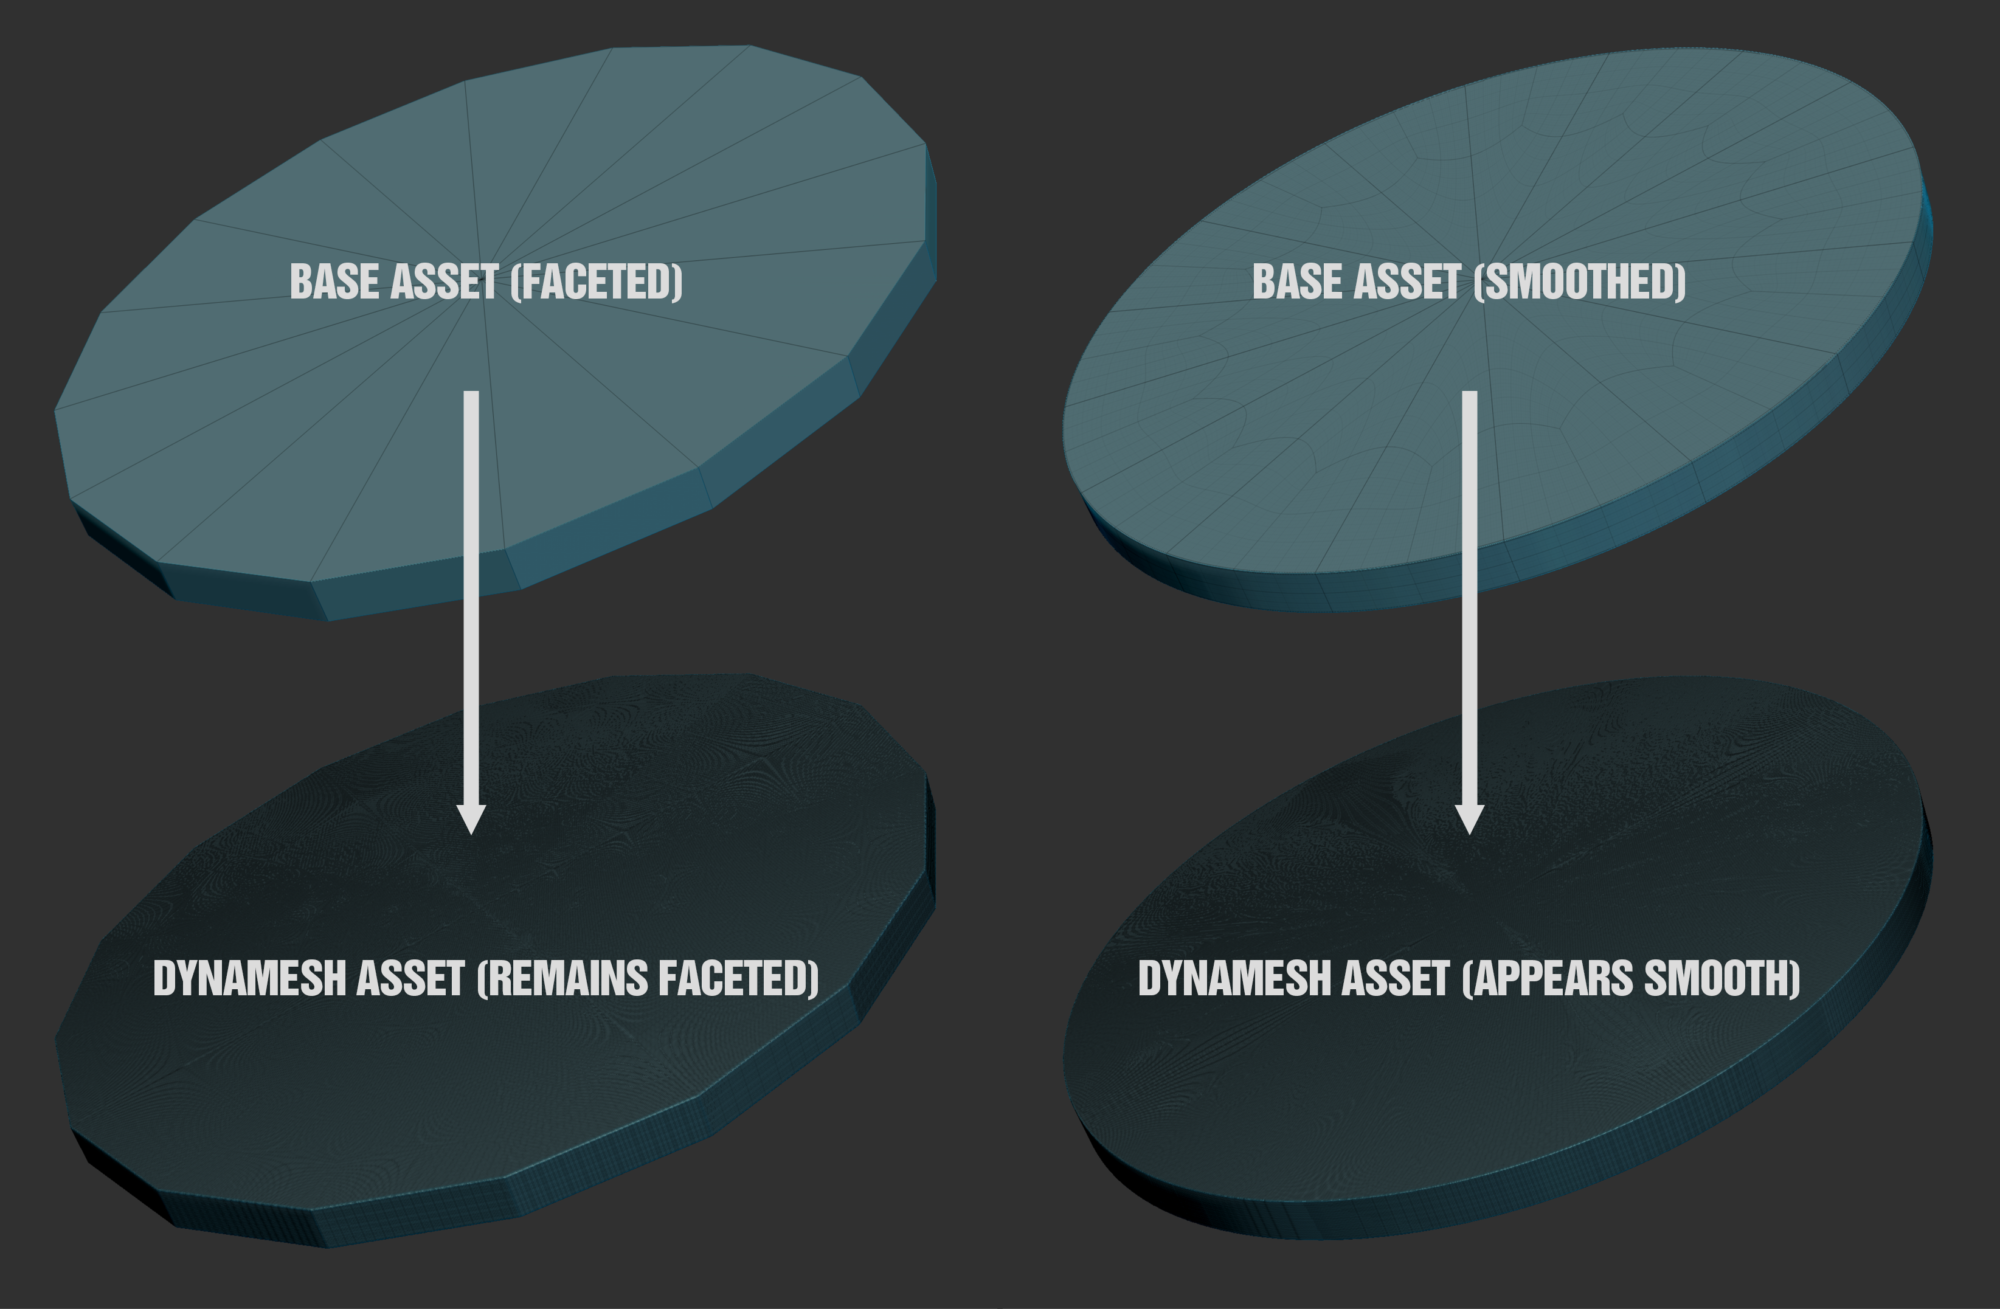
Occasionally you’ll come across a subtool that doesn’t dynamesh appropriately because of a curved surface that needs more base geometry. Dynameshing a model like this will cause it to retain a facetted appearance.
In instances like this, you want to smooth the surface as much as possible before Dynameshing. I achieve smooth surfaces by assigning polygroups to the model and then clicking Crease By Polygroups, which will add supporting loops to help retain the shape.
I then subdivide the geometry multiple times till the model is visibly smooth. Once you have a smooth result – Dynamesh will work perfectly.
From here, I could do some sculpting depending on the type of asset, things like some edge damage or custom detail.
At this point, I have a base high poly, and it’s a swift process when you get used to it. At this stage, I would like to see if I have any height alphas stored in my library to enhance the prop further. Using Height Alphas is a great way to make a high poly model look like you’ve spent much longer on it than you have. The marketplace is full of alphas for purchase, which are worth every penny. I occasionally make my alphas for future use if I want something else.
Below are some images showing the type of details I want to add.

With the high poly model complete, I export all of the Subtools into an explorer folder for later. I nearly always export the High Poly models at full Dynamesh Resolution if the computer can handle it. I prefer not to decimate as it’s one less step to worry about and less margin for error.
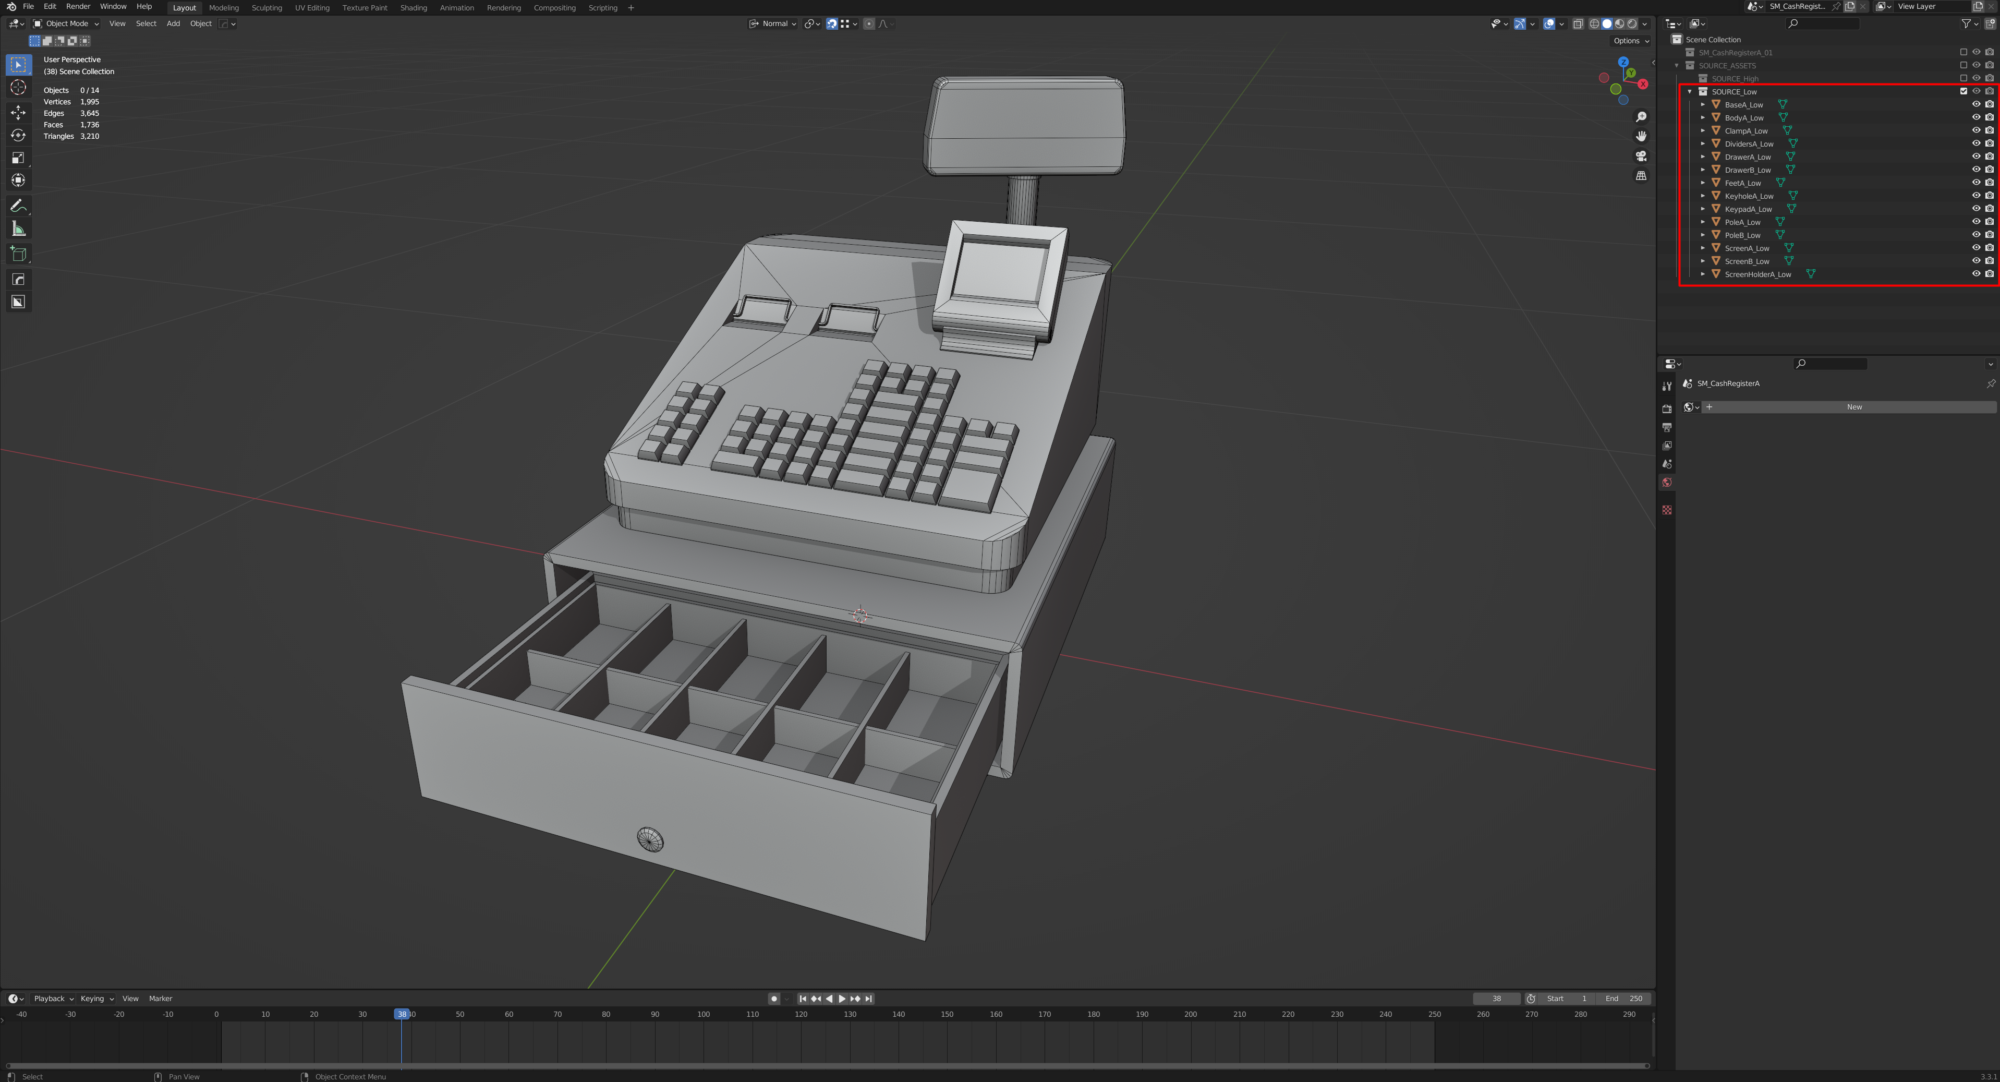
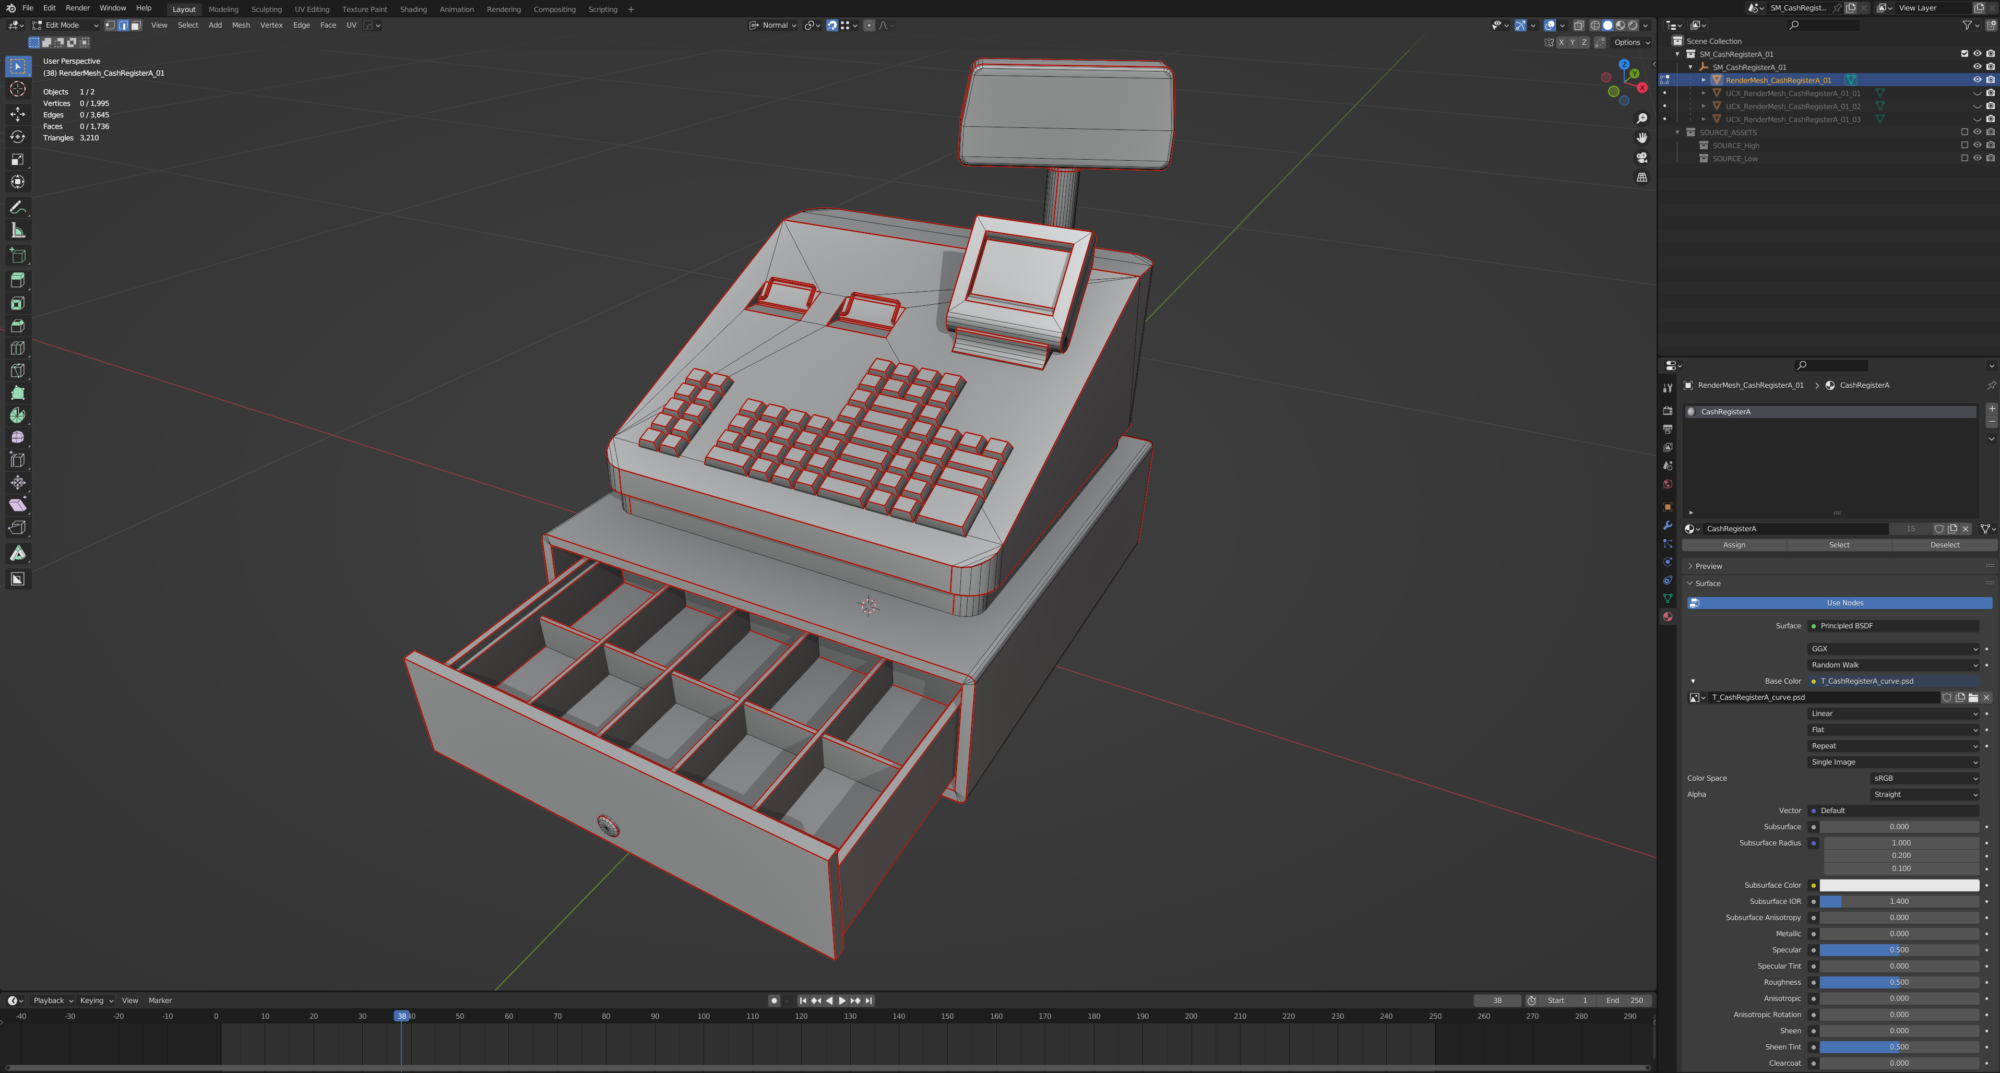
And now I return to Blender, where I duplicate the Pre-ZBrush model as a basis for turning it into my low poly model. Part of my production strategy is not making significant changes in ZBrush, so the model is almost ready for in-game. After that, it’s just a case of cleaning up some of the topology where needed, deleting hidden faces, and unwrapping and packing the model.
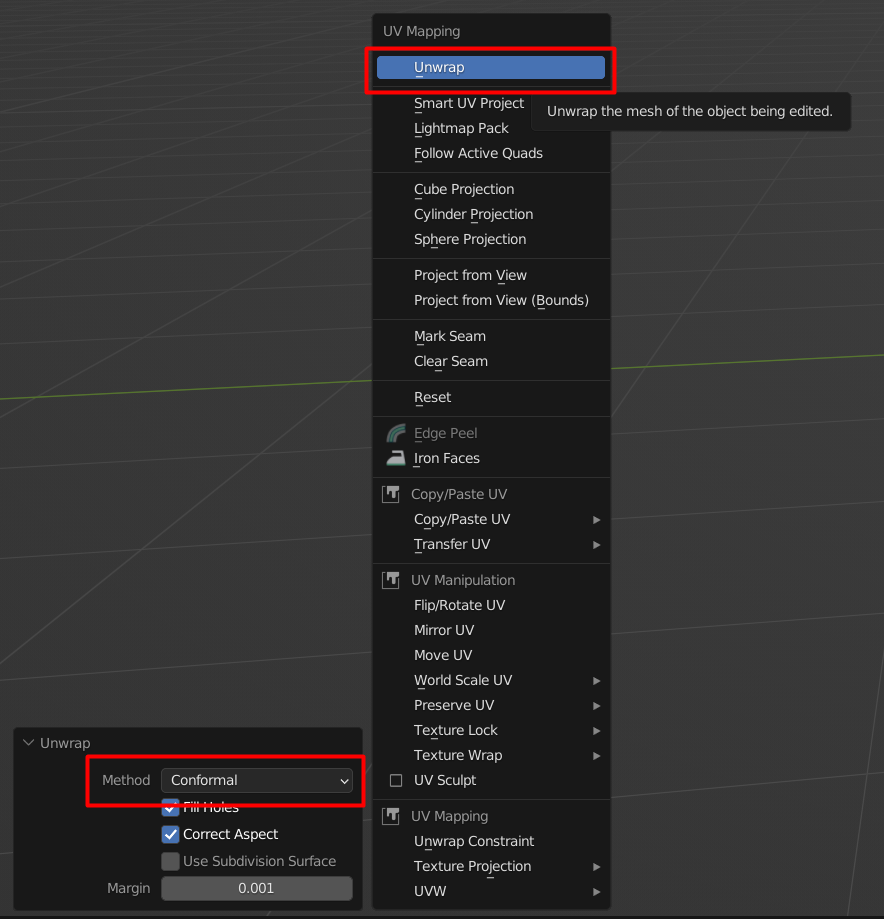
For unwrapping, I use Blender’s standard tools. First, I manually mark edges that I want to be a UV seam, then select all the faces of the model > Unwrap.
I tend to change my Unwrap Method to Conformal as it works better for geometric shapes, whereas Angle Based tends to work better for organic shapes.
You can speed up this process when marking seams by selecting your sharp edges (Shift + G) and marking them as UV seams in one action. Using the above method will get you 90% of the way there, but there’s always a bit of cleanup needed.
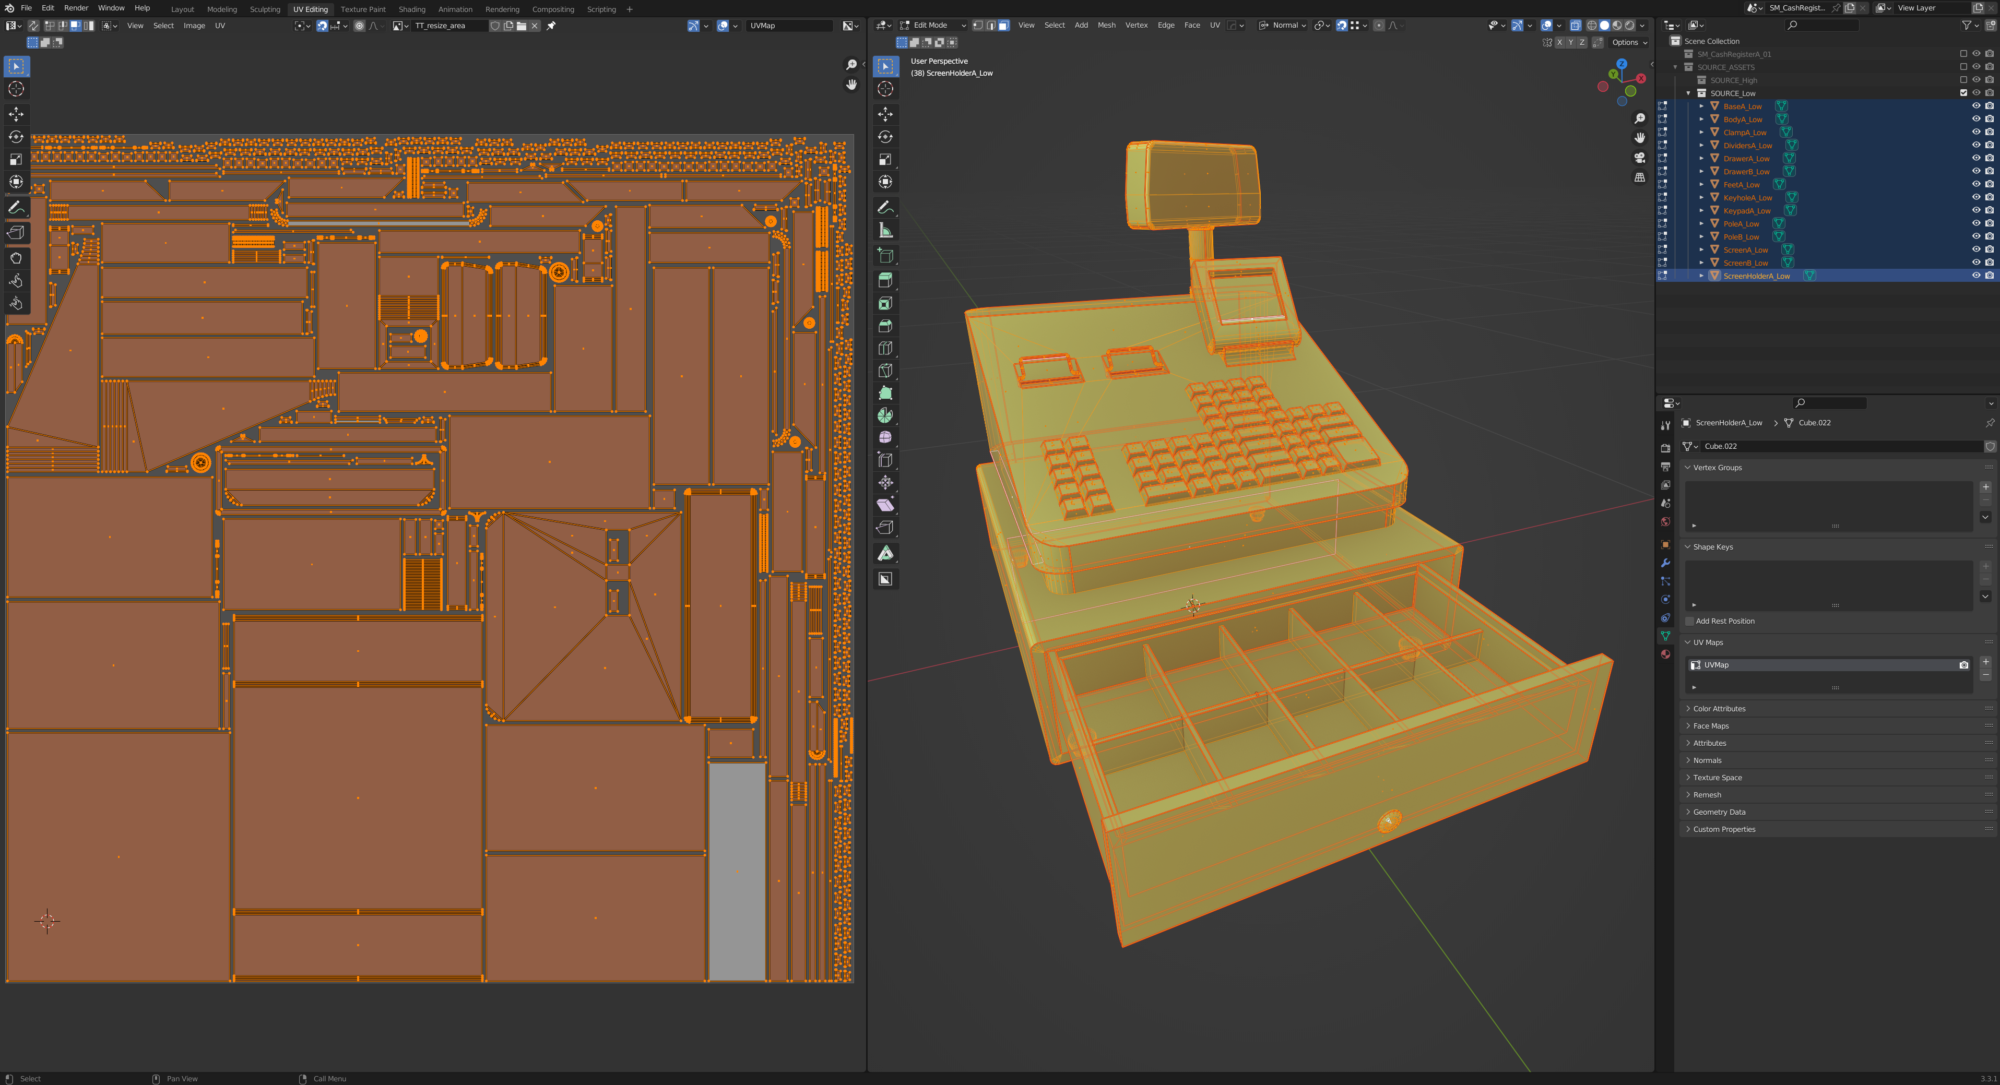
For UV packing, I use UVPackmaster. It costs money, but the time it saves you is worth it. For this project, I was aiming for a texel density of 1024 Pixel Per Metre.
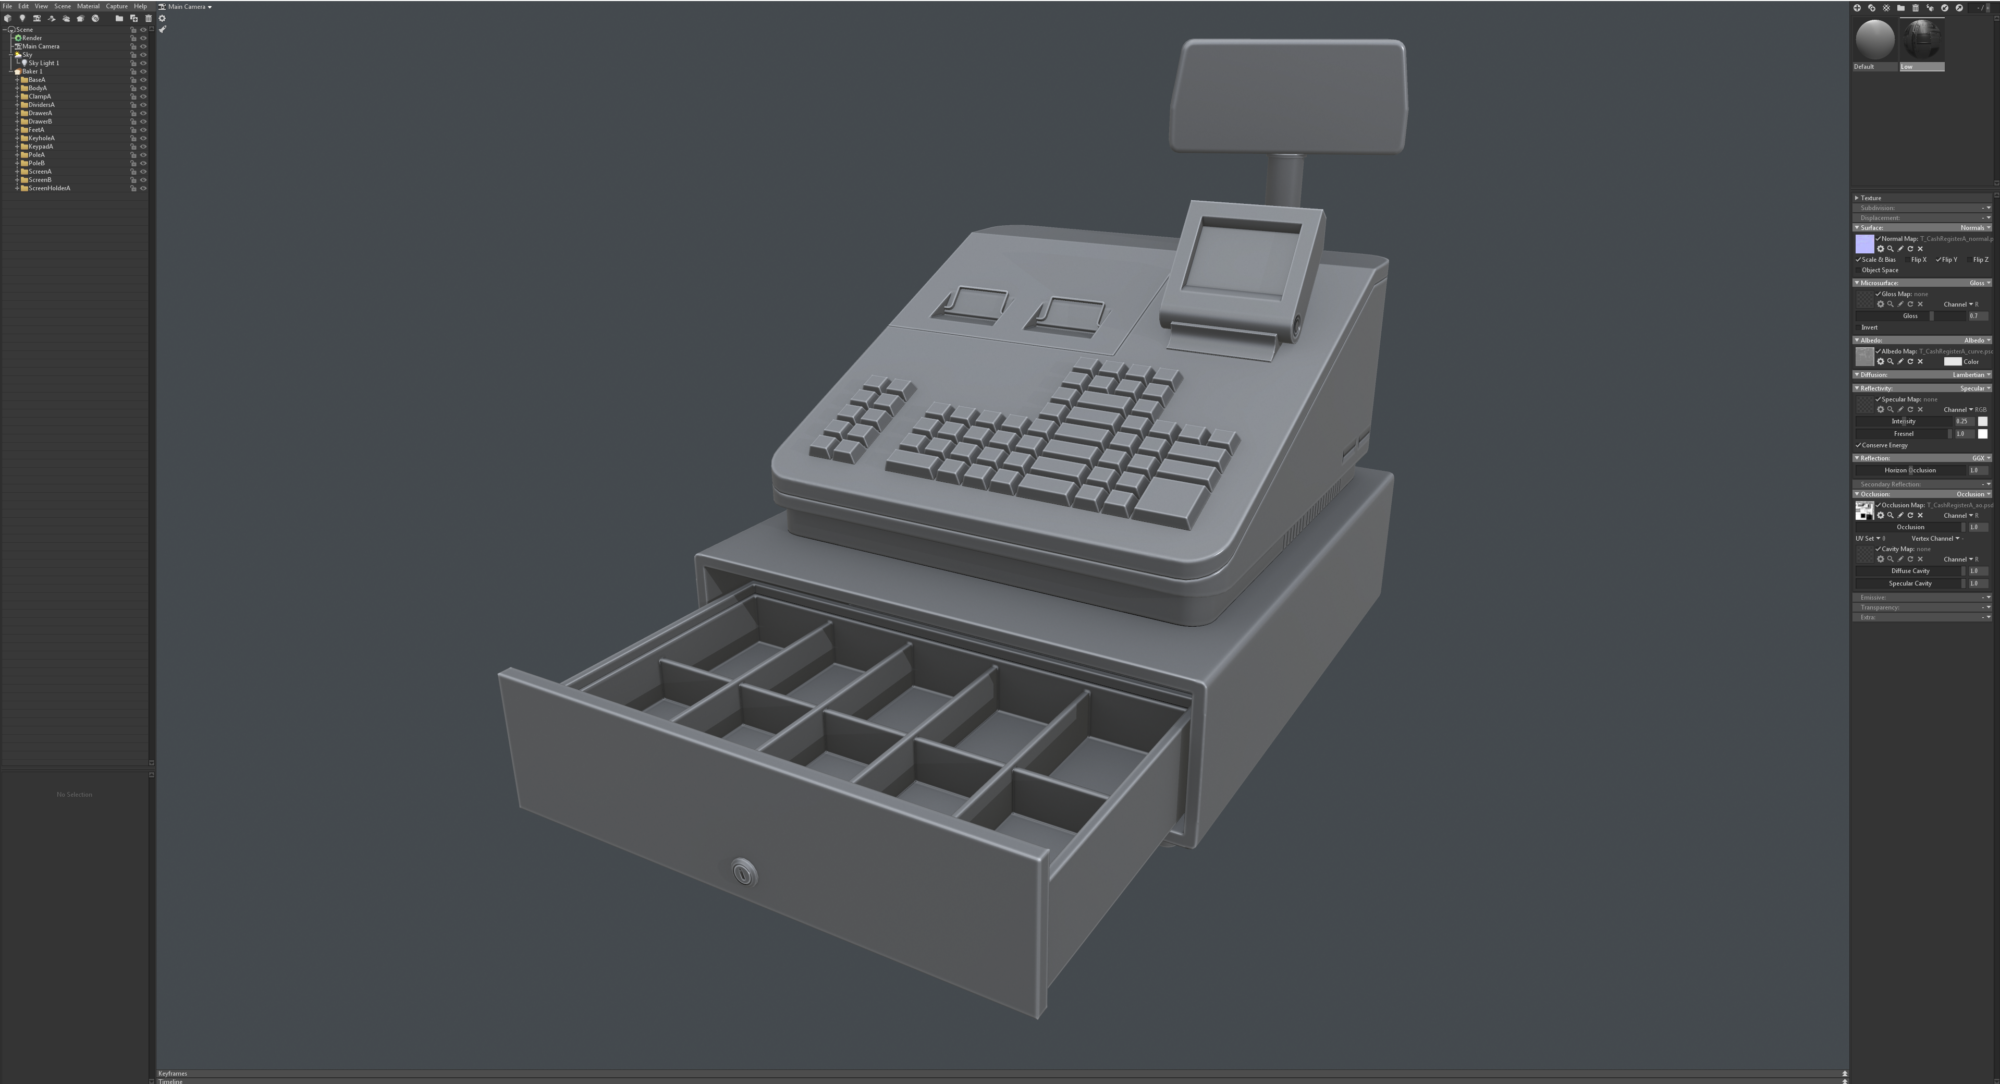
For baking – I use Marmoset Toolbag. While it’s an extra program and cost, I prefer the additional control you get. I typically baked a Normal Map, Curvature Map & Ambient Occlusion Map in Marmoset.
With my prop baked, I move into Substance painter to begin texturing, where I bring in the FBX file plus Normal Map, Curvature Map & Ambient Occlusion Map I baked in Marmoset Toolbag. Once I’ve assigned the relevant source textures. I bake the remaining source textures in Substance Painter (World Space Normal Map, Position Map & Thickness Map). I could have baked these in Marmoset as well. Still, there may be some differences between the way Substance Painter & Marmoset bakes these images, and because Smart Materials rely on these maps heavily, I prefer to keep using what has served me well for so long.
One time-saving tip regarding texturing assets is to save a copy of your last painter file as a basis for your new file, then swap out all the relevant source assets. It’s a lot quicker than starting from a blank scene, and if you’re texturing in a repetitive way, as I do when working on environments, it gives you a great base to start.
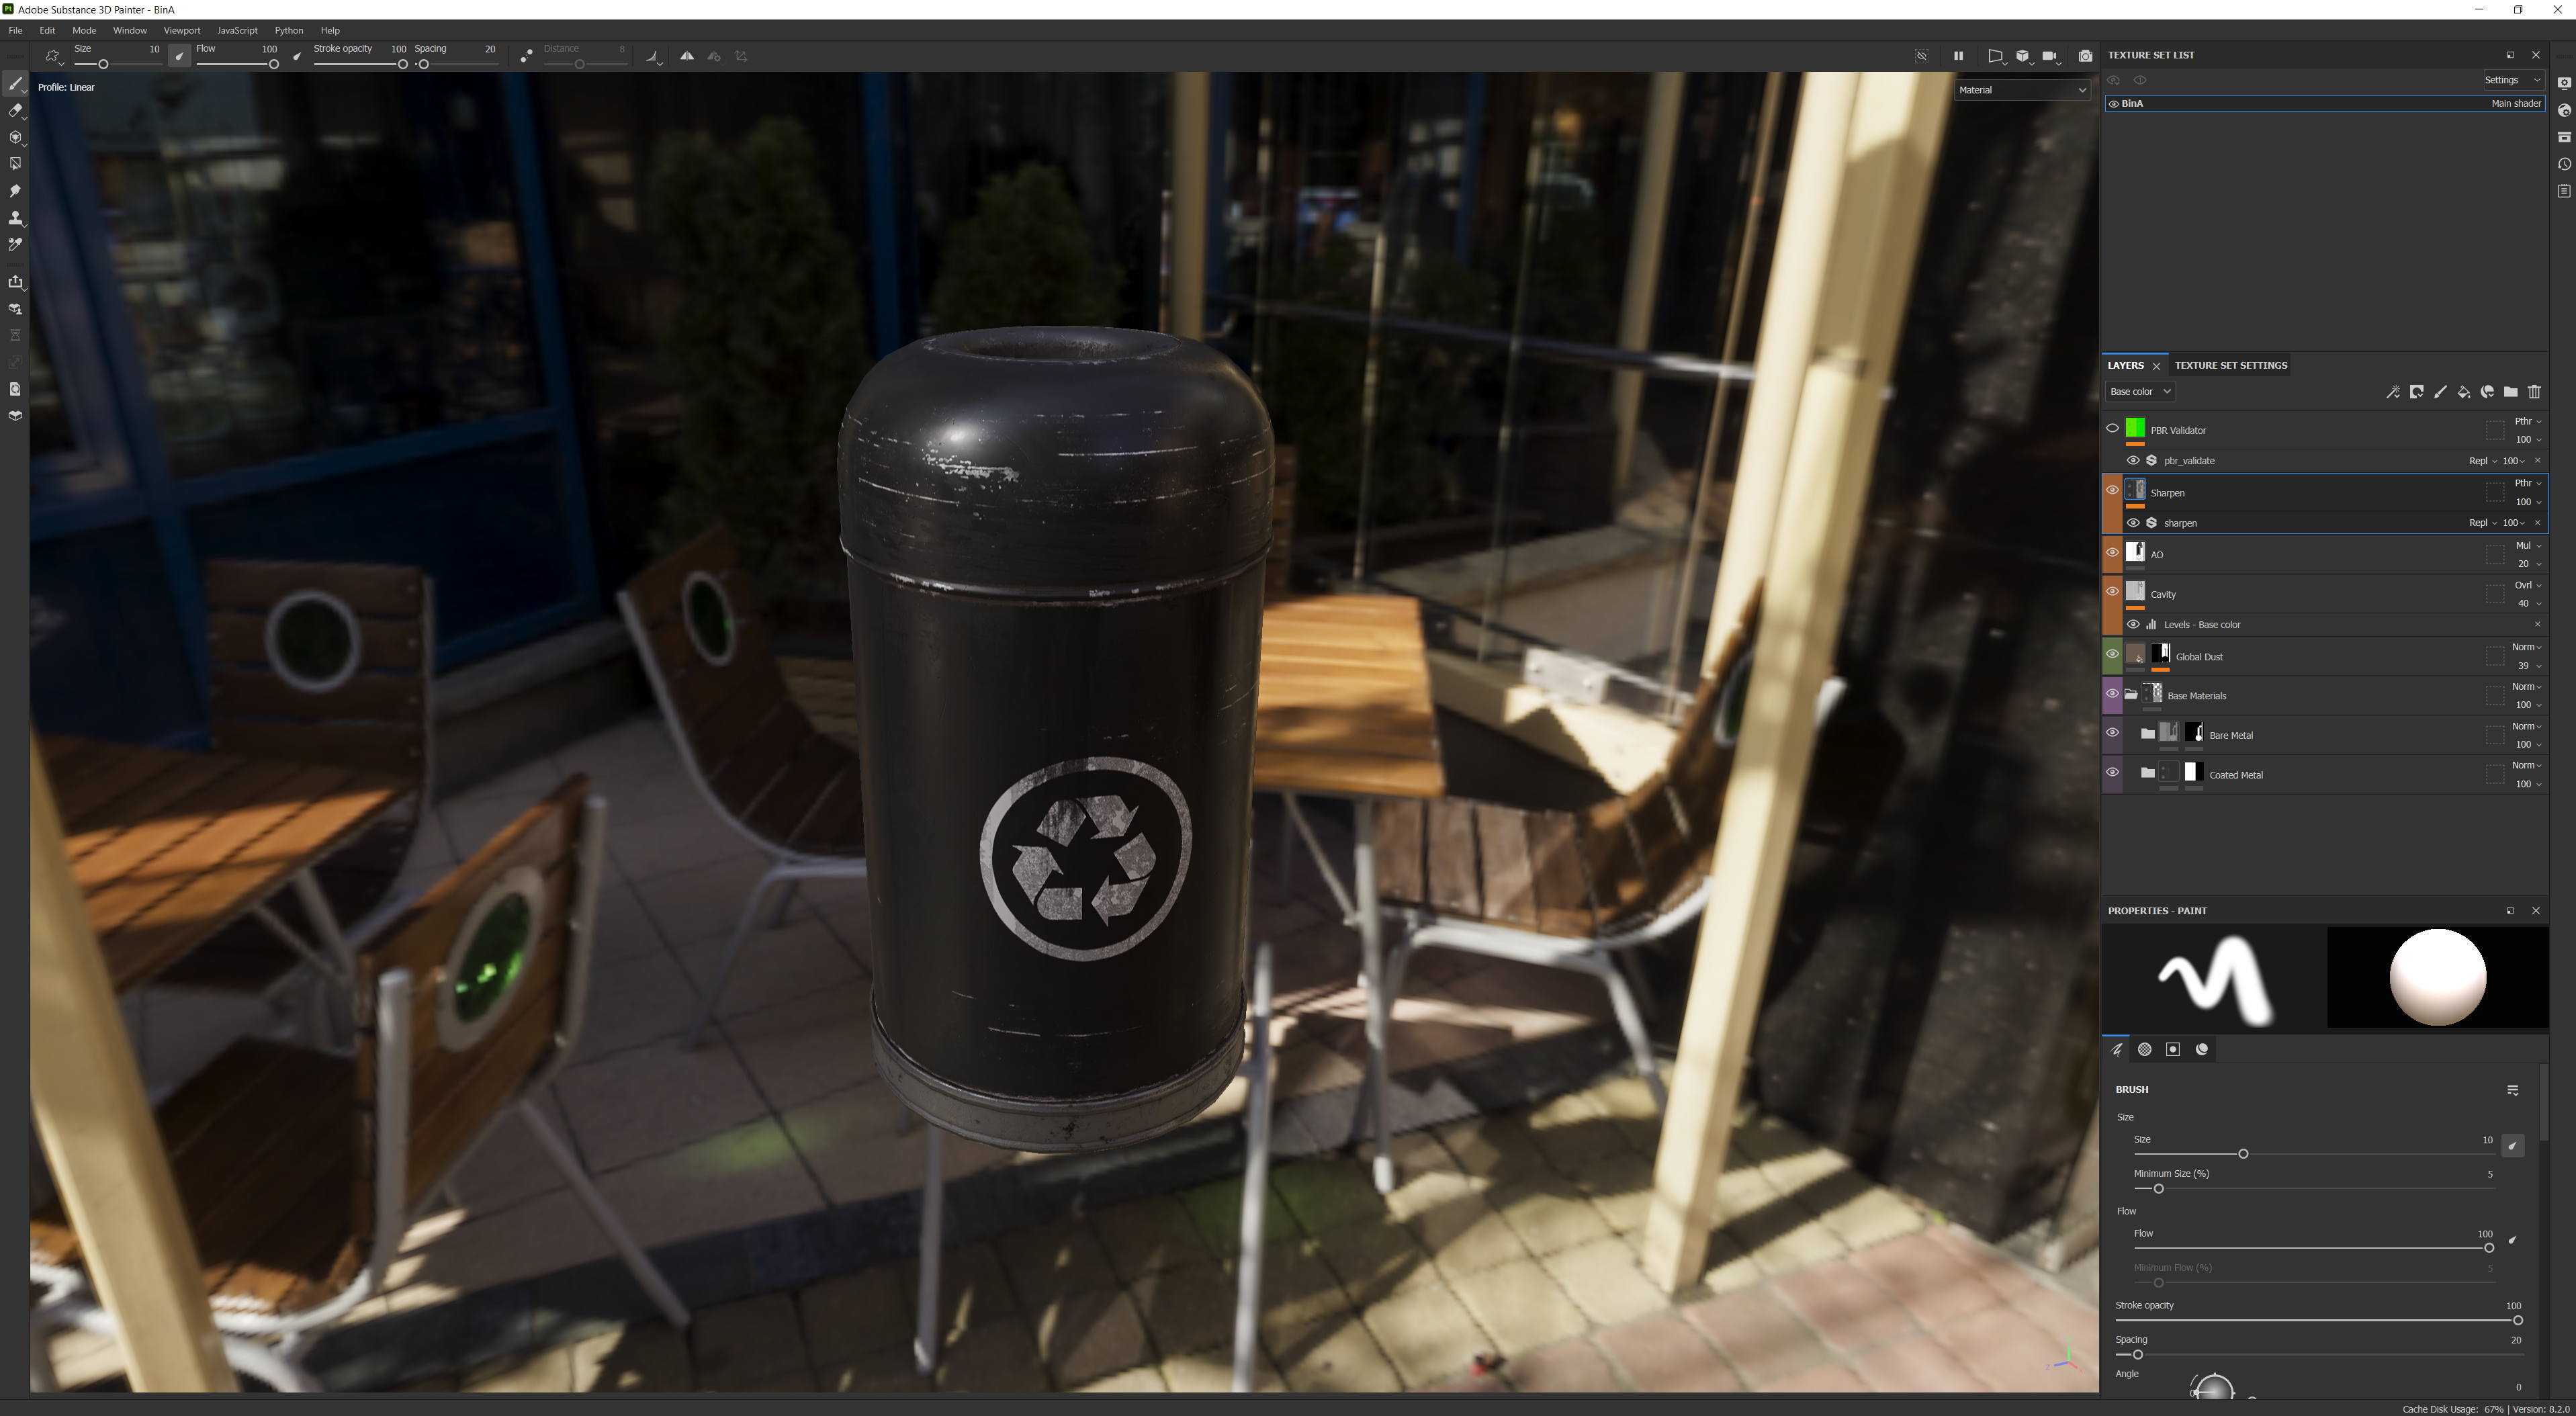
If I’m starting a painter file from scratch, every asset I do always tends to have the same set of top layers, so I set them up first:
- Curvature Map (Set to Overlay generally at 20% – 40% opacity)
- AO Map (Set to Overlay generally at around 5% – 20% opacity)
- A Passthrough Sharpen filter over the whole texture that I adjust constantly based on personal preference, but I usually have it around 0.2 – 0.4.
When texturing assets, I always tend to run through the same steps. I always start by setting up base materials for all of the components of the assets. Usually focusing on what the asset would look like close to factory new. For this, I use materials if available, but sometimes I’ll set flat color, roughness & metalness values to get a base that I can modify later.
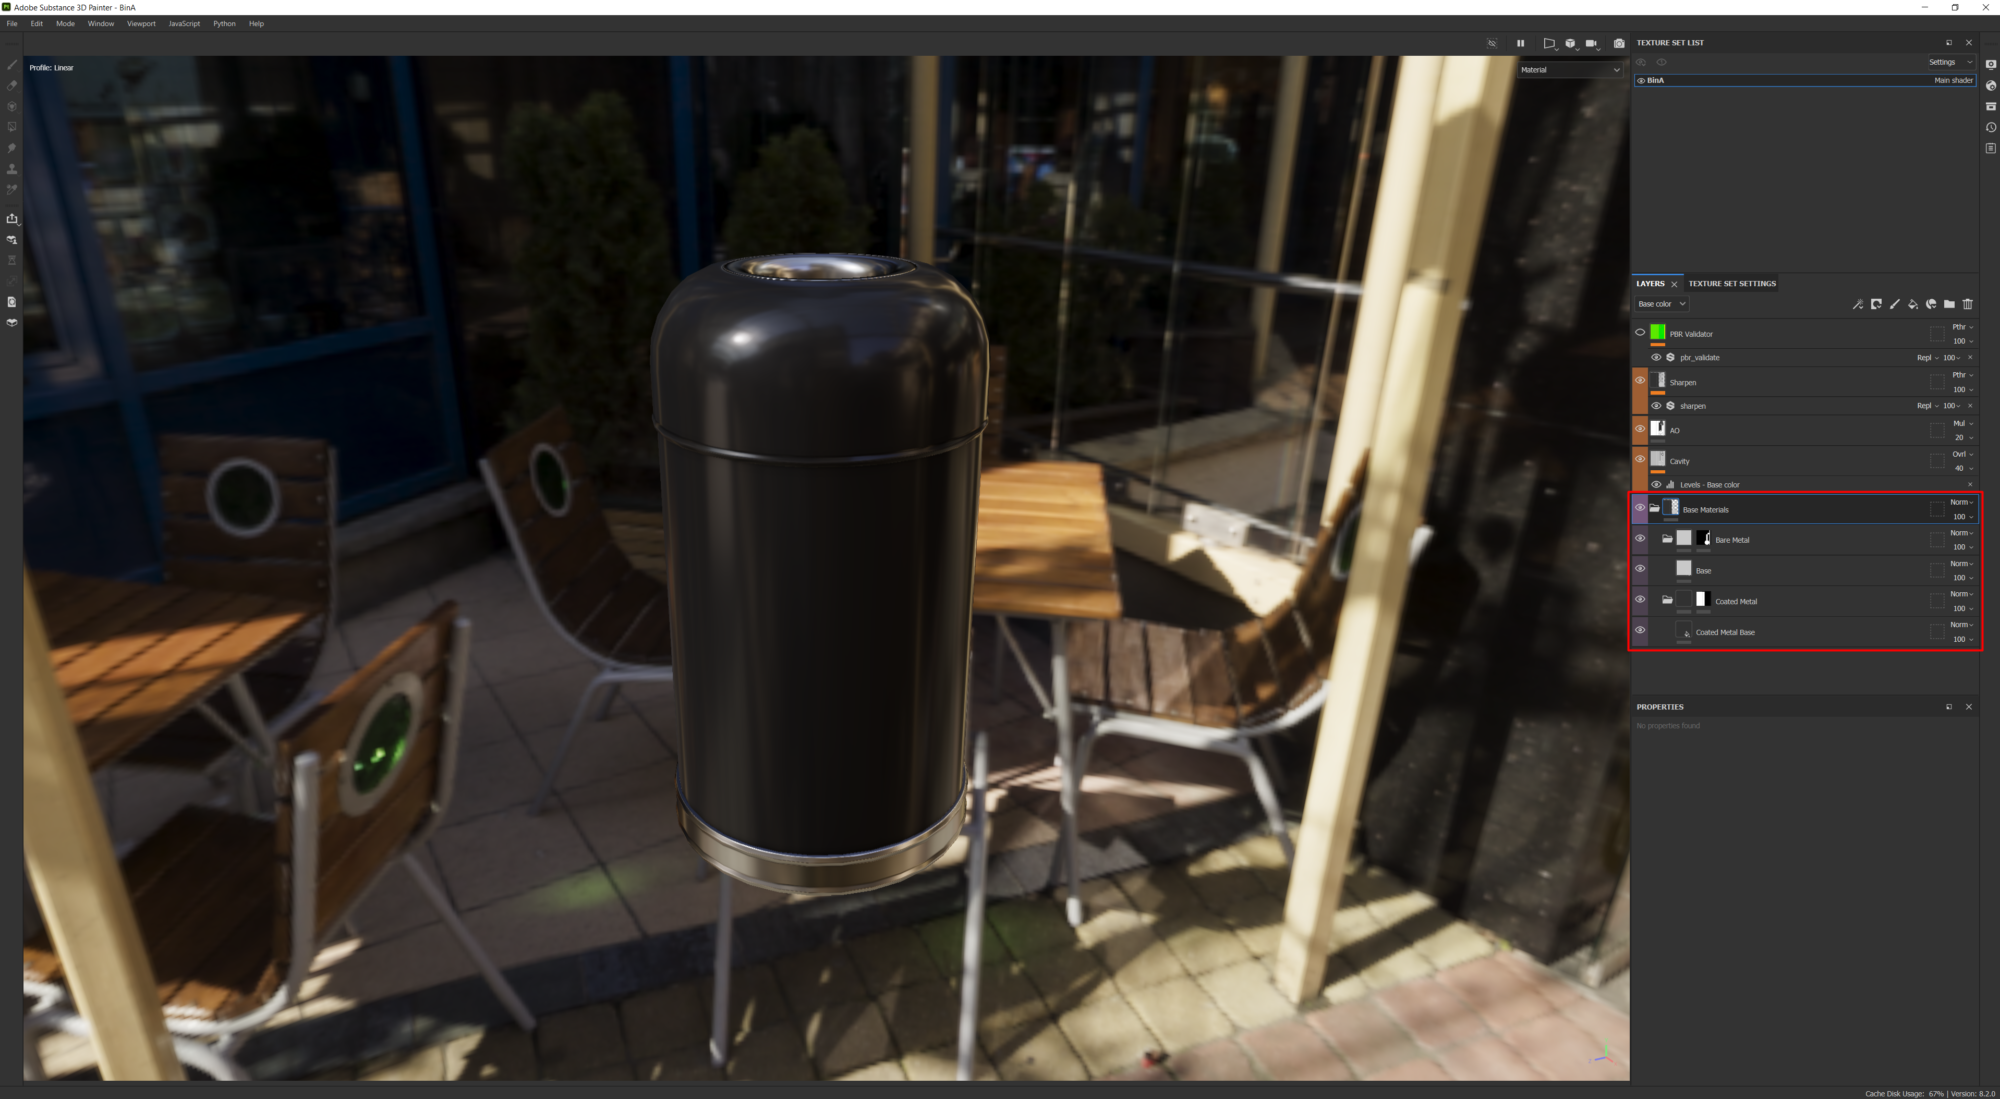
Next, I will do a localised weathering pass for each material on the prop. This type of weathering is inside a folder, only affecting the relevant material.
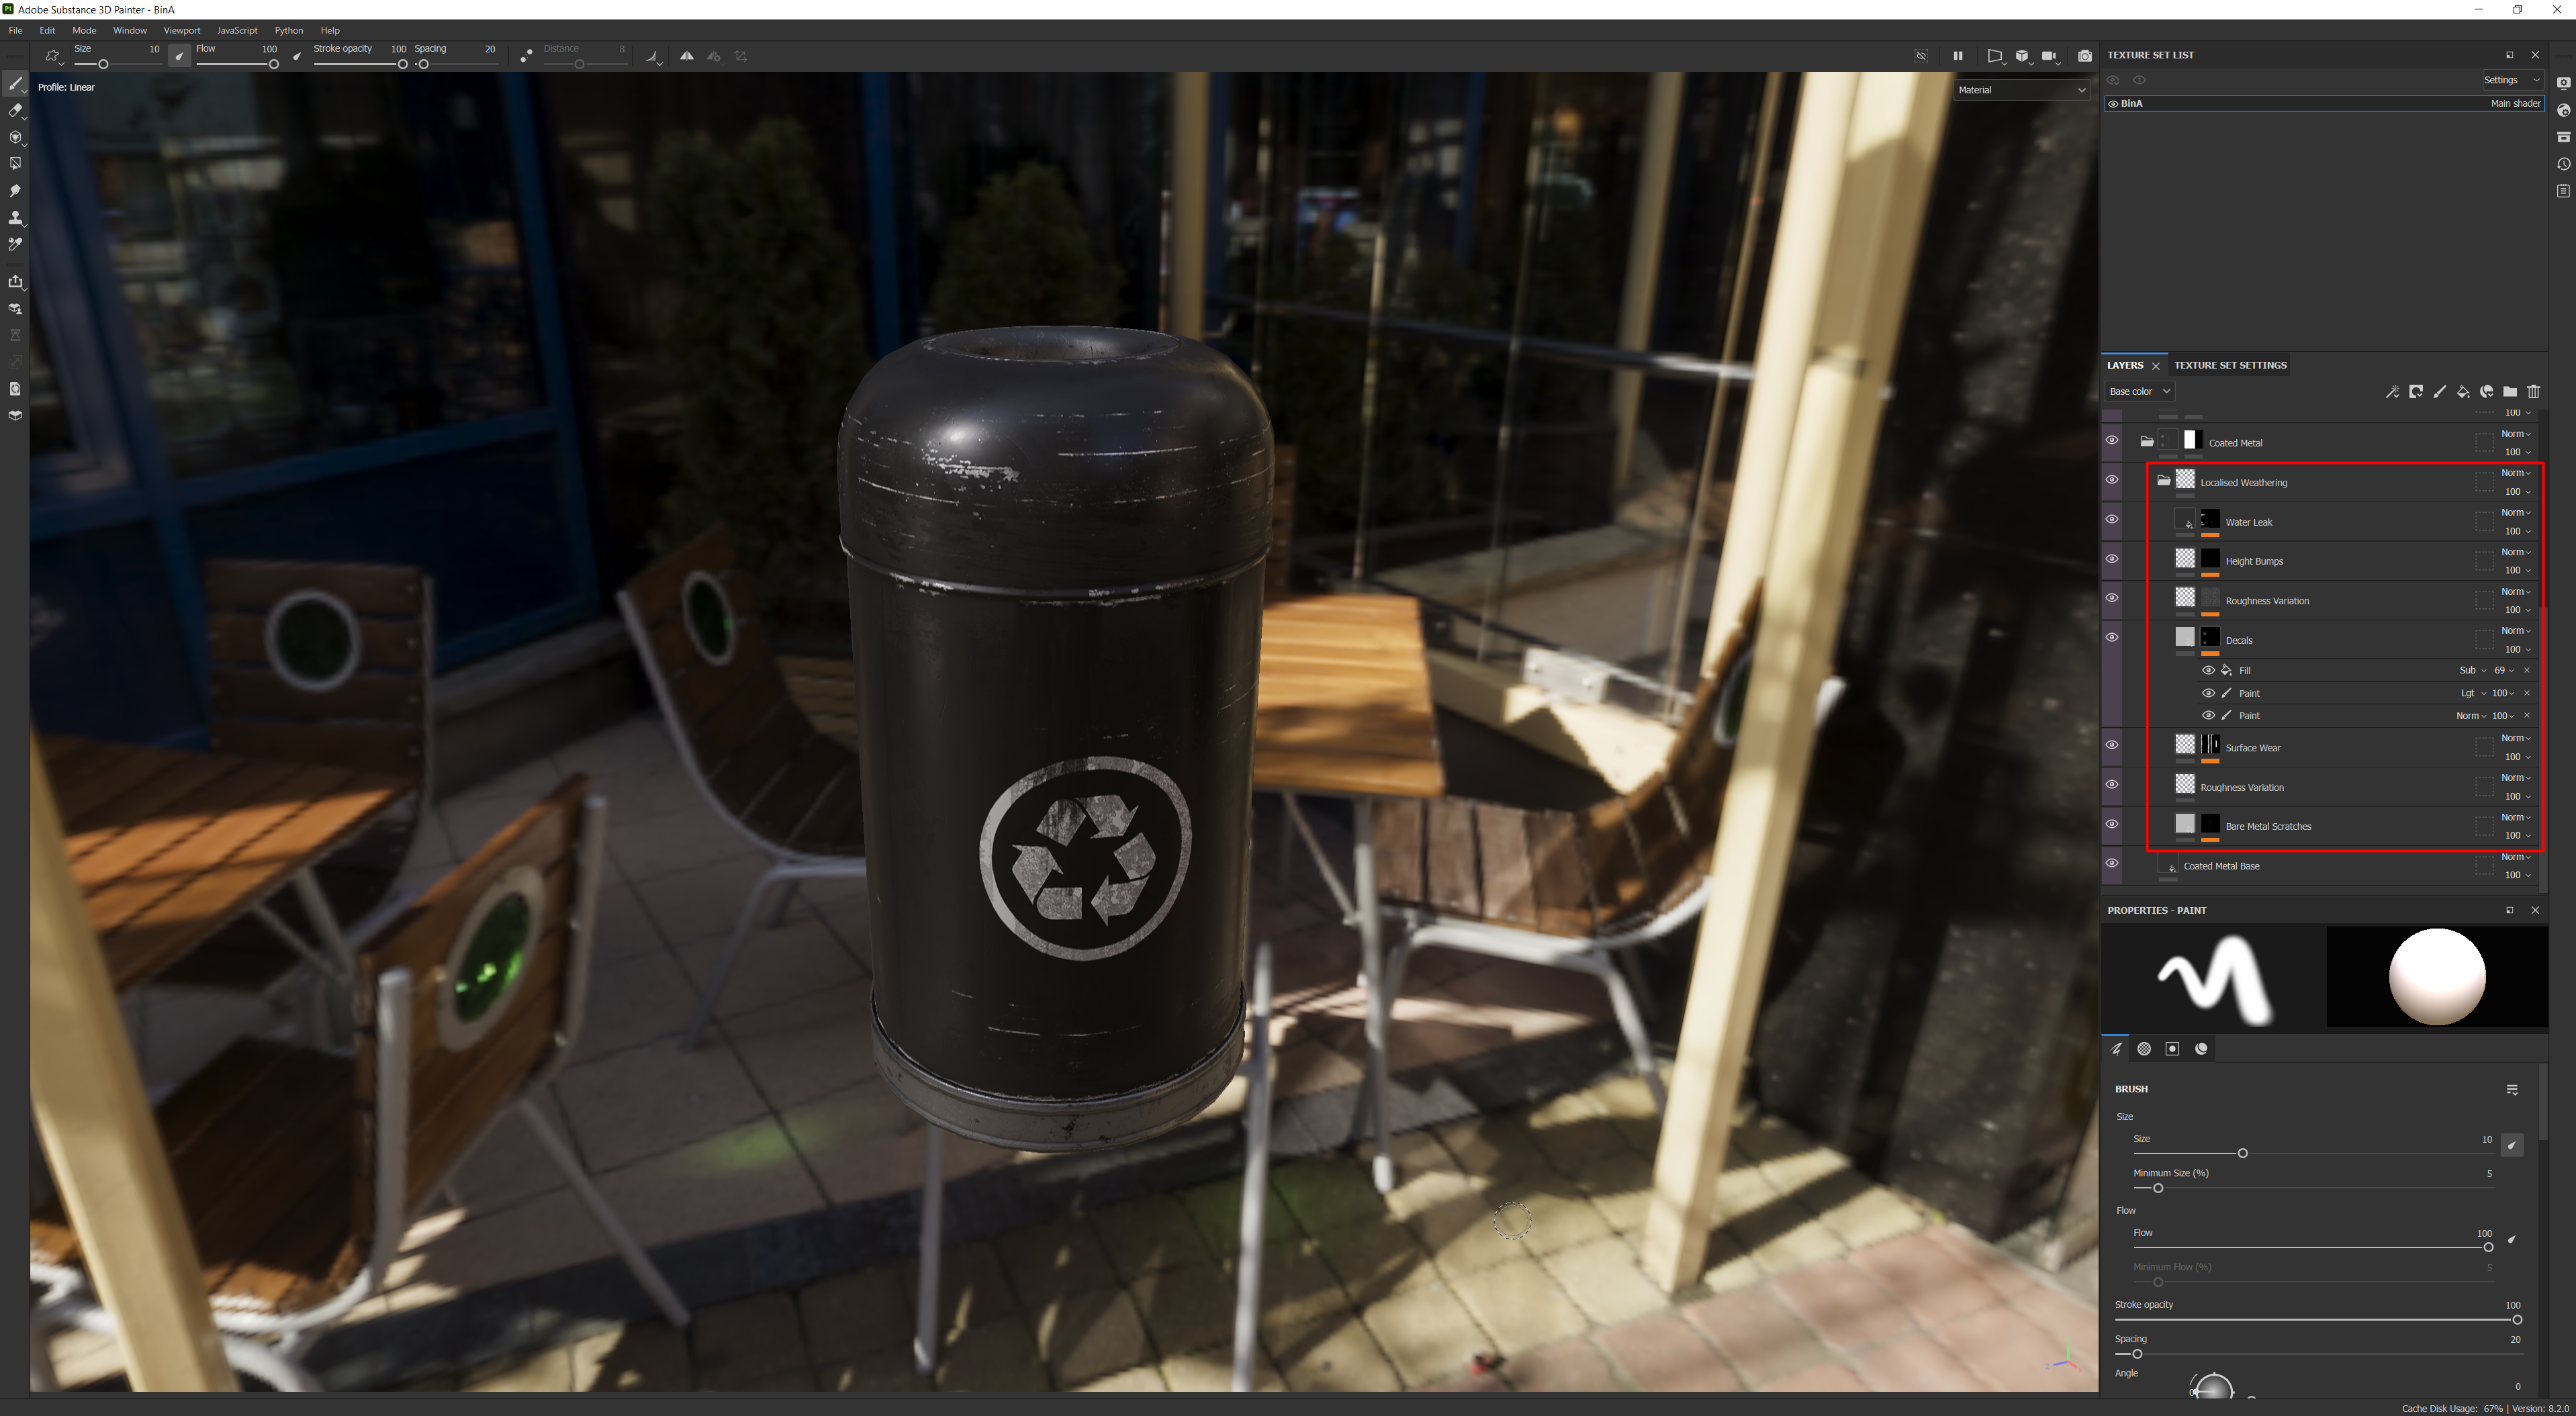
Finally, I’ll do a global weathering pass that affects all materials equally – things like Dust & Dirt – It’s often subtle. Still, this helps tie the asset together and makes all the different materials feel like they belong together as one consistent asset.
When the assets are complete, I’ll typically view them in an asset gym with neutral lighting and make adjustments if necessary.
I could take the assets a lot further than I do, but this is a conscious decision to be able to produce personal environments. As artists say, the final 20% of an asset takes the same amount as the first 80%. With this in mind, I avoid doing much hand-painting or local details as this is always the most time-consuming. You need to pick and choose where to spend your time, and if an asset requires more attention, then I will do that.
Structural Assets
Structural assets are a label I give to assets that are generally too big to warrant using a unique texture set. In my scenes, they’re often walls, floors, ceilings, and roads. Hence the structural tag, but there are undoubtedly other assets that also fall into this category.
When it comes to the final production of a structural asset, nine times out of ten, the geometry I modelled for the Whitebox version is also good enough for the final asset because I spend quite a bit of time on these at the Whitebox level.
The structural assets are textured in this particular scene using World Aligned Textures. Therefore they don’t require UVs other than Lightmap UVs, which I create using the same techniques I use on props.
Towards the end of the project, when I’m reasonably satisfied that the structural assets don’t require any modifications, I add edge loops every 20cm on all of the main structural assets to get a lot of control over vertex painting for material blending. Every 20cm is potentially excessive, but it’s OK to dial it up for personal projects.
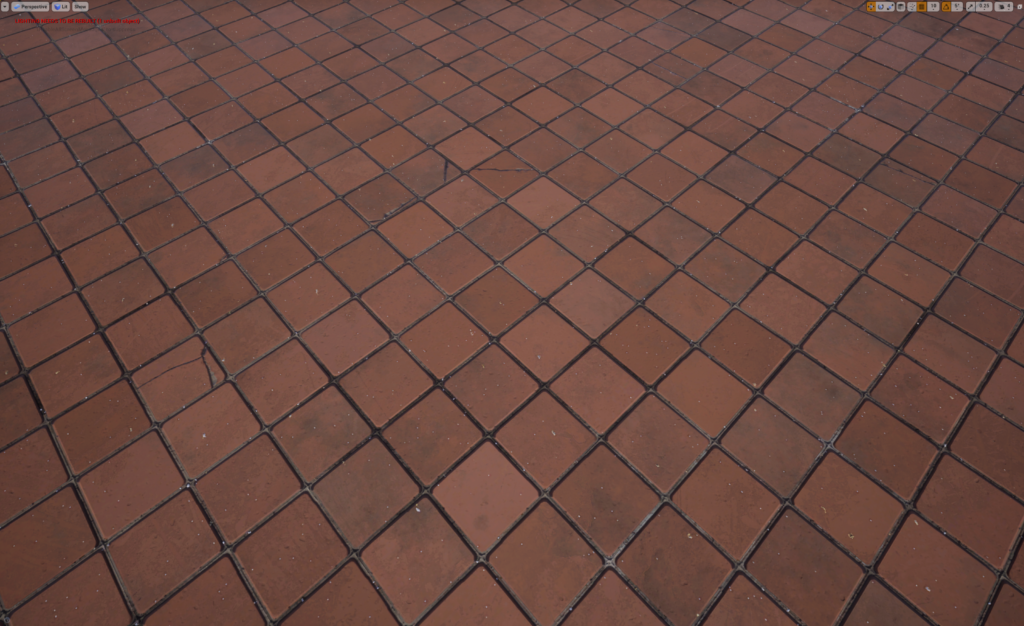
The shaders applied to the Structural Assets in this project followed a similar structure with slight variations between walls & floor. So, first, I’ll review the floor shader and then discuss the changes I made to the walls.
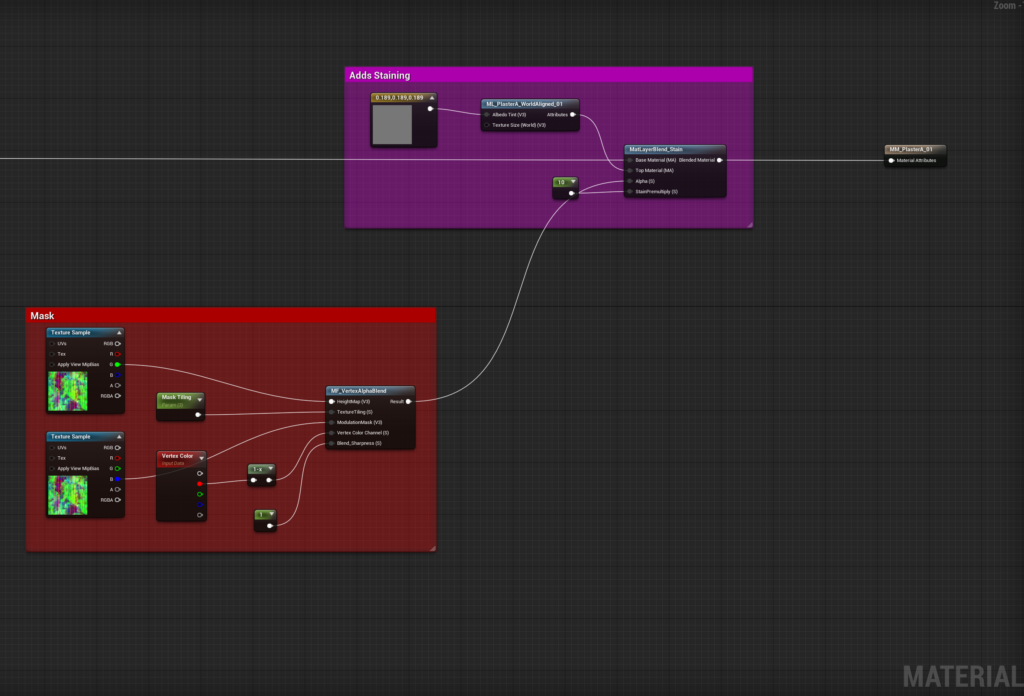
Like my method for texturing props, I always start with the cleanest / undamaged tiling texture as a basis and then build up the weathering from there. Therefore I created two main texture sets for the floor, an entire set of tiles and a damaged set. (I’ll talk about creating tilling textures in the next section). Then, in Unreal, I set up a shader to blend between them using the Red Vertex Channel, using a noise texture to break up the blend so it looks more natural.
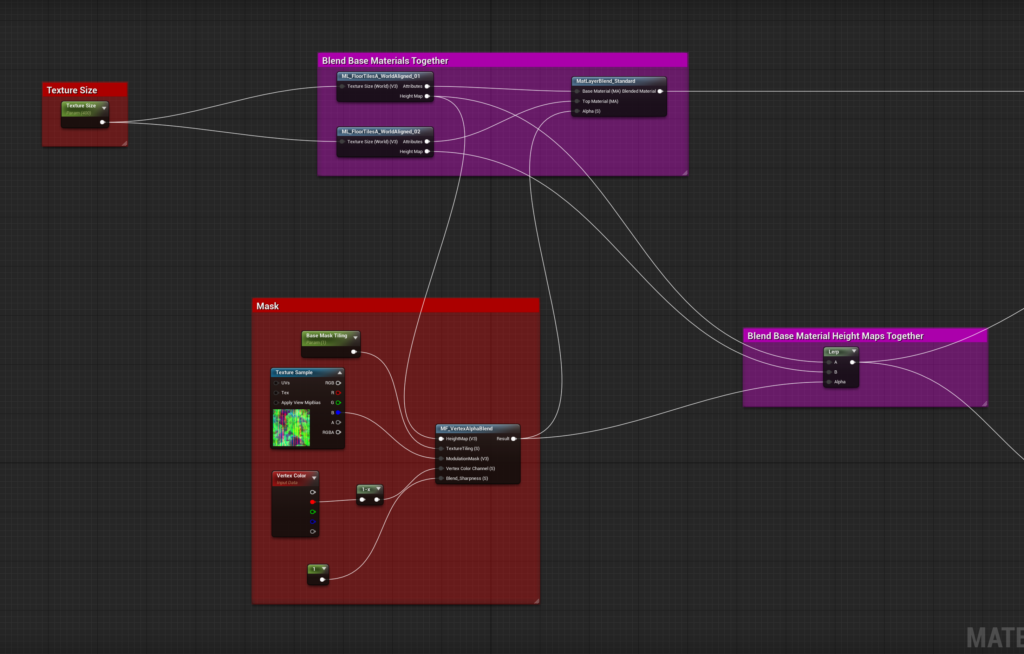
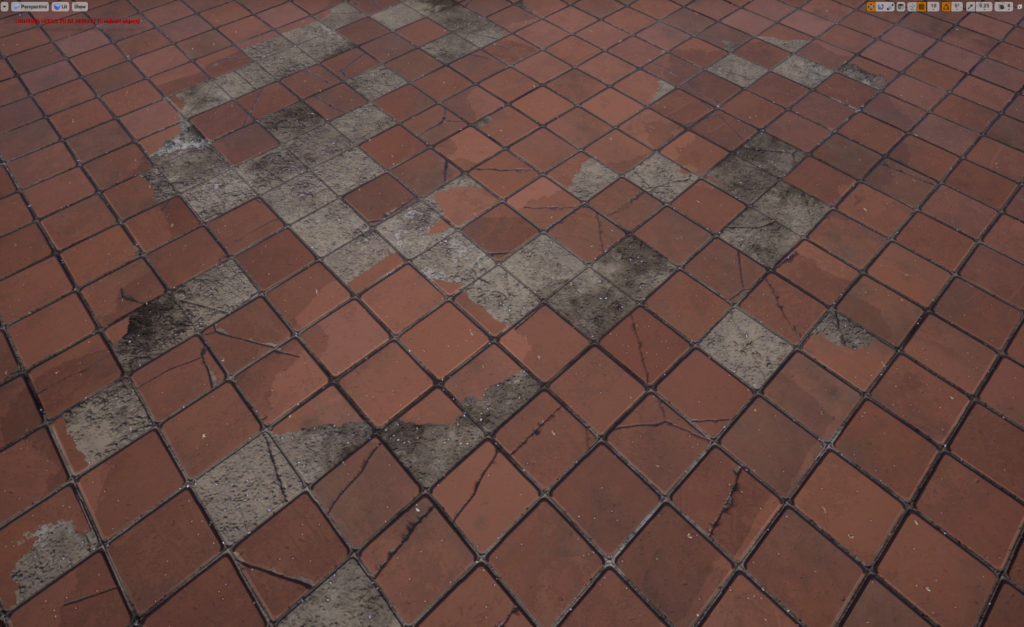
Next, I added a material layer representing tiling dust – this is painted into the mesh using the green vertex channel and again with a similar noise breakup as above. Furthermore, it takes influence from the height information so that dust will accumulate in the crevices first.

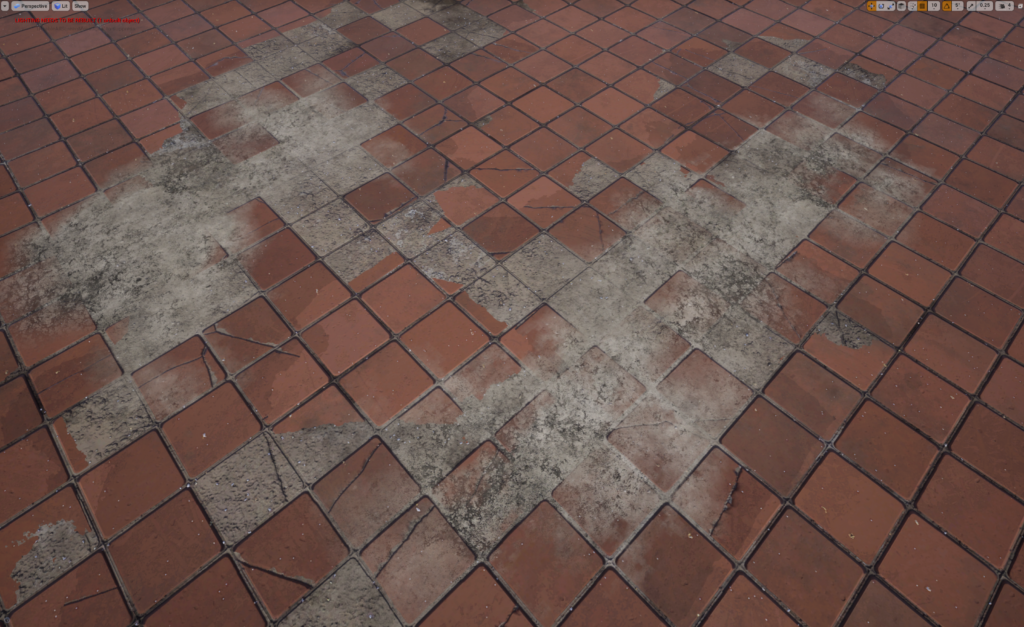
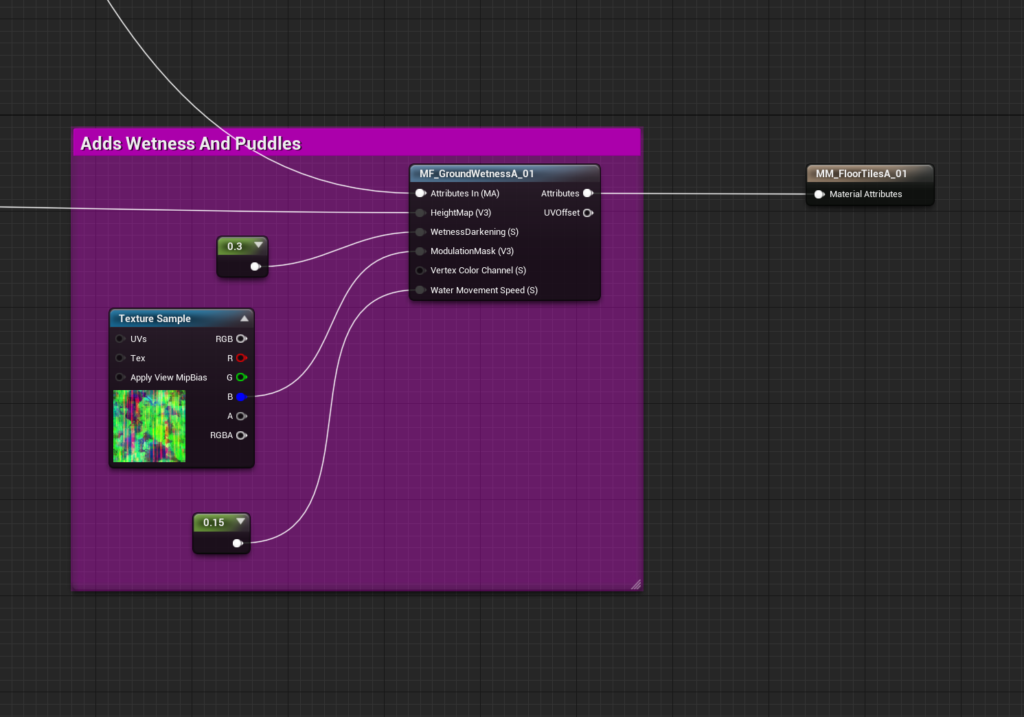
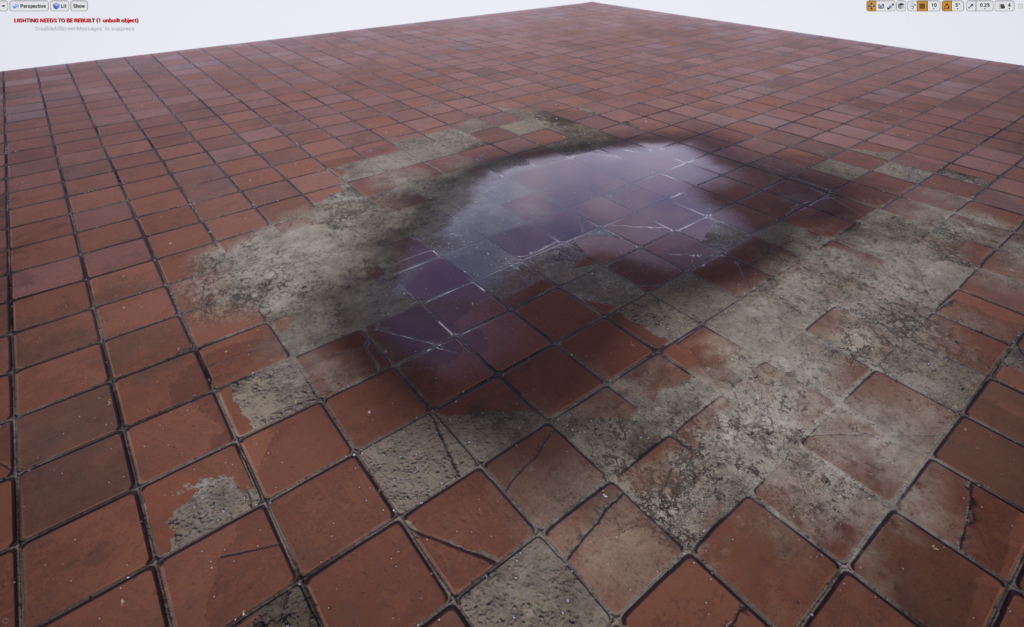
Finally, I finished the shader by creating a material layer that added wetness as a top layer, again taking influence from the height maps of all the layers underneath.
For the wall shaders, it ditches the dust and the wetness material layers as they don’t make sense for vertical surfaces.
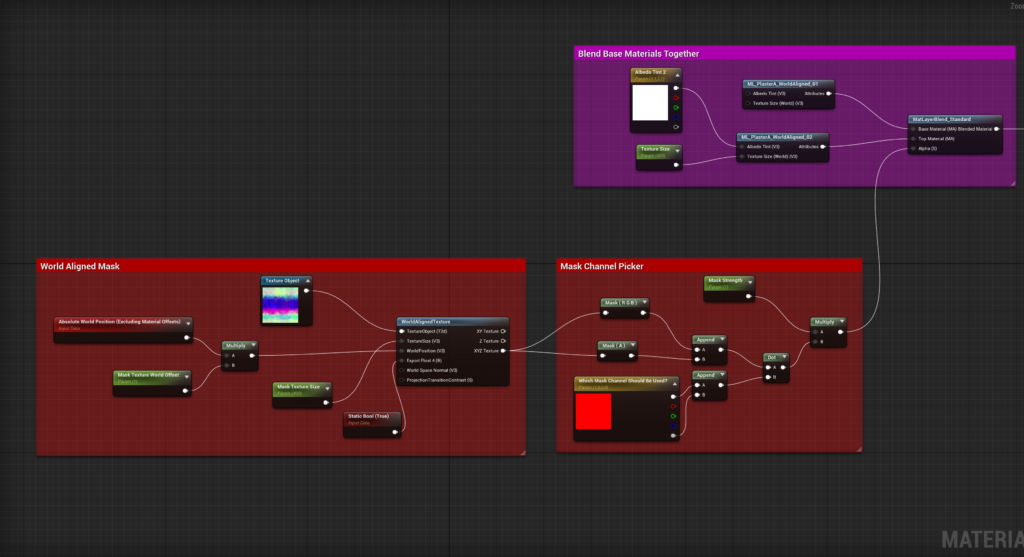
Finally, instead of manual vertex painting the blend between Material A & Material B, I decided to use a world-aligned mask to add continuity across all modular assets.
Tiling Materials
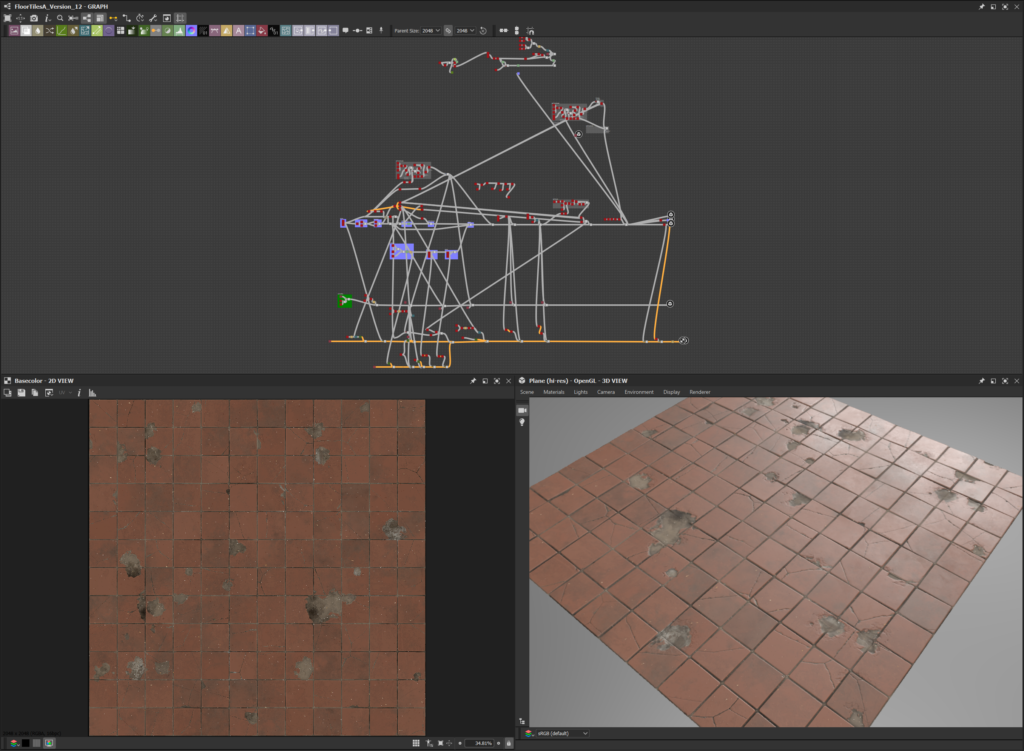
As with most artists these days, I created all of my tiling materials for this project in Substance Designer.
Out of all the materials I created for this project, I’m probably most pleased with the terracotta floor tiles. Great Substance Designer tutorials flood the internet, so I won’t go into too much detail about my Substance Designer workflow. I tend to follow the traditional workflow of focusing on the Height Map first, then the Roughness, and then Albedo Map.

In my experience, most people I know export textures directly from Substance Designer > Unreal Engine, but my workflow differs slightly, so it is worth explaining. Rather than exporting textures from Substance Designer, I publish an SBSAR (Substance Archive File) file from Substance Designer directly into my Substance Painter shelf directory. You can do this by Right Clicking the graph file name > Publish SBSAR File or Ctrl+P.
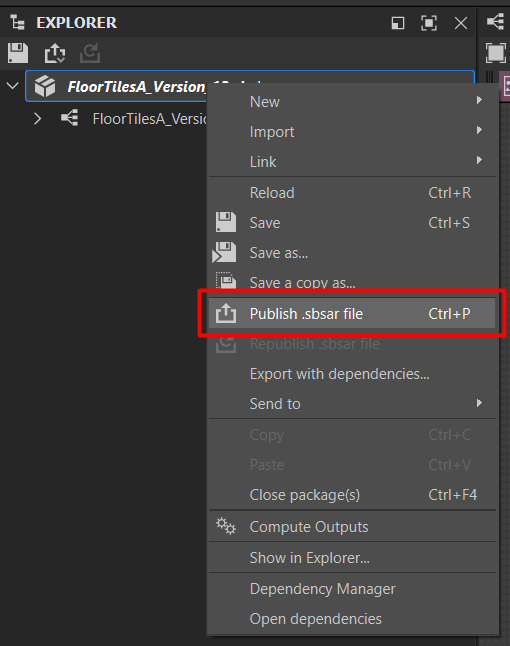
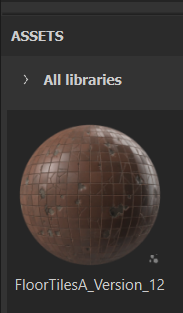
If you save the SBSAR file in the location of your Substance Painter shelf (Materials folder), it will automatically become available to use in Substance Painter.
From here, I have a template Substance Painter file set up with four planes representing 4x tiling materials, each covering 4m squared. I also have some scale characters standing above the planes, as it’s crucial to ensure details are the correct size for the area the material covers.
Each mesh has a separate material ID, as shown in the Texture Set List below, allowing me to do four variations of any texture set. I typically stick to two variations, but it’s nice to have the option available to add more without creating a new template file.
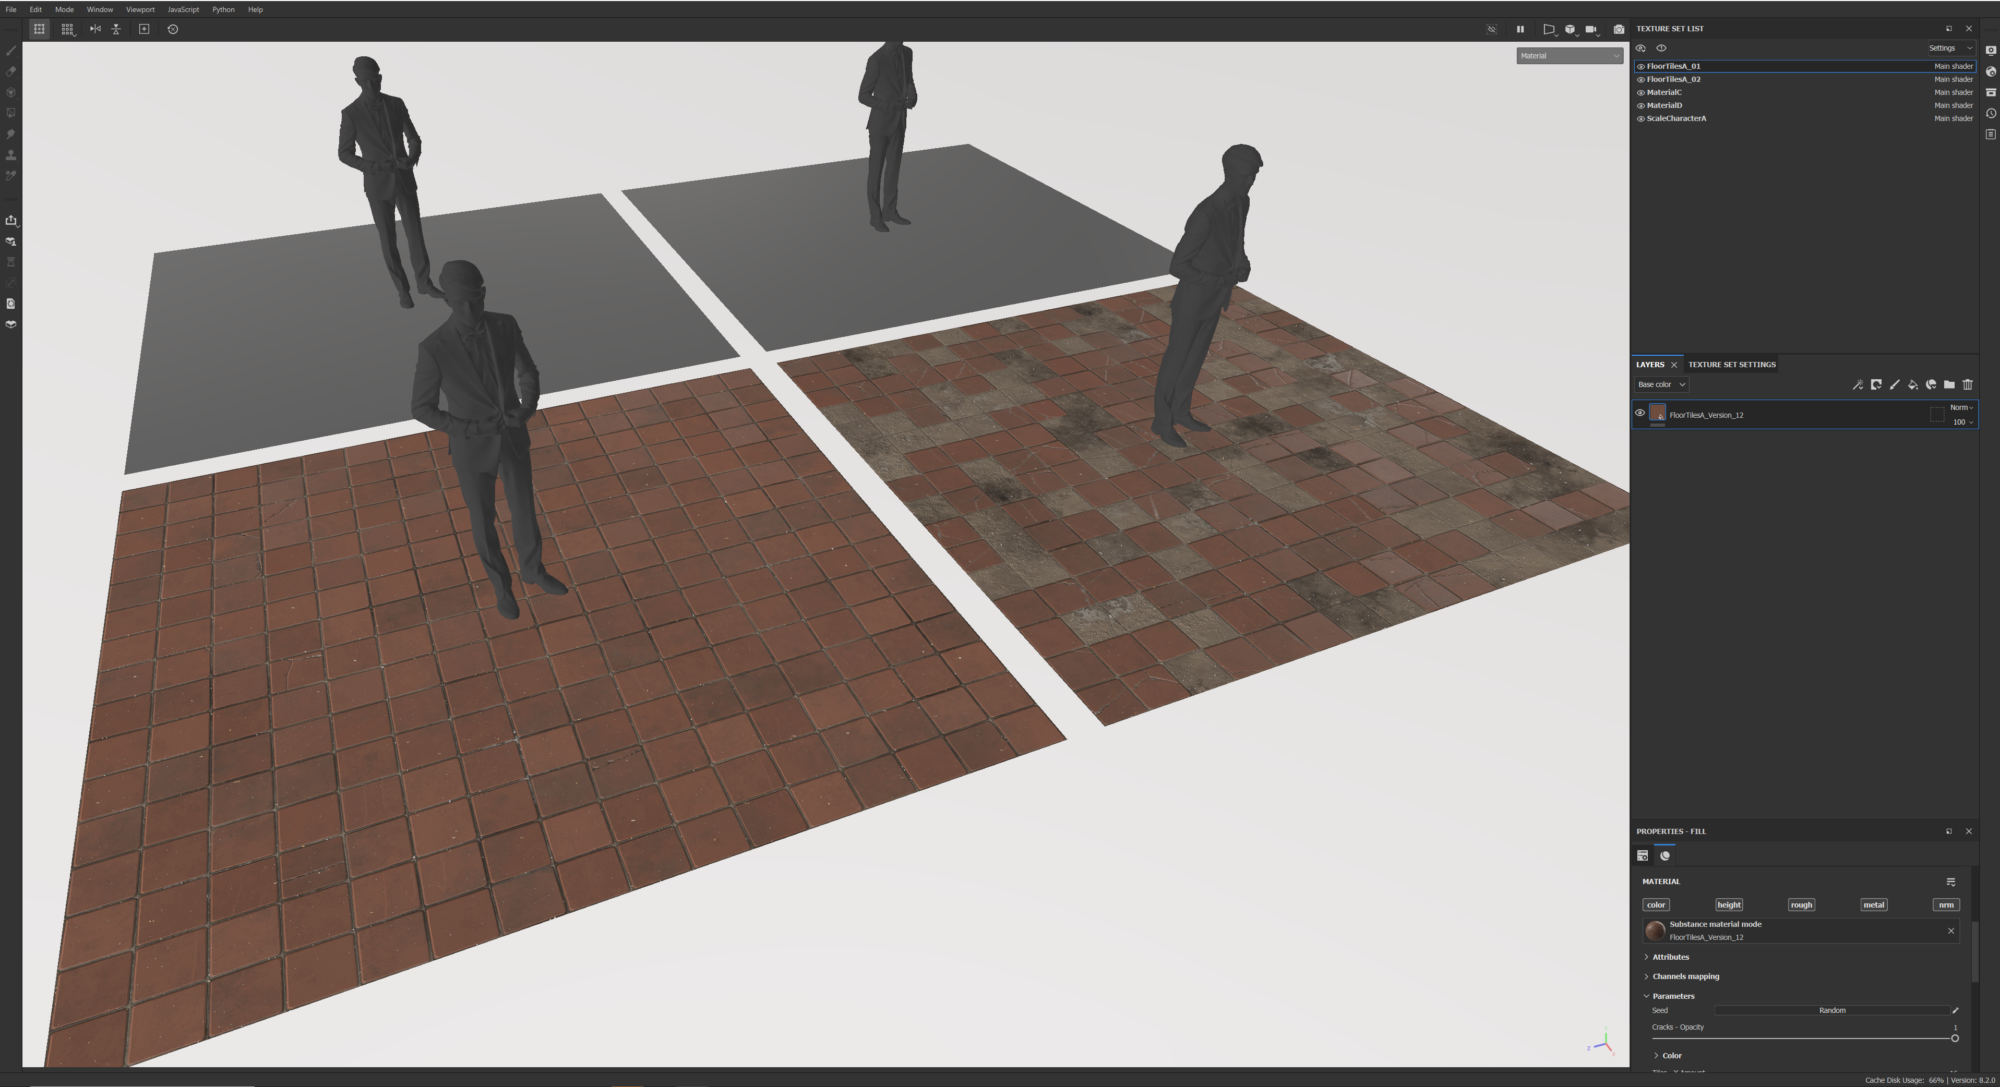
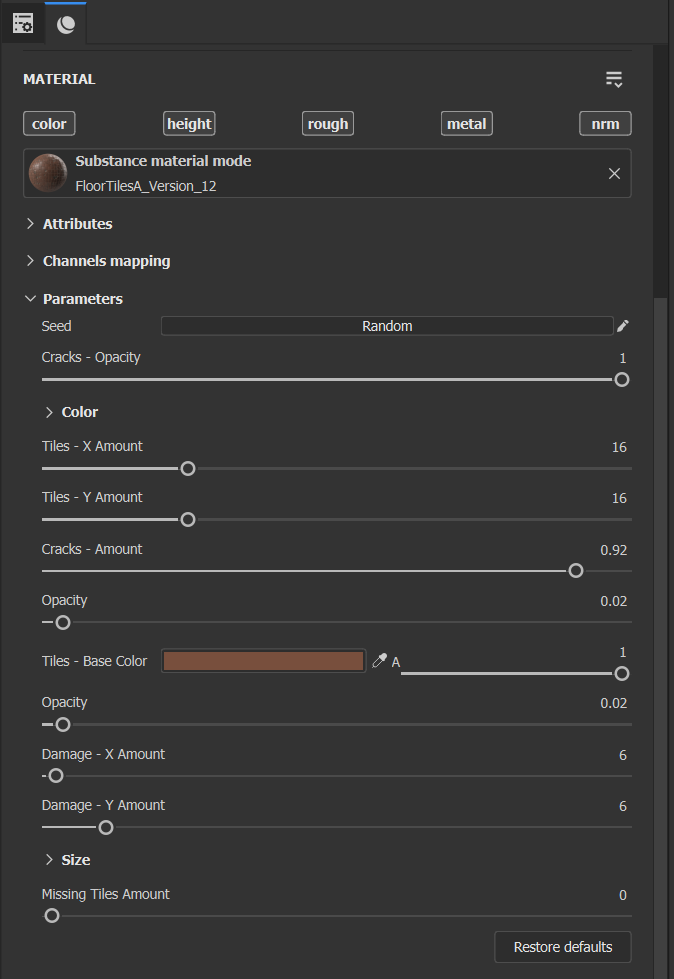
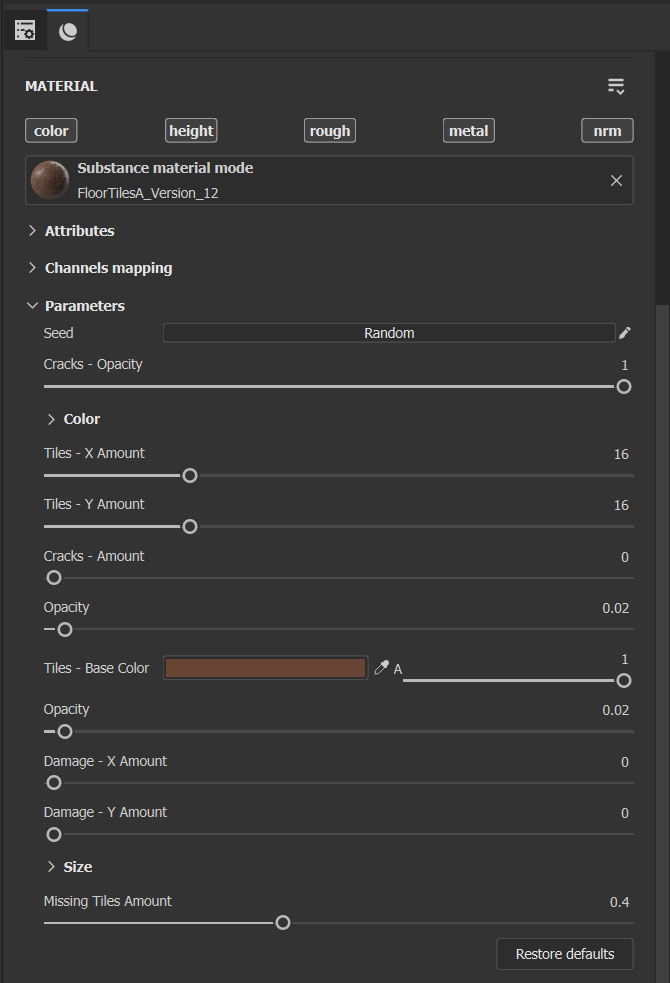
The materials on each plane are the same material node but with exposed parameters tweaked to create the variations.
There are a few reasons why I choose to use this workflow:
- I like that everything is getting exported the same way, whether it be Props, Materials or Decals.
- It allows me to change the material in a traditional handpainted way if I want to.
- I get to view all the material variations in the same environment and tweak them rather than viewing them one at a time or waiting to view them in Unreal Engine.
- I’m free to make variations without remembering values that work, should I screw up the Substance Designer graph.
- It allows me to blend in pre-existing substance Painter materials for further variation.
- The materials are available to be used during my standard asset texturing process.
I’ll often publish one of my materials to Substance Painter, which needs further tweaks once I see it in the viewport. To do this, I make the relevant tweaks in Substance Designer and then publish the SBSAR again, but this time as an incremental version, i.e. FloorTiles_Version02, etc.
The main reason I save incrementally is Substance Painter doesn’t refresh materials if the program is open. In contrast, a new material saved into the shelf will automatically populate, making it much faster. It is an annoying problem that would be great if the developers fixed it, but that said, it’s sometimes
lovely having the previous version for comparing against and making sure any changes you’re making are an improvement.
Hotspot Textures
Aside from unique bakes and tiling textures, the only other texturing workflow that I used was Hotspot Texturing. Hotspot Texturing is a method of quickly applying textures to geometry but matching faces to predefined rectangles. I first became aware of this technique through Valve Source Engine, but I’m sure many other developers use this technique as well.
For this project, Hotspot Texturing was an efficient way of quickly mapping the doorframes, window frames and other metal pieces, such as the roof.
I only made one texture set for this workflow, which was surprisingly quick. But, if I remember right, it was one of the textures that you produce quickly as a test, but you never return to, and it ends up staying unchanged for the rest of the project (You’d be surprised how much this happens, even in professional studios).
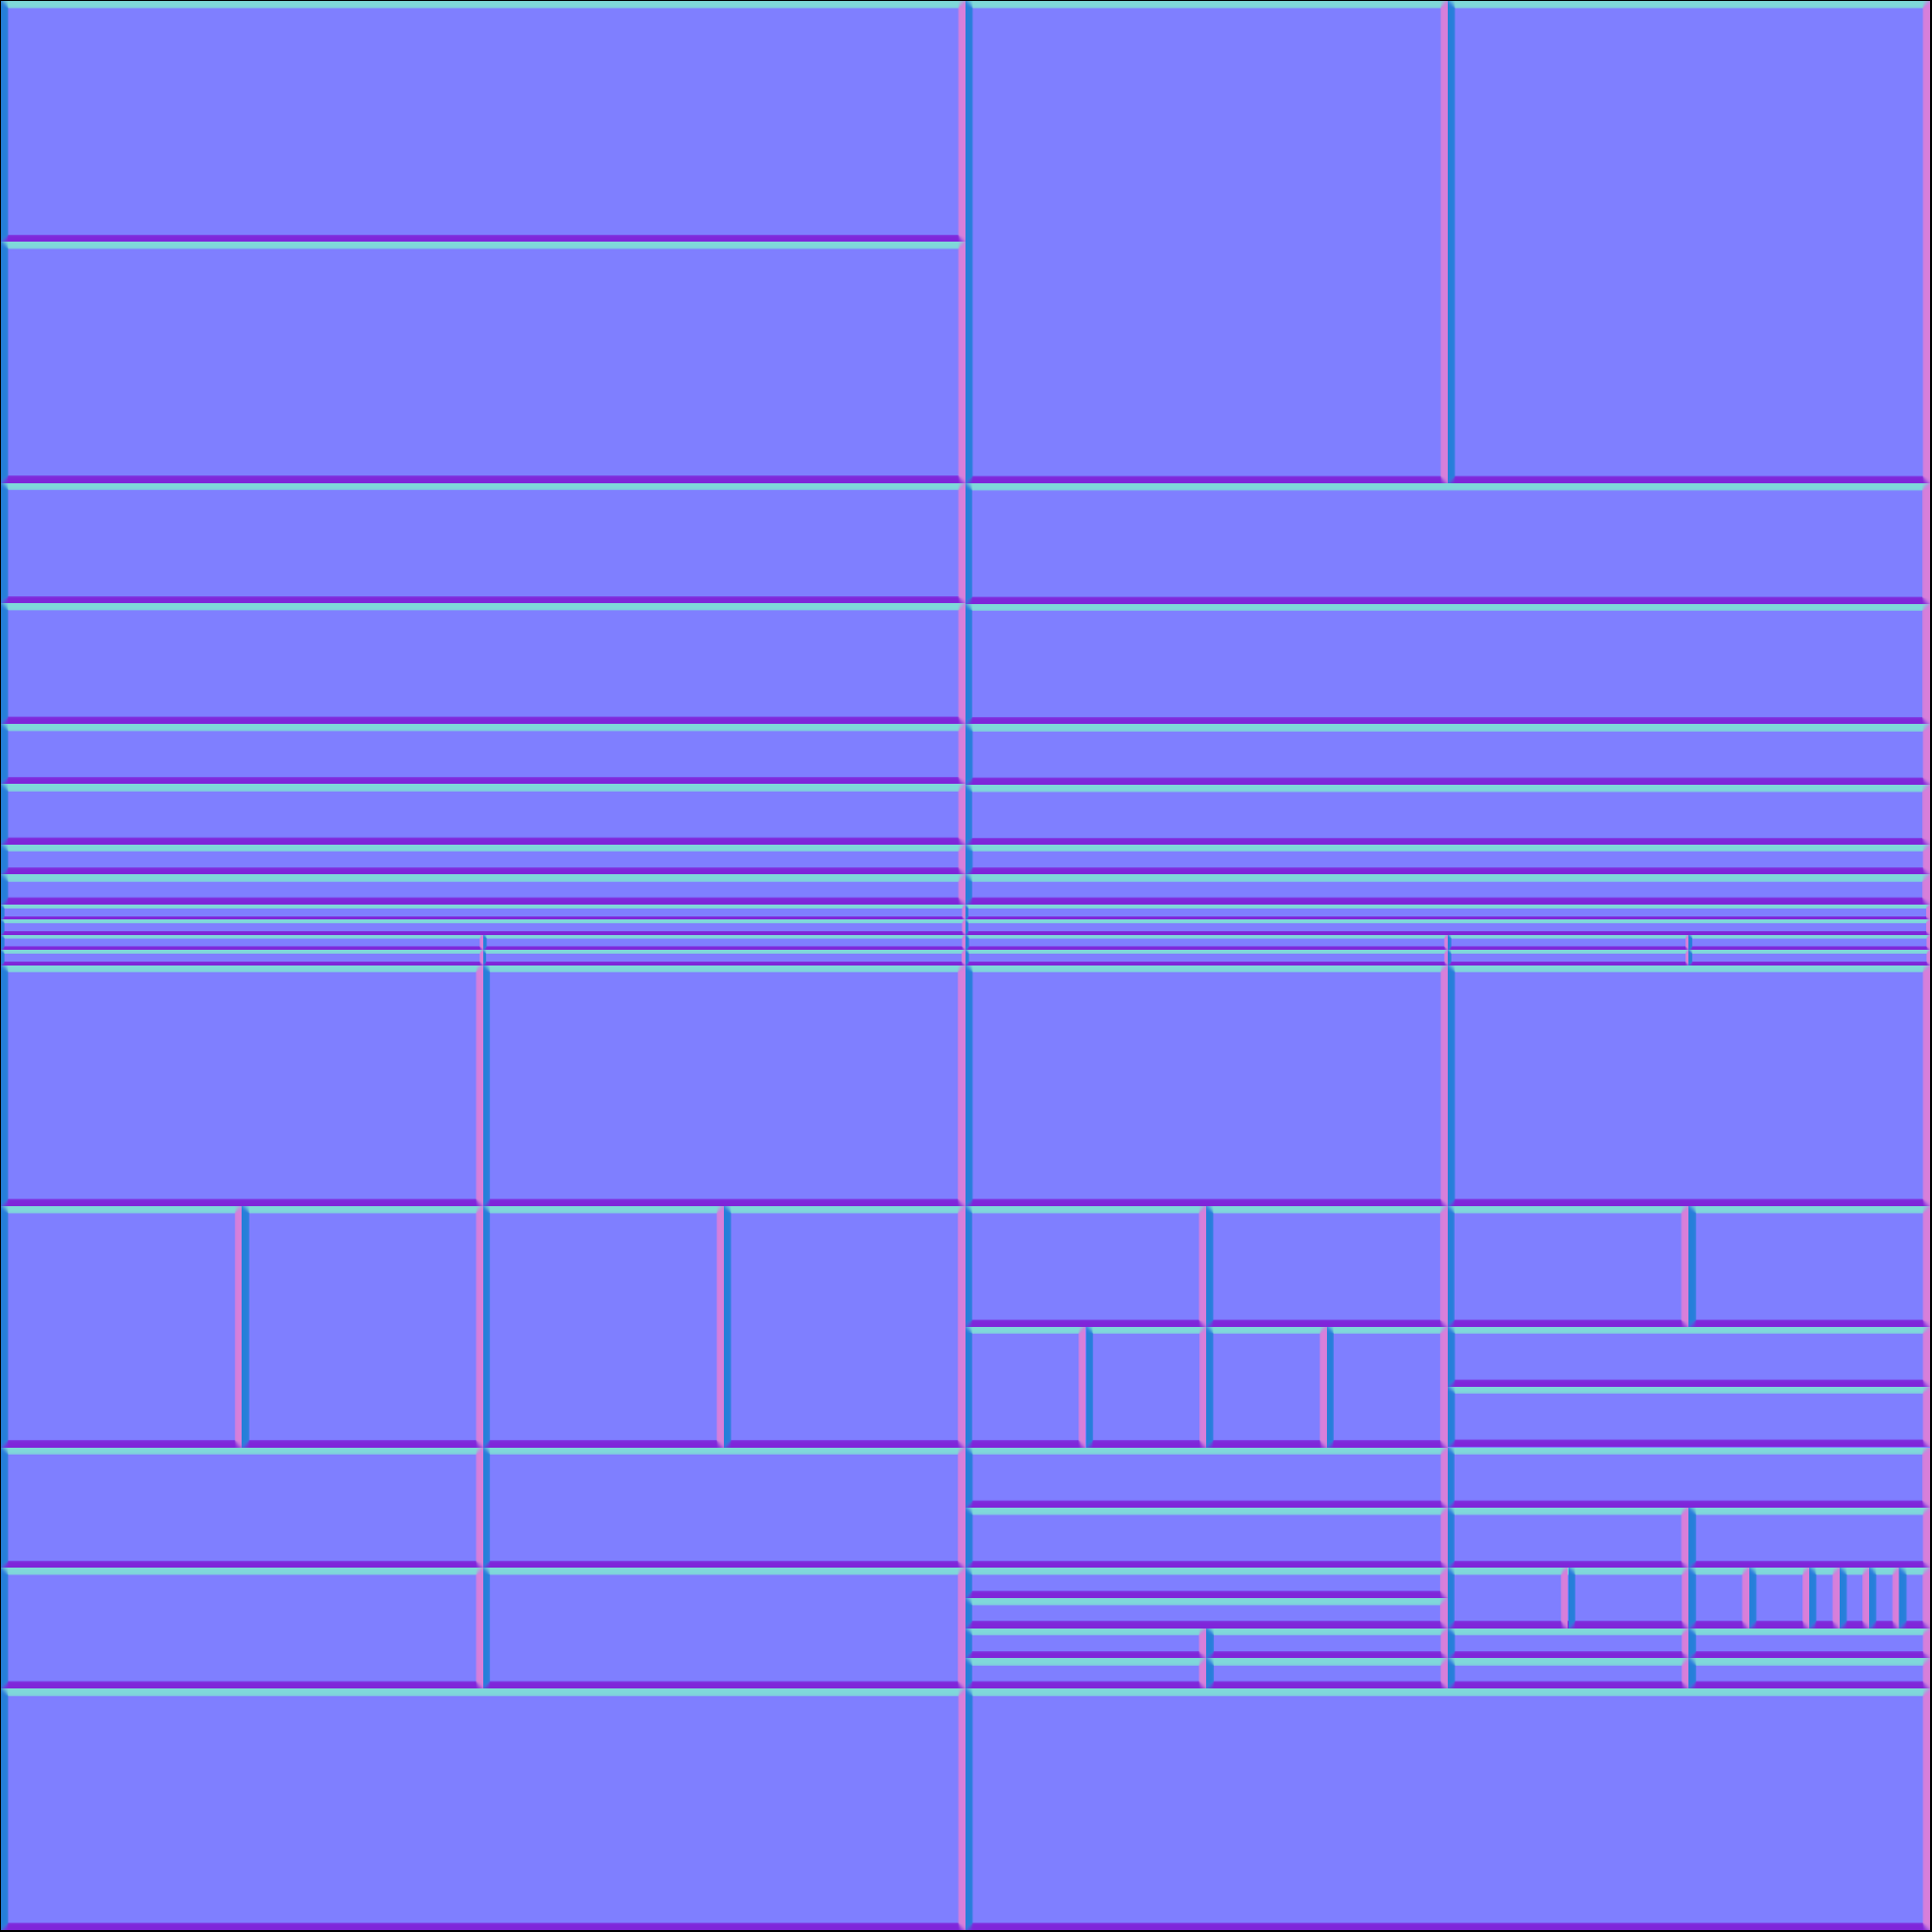
To start this material, I made a black-and-white template image to understand how I wanted the surface partitioned. This template aimed to get as many different-sized panels as possible, plus some duplicates for variation while keeping to a grid pattern.

Once I was satisfied with the template texture, my next task was to convert it into a normal map. Previously NDO / NDO2 was perfect for this task, but Quixel discontinued support for the program even though I still feel it has its uses.
For example, it used to be so good for making a quick normal map without opening up intensive programs that require a bit of setup before you’re ready to start work. Anyway, during my research into NDO alternatives, I found a bunch of photoshop actions that mimic NDO2 by Thiago Klafke. I believe they are part of his Making an Office In Unreal 4 tutorial, which I had previously purchased and can highly recommend https://youtu.be/nu1YC8nwOX8.
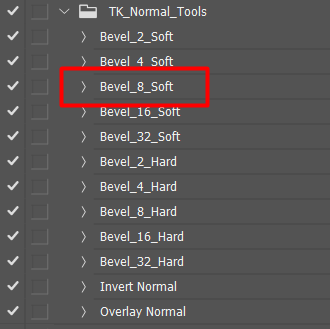
With the photoshop actions installed, I opened up my template texture and, using the Rectangular Marquee Tool, I started selecting each panel one by one and running Bevel_8_Soft. Running the Bevel_8_Soft action gives an 8-pixel 45-degree normal map bevel that is more of a rounded corner bevel, perfect for what I wanted.
This process was repeated until I eventually had a texture that resembled the following:
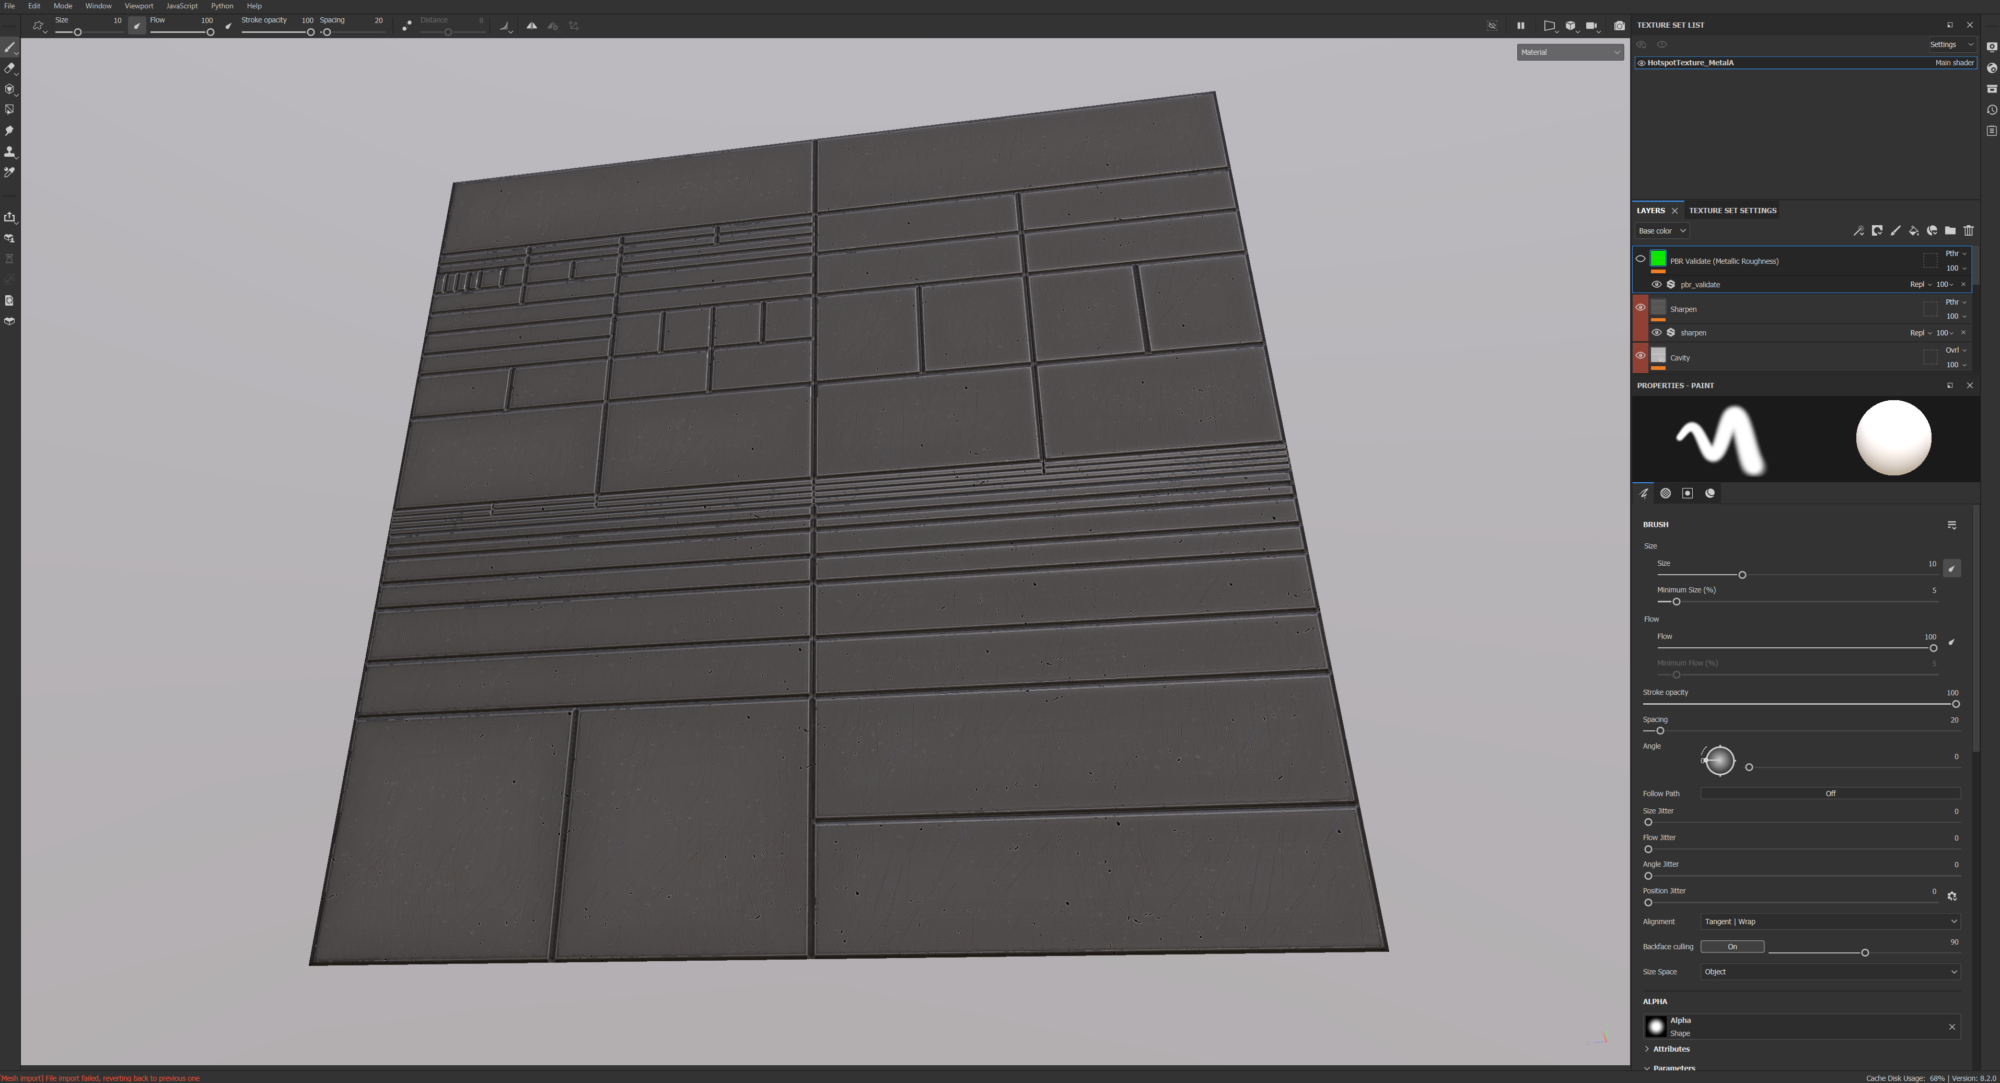
Once the normal map was complete, I imported it into Substance Painter and applied it to a flat plane using my previous setup described in the prop creation section. Then, I quickly baked all the source maps in painter to get a Curvature, AO map, etc, from the normal map.
It’s important to bake the source textures as smart materials often rely on these maps, so having them will give better results.
With the source textures baked, I quickly applied a smart material from my library and tweaked it.
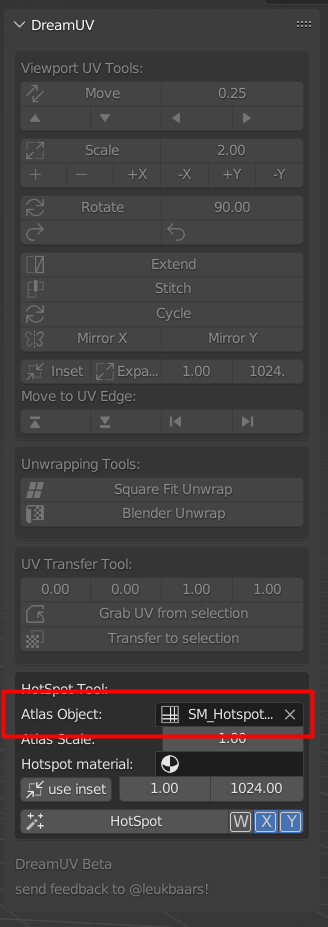
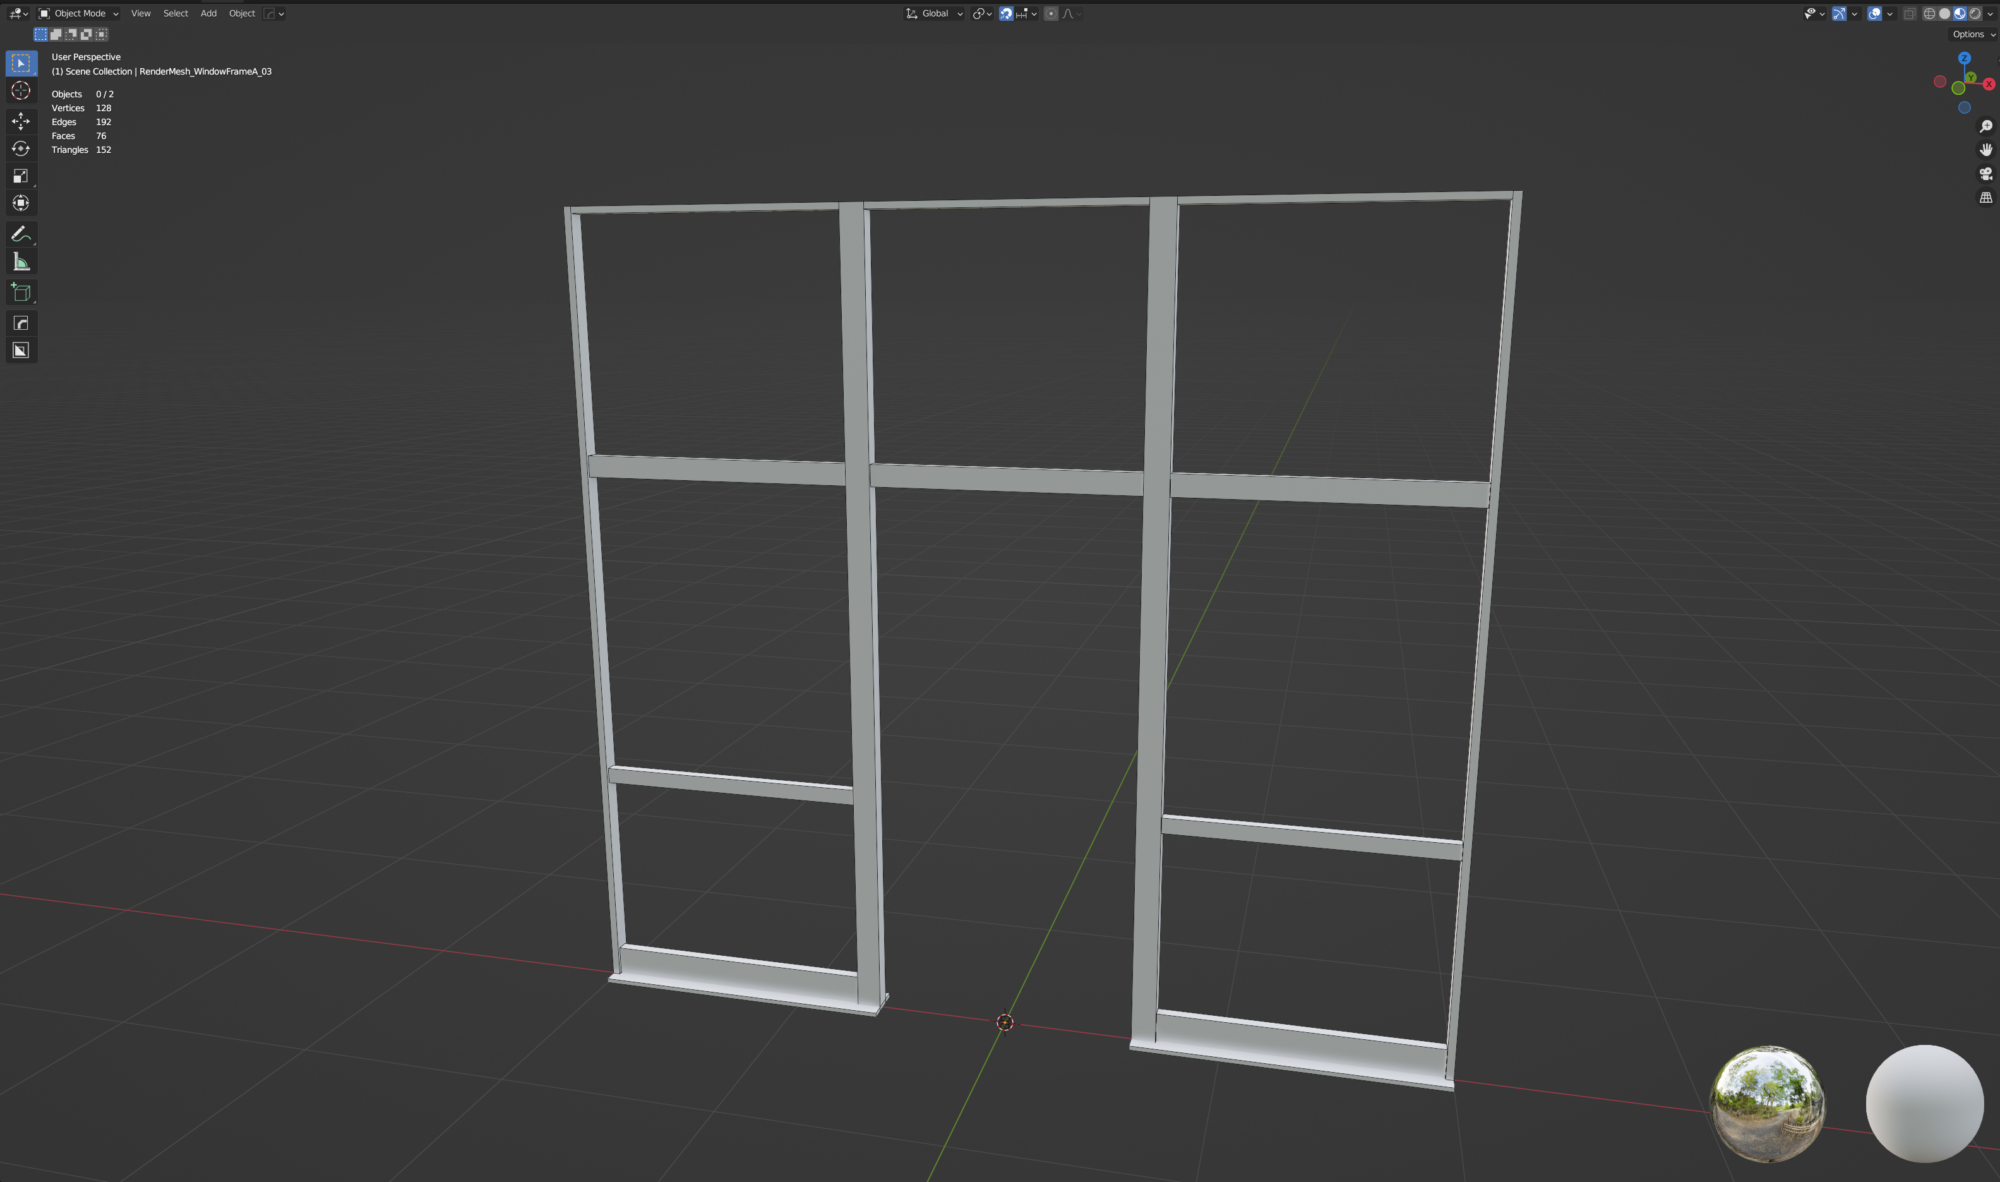
With the texture complete, I will talk through my process of using DreamUV a free Blender addon by Bram Eulaers.
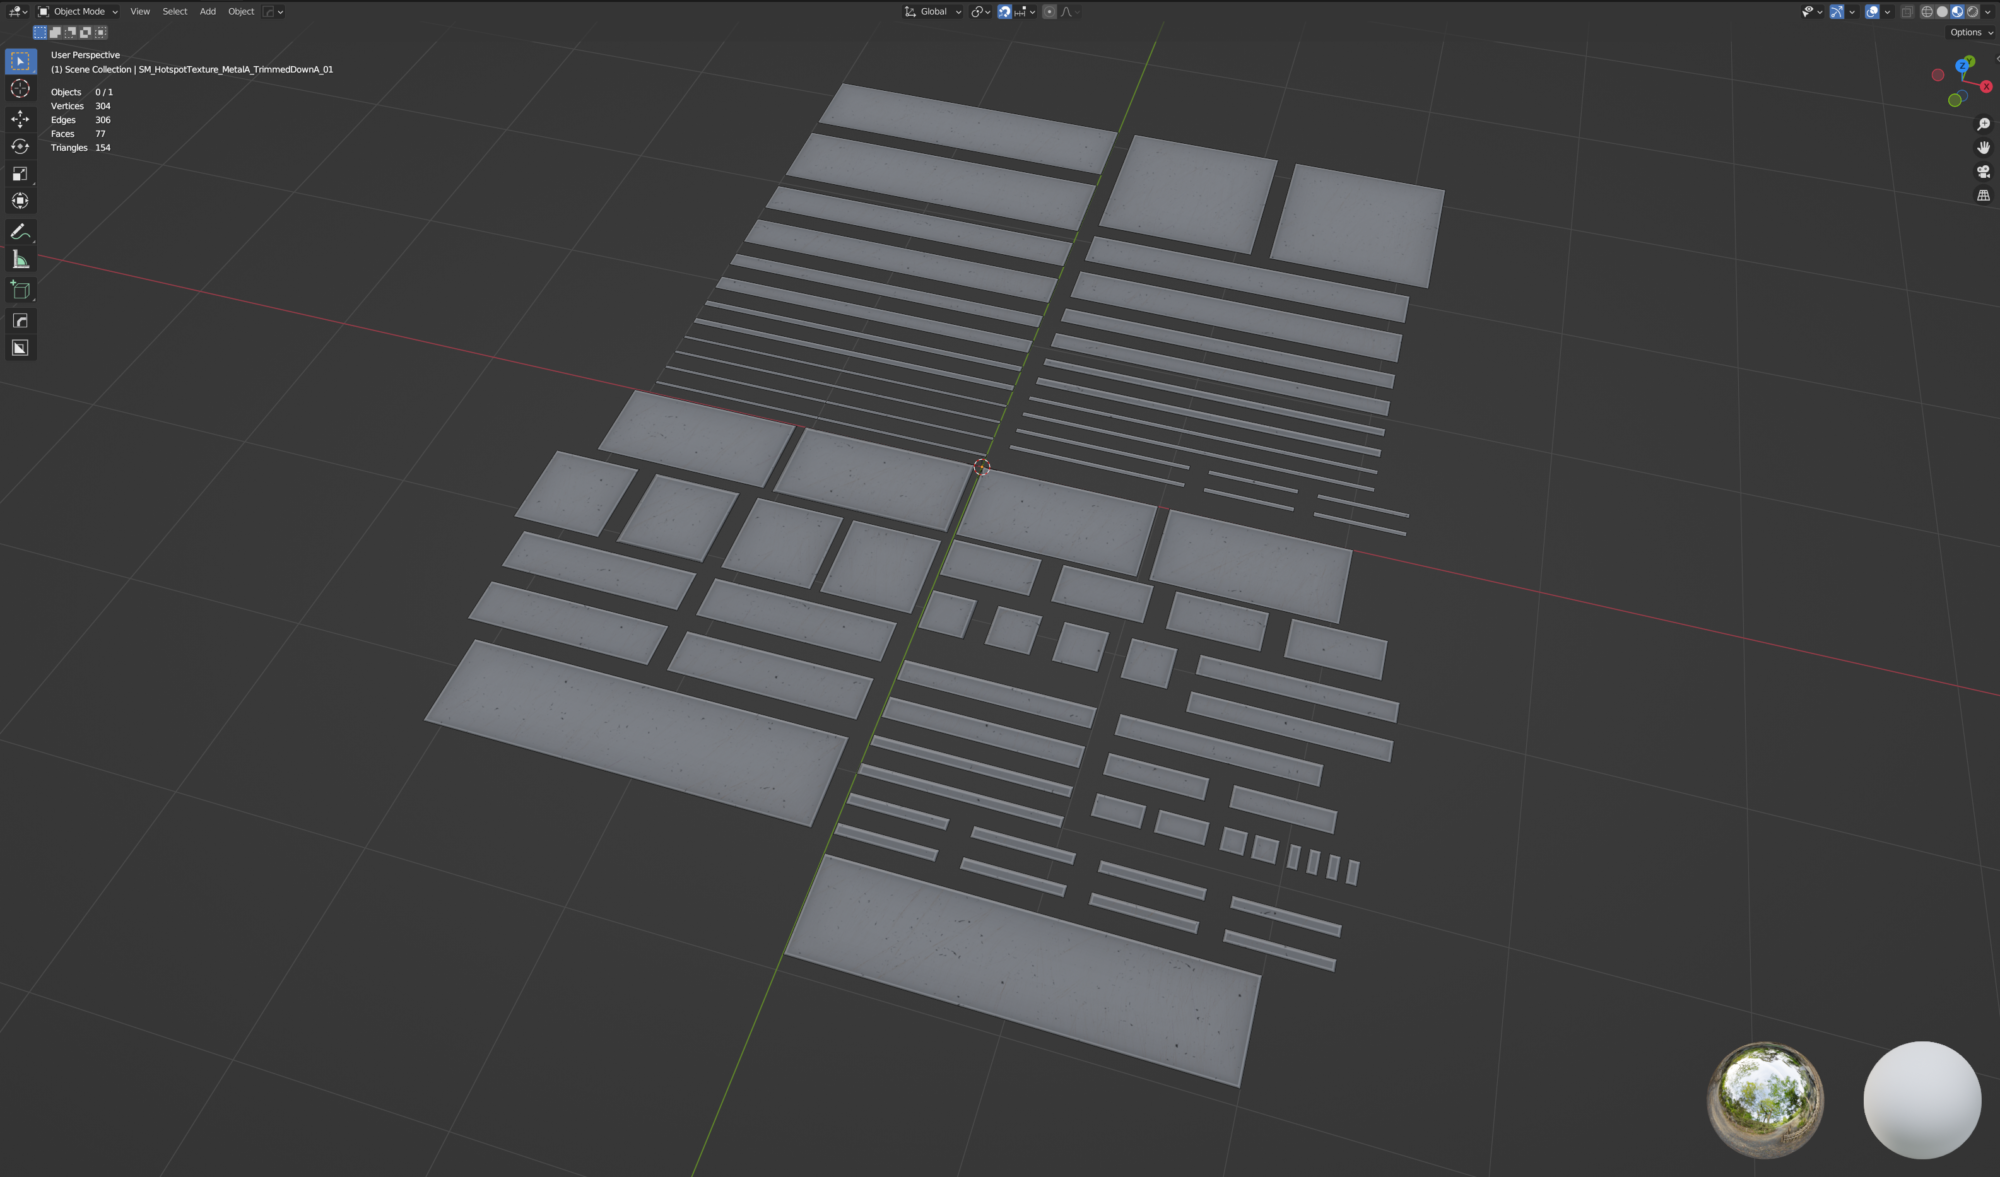
I made a plane in Blender with the Hotspot Texture set applied and began to chop up the panels into separate elements.
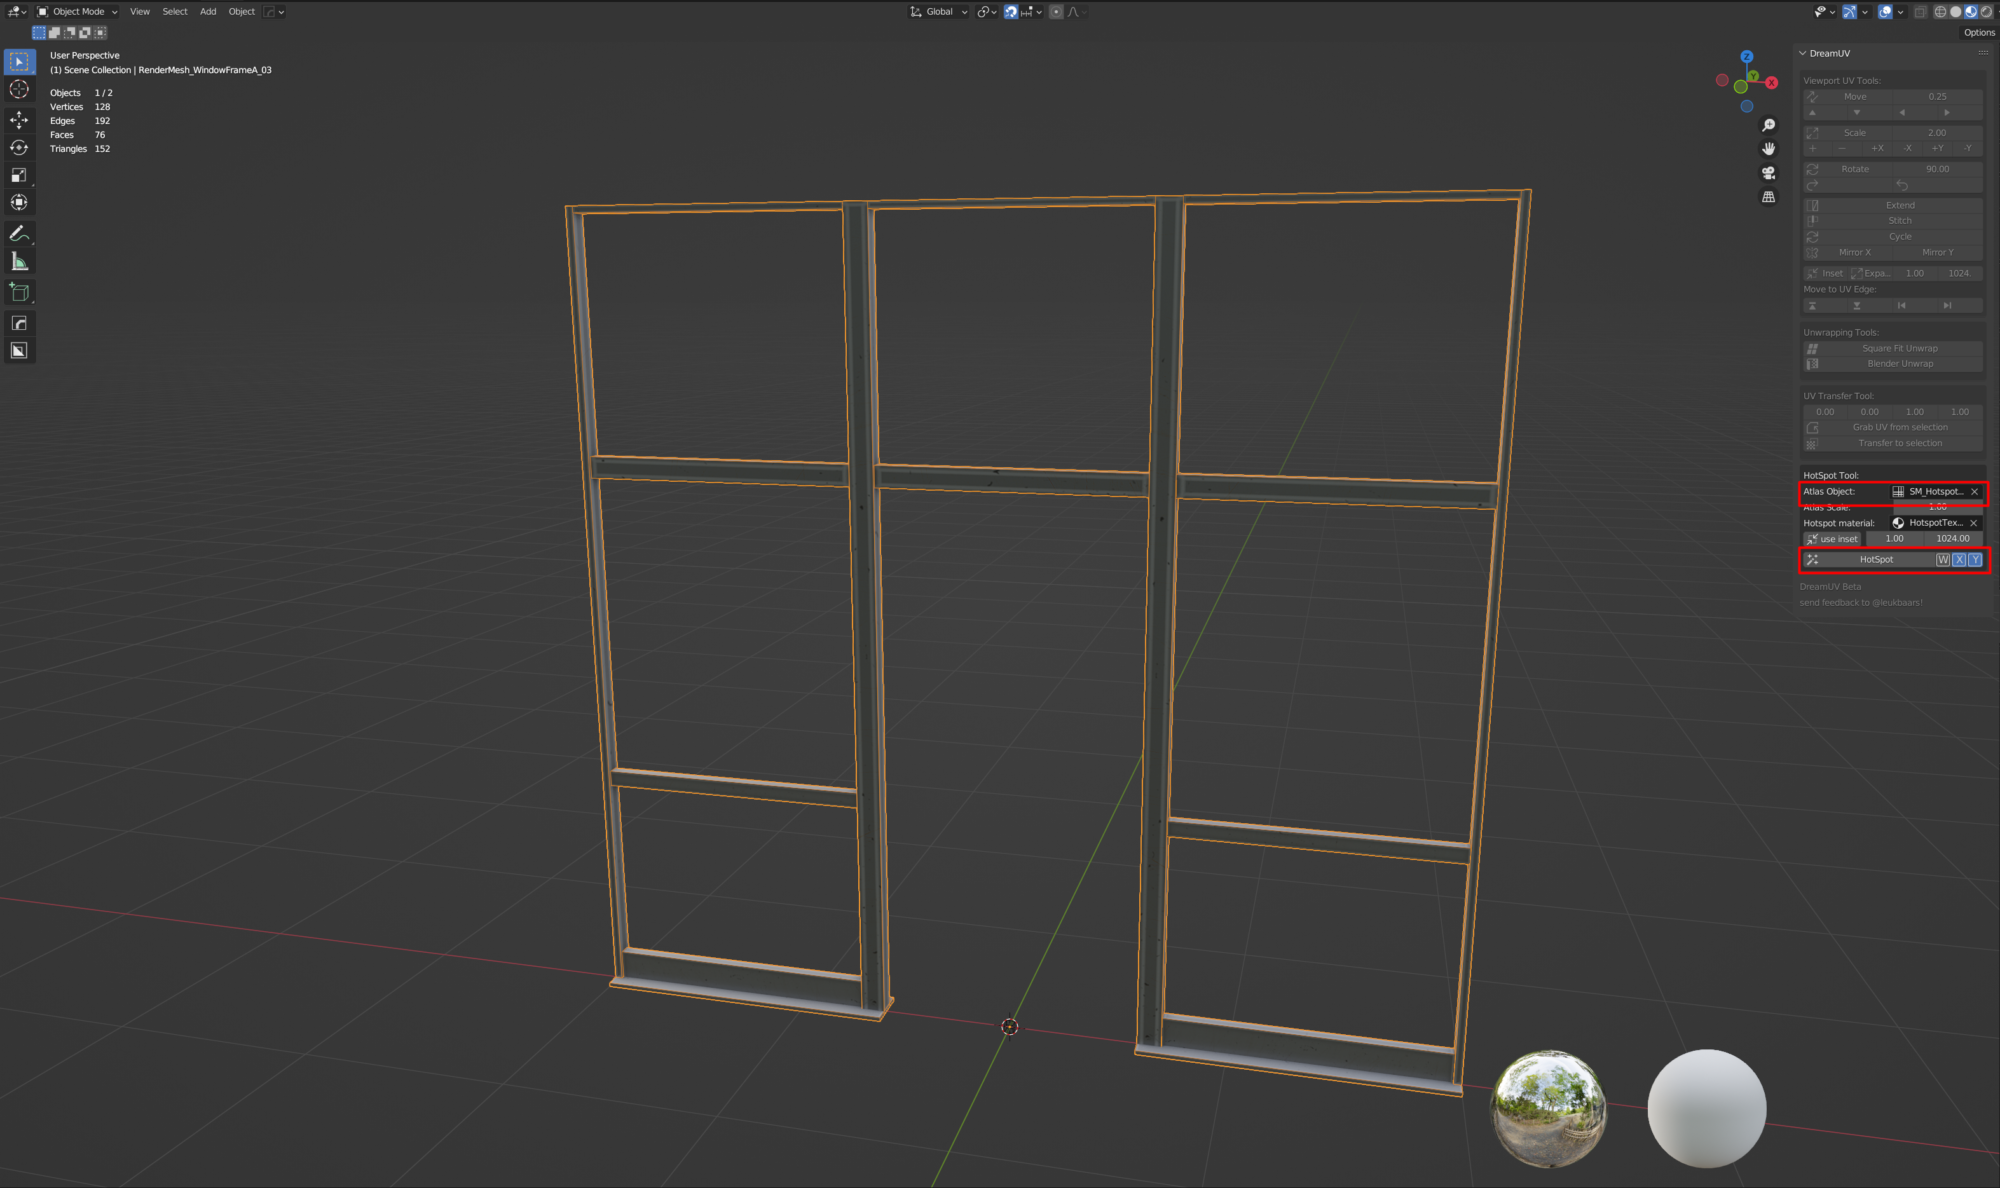
This plane will be the Source Atlas Object that I assign to DreamUV. Two things are essential at the moment; the polys must be quads; otherwise, the addon won’t work, and the polys must be attached as a single object.
Next, I start to get the asset ready to be textured using the Hotspot Texture. In this case, I’m going to be texturing a door frame. For this process to work correctly, I needed to ensure the asset was all quads because DreamUV will only map true quads. I also confirmed that I had no unnecessary divides because DreamUv will map every poly individually, making the model look divided.
Once the door frame model was ready. I selected all the polys I wanted to map and click the Hotspot button. You can be selective with what polys you want to map, but in this case, I selected everything to run the process in one go.
Clicking Hotspot will map each poly using the exact mapping as the Source Atlas Object; it will compare poly sizes between the source object and the target object and choose the closest mapping that fits the poly you’re trying to match, resulting in an asset that can be textured with a single click of a button.
It takes a bit of setup, but this can save so much time throughout a project.
Dust
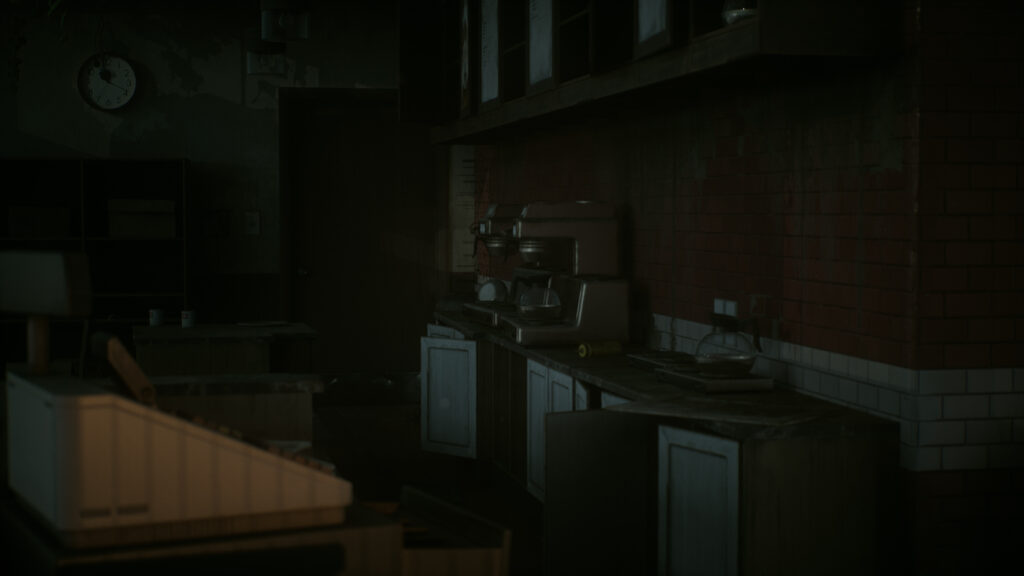
One technical aspect of my scene that I’m pleased with is the dust that appears on all props.
When I started the scene, I wanted to devise a way of doing some procedural dust across the assets. I like adding these sorts of effects because it breaks up the repetitiveness of repeating assets and, in turn, makes them feel like they are uniquely textured. The dust also helps tie everything together as part of the same scene.
Unfortunately, I don’t have any images of my early attempts, but I started by exploring Pre-computed AO. For anyone that doesn’t know, you can generate AO during a Lightmass bake and then use that AO as a material input and modify it as part of any shader.
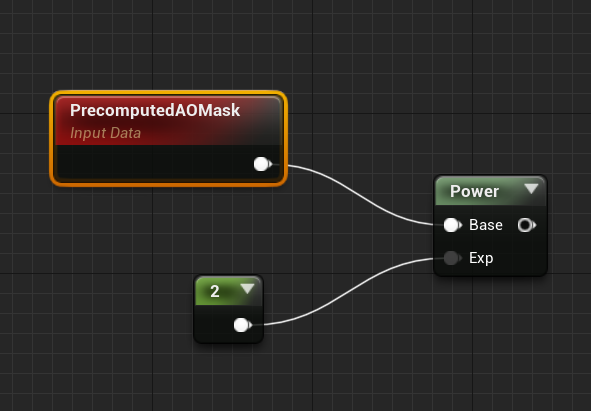
While Pre-Computed AO is great, I didn’t particularly appreciate that my scene relied on a lighting bake to look fully textured; therefore, I started exploring other options.
One thing I like to do when I’m hunting for inspiration is open up other marketplace packs or content examples, particularly those made by Epic Games, as, in theory, no one should know their engine better than themselves. Unfortunately, I can’t remember precisely what content example I was looking through, but I found a moss material that only appeared on the top surfaces of assets. With some tweaking, this could be an excellent basis for dust.
I began creating a shader, using some of the techniques in the Epic Games version as inspiration. At its very basic level, it is essentially a set of world-aligned tiling materials that are masked out by a world-aligned mask; therefore, dust will show up on some props but not all.
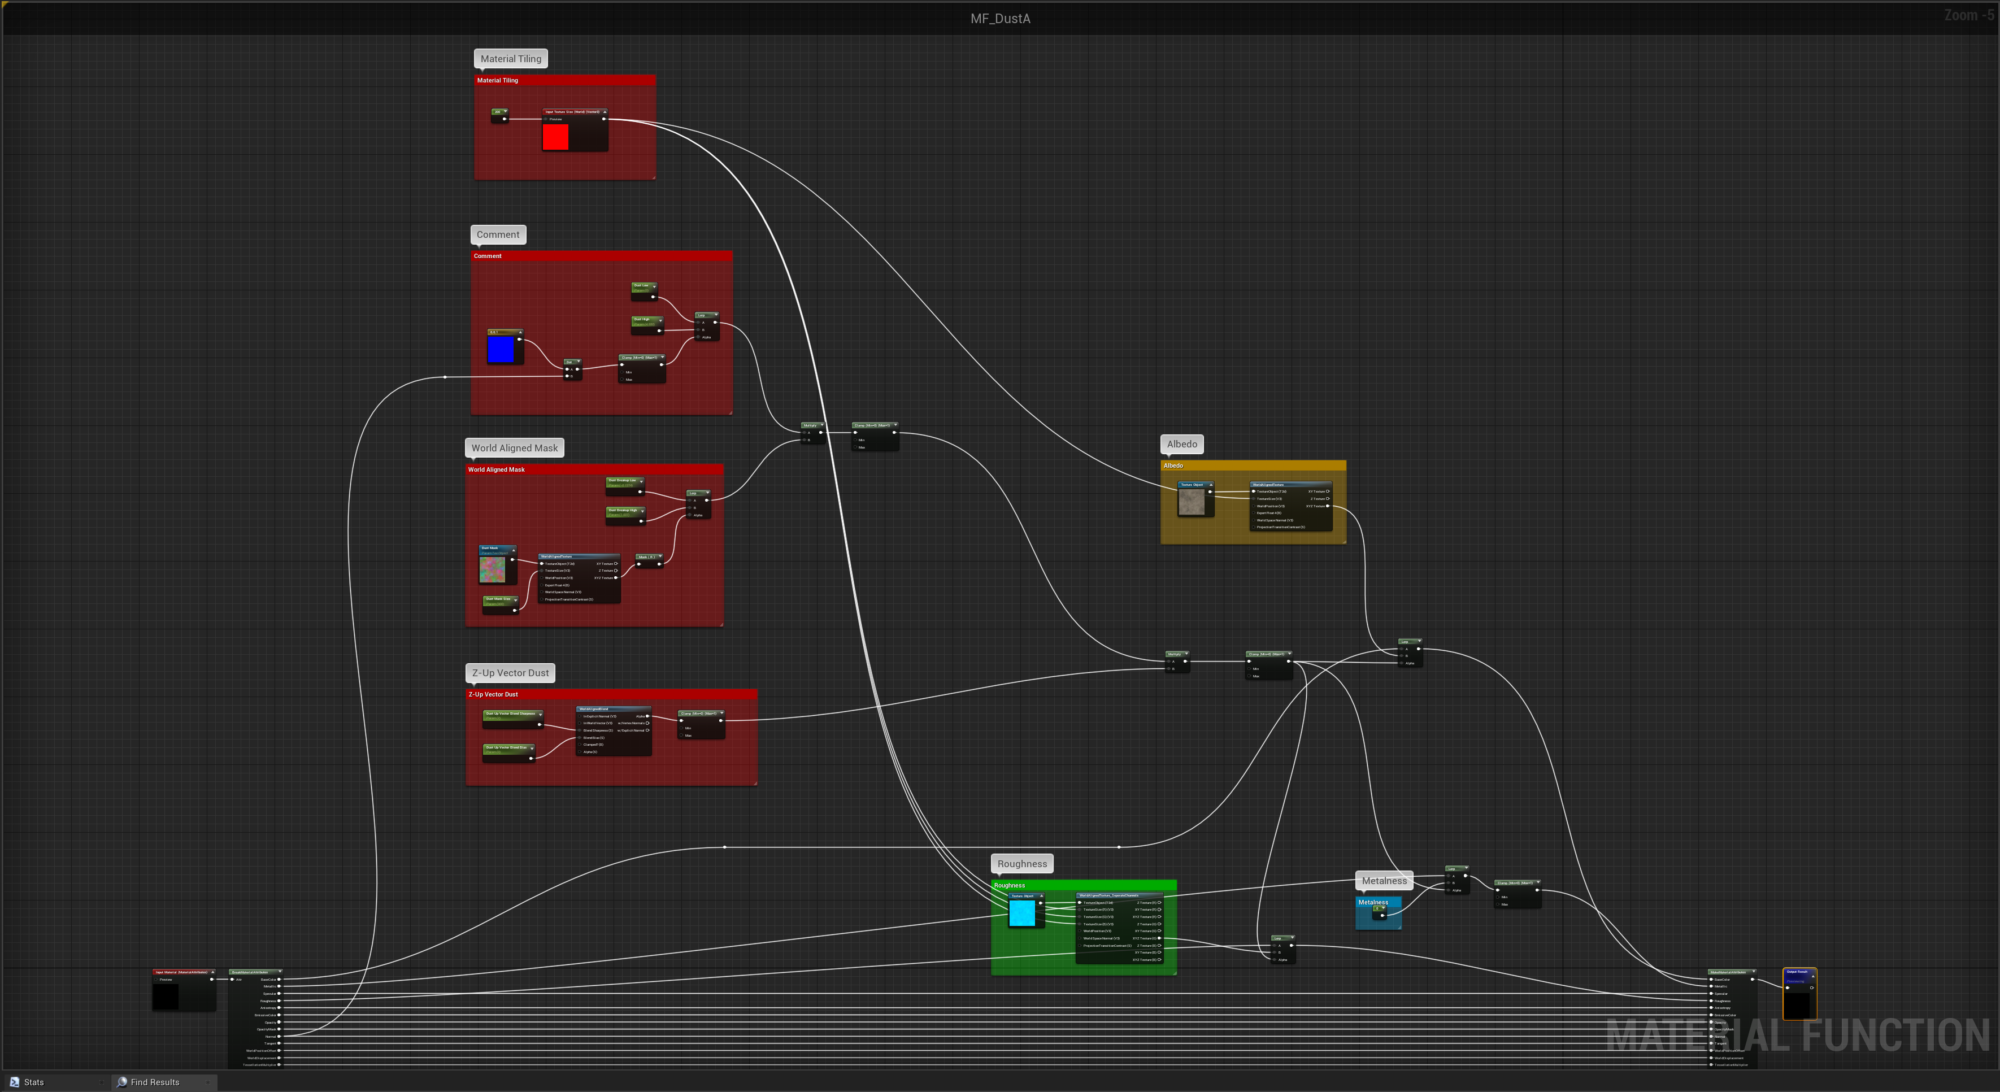
Once I was happy with the shader, I turned it into a material function with an input and an output and plugged it in at the end of my standard shader, which I used to texture my props. This way, it takes the base set of textures and essentially layers another effect on top of them.
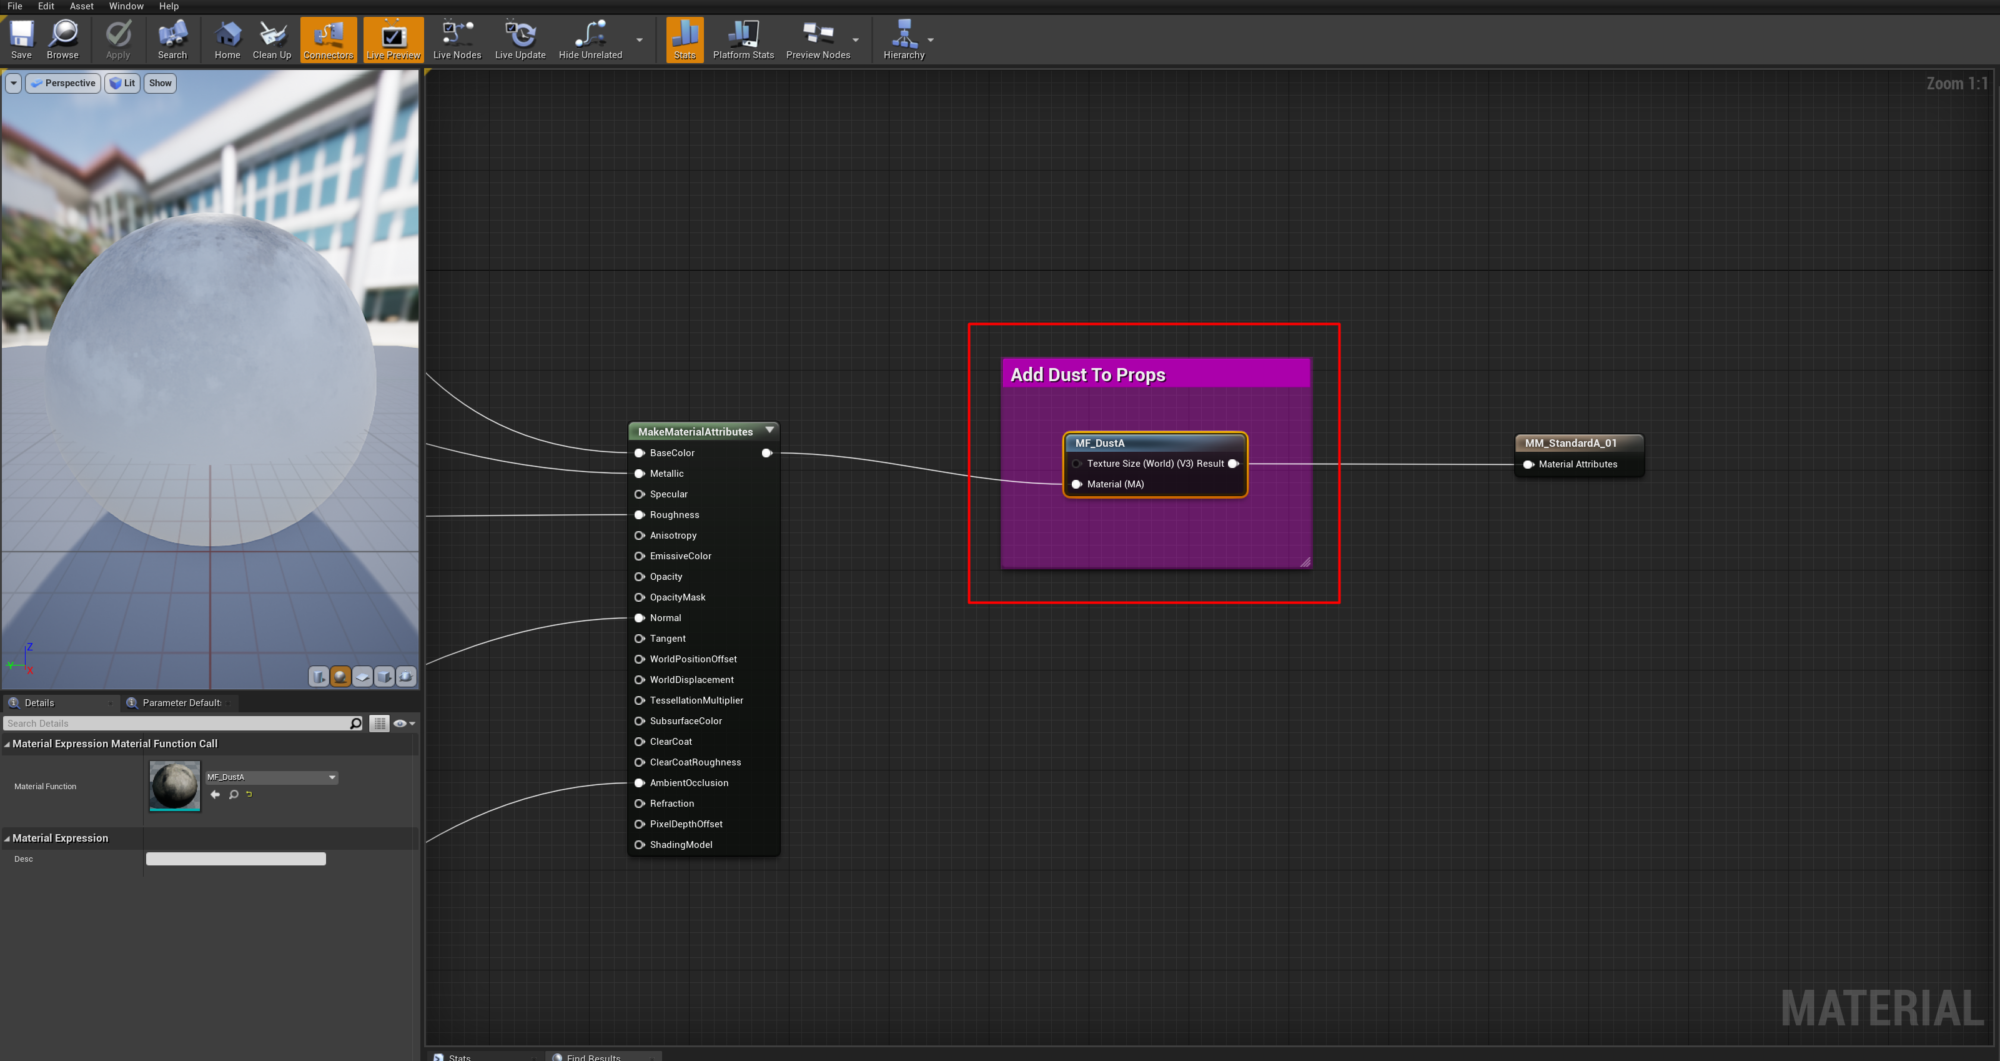
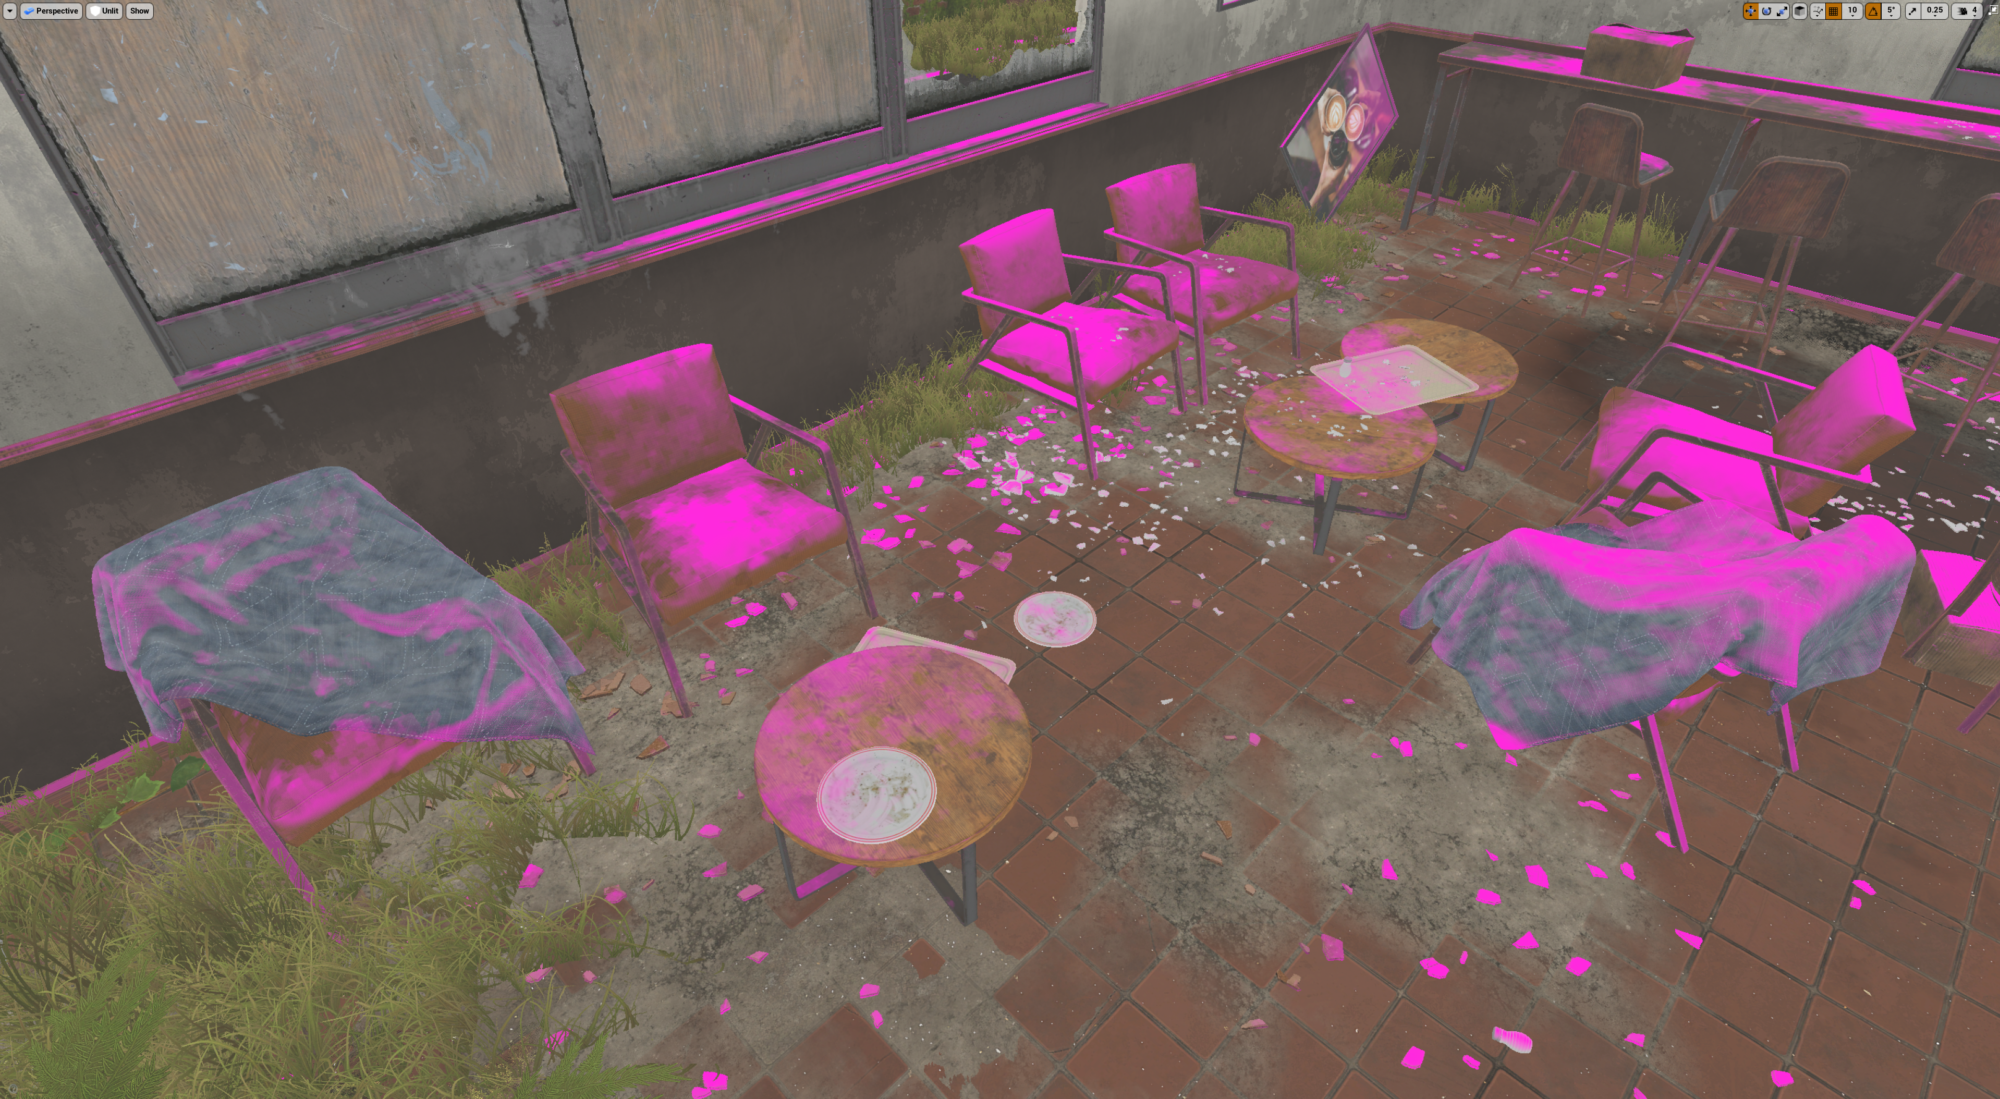
When I work on shaders like this that will be blended over other textures, I like to work with a flat colour that stands out rather than plugging in my dust textures straight away. This way, you can see its effect and the tweaks you need to make.
For example, I’ve set the colour to pink, and you can see the shader’s impact on the scene. Notice how each chair has a unique look despite being the same asset.
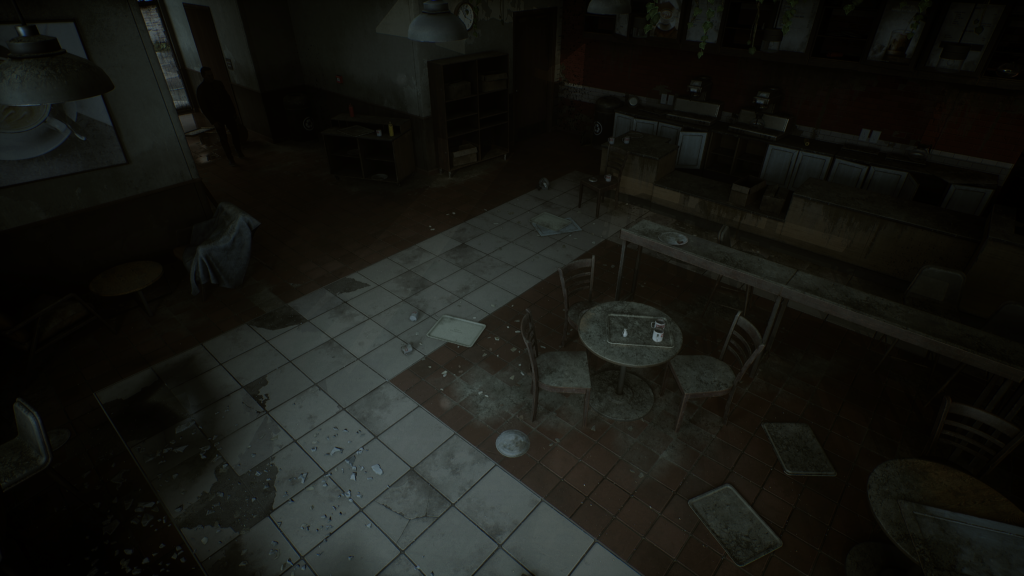
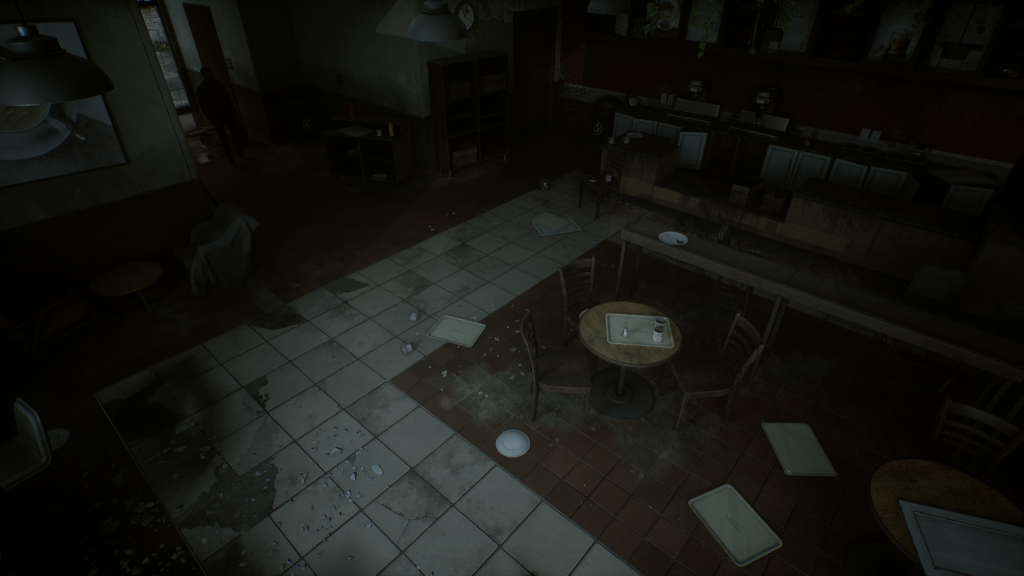
The images below show the prop dust being turned on and off.
Lighting
If I was to condense all of the positive comments I get about my scenes over the years, Lighting & Ambience always gets mentioned. However, it might surprise people that it’s the number one thing I struggle with the most when producing environments. I made some mistakes when lighting this environment despite being reasonably happy with the result.
I know what I want to achieve, but I always feel like I’m fighting the mountain of values that all affect each other. It is clear why lighting is a separate department these days.
I treat lighting as an ongoing process throughout production, so for example, I might do a lighting pass on the blockout, produce a few props, tweak the lighting a bit, create some materials and a few props, tweak the lighting, etc. This approach has served me well, but it was probably my downfall in this instant. I was so fixated on the interior and getting it looking right that the exterior became an afterthought.
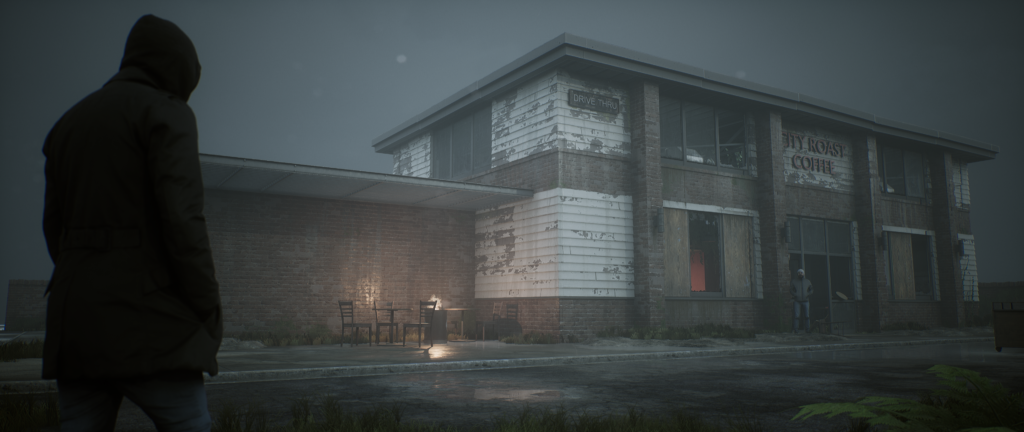
Early in production, I had interior lighting looking quite nice, but when I went outside the building, the lighting was super washed out, and exposure tweaks weren’t enough.
Disheartened, I ended up scrapping my entire lighting setup and changing my approach. This time I focused on getting the exterior correct and then using exposure to bring more light into the interior. But, again, this is something I should have done from the beginning.
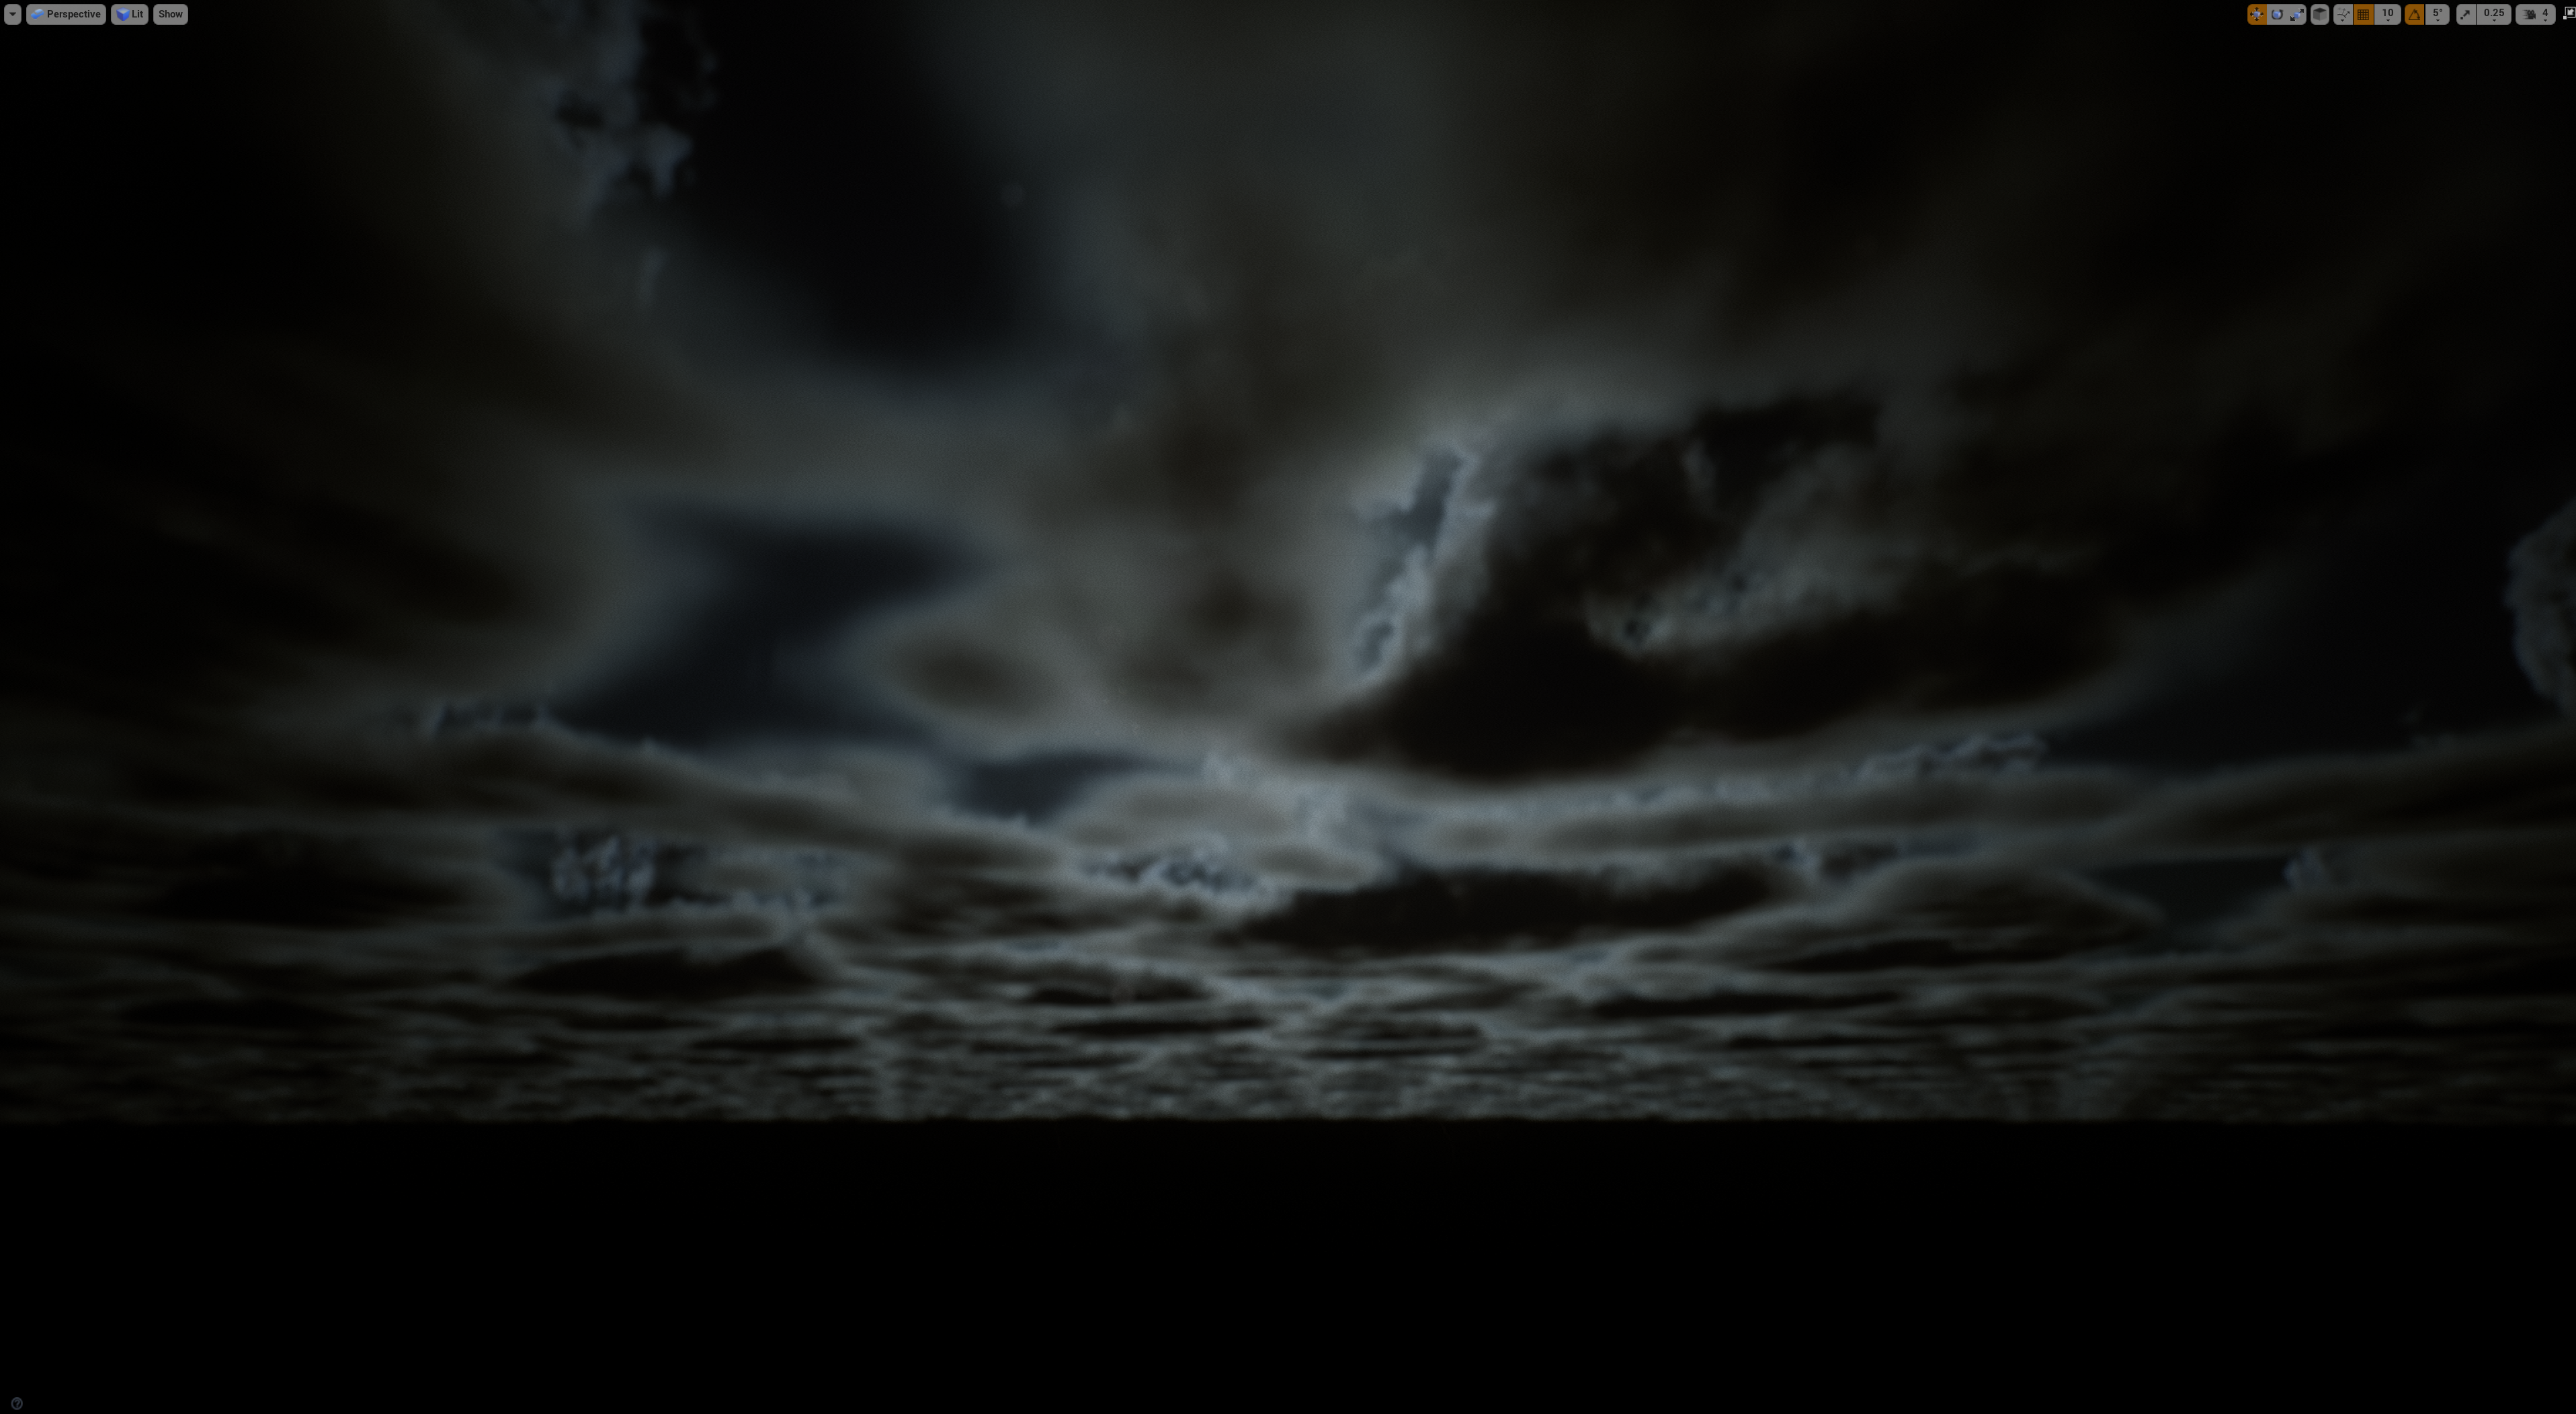
This scene uses baked lighting in terms of the technical side of the lighting. Rather than starting with an HDRI, which I usually would, I decided to use Unreal’s Sky Atmosphere system, which was pretty new at the time. I started by adding the SkyAtmosphere & Volumentic Clouds to the scene and tweaking the settings to get an aesthetically pleasing look to the sky, almost as I would looking on the internet for a suitable HDRI image to use. The main thing I was aiming for here was to make it look like the sun was behind the clouds.
Note: The sky in the image below looks dark and black; this was because I tweaked it after adding fog, and I added a lot of contrast; otherwise, the fog made the sky look perfectly flat.
As mentioned above, I added an Exponential Height Fog which I used as an extension to the sky. It helps blend the sky with the rest of the environment and helps add some much need depth to the scene.

The scene is straightforward in terms of actual lighting setup, with the ambience created by the bluish sky/fog. I just needed a low-intensity Stationary Direction Light so that it added a bit more pop to the environment.
I also added Lightmass Portals to all the windows so that Unreal brute forces the light through these small holes, which results in more light entering the interior.
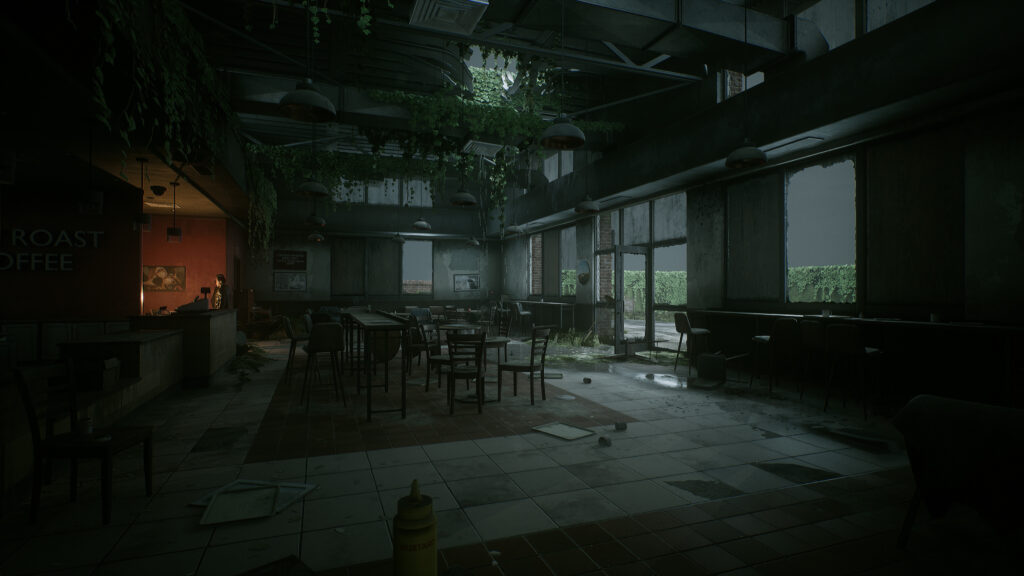
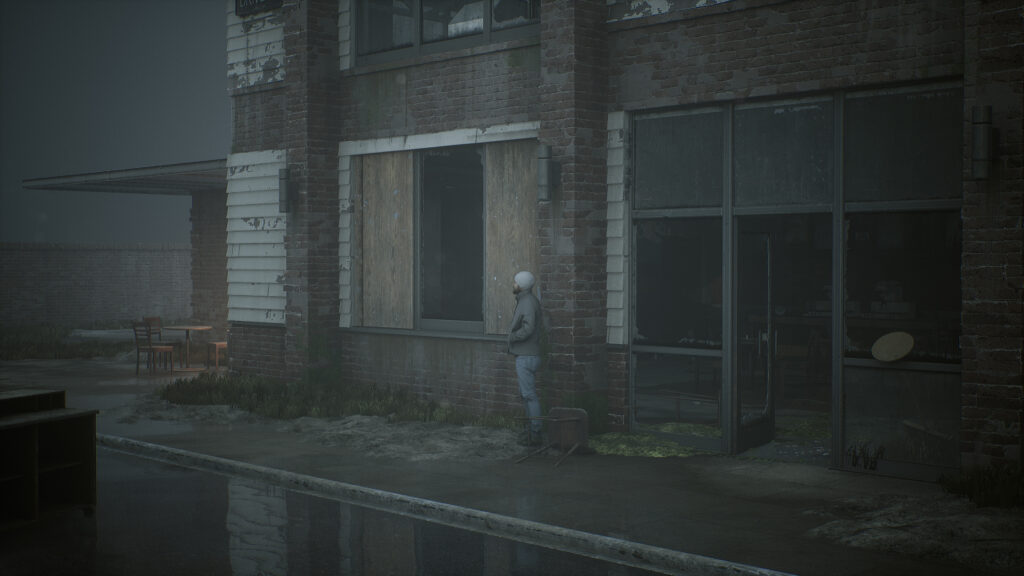
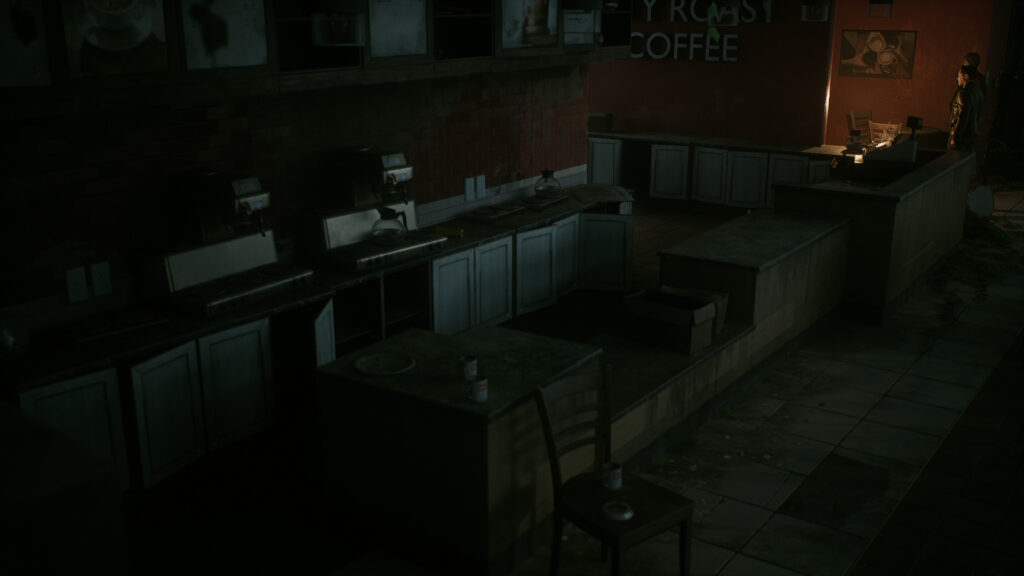
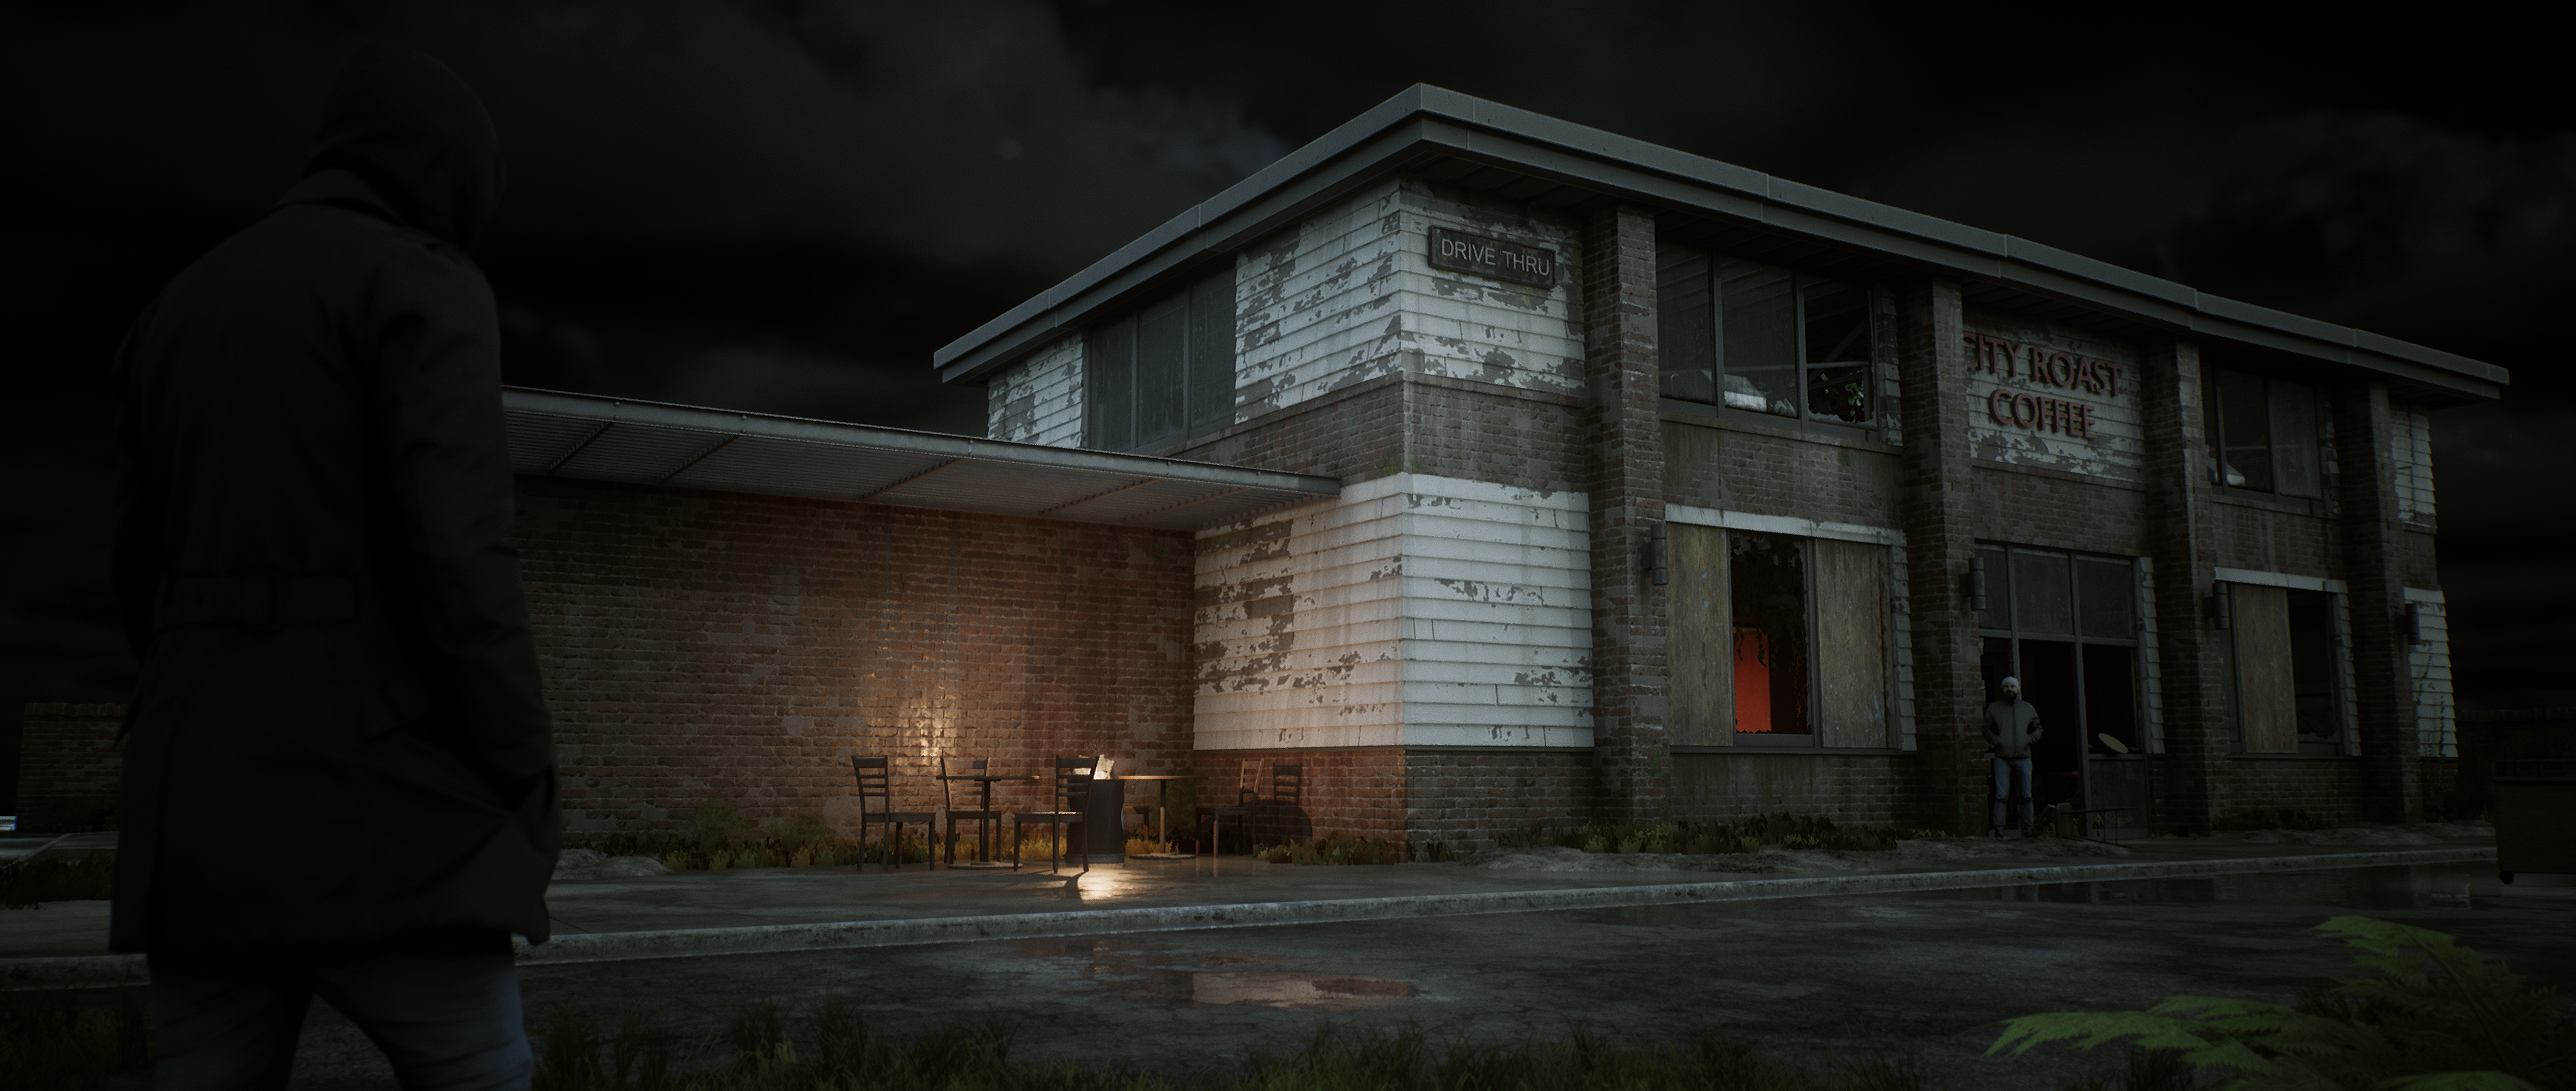
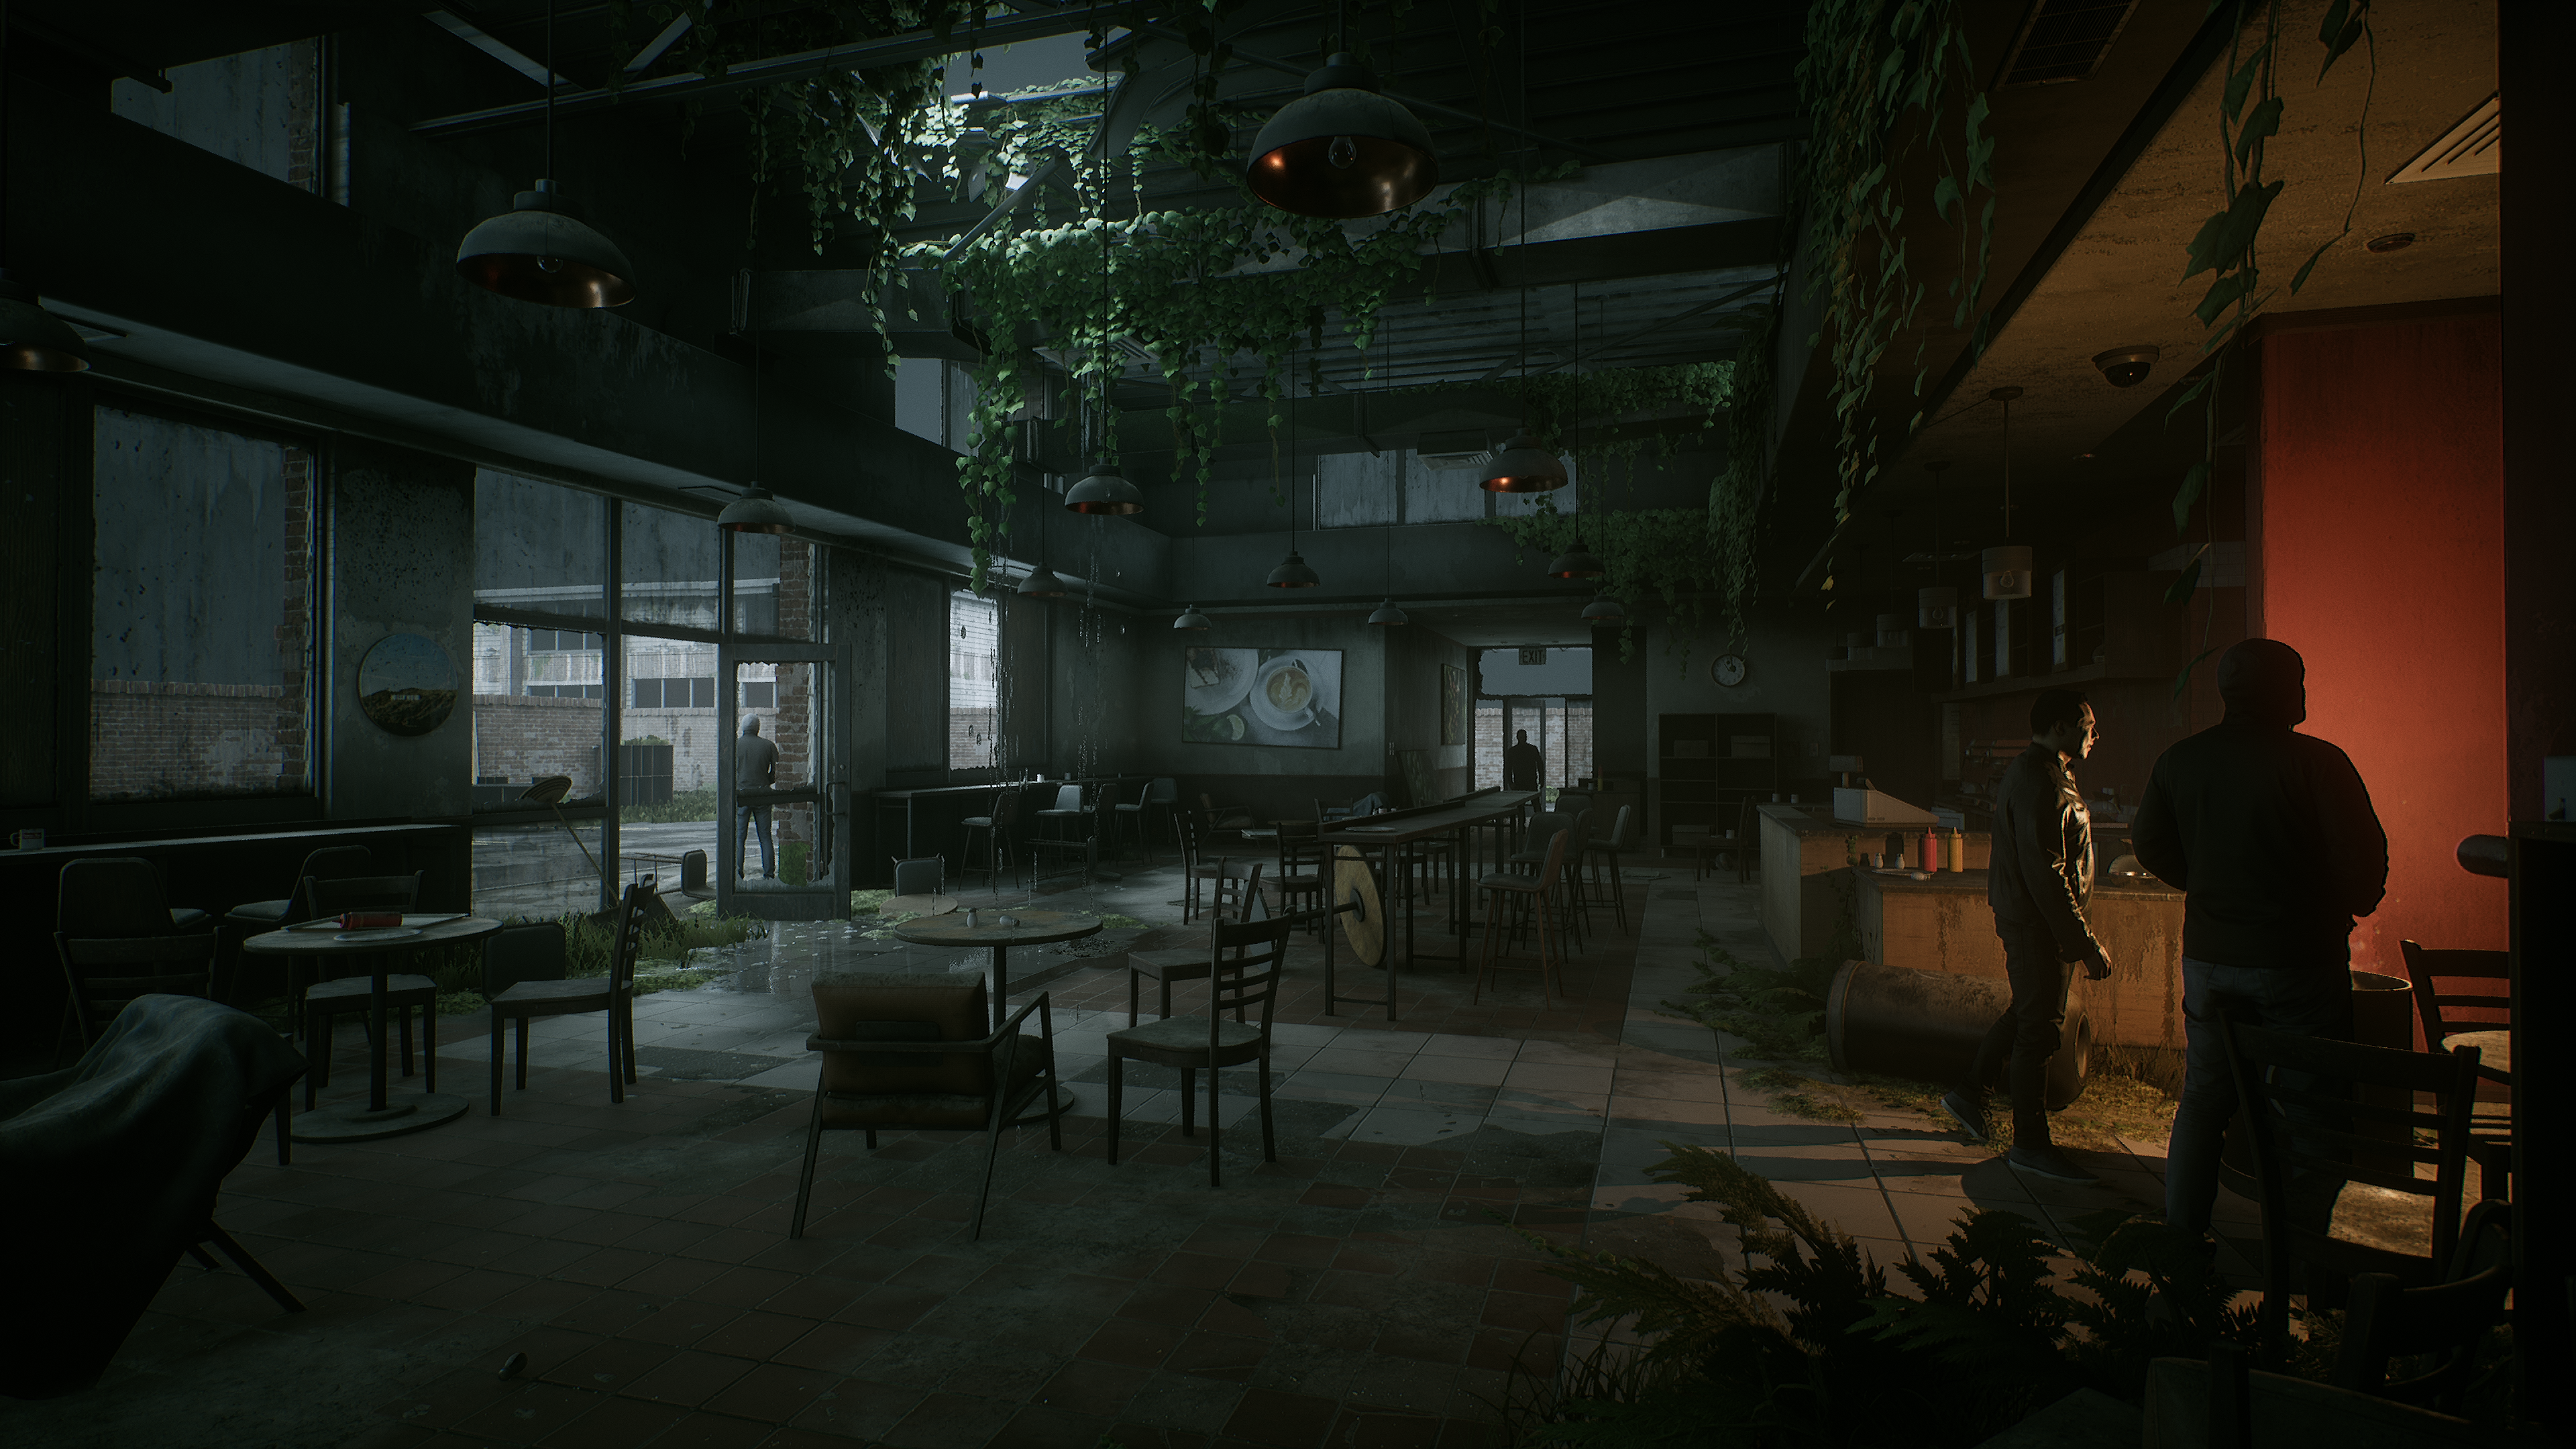
Finally, I decided to add some bins that were lit on fire to add some warmth to the scene. The scene was very blue, and it needed a complimentary colour. I like this shot below as the warm light has created a nice gradient from one side of the image to the other as it transitions to the cold blue ambiance.
Final Polish
Environment art in a production setting would be very static without the involvement of other departments such as VFX, Audio, and Tech Support. Therefore, as part of a final polish of my environments, I like to browse marketplace packs, especially those made by Epic Games for any VFX or Ambience actors, that will add the final bit of quality.
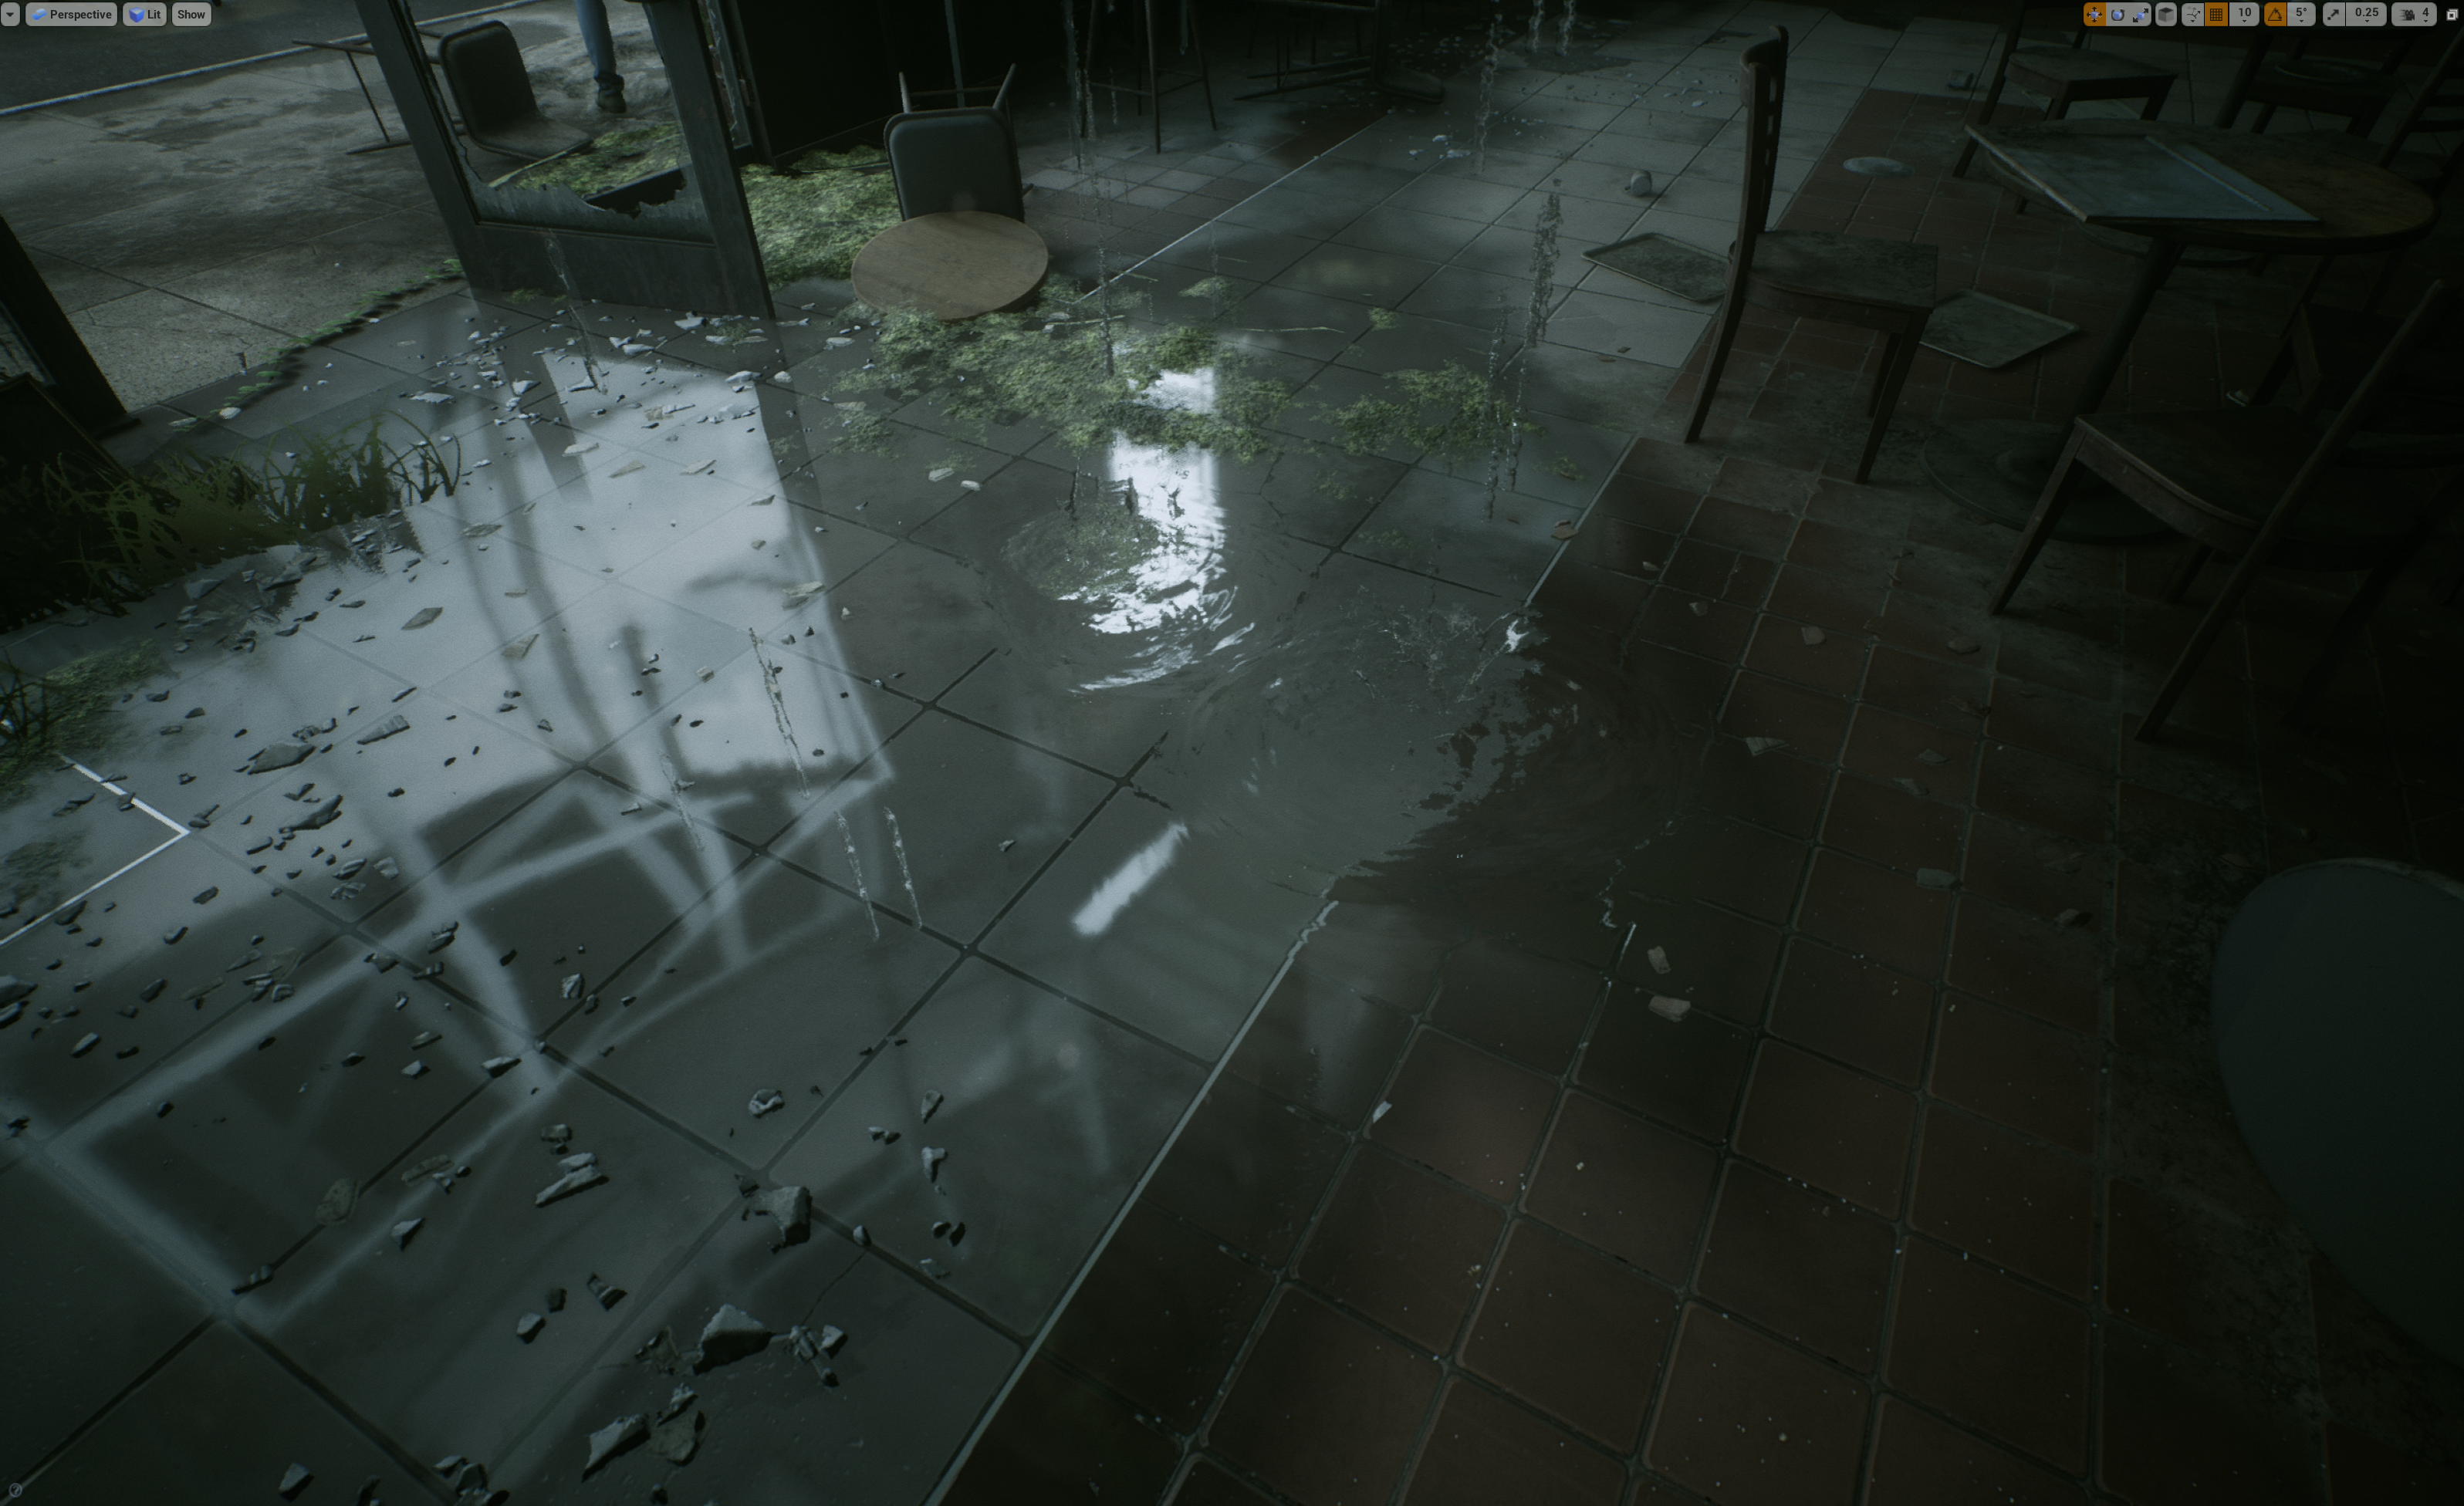
The main things I ended up using were a bunch of VFX assets such as dripping water and water puddles from Epic Games Subway Scene, and I found an excellent blueprint in Epic Games Infiltrator Demo that adds low-hanging fog and helps adds some additional depth to the scene.
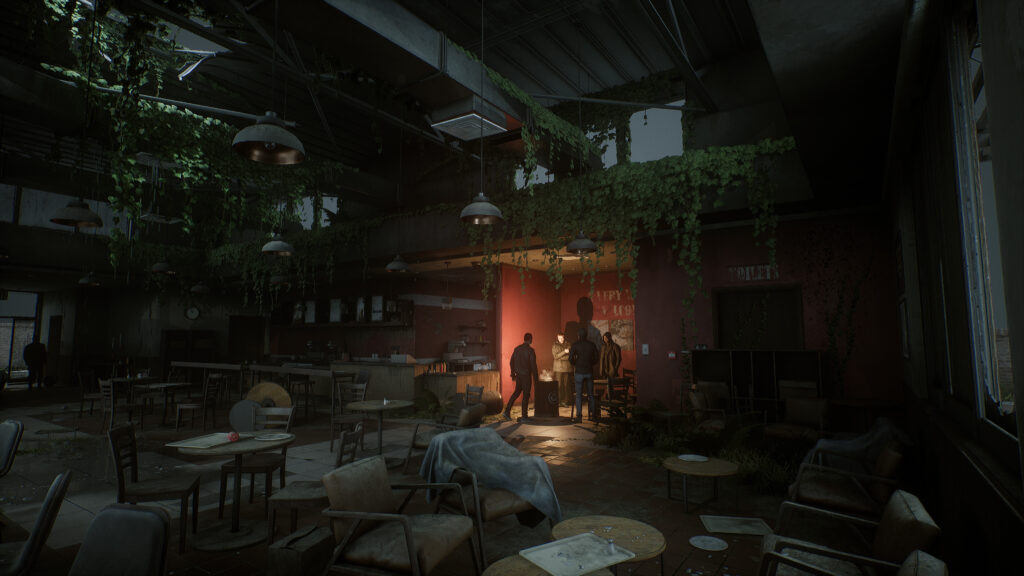
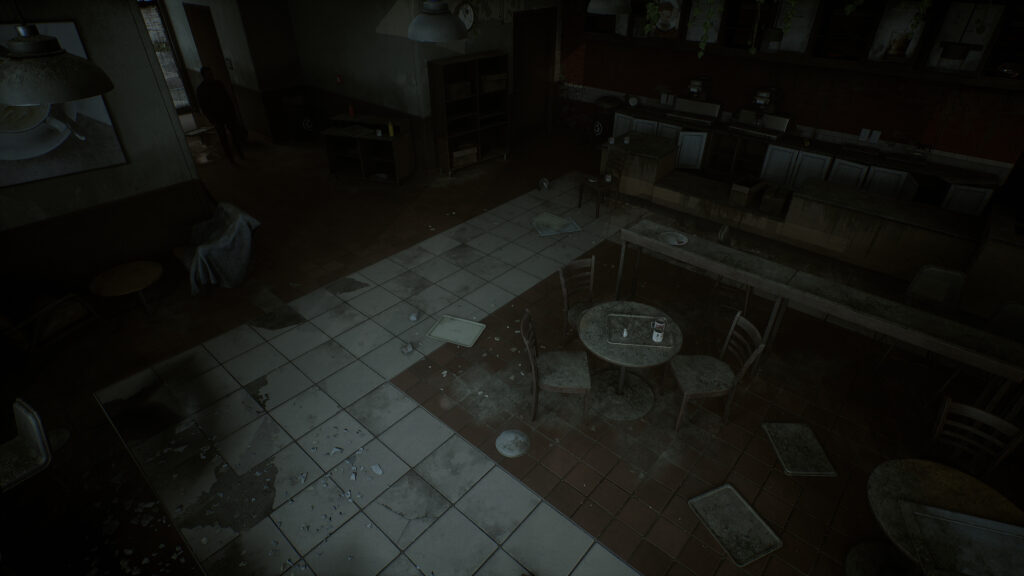
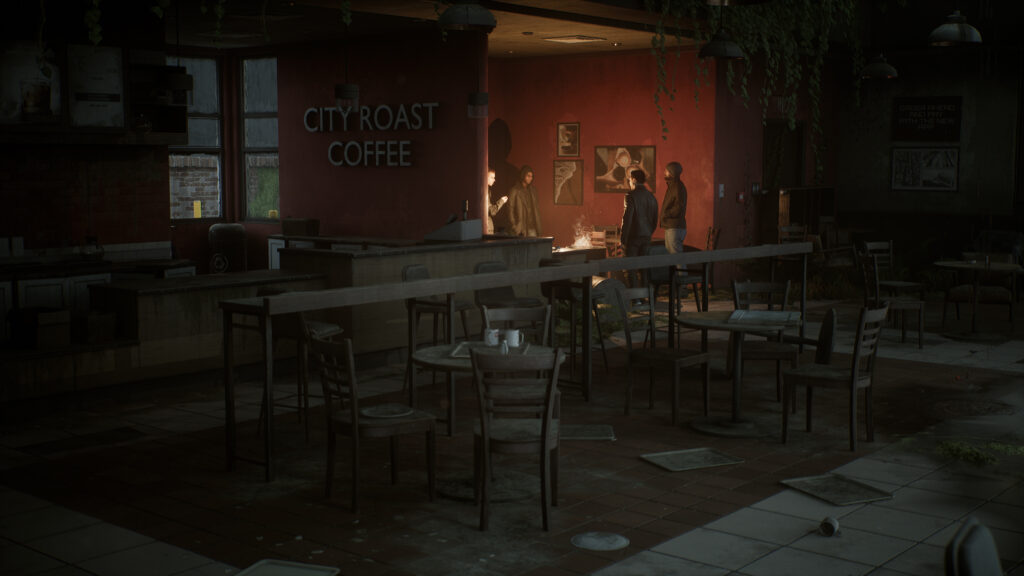
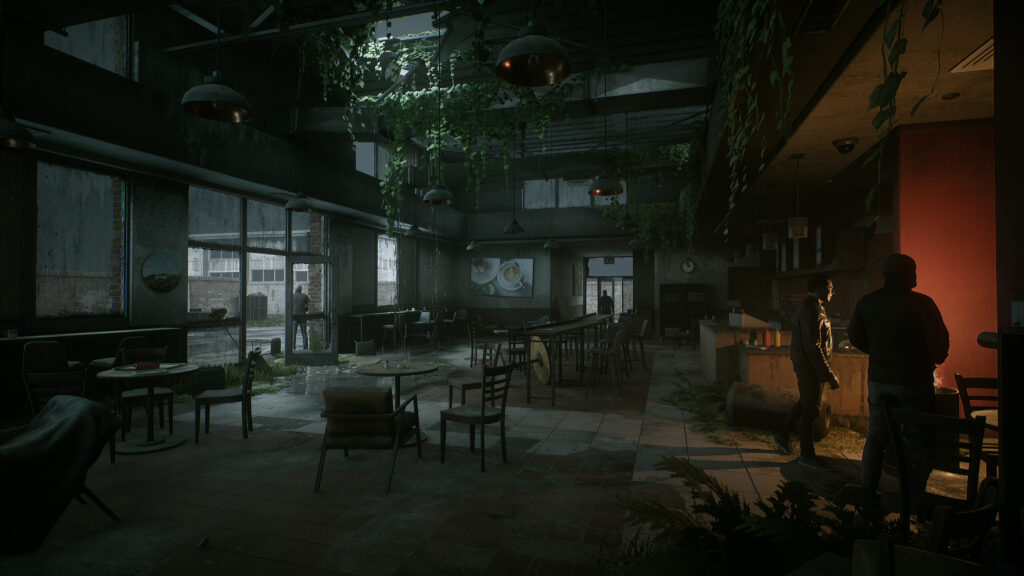
Finally, I’ve started to enjoy placing characters in my scenes for my last few environments. I think this helps sell a story when done well, a story that an environment alone wouldn’t be able to tell. It allows you to set up some cinematic camera that focuses on the characters, and you start to imagine what it could look like in a story-based game, etc.
The characters I’ve used in this scene are from a Twinmotion pack that is free on the Unreal Marketplace.

Conclusion
Overall, I am happy with how the environment turned out but mentally, it was a challenging project to work on as I kept looking at what I had left to complete; it felt like there was a mountain to climb, but I kept chipping away at it day by day, and I’m pleased I did.
I hope you enjoyed reading this article and that it inspires you to start your own environment. If you want to see more of my work or drop me a message, you can at the following links:
Email: [email protected]
Cheers.
Read more articles
You might also like these articles.