The Interceptor

Introduction
Hello readers! My name is Michael Neocleous, I’m a 24-year-old game artist from London, currently working at Playground Games.
I have worked with the Forza team for a year as an Associate Technical Artist. I spent this time working closely with the Assets team. I’ve been lucky to work with some fantastic artists who have taught me to improve my skills both professionally and artistically. Recently, I’ve begun working with their incredibly talented Fable team.
Software Used
Blender, Substance Painter, Marmoset Toolbag.


References/Inspiration
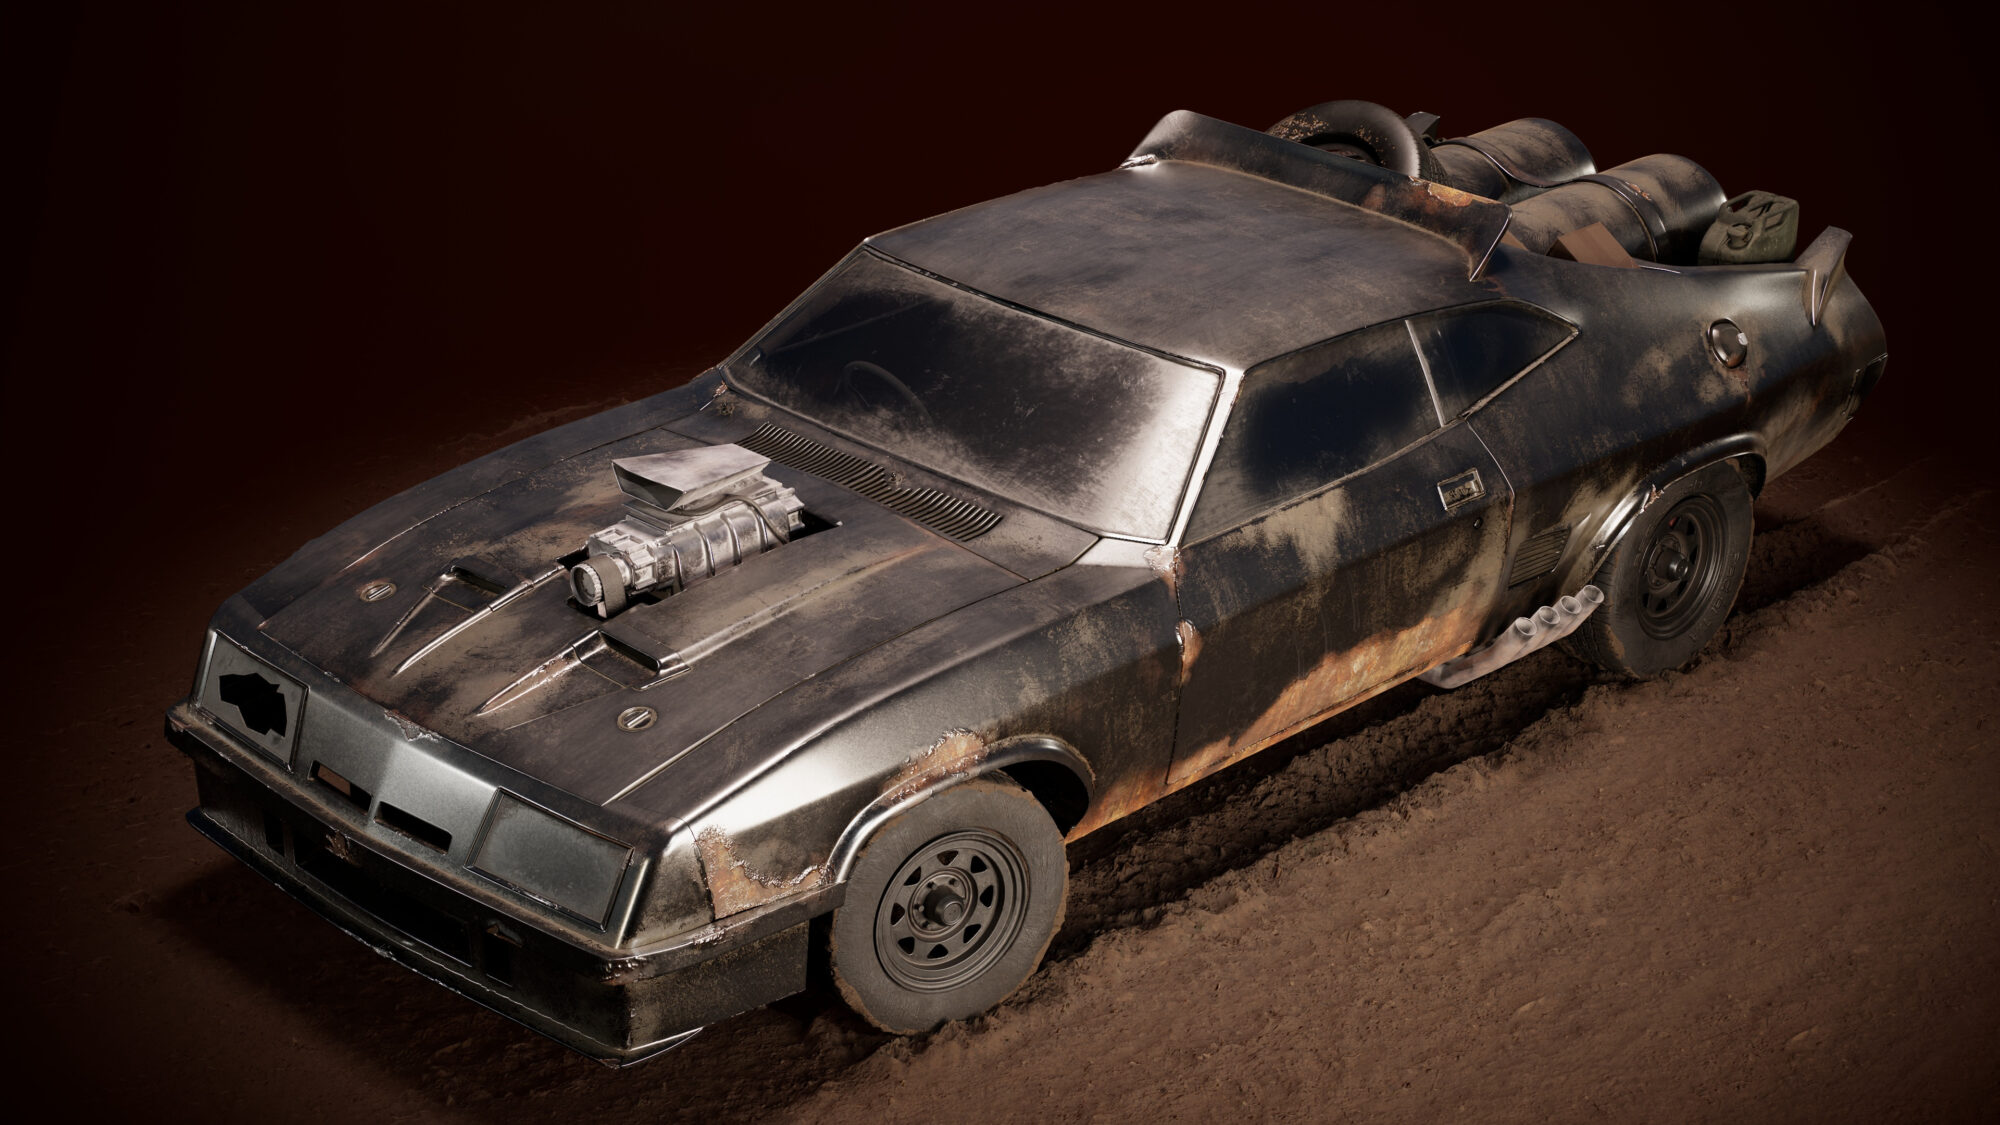
The Interceptor is without a doubt my favourite movie car of all time, so it was only a matter of time before I started working on it. It was a great opportunity to improve my modelling and texturing skills. The design has interesting shapes, as well as great surface variation.
When I started this project, I knew I wanted to improve my general texturing and modelling skills. Mainly, I just wanted to have fun with it. I adore the Interceptor so I knew I was going to have a blast.
Going in, I knew I wanted a few things from this project:
1) To adapt the car from both Mad Max 2 and Fury Road. I wanted to take features I liked from both versions while staying faithful overall.
2) I wanted to push myself to improve from my previous personal project, the Custom M4. In particular, I wanted to improve the texturing skills I’d learned in my last project.
3) To gain an understanding of a vehicle pipeline to use in future projects
From here, I started gathering references. It gave me an excuse to watch through two of my favourite action films and capture as many images as I wanted. Of course, these weren’t the highest resolution but they gave me a good overall idea of the vehicle’s silhouette. I did a bit more digging and struck gold with a website that gave a full breakdown of what one would need to put together their own Interceptor! (Link here for those who are interested: https://www.madmaxmovies.com/mad-max-replica-cars/mad-max-black-interceptor-replica/index.html). This gave me names of exact parts, from there it was easy-peasy, I collected some 3D references as well as some concepts from Fury Road.
Each version of The Interceptor is ever so slightly unique, so I had to be extra observant of the finer details. Some had wing mirrors, while others did not as an example. I wanted to take what worked, and what I thought looked great and capture the overall essence of the car.

Blockout/Modelling
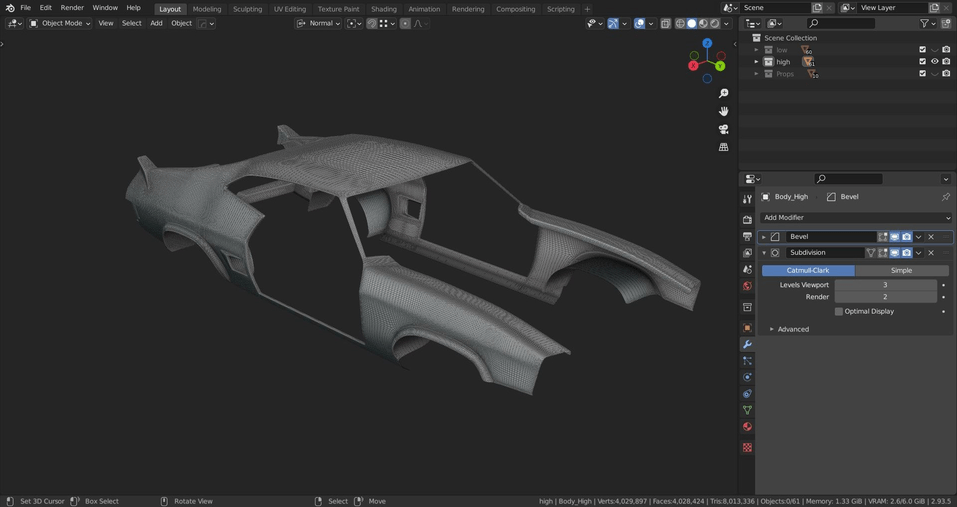
Once reference was found and organised, I was ready to go. I set up my blueprint ref within Blender and began blocking out the main shapes.
I decided to run a test and began modelling the wheels in their entirety, this was primarily to get a good reference on time when modelling fairly complex. It was a great way to warm up to the project as well as giving myself a good quality benchmark for model detail.
When I was blocking out each object of the car, I focused on keeping everything proportional. I always keep an unreal mannequin in each of my Blender scenes for scale reference and look up real-life dimensions wherever possible.
From there it was a case of taking things slow and steady, each day picking out a specific area I wanted to focus on (the engine, the side vents, the door). I found this a great way to break the work up in my evenings after work, spending an hour or so whenever I had the chance really helped keep myself focused and maintain a steady flow.
My Blender workflow was fairly plug-in heavy. I found HardOps extremely useful throughout. For each part of the vehicle, I used a bevel modifier over a subdivision modifier. I then set the bevel to be limited by weight and identified and marked any hard edges I wanted to be affected.
I kept my base mesh as simple as possible. My rule of thumb was that without the modifiers, my base mesh should be a game-ready model. Keeping the mesh simple also made it easier to edit, so I added edge-loops only when absolutely necessary. Rather than focus on creating a model that was game-ready, I decided to use the Interceptor as a chance to showcase and improve my texturing skills.

UVing/Retopo
I find it easiest to learn new techniques and improve my skills when I keep things loose and have fun. As mentioned earlier, I also tried to create a model that I could easily go back and work on later—a great reminder that a project should be a living thing, rather than a fixed benchmark of progress. I love the idea of revisiting past works to see what I can improve, so I always work under the assumption that I’ll look back at a project later.
With this in mind, the Interceptor ended up being a high-poly model. However, because I’d kept the mesh simple, I ensured I’d created a model I could go back and optimize so it was game-ready. If I wanted to review this model at a later date, I know I’ll be able to re-topologise it.
I did end up unwrapping the model for the texturing process. I did this in Blender using two plug-ins: TexTools and UV Packmaster. They sped up the UV process tenfold, allowing me to mark seams piece by piece and apply a checker map at the click of a button.
I like to keep my UV process as straightforward as possible. I go round the model, mark the seams on the hard edges where required, and hit ‘unwrap.’ Most of the time it’s as simple as that. Wherever possible, I’d use the rectify tool from TexTools to straighten my shells to optimise my UV space and avoid stretching.
I split the Interceptor into three materials to maintain good texel density across the board, these were separated by the exterior shell, interior parts and extras like the windows and wheels. You can see in this image how parts were separated by material.

Texturing
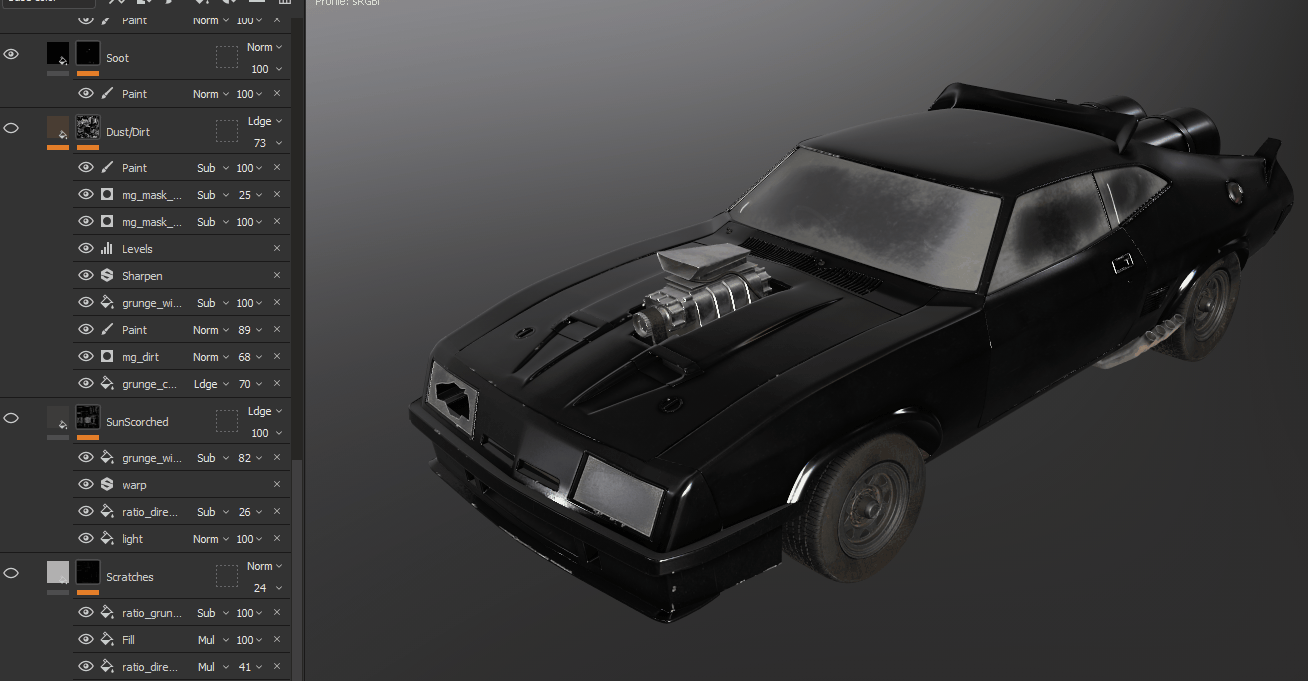
The Interceptor was a great opportunity for me to practice laying different surface types.
Before I begin any project in substance painter, I put my baked curvature map in an overlay fill layer which only affects the base colour. I then turn down the opacity, which gives the edges a good highlight. I learned this tip from a great Artstation Learning tutorial by Jason Ord which you can find here: https://www.artstation.com/learning/courses/owg/substance-painter-pushing-your-texturing-further. I recommend this to anyone trying to improve their texturing skills. Also following the advice of this tutorial, I put a subtle sharpen filter over everything.
For each surface type, whether it was paint, sand, rust or base metal, I tried to keep the same basic workflow, which went as follows…
Firstly, I create a fill layer with base values: colour, roughness, metal, and height, if needed. I would then apply a black mask to this layer, then continue to layer general grunge fills within this mask. I always try to keep in mind the visual properties of each surface type when doing so.
Next, I’d apply a manual paint layer and add detail where necessary. When isolated, many of these layers were almost imperceptible. However, when combined, these subtle details elevated the entire project.
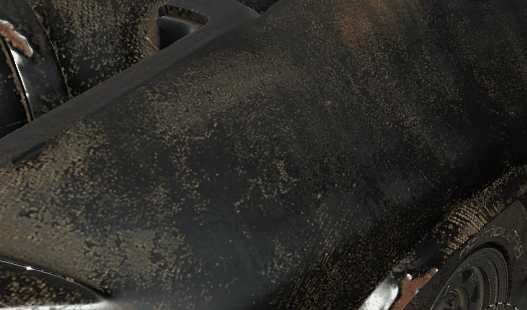
After detailing a manual paint layer, I would add a subtraction fill layer (adding more of these where necessary) and manual paint subtraction where necessary. I found adding levels within the mask gave better overall control, then over it all, a subtle sharpen filter. Occasionally, I’d add a very subtle warp or blur filter, particularly over scratches for example. A large part of creating realistic-looking texture is breaking up uniformity wherever possible. It seemed appropriate, given Mad Max’s context of chaos and disorder.
When considering texturing details, I work from macro (like the overall roughness variation) to micro (like small chips on the edge of the bonnet). With the Interceptor, macro details meant considering what areas would be most affected by the elements. As always, I focused on the story behind the details—not just what they might look like, but also why they were there in the first place. The Interceptor is almost always enduring the blistering heat of the Australian sun, naturally, the paint on top would be worn and faded compared to the rest. For this, I created a sun-scorched paint layer, attach a black mask, then apply a Light smart mask; this would only affect the top sides of the car, giving the desired result. I also added directionality to this mask, thinking about sand and debris that would wear down the paint, applying subtle directional scratches and once again layering subtraction fills to break up that uniformity.
With the top side done, I inverted the mask and added scratches to the underside of the car. I once again thought about the sandy world in which Mad Max is set, and the high-speed chases the Interceptor is put through. I thought sand and dirt flying up under the car would leave some scratches.
Mid-range details came after macro. These included details like sand build-up, and soot on and around the car’s exhaust. Once again, this stage was about getting a good base for each surface type, and creating a good overall contrast of colour and roughness, then referring to my general workflow mentioned previously.
The most challenging micro-detail to get to grips with was the rust. I didn’t just want the colour of rust, I also wanted to add distinct and interesting height variation to give that peeling effect. This is a car that looks like it’s been through hell and back, and is still standing. As always, the reference came first. I collected rust images from the internet and comped them together until I had a good base.
Once I added my rust base, I played around with colour balance and HSL Perceptive filters to get a shade that fit the reference I’d collected. Once again, I layered masks and painted on detail manually, then used a collection of subtraction masks again to break up uniform shapes. After getting the rust to a stage I liked, it was time to make it peel. I added an anchor point to the rust folder and referenced it on three stacked layers: height, occlusion and highlights.
I created a fill layer that affected only the height, added a black mask and a fill within it that referenced the rust anchor point. Within the mask, I also added a highpass filter to mask out the edges, and levels to give greater control. This created the desired peeling effect. From here, I used a similar workflow for the occlusion (adding a blur in this layer) and highlights of the peeling rust, giving a slight self-shadow and highlighting the crisper edges.
This process had a lot of iteration, and I found a great tutorial by Stanislav Teslenko that you can follow here: Substance Painter Peeling Paint Tutorial by Stanislav Teslenko

Texturing: The smaller details
When texturing the smaller details, much of my method remained the same. For the tires and windows, for example, I used the same workflow as I had on the car’s main body. Once again, I created a base and slowly layered dirt and surface variation. As with the main body, the devil is in the details. Creating realistic-looking textures is a slow process, and each layer on its own won’t always make a dramatic difference. By taking it slow and being methodical, I was able to build up believable looking texture, layering dirt and surface variation.
For the rest of the details, I strongly believe that authenticity pays off. For the license plate I found a reference from a 70s plate from Victoria, Australia, a reference to the first Mad Max film’s location. I paid the same amount of attention to details such as the petrol gauges, finding an image online and comping it into Photoshop. Even though some of the smaller details aren’t always visible on the mode, making sure every aspect of your work is as authentic as possible is a good habit to get into.
Megascans
I wanted to ground my model, making it part of a narrative environment, and literally presenting it as though it was on the dirt. Tire tracks were a detail that helped hugely with this. I kept the presentation simple, with additional set dressing is done with the help of Megascans (including the gas canister, oil tank and cardboard boxes).
The dirt floor was also a Megascan but edited in Photoshop to fit better with the model. I played with the heightmap so the tracks fitted my tires, as well as experimented with colour and roughness values. I then placed this texture on a plane and added a blurred alpha mask around the edges. To help ground the model further, I wanted to have some mud build-up around the tires. To do this I duplicated the tire, scaled it down and sculpted the mud from there, using an inflate brush in Blender. I then made sure to apply the same material that was being used on the ground.
Rendering/Lighting
For lighting, I used a basic three-point set-up that I could easily rotate around the model to fit each shot. I looked into car showcase studios and product shots as reference and found that they always used a subtle toplight on top of my three base lights. I found this really accentuated the roughness variation across the model. For certain shots, I placed point lights by the rims to bring out the highlight of the metal.
When it comes to the camera, I typically use a low FOV (usually between 10 and 30) with ACES tone mapping. This helps highlight the vehicle’s distinctive silhouette. For each camera, I always apply a slight sharpen, a varying depth of field from camera to camera (depending on the context of the shot), and a minuscule amount of chromatic aberration.

Conclusion
This project was a challenging one, and I feel as though my skills have improved drastically during its duration. Capturing that surface variation found in The Interceptor was the main challenge for me as well as staying focused and driven during the modelling stage.
There were multiple iterations and plenty of re-dos on parts of geometry throughout. Being able to tell yourself that it’s okay when something isn’t quite working with your model or texture is crucial to a successful project, it won’t always work the first time.
I occasionally found myself with tunnel vision, not being able to see how to improve or where I was going wrong. For times like these, I recommended to any artist, take a step back and don’t be afraid to ask for feedback! Whenever there was a substantial update to my project, I would post some shots into Discord servers (particularly the Dinusty server found here: https://www.dinustyempire.com/) or share with my colleagues at Playground and ask for open feedback. Even just having a second set of eyes on it was a huge help. I would like to thank my colleagues and peers who helped tremendously with their feedback: Nathan Doye, Simon Hughes, Lennert Schelpe, Eric Rogers and Martin Martschenko
I started this project around 6 months before publishing, with breaks in between (busy with work or starting new projects, etc.). During these six months, it was all reference gathering and modelling in Blender, it was the final two months or so when things started to ramp up, particularly in the final two weeks. In those final weeks, I would spend a good 1 to 2 hours working on it, focusing hard on getting it complete. In total, I would estimate The Interceptor took around 40-50 hours, with a good 20 of those focused on texturing.
Thank you for reading!
Read more articles
You might also like these articles.