Introduction
I am Ankit Garg, and I co-founded Little Red Zombies 14 years ago alongside my co-founder, Sri Ram Chandra. Our studio specializes in creating AAA characters for video games.
During my sabbatical last year, I decided to pursue my passion for teaching and founded Zombie Art School, an online education platform dedicated to helping students achieve excellence in AAA character art.
With nearly two decades of industry experience, including more than 10 years directing art for over 40 AAA game titles such as Alan Wake 2, Ghost of Tsushima, and Horizon Forbidden West, I’m passionate about artistic storytelling.
Many of the characters I create are inspired directly by the games I play.
Goals
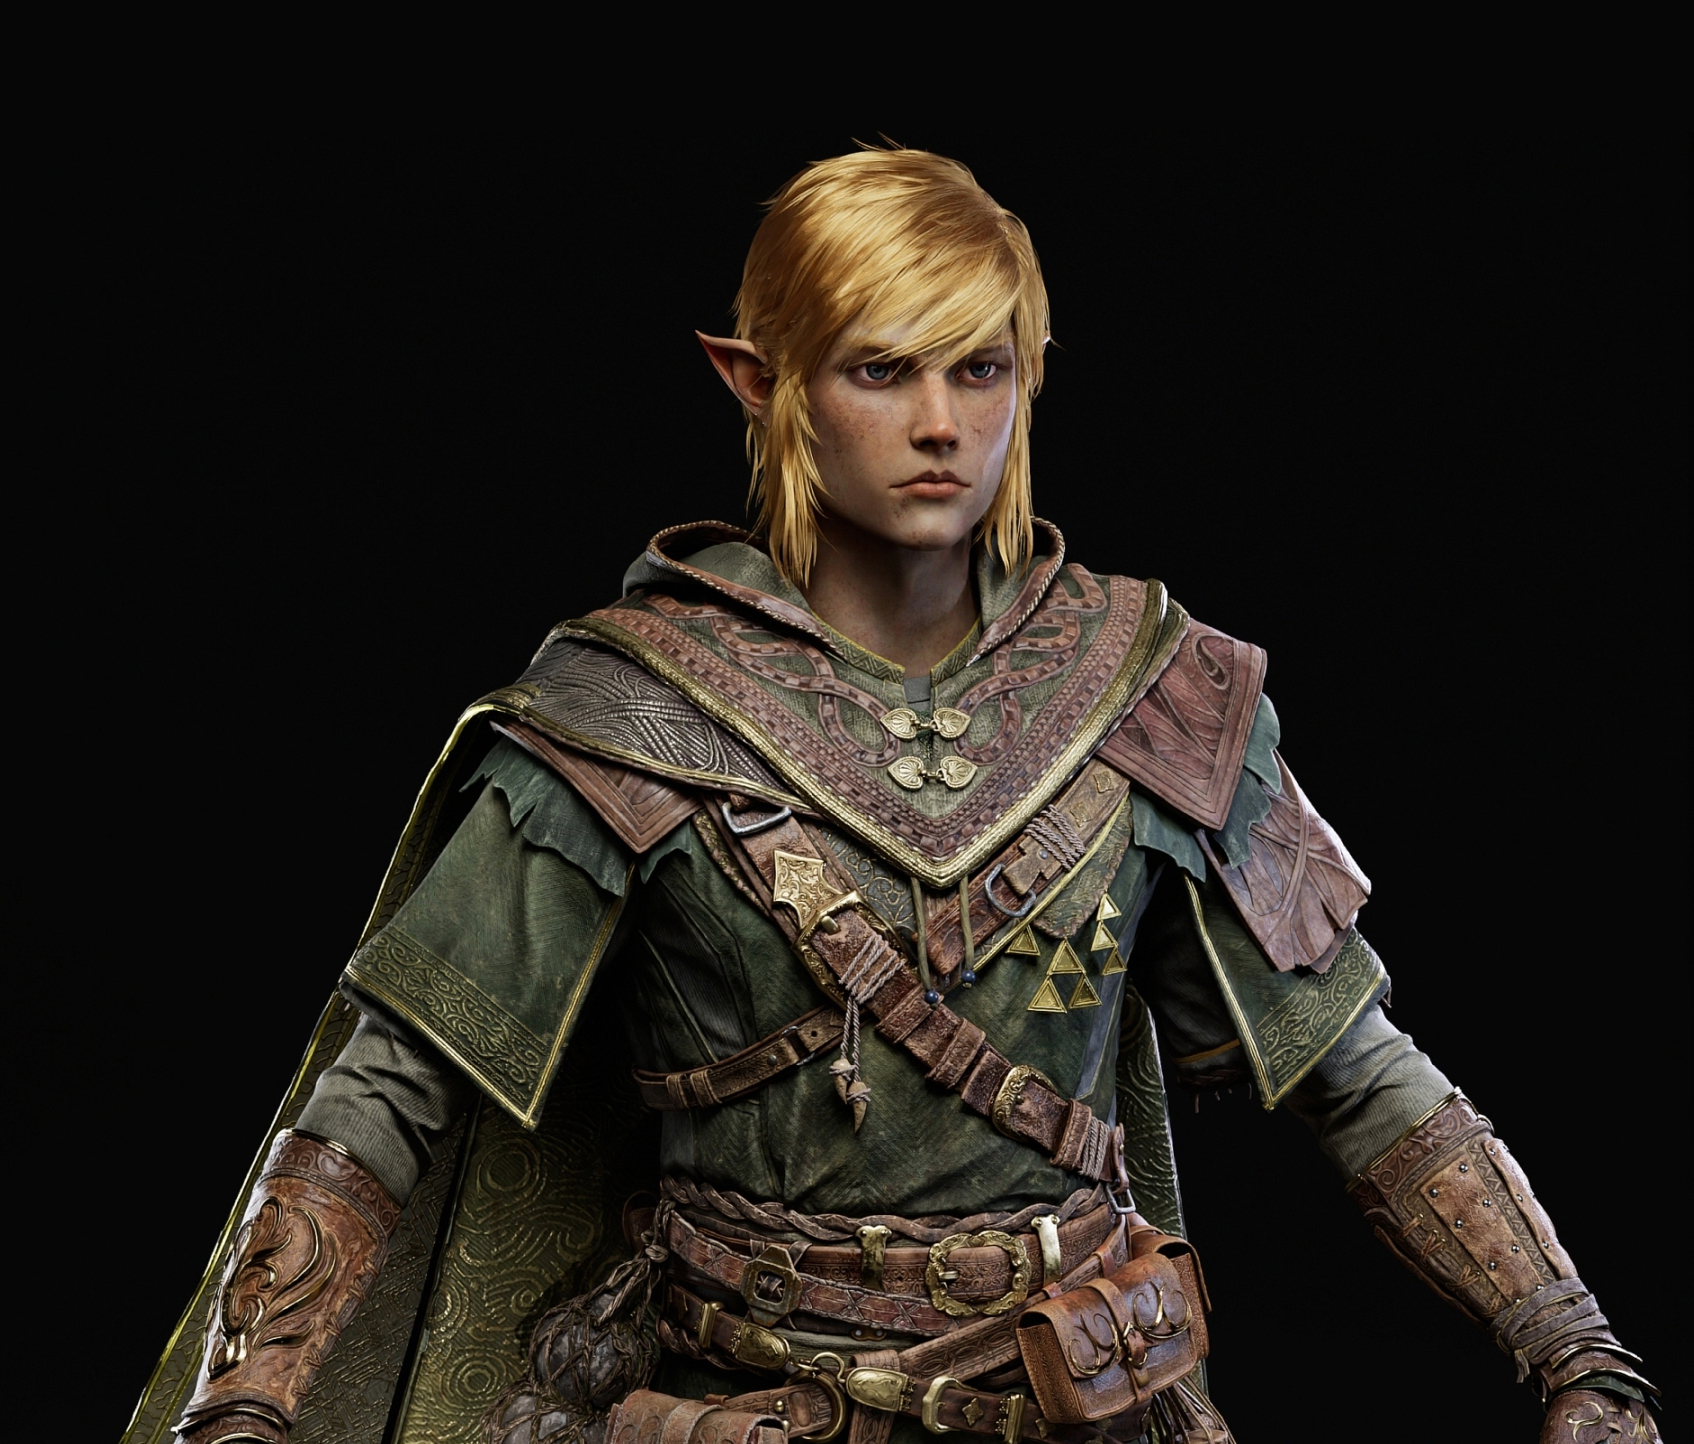
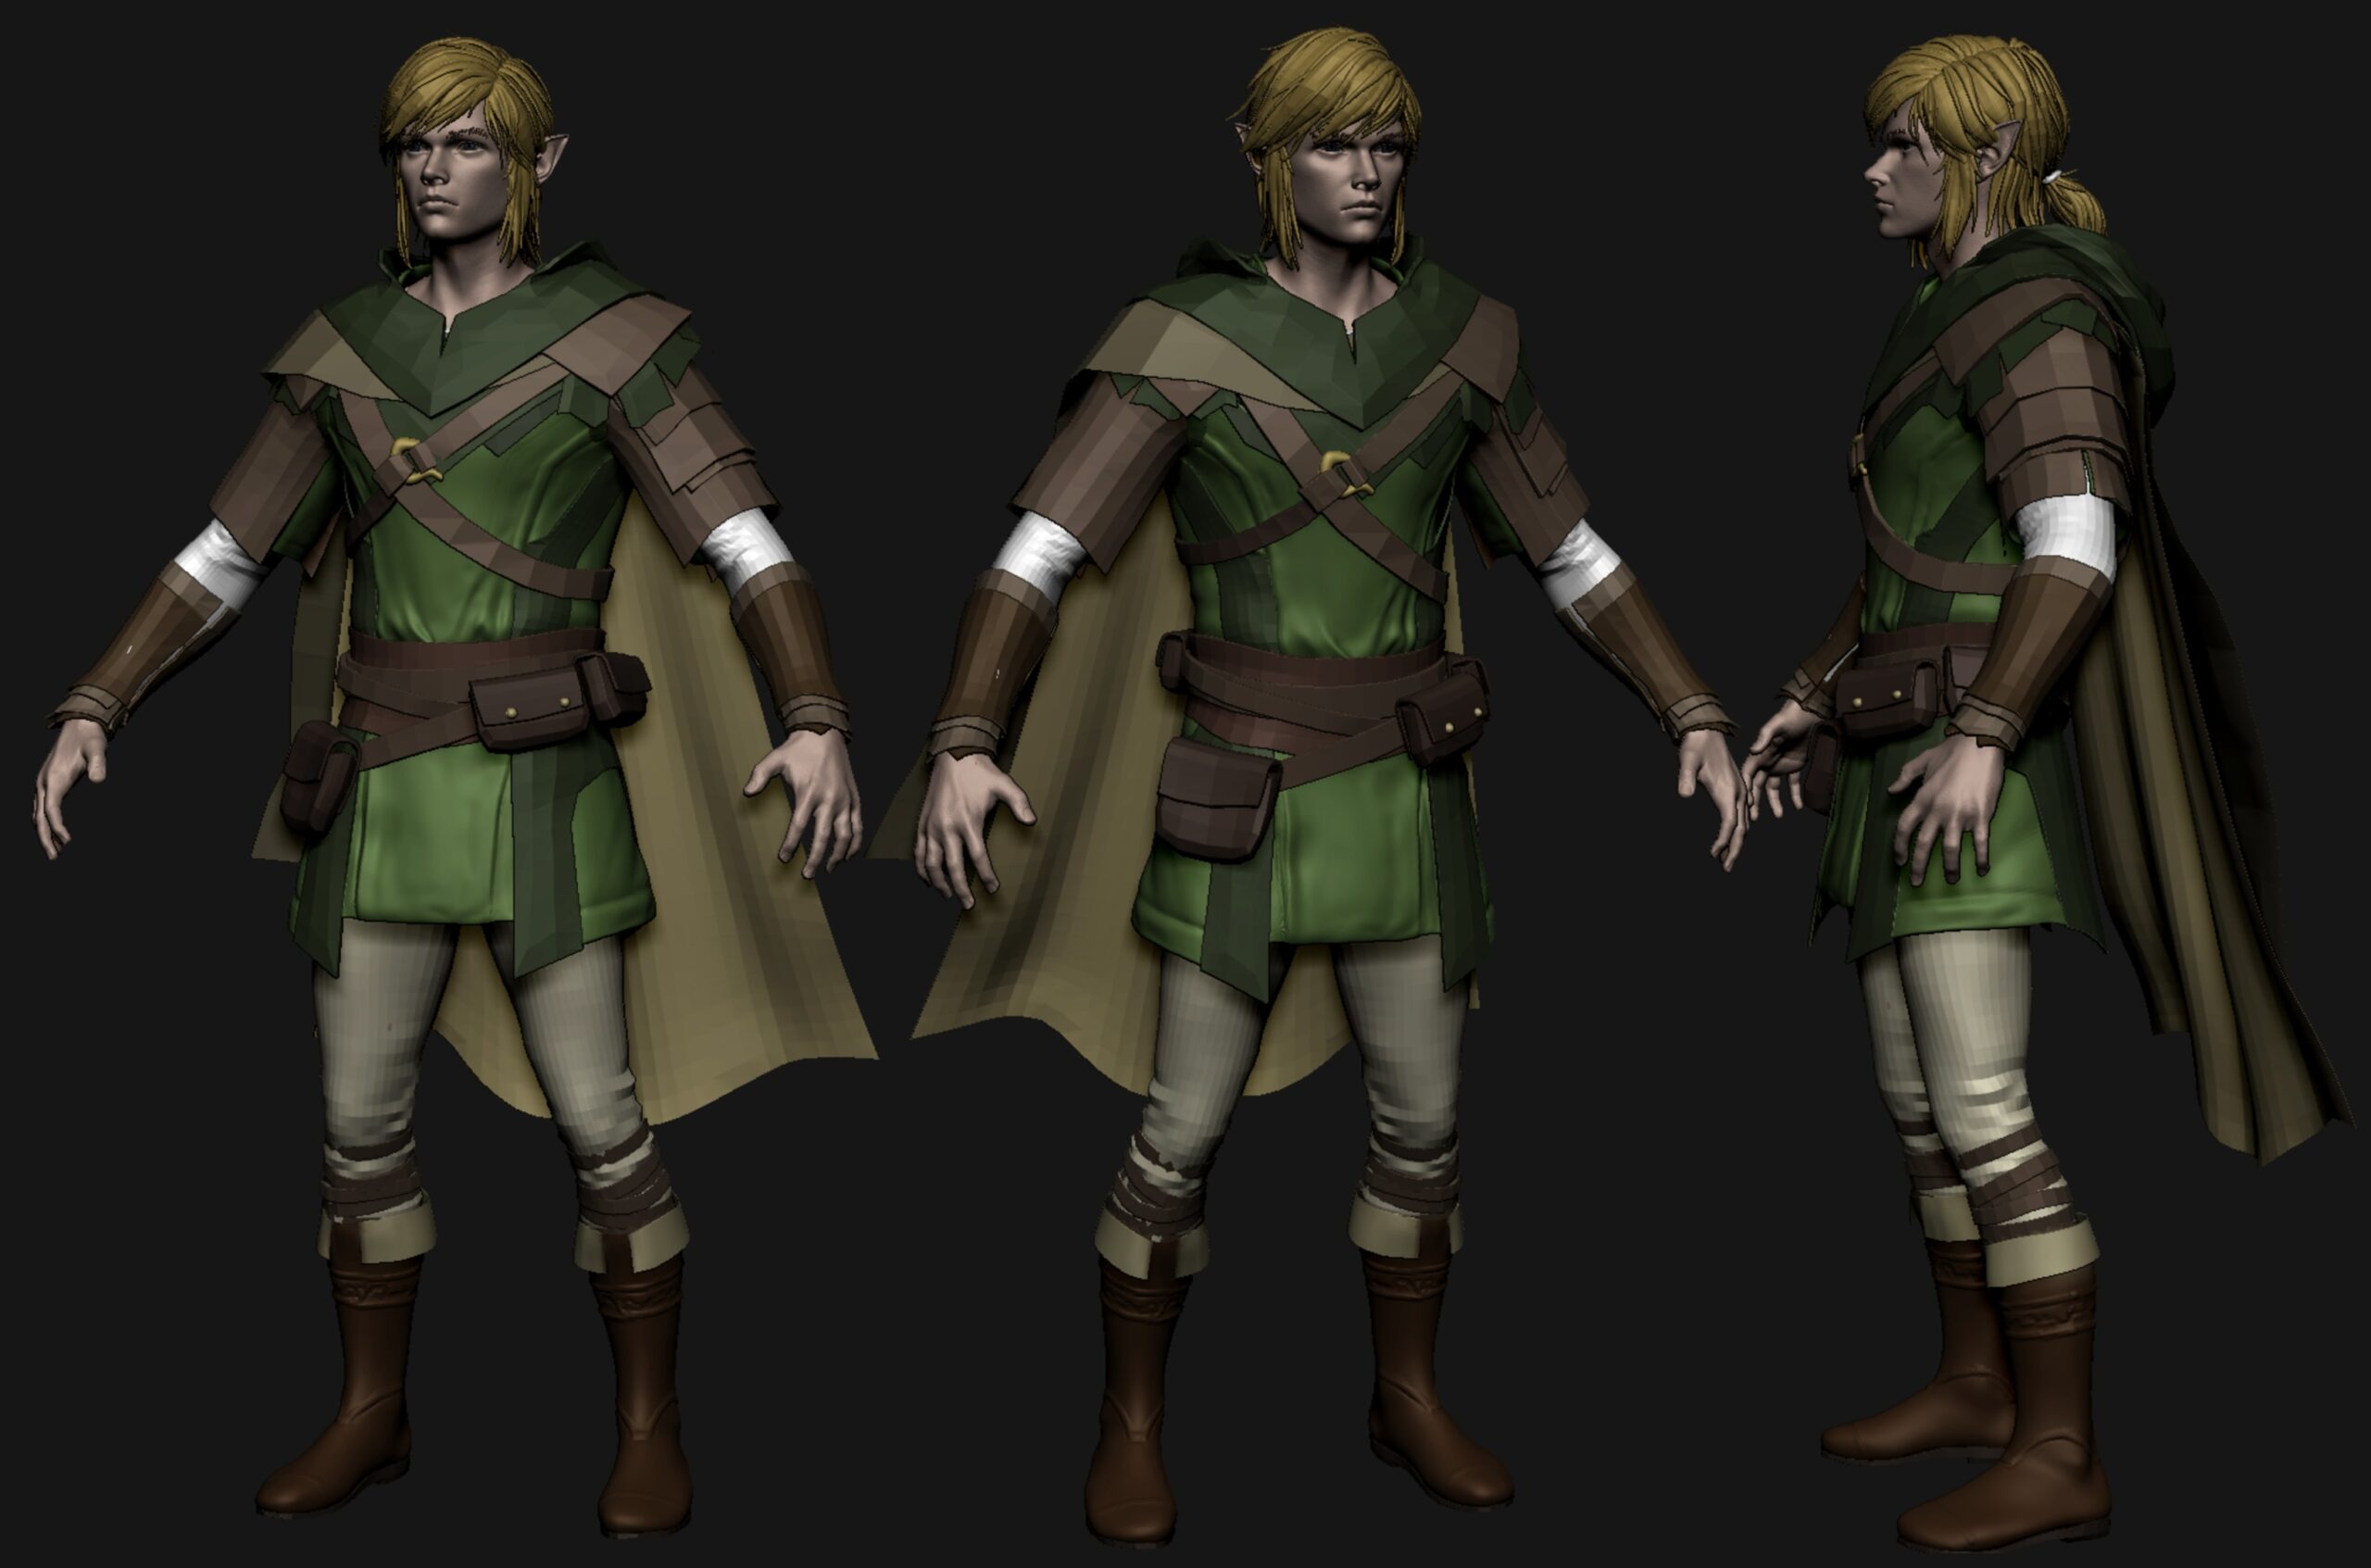
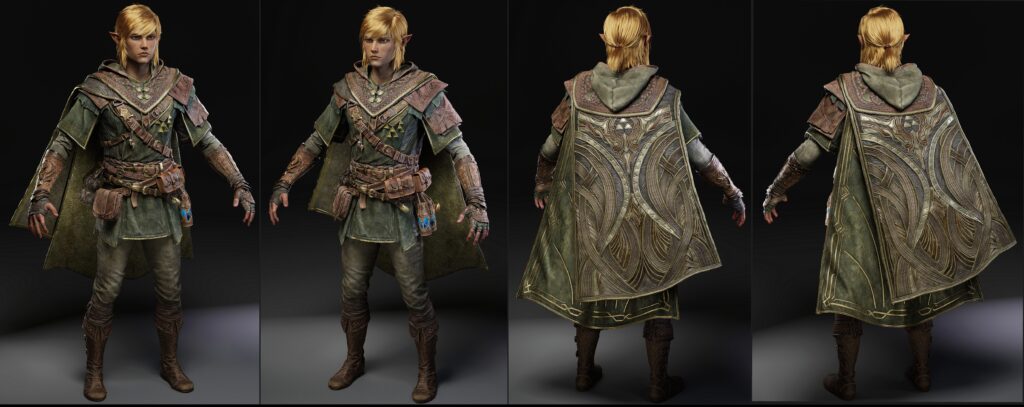
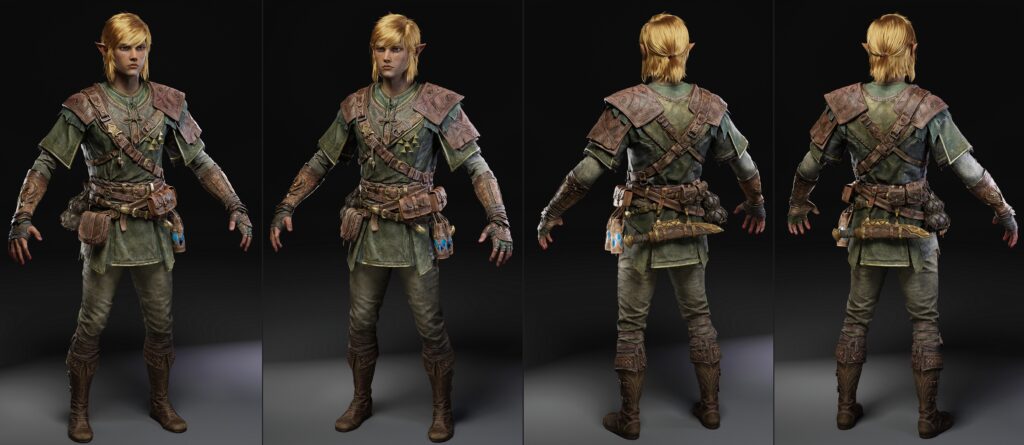
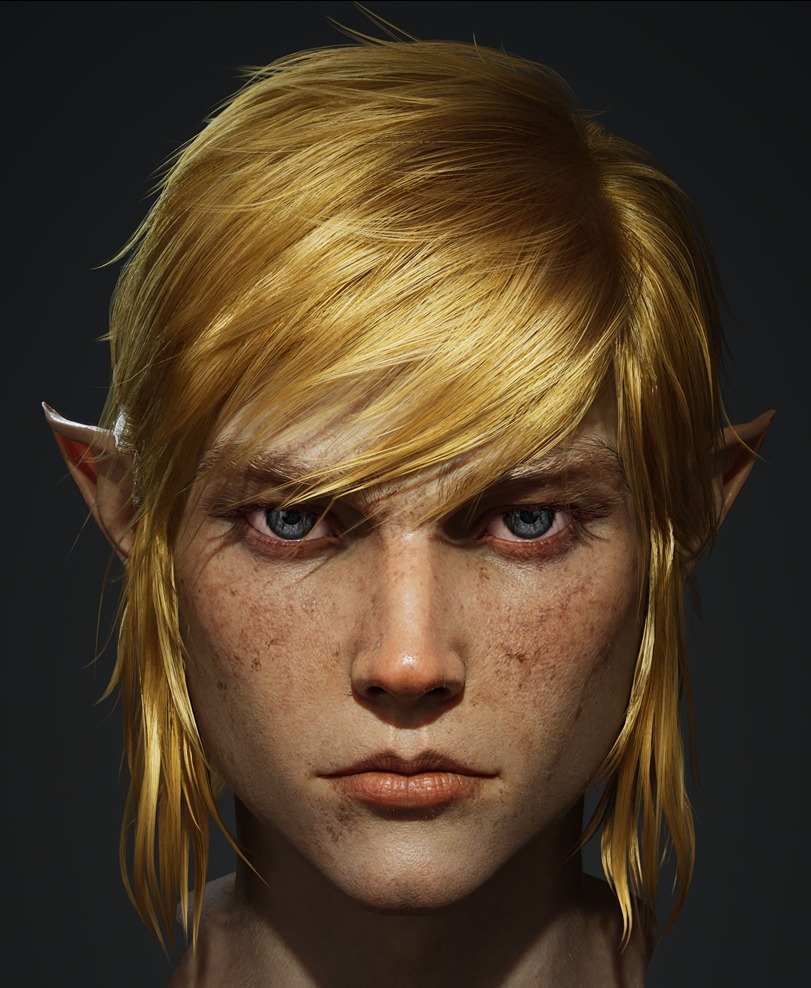
The vision was to re-imagine Link from The Legend of Zelda series as a character belonging to a darker, desolated, and twisted version of Hyrule.
This interpretation drew heavily from the atmospheric storytelling and visual aesthetics of From Software games like Dark Souls and Elden Ring.
Another driving concept was a hypothetical scenario: What if studios like Naughty Dog or Sony Santa Monica—renowned for their visually stunning, hyper-realistic work—tackled the next installment of The Legend of Zelda?
What kind of character would they design to fit a darker, more grounded narrative?
These ideas formed three core pillars for this redesign:
- Hyper Realism: A grounded, believable look that still retains the essence of Link.
- Balanced Complexity: Striking the perfect balance between intricate details and clean, readable design.
- Darker, Serious Aesthetic: A more mature, somber take on Link, reflecting the tone of this re-imagined world.


Tools
The project was brought to life using the following tools:
- PureRef: For gathering and organizing references and exploring design variations.
- ZBrush: For sculpting and detailing.
- Marvelous Designer: For creating realistic cloth patterns and simulations.
- Topogun & 3ds Max: For low-poly modeling and topology.
- Substance Painter: For baking and texturing.
- Unreal Engine: For integration, lighting, rendering, and making a playable walkthrough.
References & Inspiration
The idea for this project began while playing Tears of the Kingdom with my son. The stories of exploration, discovery, and overcoming adversities made a profound impact on us.
While we were going through the game, my son asked, “Why don’t you make Link?”—and that’s when the journey began.
Having just completed a Sci-Fi Barbarian character, I was content with the technical execution but felt it lacked visual depth and appeal. The intentionally generic design left me wanting to tackle something more intricate and creatively ambitious.
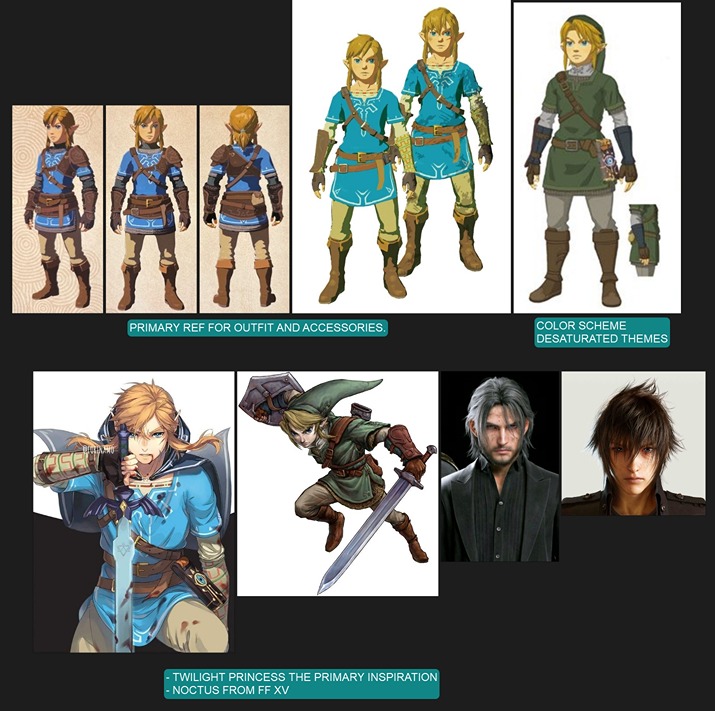
The idea of a darker, more complex version of Link—rooted in a Souls-like universe and styled with the polish of a AAA Sony title—took shape quickly. My reference pool was extensive:
- Zelda images and lore for authenticity.
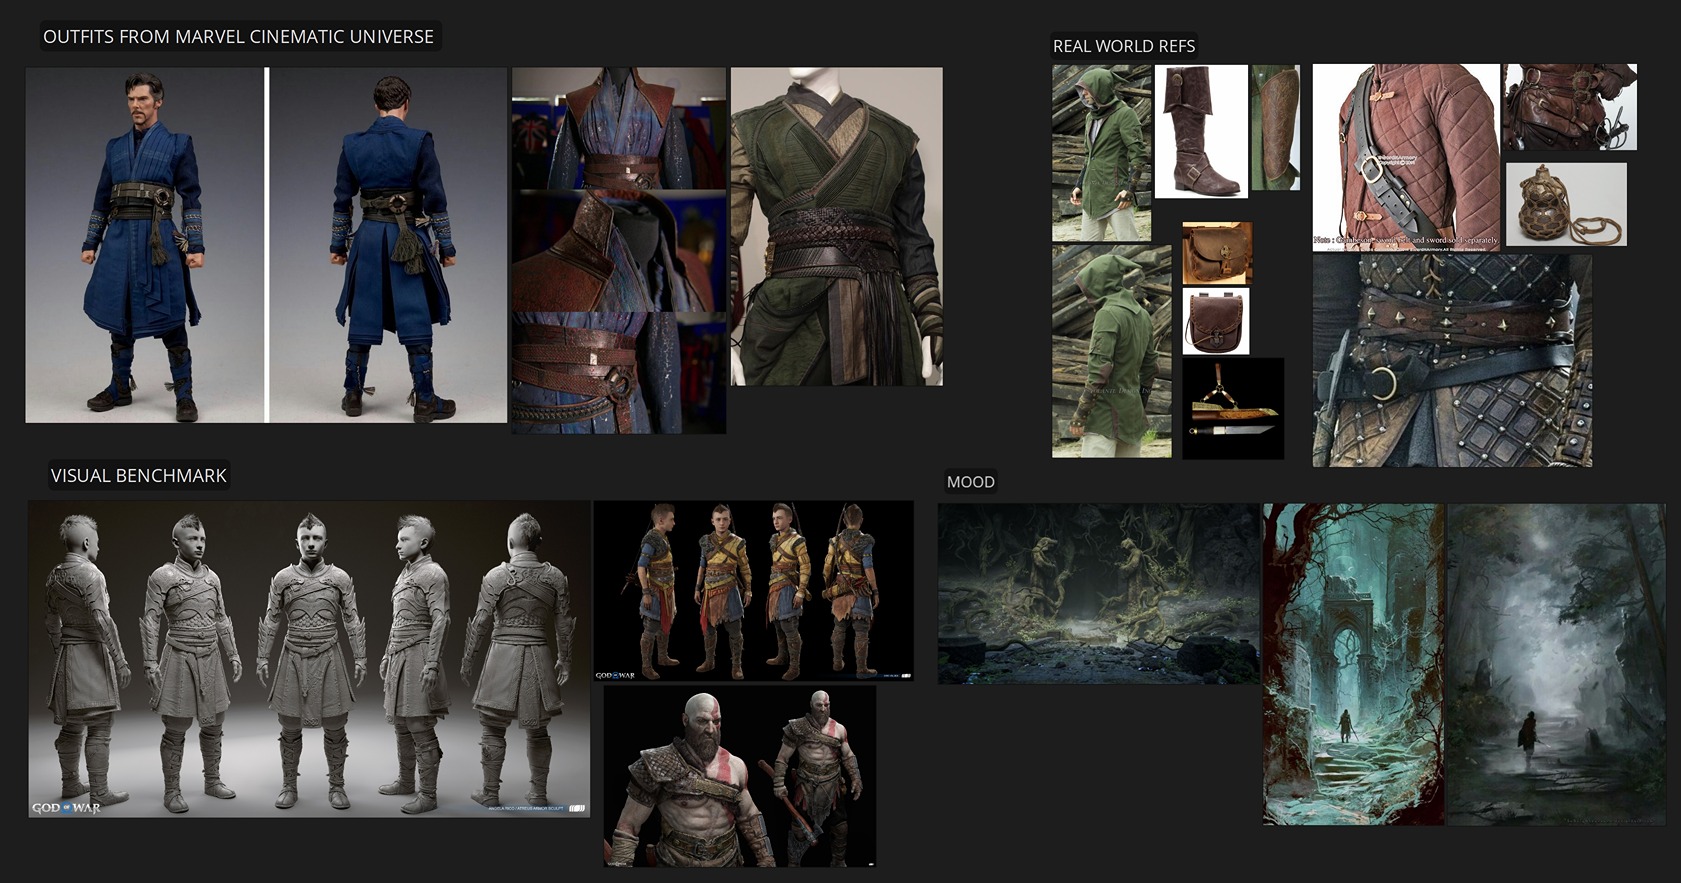
- God of War Ragnarok for its balance of readability and complexity.
- A mix of Marvel Cinematic Universe, especially Doctor Strange, for angular design language and fabric intricacies.
Blockout
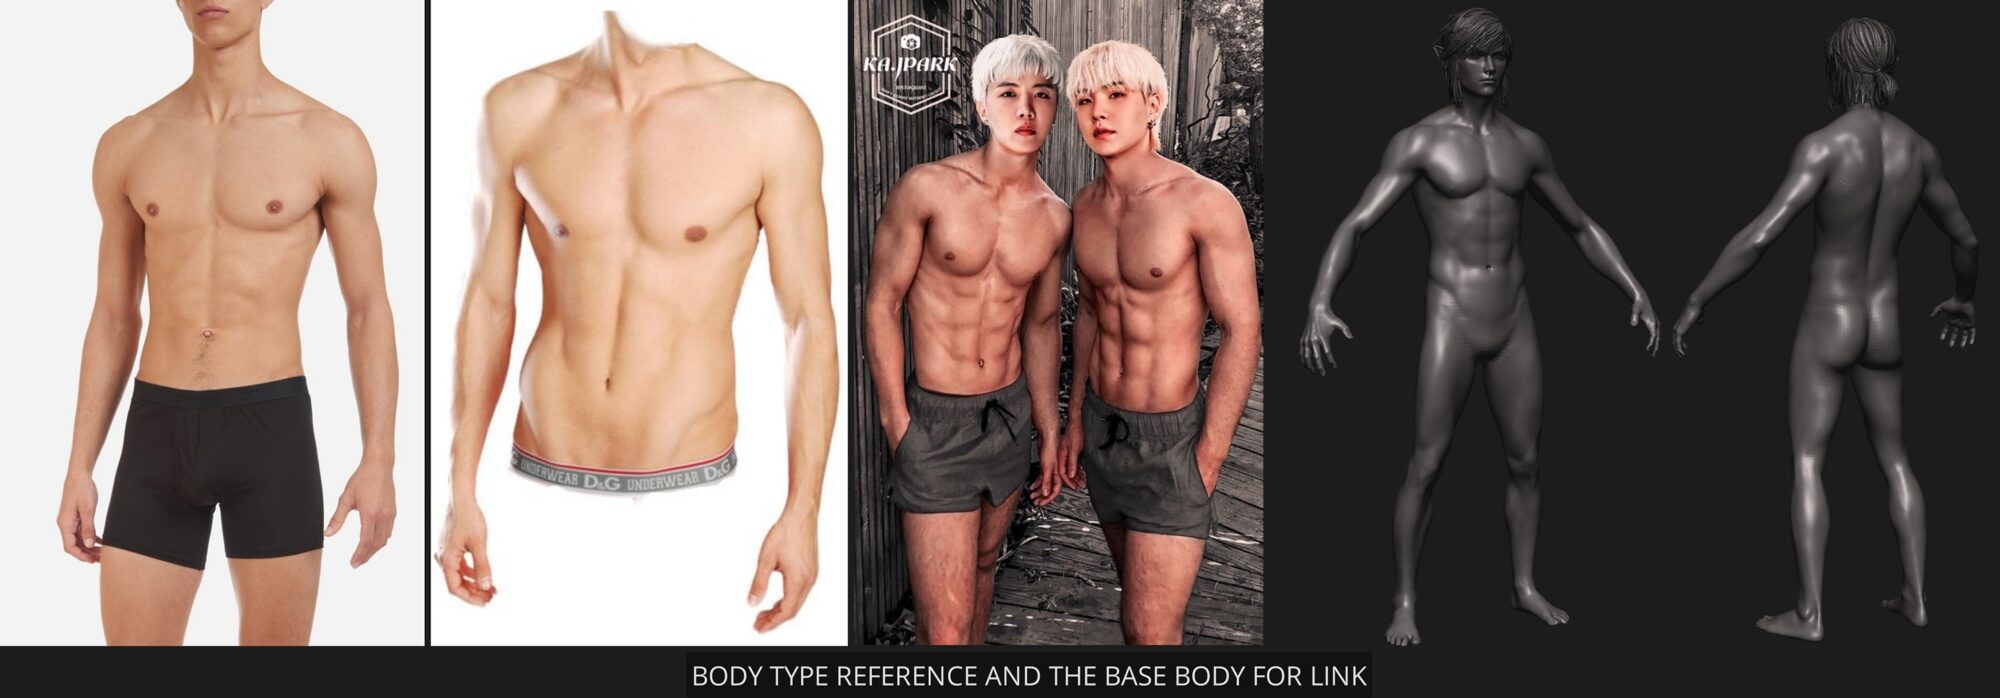
Blockout by far is the most important stage. A strong blockout relies on a base body that aligns with the character’s traits. If the body type doesn’t support the intended characteristics, the design quickly falls apart.
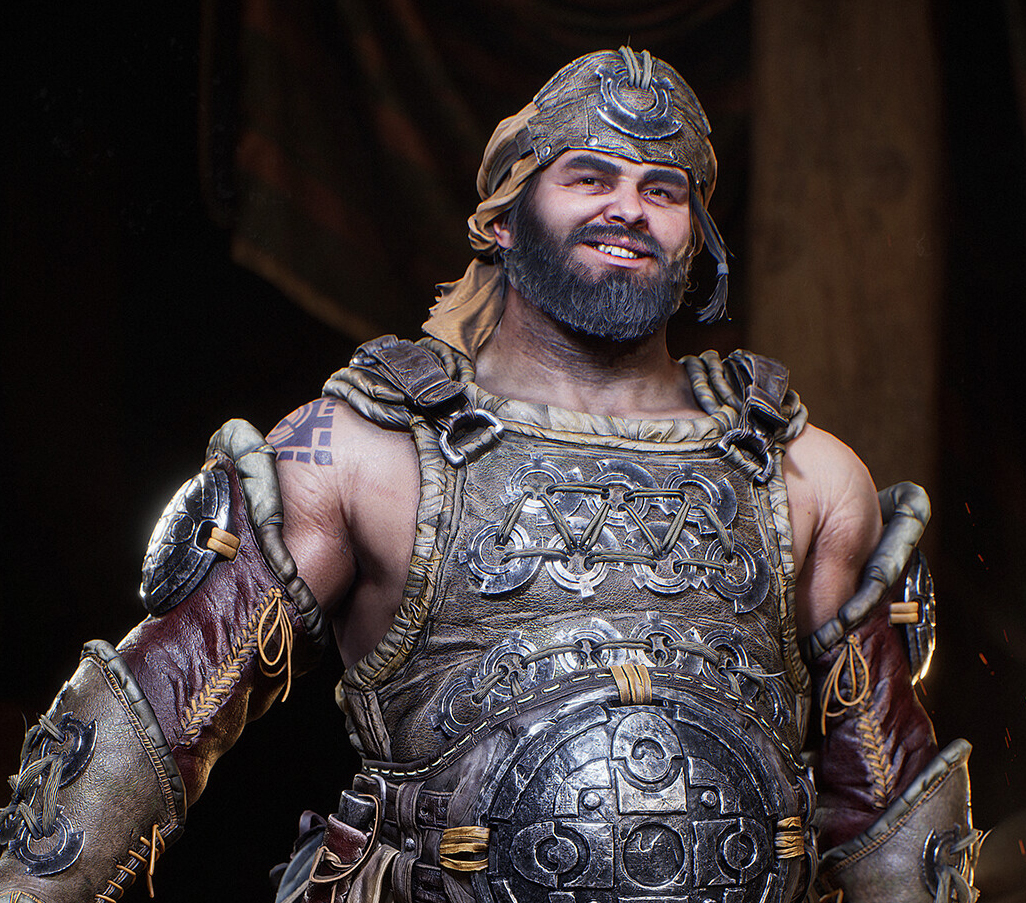
Link’s lean, athletic build was inspired by references to Japanese and Korean models to suit his characterization.
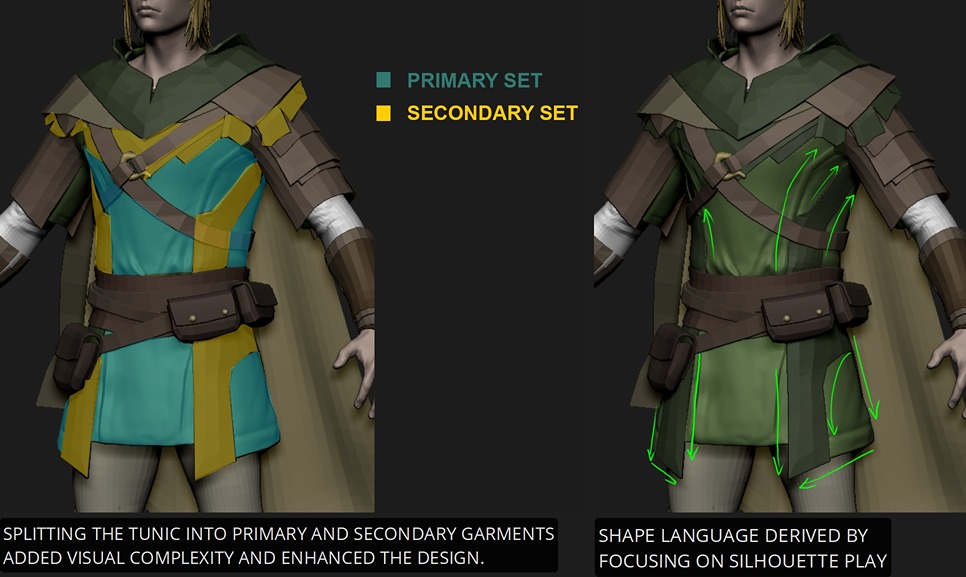
For the outfit, I broke down the tunic into layered sets with geometric angles, creating a unique silhouette and give an appeal of a garment that looks complex in construction.
The influence of Marvel’s costume designs was a driving force here.
The blockout stage also serves as a stage to solve design challenges. I resolved about 60% of the design challenges during this process, but in hindsight, I wish I had addressed at least 80%.
Leaving unresolved design elements made the later stages more demanding than necessary.
Marvelous Designer & Highpoly Clothing
The tunic, pants, and cape were created in Marvelous Designer, using the blockout of the tunic as the foundation for pattern creation. In Marvelous, everything revolves around achieving the right fit.
Once the fit is nailed, the rest of the process becomes much smoother.
In ZBrush, the focus shifted to enhancing the overall construction and ensuring the elements in the clothing were visually readable. This included defining seams for visual clarity from a distance.
Additional secondary details, like memory folds, were sculpted to achieve a scan-like level of realism. This stage also involved some material explorations to refine the look further..
The pants were deliberately kept simple, featuring only subtle wraps to break monotony and create visual areas of rest within the overall design.

Shoes & Bracers
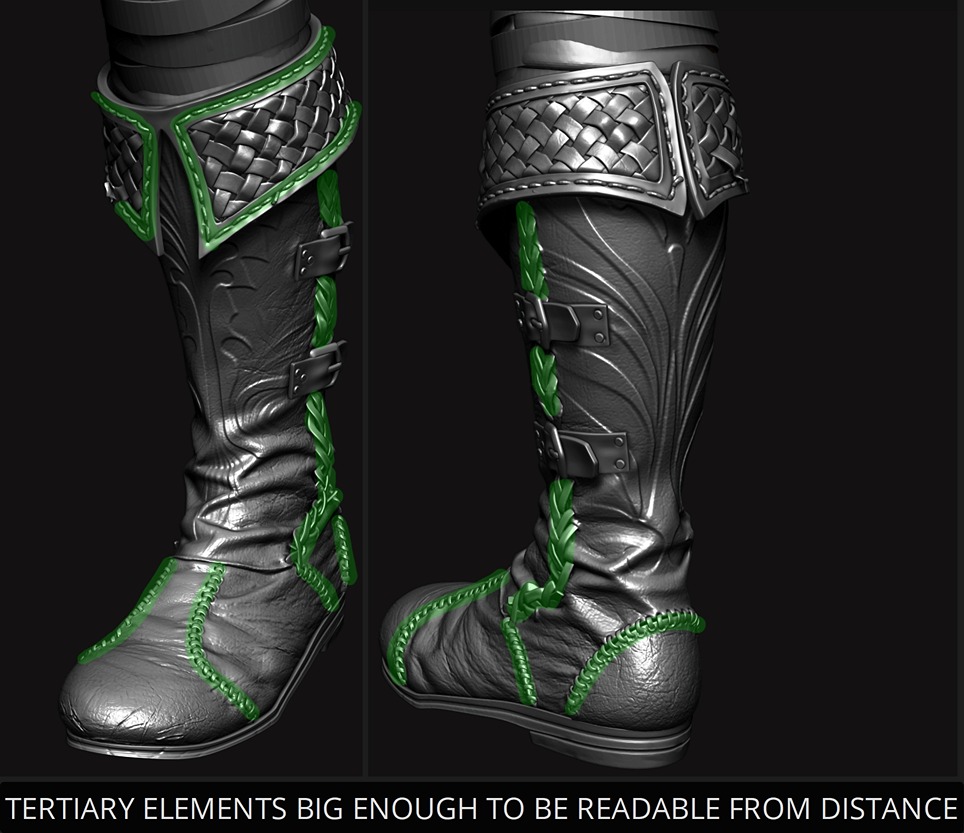
The shoes follow a classic medieval design with added personal touches. Paying homage to Kratos from God of War, I incorporated a woven leather pattern into the top portion of the shoes.
Additional design explorations included weaving details on the sides and embossed patterns on the front and back. These subtle elements break up the flatness and add decorative interest.
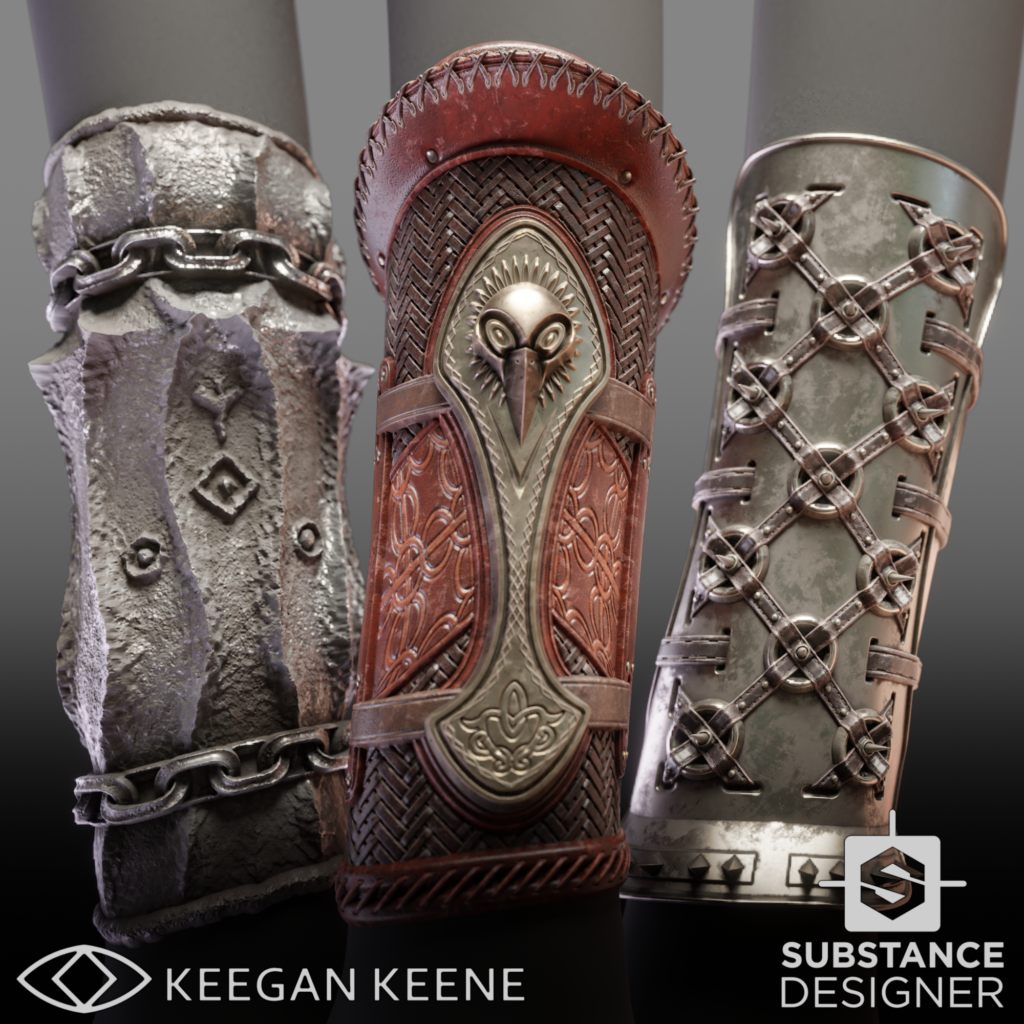
The bracers proved to be more challenging due to a lack of clarity in the initial design. The process became a trial-and-error journey, with multiple iterations before settling on the final version.
The design features layered leather with a sleek, protective aesthetic, avoiding repetition while maintaining the visual language.
Reflecting on the process, I realized the importance of thorough research and concept refinement before diving into the high-poly stage, as it would have streamlined the workflow significantly.
Accessories & Belt
Before diving into belts and accessories, I prepared a detailed chart highlighting key reference images and a rough paint-over illustrating how the belts would interact with one another.
While I’m not much of a 2D artist, even basic sketches can help address design challenges effectively.
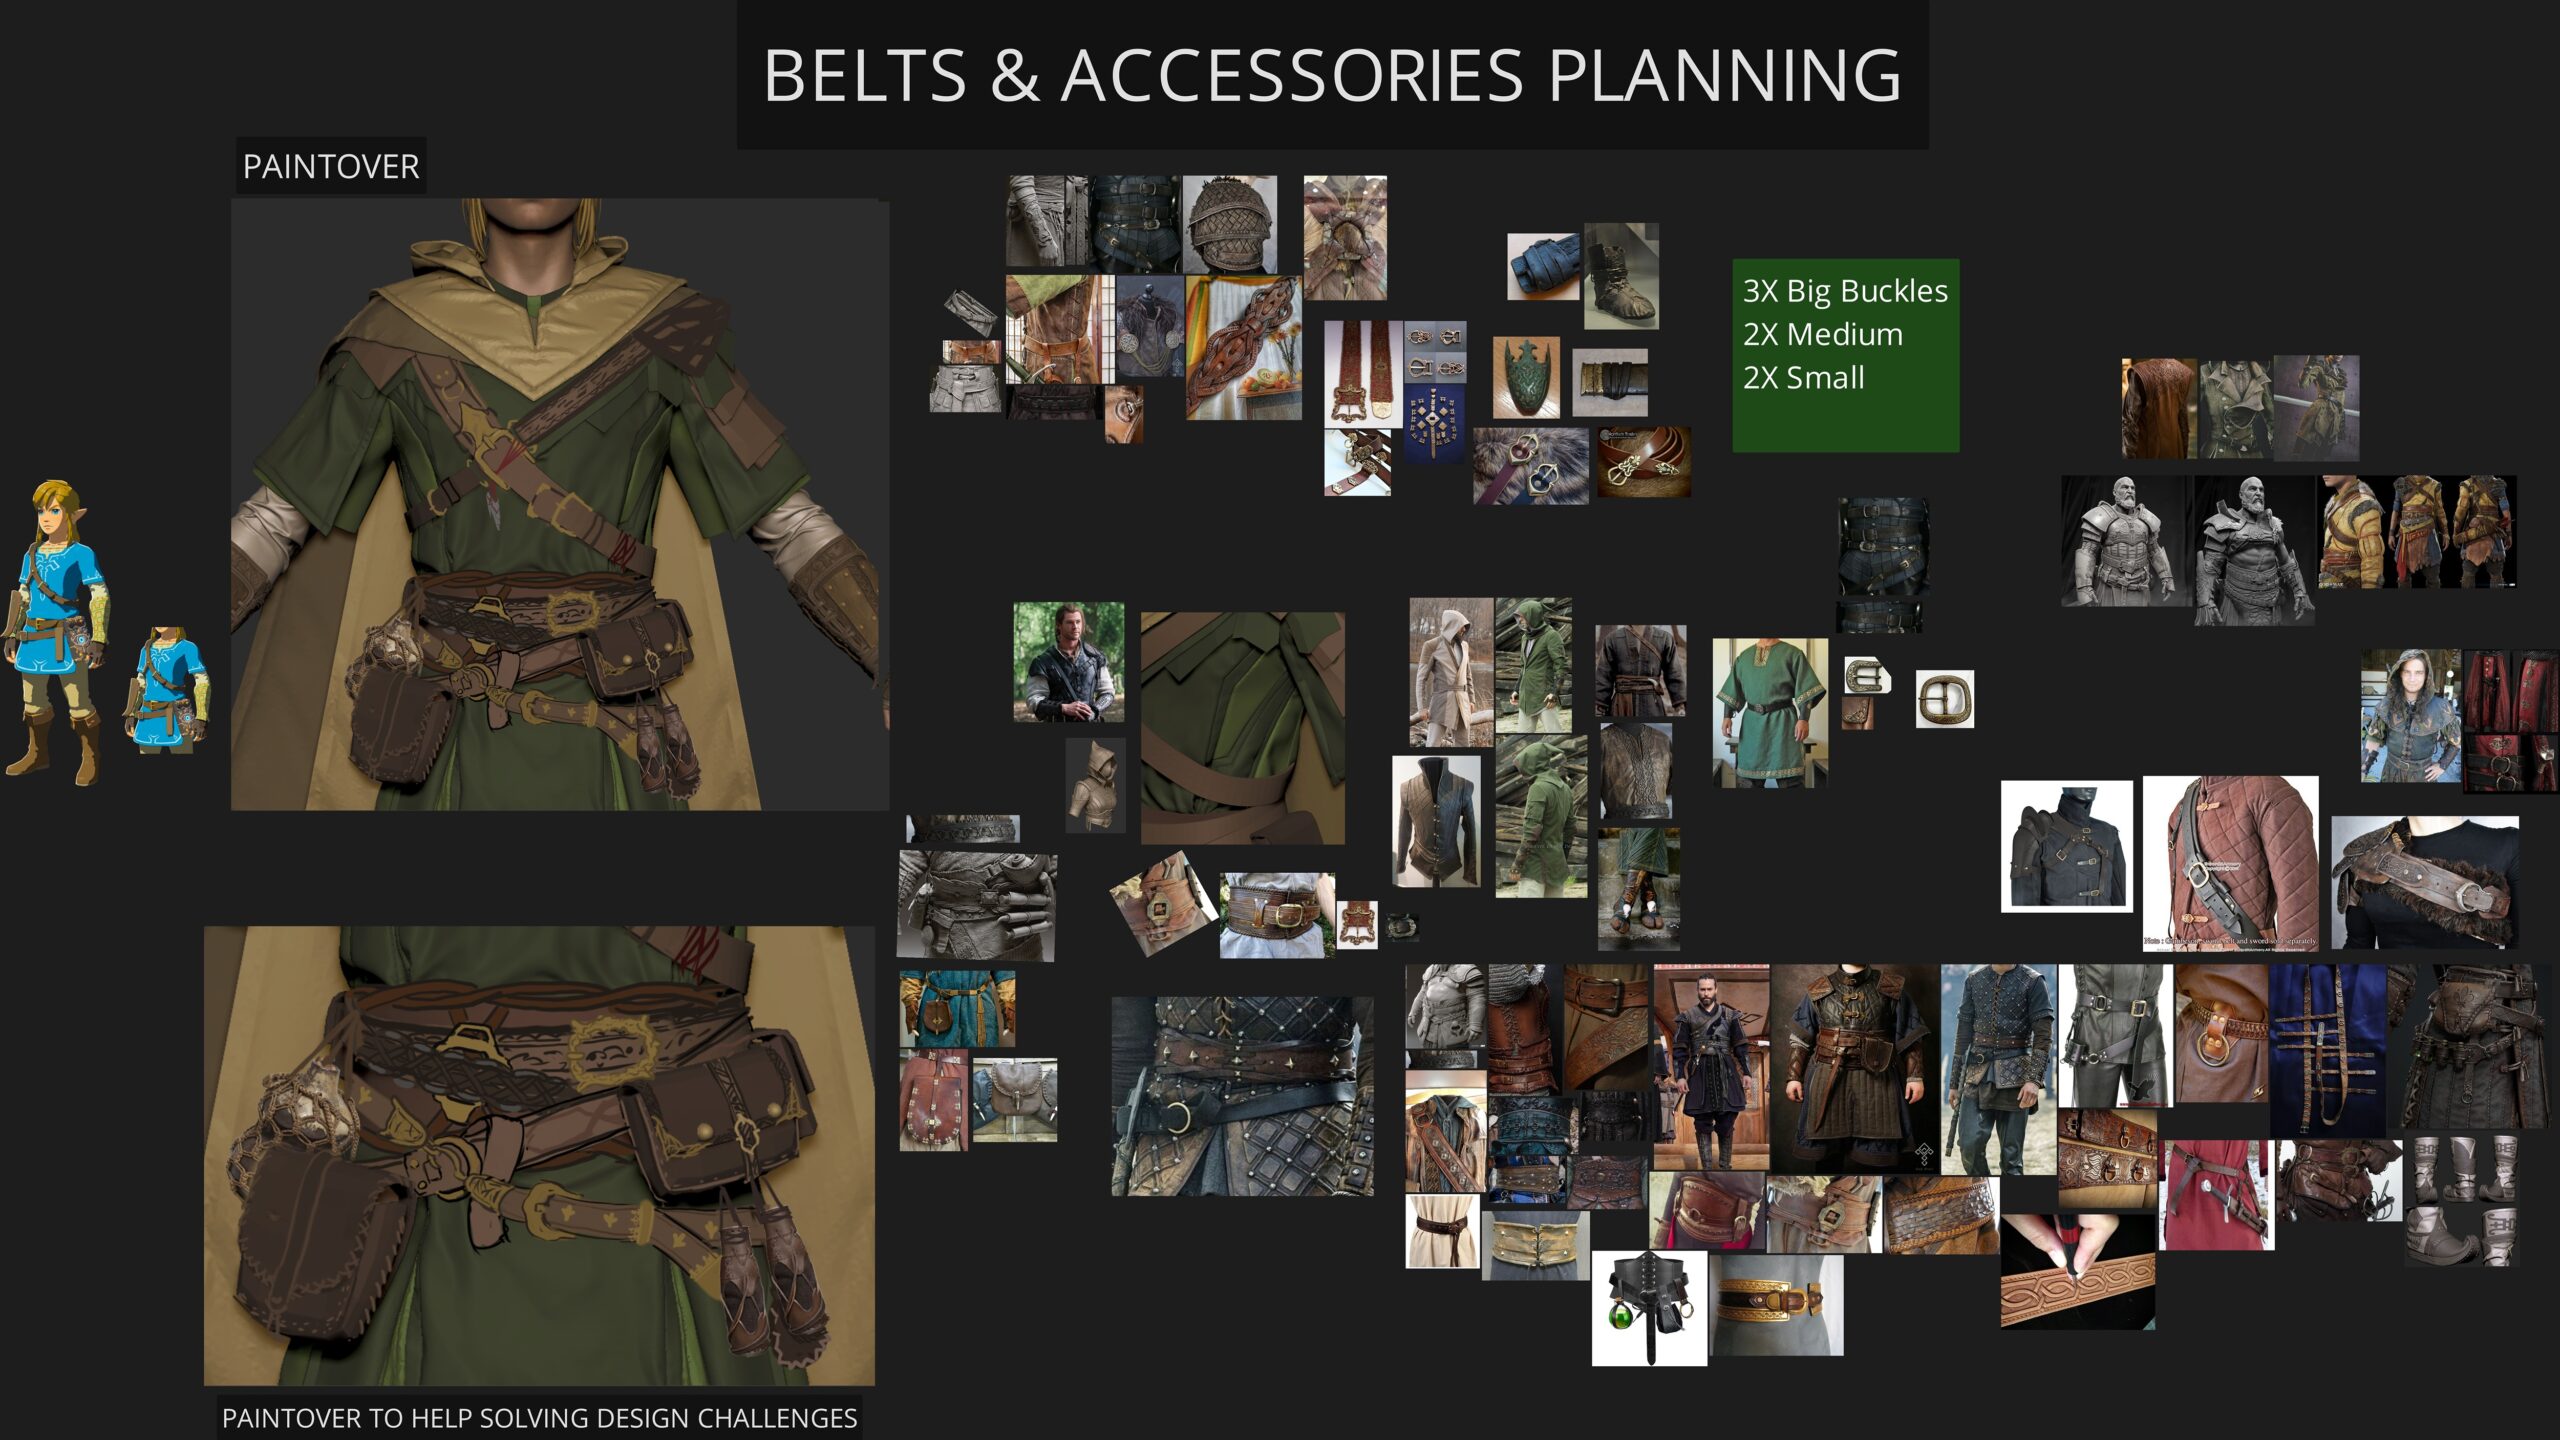
A significant portion of inspiration came from Pinterest, where I gathered references for accessories. For elements directly recreated from references, I focused on ensuring believability through realistic interactions between components, visible wear, and aging details.
Maintaining clear, readable construction for each piece was a priority.
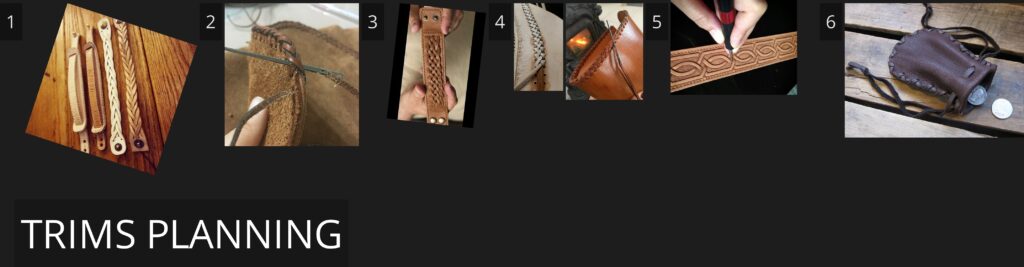
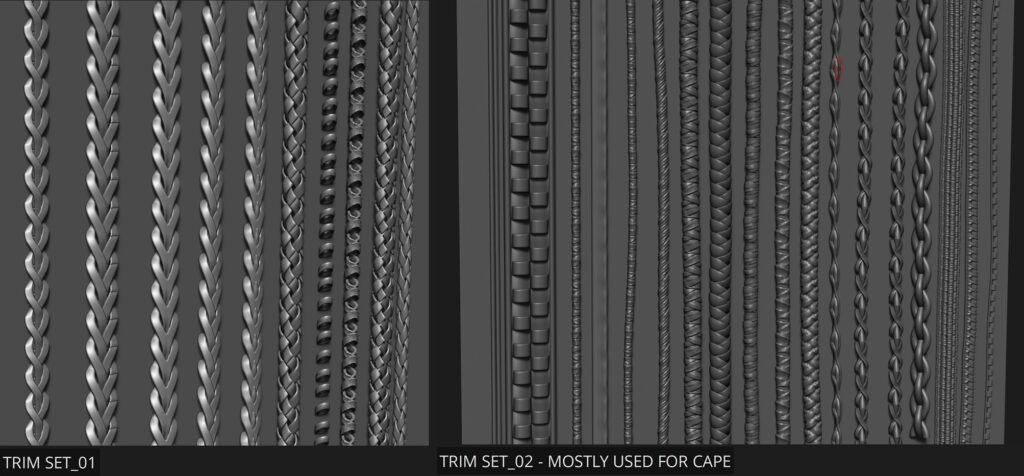
To streamline the creation process, I developed a library of trims, which allowed for crafting unique-looking accessories with consistent quality.
For specific elements like pouches, potion bottles, knife and a gourd, I dedicated time to define their purpose, refine their forms and details, ensuring they fit naturally within the overall design.

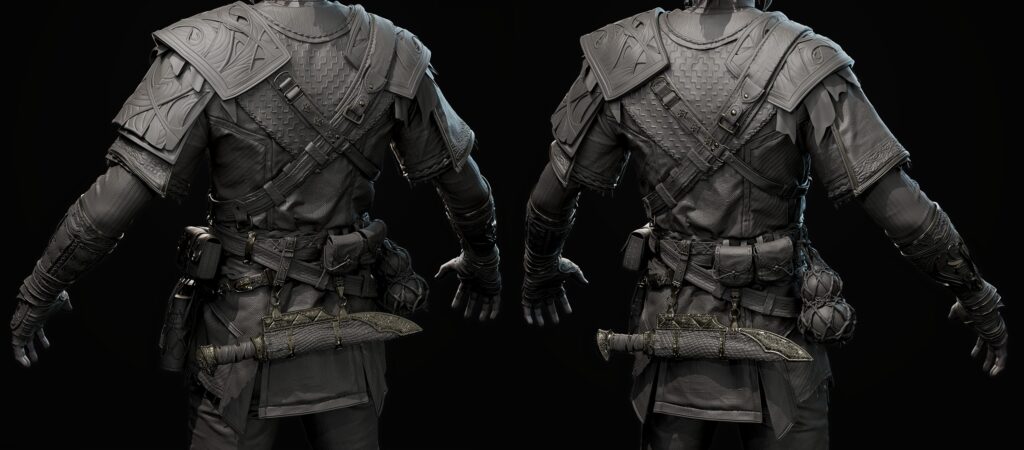
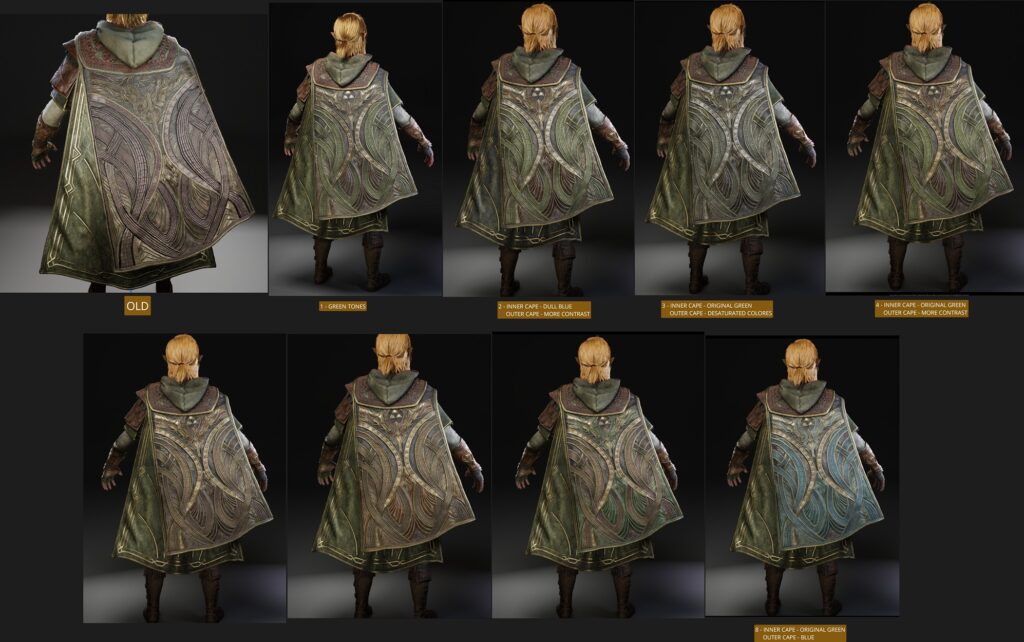
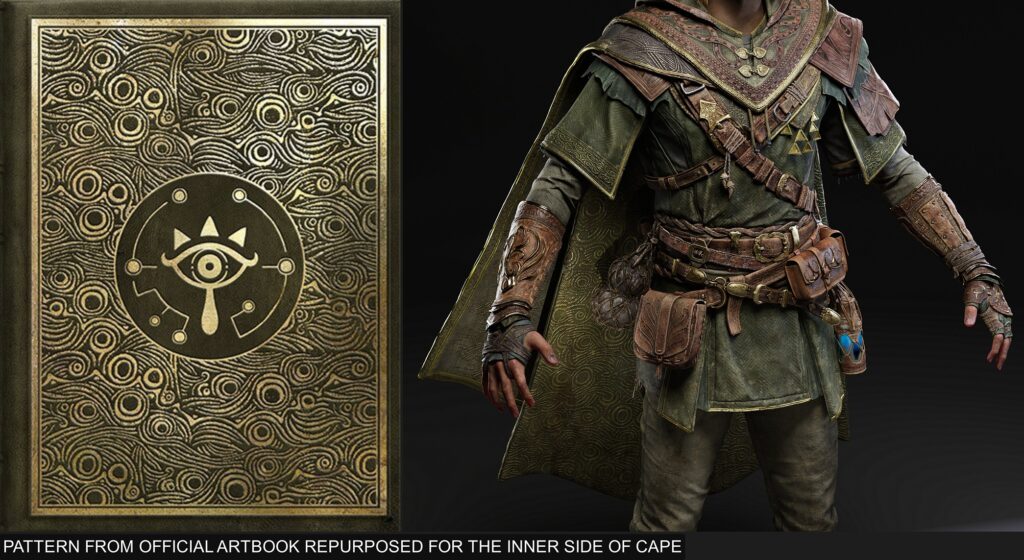
Cape
At this stage, the design of the cape became a focal point. The goal was to ensure the character retained strong visual appeal when viewed from the back, leaning heavily into mysticism as a core theme.
Envisioning the cape as more than just an accessory—perhaps it holds unique powers, introducing intriguing gameplay opportunities for Link.
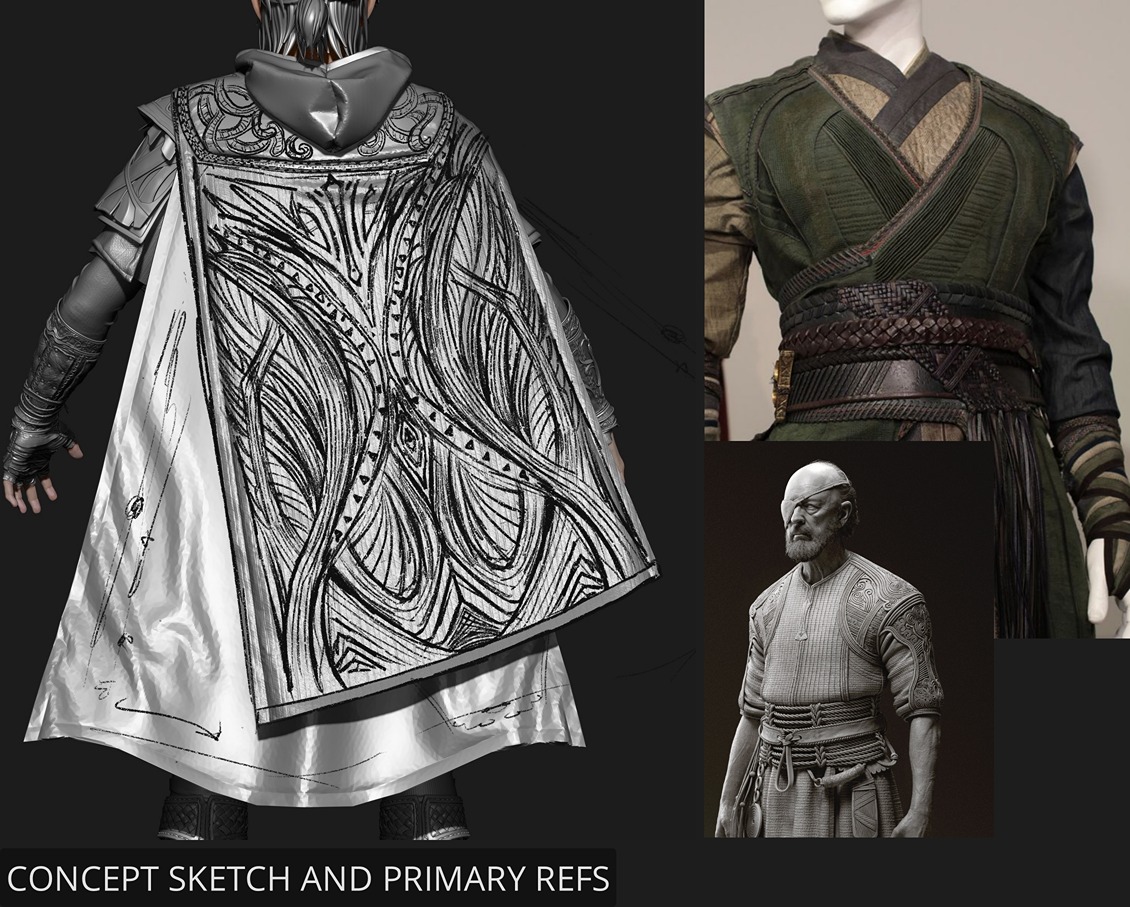
For the primary cape, I incorporated layered strips of fabric, braided piping details, and a visually intricate pattern.
The design, inspired by Doctor Strange, plays with bold shapes to convey complexity and a sense of mystique.
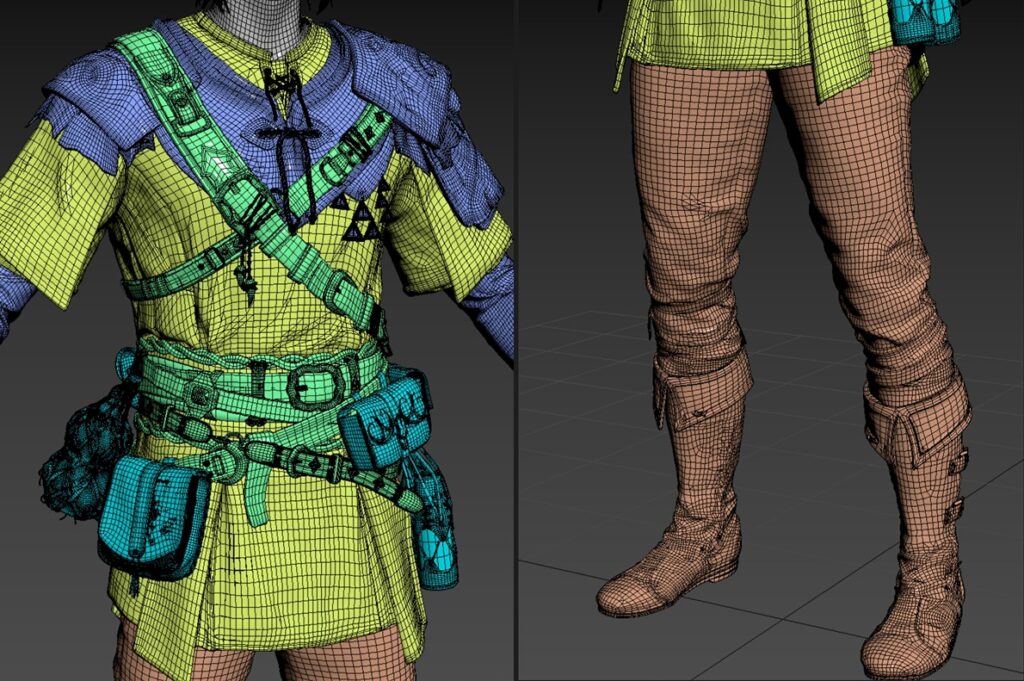
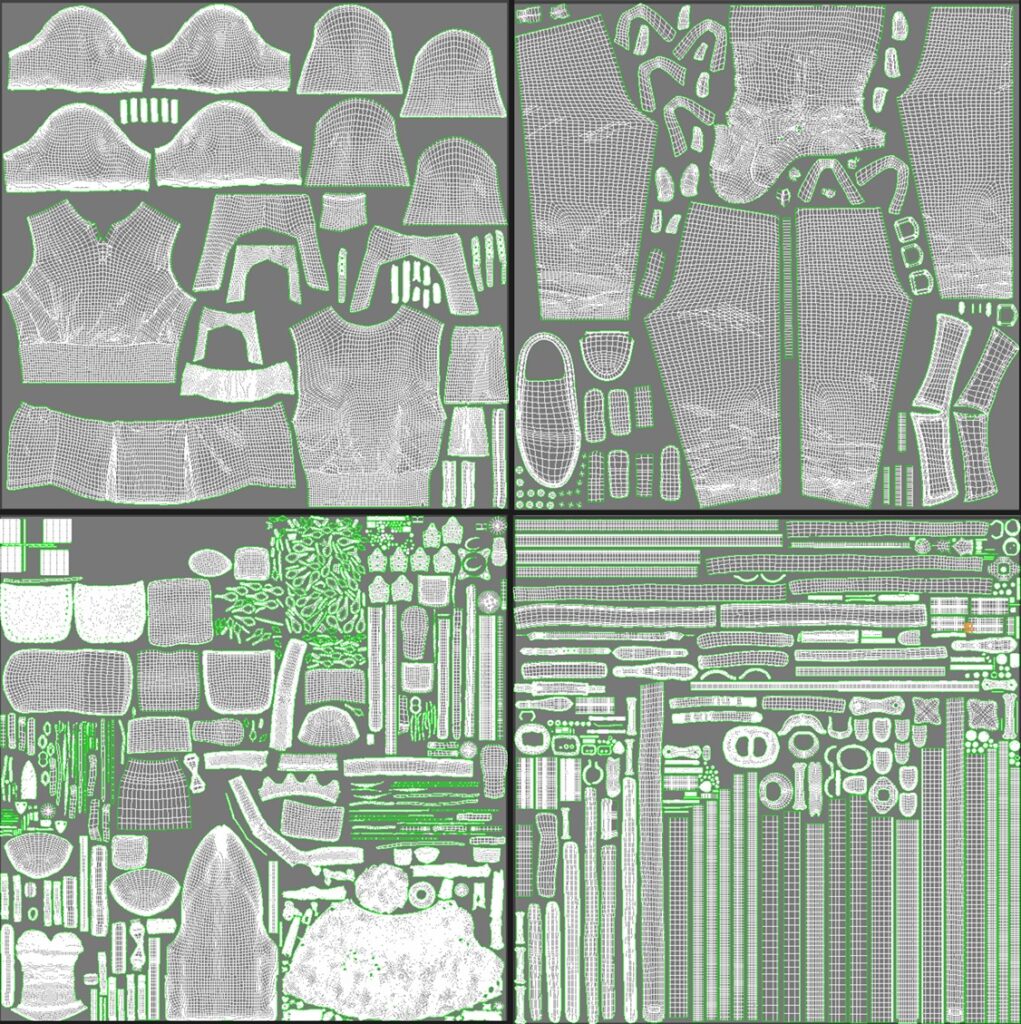
Lowpoly & Baking
For Link’s lowpoly, I used a mix of traditional techniques and some shortcuts to save time. While traditional methods for most parts, I simplified certain elements like the belts and buckles by using the lowest subdivisions.
Additionally, I ZRemeshed parts like the shoulder pads. While these techniques are far from ideal for production, they helped streamline the process. Baking was done entirely in Substance Painter.
Materials & Textures
The texturing process focused on several key principles:
- Used look: As a seasoned traveler, Link’s gear needed to reflect the wear and tear from his journey.
- Primary materials: Strong materials with varied albedo and roughness were essential to avoid flat, lifeless surfaces. The variation had to be seen even on a tertiary level.
- Gradient play: Subtle gradients were used to guide the visual flow.
- Color & contrast: A harmonious balance of colors and materials was key to achieving a realistic yet fantastical look.
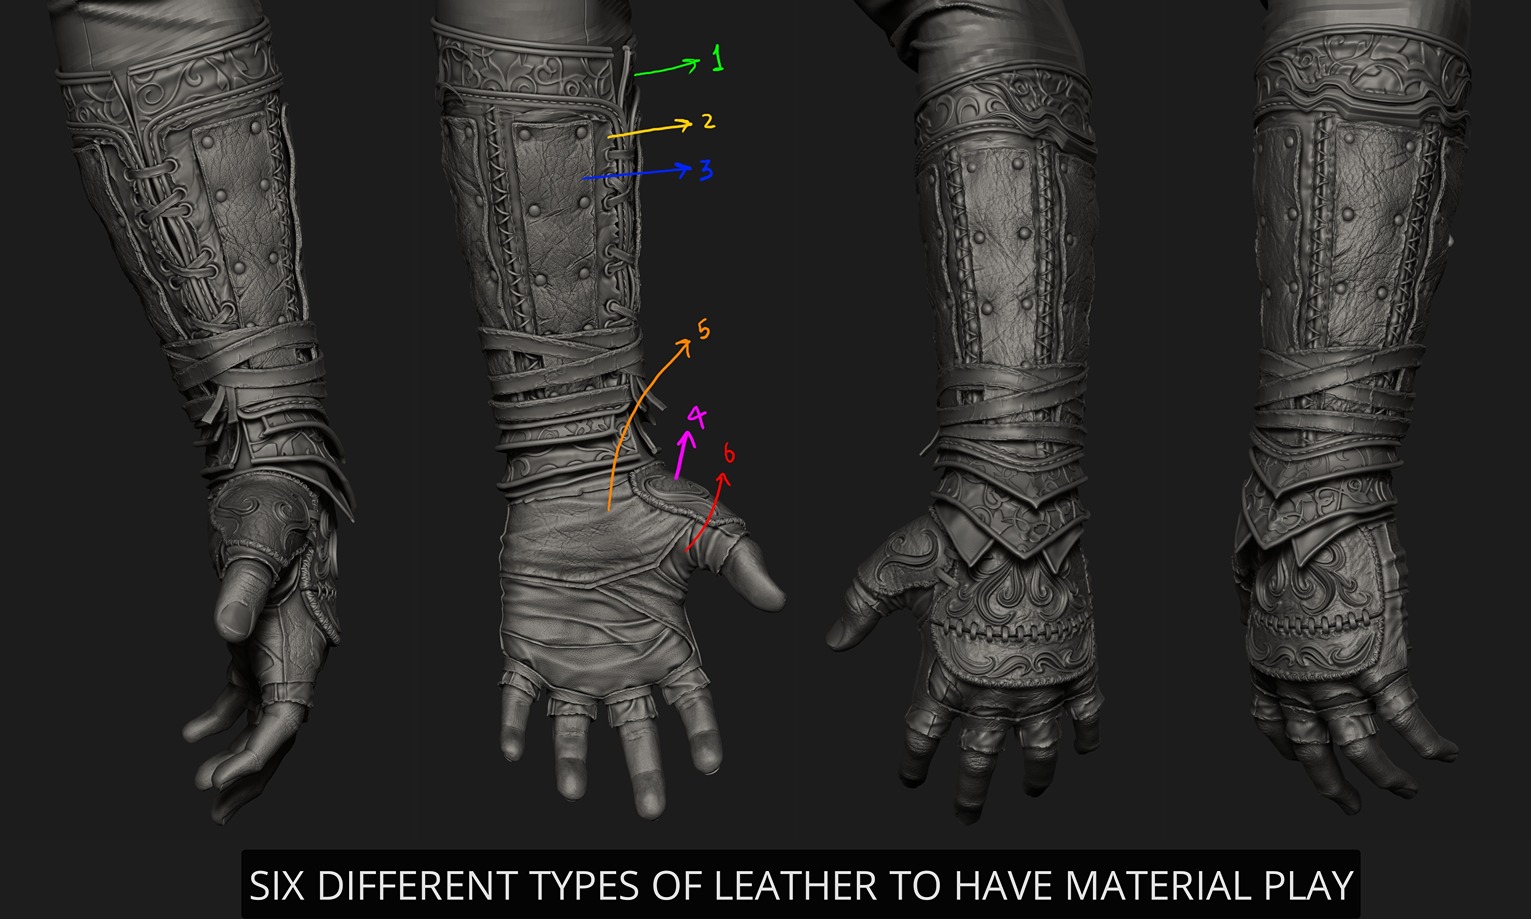
Leather and fabric were the two primary materials, each chosen for its contrast and functionality. Multiple types of leather were used to add depth and logic to the design, while fabrics were given a touch of fantasy with designer weaves, making them more visually engaging. I also played with gold to give a rich look while also adding more material variety that helped in adding further contrast.
The side of the Unknown
There was a part of this project that I was very confident and familiar with which is working on the outfit, accessories, gear etc. Things such as creating hair in Xgen, Unreal Engine, Skin Shader, Lighting in Unreal Engine was something I never did.
So I was not sure about how it would all go!
Head & Hair
The exploration of Link’s head and textures was a dual process. I was particularly concerned about how the skin would turn out, as this was my first time presenting a character in Unreal Engine.
To achieve the soft, realistic skin look, I used the Uber Skin Shader by Nick Rutlinh. It’s a powerful Shader, and by adjusting the built-in parameters, I was able to get the desired results.
This was also my first time working with XGen for hair. I was fortunate to have help from my friend Shiva Kumar, who guided me through the common issues when working with XGen.
I began by capturing the majority of the hairstyle in the highpoly sculpt, using individual clumps to construct the hair. This approach made it easier to create a guide for XGen that already had a natural flow and volume.
After generating the hair, I imported it into Unreal Engine as Alembic files and applied the MetaHuman Hair Shader.
This gave the hair a lifelike sheen and softness, adding peach fuzz for extra realism.
Rendering & Lighting
I initially used a MetaHuman lighting scene for testing, as it comes with solid lighting presets that offer a variety of moods. From there, I moved on to building a custom lighting setup based on a 3-point lighting system.
For the scene’s foundation, I relied on Megascans assets and placed a strong top-front key light to create a soft, dramatic feel.
Further experiments with particles and volumetric fog helped ground the scene, slowly adding atmosphere and depth to the overall presentation.
Pushing further with Unreal
During the creation of Link, I stumbled upon the Pwnisher challenge – Eternal Ascent, which sparked a new idea. What if Link was walking through a dark forest, and we could control his movement?
This led to expanding the scope of the project and diving deeper into environment creation within Unreal Engine. I leveraged Megascans assets, along with other great marketplace items, to add fog, particles, puddles, and more (all asset store links are listed at the end).
Integrating Unreal’s ALS (Advanced Locomotion System) was key to getting Link’s movement right. Retargeting Link’s rig to the ALS rig presented a significant challenge, and for a while, Link was running around the level… bald! 😀
Akhil Chinnabathini played a crucial role in rigging and helping with the integration of the ALS rig in Unreal Engine. His work was essential, especially in achieving the dramatic weight for the cape.
The initial rig was done by Chetan Verma.
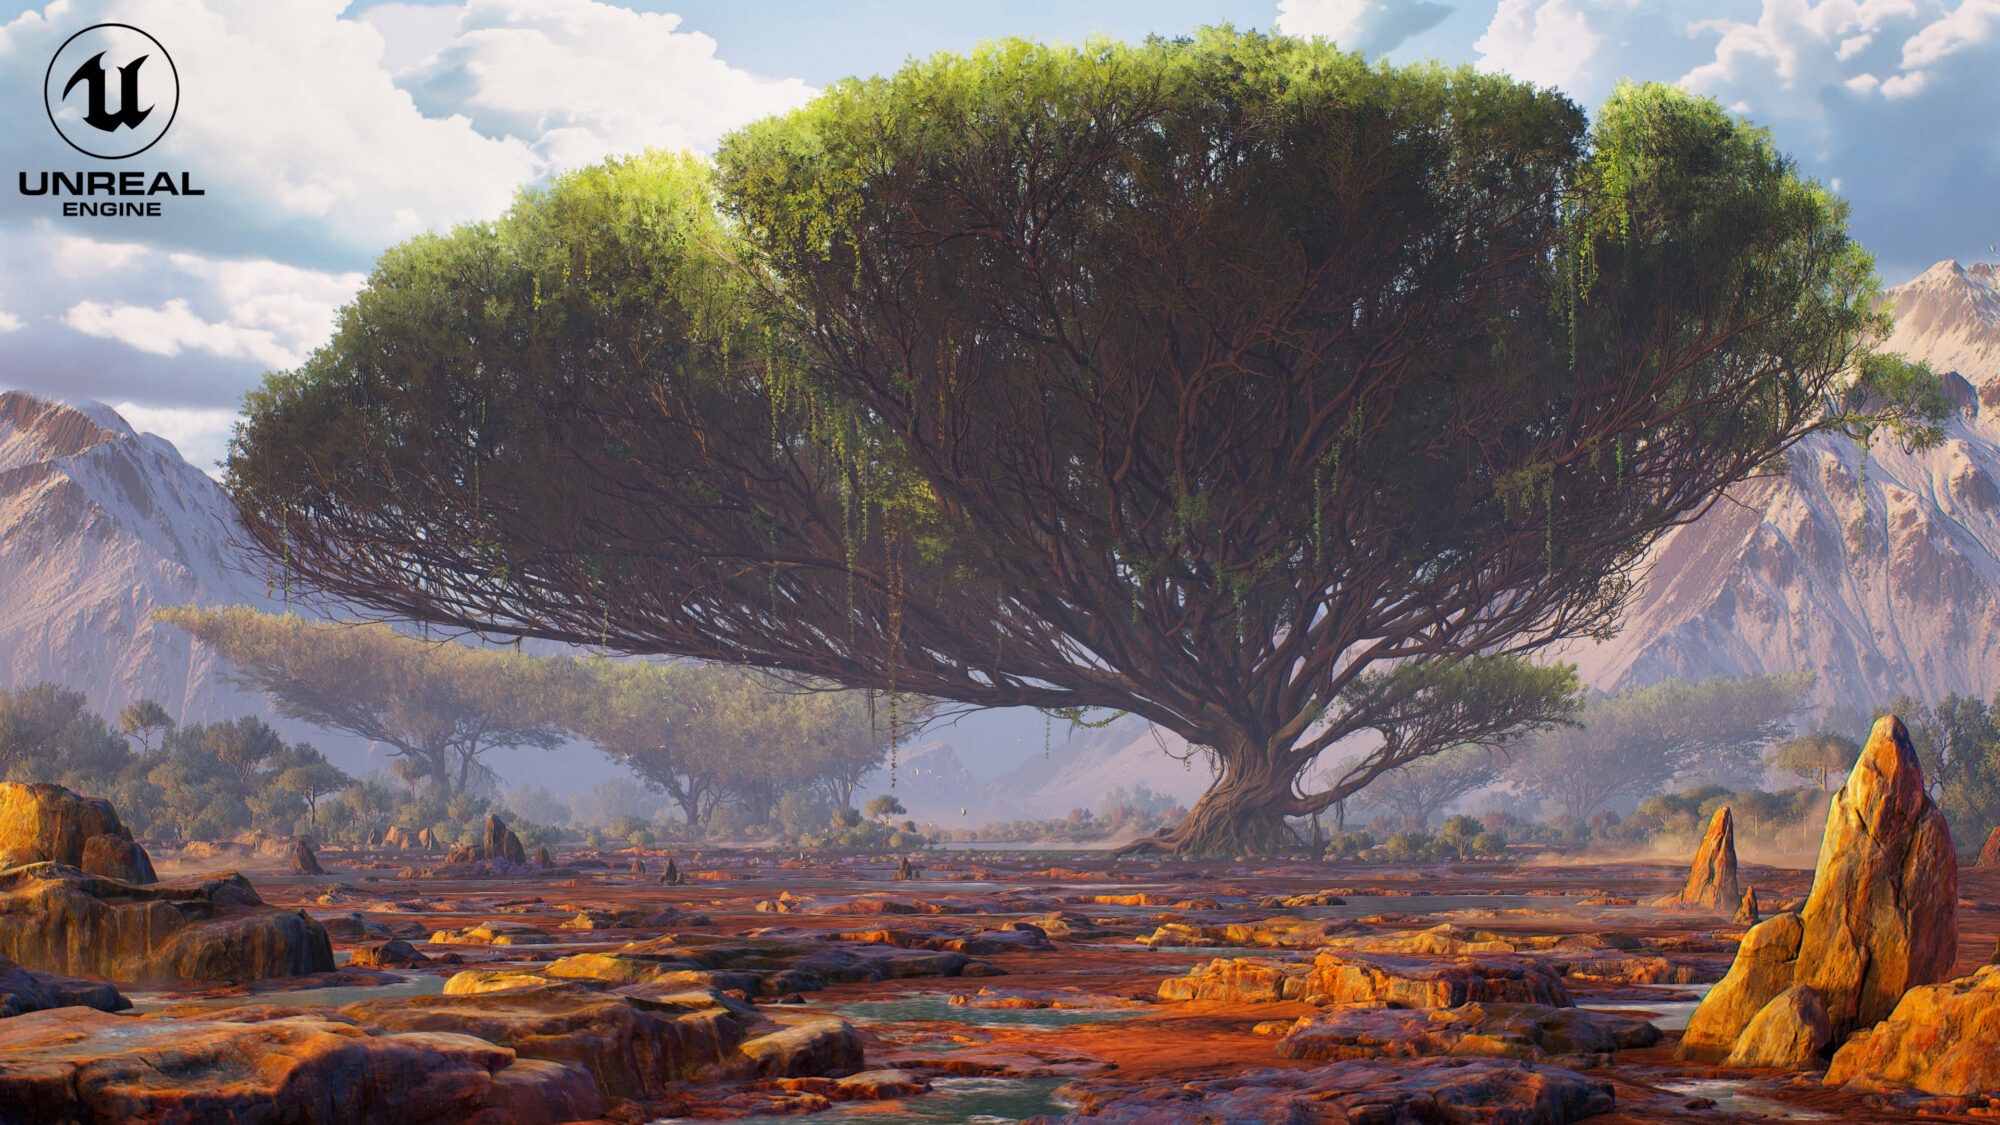
The level began to take shape slowly. Though the scene was large and elaborate, I decided to focus on beautifying just one area where Link would walk. The process started with blocking the level in landscape mode, adding trees, and setting up base materials for the terrain.
From there, I added secondary elements such as bushes, rocks, and environmental props. Finally, I fine-tuned the scene with tertiary details—fallen leaves, branches, and decals.
Adding fog, particles and adjusting wind direction for trees and plants really helped breathe life into the scene.
Conclusion
This project was a challenging yet rewarding journey that pushed my skills in character design, 3D modeling, Texturing and Unreal Engine.
Though I missed my original deadline and the process extended over 9 months, I found immense value in pushing beyond the initial scope and goals.
Learning XGen and Unreal Engine, which was unfamiliar territory for me, became a more approachable and rewarding endeavor.
The key takeaway was breaking down complex tasks into smaller, achievable steps to reach bigger goals.
The collaboration with Akhil on rigging was crucial, and the final result reflects the effort and growth in every detail.
For a closer look at the process, feel free to follow my Instagram, where I shared reels showcasing the creation of individual parts for Link.
Acknowledgments
I’m deeply grateful to my friends and colleagues who reviewed my work and provided invaluable insights:
- Patrick Van Rooijen
- Pratik Jaiswal
- Jatin Gulati
- Ren Miranda
- Sankalp Hinge
- Gael Kerchenbaum
- Rajarshri Mukhreerji
- Gopal V.
For more content, visit my school website: Zombie Art School.
Links to Marketplace resources:
Read more articles
You might also like these articles.