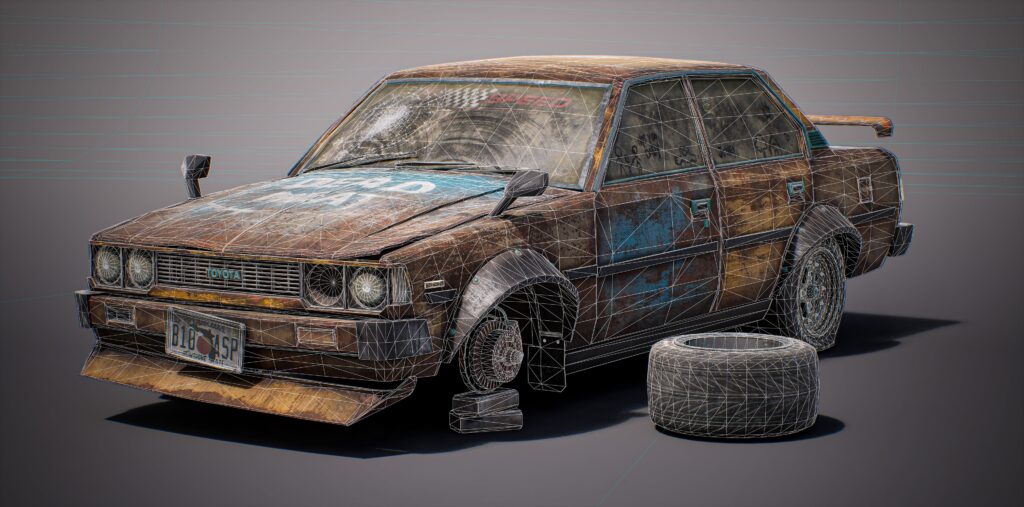
Rusty Corolla E70

Introduction
Hello everyone! I’m Montasar Feydi, a 24-year-old 3D environment and props artist from Tunisia.
I started my journey in 3D back in 2020 and have taken on various modeling and texturing roles throughout my academic path.
After earning my bachelor’s degree in 3D Animation in 2022, I joined Mob Entertainment as an environment artist, where I had the opportunity to contribute to three shipped titles: Project Playtime, Poppy Playtime Chapter 3, and Chapter 4.
Now, as I approach graduation this month with a master’s in Games Art from Teesside University in the UK, I’m looking forward to the next chapter. I’m passionate about crafting realistic props, immersive environments, and detailed materials.
I’m currently exploring new opportunities where I can bring that passion into exciting challenges and continue growing as an artist.
Project Goals
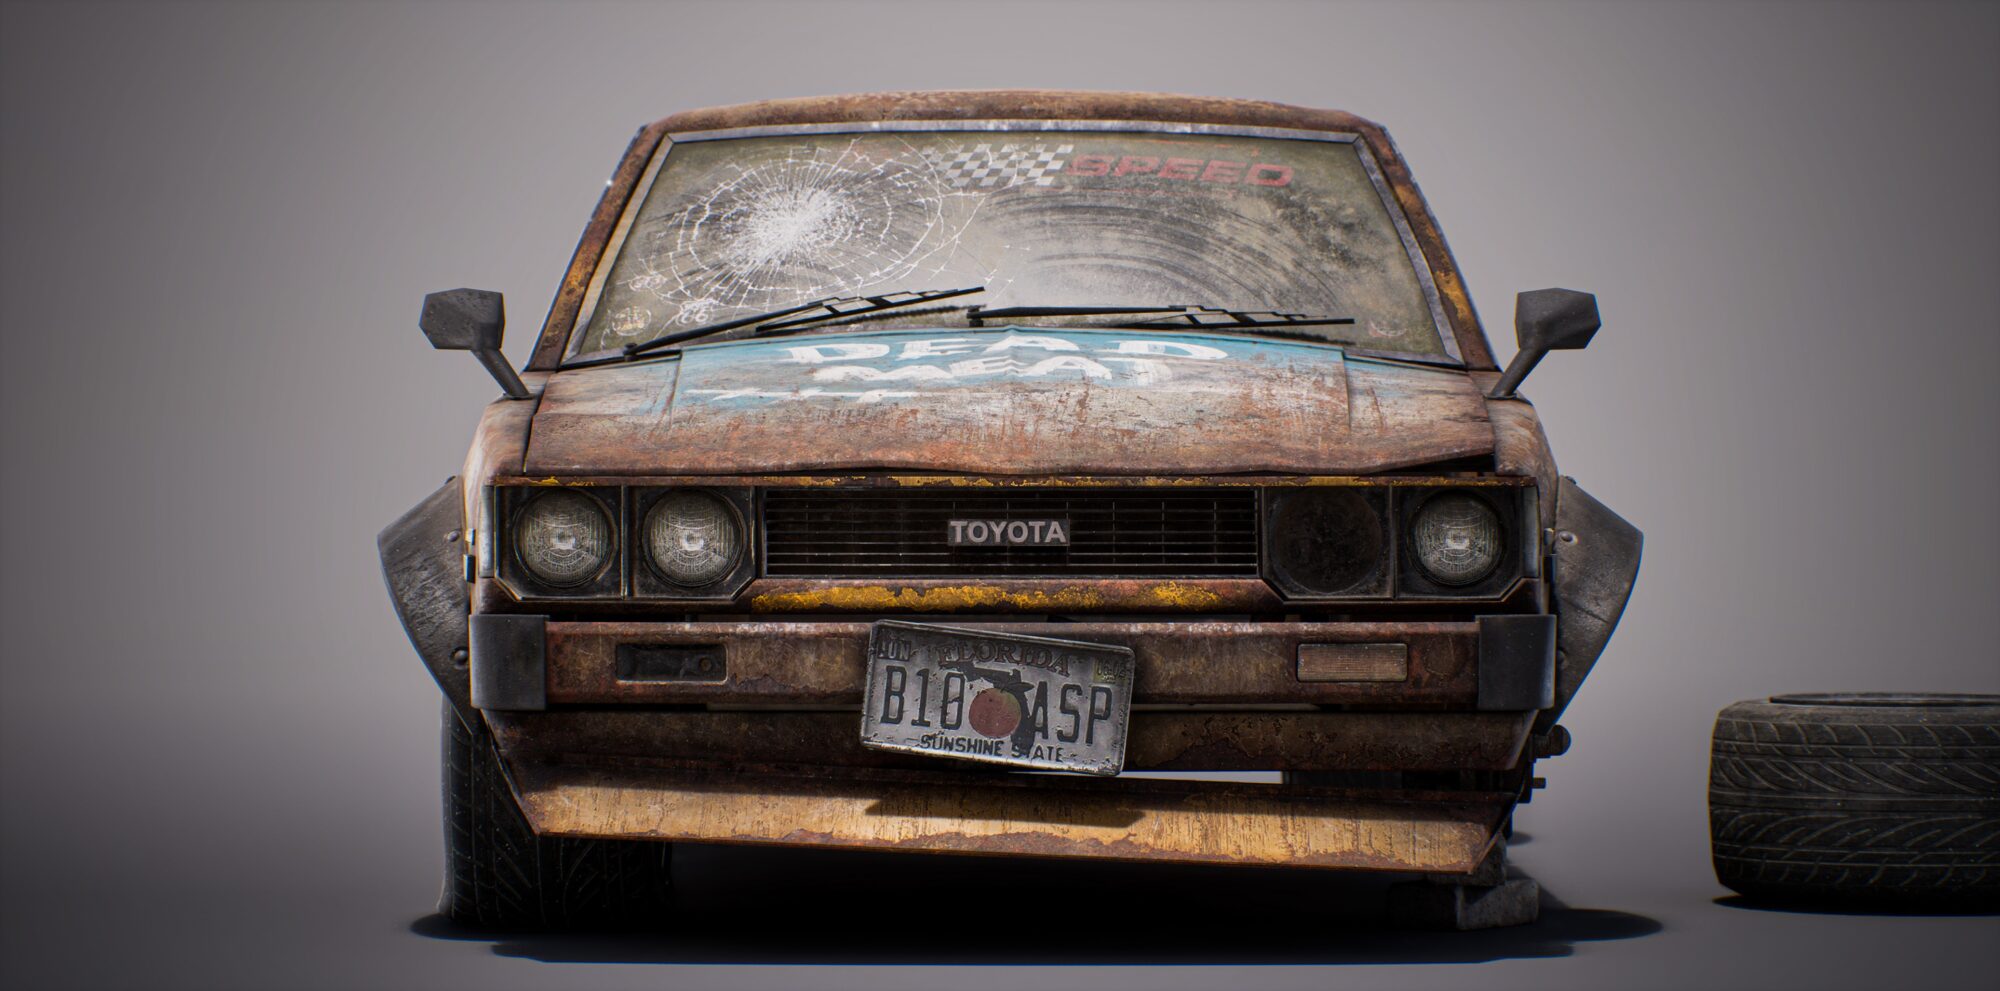
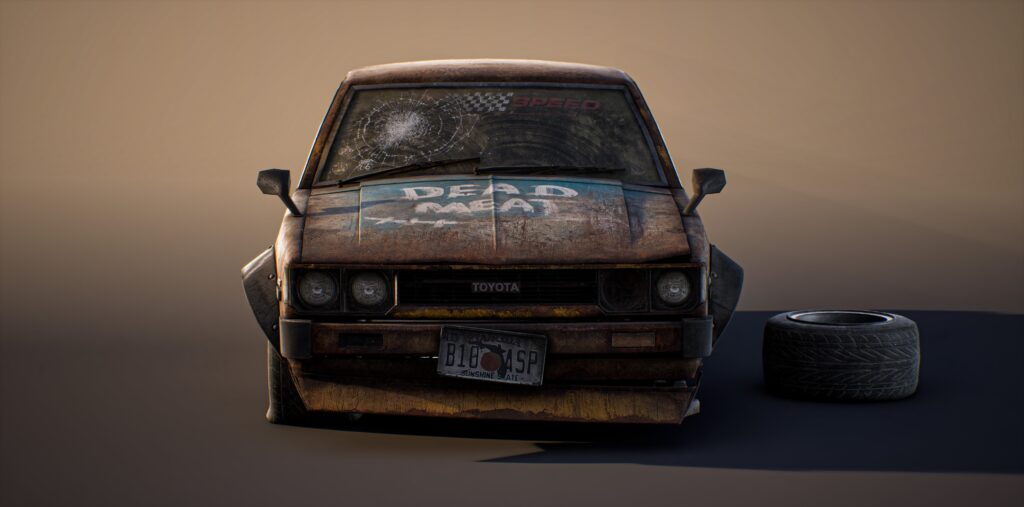
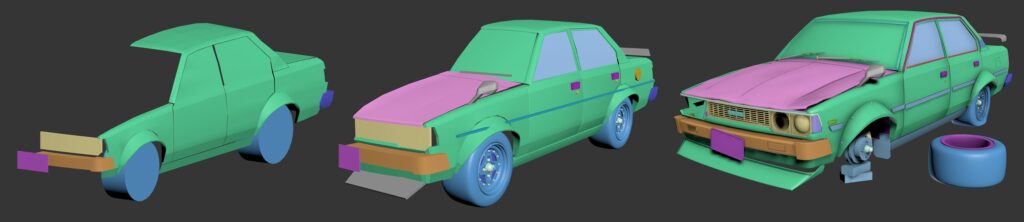
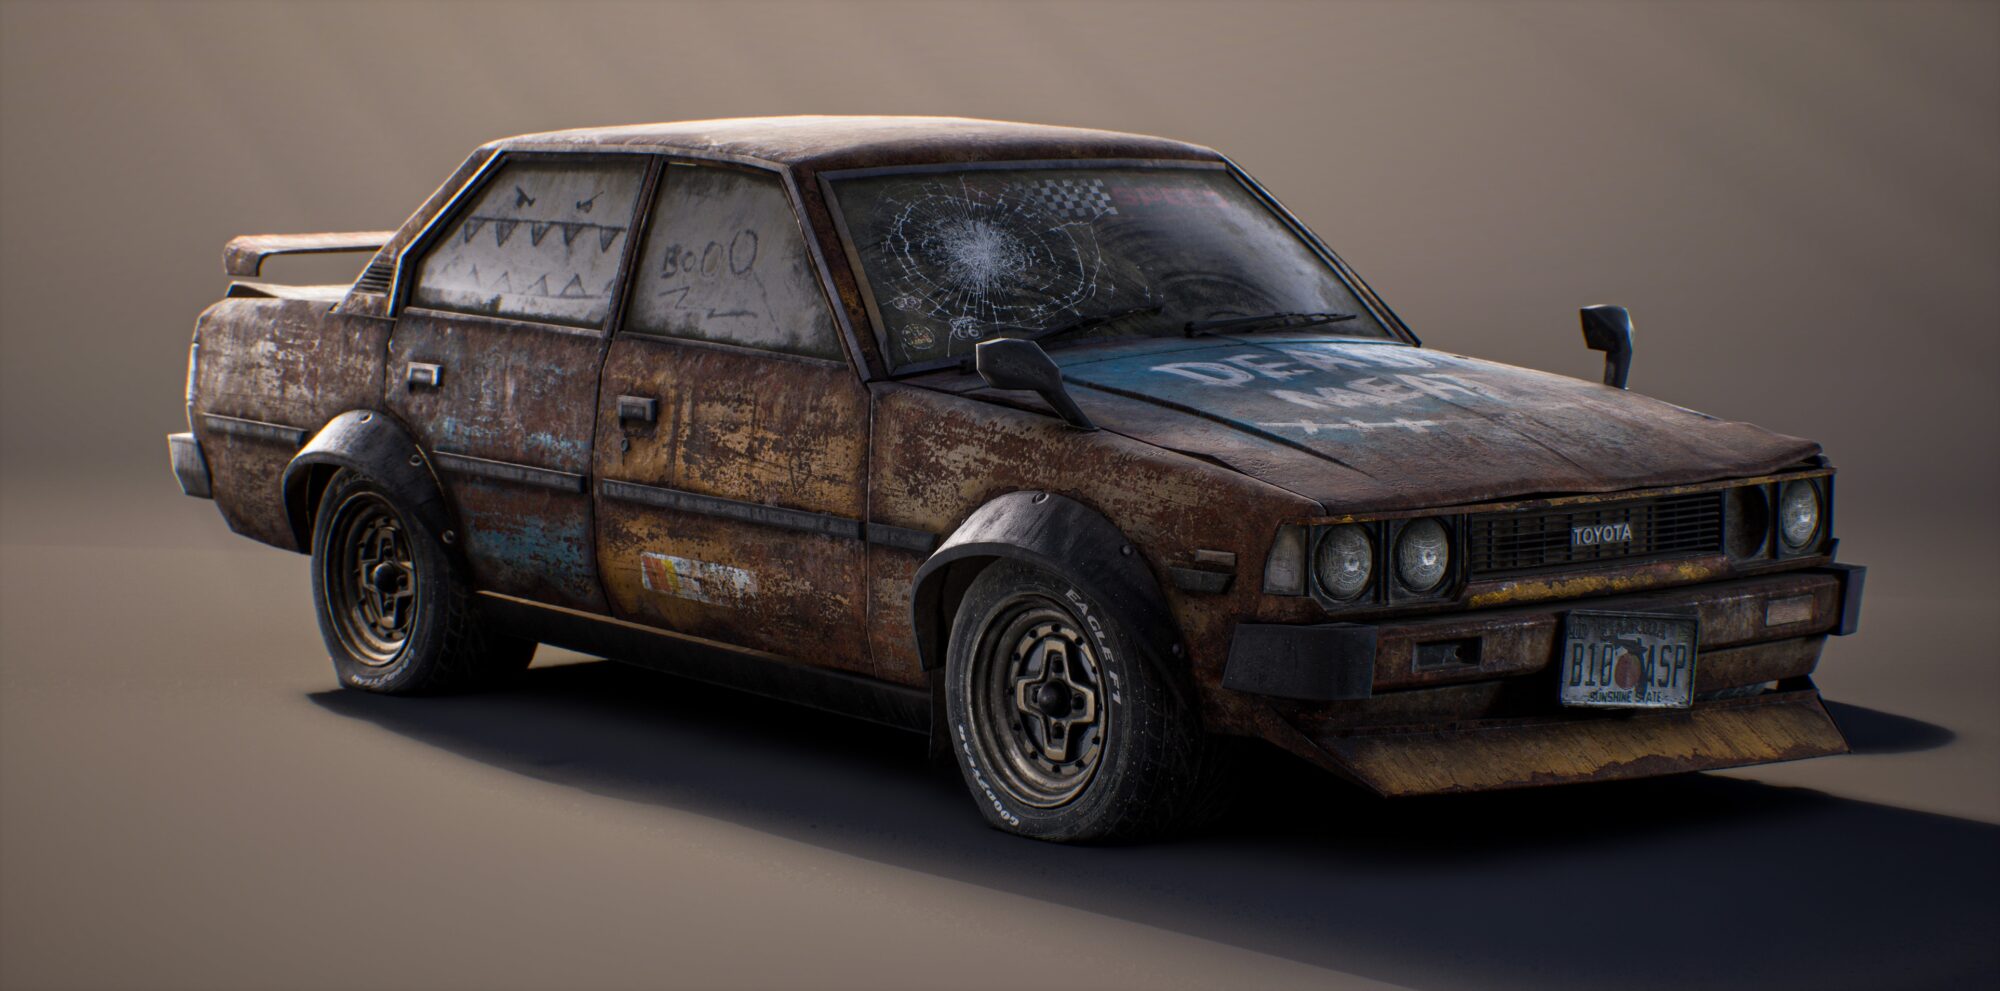
This Abandoned Toyota Corolla E70 is a key element in my upcoming environment project. Designed as a hero prop, it plays an important role in supporting the scene’s storytelling.
I focused heavily on crafting highly detailed textures to ensure it stands out in cinematic shots.
These details will help bring the environment to life, enhancing both the mood and narrative in the final cinematic video.


Planning
Planning is essential for keeping my projects on track. I always take the time to plan thoroughly, whether I’m working on a full environment or a single prop.
For this project, I started by carefully studying references and analyzing my car model.
Based on that, I set aside 3 days for modeling, UVs, and baking, followed by another 3 days dedicated to texturing and rendering.
Tools
For this project, I used 3ds Max for modeling and UVs, ZBrush to sculpt the small bricks supporting the car, Substance Painter for texturing, Unreal Engine 5 for rendering and Photoshop for subtle post-processing.

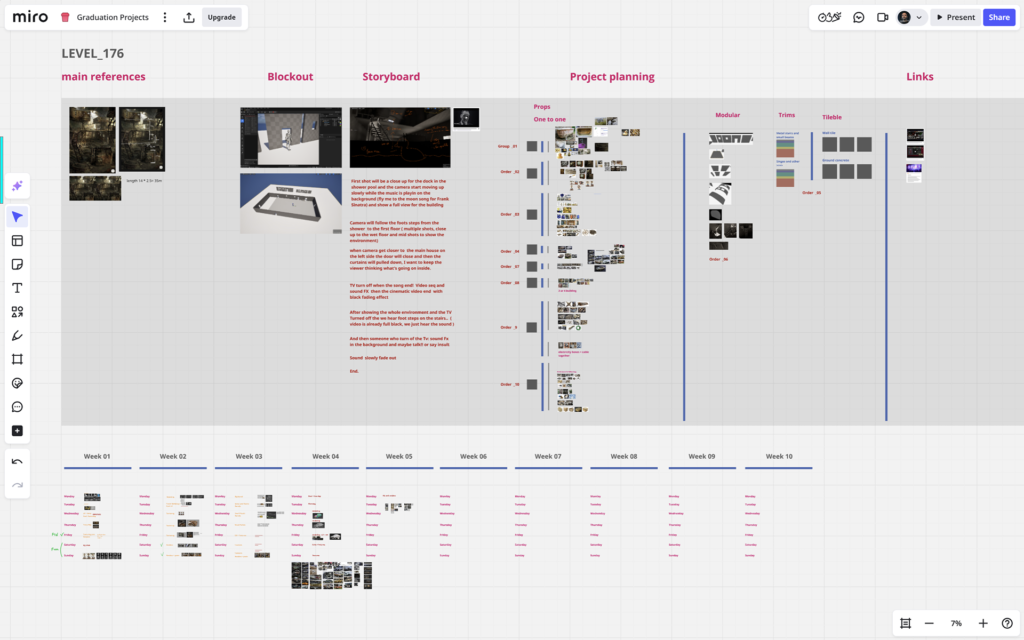
Moodboard
The moodboard is always the first thing I create when starting a new project, and I continue referring back to it throughout the process.
For me, it’s more than just collecting visual references; it’s a tool to plan my workflow, organize inspiration, and keep all useful links in one place.
I use Miro as my go-to platform because it’s intuitive, accessible from anywhere, and perfect for sharing with others for feedback or collaboration.
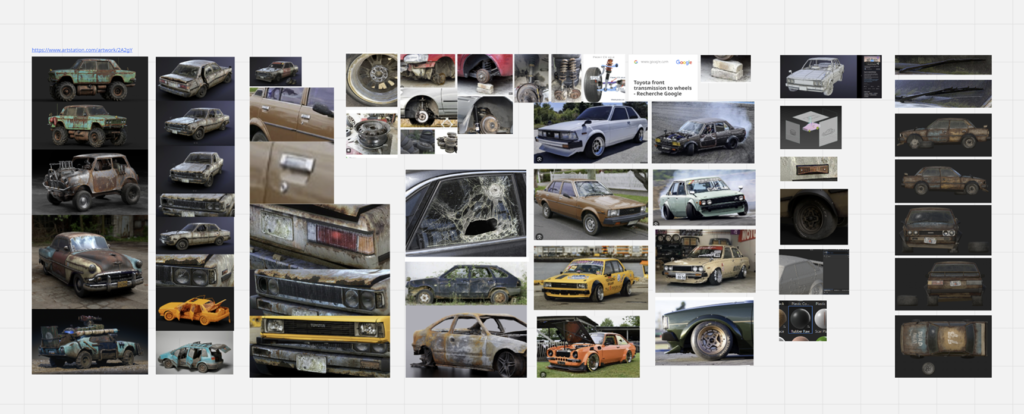
For this particular project, I gathered a wide range of references, not only for the original Toyota Corolla E70 model but also for rust textures and modified car parts.
I wanted to design a silhouette that’s visually interesting and tells a story, hinting that this abandoned car once belonged to a passionate street racing enthusiast.
Moodboard Tips
Don’t Limit Yourself to Just Images
While photos are essential, adding video links, text notes, and sketches can bring extra clarity to your vision. A moodboard is not just a visual guide; it’s a creative workspace!
Focus on Quality, Not Quantity
Choose high-quality, well-lit references that clearly communicate form, material, or mood. Avoid cluttering your board; each image should serve a purpose.
Organize by Category
Split your moodboard into sections: main references, close-up details, topology, materials, lighting, color palette, composition, etc. This helps you quickly find visual direction when you start modeling and texturing.
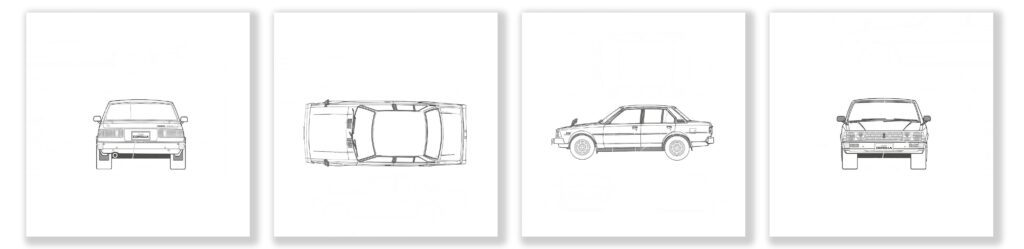
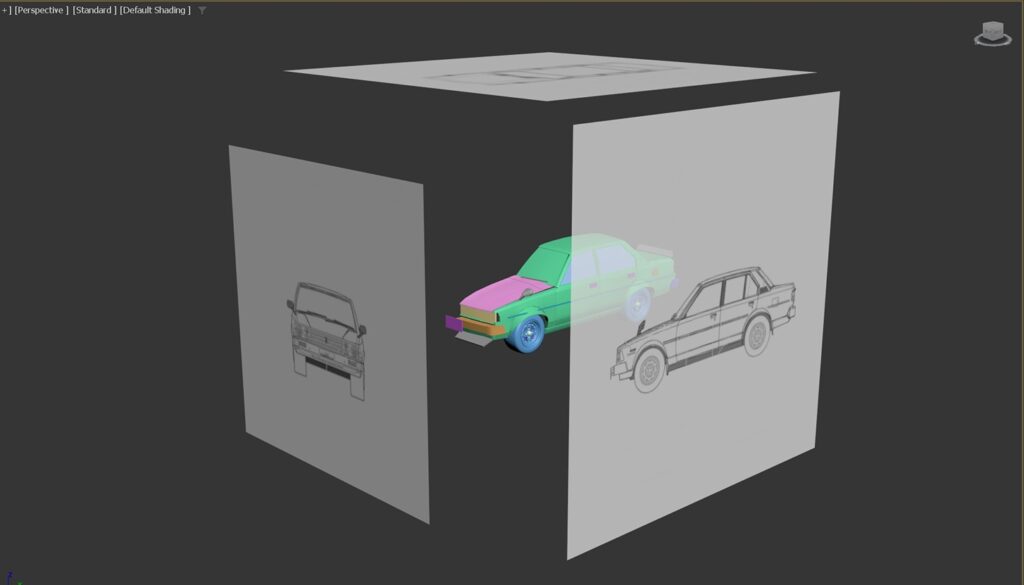
Modelling
For the modeling process, I started by finding a high-quality blueprint of the target car model. After selecting the most accurate one, I made slight adjustments in Photoshop to ensure all views were aligned and properly scaled.
I then began by blocking out the major parts of the car, working on just one half to maintain symmetry, and later mirrored it.
Once the base was complete, I moved on to modeling the smaller, more detailed components.
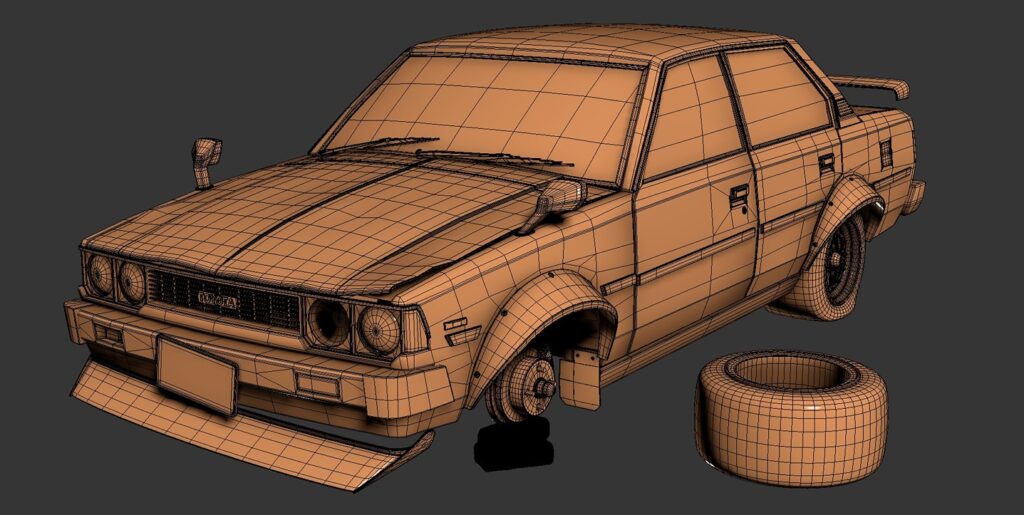
Topology and UV
For the topology, I started by modeling very low-poly meshes to keep the base clean and manageable.
From there, I added support loops and used subdivision where necessary, while in other areas I applied bevels.
This non-destructive approach made it easy to generate the low-poly version later, simply by removing the bevels and subdivision modifiers.
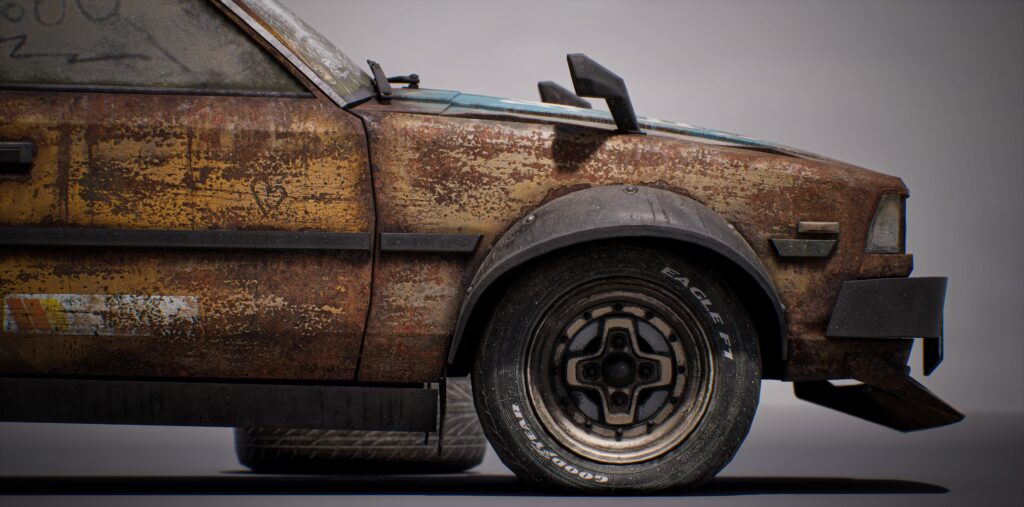
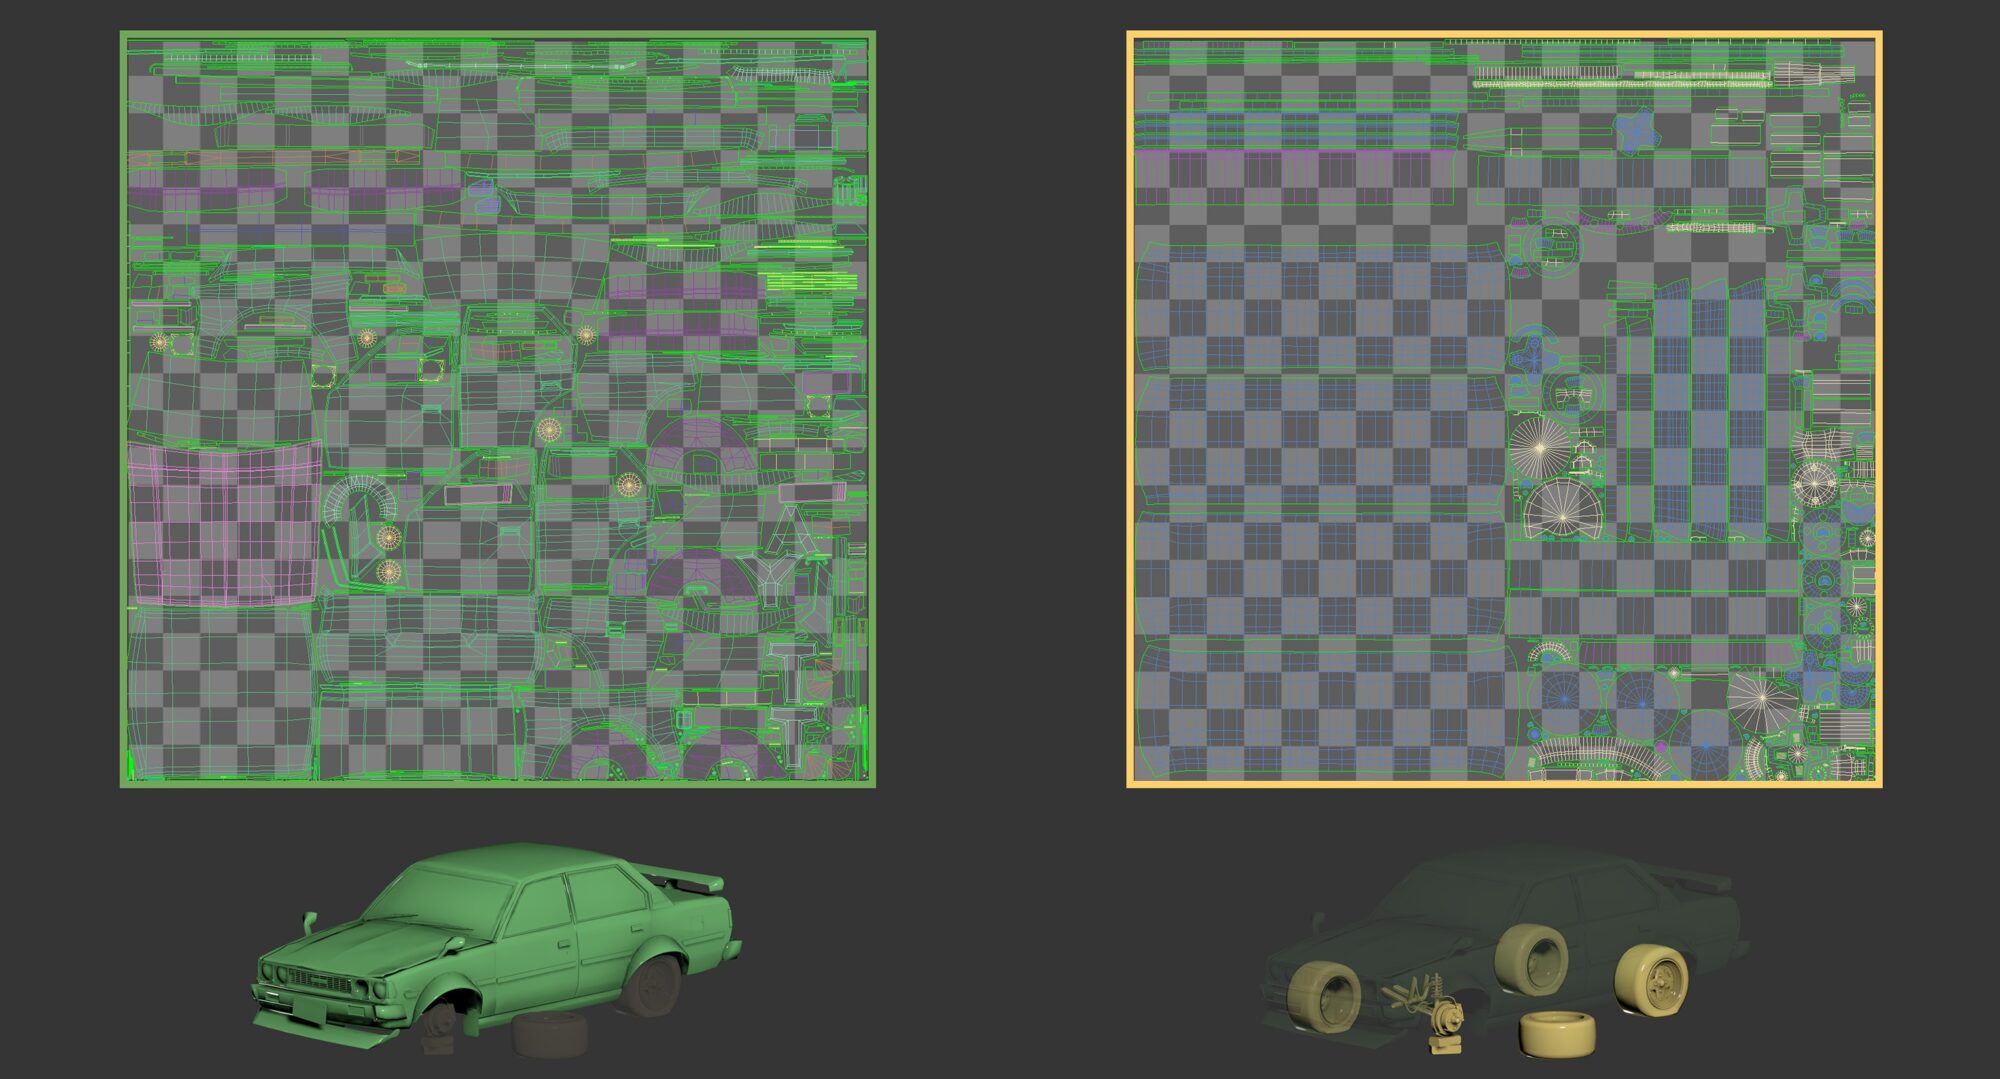
For the UVs, I focused on maximizing texel density by making full use of the UV space.
I split the model into two 4K texture sets, one dedicated to the car body and the other to the tires and suspension system.
This setup allows for high visual fidelity while giving me the flexibility to adjust texture resolutions later in-engine if needed for performance optimization.
Baking
For the baking process, I followed a clean and reliable workflow to avoid artifacts. I used a clear naming system (_low and _high) for all meshes so I could use the “Bake by Mesh Name” feature in Substance Painter.
The low-poly model had non-overlapping UVs with enough padding to prevent texture bleeding.
I made sure all transformations were applied and the normals were correct before exporting. The low-poly mesh matched the high-poly shape closely to keep the baked details accurate.
I also used the auto cage feature in Substance Painter, which worked well and saved time by reducing the need for manual tweaks.

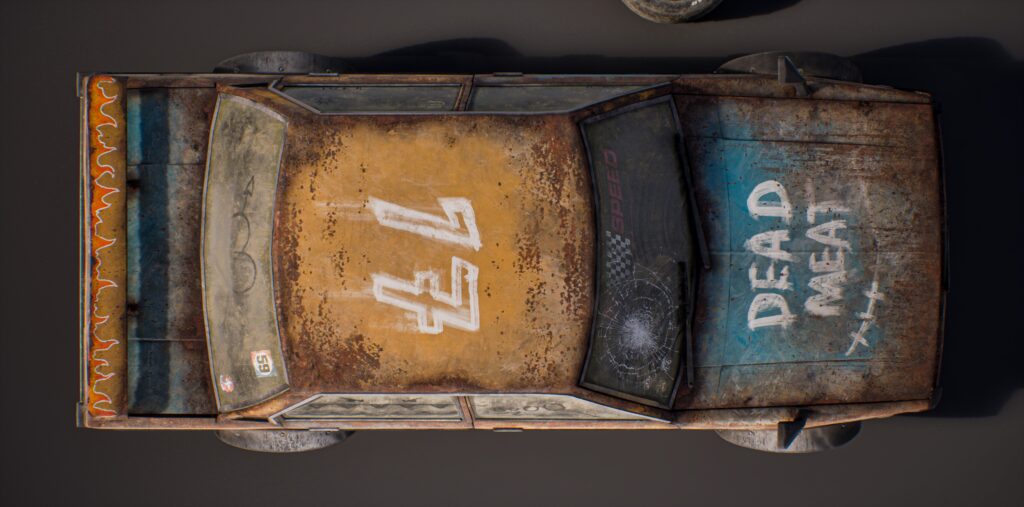
Texturing
The most challenging part of this project was achieving a realistic rusty look for the car without making the model feel too noisy or visually overwhelming.
Rust played a key role in the texture, as the car was designed to exist in an open environment where rain and humidity could easily get inside, causing it to rust over time without being completely destroyed.
I started with a solid base color for the car body and added subtle color variations to break up the uniformity. Then I moved on to building the rust. To keep things organized and readable, I split the rust into three main layers:
-
The first layer was a custom smart material created using anchor points. I hand-painted this layer in edge wear and cavity areas based on real-world references to achieve a natural result.
-
The second layer added more color variation and desaturation in heavy rust areas to help blend the rusty sections into the cleaner parts with soft transitions.
-
The final layer was a projected rust pass using real-world rust alpha maps. This helped fill in gaps and add extra detail and complexity.
All of these layers are demonstrated in the video below.
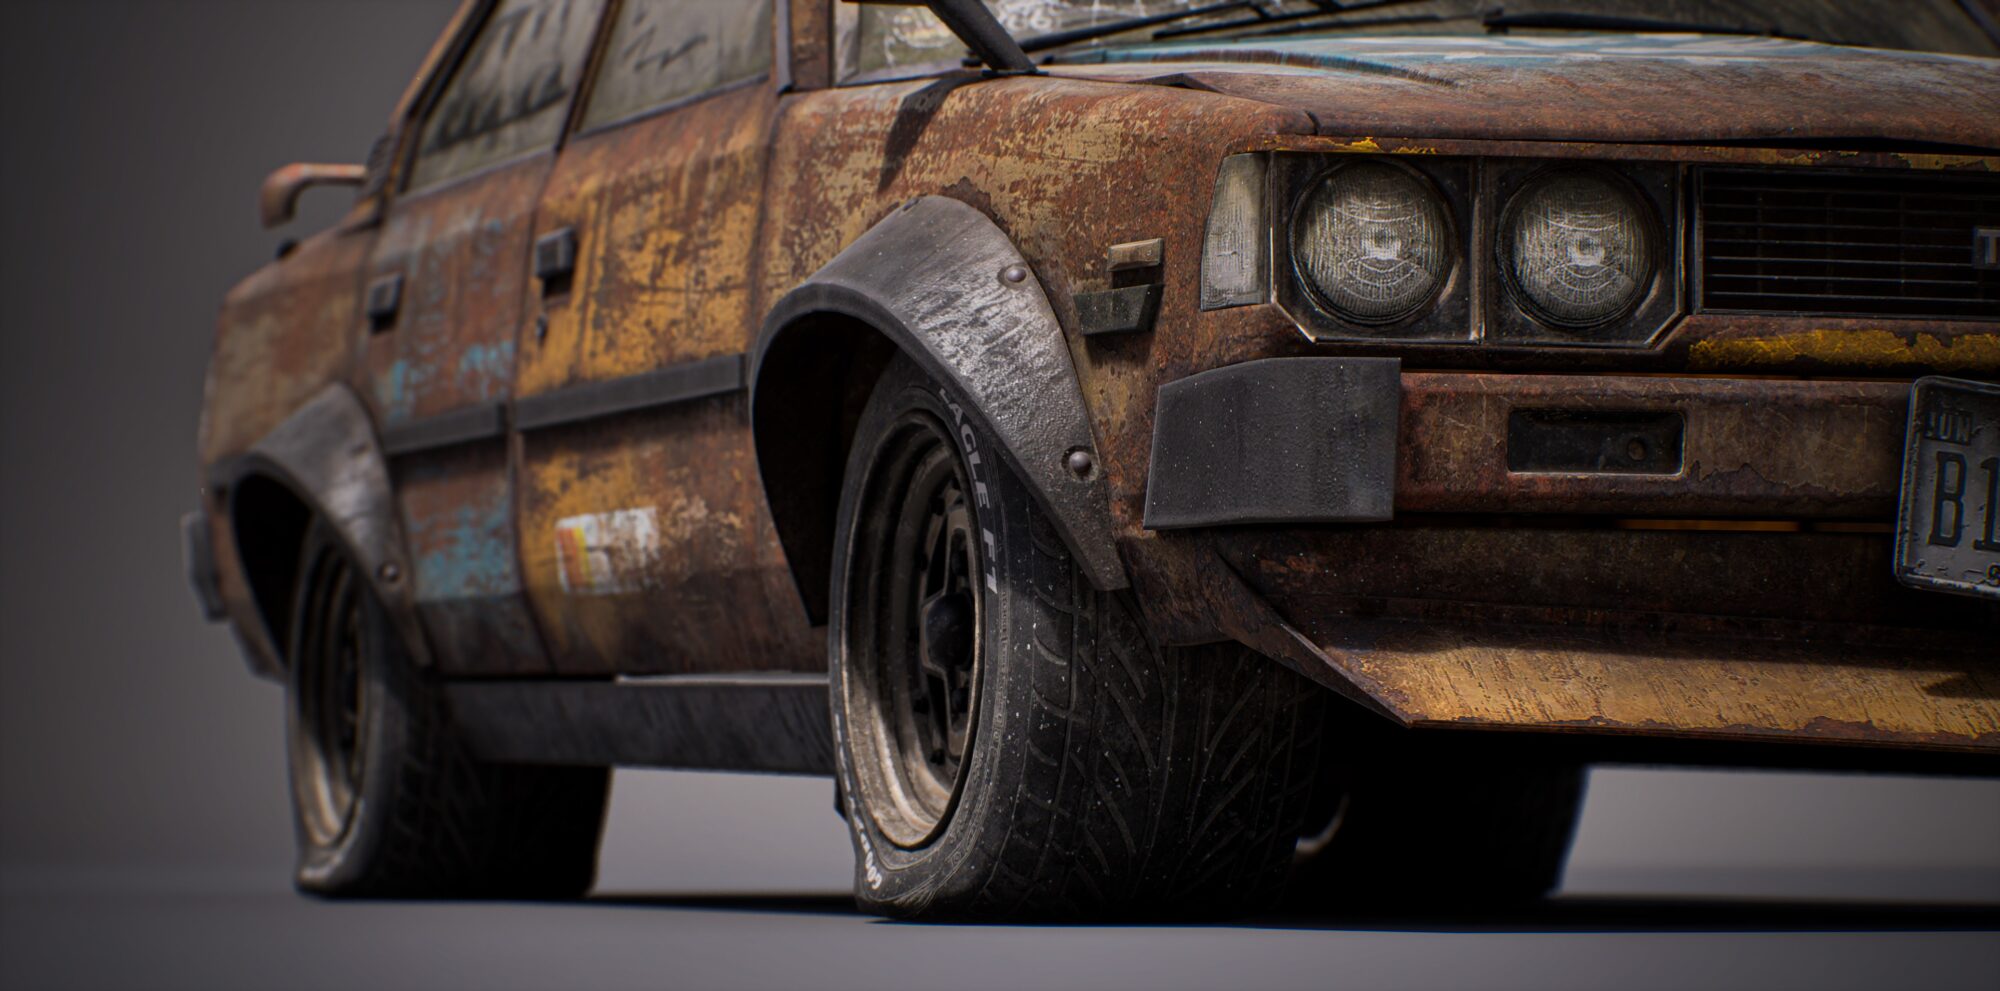
To finish, I added many dirt layers on top and an extra roughness variation layer to enhance light interaction and break up flatness.
I also used a sharpen filter on a paint layer set to passthrough mode, which helped tighten up the overall texture and eliminate any blurry appearance.
In this video, I break down the individual layers that make up the material.
In this video, I show how I built the final rust using three different rust layers.
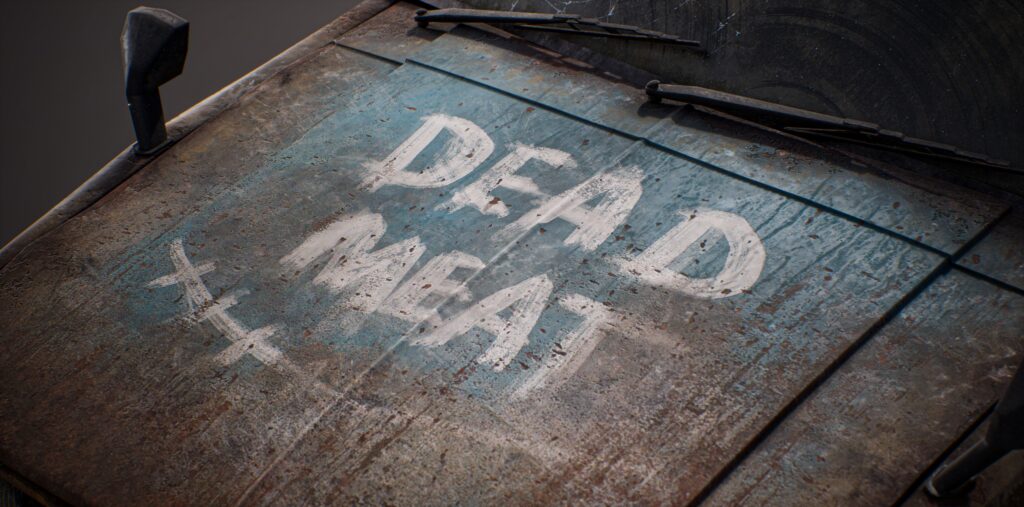
In this video, I show how I created the painted-over-glass effect by stacking multiple dirt layers on top of the glass material and using a black mask to manually erase parts, revealing the glass underneath.
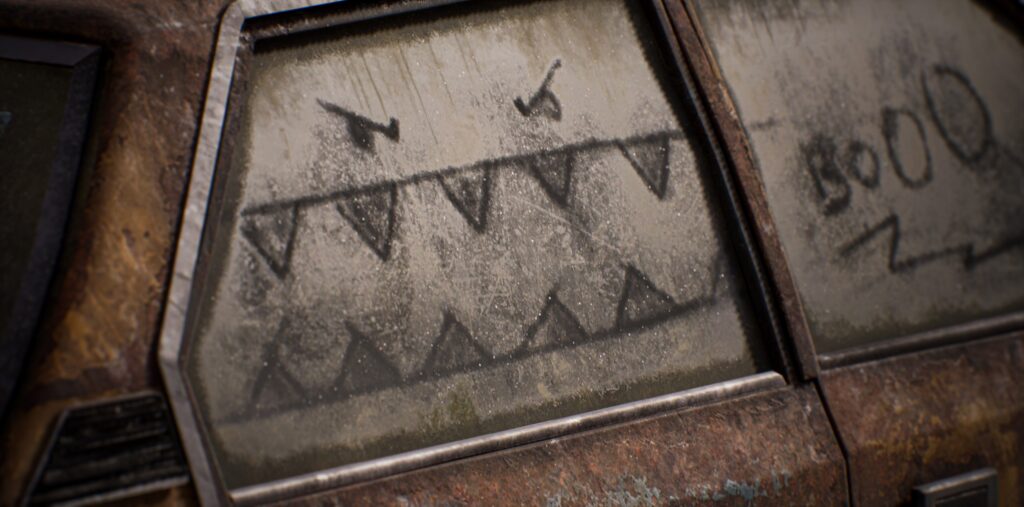
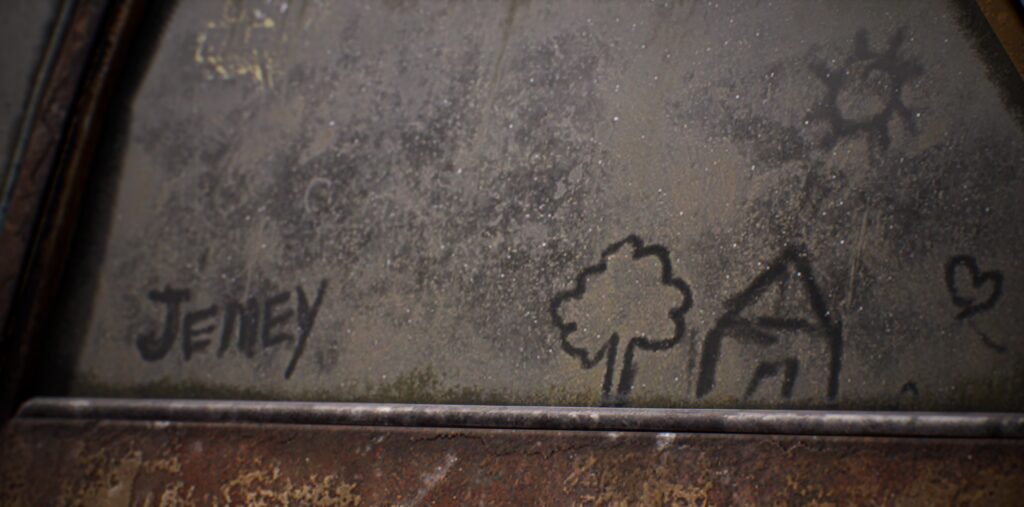
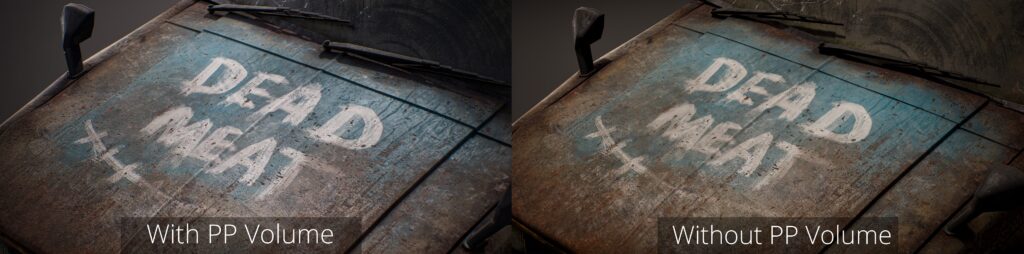
Storytelling
Storytelling is a game-changer in texturing; it can make a prop truly stand out and feel unique.
But it needs to be used with care, as too much or poorly placed detail can break the overall believability.
For this model, I wanted to reflect the history of the car’s owner by adding stickers and hand-painted text and signs, inspired by Wreckfest, one of my favorite car games.
I also added hand-painted elements on the glass and subtle handmade scratches on the car body, suggesting it was left in an abandoned area where kids have interacted with it over time.
This is a small comparison showing the model with and without storytelling elements.
UE5 Rendering
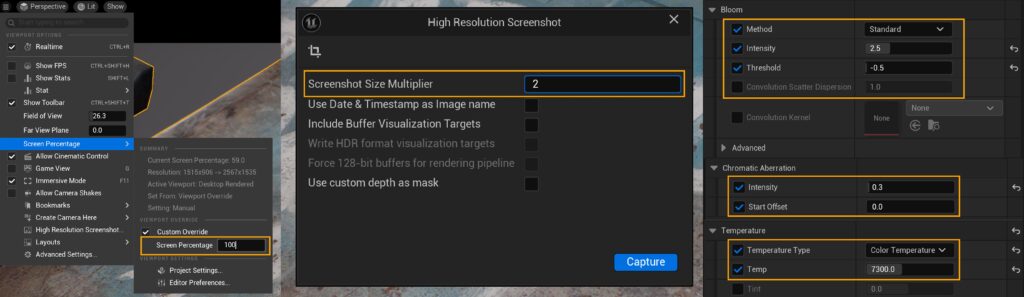
For the render in Unreal Engine, the process was straightforward. After setting up the lighting, I made some small adjustments to the post-process settings.
Specifically, I added a subtle bloom effect and a slight chromatic aberration to introduce an interesting blur around the edges of the model. Additionally, I tweaked the overall color temperature to achieve the desired mood.
Once the post-process effects were finalized, I increased the Screen Percentage to 100% for optimal quality. Finally, I captured the final renders using the High Resolution Screenshot tool, setting the size multiplier to 2 to obtain a higher resolution output.
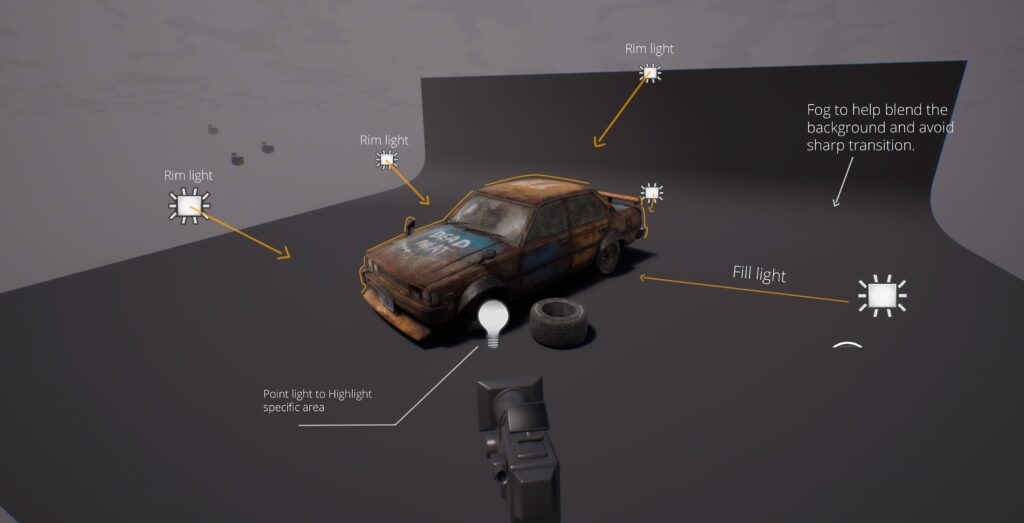
Lighting
The lighting setup was primarily based on Unreal Engine’s default directional light, which allowed me to easily achieve different lighting conditions simply by rotating the light.
In addition to the directional light, I added several supplementary lights: some fill lights to brighten specific areas, rim lights to help the model stand out from the background, and point lights to highlight darker spots or to emphasize surface details and roughness variations in certain shots.
For the background, I used a simple curved plane combined with fog to create smooth transitions and help blend the sharp edges, resulting in a softer and more cohesive backdrop.
Post Process
For the post-process, I always make subtle adjustments to enhance the visual fidelity of my renders without overdoing it, as excessive editing can break the realism of the scene.
In this project, I primarily used the Camera Raw Filter to fine-tune the final renders. Some of the key parameters I adjusted include exposure, contrast, saturation, texture, clarity, and sharpness.
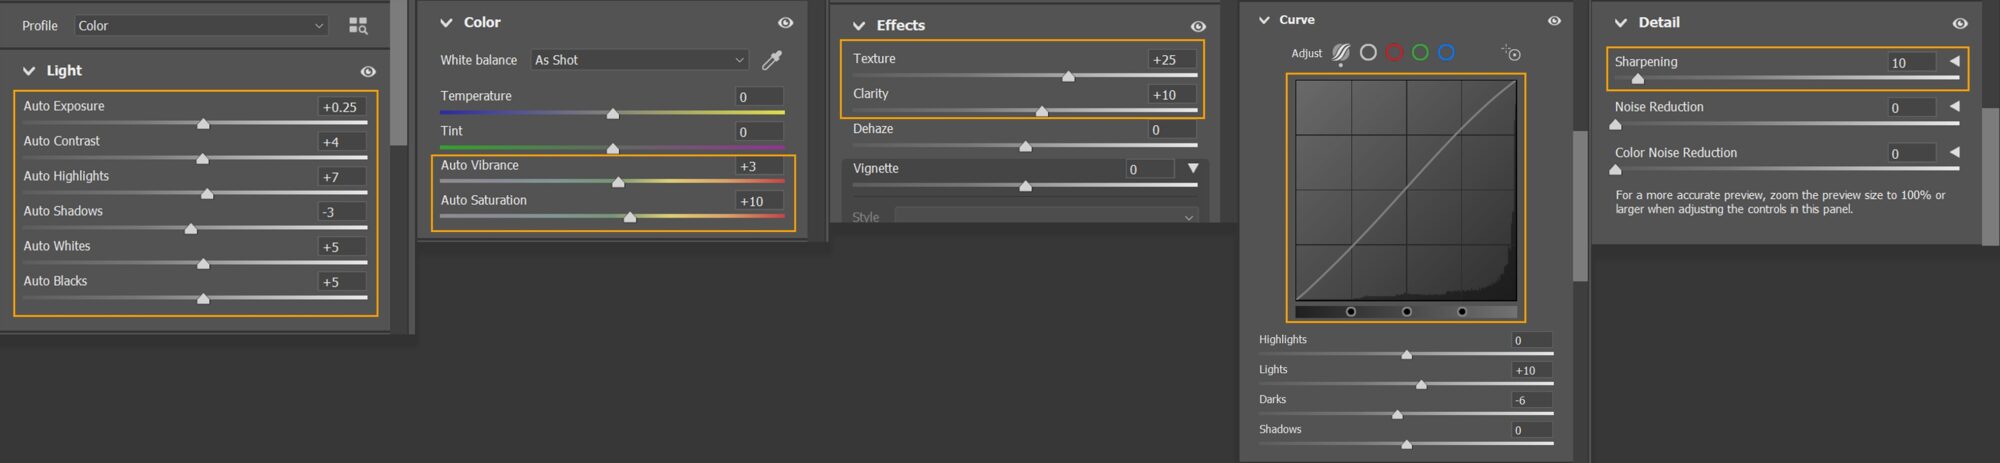
It’s important to keep the post-process very slight to maintain a natural look.
Key to creating appealing Props
Creating appealing props starts with strong visual storytelling and real-world reference.
I use references to guide form, material, wear, dirt, and how the material interacts with light, ensuring each prop feels grounded and believable.
Understanding PBR properties is essential: accurate values for roughness, metallic, and base color make a big difference.
I also balance normal map intensity to avoid overpowering or flattening the surface detail. This blend of narrative and technical accuracy helps tie props naturally under any lighting condition.
Advice for beginners
-
Focus on the fundamentals. Before diving into complex scenes or tools, make sure you understand form, composition, colors, lighting, and PBR values. These are the foundation of everything in 3D.
-
Use real-world references constantly. Don’t try to guess how something looks. Study how materials behave, how things age, and how objects are built in real life. Reference is your best friend.
-
Finish projects, even if they’re not perfect. It’s better to finish a small, polished project than to get stuck chasing perfection. Each project teaches you something new.
-
Ask for feedback and stay open to it. Don’t be afraid to show your work and get critiques. The more you get used to it, the faster you’ll grow.
-
Stay consistent, not just motivated. Skills take time. Even small, daily progress adds up. Make learning and creating a habit.
Summary
In this article, I talked about my workflow behind the abandoned Toyota Corolla E70 model. I broke down the entire process, from modeling, retopology, and UVs to texturing, rendering, and post-processing.
I emphasized the importance of adding a manual touch and integrating storytelling, weathering, and environmental context, even when the asset stands alone.
These choices help give the prop a unique identity and spark curiosity about its past. I hope this encourages other artists to keep pushing forward, even during challenging times in the industry.
Keep learning, keep creating, and be ready for when opportunities come.
And make sure to stay tuned; the full environment where this prop belongs will be released soon!
Read more articles
You might also like these articles.