Mad Science Gun


Introduction
Hello, my name is Joris Brouwers and I’m a self-taught 3d artist from the Netherlands. I enjoy doing props and environment work with a focus on hard-surface modeling.


Goals
As I’ve heard many good things about Blender I wanted to learn it myself, it’s the main reason for doing this project.
Additionally, I wanted to improve my ability to plan, so I budgeted time for each part of the process and started tracking time using an app called Harvest. Sticking to a budget also helped me in keeping the big picture in mind without getting stuck on details.

The final model is intended to be animated and implemented in Unreal Engine 5 as a first-person weapon.
Software
For modelling, I used Blender, ZBrush, Maya (UVs) and Marvelous Designer. Texturing was done using Substance 3D Painter. For the final renders, I used Marmoset Toolbag 4 and Photoshop for post-processing.
Concept & References
The concept created by Bruce Yu immediately caught my attention. It leaves a lot open for interpretation while providing enough detail to hint at all the different material types and their history. On top of that it’s a fun design that I felt provided the right amount of challenge for my current skill level.
To complement the concept art I’ve gathered a bunch of reference images as well.


Blockout
As usual, I started with a simple blockout to get an idea of all the different parts and their proportions.

Because the concept doesn’t always show how wide something is I like to start with a cylinder since the height and width are the same. In this case, I started with the lightbulb which served as a good point of reference while blocking out the rest.
This model uses a lot of cylinders, pretty much the entire front half is round in some way. To save time later on I tried to use the right amount of edges for my cylinders as the blockout will eventually serve as a base for the low poly.
High Poly
To model the high poly I used a workflow I learned from Simon Fuchs’ Military Radio Tutorial. It works by first creating a fully detailed “medium poly”, which is essentially the high poly without smoothed edges. I smooth the edges later in ZBrush.

This is roughly how it works:

I like this workflow because I don’t have to worry about topology as long as the shading looks good.
This workflow is especially suited for hard-surface work, topology becomes a lot more important when modeling organic stuff.
There are some downsides, however, like Dynamesh not being able to handle small or thin objects very well. I modeled these in Blender using subdivision modeling.
After going through each part I did a sculpting pass to add details like edge damages, welding seams and the wrinkles on the wire insulation.

For the grip tape I decided to use Marvelous Designer after finding a helpful tutorial on YouTube. The simulation took a bit of trial and error but I’m glad I stayed persistent. After importing the final result in Blender I used Solidify to give it some thickness.

Final high poly:


Low Poly
Modeling the high poly this way allows for quick low poly creation as well because the medium poly is perfectly suitable as a starting point. In most cases, all I had to do was remove the subdivision modifier and optimize the topology. No need to remove tons of support loops 🙂
I also made sure to pay close attention to the silhouette, especially from the first-person view. I wanted the round surfaces to have enough edges to not look jagged or cause baking problems. It was challenging to stay consistent doing this; smaller pieces needed to have fewer edges than larger ones so that the overall resolution stays the same while also keeping other factors in mind like how important/visible a part is or the perspective it will be seen from. This model’s been great practice in this department!
For example, here I prioritized the first person view over the side view:

I went a bit higher in polycount than I normally would in a production environment as this is a portfolio piece, but I still wanted to optimize it as much as I could.
Final low poly:

UVs & Baking
I like to prepare the UVs while working on the low poly so that most of the work is already done when I get to the unwrapping stage.
By preparing I mean setting my hard edges correctly, making UV cuts based on those and hitting the unwrap button. I don’t look at the result, I’ll go over each part later anyway. You can automatically select sharp edges in Blender which helps to speed things up.
When ready I move to Maya for its Unfold and Straighten tools which work like magic to me. I really wish to have something similar in Blender, I even tried Textools and ZenUV but I haven’t found it yet.
In Maya, all I do is go over each piece and double-check with a checkered material applied, making sure islands are nicely straightened and there is minimal stretching.
When I finish I bring everything back to Blender where I pack the UVs using UVPackmaster 3, which is now my favorite packer!

Before packing, I set the texel density so that all UV islands have the same resolution. I then increased the resolution of the islands that are close to the first-person camera and decreased the resolution of those that are mostly obscured or rarely seen (e.g. the bottom of the stock).
I also overlapped identical islands to save UV space and moved them to adjacent tiles to prevent baking issues. UVPackmaster has some useful tools to help with this!
Finally, I divided all of the parts into two UV sets while maintaining relative texel density, which took some trial and error. Now I can apply two 4K materials for maximum quality.
For baking, I used Marmoset Toolbag 4. Luckily I faced only minor issues which were easily solved by using the Paint Skew tool or correcting the size of the cage.
I made sure to disable ambient occlusion for the glass parts and also the battery since it’ll be removed during the reload animation.
After baking I proceeded to set everything up in Painter. Usually, I use Studio Tomoco as my environment map but I found an amazing alternative on Polyhaven called Brown Photostudio 02. It has neutral colors and doesn’t contrast as much, which I like. I also changed the camera FOV to 30.
Finally, it’s all set up and good to go. Now is when the real fun begins!

Texturing
Usually, I start by creating folders for all of the materials and get the masking done before anything else. I wanted everything to look rough, old and weathered to stick to the theme of the weapon being put together by a mad scientist.

Personally, I like to work on one material until it’s fairly detailed and then move on to the next. Every once in a while I look at the entire model and ask myself what stands out and where more work is needed. While doing this I consider each individual channel, so maybe there isn’t enough variation in the roughness map or colors are contrasting too much in the base color map.
I think it’s a lot about finding a balance between variation and uniformity. Your materials shouldn’t be too flat, there needs to be variation. At the same time, you don’t want anything to stand out too much either. This applies to individual materials, an entire asset and even complete environments.
Below are some WIP renders:


The way I approach a material is by first looking for a smart material that comes close to what I need, then disabling all of the layers and enabling them one by one starting from the bottom. I go through each layer and tweak values to fit my needs. I remove layers and add new ones.
Basically, I start with a default material and make it my own while closely examining my reference images.
A neat way to add variation is by duplicating the layer that defines the main color and giving it a slightly different color. Add a mask and assign it to different parts. This way you get color variation without having to duplicate the entire material. Changes made to other layers like dirt etc. will affect all versions as well.
Here are some breakdowns of a few materials:
A lot of the time it’s an accumulation of subtle details that make up the material.
For the barrel, I wanted to create the effect of steel that has repeatedly become hot and then cooled down again. I found a great plugin called Dynamic Hot Metal that does exactly that, works like a charm! I used it to tint the fitting of the lightbulb as well to give it this cool metallic look, it’s a lot of fun to play around and experiment with the effect.
Polishing
The moment I felt satisfied with the materials I continued adding unique details to break the repetition and give the weapon more character. Think about leaks, stickers, paint, decals (rust, dirt, damages), labels, etc.
I put together this alpha map which I used as a stencil to stamp down the text details.

During this stage, I continued to observe the first-person view to make sure everything still looked interesting and pleasing from that perspective.
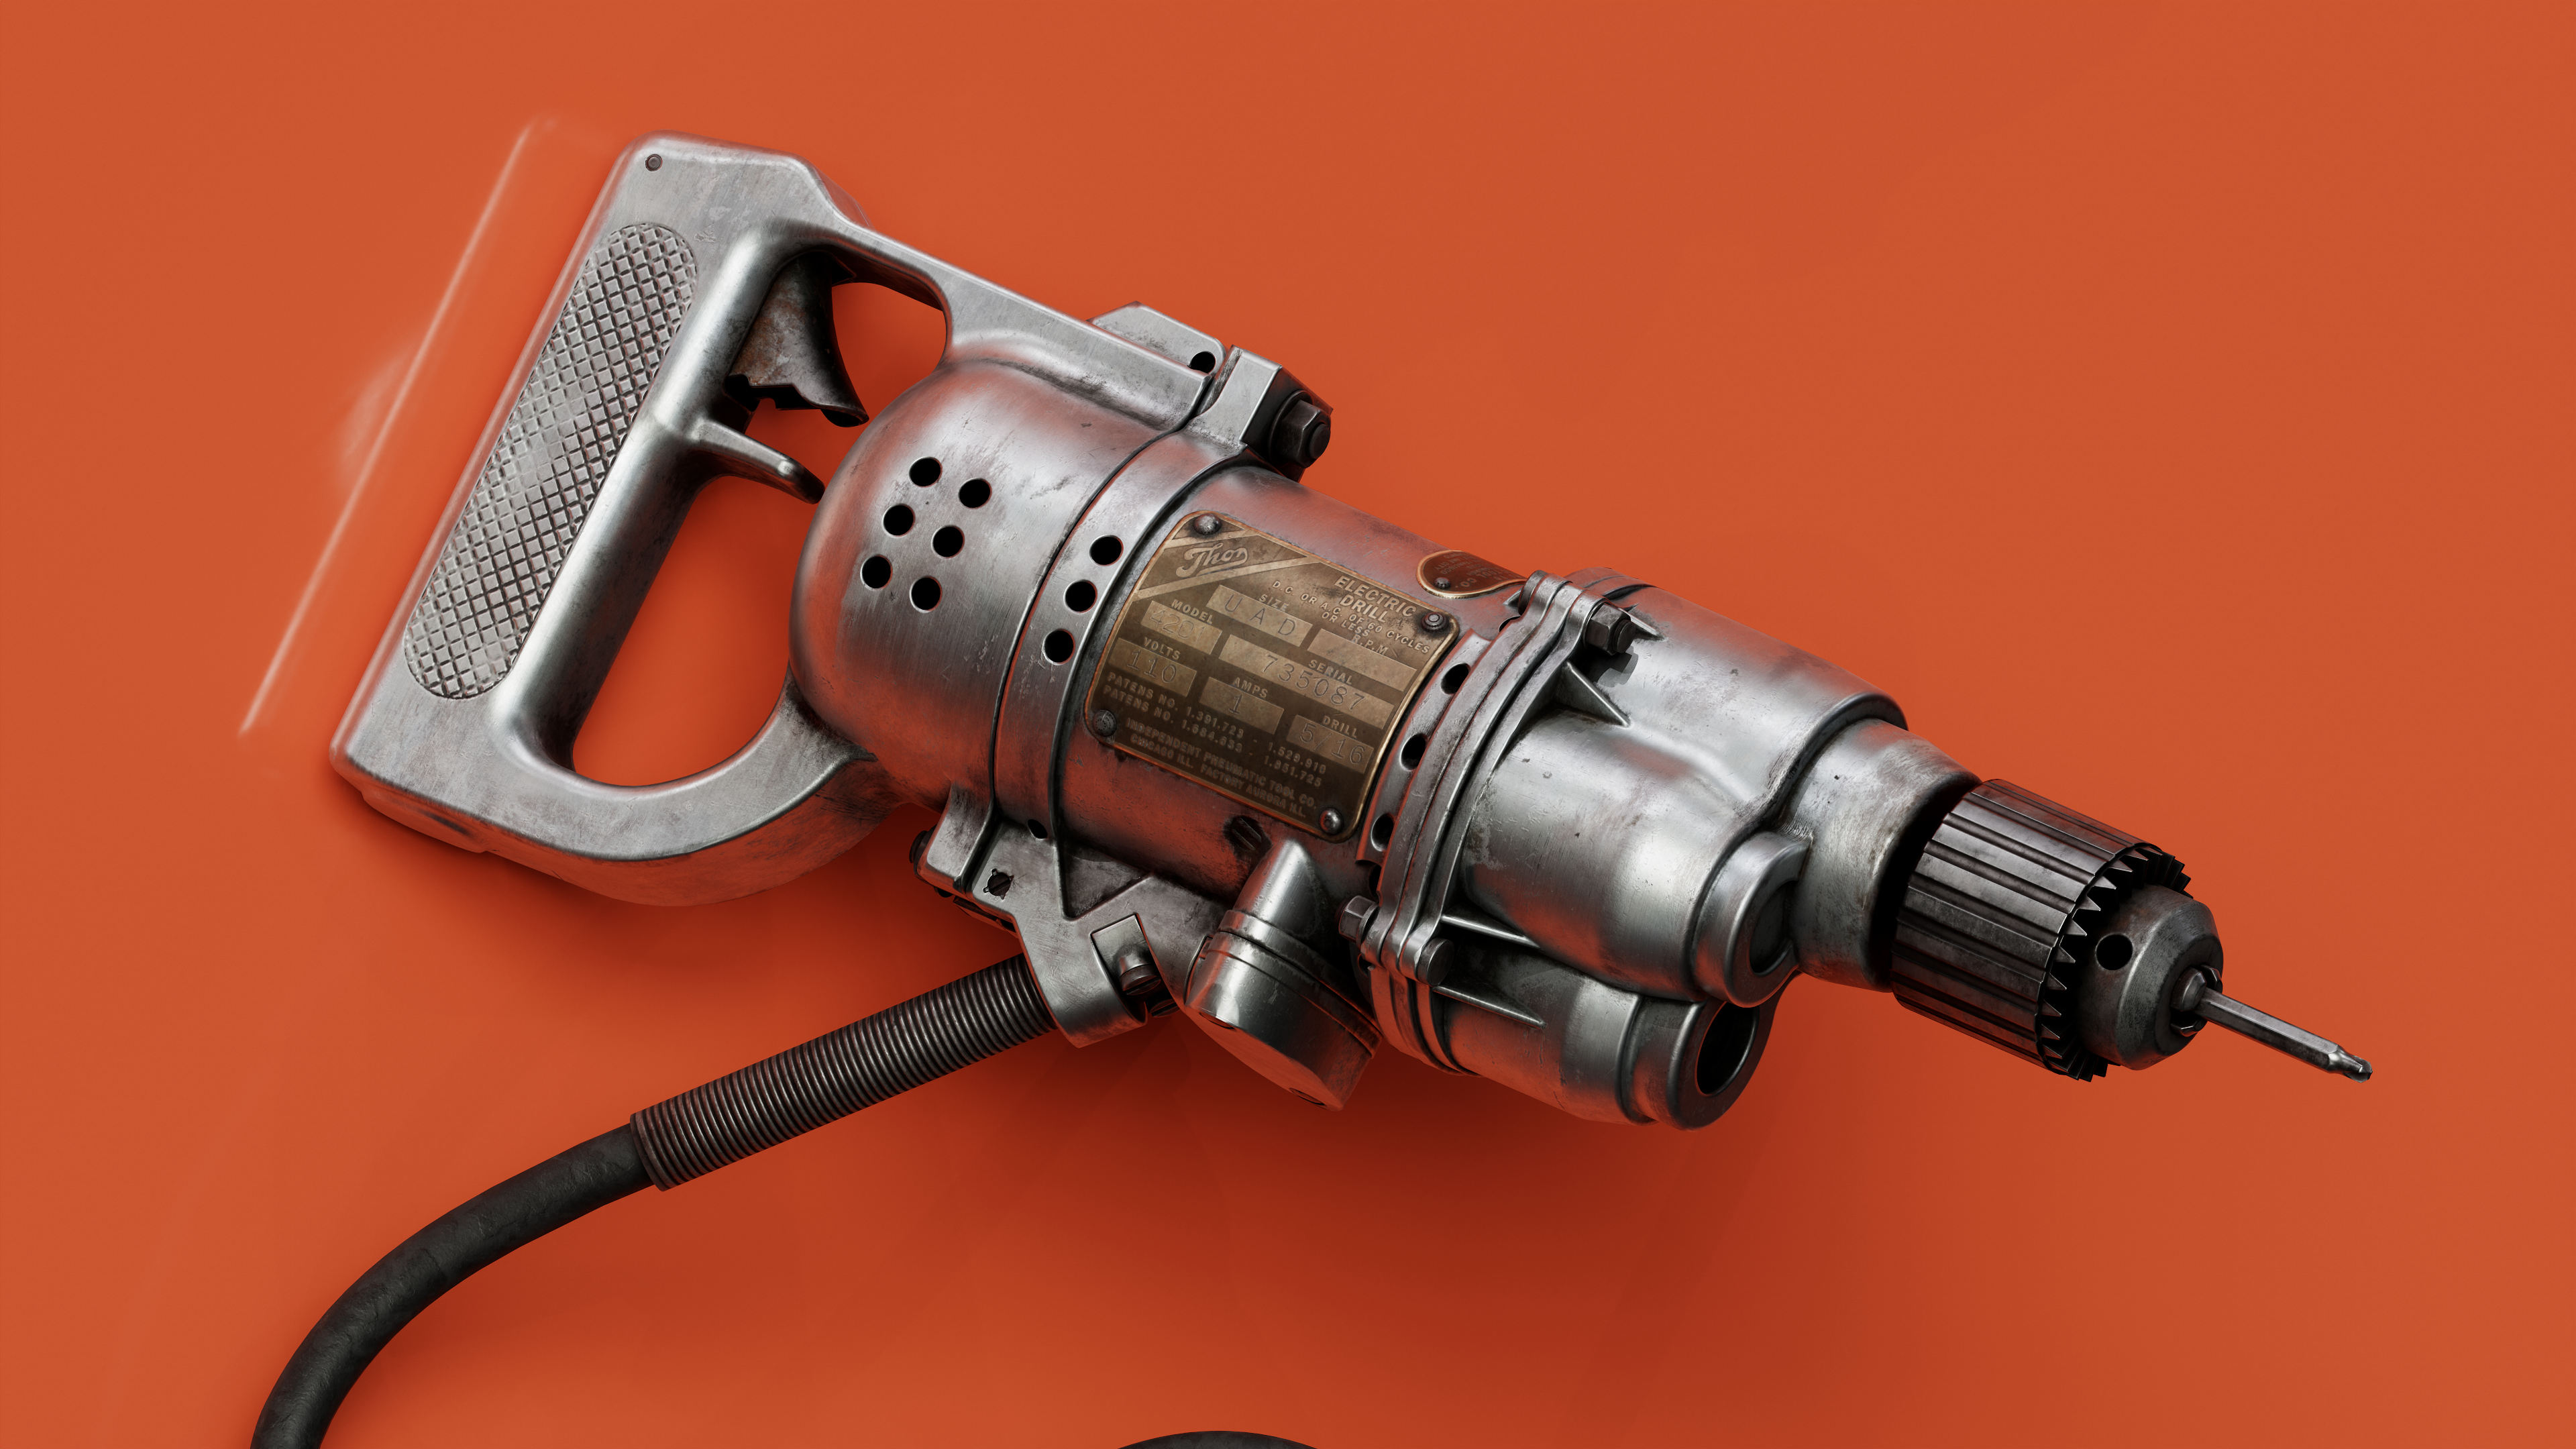
Rendering
For this final task, I used Marmoset Toolbag 4. To keep things non-destructive I created a separate folder for each render with a new camera and lights within. Now I can always come back and modify each render with the lighting setup still intact.
This was my scene setup:

I used the same HDRI as I used in Painter. For each shot I first tried to find a good camera position and sky rotation and then continued to add child lights by dragging the mouse in the sky preview window. I really love this feature, it can sometimes give you cool unexpected results.
After rendering I used Photoshop for post-processing. I didn’t do anything fancy, only adjusted the vibrance, contrast and brightness a bit. It can make a big difference and really give your renders that final touch. Here’s a before and after comparison:
At this point, I added the lightning effect after someone on Polycount inspired me with the idea.

It’s simple geometry created using splines. In Marmoset I toggled the visibility for the animation and played around with the bloom and flare settings to give it more “power”.
I’m planning to learn more about VFX in Unreal Engine 5 to create actual lightning, something I’m really looking forward to!
Conclusion
That’s about it! One last tip I would like to give is to take breaks. Come back after a few days while working on something else maybe. You’ll return with fresh eyes and really see things from a new perspective. It can do wonders, especially after working on the same project for a long time.
I really hope you’ve found this article informative or helpful in some way. Thank you very much for reading, and many thanks to Games Artist for inviting me!
Read more articles
You might also like these articles.