Ruins

Introduction
Hi, my name is Ioannis, and I am an Environment Artist for games. My passion for games began during my childhood, and later, I discovered that as a gamer, I love finding hidden stories in games, and as a developer, I enjoy crafting them.
Therefore, as a recent graduate of the Think Tank Training Centre program on CG Asset Creation for games specializing in Environment Art and Storytelling, I am excited to start my career in the gaming industry!
Project & Concept
“Ruins” is my mentorship and last project as a student at Think Tank Training Centre.


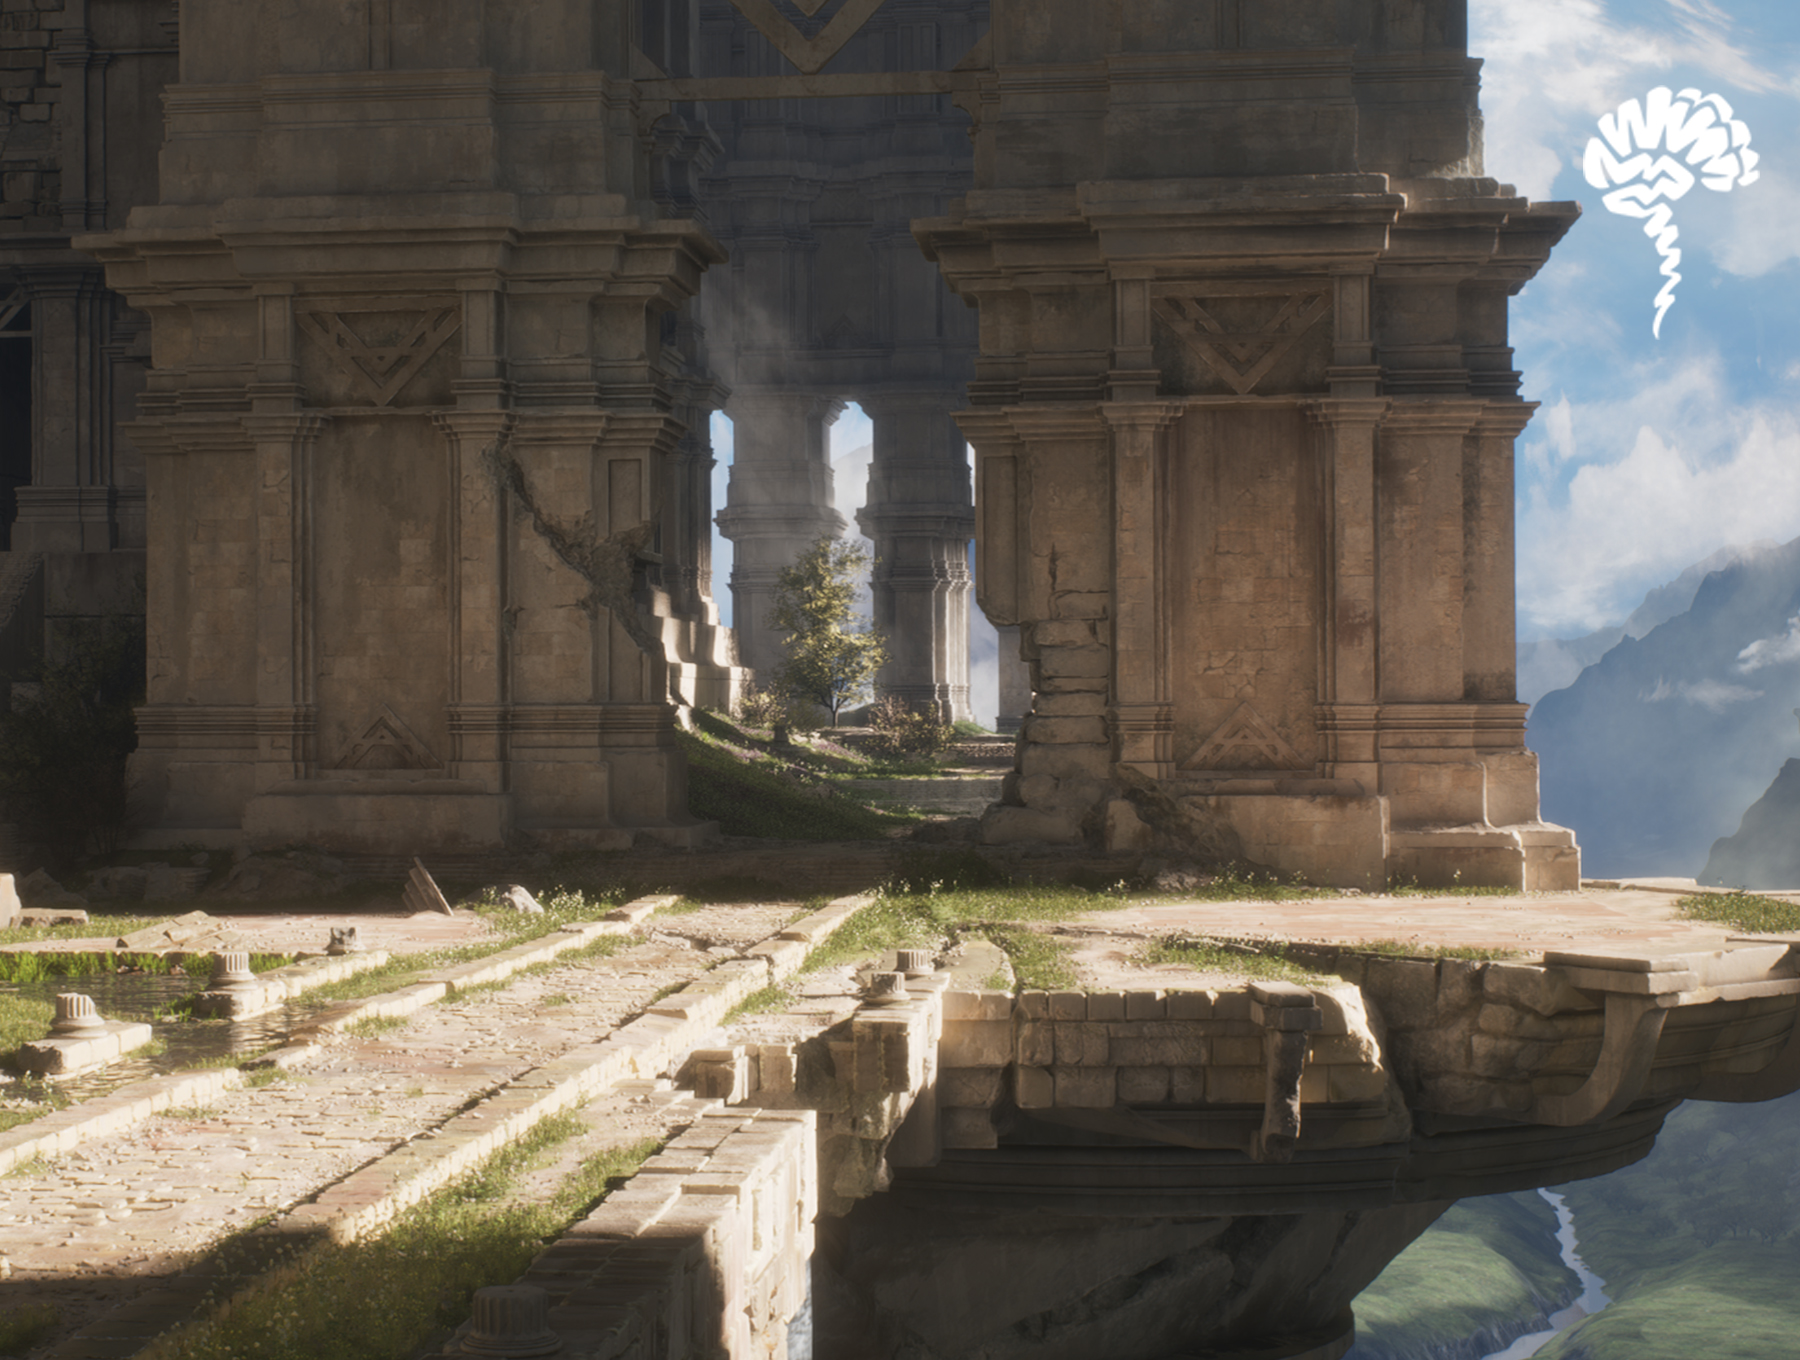
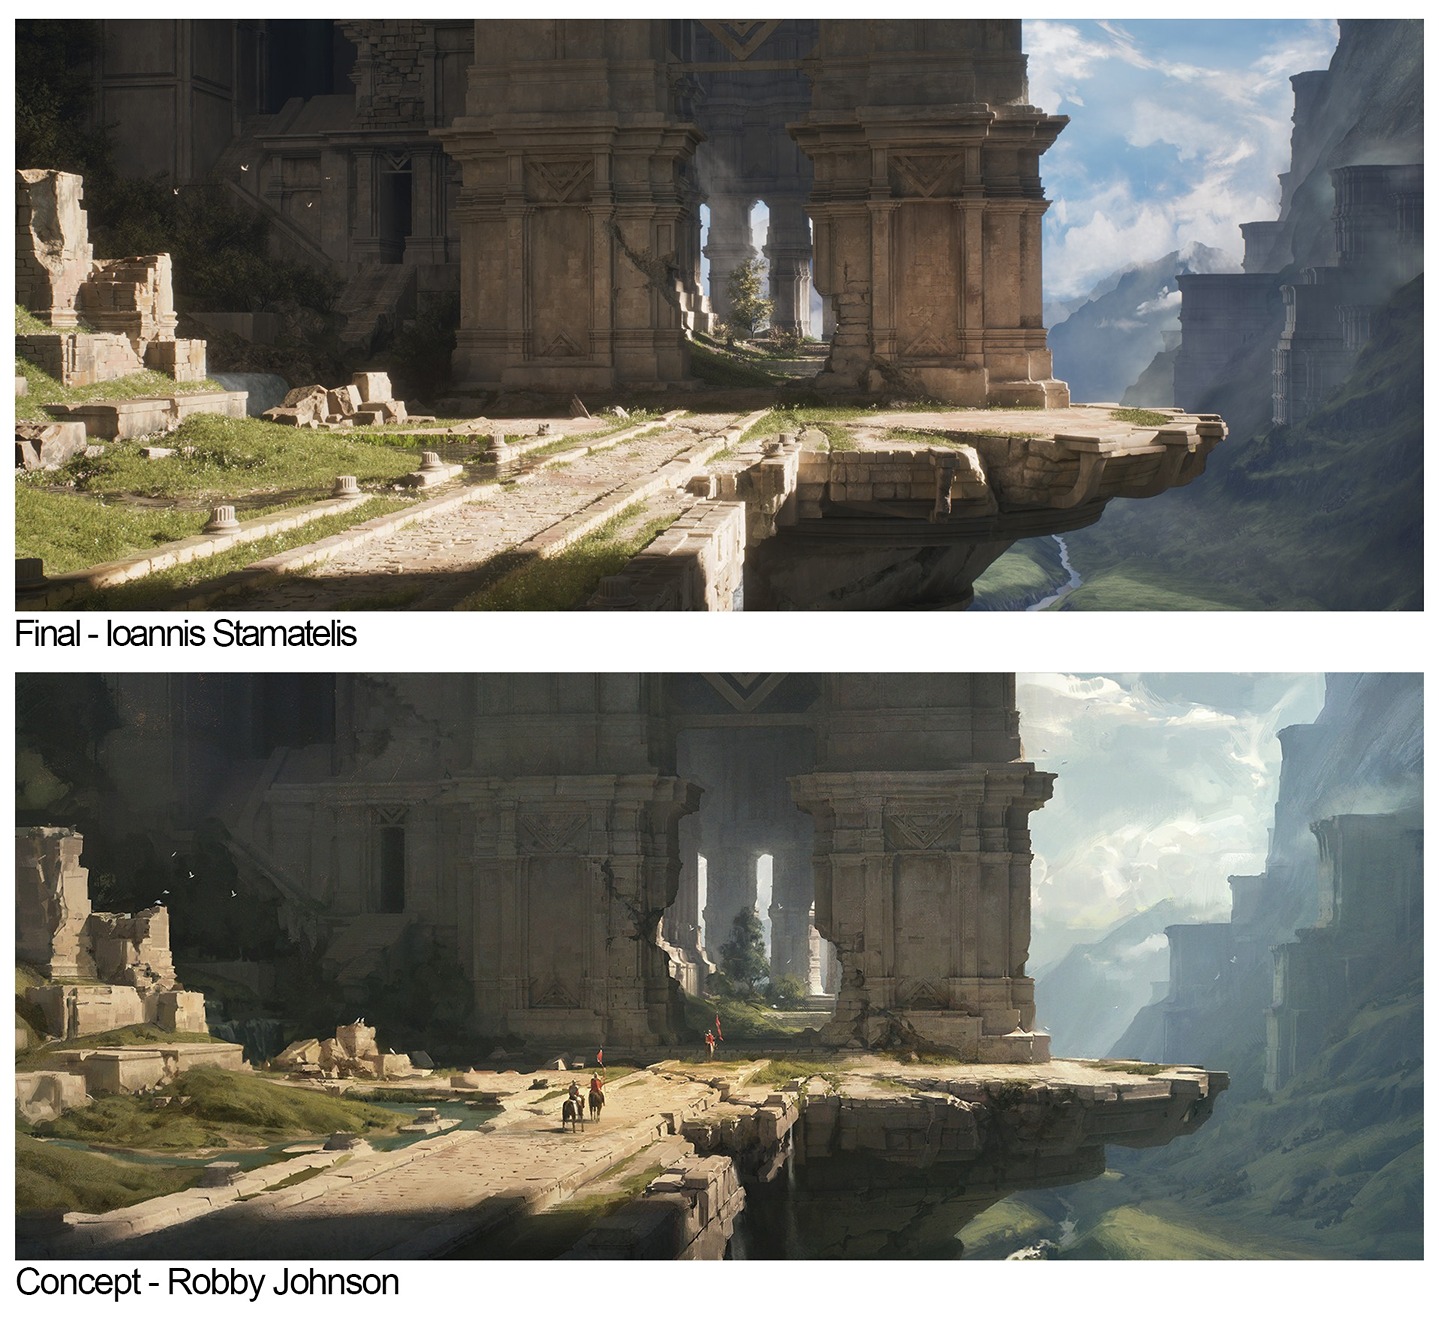
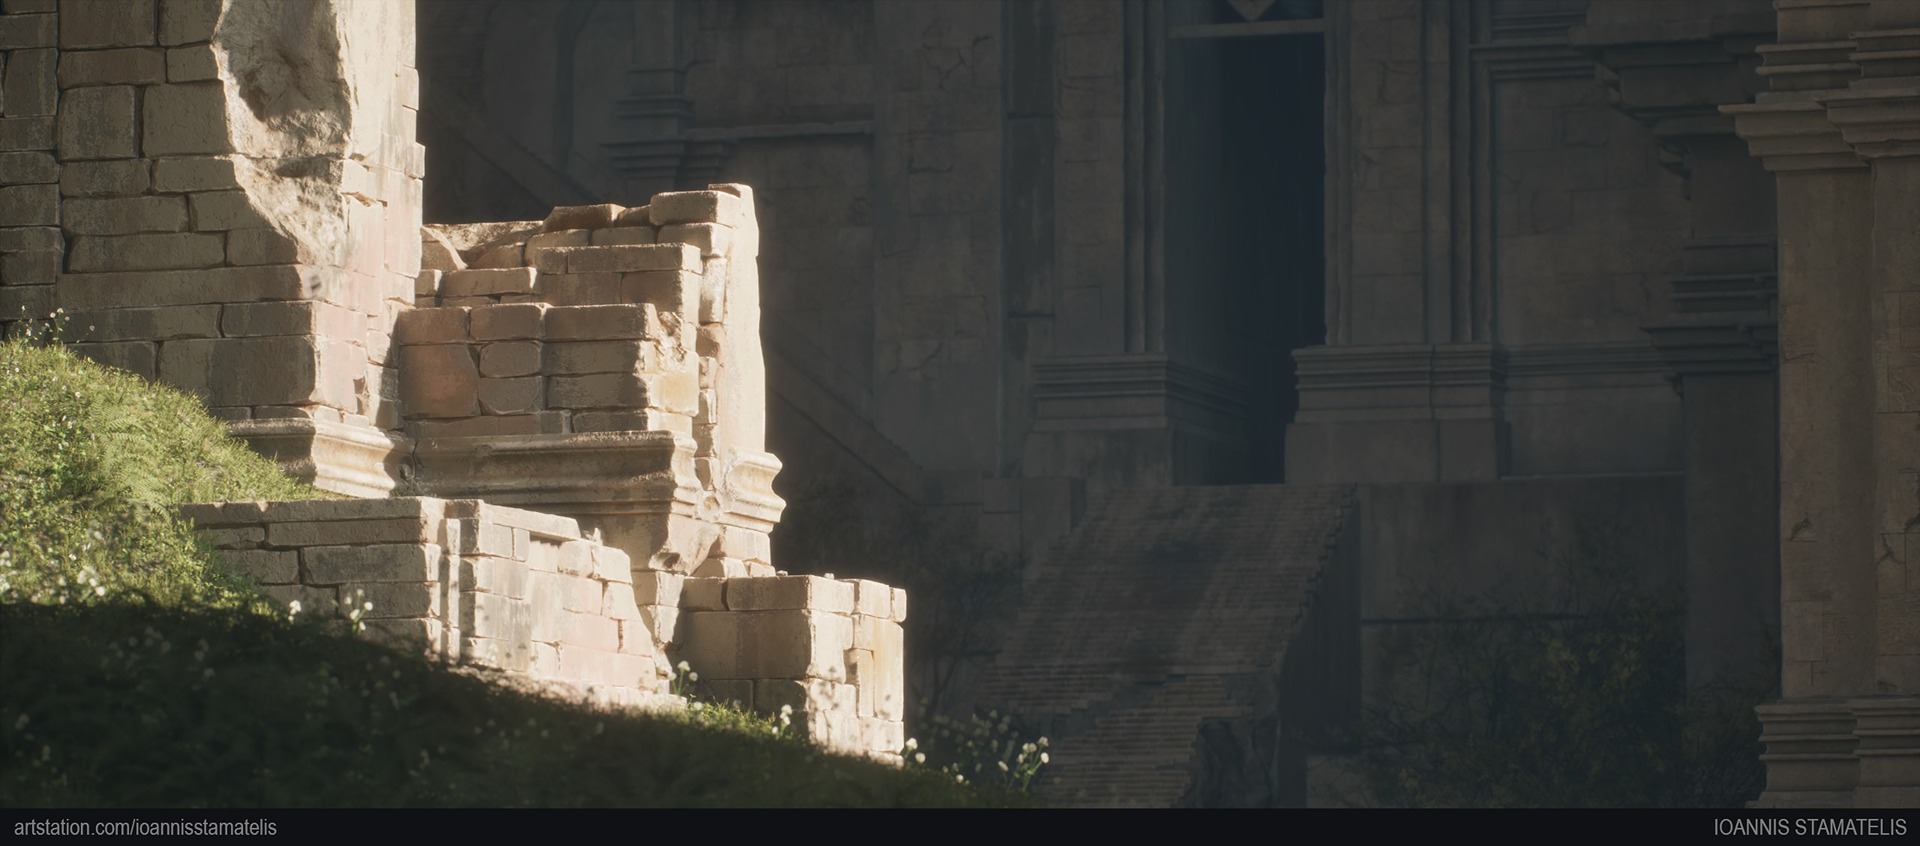
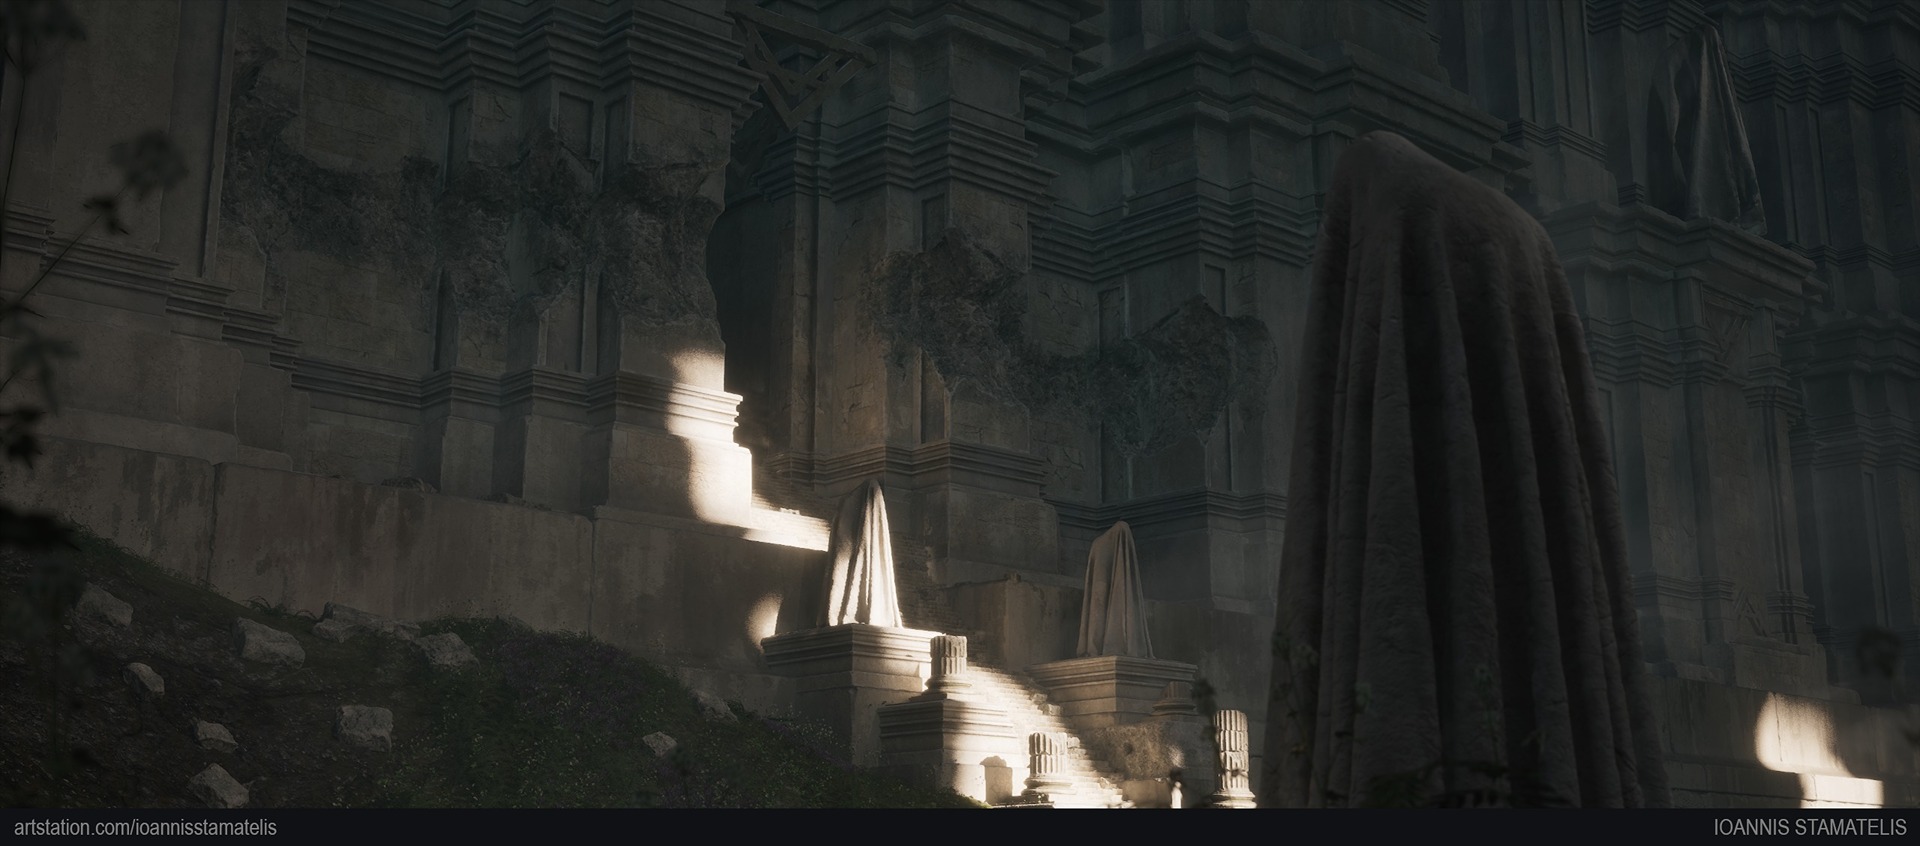
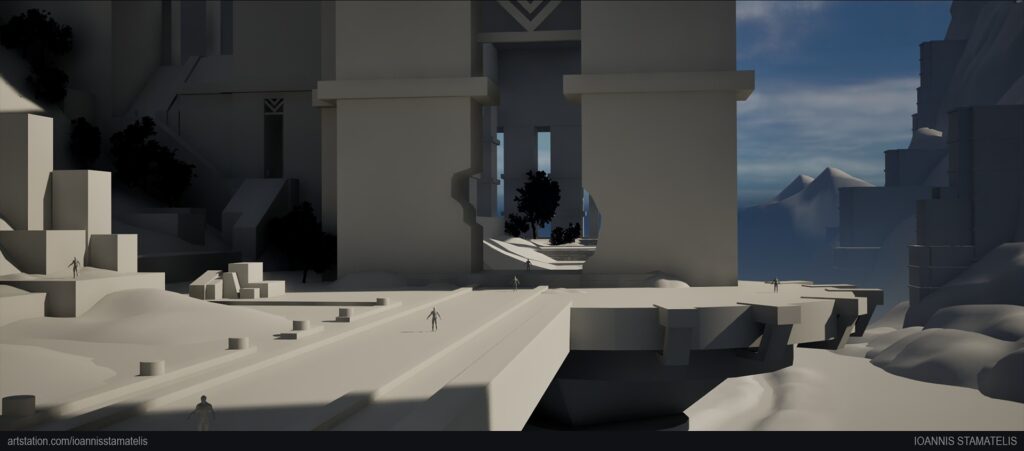
The main goal of this project was to capture the tranquility of a forgotten temple exterior scene within a real-time game environment, following the concept art of Robby Johnson.
Since my previous work was interior scenes, I wanted to expand my knowledge and practice my skills in tackling open-environment scenes.
This project was created in Unreal Engine 5 within 15 weeks. Throughout this time, I focused on sharpening my sculpting and texturing skills.
Also, I set up workflows and techniques I learned from previous projects, such as using RGB masks for texturing and breaking the main elements into modular pieces so that the scene would be populated quickly and efficiently, ensuring a high-quality result.
Every asset was created by me except the flying birds (Rural Australia project by Andrew Svanberg Hamilton), the waterfall (Water Materials by tharlevfx), and the fog (EasyFog by William Faucher) to save time and focus on the areas that were important for me to hone my skills further.
Software & Tools
- PureRef – Reference gathering.
- Maya – Blockout, modeling, UV mapping, and mesh cleanup.
- ZBrush – Sculpting high-poly models and organic modeling.
- Substance Painter – Bake and RGB mask creation.
- Substance Designer – Tileable textures creation and decals.
- SpeedTree – Foliage generation.
- Gaea – Background landscape meshes.
- Unreal Engine – 3D Development, Visualization & Rendering.
- Marvelous Designer – Cloth simulation for the statue.
- Resolve Davinci – Color Grading & Final export.
Challenges & Thoughts
Although the concept art depicted an interesting gestural exposition shot, with enough information about the look and feel of the environment, parts of the scene raised some questions.
For instance, are there any extra assets to take into consideration that I do not see? What does the interior layout of the temple actually look like?
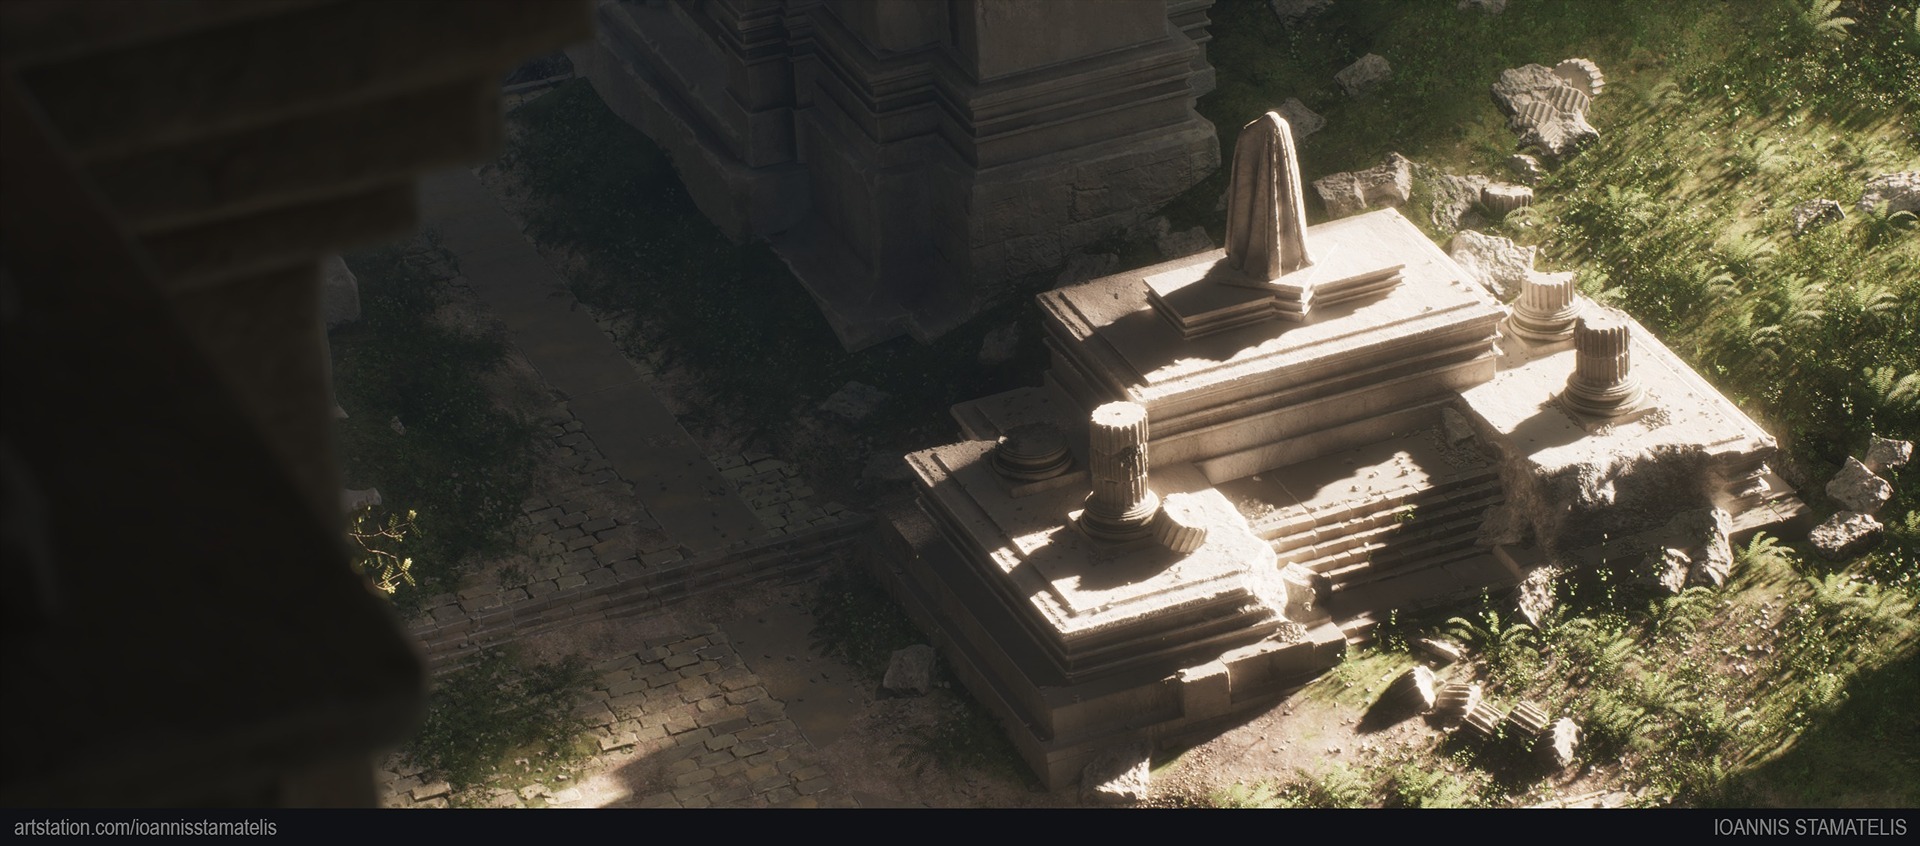
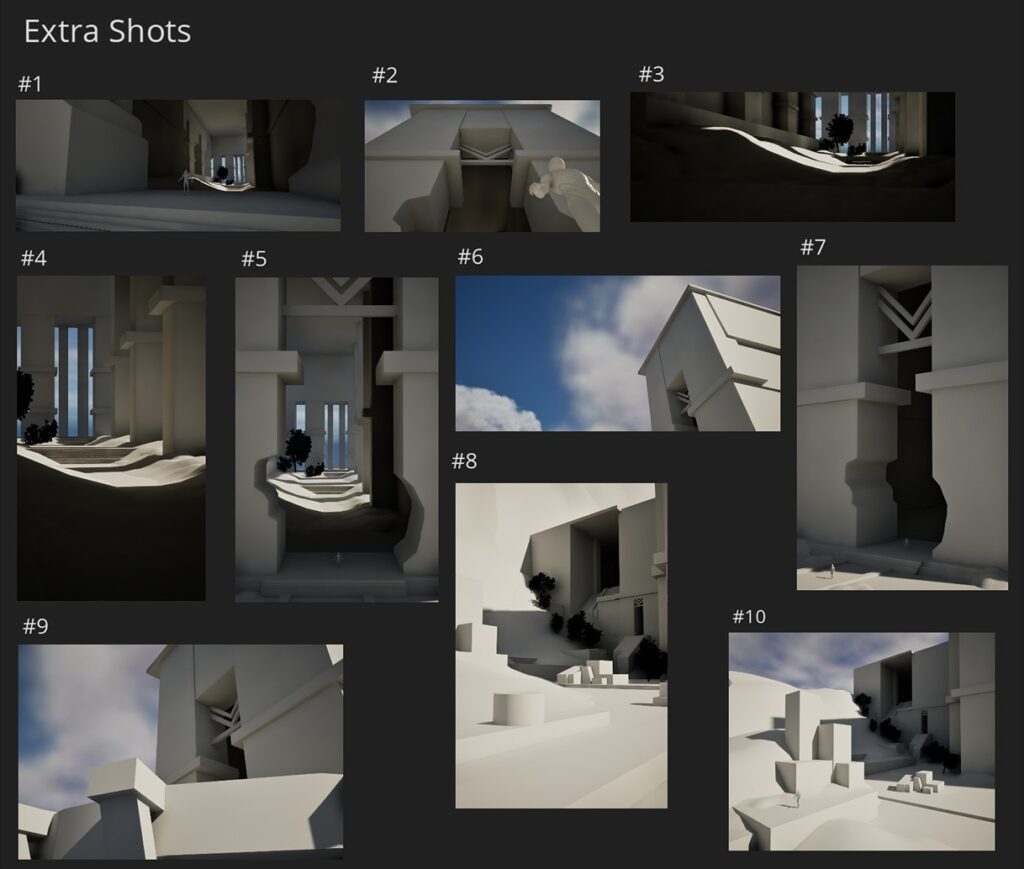
My aim was not to just replicate the key shot in 3D but to build an environment to showcase up close from different angles.
Except for the recreation of the scene in 3D, I was the creative director of the scene, searching for interesting cinematic shots while keeping the lighting and layout of the main key shot intact.
This and the scope/scale of the project were the two biggest challenges to tackle for this project.
From the start, I decided to solve these challenges by reiterating ideas and models quickly and figuring out what works and what does not while always keeping the concept in mind.
By establishing an asset and texturing workflow early, I could experiment with ideas rather quickly, get assets into the engine fast enough, and reiterate.
References & Concept Breakdown
I gathered references for every aspect of the scene, such as assets, materials, and vegetation. Additional references were collected as the weeks passed.
I got more feedback from my mentor, and new ideas arose. The project’s job sheet was a “living” document where references would come and go if they did not serve a purpose.
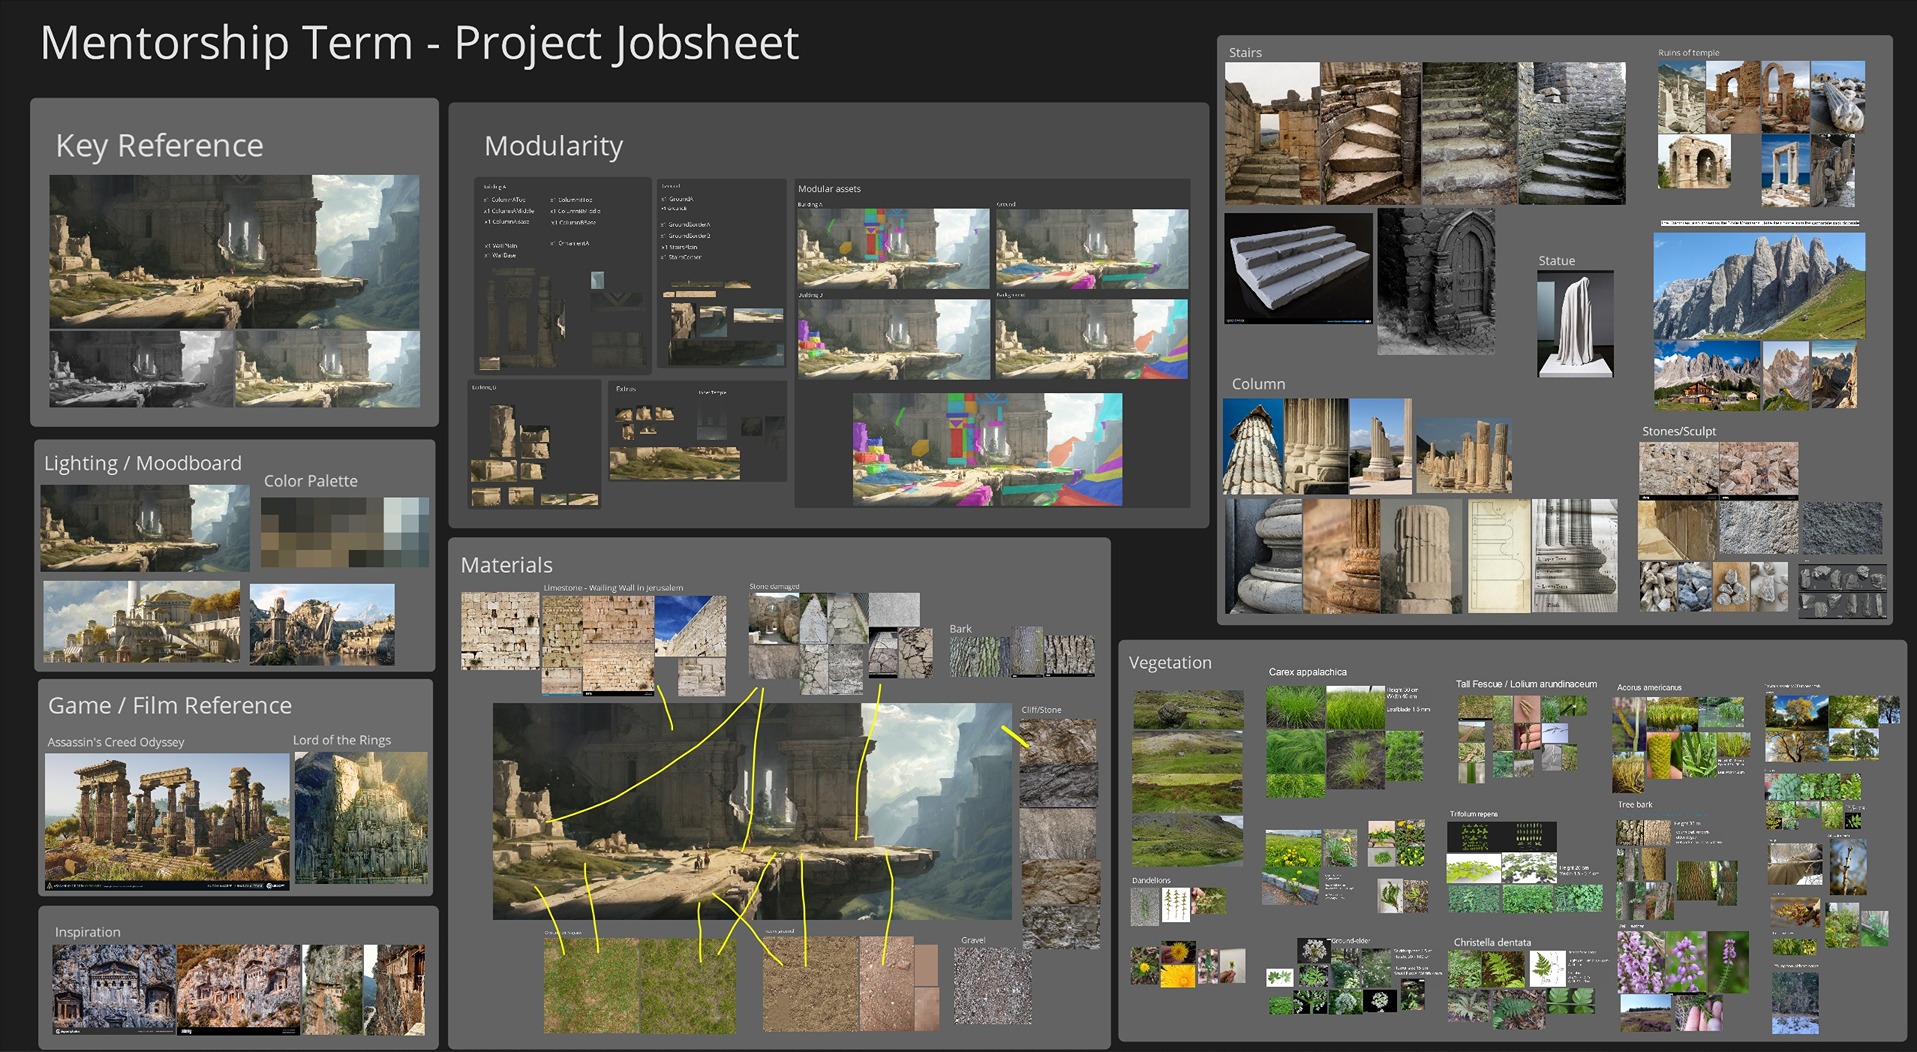
Tip
A great tool for reference gathering is PureRef. It helped me arrange my references easily, keep notes, and share my progress with my mentor.
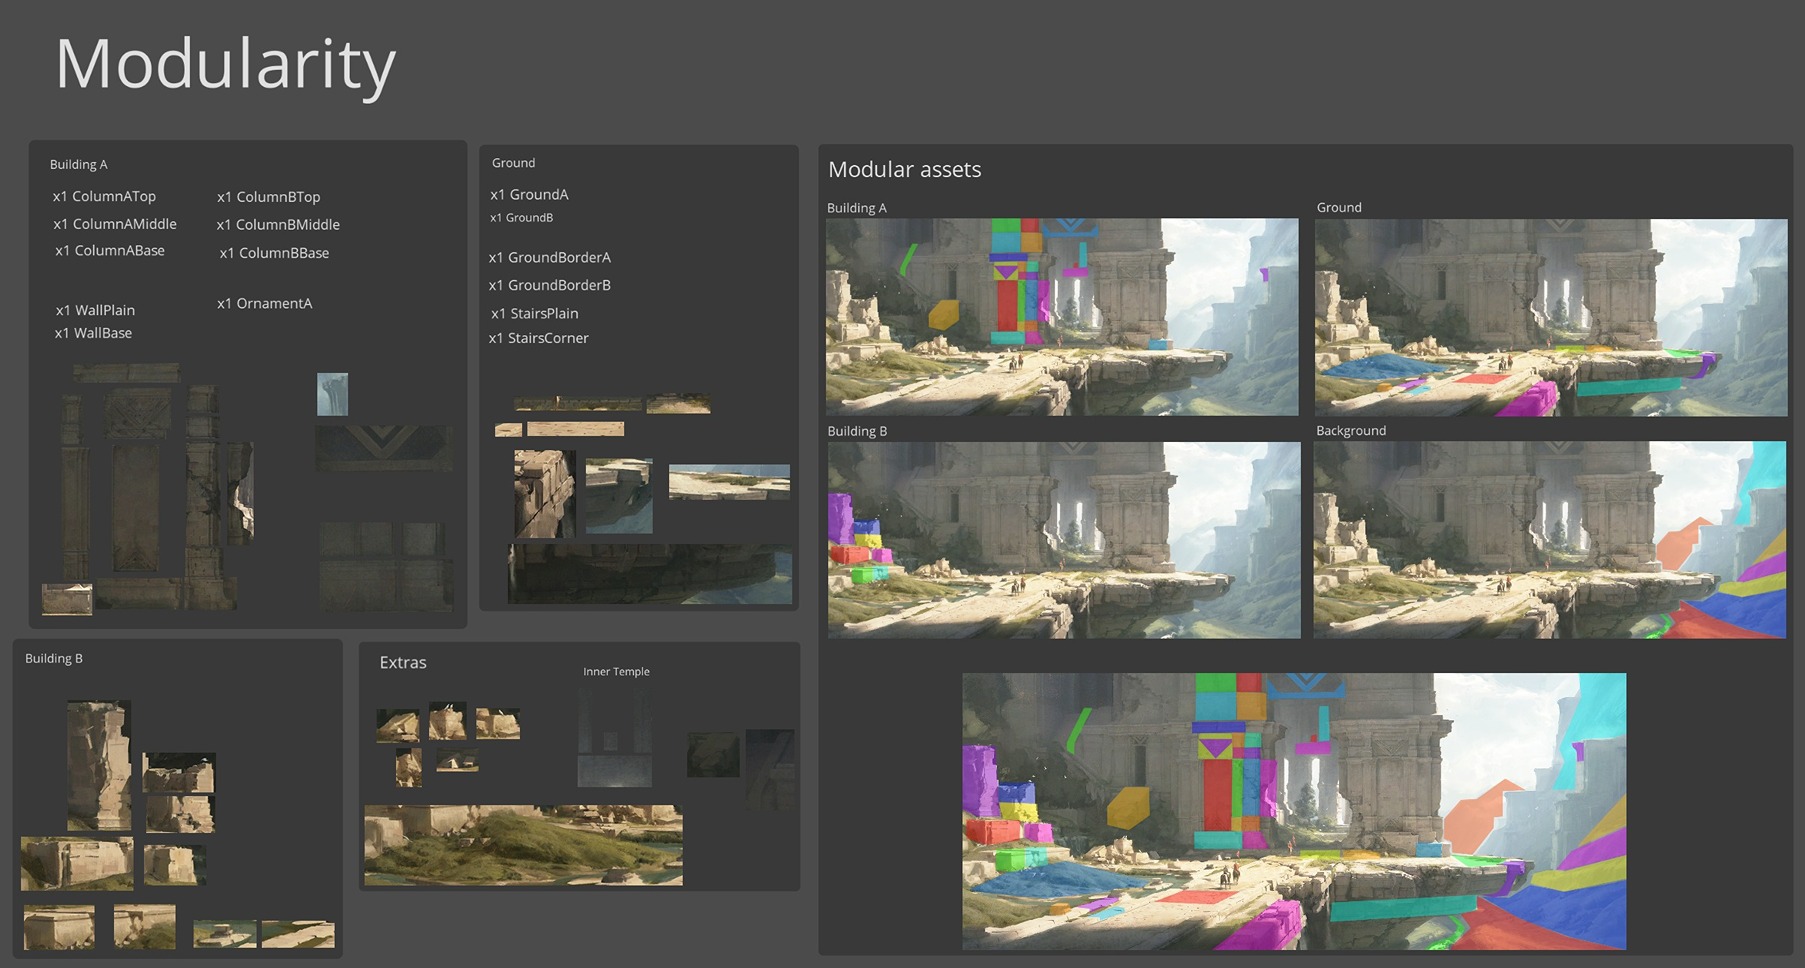
I started to break down the concept art into different areas to achieve an overview of the scene, e.g. building A, B, C, ground, and background.
Then again, these areas were broken down into modular pieces, making it easier to make an asset list, see what I could reuse, and plan what I needed to tackle in the next phase, the blockout.
Blockout
I imported the concept into Maya, set a camera to find its perspective, and blocked the main elements and shapes of the scene out.
Then, I imported the scene into Unreal Engine and did a simple lighting first pass to replicate the main lighting of the concept.
I also followed this tutorial to add the camera into Unreal Engine’s Sequencer to get the correct perspective easily, rather than trying to replicate the camera perspective in the engine manually.
In the blockout phase, it was important to set sizes and figure out distances between key assets.
A lot of assets felt too close or too far from each other. I tried to keep the level design close to the concept and not make the level huge to make it easier to work with in later stages, e.g., set dressing.
Lastly, I also tried to establish interesting shots to work on throughout the process early on.
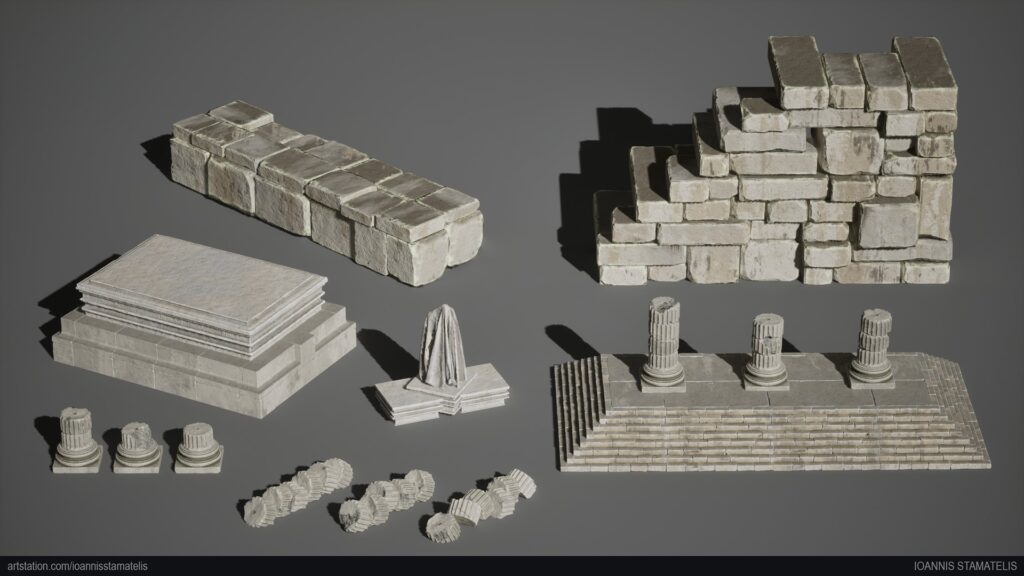
Modelling
Asset Workflow
The goal was to create fast iterations/results to visualize in Unreal Engine. That is why I modeled a basic blockout of the asset in Maya, sculpted it in ZBrush, decimated it, cut UVs in ZBrush, and imported it into the engine.
I iterated the shapes and details of the mesh where necessary and reimported the adjusted mesh into Unreal Engine.
Once I finalized the model, I decimated it further, cleaned the topology up in Maya, prepared it for baking in Substance Painter, and imported it again into the engine.
I also added extra vertices to some meshes I had planned to vertex paint on later in the engine.

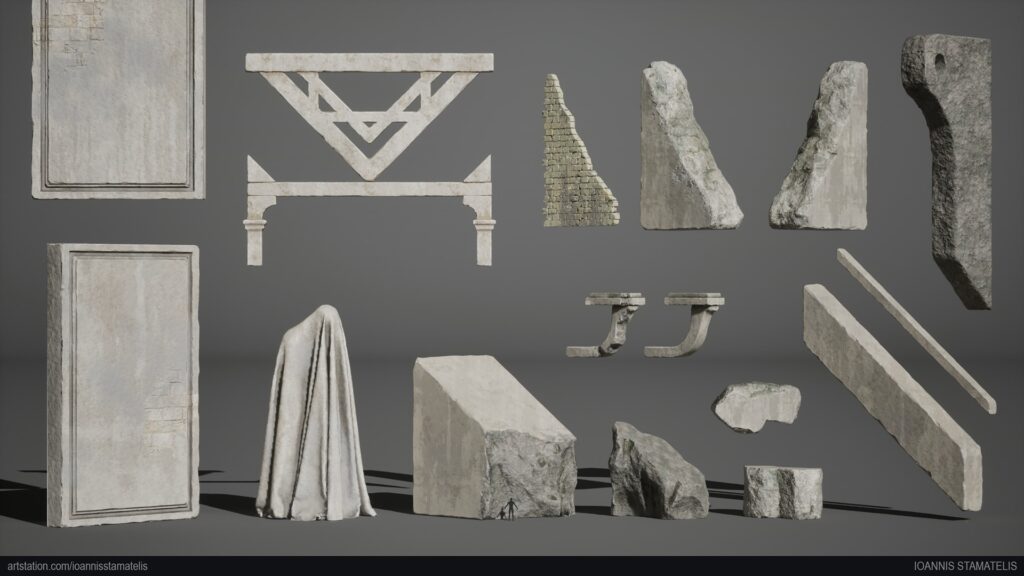
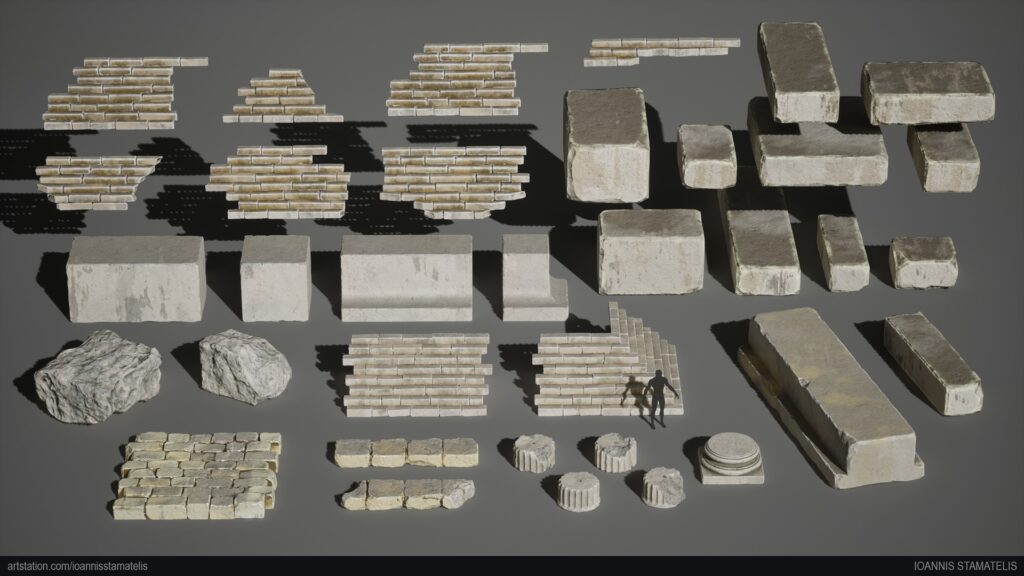
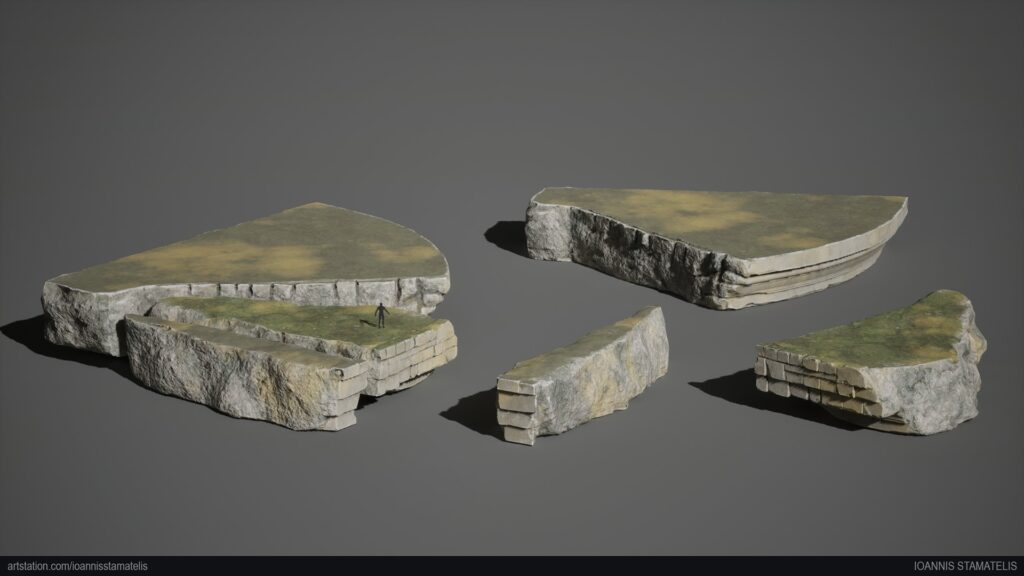

I also wanted to create rock piles to scatter around the scene to support the damaged areas of the concept.
I achieved this quite simply with the MASH plugin in Maya by following this tutorial.

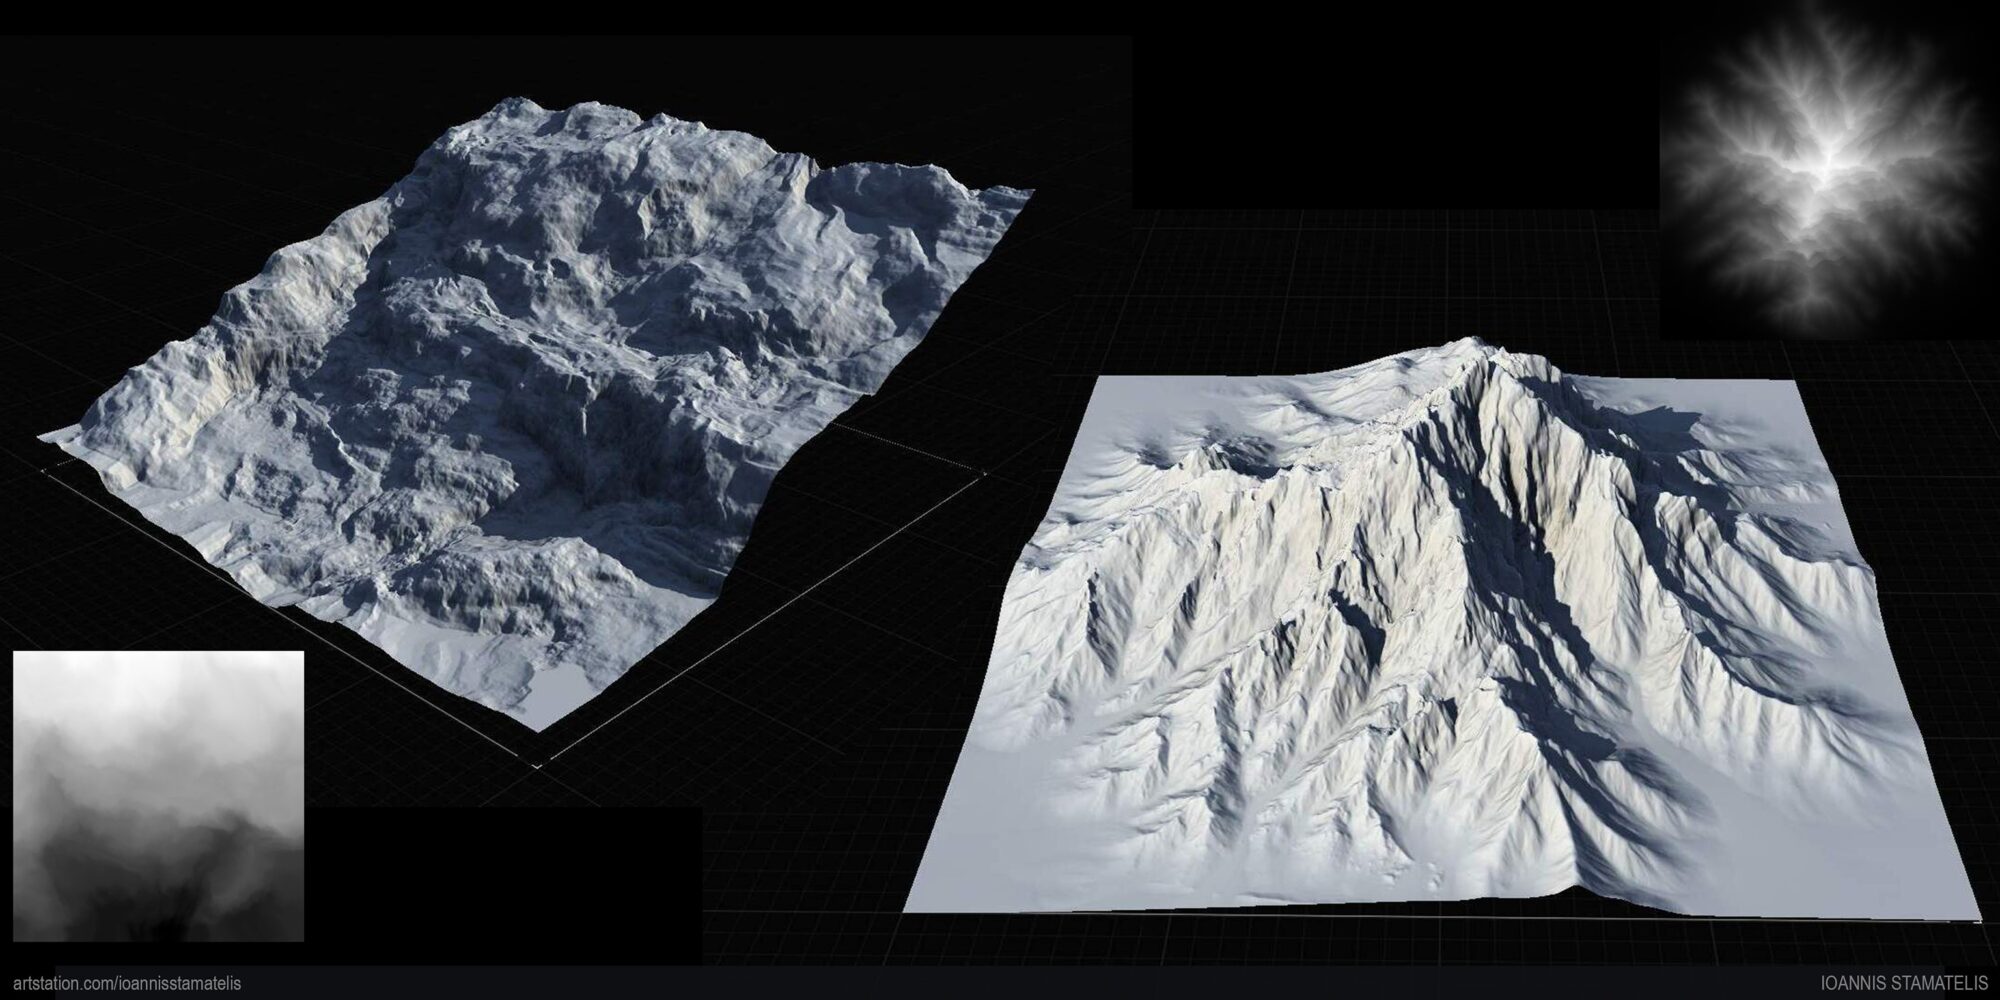
Since the landscape meshes were far away and covered with fog in the concept, I decided to create them with simple nodes in Gaea following a beginner’s tutorial.
This is what I ended up with and used in Unreal Engine.
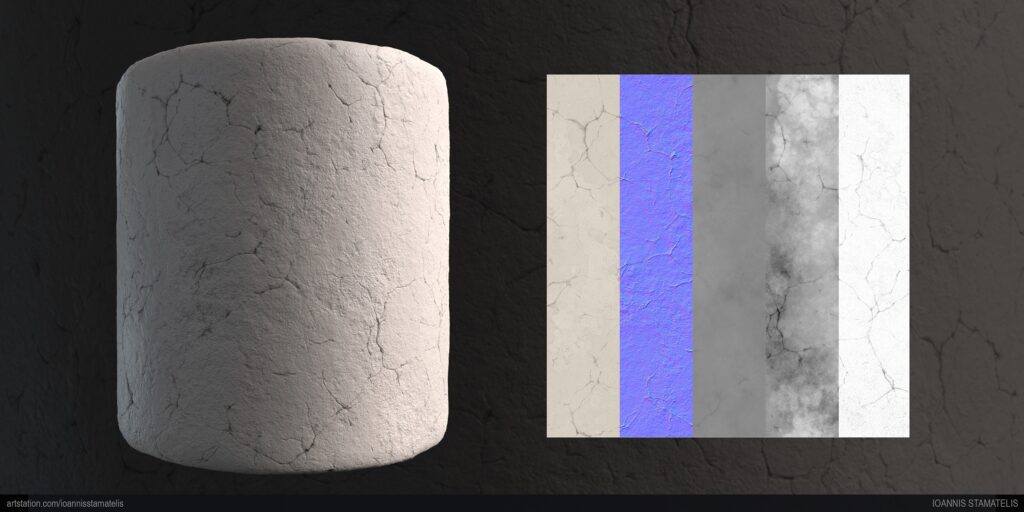
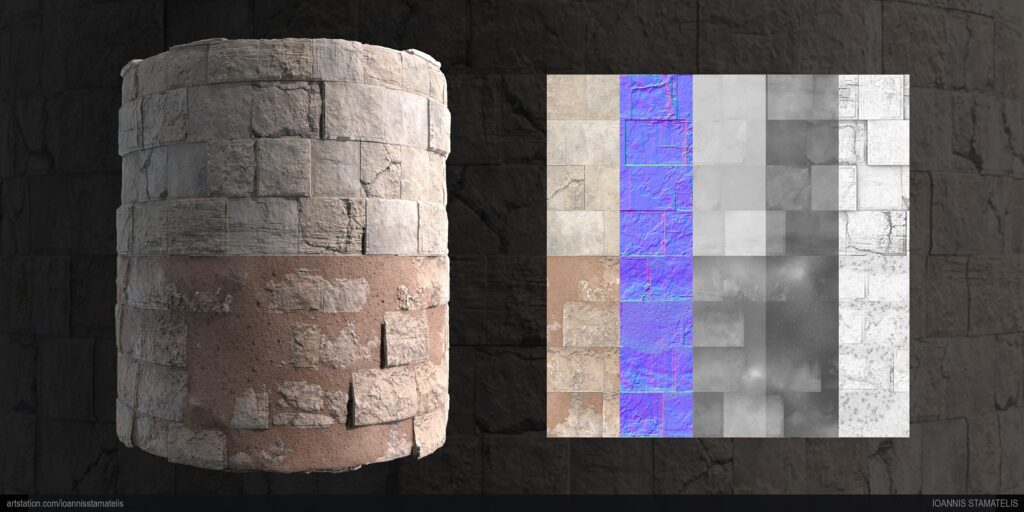
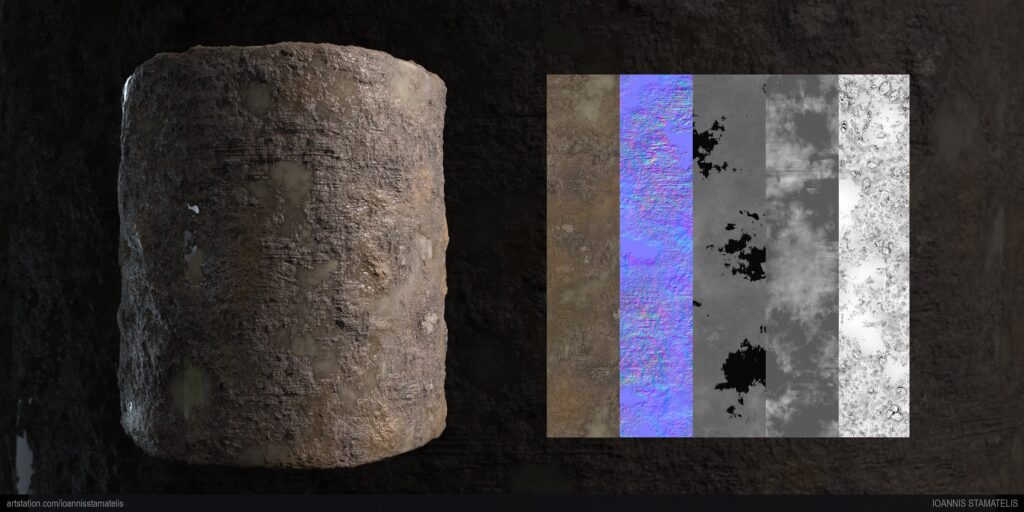
Texturing
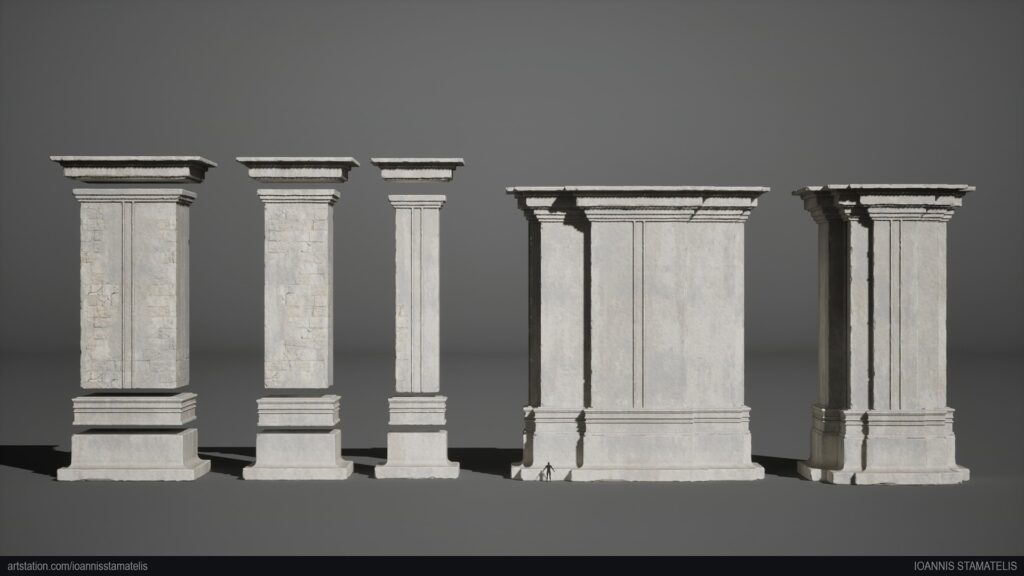
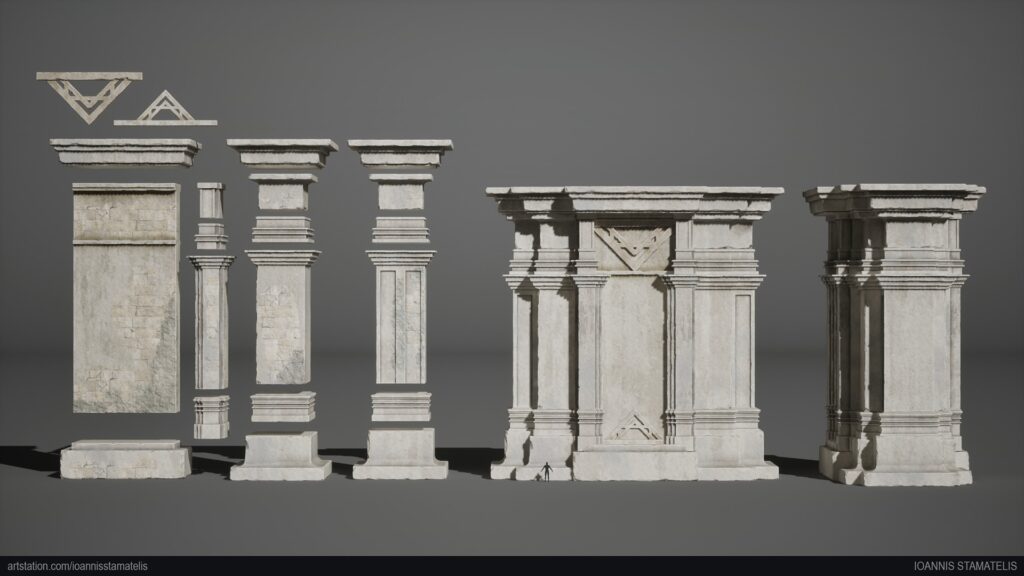
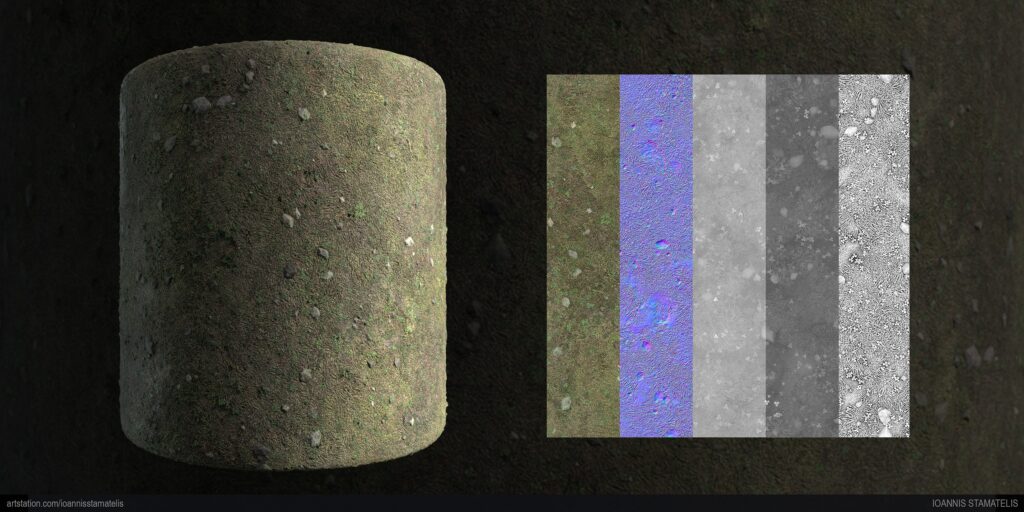
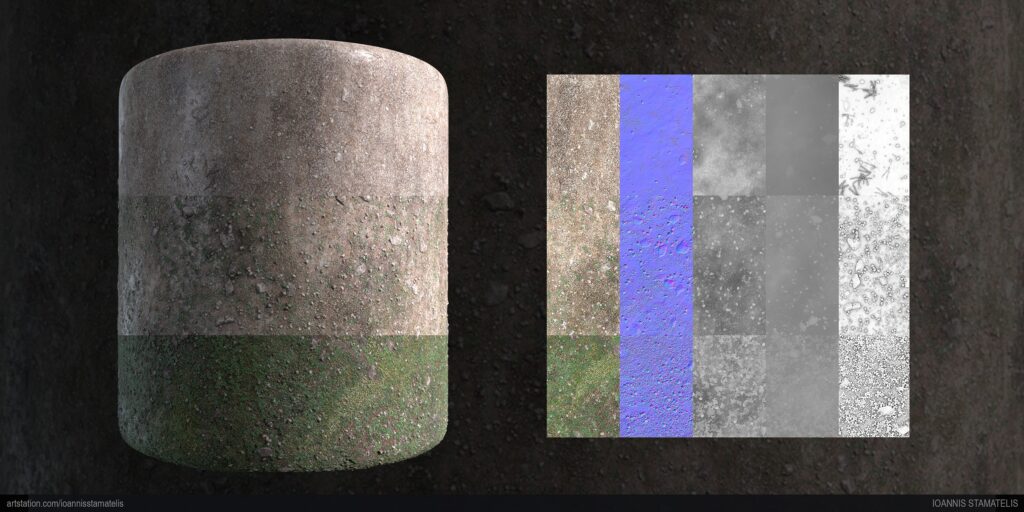
For this project, I set the texel density at 1024px per meter and used 2K textures following the PBR workflow. I wanted to cover a lot of space with as few assets as possible and avoid texturing each asset separately.
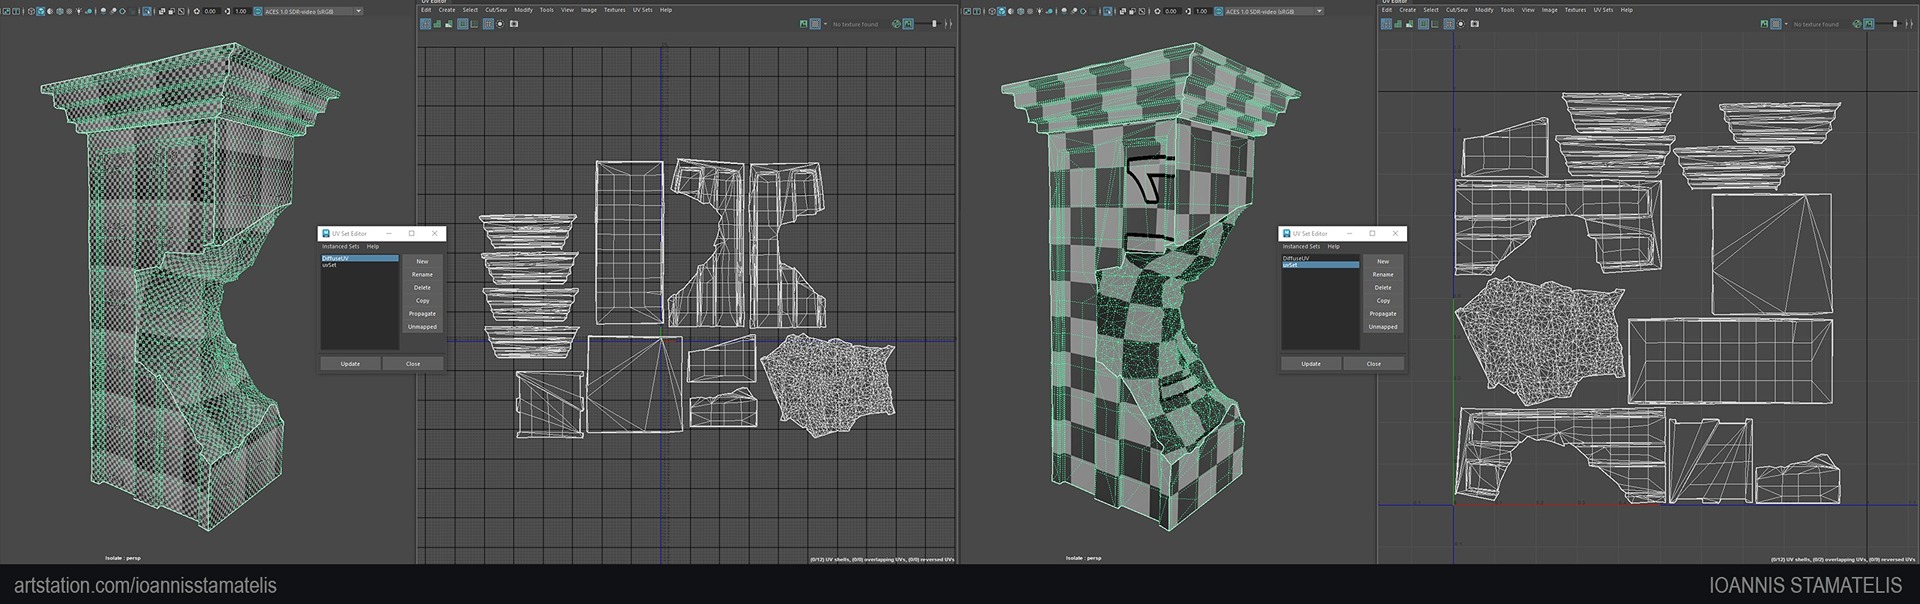
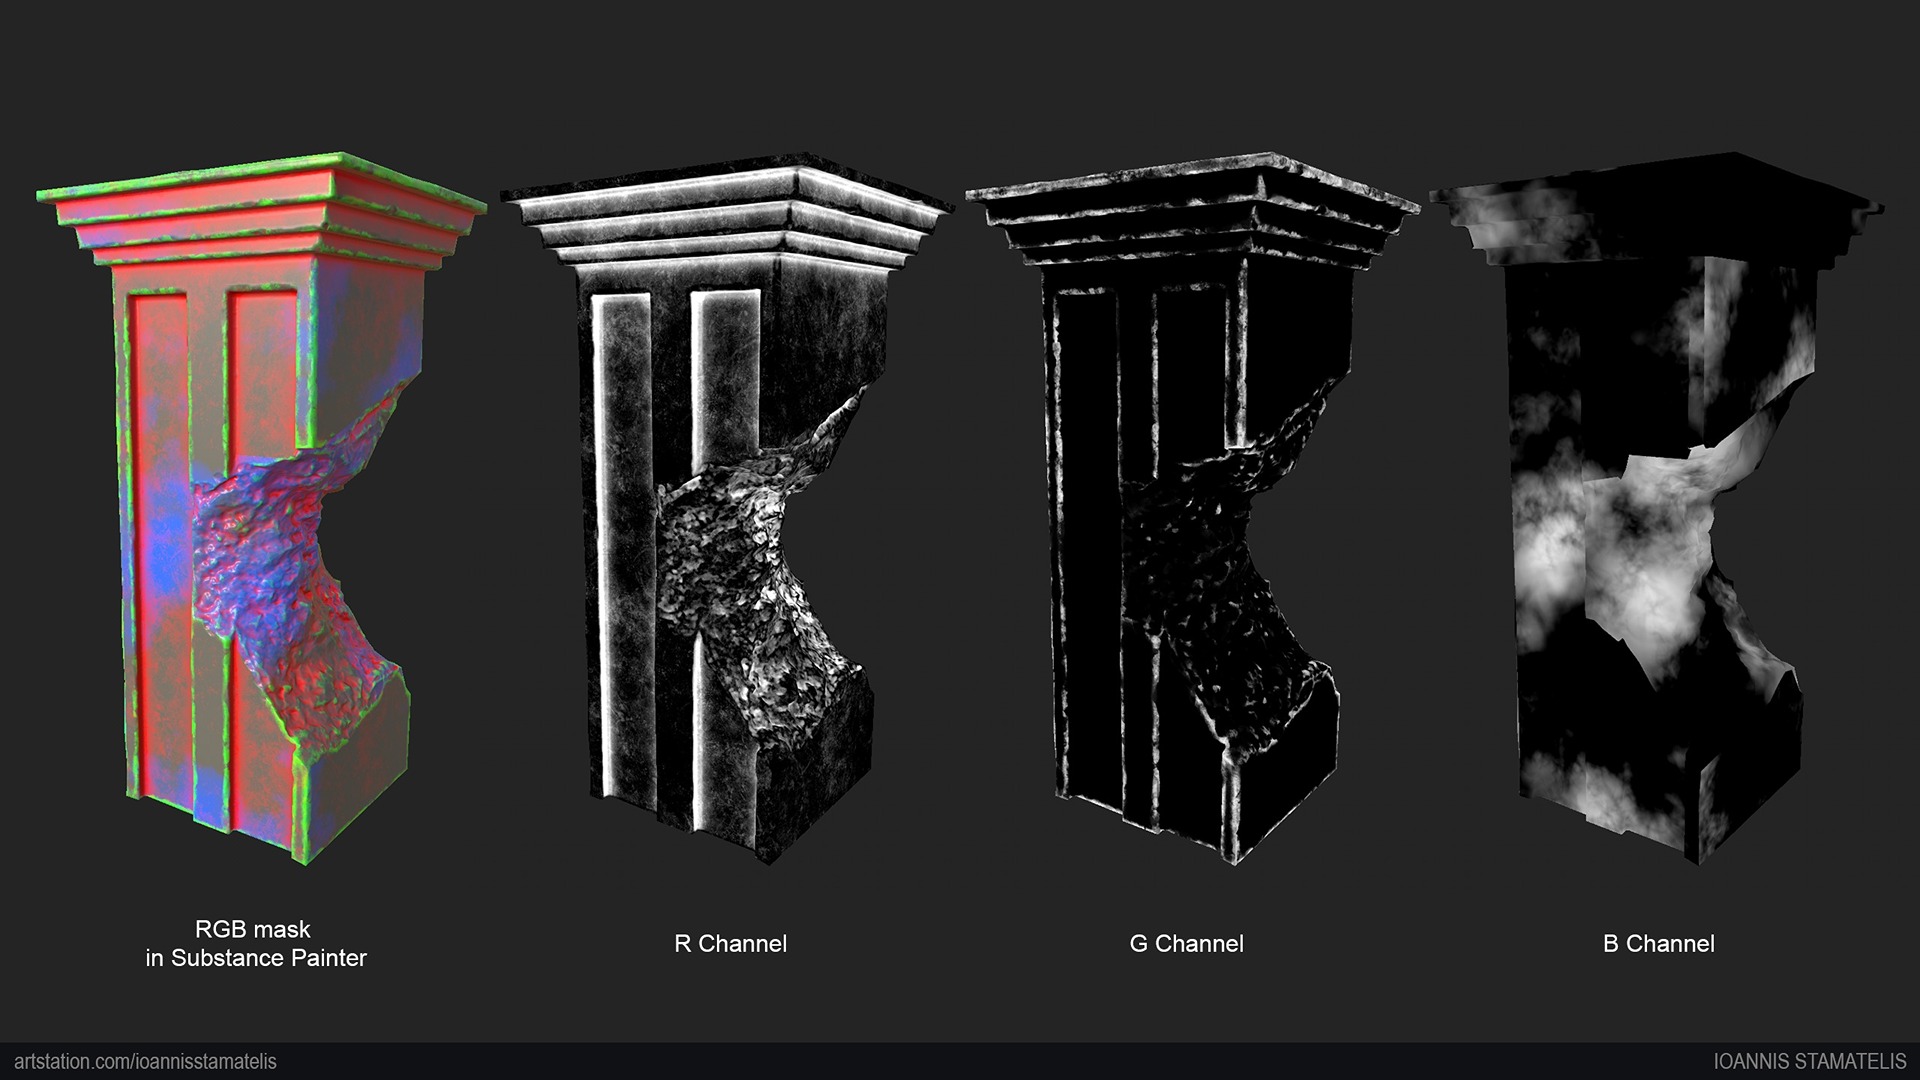
I decided to texture the assets with tileable textures in Substance Designer and bake each asset to export its normal map and RGB mask in Substance Painter to break up the tileability of the textures.
I defined the usage of each channel based on mask generators and created a smart material to assign to each asset. Each asset needs two UV channels for this workflow to work.
One channel is set to the correct texel density, and the second one is set within the 0-1 UV space for baking.
Dylan Abernethy’s setup, “Substance Painter Work with RGBA Layers in Viewport,” helped me to proceed much faster with this phase.
Here is the link to it.
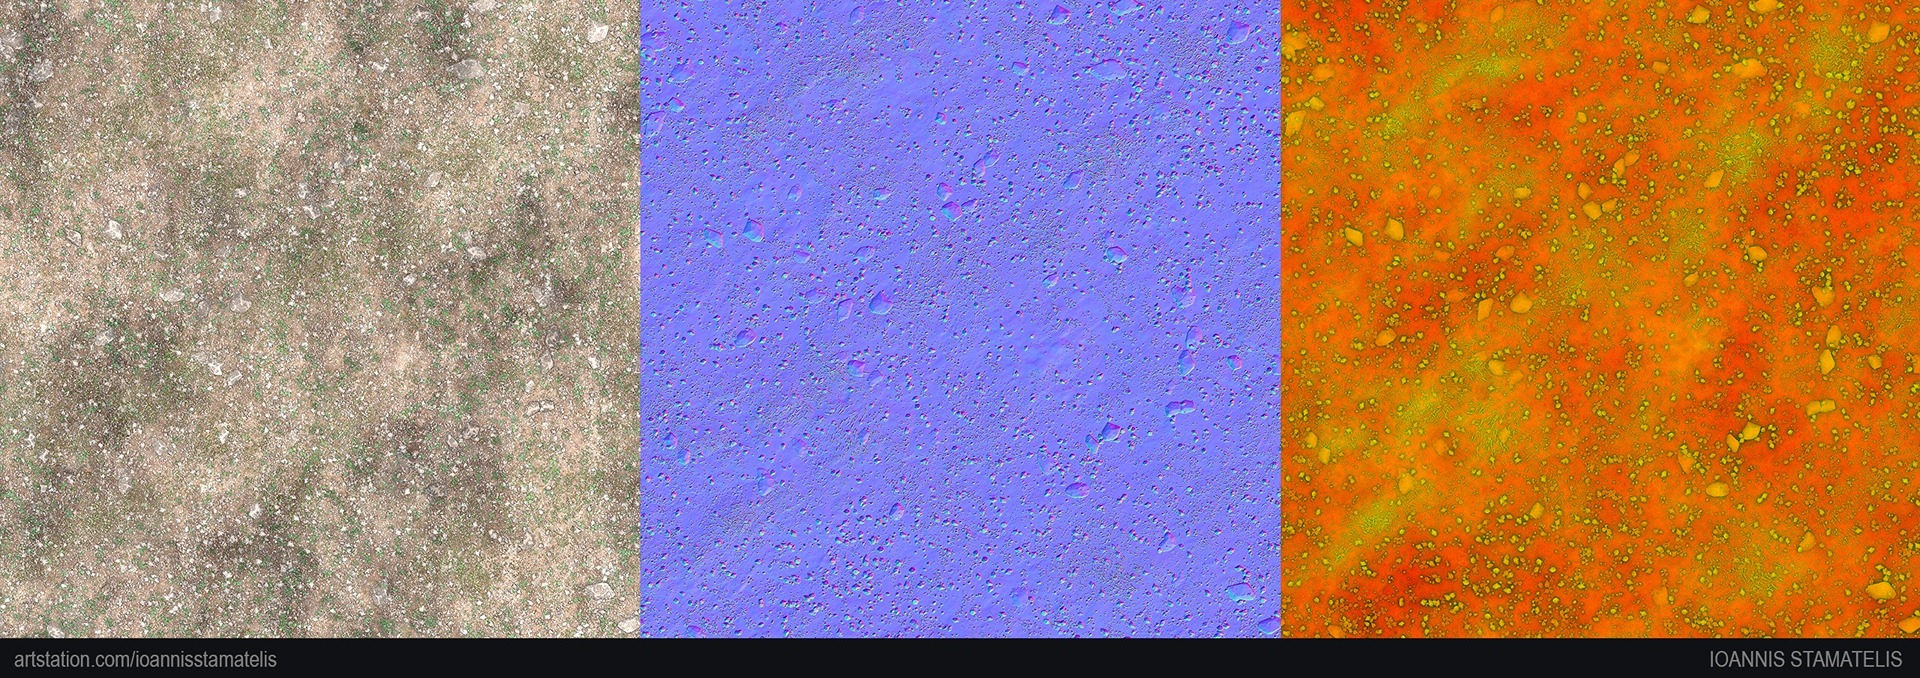
Channel Assignments
Red Channel: Dirt
Green Channel: Edge wear
Blue Channel: Breakup
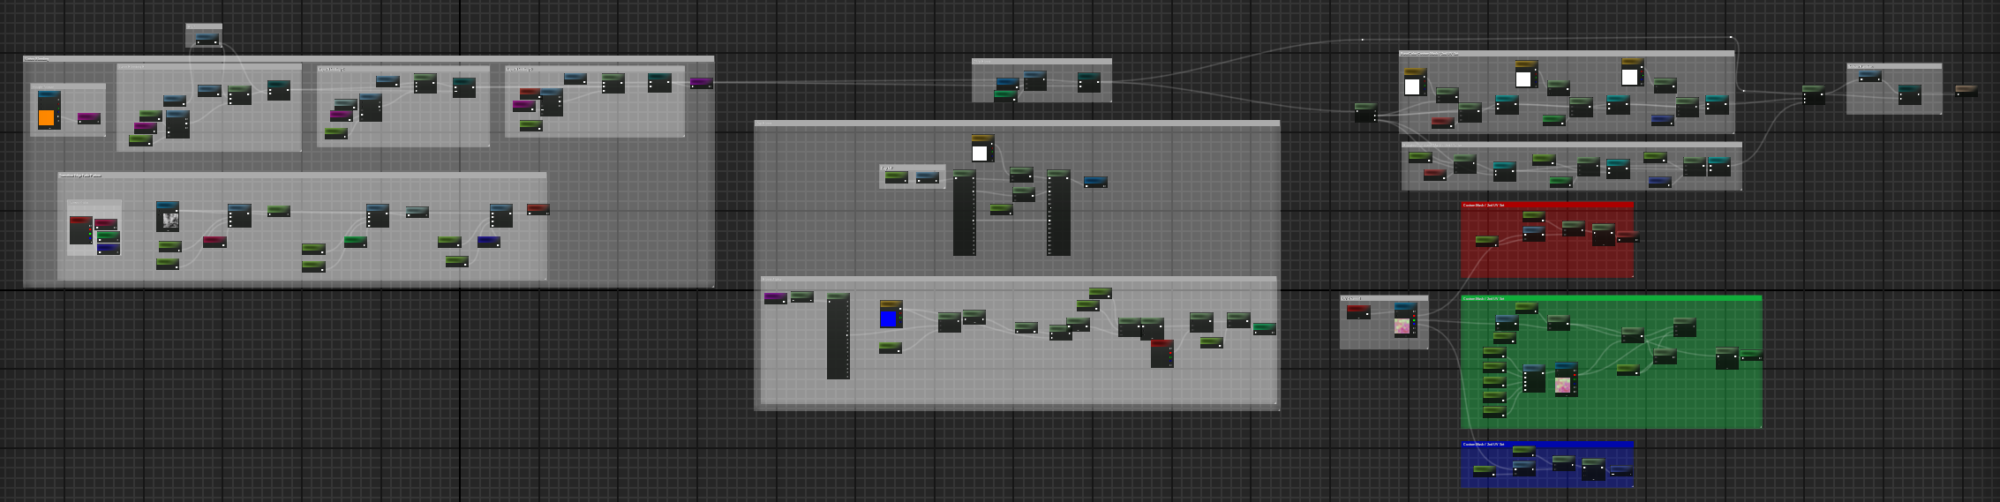
As mentioned, the textures for this project were created in Substance Designer.

Tip
Use the dot nodes to reroute your nodes easily in Substance Designer to keep your graph clean. It can result in a mess of nodes.
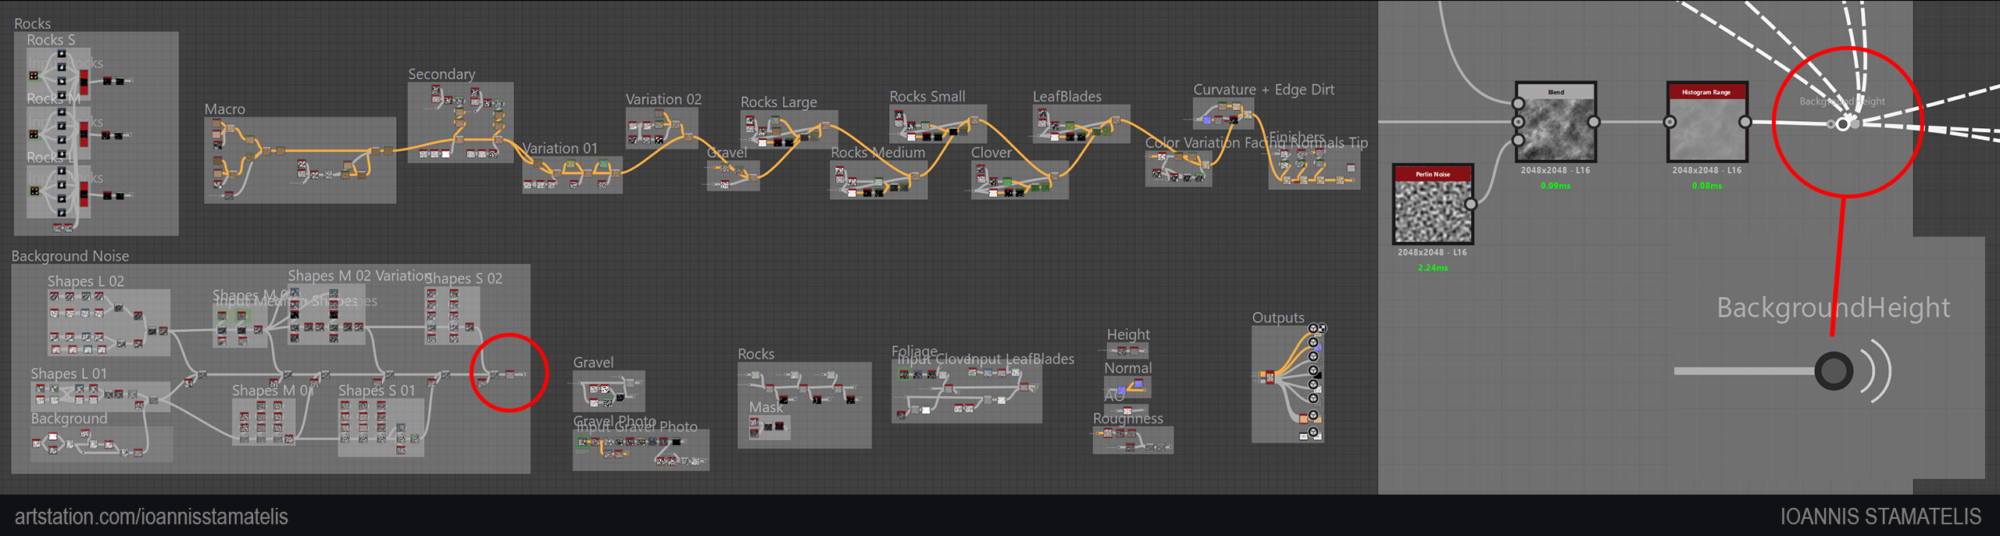
Therefore, keep it organized and understandable for you when you return to it after some time or for your colleagues.
I set up a lighting template in Marmoset Toolbag 4 for presentation purposes.
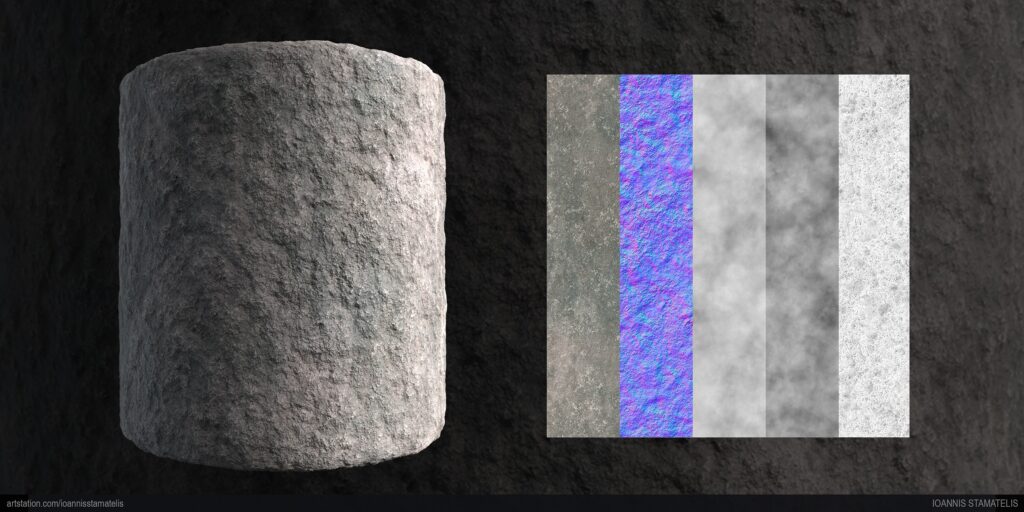
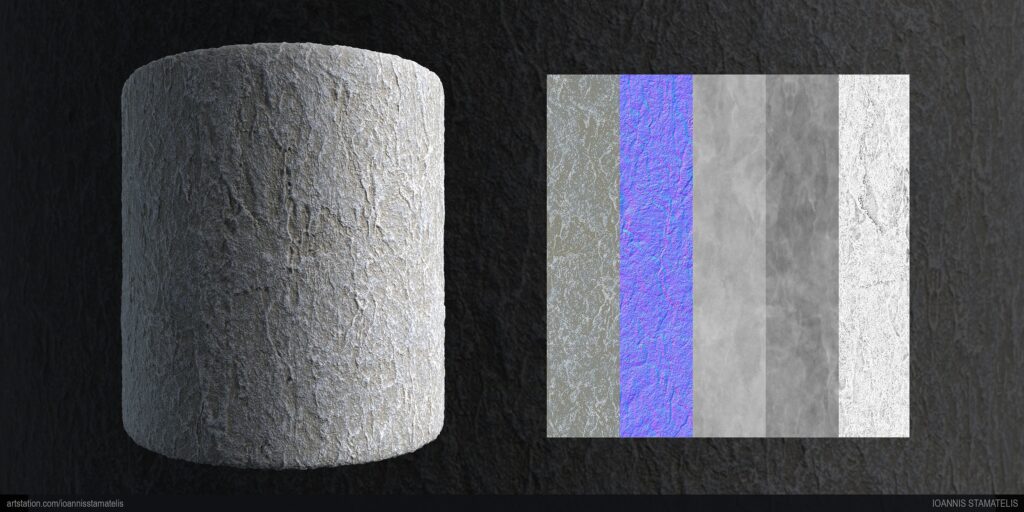
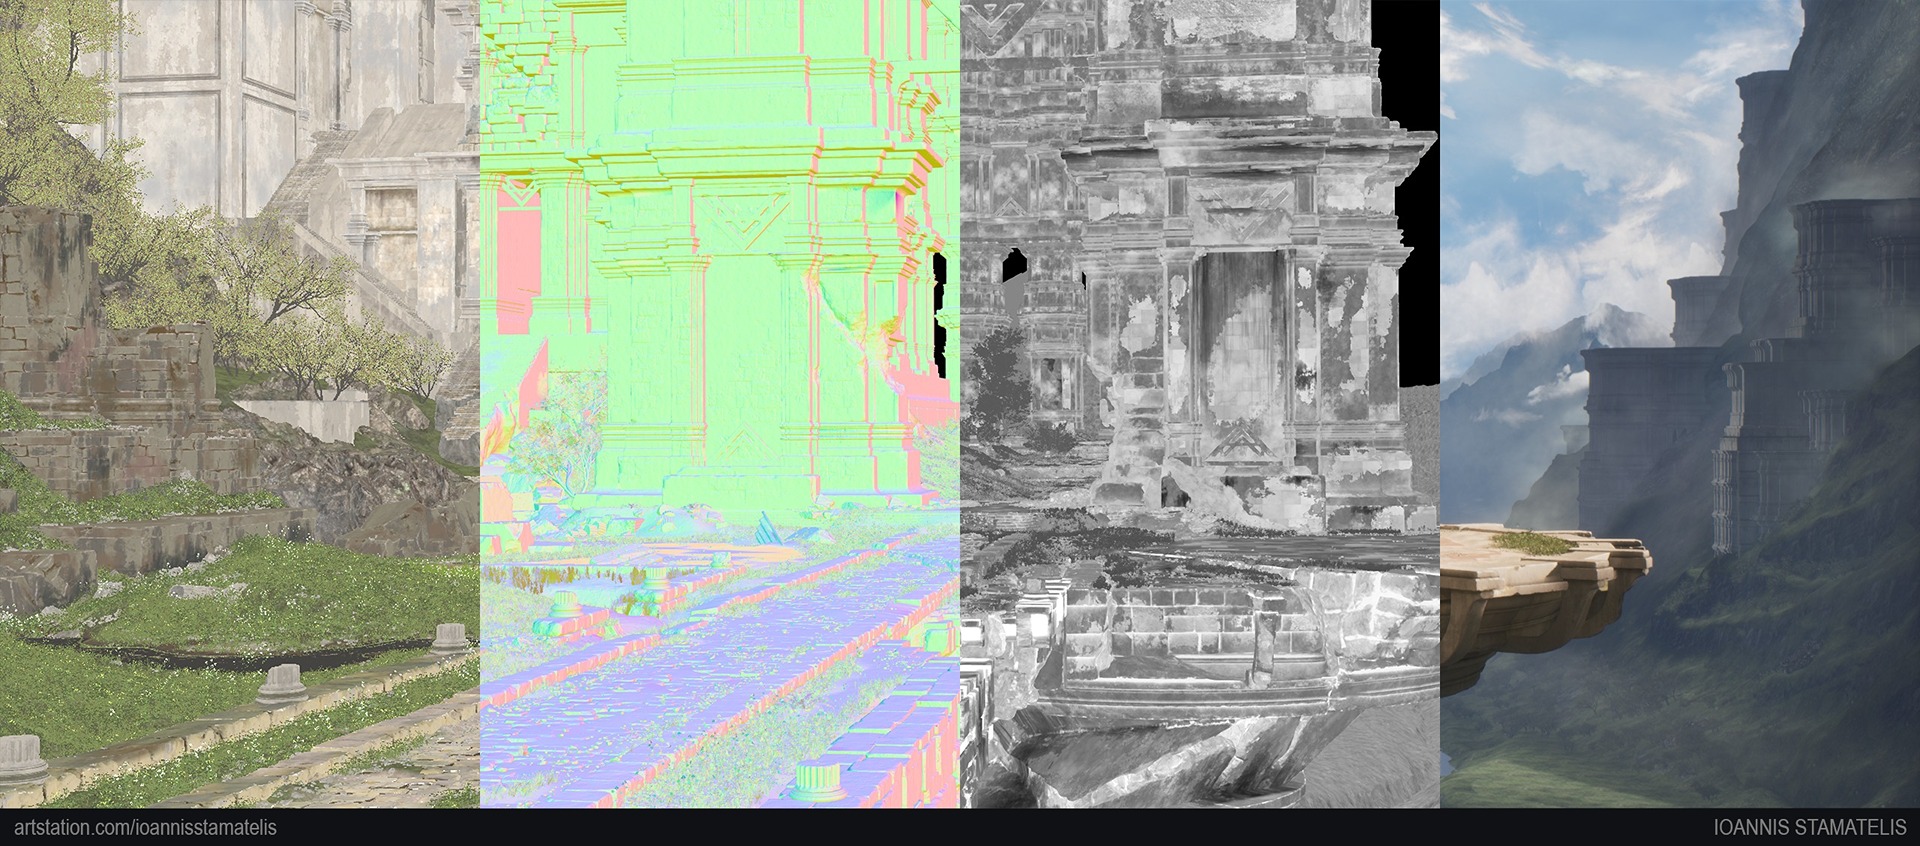
For some materials, I decided to try out another workflow. I sculpted the bark and the cliff texture in ZBrush on a flat plane.
Tip
Set the WrapMode option in ZBrush to 1 so that any brush strokes affect the opposite side of the plane.
You can find this setting under Brush – Curve – WrapMode. Do not forget to set this setting for each brush individually before using them to retain the tileability of the texture.
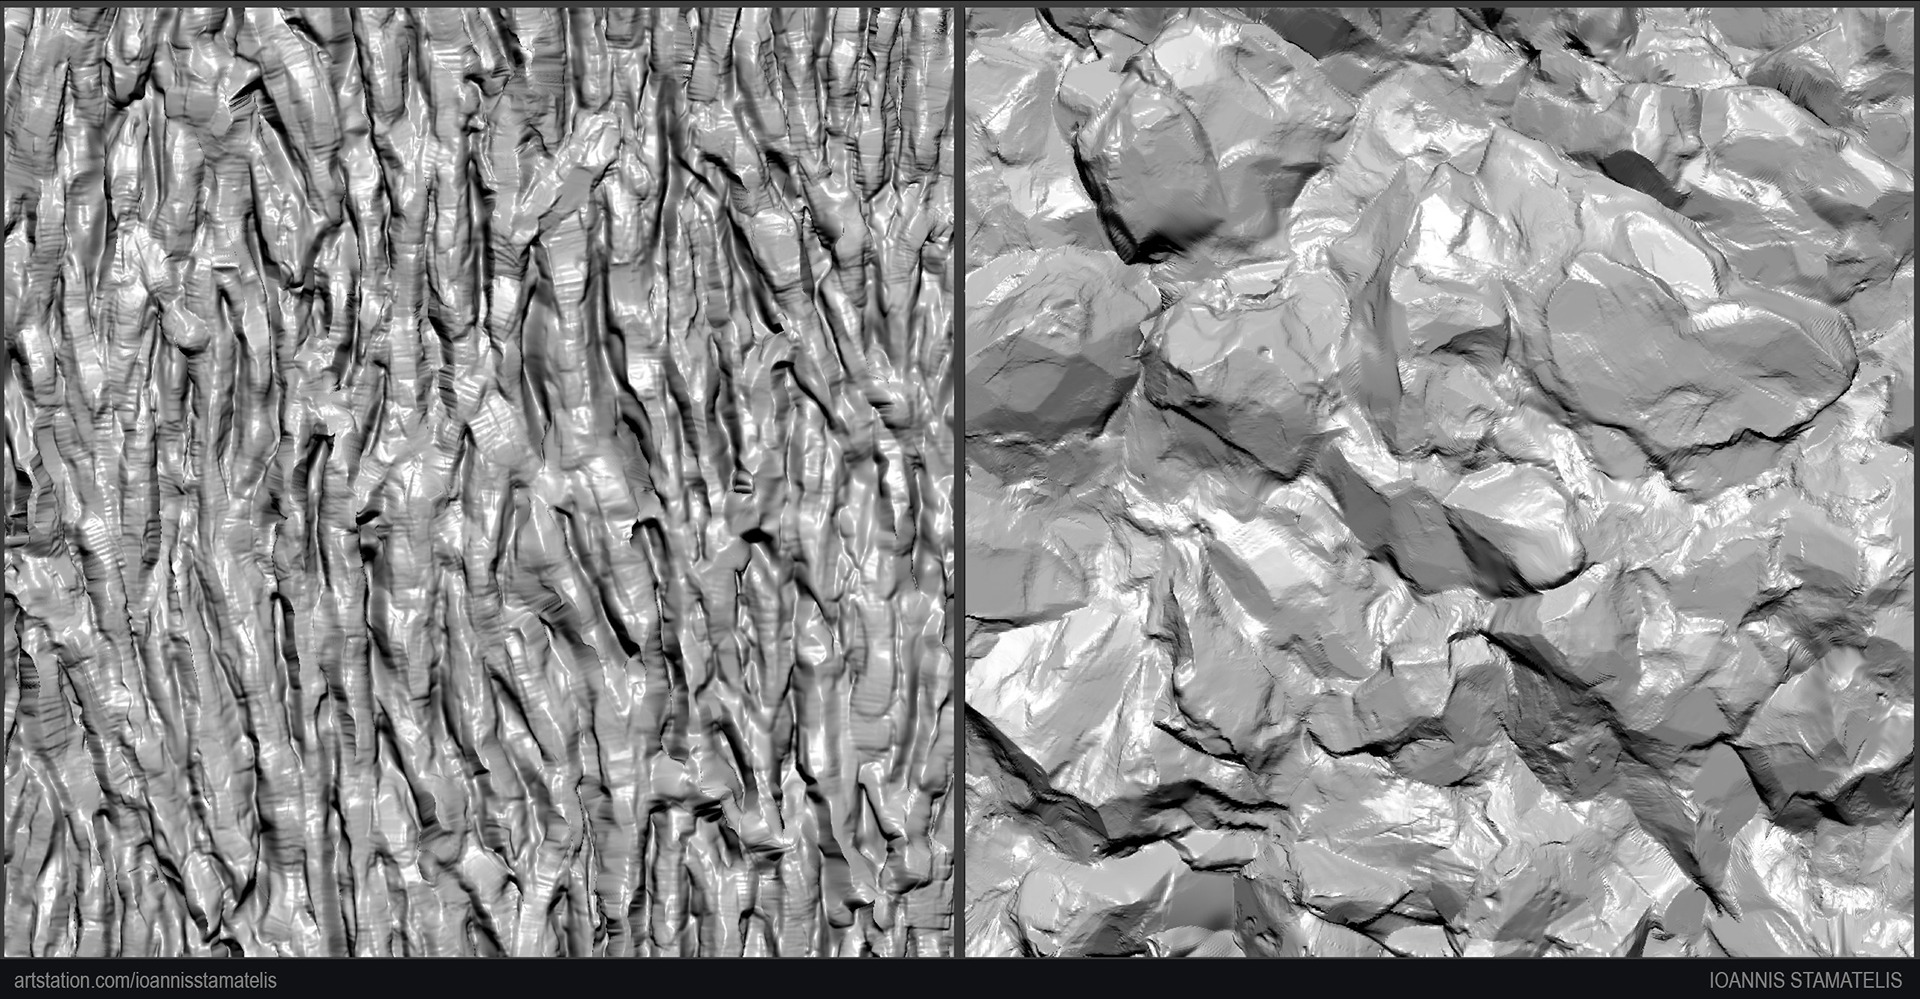
Then, I exported a normal/height map out of ZBrush and modified it further in Substance Designer.
It was faster to achieve the basic shapes and had more fun creating them in ZBrush.
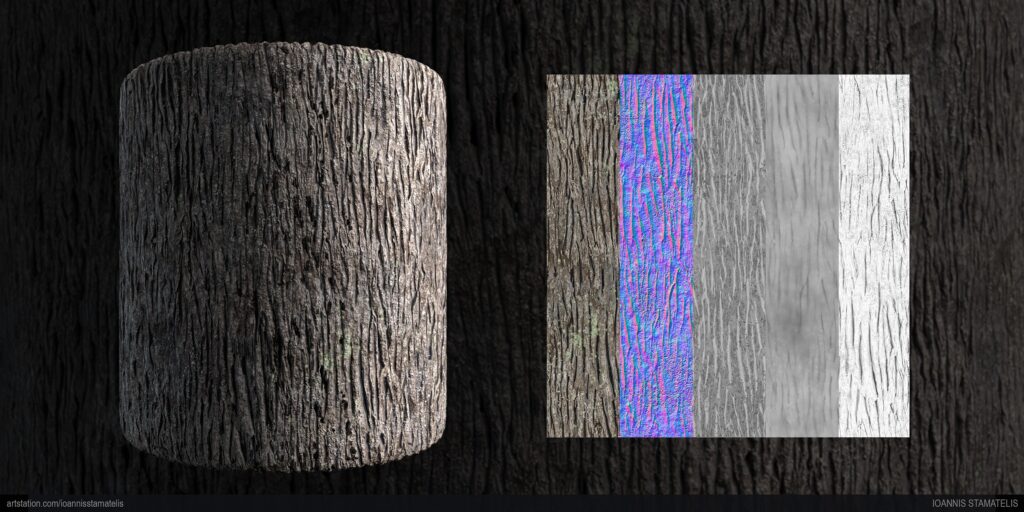
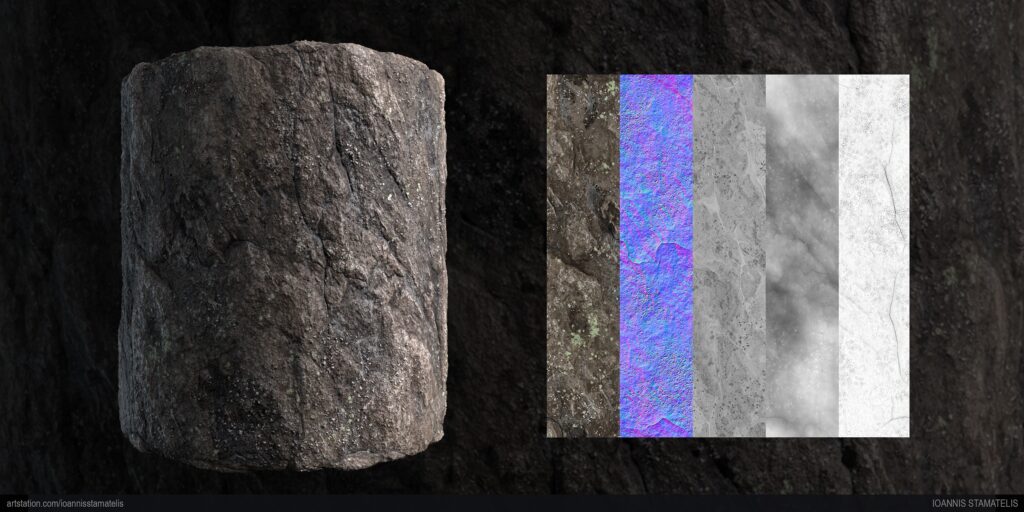
I used three texture maps, BaseColor, Normal and Packed (ARM: Ambient Occlusion, Roughness, Metallic), to texture the assets in Unreal Engine.
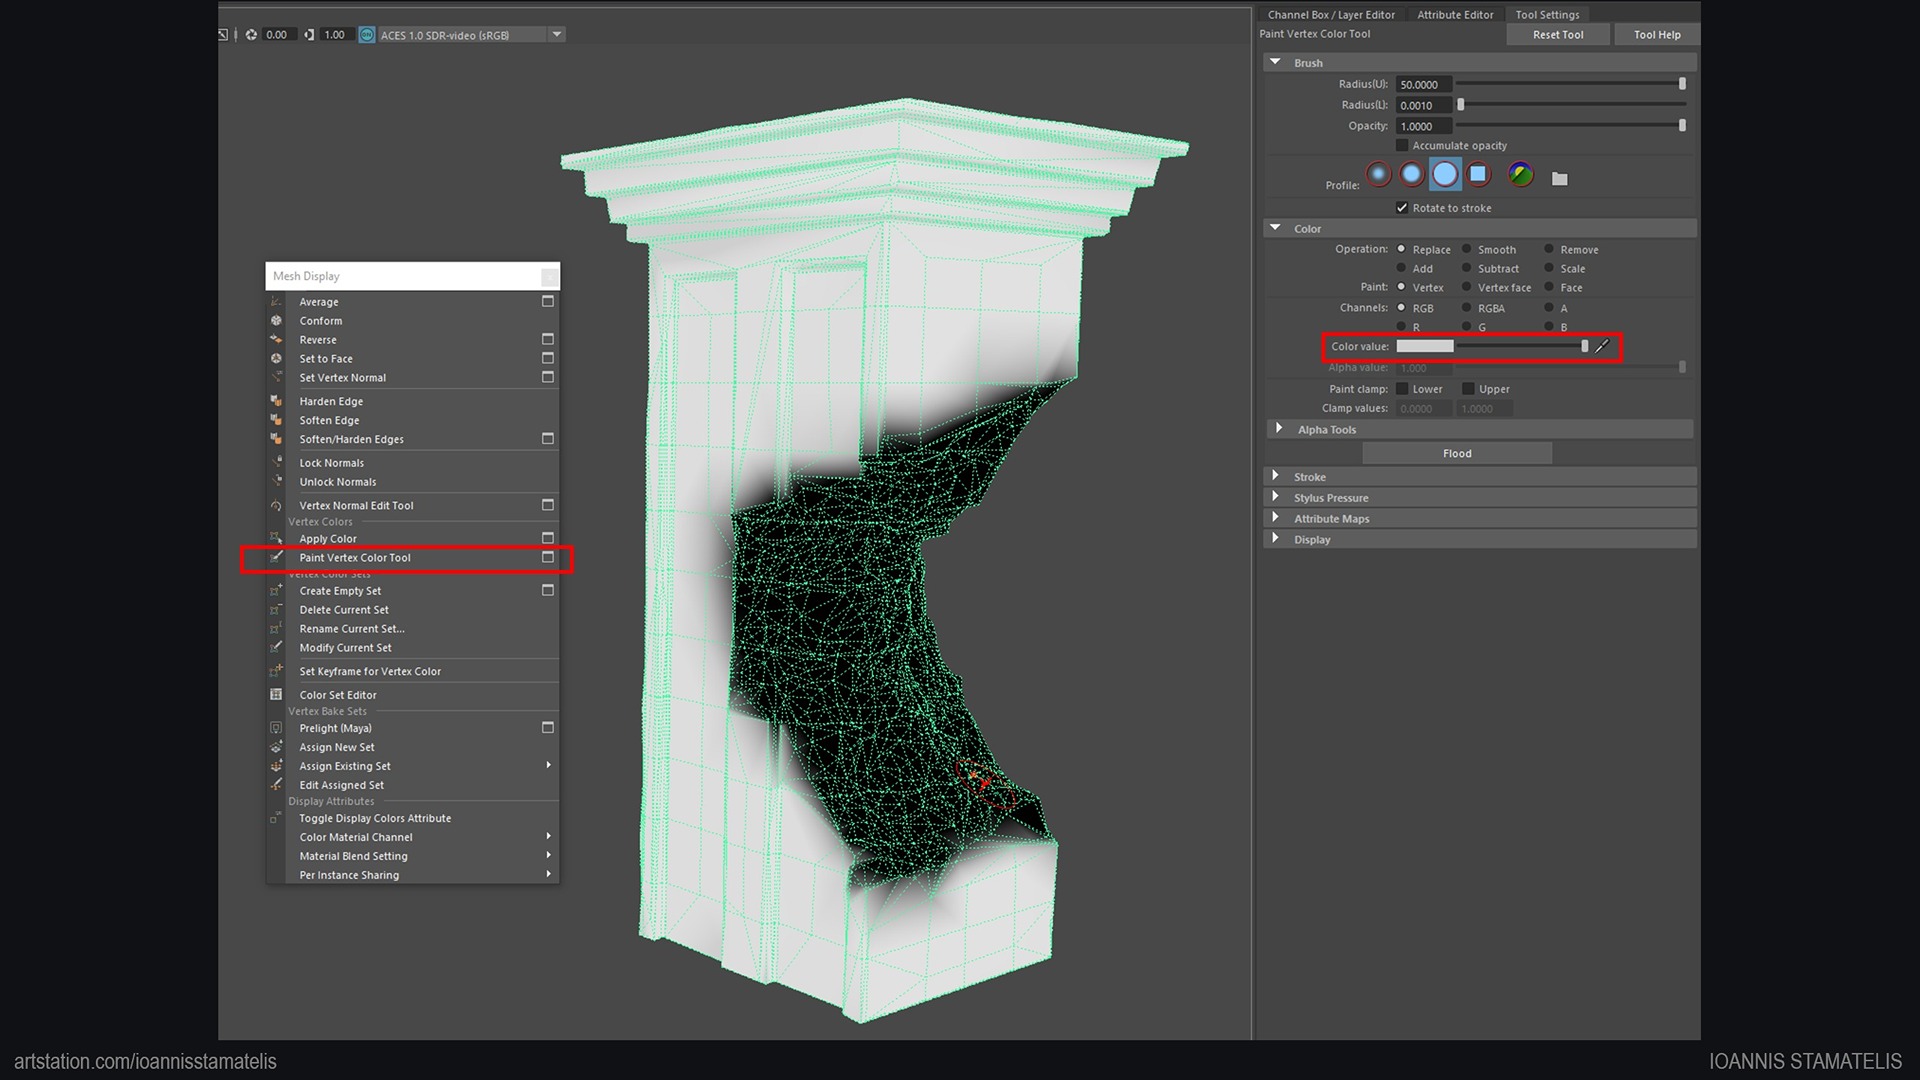
Lastly, I used the “Paint Vertex Color Tool” found under “Mesh Display” in Maya to vertex color the damaged meshes in advance.
This way, I would avoid vertex painting them every time I used the mesh in Unreal Engine.
Shader Setup
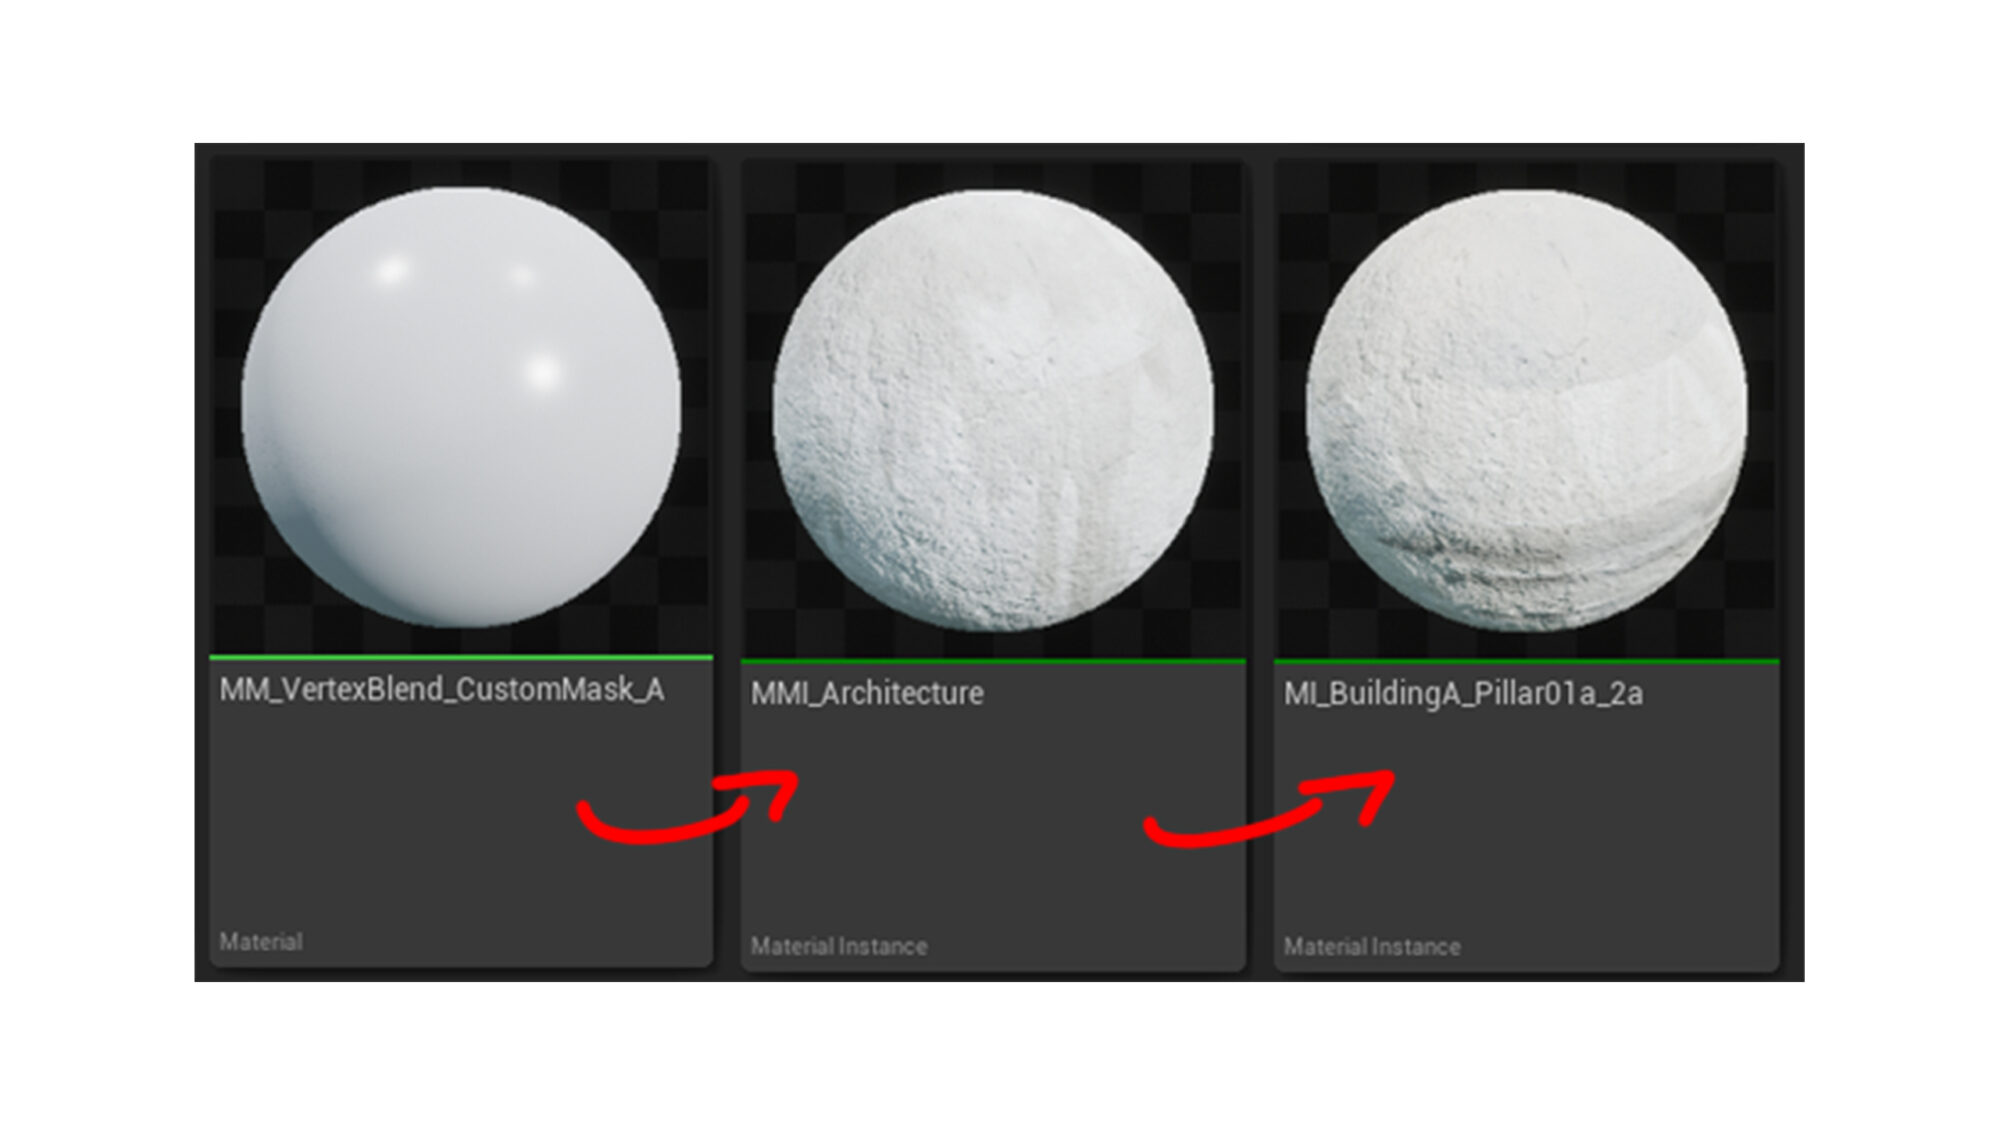
In Unreal Engine, I created a Master Material (MM), which was assigned to a Master Material Instance (MMI), which was then assigned to Material Instances (MI).
I established an architecture MMI for the huge pillars in the scene. In this way, I could change tints and the tileability of textures of all the assets with this particular MMI, saving a lot of time in the process.
For example, the texture of a huge pillar consisting of 20 different assets is changed by tweaking one setting in one shader instead of tweaking the same setting for each asset individually.
All materials for all assets are set up with tri-planar textures. RGB masking, vertex painting up to 3 materials, Z-up blend, as well as leakage and dirt masks to break extra obvious tileability, are set up in the same shader.
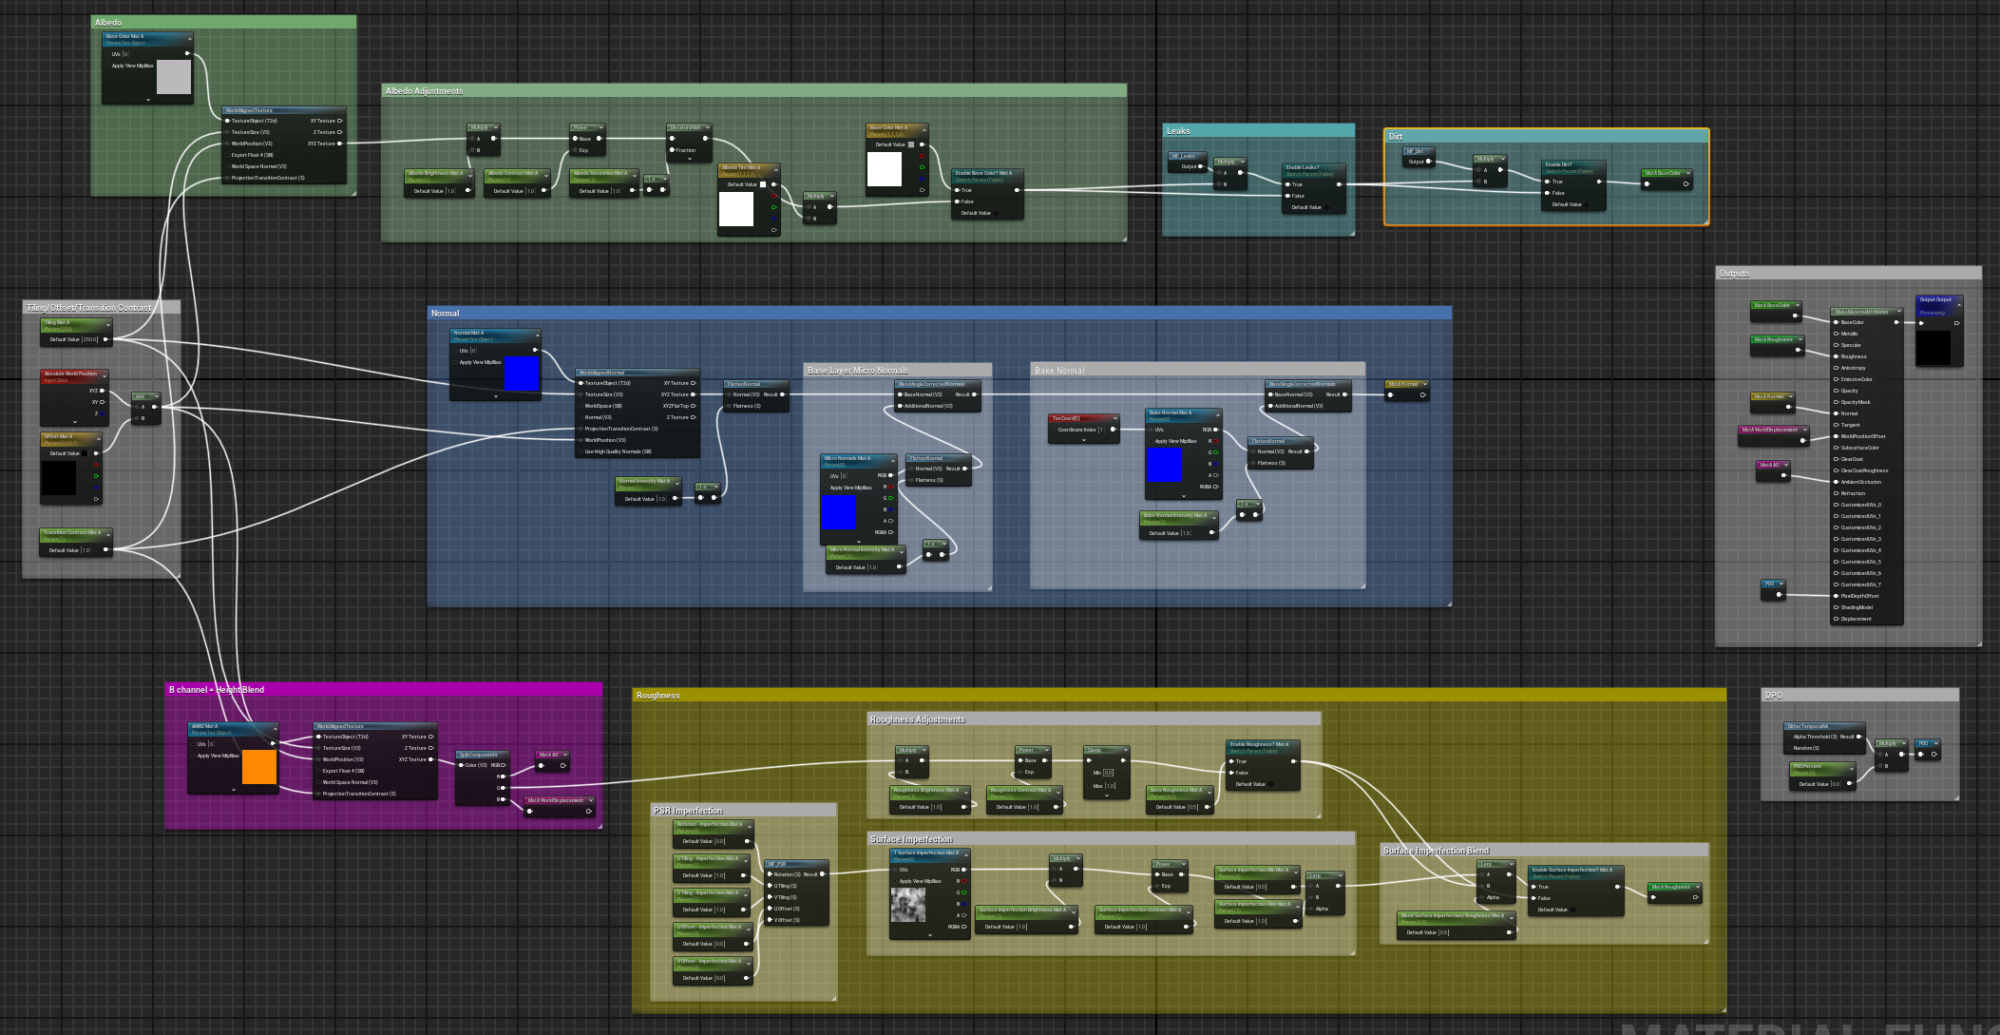
Tip
Reroute the nodes to keep the graph tidy with the reroute nodes!

Prefabs
Again, to save time and be faster with set-dressing my scene, I combined assets into prefabs in Unreal Engine and made different versions to make the scene more interesting visually and avoid too much repetition.
For the background, I made bundles of pillars to dress the scene as well.


Decals
Decals, such as simple grime/dirt for the floor and walls of assets, were made with Substance Designer.
I used the normal and height textures for decals. With more color variation where necessary, I broke up texture repetition and tried to match the concept.


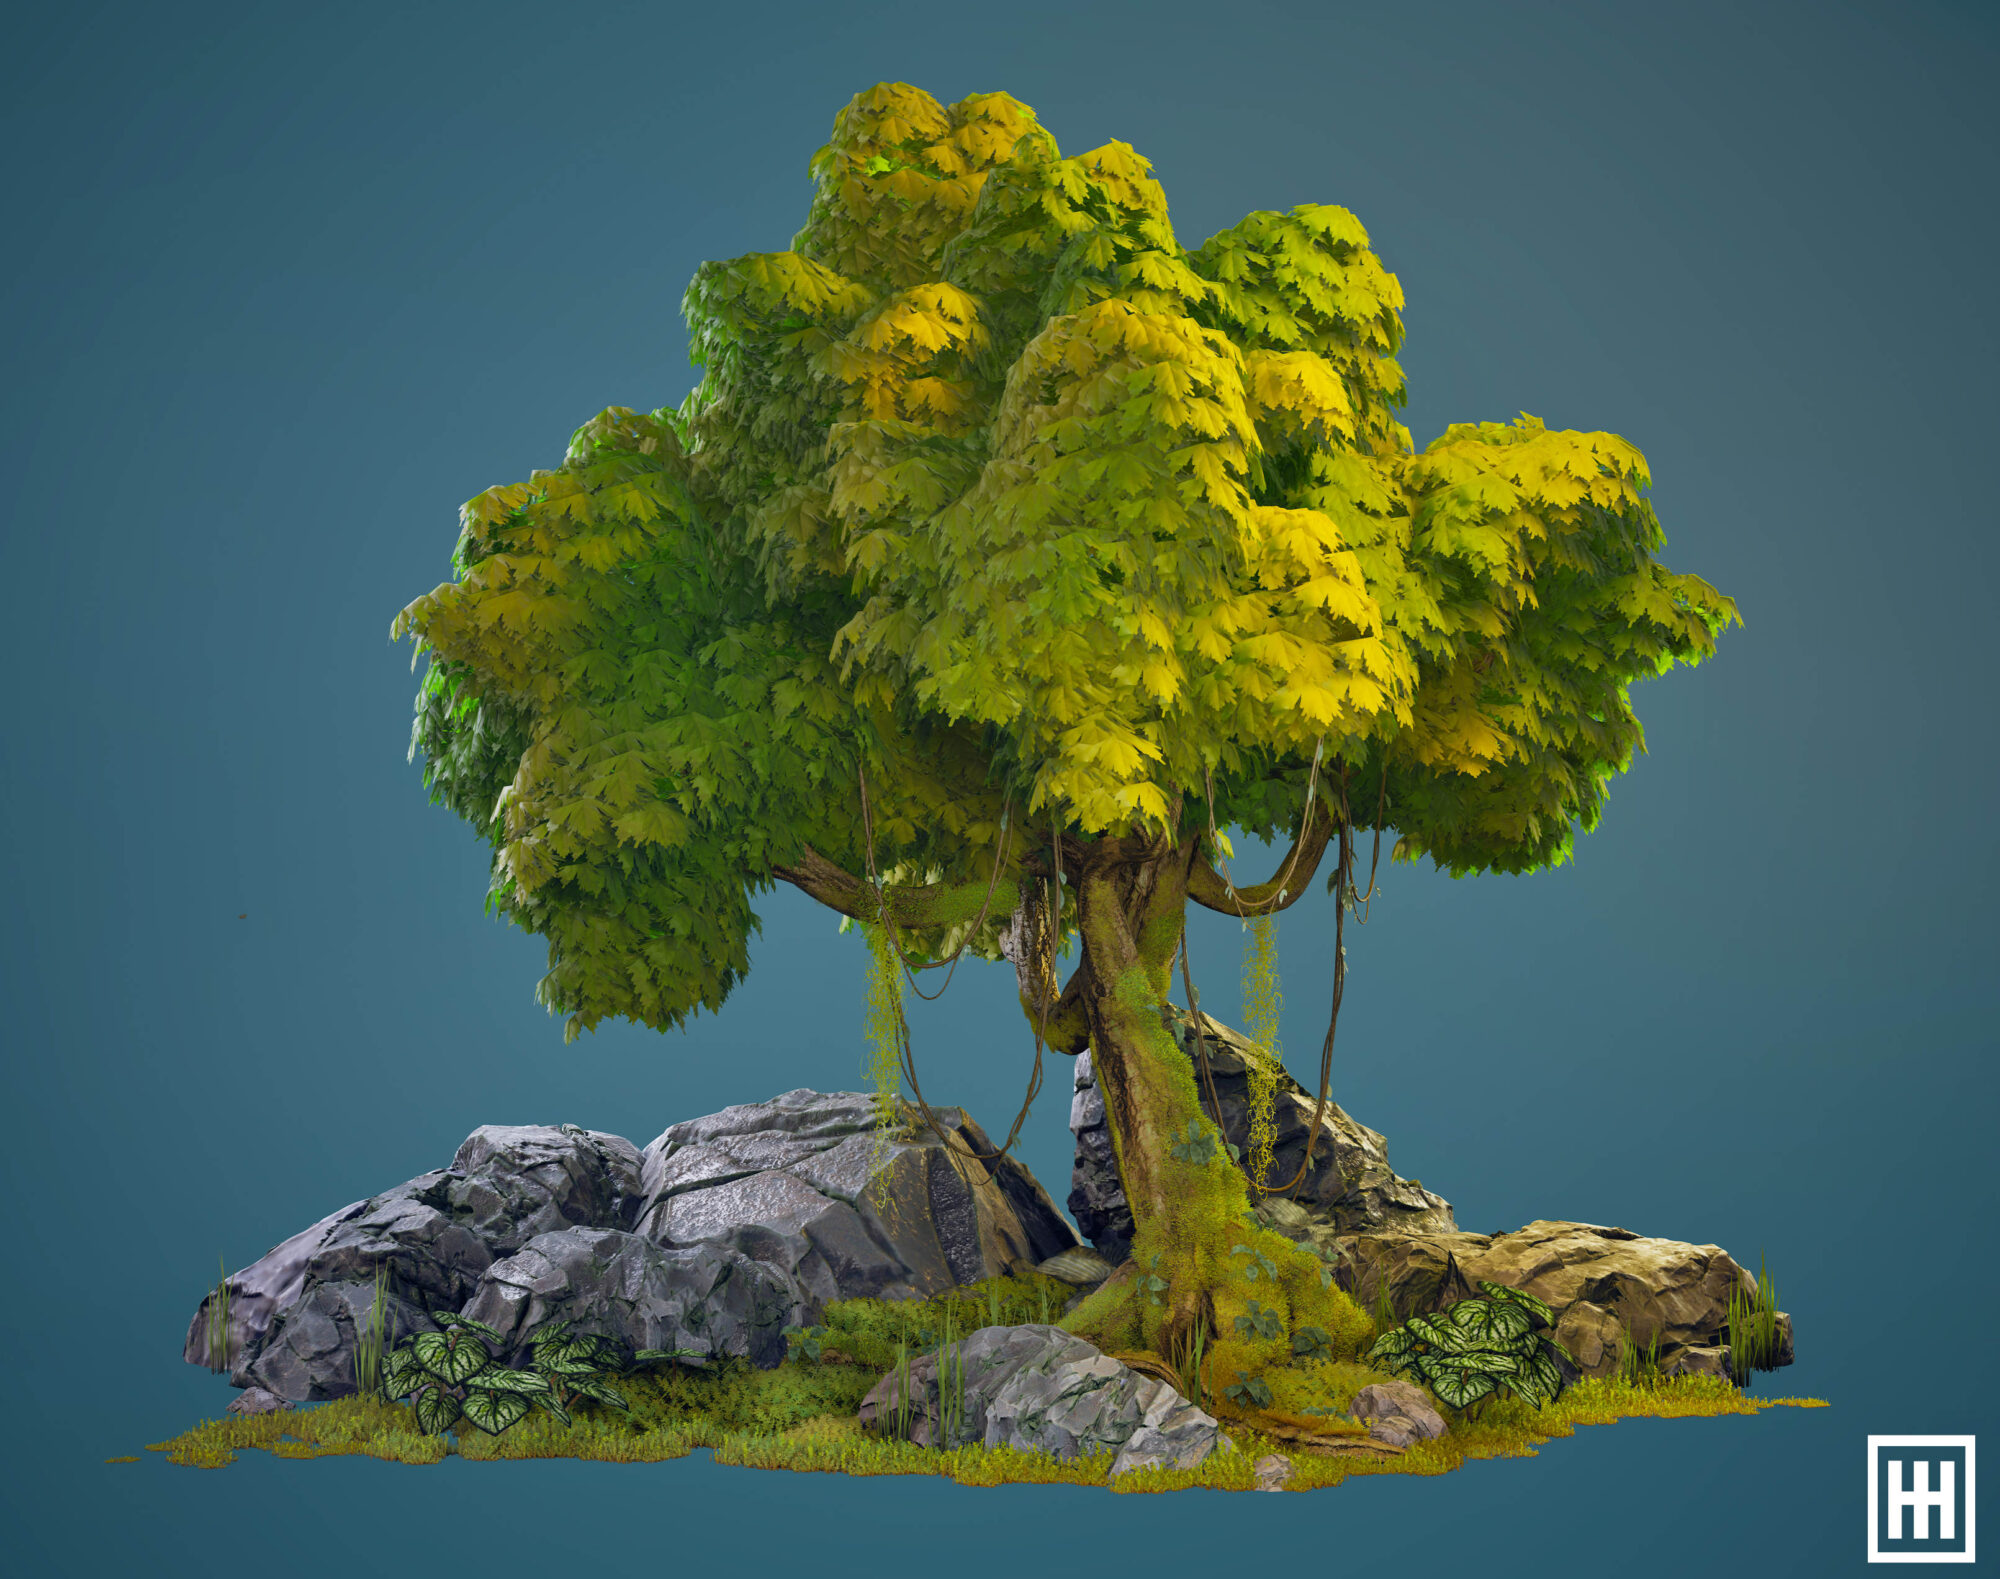
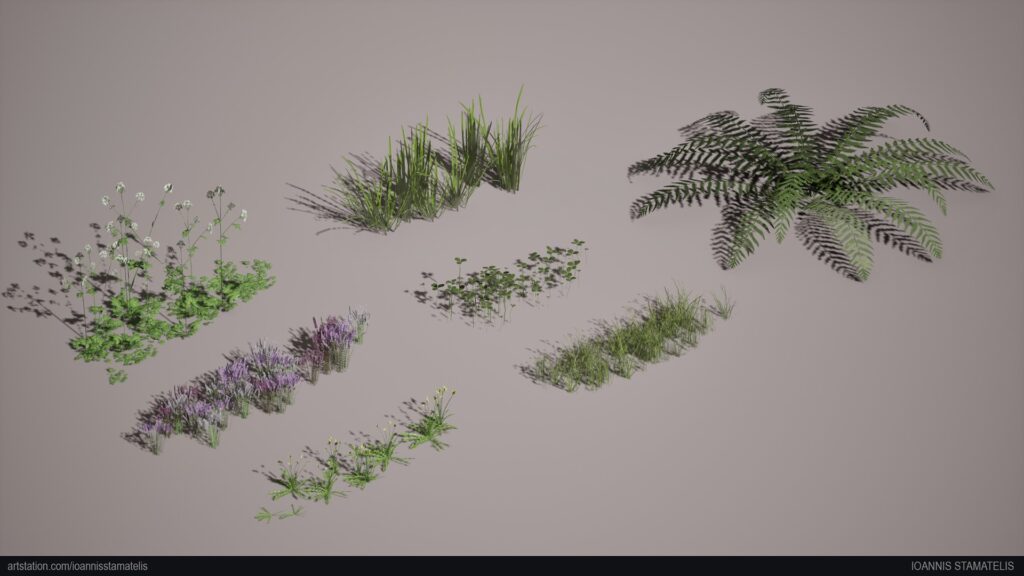
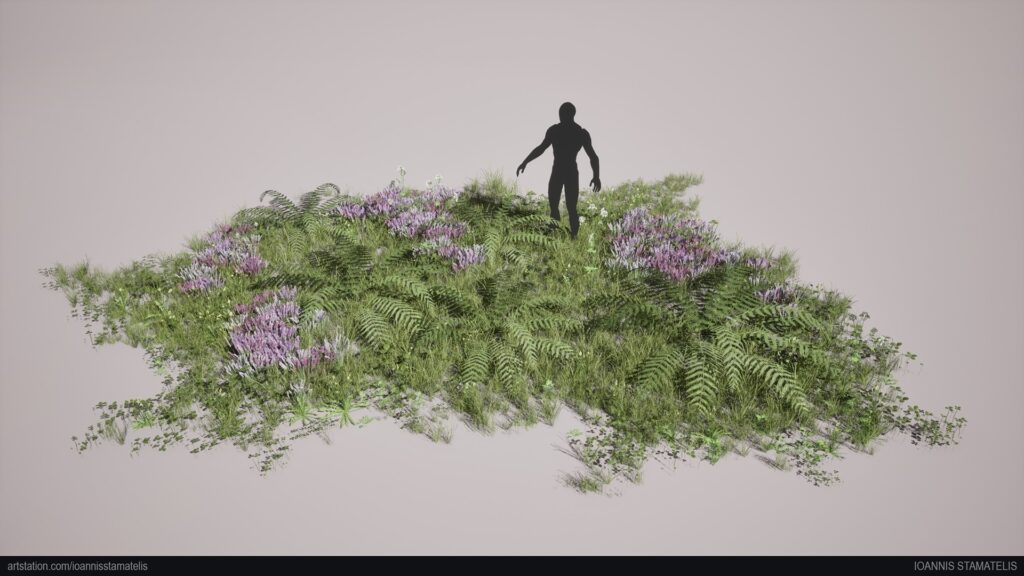
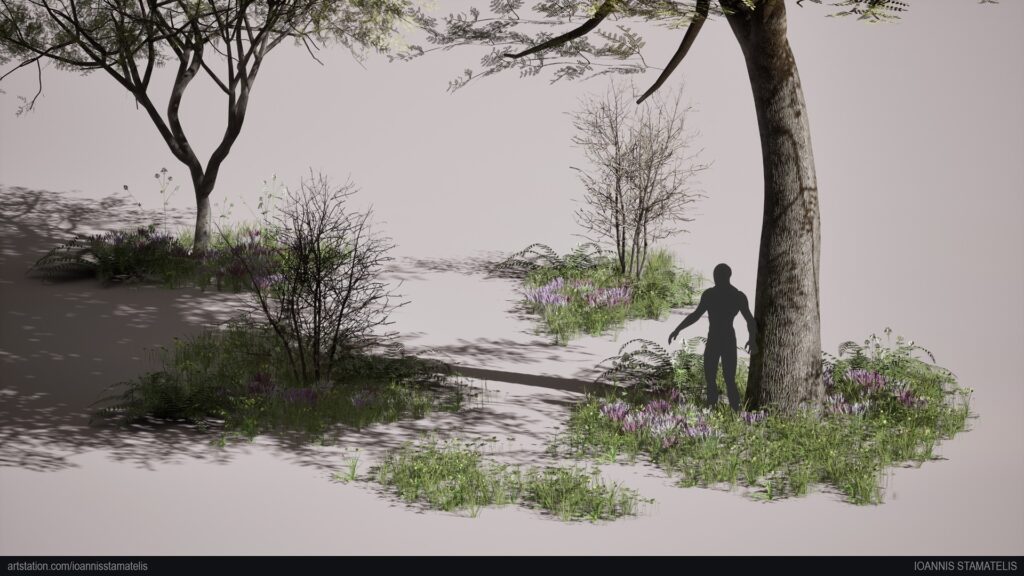
Vegetation
My goal was to create vegetation that is correct to the real-world metrics within one atlas.
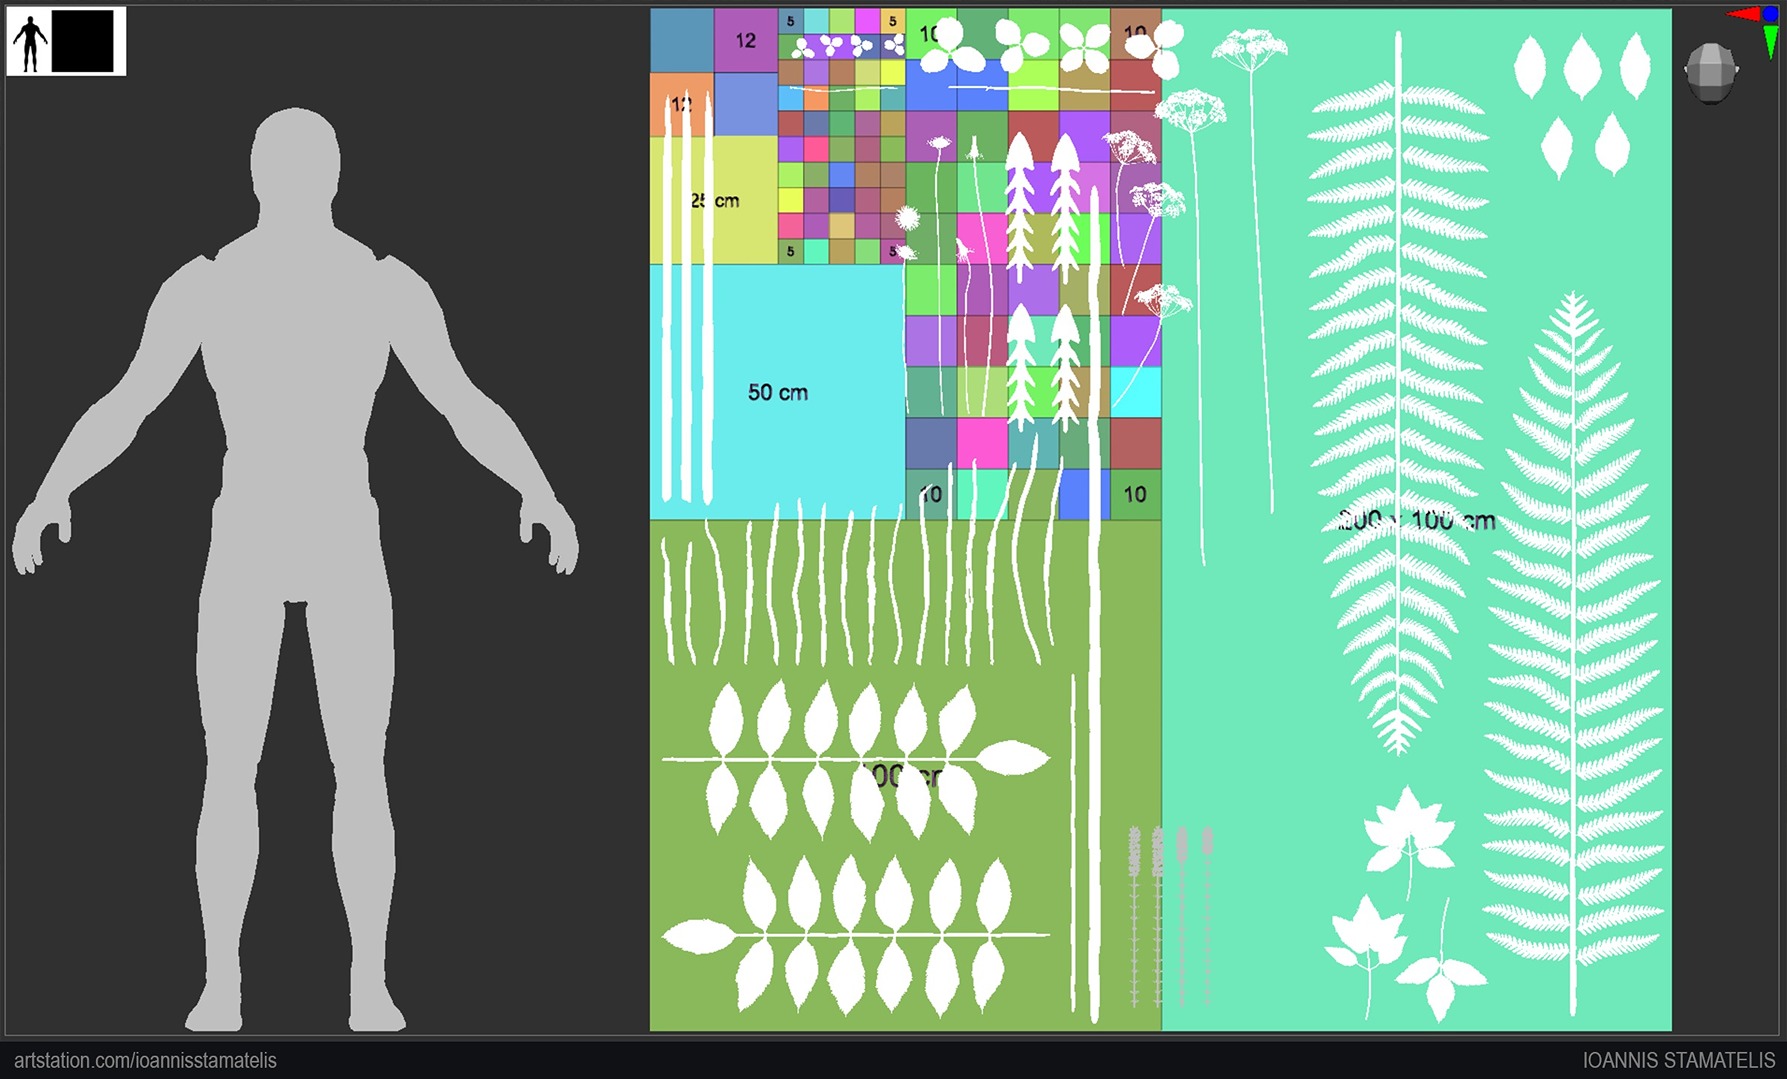
My workflow for vegetation below:
- Modeling in Maya and sculpting in ZBrush, focusing mainly on shapes.
- Baking in Substance Painter using a flat plane mesh.
- Texturing in Substance Painter.
- Cutouts and assembling in SpeedTree.
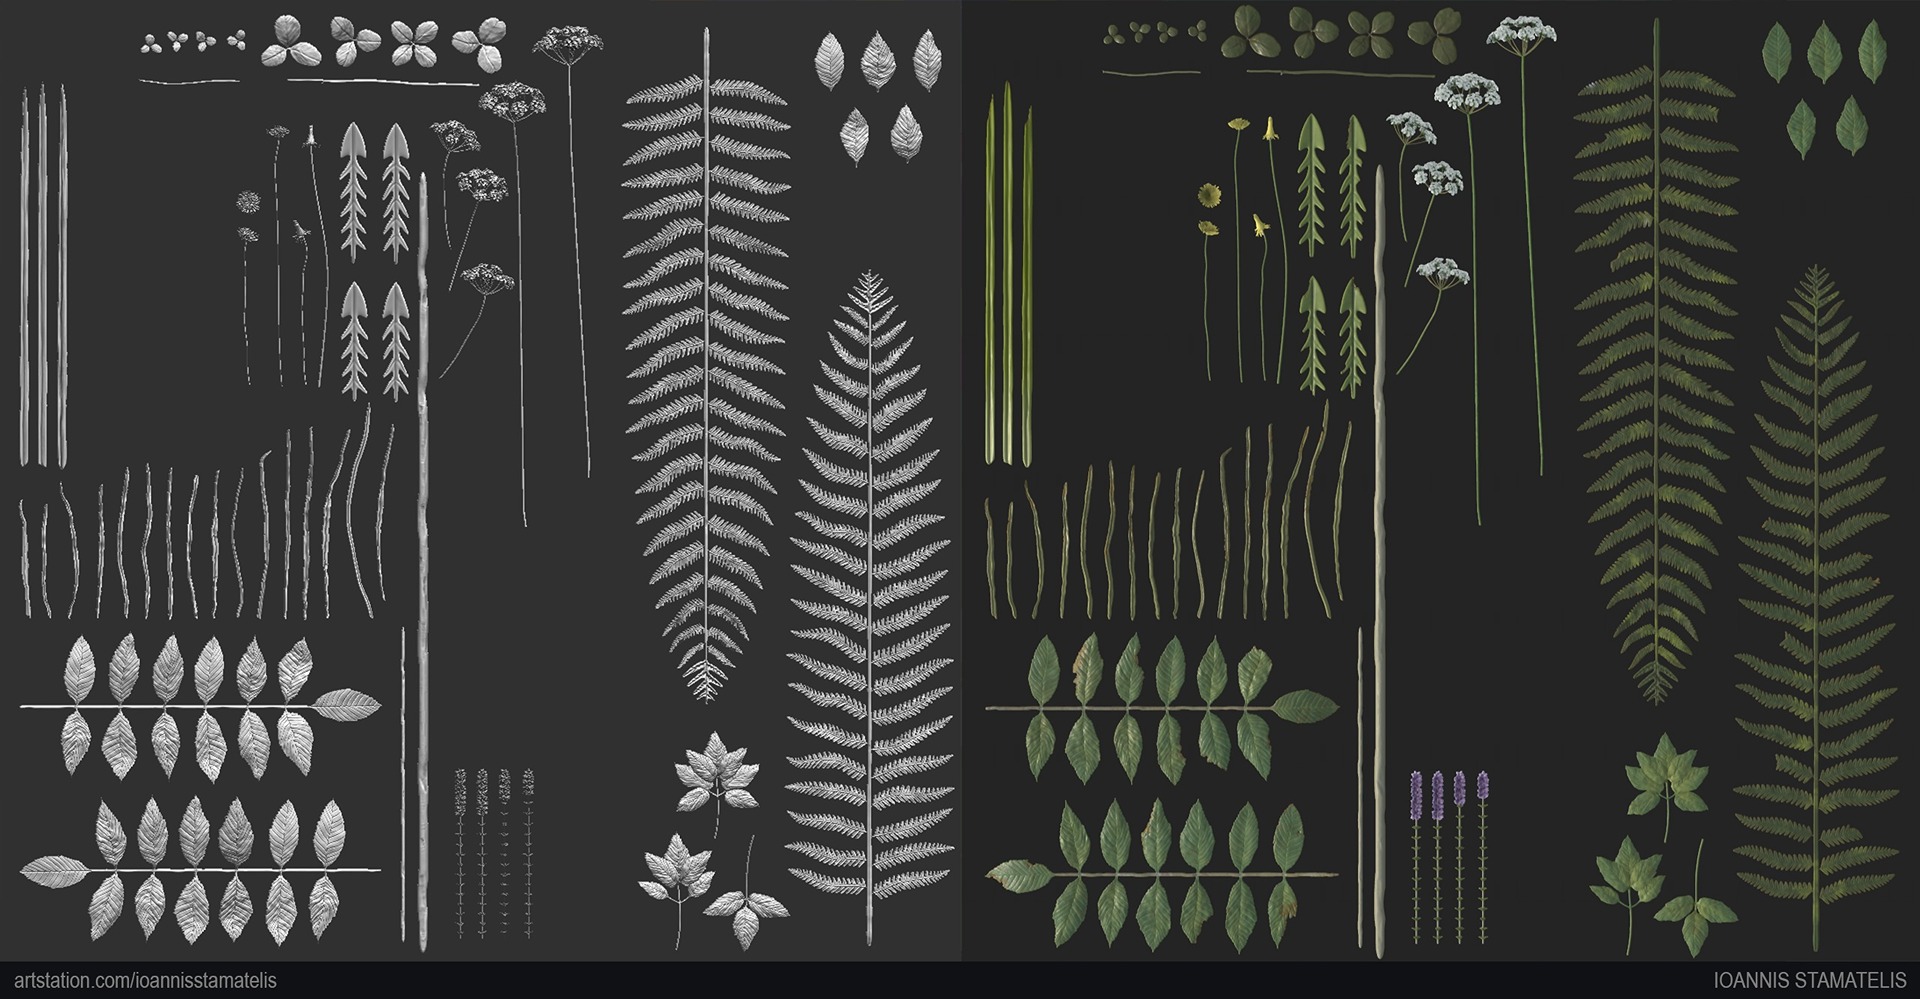
For the tree mesh, I used the branches of the vegetation atlas to create the high-poly of the tree atlas in SpeedTree, which was a new way of thinking about making vegetation for me.
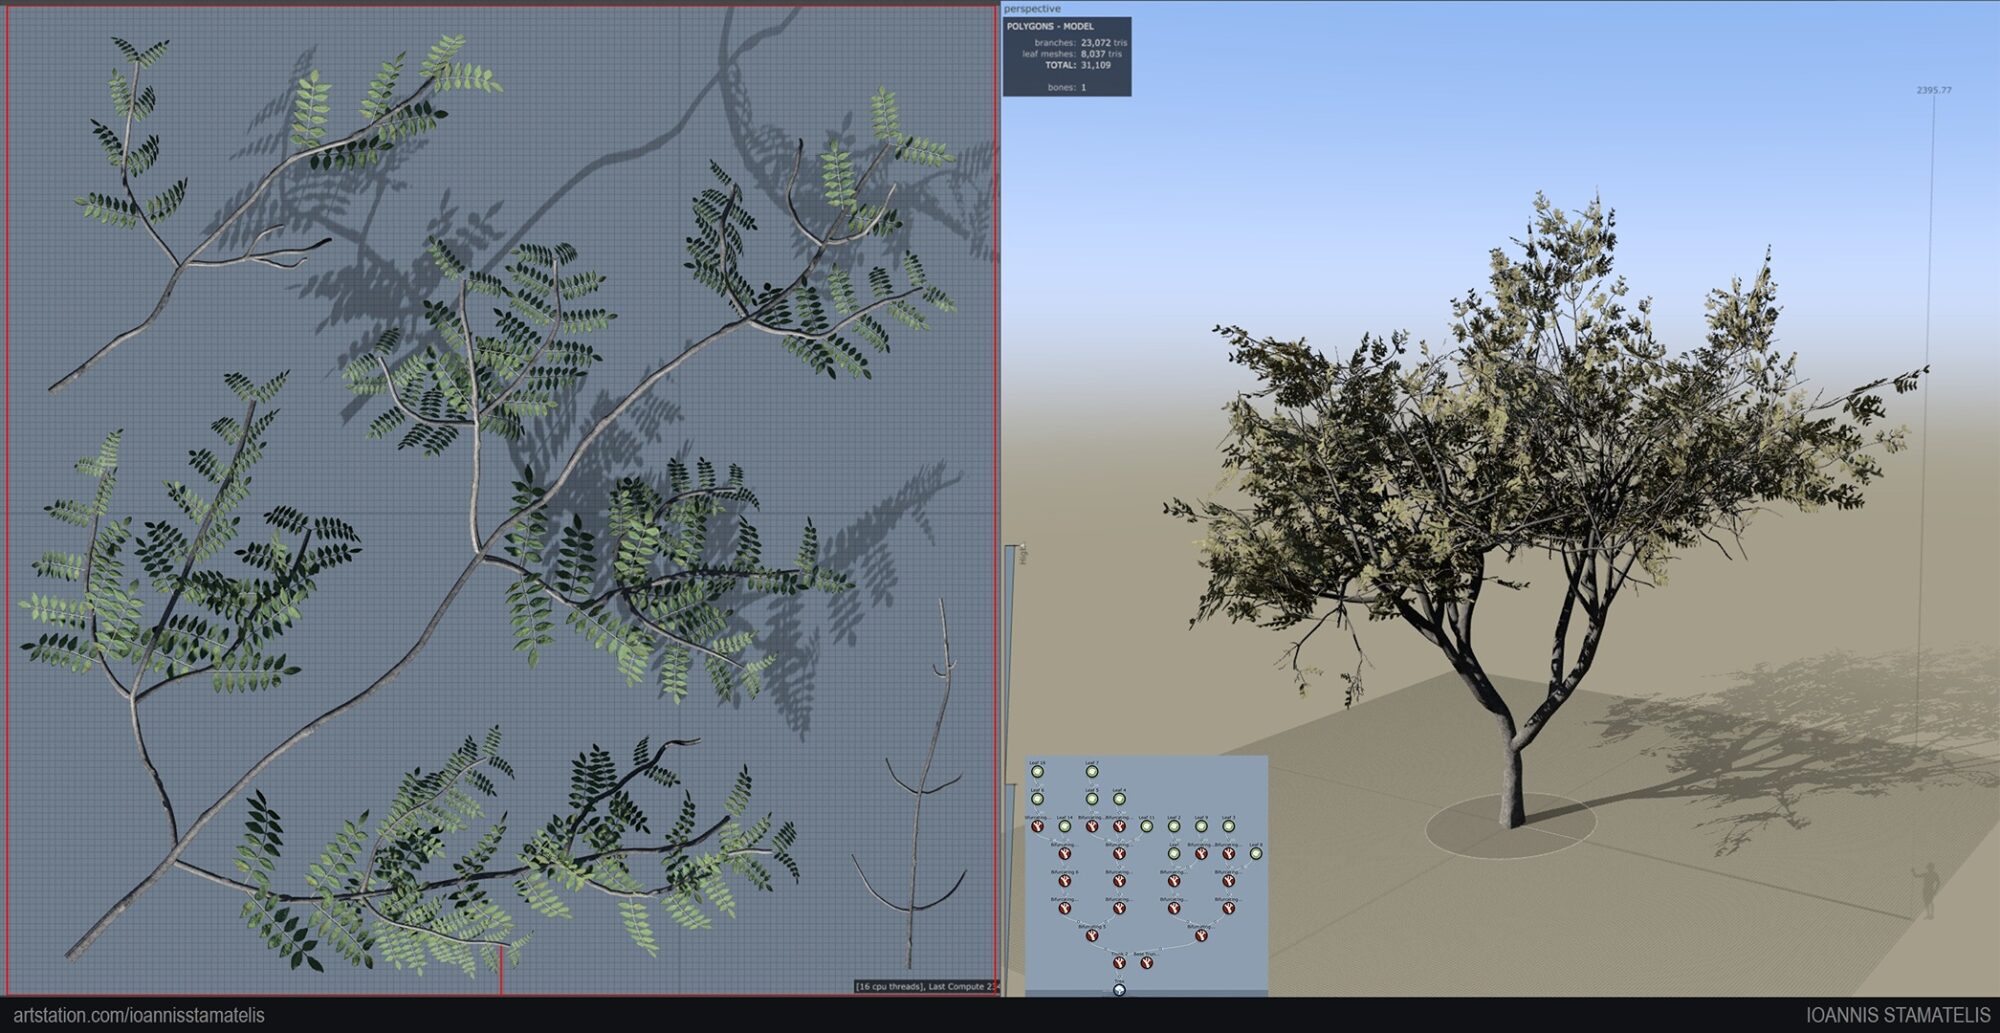
I used a BaseColor map with an A channel for the opacity, a Normal map, and a Packed map (ARMT, T stands for translucency).
I scattered vegetation around the scene with the foliage tool in Unreal Engine.
Lighting
The focus here was to replicate the lighting mood as closely as possible to the concept art.
Tip
Do not be afraid to ask for feedback when you are feeling stuck, as a fresh set of eyes can always prove helpful to push your artwork forward. And plan time, of course, to implement it.
It can really make a big difference.
Rendering
I followed William Faucher’s tutorial on how to render with the output color setting in the Movie Render Queue in Unreal Engine.
I followed the ACES workflow with the OCIO configuration, converting the source color space sRGB to ACEScg as the destination color space.
Finally, I used DaVinci Resolve to make some basic color adjustments to achieve the final look. Each shot was rendered with a 10-second timeframe.
Conclusion
All in all, this project was both exciting and frustrating to complete. I believe I learned many valuable lessons regarding time management, new workflows, and being diligent and consistent with my work by reporting back to my mentor.
Every asset I built and every texture I created for this project pushed my skills further.
Huge thanks to my mentor, Declan Hart, for his support and guidance during my mentorship term at the Think Tank Training Centre and to everyone who supported and gave me feedback to push my boundaries and the quality of this project.
Thank you, Games Artist Team, for giving me this opportunity to share my work progress and thought process of creating the “Ruins” 3D environment with you in this article.
I hope this article was helpful and you learned something new. I am open to any feedback and tips you share with me to improve my next projects.
I am looking forward to seeing what is next for me, as I am currently applying for an Environment Artist position in the game industry.
Here are my social media channels to connect with me:
Read more articles
You might also like these articles.