Ominous Bridge

Introduction
Hello there, my name is Thomas. I'm a French 3D Environment Artist for games, and I just graduated from Artside School. I love to craft large-scale environments with great vistas and impressive sceneries, with a particular appeal for sculpted assets.
My first video game memories were with my dad when I was 4 or 5. I used to sit on his lap, and we played an old Star Wars game. I've been a fan and video game enjoyer ever since, and I aspire to work on such a legendary franchise one day.
Goals
Our final year at Artside is split into two parts, with this being the first. Spanning over 14 weeks, it was our final individual project at school.
Therefore, we could pick any concept art and focus on something aligning with our own career prospects.
My main goal was to achieve a significantly larger scene than in my previous projects, in order to feel like this is actually a small part of a level that leads somewhere, and not just an enclosed diorama.
I also wanted to explore a new pipeline that would better represent what the “Next-Gen” AAA games are going for with all the new tools in Unreal Engine 5: Nanite, Material Layers, Lumen, etc.
All this while trying to hand-sculpt as much as possible, to follow the path of studios like Sony Santa Monica on God of War and Respawn on Star Wars: Jedi, which I admire.

Tools
Here are all the tools and software I used for this project:
- PureRef – Reference
- Blender – Blockout, modeling, UV Packing, mesh prep before export
- ZBrush – Sculpting
- RizomUV – UVing
- Marmoset Toolbag – Baking, sculpt, and material renders
- Substance Painter – Texturing and RGB Masks
- Substance Designer – Tileable textures
- SpeedTree – Foliage/Vegetation
- Unreal Engine – Main platform to build the actual scene
- Photoshop – Screenshot touch-ups and miscellaneous
- DaVinci Resolve – Video rendering


Concept Art
I had just finished playing Black Myth Wukong when I first started looking at Concept Art for this project, so I had a bunch of Asian-inspired environments piling up, but nothing really struck me as “the one”.
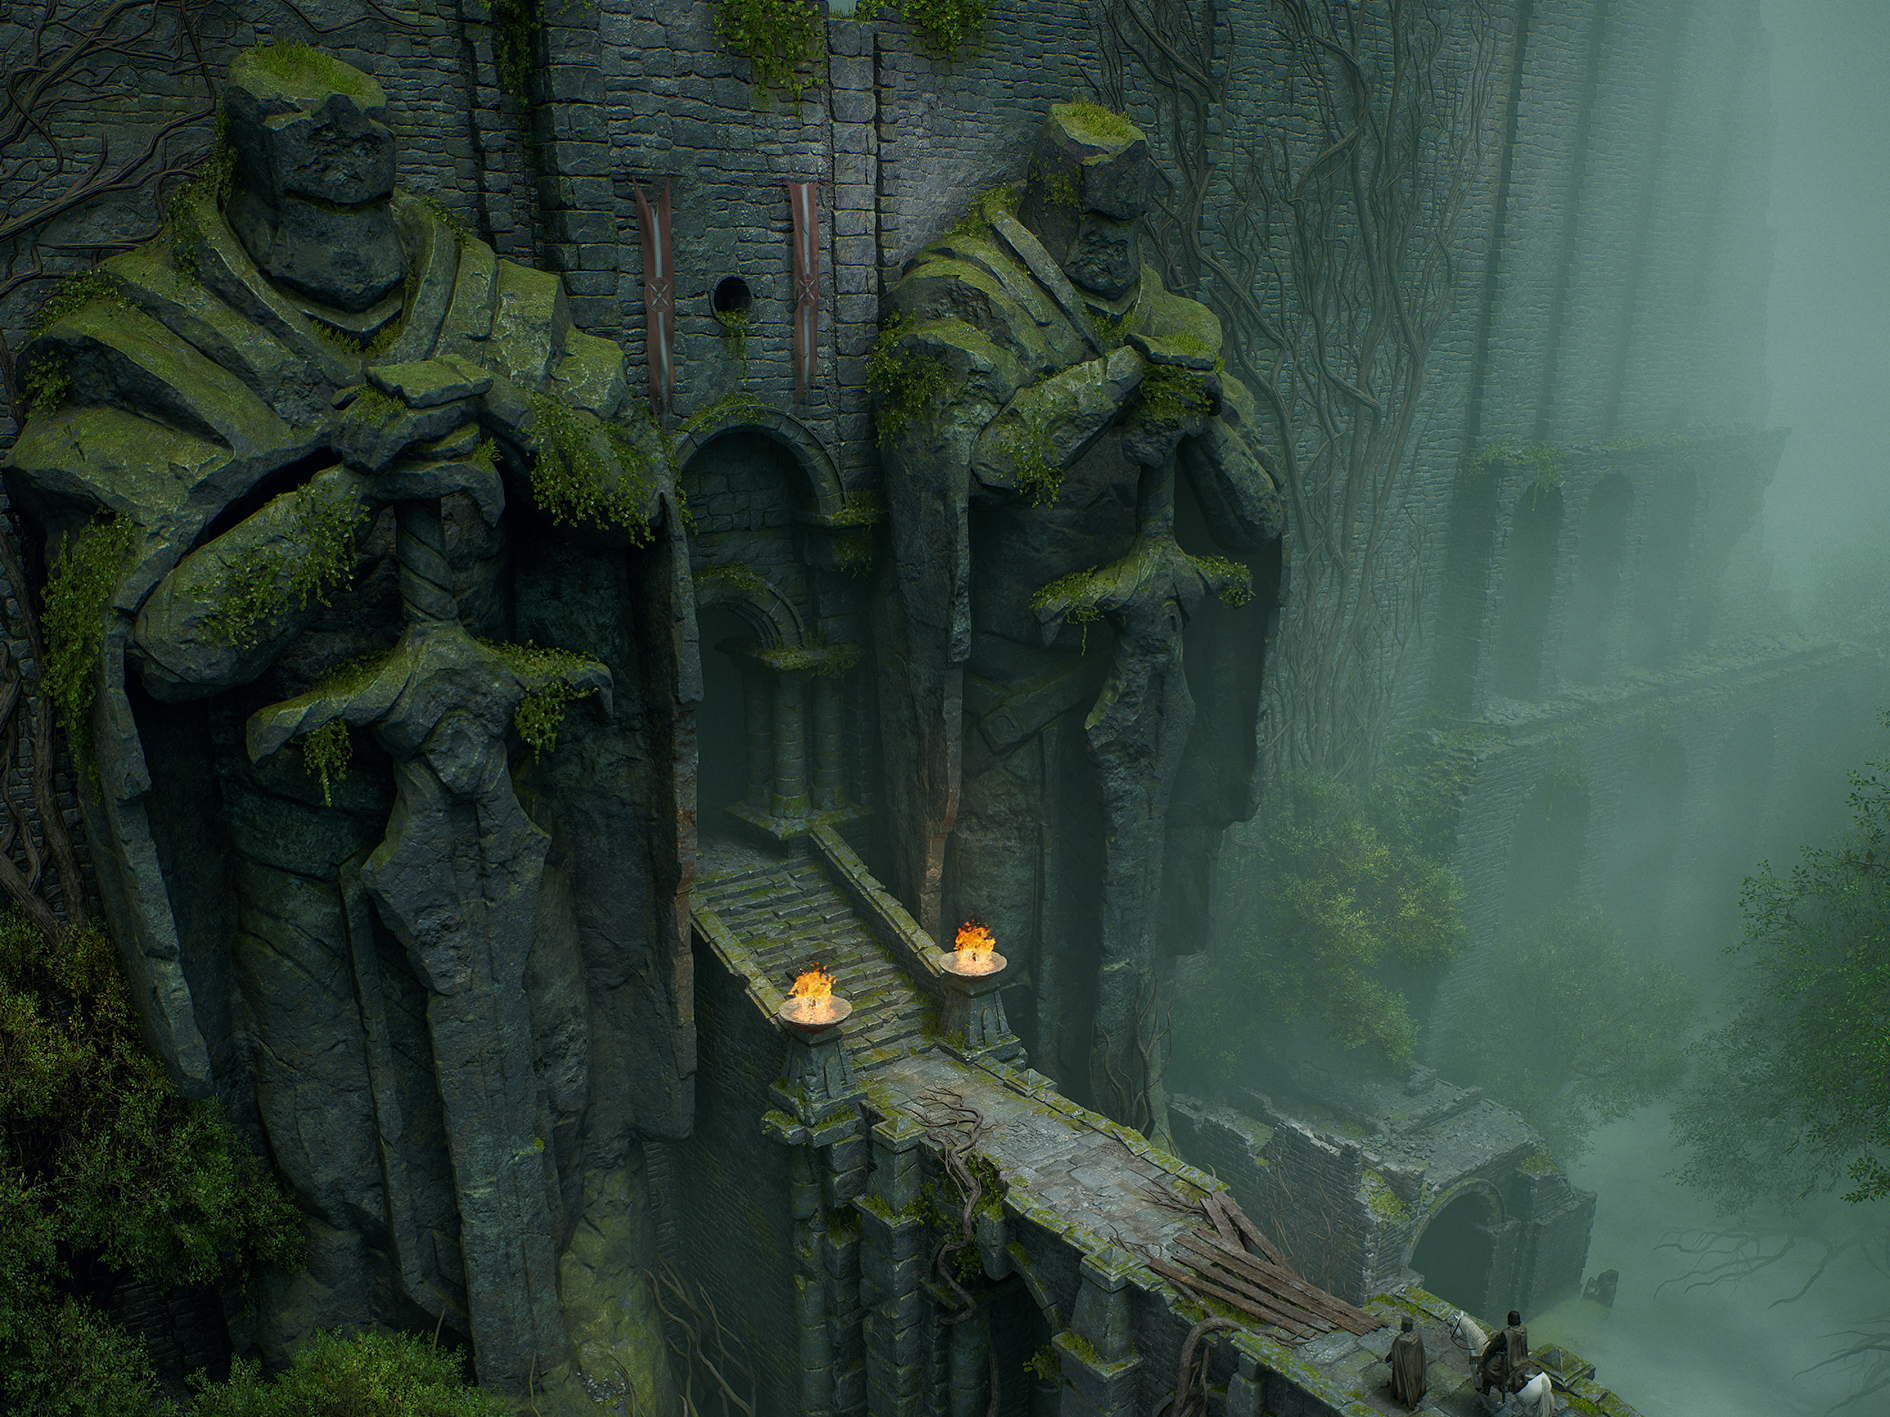
Then I stumbled across this epic concept made by Andrew Palyanov; as a fan of the Dark Souls series, it really stood out.
There was a gloomy and mysterious story to tell, plus it also felt really huge and cinematic.
Another great thing about it is Andrew also posted some other sketches and iterations that would prove quite useful to better understand his intentions.

One of our guidelines was to focus on the Concept shot first and foremost, trying to follow it as best as possible.
Setting up a clear goal like that is important when tackling a big piece like this with limited time.
But for me, it didn’t mean that “looking good from the top view camera” was sufficient. I already knew I wanted to walk on the bridge, do close-ups, and extra shots.
So I also set myself some technical constraints as if it were an actual game: it had to work in 3rd Person Camera view, like when playing Action/RPGs.
This was essential to then establish how far I needed to push each asset, how much detail, Texel Density, etc.
References & Inspiration
I use PureRef; Miro is also a great solution when working as a team or when you want other people to be able to keep track of your progress easily.
The first step is, of course, to gather some references. I really like to look at what other artists do in a similar setting; it’s also a good way to see what kind of workflow and techniques they are using (this can depend on how old the work is).
I went to some Demon’s Souls artworks; I remembered the tutorial and the first level having a similar ambiance, just a little bit less swampy.
Another key reference artwork was the Phantom Abbey environment made by Jonathon Gregory Bick: fantastic mood, super detailed and high quality, and a great breakdown showing sculpts and RGB Masking.
If I could get somewhat close to his result, I would feel rather satisfied.
3D and screenshots from games are cool, but never forget to add some real-life references as well; there’s no better way to understand how things are actually made.
So I went for pictures of Irish ruins, and more specific stuff like twisted roots and swampy waters.

At this point, I already started to break down the main Concept Art, identifying what kind of materials I would encounter and need to make, what would be part of the main modular kit, what would be unique, etc.
Blockout
One of the most important things I learned is to get a first rough pass done in Unreal as soon as possible.
Spending two weeks in Blender or Maya just for the blocking stage will only get you so far, and you’ll need to redo a lot of stuff when going in-engine, which is not the most efficient.


So during the first few days, I would do lots of back and forth between Blender and Unreal: modeling basic shapes, getting the camera in position, and placing the most important elements quickly, refining as I go.
Trying to nail the silhouette, paying attention to the negative spaces and the original composition, while translating a 2D drawing into 3D with correct perspective and FOV.
During this phase, I mostly export everything as one FBX file, unless I really need something to be separated.
A quick first lighting pass to set up the mood is also welcome.

Workflow
One of the main challenges was to figure out what kind of workflow to follow in order to truly get the “next-gen” feeling while remaining game-ready (since this was a personal project, I would still allow myself some experiments).
I knew I was aiming at a Texel Density of 10.24px/cm: this is the modern standard for AAA games with a realistic art direction (for more explanations on Texel Density and other fundamentals, I recommend checking out this tutorial from Nate Stephens).
Now you can’t reach that value with the usual “prop” workflow and specific 0 to 1 baking for such large assets.
You’d need numerous 4K maps that cost a lot of memory, and it wouldn’t be efficient to make.
This is where the Material Layers and RGB Masking workflow will come into play.

This workflow would be the best approach for most of my assets (exceptions being the planks and the banners, for example; those are smaller and need different kinds of materials that won’t be used elsewhere, so they have unique textures).
With that in mind, and knowing I would use Nanite, I kept the blocking for the kit pretty simple because I knew I would decimate most of the sculpted elements.
If I were to do proper retopology, I could spend more time on the blocking stage in order to later reuse it instead of starting the low-poly from scratch. I then jumped right away into ZBrush to sculpt an asset that I would take to “final quality”.
This was a test-asset using scanned textures just so I could create a first draft of my main Material in Unreal, to start messing around with the Layered Materials setup since I had never used it before.


For the sculpting process, I often start by damaging the edges and trying to make the silhouette a bit more interesting.
Even small variations are important because of the decimation used later on; it’s all retained.
My main brush for that is the “chipie” brush; it was originally created for God of War 2018, and you can find it in Nate Stephens’ sculpting tutorial (along with lots of very cool noise brushes that I also use).
It’s basically like the “TrimSmoothBorder”, which I still use sometimes, with a different Alpha that adds a bit of noise and character to the sculpt depending on the angle of the stroke.

During this step, I rely on Dynamesh a lot; it allows me to keep good control of the needed polycount, with a somewhat clean topology, so I can avoid weird clusters flying everywhere that can become problematic later.
Tip
Dynamesh can be a bit quirky with small meshes and sometimes refuses to give you a higher polycount.
You might need to enlarge your mesh, and cleaning is often needed, especially around the decimate phase.
Yet it remains the most dynamic approach to me, and you don’t have to stop and reproject all the time while sculpting.
Once I am satisfied with the edge wear and main silhouette work, I start adding some noise and details.
You can use the Noise tool in the Surface tab to make your own, but I often rely on a few noise brushes that I really liked and purchased, like the ones from Dannie Carlone or those from Nate Stephens that come with the “chipie” used previously.

In our case, going for the noise details directly in the sculpt will be very useful for our bake, since it will then feed right into the RGB Masks, and still be kept in the Macro Normal map.
When I’m done, I simply duplicate my sculpt to make a decimated version that will serve as the “low-poly”.
The correct amount of triangles really depends: technically with Nanite, you can go really high, but the main problems will be disk size and time to unwrap.
On the other hand, staying too low is not worth it: Nanite will struggle to create clusters at a distance, and you can have more overdraw.
So it all comes down to finding the correct range and “triangle density” that suits your needs and doesn’t slow you down too much.
For me, this was a bit arbitrary here, but in a production setting, this is probably better defined, especially now that people have had more time to play with this kind of workflow.

For the statues, the process was largely the same, except I would spend a lot more time on them because of their importance and size in the level.
Several iterations were necessary; they needed to be sharp, imposing, and menacing as they guard the entrance.
After receiving a big chunk of feedback towards the end, I took some extra care during my free time to refine the design because it felt a bit “too simple and blocky” next to the rest.
I went and changed the helmet shape, broadened the shoulder plates, and worked a bit on the guard of the sword.
I also used this retake phase as a good opportunity to apply some of my learnings from the previous versions: it was really important to treat it as a huge sculpted block, properly sealed and with no empty spaces near the junctions, or else it becomes a nightmare to unwrap.
Because of the size of the statue, even with a 4K map, the Macro Normal would lack a lot of resolution, so there were two options to solve this issue: either use multiple texture sets or crank up the polycount when decimating, in order to retrieve more details from the sculpt directly in the geo (which is possible thanks to Nanite).
I went with the latter to experiment, since there would be only one sculpted statue plus its mirrored version, and I wasn’t worried about disk space.

UVing & Baking
When dealing with dense and triangulated meshes, RizomUV is a super convenient software.
The path tool is excellent and dynamic, so you see where you are about to place seams in real time.
There are a good amount of other functions, and I haven’t explored them all yet. I made some keybinds on my mouse to quickly use the Horizontal & Vertical Pins; this way, I can do the straightening part quicker.
Since we’re working with triangles, straightening means we always end up with squashed up or distorted faces that we have to manually clean up.
Thankfully, Rizom has a “Distortion” view mode that helps you manage that.

It also comes with a good enough Packing solution, but I find the UVPack Master 3 add-on for Blender to be even better.
Since I send and retrieve my meshes between Blender and Rizom in just a couple of clicks thanks to a bridge plugin, I might as well use it.
For this project, I went with a WorldAligned/Tri-Planar approach, but it clearly was not necessary for most of the assets on the kit. Using a second UV and scaling the islands to the desired Texel Density would be more efficient.

With even denser meshes, such as was the case with my statue, I applied the UV transfer trick explained here by Dannie Carlone.
The goal is to decimate your mesh even further so it’s more comfortable to unwrap, and then in Maya, you can easily transfer the UVs from your “very low” to your actual “low” poly decimate.

I do all my bakes in Marmoset Toolbag 5.
My friend Kostia made a fantastic free add-on that saves so many clicks and so much time.
If you’re using both Blender and Marmoset, I highly recommend you give it a try; it makes the entire process super fast.
RGB Masks & Material Layers
I create my RGB Masks in Substance Painter; it’s quite easy to set up, you just add User Channels and create a custom export that packs them in a single map. My usual setup is the following:
- Red Channel is Curvature Based
- Green Channel is AO Based
- Blue Channel is breakup (so different grunges depending on what’s needed)

The goal here is to export a Macro Normal map and RGB masks at a rather low resolution (a TD of 1.28 can be enough), because the RGB masks will drive different Tiling Textures that will meet the 10.24 TD target through the Material Layers setup in-engine.

My Material Layer setup is pretty basic and simple, since it was the first time I was working with it.
The first slide is about what constitutes each layer, with the Tiling Textures I made. As I said previously, I went with a World Aligned setup here, but a more classic approach using a second UV would have been better.
I have basic Albedo and Roughness controls; the Metallic isn’t plugged here because I wasn’t working with any, therefore I had one free channel in my packed maps if needed.

The second slide takes into account the content of the first via Material Attributes and builds on top, giving us more general parameters for each instance, and not each layer.
Here, I manage the blending of the different Normal maps I have, Macro + Tiling, Detail for assets viewed at close range.
This is also where I added my Z-Up Moss setup; it allows me to add moss to the sides of my assets facing the Z-axis, here again with basic masks and controls.
Finally, I added a quick Gradient setup that would allow me to adjust the Albedo and Roughness on the assets closer to the water, in order to get that “wet” feeling.
I have a decent amount of switches that can disable certain portions of the Material when I don’t need them.

Finally, here is one of my Material Layer Blends (I have one for each channel); it uses the RGB_Mask maps to drive the blending of the different textures on each layer.
The overall setup is probably far from perfect, but since it was my first time using this workflow, it was relatively easy to implement and worked fine for my needs.
Since then, I have refined it a bit on the project I did after.
Tileable Textures / Materials (slider with images) Here are the main materials that I created for this environment (renders were done in Marmoset Toolbag).
Most of them were made in Substance Designer, except for the wood one used for the roots, which was done using ZBrush and Substance Painter.
I am still in this weird place with Designer, where I am not a total beginner and I understand what the nodes are doing, but I still struggle to make complex materials all by myself from scratch.


So I did refer to some resources and tutorials to help me, but I definitely plan to practice more to level up in that regard.
For the stone ones used on the walls and the bridge, Ethan Olson (BrushBits on YouTube) had some nice videos that proved quite useful.
I hand-painted my own stone patterns in Photoshop to have a base that fitted my references, and made variations with more mortar to Vertex Paint in-engine.

For the rock/cliff textures and the moss, Javier Perez made a cool series of videos for the NVIDIA Studio channel a few years ago, tackling a material combining cliff and moss.
I needed them separated here, so I built them on their own, with one variation as well.
Roots and Foliage
The roots were another challenge: I needed them to be somewhat reusable but still fit correctly to the concept.
Thankfully, just modeling and applying my tileable texture on them would be enough with correct UVs.
So for the ones on the walls, it was a matter of crafting a few different clusters of roots that I could assemble, resize, rotate, and mirror.
I still had to model a few unique and custom ones to properly follow the concept, for example, on the bridge.
For the grass, I reused some older content I created during a class where we learned SpeedTree. I changed a few parameters and tweaked the Albedo and Subsurface directly in-engine so it would blend well with the rest.
For the ivy, I made a couple of iterations in SpeedTree, and drew a few cutouts from a Megascans atlas to save some time.
Then I could properly integrate it in Unreal.

The same thought process for the trees; vegetation isn’t my specialty, nor was it my focus here, so I started from a sample tree available in SpeedTree.
I changed the density of branches and leaves, killed everything I wouldn’t need since I wasn’t going to see them up close, and that would be enough.
Rubble, debris, asset placement
Since I was dealing with a good amount of ruins here, I needed to build some piles of rubble to reuse easily.
To build those piles, I reused the stone bricks from my kit, or some rocks I had sculpted in previous projects.
Then you can either use gravity, “Simulate” their fall, and lock their new position on the ground, or you can use the Physical Layout Tool, a plugin made exactly for that purpose (not sure if it has been updated beyond 5.4 yet).
This plugin was also useful to sprinkle some more debris here and there directly in the scene.
I didn’t go for actual Blueprint/Prefabs here; instead, I used the “Group Actor” function (Ctrl + G on multiple actors) because it was quicker for me, and I could move/delete any actor individually.
Probably less optimized and more single instances, but I didn’t need to worry too much about that here.
I also needed to find a clever way of placing stones on the edges of my big structures (the wall and the bridge, for example).
Putting each stone by hand along all the edges would have taken too much time and wasn’t very modular if I needed to adjust the silhouette of the wall.
Therefore, I used a simple PCG along-spline setup that allowed me to sample my bricks, and it would place them automatically along a spline, with random picking and rotations (you can find many videos about the topic easily).
I just needed to have a few different presets depending on if it was vertical, horizontal, diagonal, etc., to keep the offsets working.


Vertex paint, Blending & Decals
For the meshes with tileable textures, I had prepared a few variations of the materials to vertex paint, in order to reduce the feeling of repetition and to properly follow everything on the concept.
- Painting on the Red channel adds more moss.
- Painting on the Green channel adds more mortar.
- Painting on the Blue channel allows me to control the intensity of the Normal and AO (gives a bit more variation since I didn’t have another texture to put in here).
In-engine, I opted to use Nanite Tessellation to get real displacement; it’s probably still a bit expensive, but it’s the most dynamic and quicker approach (as opposed to Static Displacement Mapping, for example).
For further blending up close, I also made a couple of meshes that would help a bit. I didn’t have the time to create custom skirts for every surface, and blending with techniques like PDO (Pixel Depth Offset), which worked great in Unreal 4, don’t behave very well with Lumen and Nanite here.
Now you have access to incredible plugins like the Mesh Blend by Tore Lervik to better blend meshes and surfaces.
I haven’t been able to test it yet, but it looks fantastic and easy to work with.
When it comes to decals, I surprisingly didn’t use a lot of them. In hindsight, there is no doubt it would have helped ground the scene even more, but I did my best with the time available.
My main usage for decals was on the statues: since they are mirrored, adding some damage with the help of normal decals would help break the symmetry where it was too obvious.
VFX & Lighting
I have a couple of VFX in the scene, mainly the fires and the birds. The fire is one of the main things I wish I had time to redo; I originally made it for an older project and only slightly modified it since.
It feels a bit cheap and basic, in my opinion, plus it’s not as majestic and impressive as in the concept.
It is made up of four Niagara emitters:
- Flames
- Smoke
- Sparks
- Heat Distortion
For the birds, I migrated some birds present in the Rural Australia sample pack available for free on Fab.
I was able to reuse the mesh and material with the wings flapping. I believe they are supposed to be cockatoos, but here I heavily darkened the albedo, and since we only see them from very far, it’s enough to imagine they’re crows!
I then made a couple of very simple Niagara emitters to have two distinct groups of crows moving differently.
One is spawning birds going straight in the background, and the other is spawning crows going in circles above and behind the entrance, suggesting something is happening inside.
You might have spotted some rain present in the main beauty video; it was simply added with Ultra Dynamic Weather.
Note that you need to have an Ultra Dynamic Sky actor present in the scene as well for it to work, but it was hidden and did not affect any of my lighting. For the Lighting, I kept a relatively simple approach.
I had just learned about PBL (Physically Based Lighting) a bit late while making the scene, so I did not go that route, but I highly recommend this workflow for realistic settings.
It relies on using real-life values regarding light sources, combined with correct exposure values; you can accurately emulate camera behavior, like in real life.
It allows you to be more precise and input more coherent values that make more sense overall, instead of randomly and arbitrarily setting your exposure and lights because Unreal doesn’t default to that.

Here, my Directional Light has a slight blue-green tint, combined with some tweaks on the Mie Scattering Scale in the Sky Atmosphere, and I was able to get quite close to the mood of the concept.
The Source Angle is cranked up to a pretty high value in order to avoid sharp shadows. The Exponential Height Fog is also a key element here; I increased the density, enabled the Volumetric Fog option, and there adjusted the other settings as well: distribution, colors, and view distance so that the fog doesn’t start right in front of the camera, but also gets thicker the further we look.
I used a few Local Fog Volumes in the background for areas that needed it, like the darker sky on top of the wall, and where the fog blends with the silhouette of the rampart on the far side to the right.
Then the fog cards from Easy Fog by William Faucher came in handy to give some more depth and thickness above the water.
For my extra lights, I have a few warmer point lights at some key locations above the trees, with a small radius, just to give a bit more contrast and vibrance as seen in the concept, as if a few bits of sunlight could still reach through the fog.
I added a couple where the fires shine, with a basic light function that flickers slightly; this way, we can see the flames lighting up the sides of the statue.
The same process with a bunch of spotlights to highlight some key points of interest, and to raise back some areas that were appearing darker compared to the concept art.
Render
In my Post Process Volume, I use a bit of sharpening and vignette (which I can push further in post).
I can manage some AO settings there, and add just a tiny amount of Film Grain and Chromatic Aberration to get that cinematic feel.
I’m still a bit shy when it comes to Color Grading. I usually tweak a few values while working to get the scene to follow the concept art, but then I rarely get to try out completely different intentions.
On this project, I opted for a more cinematic aspect ratio, so instead of the usual 16:9, I went with 2.35:1. Try to avoid very distorted FOVs with crazy high values as well.
For my renders, I really like to have clean and high-resolution pictures. For this, I enjoy using DLSS/DLAA as the Upscaling and Anti-Aliasing solutions.
I find it to be cleaner than the native TSR of Unreal, and it feels a bit smoother as well when working.

I use the High Resolution Screenshot window in Unreal for still frames, with a 1.5-2x multiplier (I work on a 4K screen, so I don’t go higher to avoid crashing).
Don’t forget to put 100 screen percentage as well (not higher if using DLSS/DLAA, because it will revert back to TSR).
I also make sure to add some delay with a console variable so the engine can build enough frames for the lighting to be clean (very important with Lumen). And for the videos, I use the Sequencer in Unreal with the Movie Render Queue export.
I output at 4K60FPS and use either DLSS Quality or DLAA; this way, I can get really clean frames that are still reasonably fast to render.
I then put the entire sequence in DaVinci Resolve to properly cut and edit the video. I keep it simple here as well, but I know you can do a lot of Color Grading and editing work too.
Quick note: the two characters on the bridge come from the BMS Medieval Collection pack.
Bonus: here is the little progress video!
Conclusion
Thank you for reading this far! This project was a big achievement towards my graduation; I learned a lot while making it, and I’m happy with the way it looks, even a few months later now.
Of course, there are many things I would change or do differently, as is the case with every project when reflecting on it.
I want to thank Sacha Veyrier for his supervision throughout those 14 weeks, and all the other mentors at Artside who helped along the way (complete list available on the Artstation post).
Special thanks to Nate Stephens from Respawn Entertainment, who was kind enough to find some time to have a chat with me, giving me feedback on this project and many other fantastic pieces of advice.
Thanks as well to my dear friend Lilian Orth, who made the music specifically for the beauty video; and to all my friends and colleagues I met at Artside during these last 4 years, it was a privilege to learn alongside so many great people.
Thanks to the Games Artist team for this amazing opportunity and for their patience because I wasn’t able to start writing right away.
I hope you enjoyed this article and that you found some useful stuff in it, and if not, that you liked seeing a bit more of my process at least.
I am currently looking for work, applying where I can. The industry is definitely still in rough shape, especially to enter, but I’m hopeful it will improve soon enough.
There are so many incredibly talented people out there that really deserve a spot to make great and beautiful games.
Here are my socials if you wish to connect with me:
See you around!
Read more articles
You might also like these articles.