Luger P08


Introduction
Hey everyone, my name is Moritz Eichinger and I am a Senior 3D Artist working in the Games Industry. The Luger P08 was an on-and-off project that I completed in my spare time besides my day-to-day work. It is very difficult to say how long it took me without all the long breaks I had, but 2-3 months, 8 hours a day is probably a good estimate, including all the additional props, experimenting and the rendering setup. Whilst working on the project I created tons of 3D Props at work and learned a lot along the way, all these learnings went into the creation of the Luger P08. I also switched my modelling software from 3Ds Max to Blender during the project.


References
Whenever I create an asset, I use different references for specific stages of the modelling process:
Modelling Reference:

Here I search for blueprints or photographs with a flat perspective. They serve for blocking out the object as close as possible to the real dimensions.
Detail Reference:

When creating detail, it is essential to closely study the reference. You can make up things, but it should always be based on reality, otherwise, it won’t be believable. Therefore, I look for close-up photographs of real damage to the object.
Material/ Texture Reference:

It is very important to have a good reference for the texturing stage. These images should give a good impression of the roughness and details of the surfaces.
I am not a real expert when it comes to guns and pistols, so there was a lot of research to be done. I watched disassembly videos and 3D Animations of the pistol in order to figure out how it works and what the separate parts look like.

Also, I stumbled across a cool series of images of the suppressor on imgur.

For this prop I gathered a lot of references over time. In the end I had one giant reference board with a lot of images for modelling, sculpting and texturing purposes.
Software Used
I started the project back when 3Ds Max was still my main modelling kit, but I saw a lot of artists switching to Blender while I worked on the Luger. At some point, I gave it a try as well and quickly understood why so many people use it. Since then, I sticked with it because it has lots of cool features that make modelling feel more dynamic and also increases efficiency. For baking and a few renders, I used Marmoset Toolbag and the texturing was done entirely in Substance 3D Painter. The cloth in the renderings were created in Marvelous Designer.
Modelling: Blocking out, Low Poly and High Poly
Highpoly 3DS Max
I completed most of the highpoly in 3Ds Max. The first thing I did was look up the dimensions for the pistol and then I used blueprints and photos for blocking out the main shapes of the objects. Basically, it was all simple box modelling with the combination of some booleans. I like to be flexible with the highpoly, some parts I model using support edges, some using Chamfer and Turbosmooth, whatever fits best. I wasn’t too perfectionistic about it, if it smoothed correctly and looked like in the reference, I did not waste time on cleaning up everything even if it was a bit messy in places.

Anything that would have taken too long within Max I just dynameshed and polished in Zbrush later. After I was done with all the separate parts, I continued in Zbrush.
Highpoly ZBrush
Here I basically used the hard surface polish workflow. It is quite a common technique these days, and it was very well documented by Ben Bolton on polycount:
https://polycount.com/discussion/168610/3ds-max-zbrush-proboolean-dynamesh-hardsurface-workflow-tutorial
Everybody does this a little differently, but it generally all ends up by using polish in Zbrush as a last step. I already had a smoothed highpoly from Max, but since I wanted to sculpt in detail, I did the Zbrush pass on top.
I first dynameshed all the parts. Where necessary I used polish to exaggerate the beveled edges even more, since it will result in nicer results in the bake. In case of doubt, I always go for the smoother version. It is also important to keep an eye on edge consistency throughout your model. Having vastly different or unlogical widths for your outer bevels can break a good model easily. Study your reference for that and try to mimic what you find there. Usually, the smaller a detail gets, the smaller its bevels will be.
For the knurling on the pistol grip, I simply created a displacement map, adjusted the UVs in 3Ds Max to fit the pattern and displaced it in Zbrush on a very high subdivision level.

It is crazy, but yeah, all the text is part of the Highpoly geometry. I don’t recommend that for production, as it takes a little longer and is way less flexible than stamping it in Painter, but as I had time and I like creating extra geometry I just went for it. I modelled it in 3Ds Max and used it as booleans in ZBrush. The areas with text were masked and subdivided to give enough geometry for the text and engravings.

I didn’t do too much sculpting for this asset, breaking up the edges a bit and adding a few bigger scratches here and there was all that it needed. All details were created in layers, that way it was easy to play with the strength and remove detail that I didn’t like with the morph brush. My main brushes were trim dynamic and the planar brush.

Lowpoly
Since I created all the parts using the subdivision method or modifiers, it was just a matter of removing support edges and optimizing some areas to get a good lowpoly version of the pistol. I ended up with these polycounts:
Pistol: 15097 triangles
Magazine and Ammunition: 3816 triangles
Suppressor: 4498 triangles

UV Unwrapping
Unwrapping is not really complicated, if you set your sharp edges correctly and split the UVs according to those it should not be too much of a hassle. You probably know the rule:
Every hard edge is a UV seam but not every seam is a hard edge.
You don’t need a hard edge on a cylinder’s seam. Don’t forget to straighten all your UV islands and rotate them correctly, in case you have directional detail like wood grain or brushed metal.

I used Zen UV and UV Packmaster to save time on tedious things like straightening and packing UV islands. I can really recommend those Blender addons:
Zen UV:
https://blendermarket.com/products/zen-uv
UV Packmaster:
Also, a free and good alternative for UV packing is UV Packer for blender:
Baking
I mainly bake my assets in Marmoset Toolbag. It gives great baking results right away and usually, every issue can be fixed by adjusting the cage size inside the application. Another great feature is the ability to fix skewing with the included paint tool. These were my baking settings:

It baked quite nice right away and there was only a little bit of skewing in tighter areas, which were easy to fix with the paint tool.
Texturing
In my opinion texturing is one of the most rewarding and interesting stages in the creation of any asset. You really get to see all the hard work that went into the highpoly and lowpoly leading to great results in Substance 3D Painter. For this project, I used a combination of procedural generators, alphas and handpainted details as the last step to give the asset a more natural look. In future projects, I want to improve my texturing workflow and quality by focusing more on handpainted details because I believe it leads to more realistic and grounded results.
I start by just applying basic materials to the different objects to give me a base. Material contrast is very important and one of the main challenges of this project was the fact that almost everything had the same material. That is also part of the reason why I decided to introduce some contrasting materials, like the wooden planks or the box to make it look more interesting.

Pay attention to directional changes in surfaces like wood grain or brushed metal, getting this right really adds interest and adds a lot of believability and realism.
It is important that each channel (base color, roughness, etc.) looks interesting on its own, so I regularly check through them to see if they look pleasing.

The roughness map has a big impact on the look of the materials in light, so try to add nice variation here. Think about where dust gathers, or natural wear appears and change the roughness value there. Also, subtle color variation really makes a difference in metallic objects, especially if they are aged.
Luckily, I found some good closeup photographs to look at for details like scratches and other signs of wear on a real Luger pistol.


Rendering & Lighting
I mainly used Blender for rendering, because I wanted to learn more about Eevee and Cycles. Also, it was great to have all the meshes and lighting in one application, so it was easy to move things around and change the lighting quickly. In the end, I had one blender scene containing all the shots and I could easily iterate on them.
Since I had no idea how to get good renders out of Blender in the beginning, I looked at parts 14 and 15 of the CGBoost tutorial series by Zacharias Reinhardt (https://www.artstation.com/zreinhardt) which covered everything I needed to know about Eevee and Cycles:
https://www.youtube.com/playlist?list=PL3UWN2F2M2C8-zUjbFlbgtWPQa0NXBsp0

Presentation
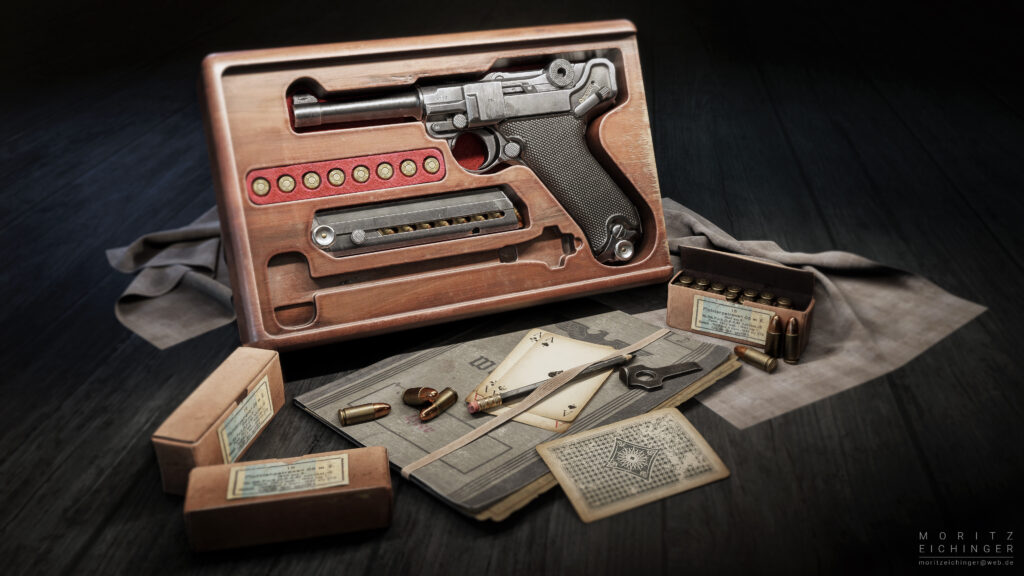
There are tons of awesome renderings of weapons on Artstation and elsewhere on the internet. In my opinion, the most interesting ones are the ones that offer a little bit of context and storytelling and that was what I wanted for my project as well. I saw an image of the pistol case online and decided to present the Luger in it. For all additional assets in the scene, I used the same approach, highpoly/lowpoly and then textured them in Substance 3D Painter.


The cloth was created quickly in Marvelous Designer and uses a material created with the node editor in Blender.
I assembled all the assets in Blender and experimented with various compositions and lighting scenarios until I found my final shots.
The renderings on a white background were heavily inspired by Moritz Gersmann on his ZM LR-300, here is his Artstation: https://www.artstation.com/mgersmann


Conclusion
I learned a lot during the creation of this asset, not necessarily technically but mainly personally. One of the main takeaways of this project is that perfection is unreachable. For me, that is probably the most important lesson. Honestly, I could probably go on and on with making it more “perfect”, but at a certain point, it won’t make any difference anymore. Some of the techniques I wouldn’t use in production, as they are lengthy and sometimes tedious, but I enjoy the sheer act of handcrafting things when working on personal projects sometimes.
Also stepping back from the project helped me to see it with fresh eyes whenever I came back and allowed me to put in all the learnings from my job as 3D Artist. After all, I am really happy with how the project turned out and I learned a lot of new things for future projects.
I’d like to thank GamesArtist for asking me to write this article and share it with you. It is important to have good people around you, and when it comes to art it is always good to show your work and ask for feedback. Therefore, I also want to use the opportunity and say thank you to my great friends Chris and Valentin, who helped me whenever I got stuck on anything. You can check their work on Artstation:
Christian Groß:
https://www.artstation.com/christiang
Valentin Pavliuchenko:
https://www.artstation.com/silverwind
That’s it! Thanks for reading and I wish you all the best!
Moritz Eichinger
Read more articles
You might also like these articles.