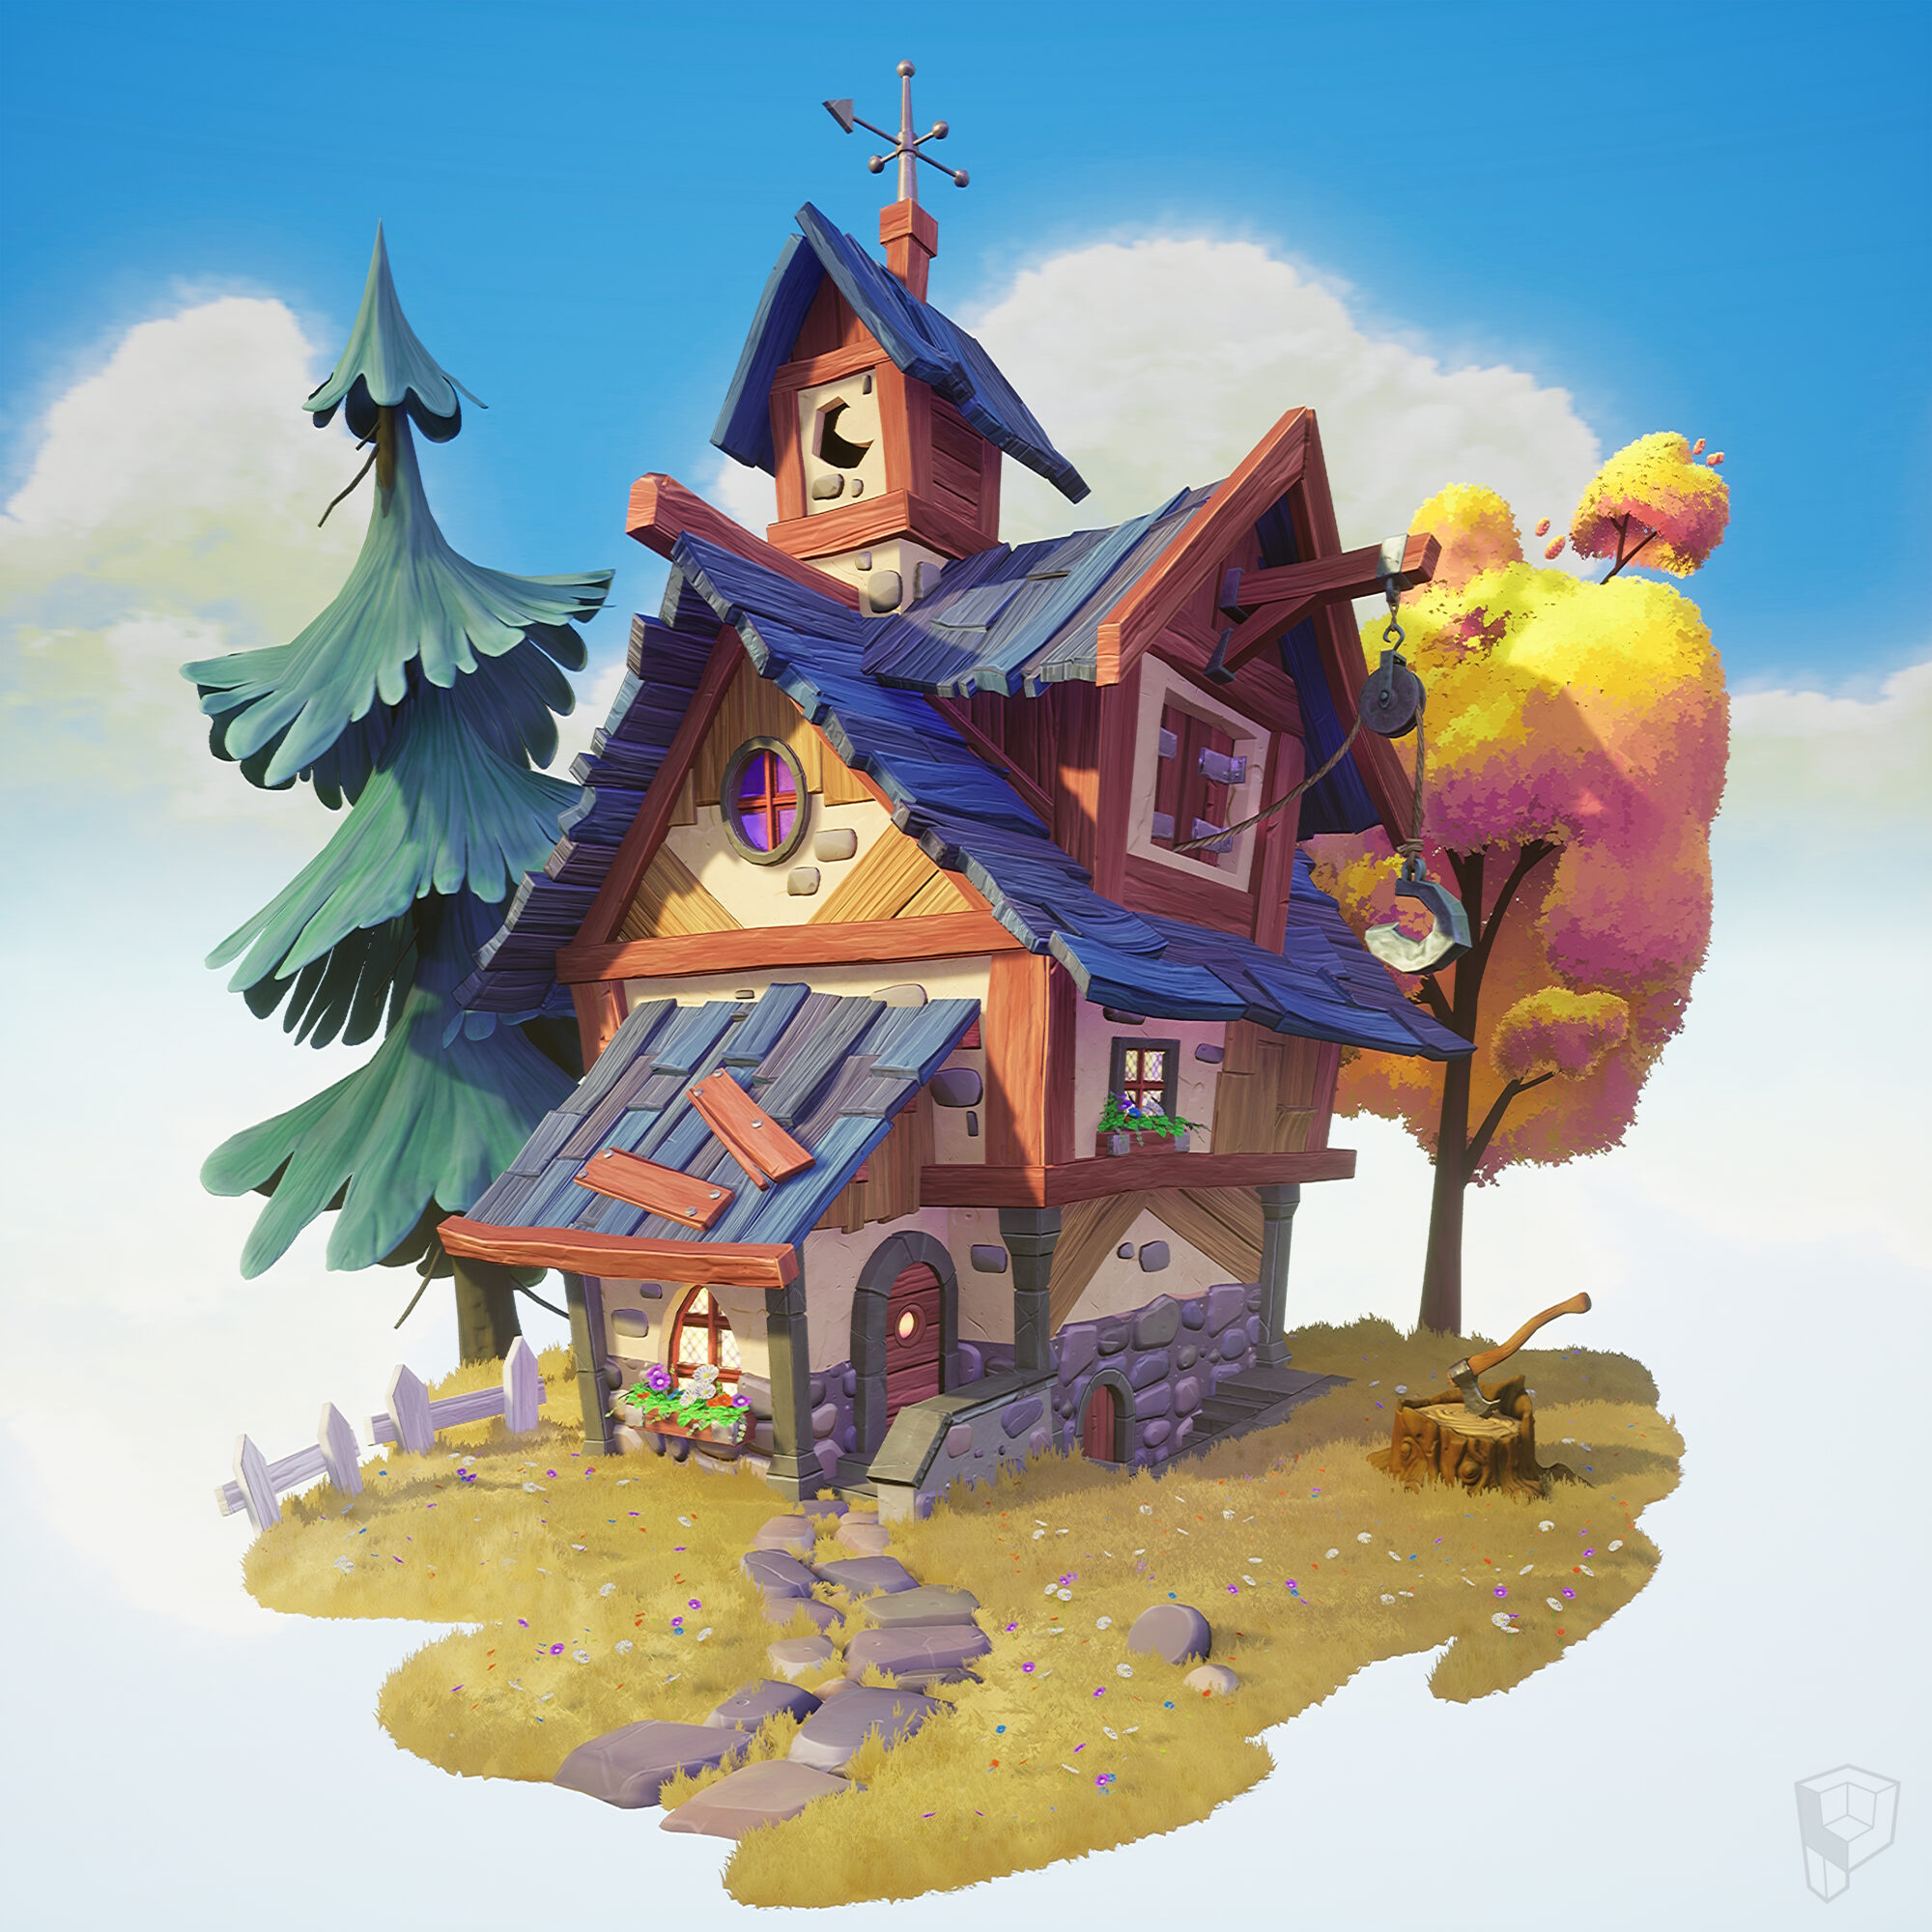
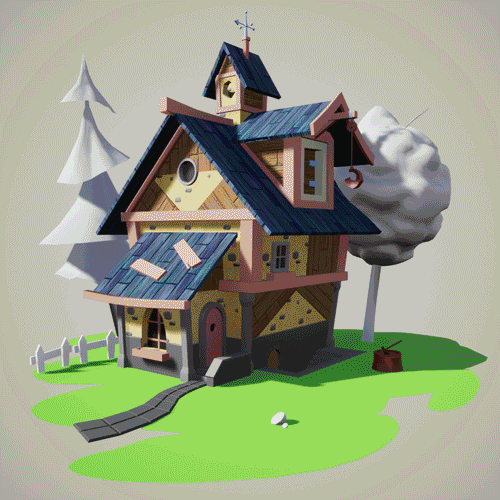
Cute Stylized House

Introduction
Hello, my name is Tyler Lariscy, and I’m a 3D Environment Artist currently looking for work while residing in North Carolina. I graduated with a BFA in Game Art & Design from Ringling College of Art & Design. I’ve worked in the industry for four years mainly on land-based and mobile casino games. My goal is to break into the main game industry as an Environment Artist.


What goals did you have in mind when making the Environment (what did you want to achieve)
The Cute Stylized House environment was created with the intent to take my time and push my overall skills in creating a final polished stylized environment. I also wanted to try out new techniques I wasn’t as familiar with such as trim sheets. As well as utilize software such as Substance Designer/Painter, which up to this point I had only created one-off materials in.
What software did you use?
I used PureRef for my reference images. Maya for modeling and UVing assets. Zbrush to sculpt some of the high poly assets. Substance Designer to create tileable and trim sheet textures. Substance Painter to bake and paint the Zbrush assets to their final low poly model. Finally UE4 and then UE5 for the final presentation.

References/Inspiration
I constantly collect concepts on Artstation for ideas of characters, models, or environments that I’d love to create in 3D. Starting the project I turned to my environment collection but already had an idea of which one I’d choose.

My main source of inspiration was the concept from Etienne Savoie titled HOUSE (https://www.artstation.com/artwork/aRwvkJ).


I absolutely love his fun and whimsical style and the overall shape language of his concepts along with his color palettes. It was also a self-contained diorama, meaning I could really focus on bringing this small set to life and really polish it. The other nice thing is this house is part of a larger environment piece from him titled Green House (https://www.artstation.com/artwork/VdnPX5).
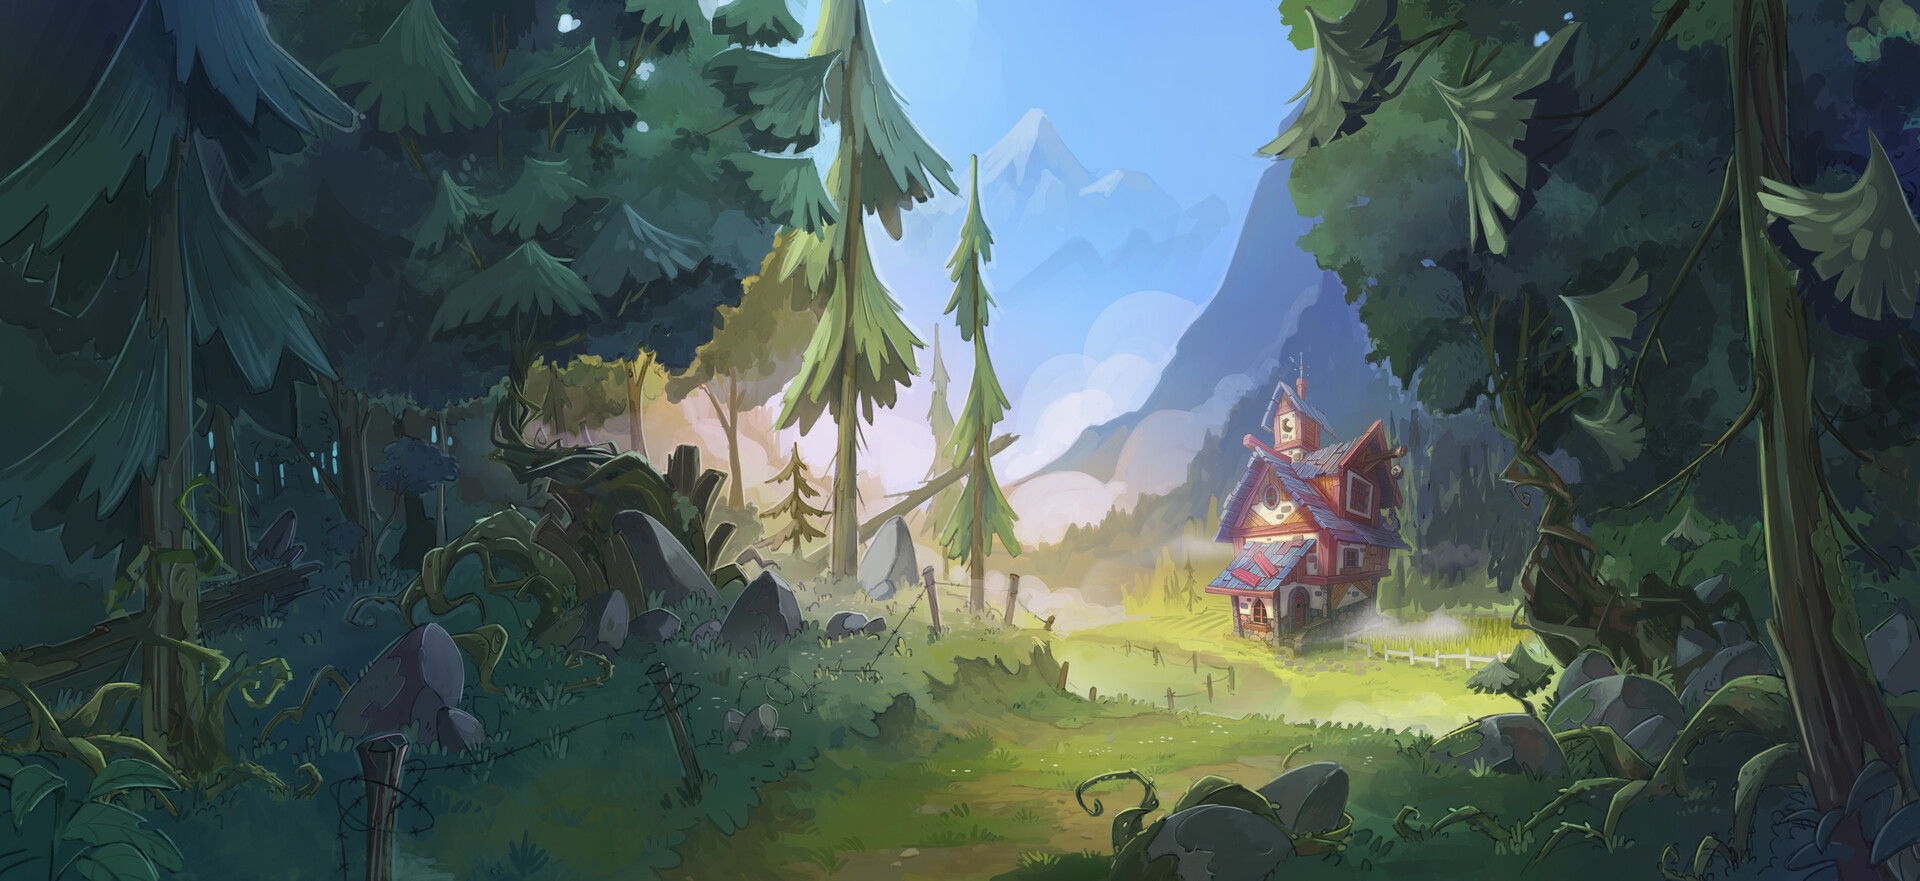
I eventually plan on creating this beautiful outdoor environment reusing the assets I’ve already created to help speed up the process.
Planning
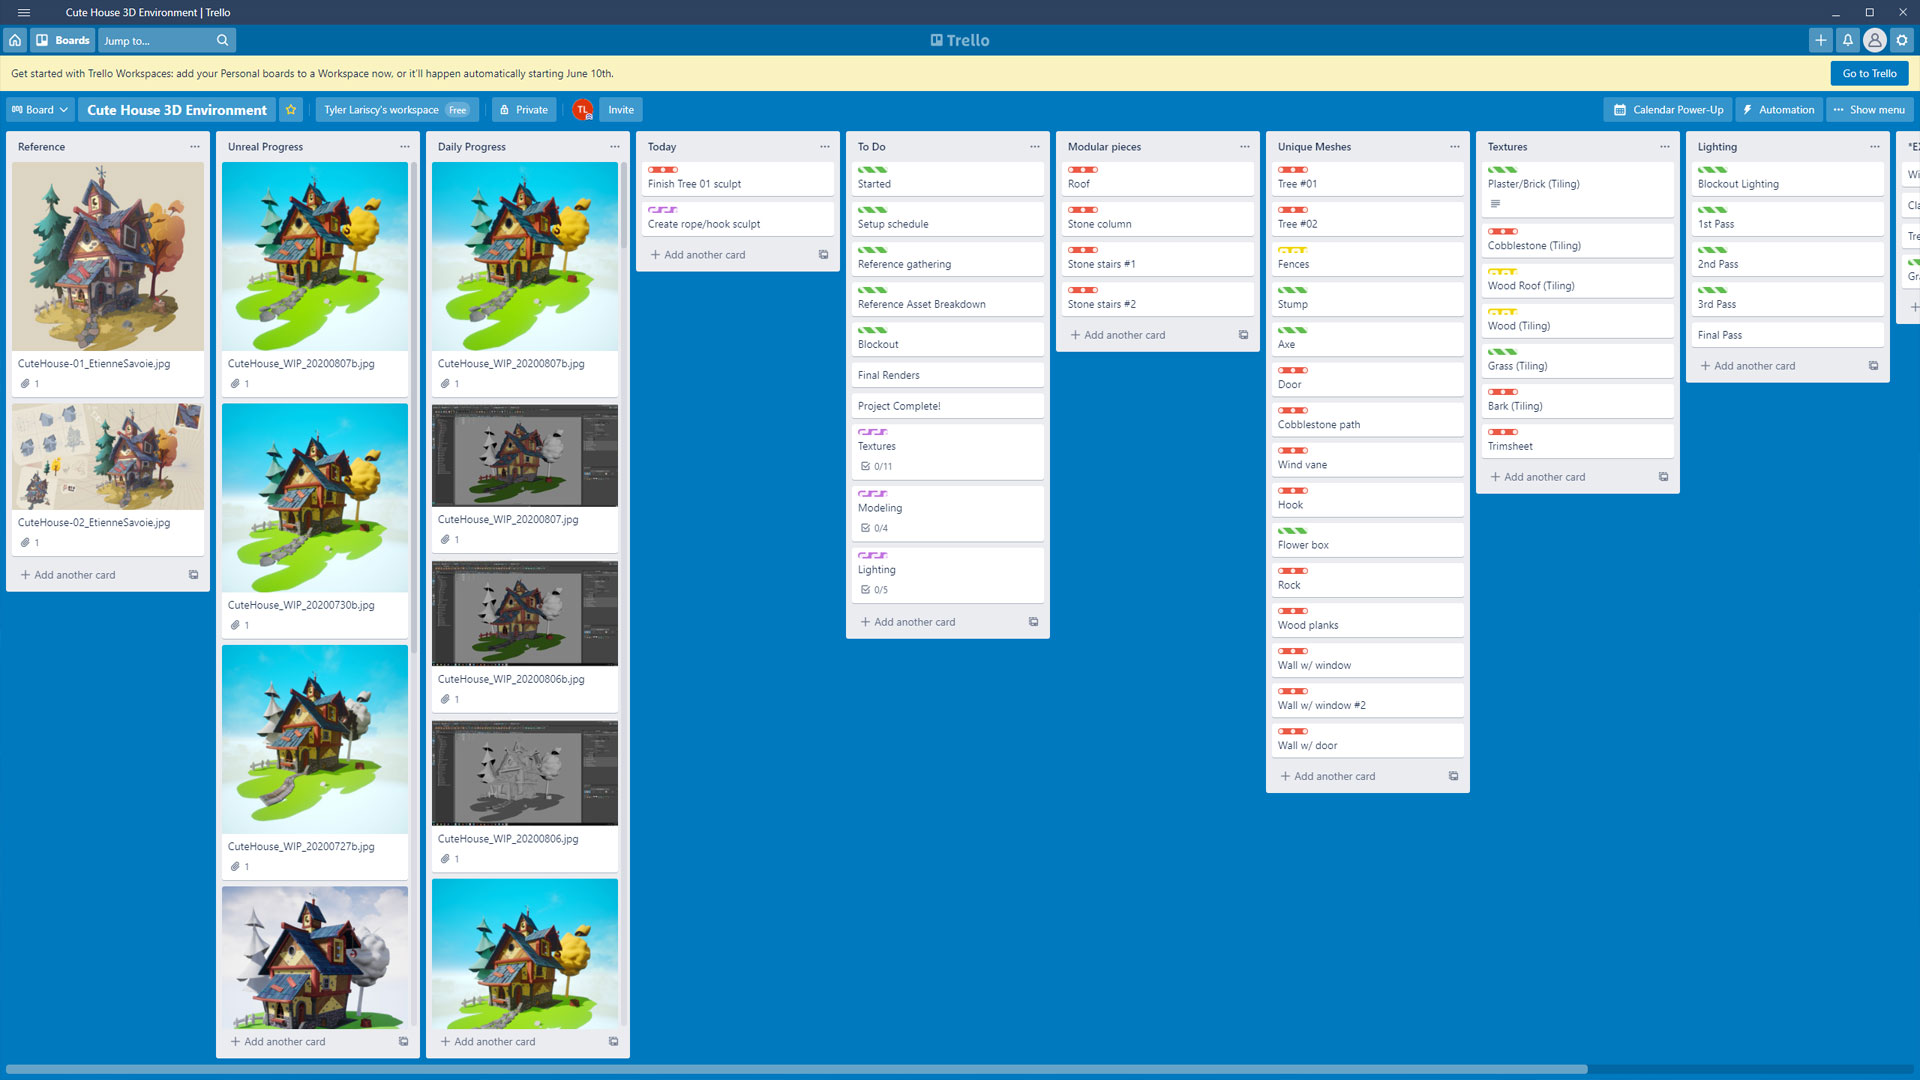
I approached this project a little differently than I normally would. When starting a new project I tend to overthink, overanalyze and overwhelm myself with everything that needs to be done. So I briefly set up a list of assets, textures, and things that needed to be set up in the scene on a Trello board, yet didn’t give myself a hard deadline. While this was nice to be able to focus on making the best art I could, the project would have benefited from having a more structured timeline and to-do list.
Blockout/Modelling
I start off by bringing the concept into Maya and blocking out the main shapes. I prefer this to Unreal’s tools as I can more quickly create refined shapes that will eventually be used for the final model. Once I had something solid I then brought it into Unreal. Most artists will tell you that the faster you get your assets into your final scene, the faster the scene comes together.
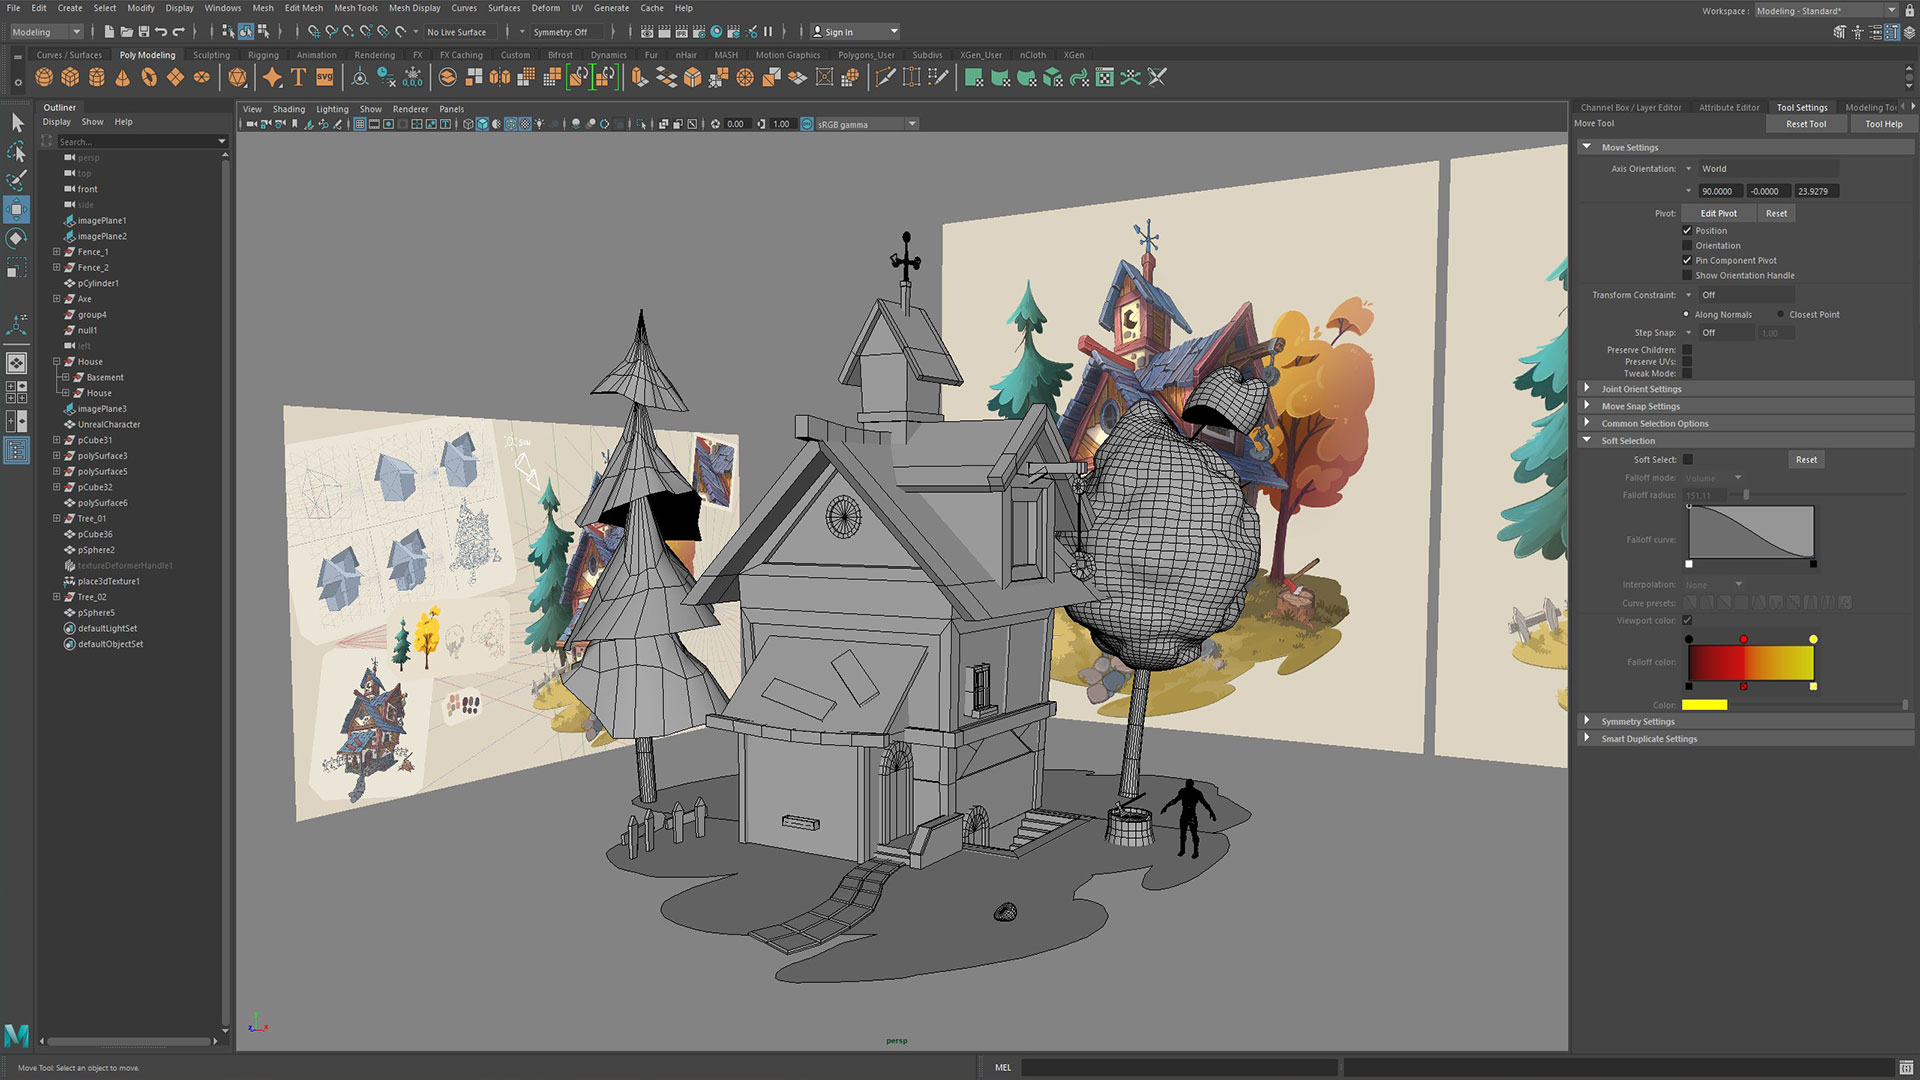
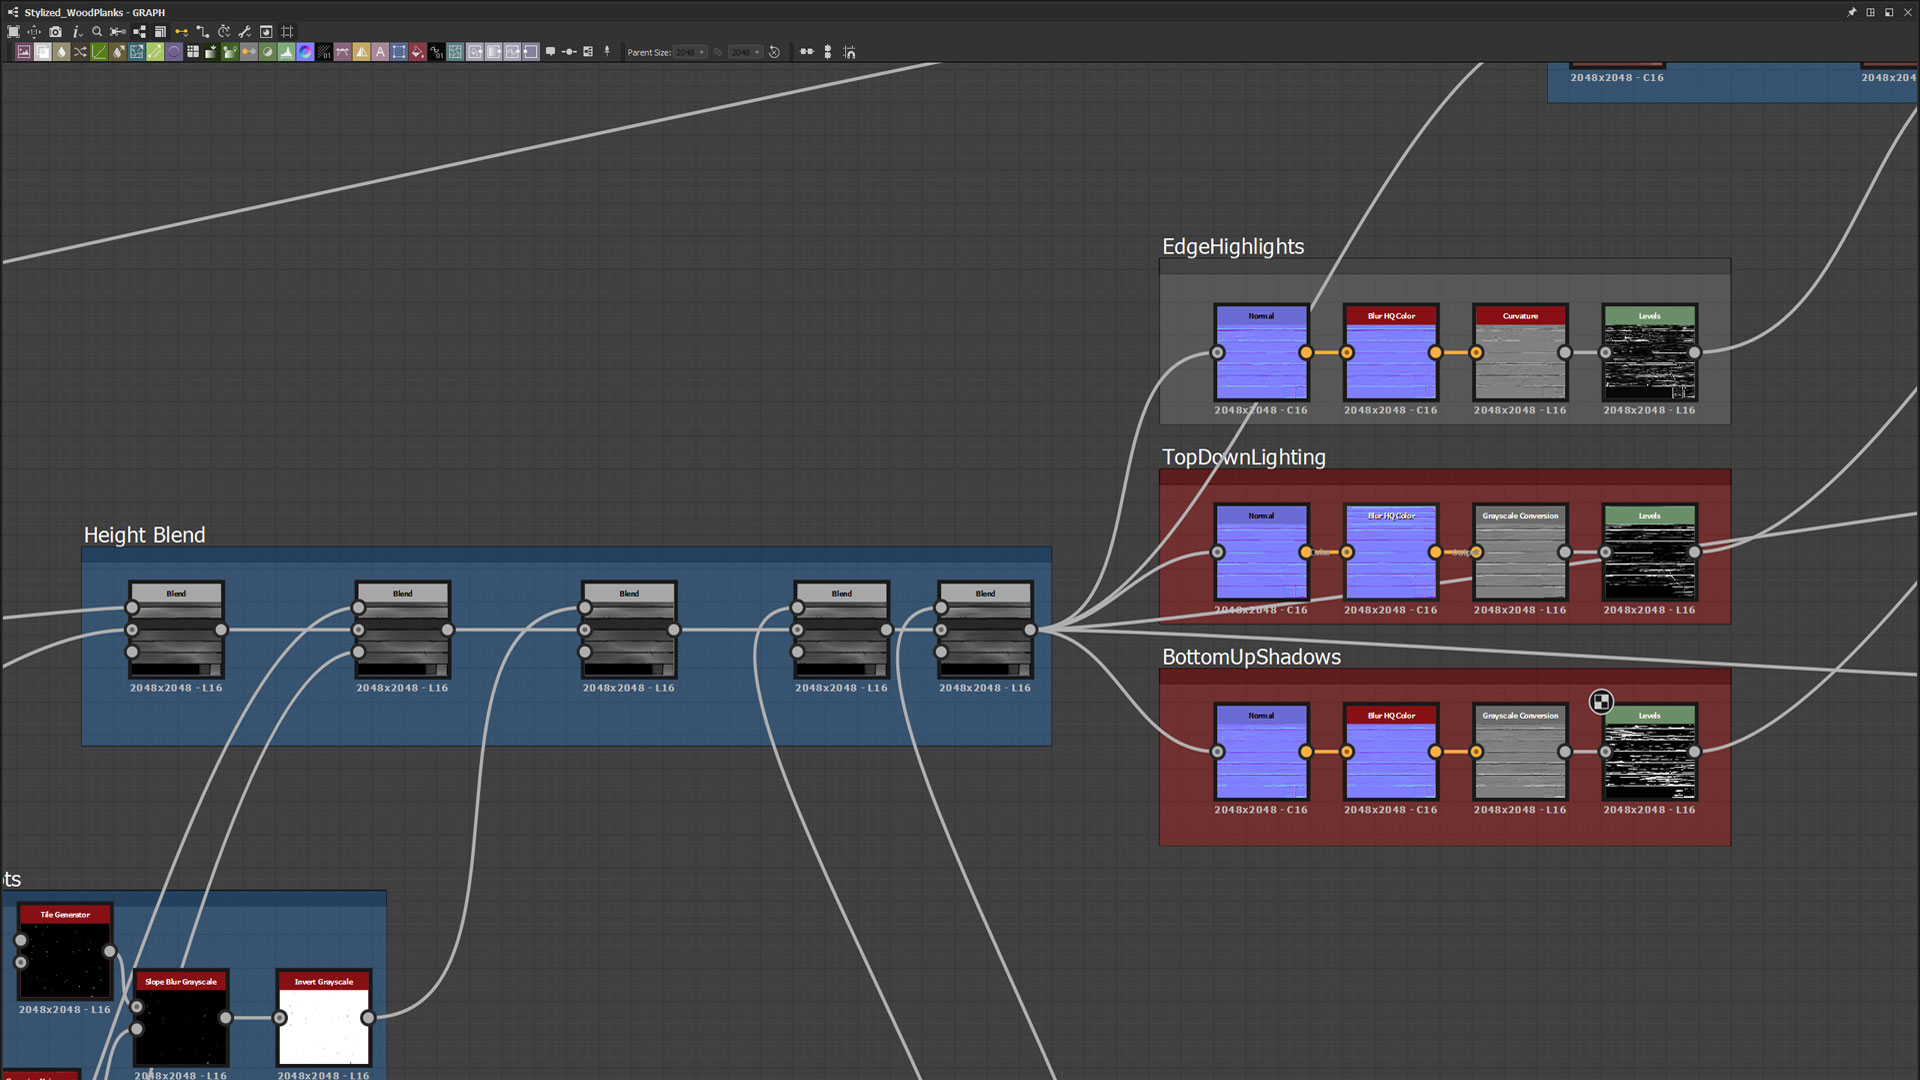
Since one of my main aims was to utilize trim sheets as much as possible with this project, I actually focused on creating the trim sheets and tileable textures first. Once I had a set style of texturing down I made sure to create the main utilized textures which were the tileable stucco brick, tileable wood roof, and the wood trim sheet. At first I roughly UV mapped the block-in assets and applied the materials in UE4 just to get an idea of how they looked in the engine. I then started slowly going through the blockout models and started refining them to their final form. One thing that helped my overall scene was an 80 Level article from Taylor Harris (https://80.lv/articles/making-an-animated-stylized-house-diorama-in-substance-unreal/). He has a 10-minute video about matching the perspective and composition of your concept. His trick of setting up a plane with the concept image applied in front of the camera in Unreal along with a panning mask helped me nail the final look of the piece.
Sculpting
There wasn’t a lot of sculpting in this scene as one of my main goals was to tackle trim sheets. I’m still always looking to improve my sculpting skills and that was the same with the few assets I did bring into Zbrush. The main issue I’ve always found myself with is not having enough topology in certain areas but too much in others. I really tried to focus on using a combination of Dynamesh and Zremesher to make sure my model had consistent topology throughout the sculpting process. Artists that inspire me when sculpting are Michael “Orb” Vicente, Sabrina Echouafni, Tobias Koepp, and Fanny Vergne just to name a few. Along with work from Darksiders, Ratchet and Clank, Spyro, and other stylized games.


Texturing/Substance
After watching 3dEx’s YouTube channels sped up videos with voiceover, I subscribed to his Patreon (https://www.youtube.com/channel/UC0InhTEH5giQYPaTp69z-7g). I also grabbed Alexander Galloway’s free Overwatch stylized Substance materials (https://www.artstation.com/alexgalloway/store) and purchased his second set. Breaking down his Substance files gave me a really good understanding of creating stylized shapes and textures. I especially used his method for creating highlights, top down lighting, and shadows for all of my materials. The nice thing with Substance Designer is once you get something you like, you can easily translate it into new assets. So for instance, after I created the wood roof I was able to make some variations to the detail as well as using the Ultimate Trim Generator from Justen Lazzaro (https://www.artstation.com/artwork/V5k34) to create my wood/metal and stone trim sheets.
I start by working on the height and normal maps in black and white with larger shapes/textures first and then continue down to the tiny details such as cracks, scratches, or nicks. After that, you can start to add color.

Speaking of color, this for me is always one of the more difficult parts of the process being that I’m slightly colorblind. No, that doesn’t mean I can’t see color though I get that question all the time. I just have trouble discerning certain colors especially when it comes to subtle variations in shade or hue. So the color picker in Photoshop is my greatest ally in making sure I’m sticking to the color palette from the concept. I also heavily rely on feedback from friends and the community to make sure my color palette isn’t getting out of hand.
As for the unique models I used Substance Painter for their textures. This was my first time baking my assets straight in Substance Painter but it worked out nicely. I then bought and used 3dEx’s smart material for Substance Painter as a base to make my materials (https://3dex.gumroad.com/l/styllized). Then I could adjust the colors and textures, add my own, etc.


Animation/Movement
I knew for sure that adding in animations would help bring the scene to life. There were obvious items such as the grass, flowers, trees, and the weather vane. Later on, I added movement to the hanging hook and the lights flickering in the windows material. For the grass, I used a mix of Jess Hider’s (https://jesshiderue4.wordpress.com/materials/stylized-wind-blown-grass/) and Kristian Kebbe’s Lucen Dev (https://www.youtube.com/watch?v=VJMd4d4viQ8&ab_channel=Kris-LucenDev) setups. I also bought Kristian’s grass and breaking down the shader was able to blend the two setups together.

One of the big issues I had is I wasn’t able to use a landscape as my ground plane has such a specific shape, which I wanted to keep. With landscape, you can turn on this nifty setting called Runtime Virtual Texturing. This allows your scene to capture the colors from the landscape and apply it to your grass meshes. Because I was unable to use the RVT, I had to resort to other means. I ended up creating different mesh instances of my grass and applying different instanced materials changing the color for each one. Then using the foliage tool I was able to blend between the different colors of grass. I also added Dither TemporalAA and Pixel Depth Offset nodes to create a blend between the bottom of the grass and the ground plane.
For the trees, I first found this great fluffy tree tutorial by Pontus Karlson (https://www.youtube.com/watch?v=iASMFba7GeI&ab_channel=PontusKarlsson) who also translated it to Unreal. By sculpting the shapes I wanted in Zbrush and using a low-poly mesh, I was able to use this method to still retain the shape of the tree, which I really loved. I also wanted to create fun stylized leaves that we’re able to utilize the wind set up in the material.
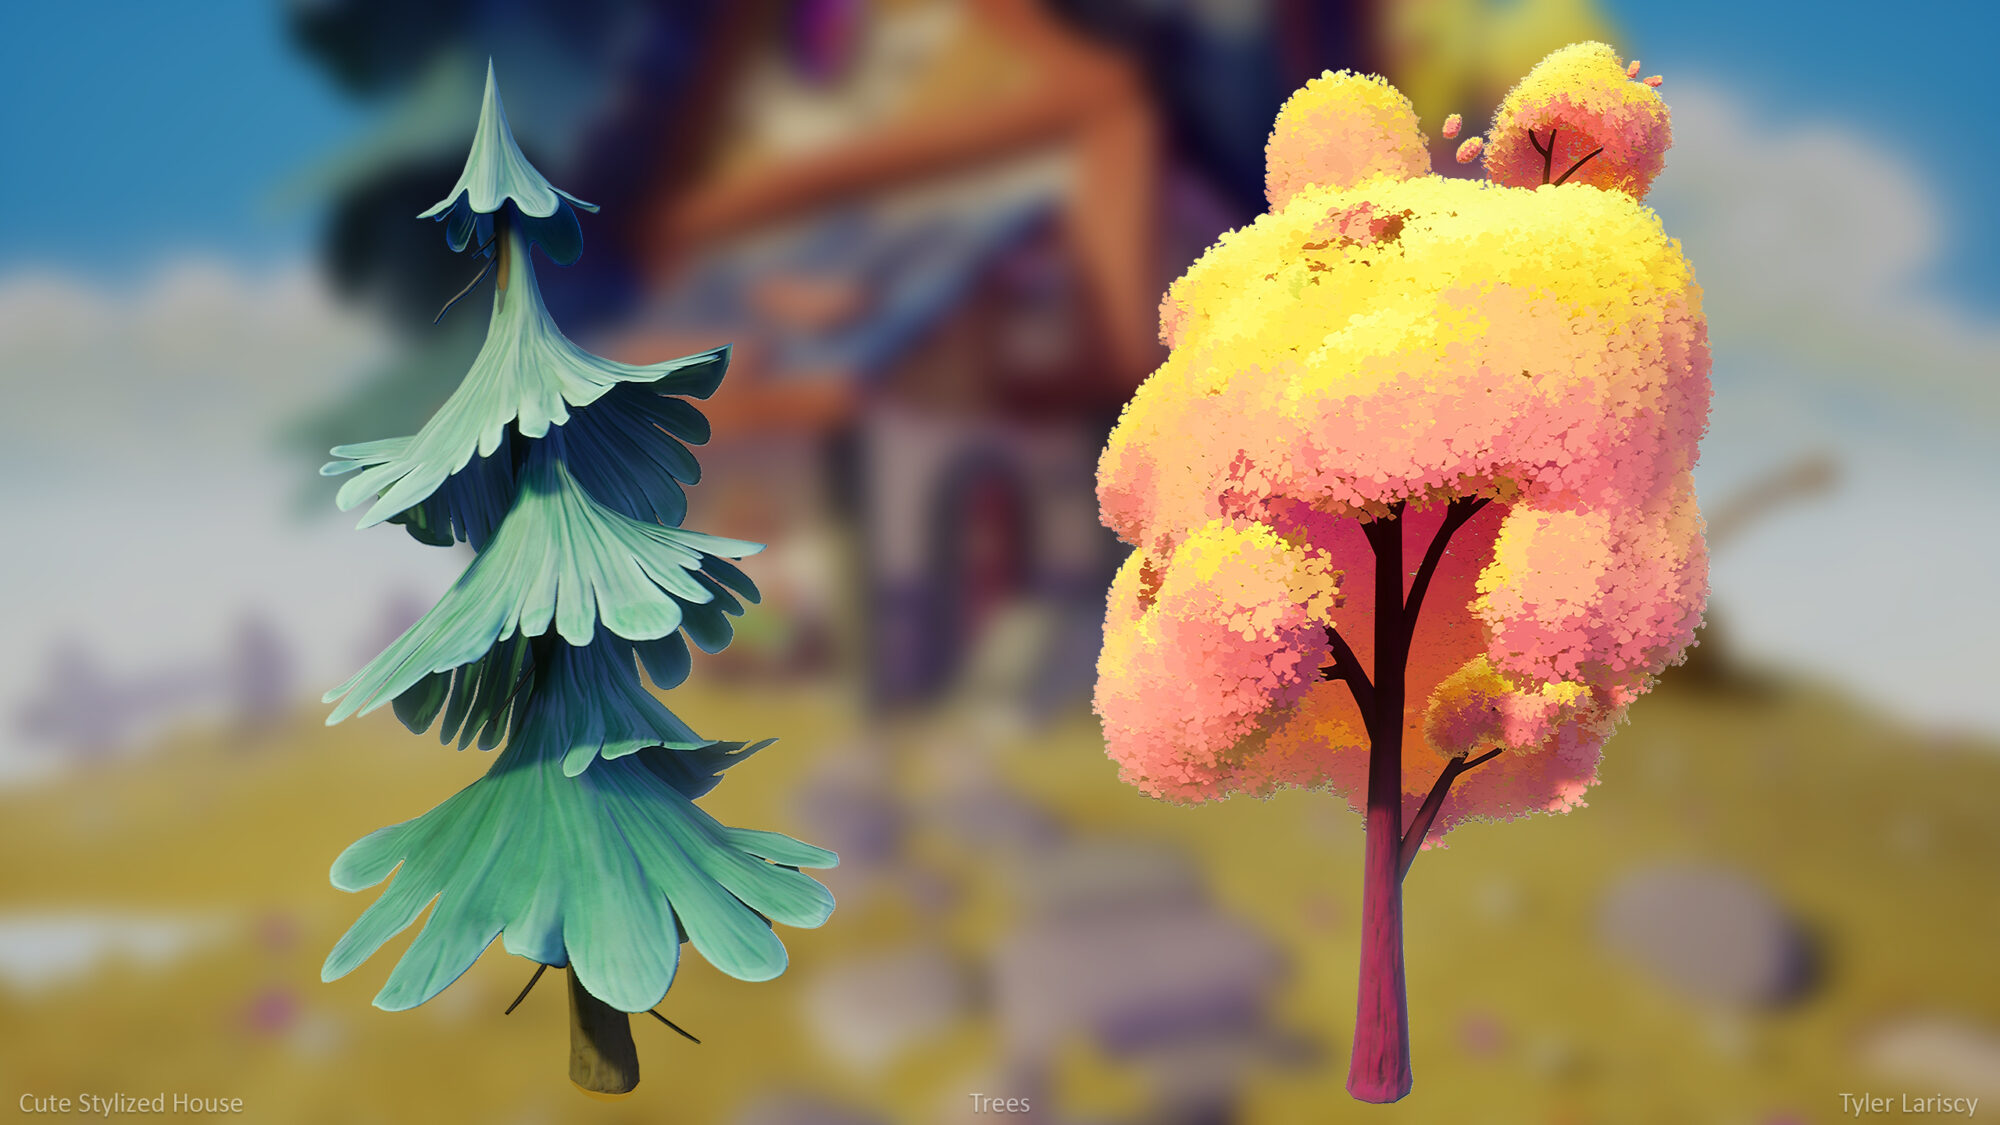
For the pine tree, I used the regular wind for leaves from the fluffy tree but didn’t like how it looked. In the end, I decided to try using a ripple effect in the shader, which I found on a forum and was able to get a nice effect where the wind would blow outward from the center of the leaves.

I combined these two wind shaders with a tree sway shader I found from Ben Cloward (https://www.youtube.com/watch?v=cBW3a0XVXsQ&ab_channel=BenCloward) along with some tweaks I found on a forum. I ended up using the same nodes that created the tree sway to get a very subtle sway on the rope and hook after painting weights for where I wanted it to move.

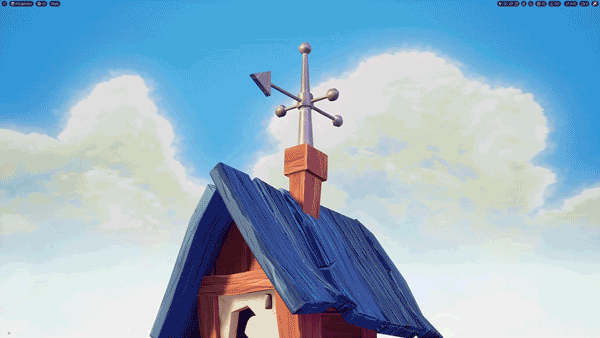
Finally, the weather vane was a pretty straightforward blueprint that randomly lerped between a negative and positive value on the Z-axis.

Lighting
My main inspiration for lighting was the Bird House scene from Jasmin Habezai-Fekri’s (https://80.lv/articles/bird-house-working-on-a-stylized-landscape-in-ue4/). Like many other artists, her work is incredibly inspiring! Her stylized scenes are beautiful in terms of shapes, color, and overall simplicity! Like her scene, I sought to keep my overall lighting simple. I would have the skylight, directional sunlight, and then a secondary directional light for cool shadows.

In past projects, I never really focused on lighting so I wanted to correct that with this project. From the very beginning till the end I tweaked and tweaked my lighting. Especially as I got more and more of my final materials into the scene. The main goal was to balance the sharp shadows on the front of the house with the soft cool shadows on the side of the house.
Polish/Final pass
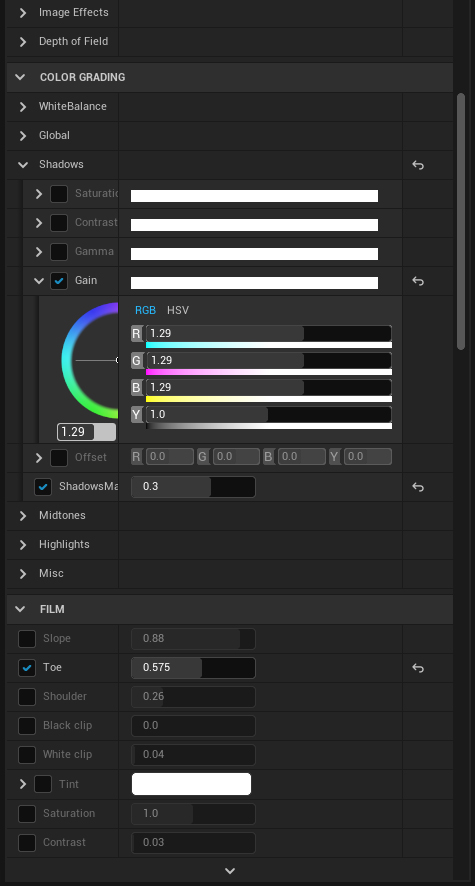
As far as post-processing inside Unreal, I adjusted the Min/Max brightness as is usually suggested for Unreal scenes. I slightly adjusted the Gain and brightened the overall ShadowsMax setting under Shadows. I also slightly boosted the Toe setting under Film to help reduce the white in the scene so that everything popped just a little more. The final thing I did was to sharpen the overall scene using Ervin Jesse’s tutorial.
Rendering
I originally started my project out in UE4 but right when I was wrapping it up Epic released the beta for UE5 with the new Lumen lighting. I tested it out by bringing my scene in and really liked the small editions it made to the scene. Stuff-like emissive materials actually emitting light onto the models for the windows. As well as how the lighting overall was a bit softer. I did have to tweak the lighting and shadows settings to replicate some of the cooler AO I lost because Lumen replaced DFAO.

Conclusion
Overall I’m incredibly happy with where this piece ended up. Of course, there are a handful of things I wish I had done differently or didn’t quite come out the way I wanted. I tend to be a perfectionist and get bogged down in tiny details. At the end of the day, the point of this piece was to grow as an artist and I accomplished that! I learned a lot about lighting as well as utilizing trim sheets, which were two of my main goals. I can take these areas I’ve improved in and apply them to new pieces.
I wanted to give special thanks to Sabrina Echouafni, who took time out of her schedule to give me valuable feedback on my scene! Also, shoutout to the Beyond Extent, The Club, The Handpainters Guild, and Experience Points Discords where people were helpful in giving me feedback as well!
Thank you for taking the time to read this article! If you’d like to find more images of this project along with my other work, you can check out my Artstation.
https://www.artstation.com/lowpology
Thanks to Tyler for allowing us to have such an in-depth look at his process. If you liked this environment breakdown and want to see more like it from other inspiring artist’s make sure to follow us on :
https://www.artstation.com/gamesartist
Read more articles
You might also like these articles.