Colt Python


Introduction
Hi everyone! My name is Pelayo Martín Fernández, and I’m a 3D artist from Madrid, Spain. I especially enjoy Hard Surface and Weapons modeling.
However, I also have knowledge in organic modeling and sculpting, thanks to the various masterclasses and courses I've completed at digital arts schools here in Madrid.
I started studying video games and 3D art in 2018, and now I consider myself a professional with almost three years of experience working as a 3D Artist and Weapon Artist. Although I'm still learning new techniques every day, I don’t think that will ever change.
I’ve had the opportunity to work on some AAA games like EA Sports PGA Tour and IGI Origins when I worked for a few months at Secret6, an outsourcing studio in Madrid. In the last two years, I’ve been working as a Weapon Artist at another studio located in Madrid, Saber Interactive Spain, where I worked on the video game Radikal Fighters and two highly interesting AAA games still under NDA.
Goals
In this article, I intend only to share the process I followed in creating this gun. This is not the only way to do it, and there are probably aspects that could have been done differently.
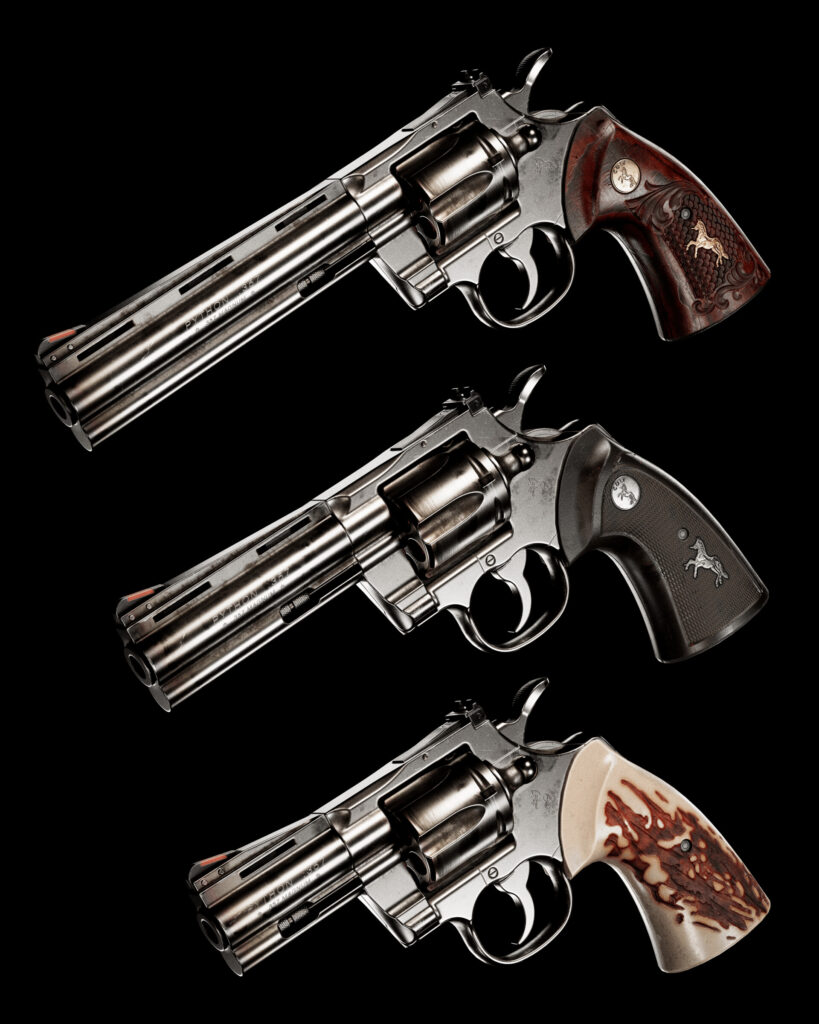
Here’s the final result: COLT PYTHON with Leather Holster.


Why did I make a revolver? Well, there’s no compelling reason. I had never shared any kind of pistol on my ArtStation, and revolvers are very particular.
They have an easy-to-understand mechanism and are visually appealing.
The Colt Python model is well known, and I also liked that the same model could have different barrel sizes, so I decided to make all three sizes to post on ArtStation—something different to try to stand out from the artworks of other artists who made the same model.
Besides making three barrels, I thought: why not have a variety of grips? I made this decision later on, so for the grips, only the texture changes, not the shape.
With this, I already had variety in the weapon itself, but I also wanted variety on a technical level. I wanted to show that I could make organic props.
I looked for different holsters, but none of them were appealing to me. They were all very flat and not particularly attractive.
I liked the one that I finally chose because it was somewhat complex to make and had the detail of exposing the bullets on the outside of the holster, which caught my attention, in addition to the engravings on the leather. It had to be that one.

So, let’s get started. The points I’m going to talk about will be:
- References
- High poly (Fusion 360 and ZBrush)
- Low poly (3Ds Max)
- High poly of the holster (3Ds Max and ZBrush)
- Low poly of the holster (ZBrush)
- UVs (3Ds Max and RizomUV)
- Baking (Marmoset Toolbag 4)
- Texturing (Substance Painter)
- Rendering (Marmoset Toolbag 4)
- Conclusion


References
All steps are important, but this step is probably the one most people don’t take into account enough. It’s very important to know what your prop is, how it works, what parts it is made up of, etc.
I use many websites and YouTube videos to get any captures that may be useful in any project I make. The next step is to start modeling the weapon.
The goal of this first reference board is to get a better understanding of the shapes, the different parts, how each part works, measurements, and proportions. To know which parts you have to model separately, which parts are going to move or rotate, or which will not, etc.
On this reference board, I don’t mind if the screenshots are from heavily-used weapons or newer weapons. The only thing that matters here are the shapes. It’s important that all the references are from real weapons, not 3D renders.

High Poly (Fusion 360 and ZBrush)
In this step, I started modeling all the parts of the weapon—screws, bullets, different barrels. I didn’t need to round the sharp edges, as I did this step in ZBrush after Fusion.
In this step, I started defining the three different barrels and the mobile parts:
There are two ways of exporting this model to ZBrush: through Fusion or MoI3D (which is the one that I finally used).
The next image is an example of the Fusion exporter, where it’s necessary to export the parts one by one.
The exporter triangulates the whole mesh, but in this case, it’s not a problem, because I need a model without n-gons to import to ZBrush. This exporting method allows some control over the number of triangles, but I prefer the control that MoI3D gives me.

This is an example of the MoI3D exporter, where I could export the whole model at the same time in FBX format, triangulated and with more control over the number of triangles.
Tip: To maximize the triangulation the program can perform, you have to put “1” instead of “3” in the Angle option.

Once the model is imported into ZBrush, I usually follow the same steps on each part of the weapon to get the right smoothness on the edges:

- Step 1: I use Dynamesh with enough resolution to be smooth. If I use too much resolution, it may be difficult to smooth the edges; if I use too little resolution, polygons can still be visible. So, I have to be fairly precise with the correct resolution for each part; it usually varies mostly depending on the size of the part.
- Step 2: I use Polish Crisp Edges to smooth only the sharp edges. The intensity of polish depends on each part, its size, and its amount of geometry.
- Step 3: Once steps 1 and 2 are done with all parts, I apply the Decimation Master tool to all parts to have a High Poly model with less geometry.This is very useful to import the model into 3Ds Max or other programs, helping them to work better, because ZBrush has no problem with a model of (for example) 90 million triangles, but other software is not prepared for that amount of geometry.In some pieces, I also use tools such as “ZRemesher” and then subdivide it and “Project,” or I use polygroups, crease hard edges, and subdivide. It depends on the complexity of the part and its size.There are many combinations of tools to reach the same goal, but I mainly use the three steps mentioned above.

Low Poly (3Ds Max)
To get the low poly model, I followed a process very similar to the High Poly, with some differences. First, I made a copy of my Fusion file and renamed them “_low” and “_high.” Then, I made some changes in the low one before exporting it to MoI3D.
Let’s look at only a part of the gun to explain this better.
This is the sight of the revolver, specifically a capture of the High Poly in Fusion, so the model has all specific parts.


I painted the different parts with colors: The yellow part is just a hole on the main body of the sight. The red and green parts are different bodies; they are not attached to the main body.
The point is that all these colored parts have to be baked onto the same model. Therefore, what I did next for the Low Poly is attach the red part to the main body, remove the yellow hole and the green screw, as well as its own hole in the main body.
Here is the final result of the low model in Fusion. It will be easier to clean the mesh of this model in 3Ds Max.


These are the settings that I usually use to export a Low Poly model from MoI3D.
The next capture shows the mesh cleaned in 3Ds Max. It’s very easy to clean a model with n-gons, and faster than making it from scratch with traditional modeling.

Using all that I have just explained, I made the low poly of the whole gun, so here is the result.
The tri-count is 9K-15K (depends on the barrel and the number of bullets).

The colors you see will be the different texture sets that I will use for the gun, but I will talk about that later.
Before that, I’m going to talk about the holster.
High Poly of the Holster (3Ds Max and ZBrush)
As with the revolver, the first step in creating the holster is getting references. I found just a few websites where you can buy the holster, so they have many pictures of it.
I think the holster was handmade.

This model is clearly organic. Because of that, I made this model using the traditional modeling method.
I started with the blocking mesh in 3Ds Max and used it to make the High Poly in ZBrush.

I didn’t use any special tools or techniques in ZBrush. I used ZRemesher, polygroups, crease, subD, typical brushes, and stitches.
In this model, I reached a very high tri count, so I applied the Decimation Master tool again.
Low poly of the holster (ZBrush)
I have to admit that I’m not particularly proud of the low poly of the holster. I was in a bit of a hurry to share the post on ArtStation, and the holster delayed me more than I expected.
So, I decided to apply the ZRemesher tool to the High Poly modeling that I already had to generate the Low.
Despite being the “easy way,” it took me a while to generate a mesh that was not a mess, and I tried to get one that looked as good as possible in the final renders.
I also had to refine some parts of the geometry in 3Ds Max since the ZRemesher tool is not perfect.

UVs (3Ds Max and RizomUV)
Now let’s talk about UVs. As I said at the end of section 3, the colors you see will be the different texture sets that I will use for the gun.
Why did I use a texture set for each barrel and another one for the grip? Regarding the grip, I wanted three different textures for three different grips, so the easiest way was with a texture set for itself.
It’s the same grip with the same UVs, but depending on the material I drag over it, I will see the wood grip textures or the rubber ones, for example.
In the case of the barrels, the main reason I decided to make a texture set for each one was to make it look better. I also thought that in a video game, maybe I could put all three in the same set, but in that case, the engine would be loading a texture of which only a third part is being used.
This would depend on the direction of the video game and if it’s necessary to prioritize graphic quality over performance. In my case, I did it this way because I wanted it for rendering, and I prioritized making it look as good as possible.
Note: the holster has another texture set of its own. Now I’m going to talk about my workflow for making UVs:

First, I use 3Ds Max to make the UV seams and create a basic UV pack. I use smoothing groups and the buttons I have marked in green in the first picture.
I use RizomUV to make some edges completely horizontal or vertical. This way, the program can pack it much better and be more efficient. To do this, I use the buttons marked in yellow in the second picture and the red ones for the final packing with the correct texel density, margins, padding, etc.
These are all the UV packs for each part of the gun. I tried to match all sets of UVs in texel density.

Baking (Marmoset Toolbag 4)
It is very satisfying when everything works well in this step, but it can be a headache if done in a disorganized manner. Because of that, it’s very important to rename all parts of your high and low poly models. Everything has to be well-organized, in the correct folders, and follow the nomenclature, including the suffixes like “_low” and “_high.”
Another problem I had to solve was shading issues. Some islands contain different parts of the mesh that form hard angles with each other.
I did this to avoid too many islands in the UVs, because the more islands, the more padding, which also negatively affects performance.
Having a certain angle between two faces that share the same island in the UVs generates artifacts in the shading. This is why, before baking, I edited the normals in 3Ds Max for the surfaces that needed it.
Once I had the normals correctly weighted and all parts well-renamed, my goal was to import the low and high models into Marmoset so it organized the bake project automatically.

Here are the 3DS Max layers, the Quick Loader files of Marmoset and next to it, I show you the settings that I usually put when making a bake.
In addition to this, I used skewing to fix those details that didn’t project correctly. Only in flat faces.

And of course, I followed the same steps to make the holster bake (I didn’t use skewing here):

Texturing (Substance Painter)
As in the High Poly modeling process, the first step I took before starting with Substance Painter was to gather texture references.

I looked for references across many image repositories, and there is one that I want to recommend for its variety and quantity of references:
https://dinustyempire.notion.site/6-1-Weapons-library-0ab1d28137e749f0abfca738d93a9222
I collected many references, including real photos and 3D renders, but I wasn’t entirely clear on how I wanted to texture my gun, especially the metal parts. Because of this, I collected references for different revolver types with various metal finishes to decide how to define the metal.
Looking through all these images overwhelmed me, and it took me longer than expected to come up with a clear idea. During the texturing process, I experimented with many types of metal finishes until I found the one I liked the most.
After gathering references, I imported the maps I generated from Marmoset into Substance Painter and set up the scene.
I also imported an FBX file with the gun model and the holster in different positions. In hindsight, I don’t think it was necessary to have so many duplicates; I wouldn’t do it this way again, as it gave me some issues during the texturing process.
Then, it was time to check all parts and ensure that the bake was flawless.

I usually do two things before starting material definition: first, I add a group of layers that helps enhance the AO (ambient occlusion) and the highlights in the Base Color and Roughness.
The second thing is to add another group called “MASKS,” where I add multicolor layers with all the masks and anchor points I will need in the future. This “MASKS” group is kept hidden at the bottom of the layer list.
The workflow I generally follow for texturing is as follows:
- Masks and anchor points.
- Material definition with general details: dust, dirt, color variation, roughness variation, and noise.
- Texts and alphas.
- Storytelling: adding dust and dirt to specific parts, heavy scratches with decals, burned effects, smoked effects, oil and fingerprints, edge wear, and heavy wear details on selected parts.
- Adding layers with color and roughness filters, such as levels, contrast, or saturation.
As I created the textures, I simultaneously set up a scene in Marmoset, where I planned to render, to ensure the textures appeared as I wanted.
Even if textures look good in Substance, there might be differences in color tone, roughness, etc., when imported into the rendering engine, depending on the engine and lighting.
Rendering (Marmoset Toolbag 4)
Here we are, at the last step, and probably one of the most important. Good lighting can improve and elevate a subpar texturing process. However, it’s impossible to achieve great results with excellent textures but poor lighting.
Below is a screenshot of the main Render and Camera settings that I usually apply in my Marmoset scenes.

When lighting a prop for rendering, I have two main goals: first, to understand the shapes with shadows, roughness, and other surface details, and second, to achieve an eye-catching and visually beautiful final result.
It’s difficult for me to explain how I think when setting up lighting, but I think this video will help illustrate it:
Another type of rendering I enjoy creating is what I call “contextualized renderings.” These are renders where the weapon or prop is shown within a scenario to provide context. Good lighting that matches the context enhances the scene.
When I was initially looking for references, I found a real photo of a revolver that I liked and used it as an inspiration for a render. Here’s the result:

The following image is another example of contextualized rendering. Since this weapon is a game-ready model, I wanted to place it in a scene from the player’s point of view.
For this, I used an HDRI I liked and used the hands and arms model by Eugene Petrov to pose the weapon.
As a final step, I asked for feedback from some artists who were happy to provide it. I highly recommend this because, at this point in the workflow, I tend to feel saturated from seeing the prop for so long.
If you’re not sure whom to ask, there are many groups of 3D artists on platforms like WhatsApp, Telegram, Discord, etc. Many artists are happy to help each other (myself included).
Conclusion
It took me around a month to create this revolver. If I had to make it again, I would change a few aspects of my workflow. Despite that, I’m very proud of the final result and learned a lot from the process.
Special thanks to the people who provided feedback and to the Games Artist community for allowing me to write this article.
I hope you enjoyed this breakdown. If you have any questions, feel free to contact me on ArtStation or LinkedIn.
Thank you for reading, and good luck with your projects! 🙂
Read more articles
You might also like these articles.