Remington 870

Introduction
Hello! I'm Li Fuhao, a 3D Artist from China and currently an undergraduate student. I have been learning and engaging in the CG field for about two years.
Project
The Remington 870 on display on the wall at my current internship company has caught my attention for a long time. Its design is sleek and crisp, yet exudes a strong sense of power, which always brings me a sense of delight whenever I see it.
Thus, I came up with the idea of creating a custom Remington 870, and also wanted to take this personal project as an opportunity to devote more energy to polishing my skills in texture mapping and rendering, and to refine my capabilities in these two aspects.


Tools
The main tools used for the creation of this Remington 870 project are as follows:
- Plasticity
- Blender
- Marmoset Toolbag
- RizomUV
- Substance 3D Painter
- Photoshop


References
Since the core of this creation is to showcase the effect of texture mapping, finding clear and accurate reference materials is particularly crucial. I usually collect the reference materials I need on platforms such as Pinterest, Google and ArtStation.
Especially for the wooden part of the gun stock, precise color references are required to provide a reliable basis for creating the base color in Substance 3D Painter (SP) later.

ModeLling
This is my personal practice project, and model optimization is not the focus of this creation.
Therefore, I did not create a low-poly model, but directly used the high-poly model exported from Plasticity to make texture maps. All the modeling work for this project was independently completed in Plasticity.

UV Unwrapping
UV unwrapping was mainly completed with the help of Blender and RizomUV. Due to the limitations of my computer hardware performance, I did not adopt the UDIM workflow.
There are no overly complicated skills in UV unwrapping operations, so I will not go into more detail here.
Baking
In the baking process, AO and CV maps were mainly created through Marmoset Toolbag, and all other maps were baked in SP. To save computer performance, the resolution of AO and CV maps was set to 2048×2048, while the resolution of other maps was 512×512.
It should be noted that when baking AO maps, all parts of the model need to be separated to avoid mutual occlusion between model components, which will affect the baking result.

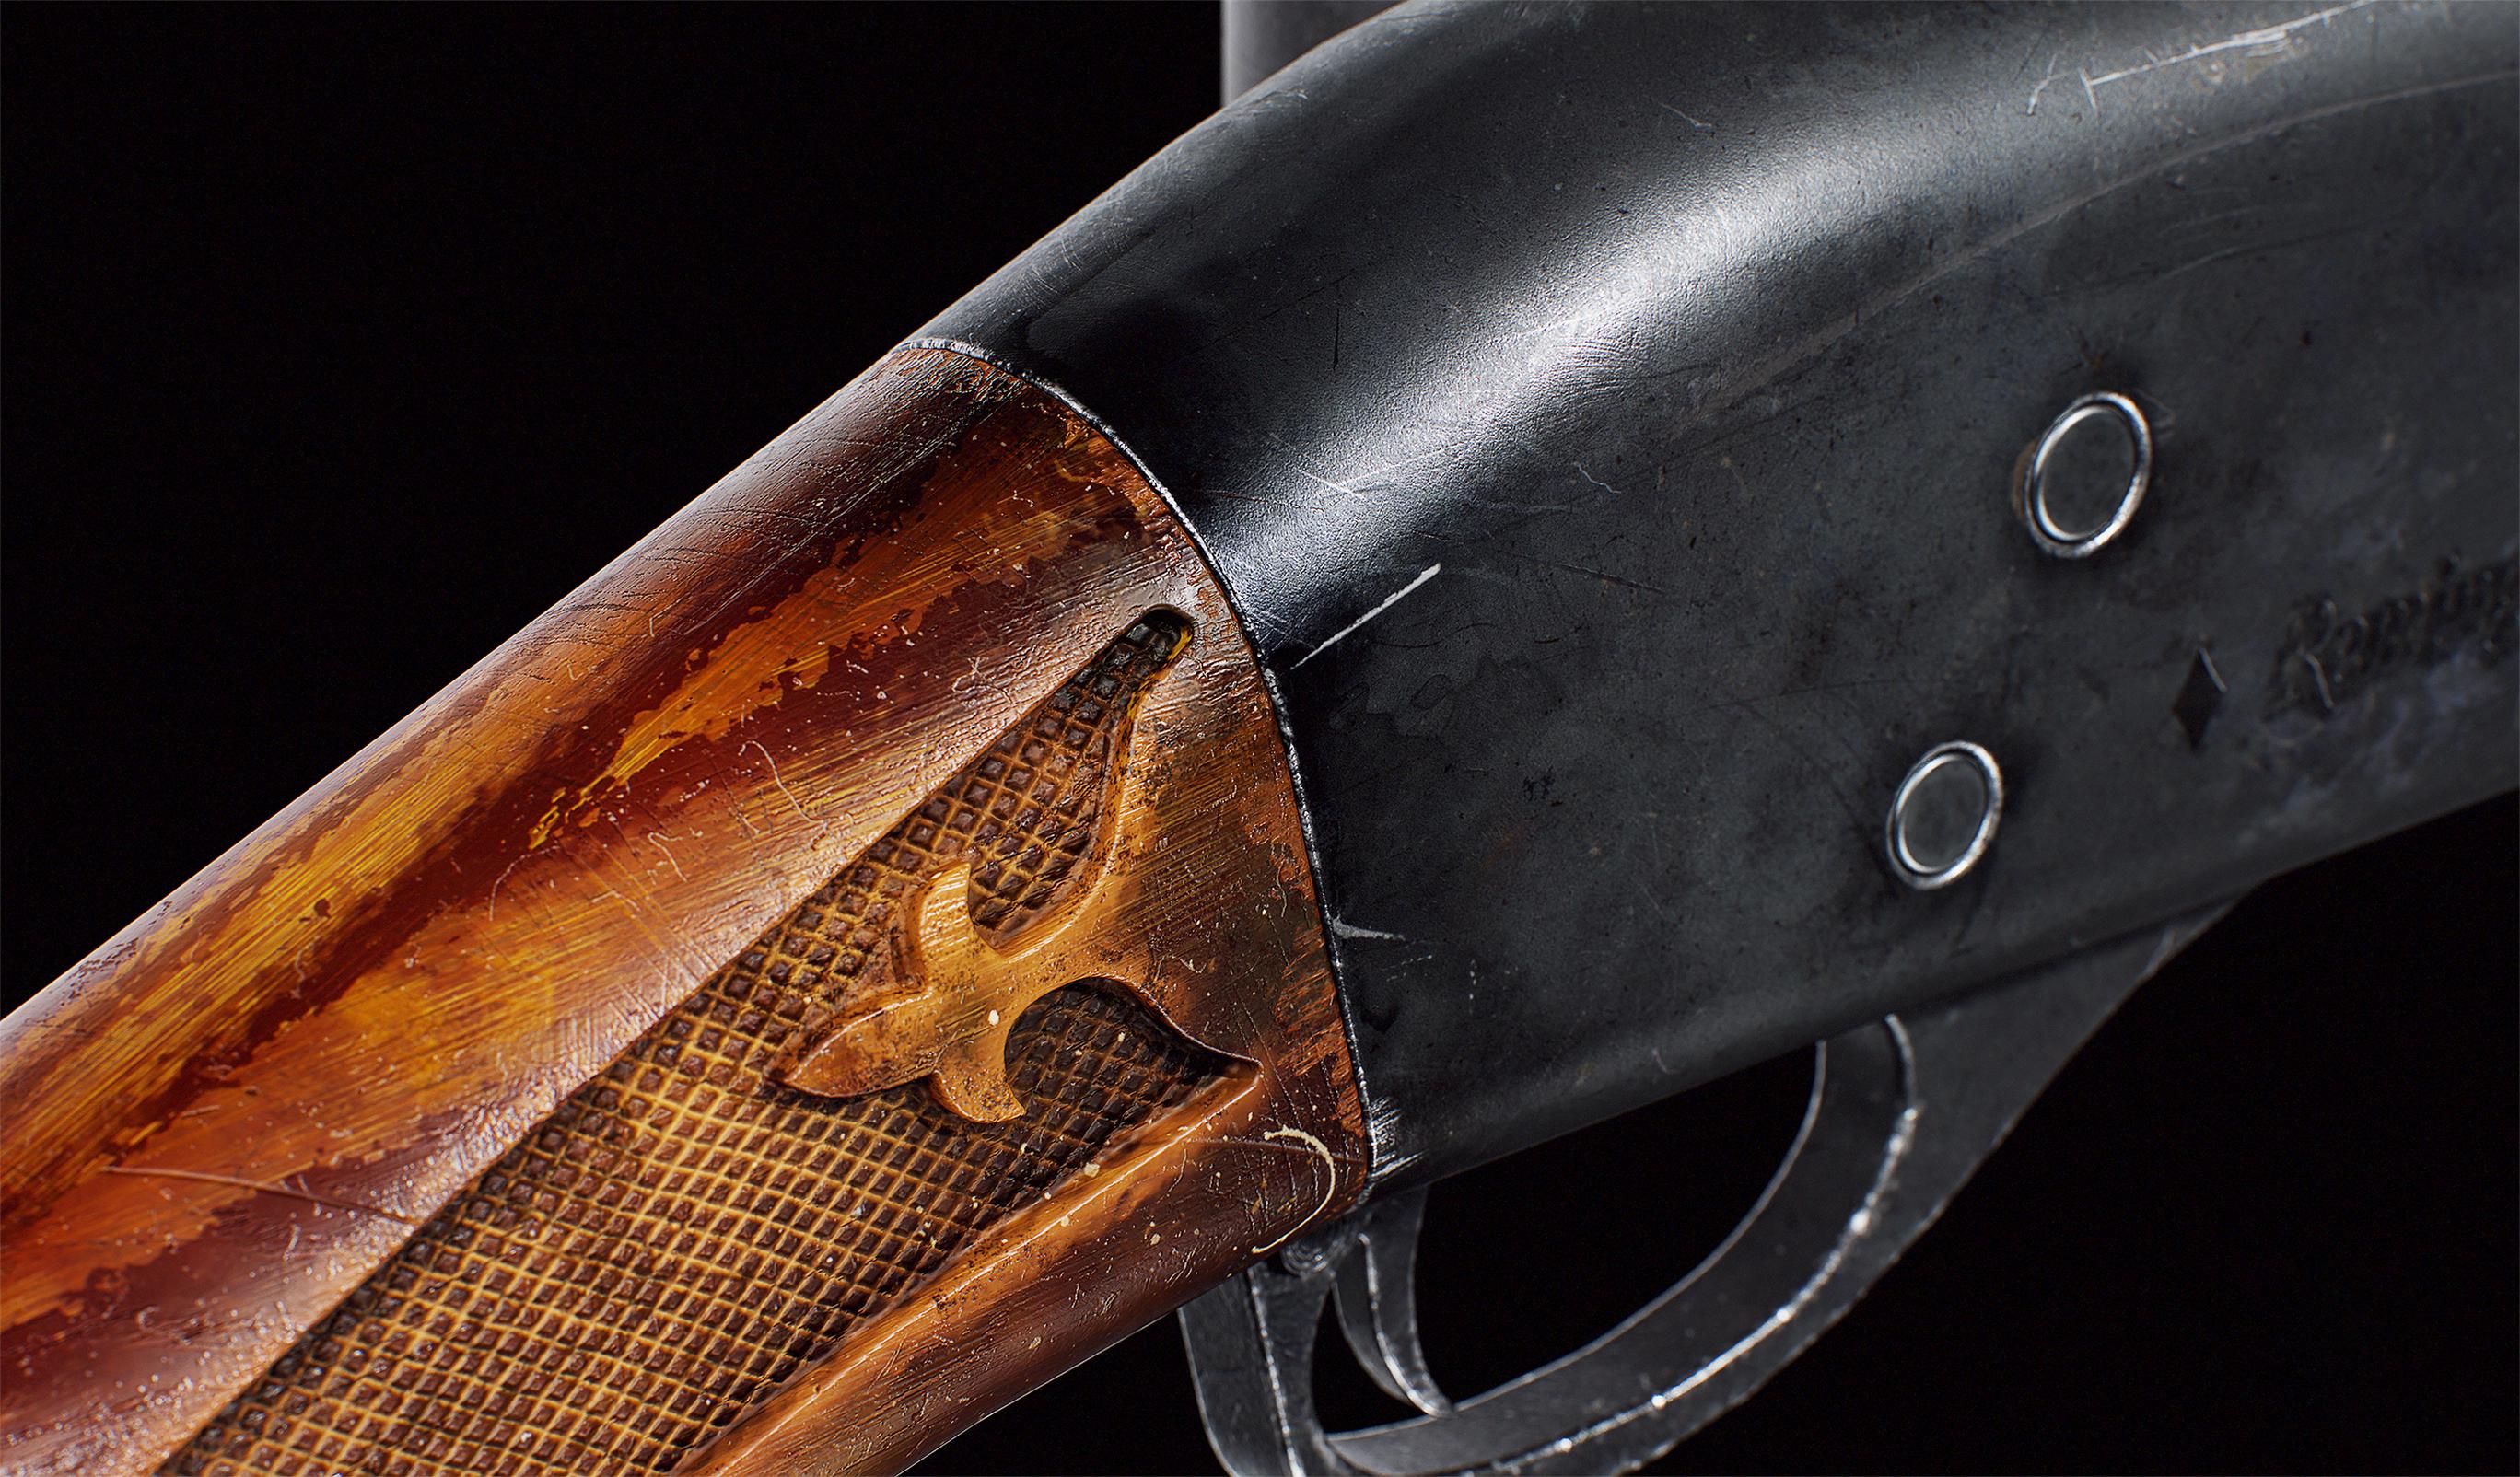
Material
Material creation is the core focus of this practice, and I invested the most time and energy in the wood material of the gun stock. I will focus on explaining the production process of this part next.
I divided the production of wood material into three stages: base color, color variation, and detail rendering. When creating the base color, I did not use any smart material balls, and completed the production entirely through basic color adjustment combined with the masks built into SP.


There is no need to add too many details to the base color production; it only needs to restore the basic texture of the object in reality. Since I wanted to create a gun stock with a smooth and greasy surface, I adjusted the roughness parameter to a relatively smooth value.
At the same time, in terms of color, I added basic scratch effects and natural color variations to the wood.

Compared with the base color, the color variation of the wood is the key to production. In the color variation layer, I added the iconic wood grain texture of the wood, and set an anchor point for the mask to facilitate richer color adjustment and scratch rendering on this area later.
This is because I observed that in real wood materials, scratches are often more dense in the darker areas.

After completing the light and dark color differentiation of the wood grain, I made special treatments on the head and tail parts of the gun stock wood, making the texture of these two areas more greasy and the color more dim.
This is to restore the natural wear effect of the wood caused by high-frequency use in reality. Finally, I also added particle height variation to the groove parts of the wood to make the texture more in line with reality.

Finally, I moved on to the production of the detail rendering layer. In this stage, I added more dust effects and color variations to the AO area of the wood, and at the same time added more dust particles and scratches on the wood surface.
There is an important production tip here: the addition of stains and scratches should not be evenly distributed across the entire surface. As my teacher said, if the picture is full of details, it will lose the layering of those details. Focusing on detail rendering of local areas will yield a far better effect than laying out details all over the surface.
I adopted the same approach for the receiver as I did for the wooden stock. First, I recreated the inherent metallic texture of the receiver on the base color layer, and used the Grunge Dirt Thin mask to add subtle chip marks to the metal surface.
I often use various mask maps to bring out the delicate material variations of an object.


Moving on to the color variation layer, this stage was created primarily with reference materials. I made the color gradations richer and the texture more oily and smooth at the joint where the rear of the receiver connects with the wooden stock.
I also used simple mask maps to recreate the color changes and dirt accumulation on the receiver that come with actual use.

Finally, for the detailing stage, the focus was to further emphasize the changes in roughness and metalness in the AO and CV areas, and hand-paint wear marks on the parts of the receiver that are prone to daily scuffing.
I did not add excessive scratches here, as I wanted to avoid making the gun look overly worn and shabby.

Rendering
There are no overly complicated skills in the rendering phase of this project. I did not use scanned assets to build complex scenes, but adopted a pure black background. This treatment helps concentrate the viewer’s attention and better highlights my expression of material texture.
In terms of lighting, no additional lighting was used in the entire scene, and rendering was completed solely by relying on Studio Tomoco, the HDR built into SP.

Conclusion
The production of this Remington 870 took about two weeks in total. Since I was interning at the company during the creation period, I could only advance the project in my spare time after work and on weekends. I am very happy to share this creation process with you, and I also hope that my production ideas and experience can provide a little reference for creators in the same field.
Through this personal practice, I have gained a deeper and more comprehensive understanding of the texture mapping and rendering techniques of firearm models, and my CG production capabilities have also been greatly improved.
I would like to express my sincere gratitude to the Games Artist team for noticing this project of mine, and also to every friend who reads this creation sharing. I hope my sharing can be helpful to you.
Read more articles
You might also like these articles.