
Introduction
Hi, my name is Cyrus Kian. I'm a 3D Character Artist from Vancouver, Canada.
Project
I’m currently in my final term at the Think Tank Training Centre.
Today, I’m going to give you a breakdown of my Advanced Term final at Think Tank.
Inspiration & Concept
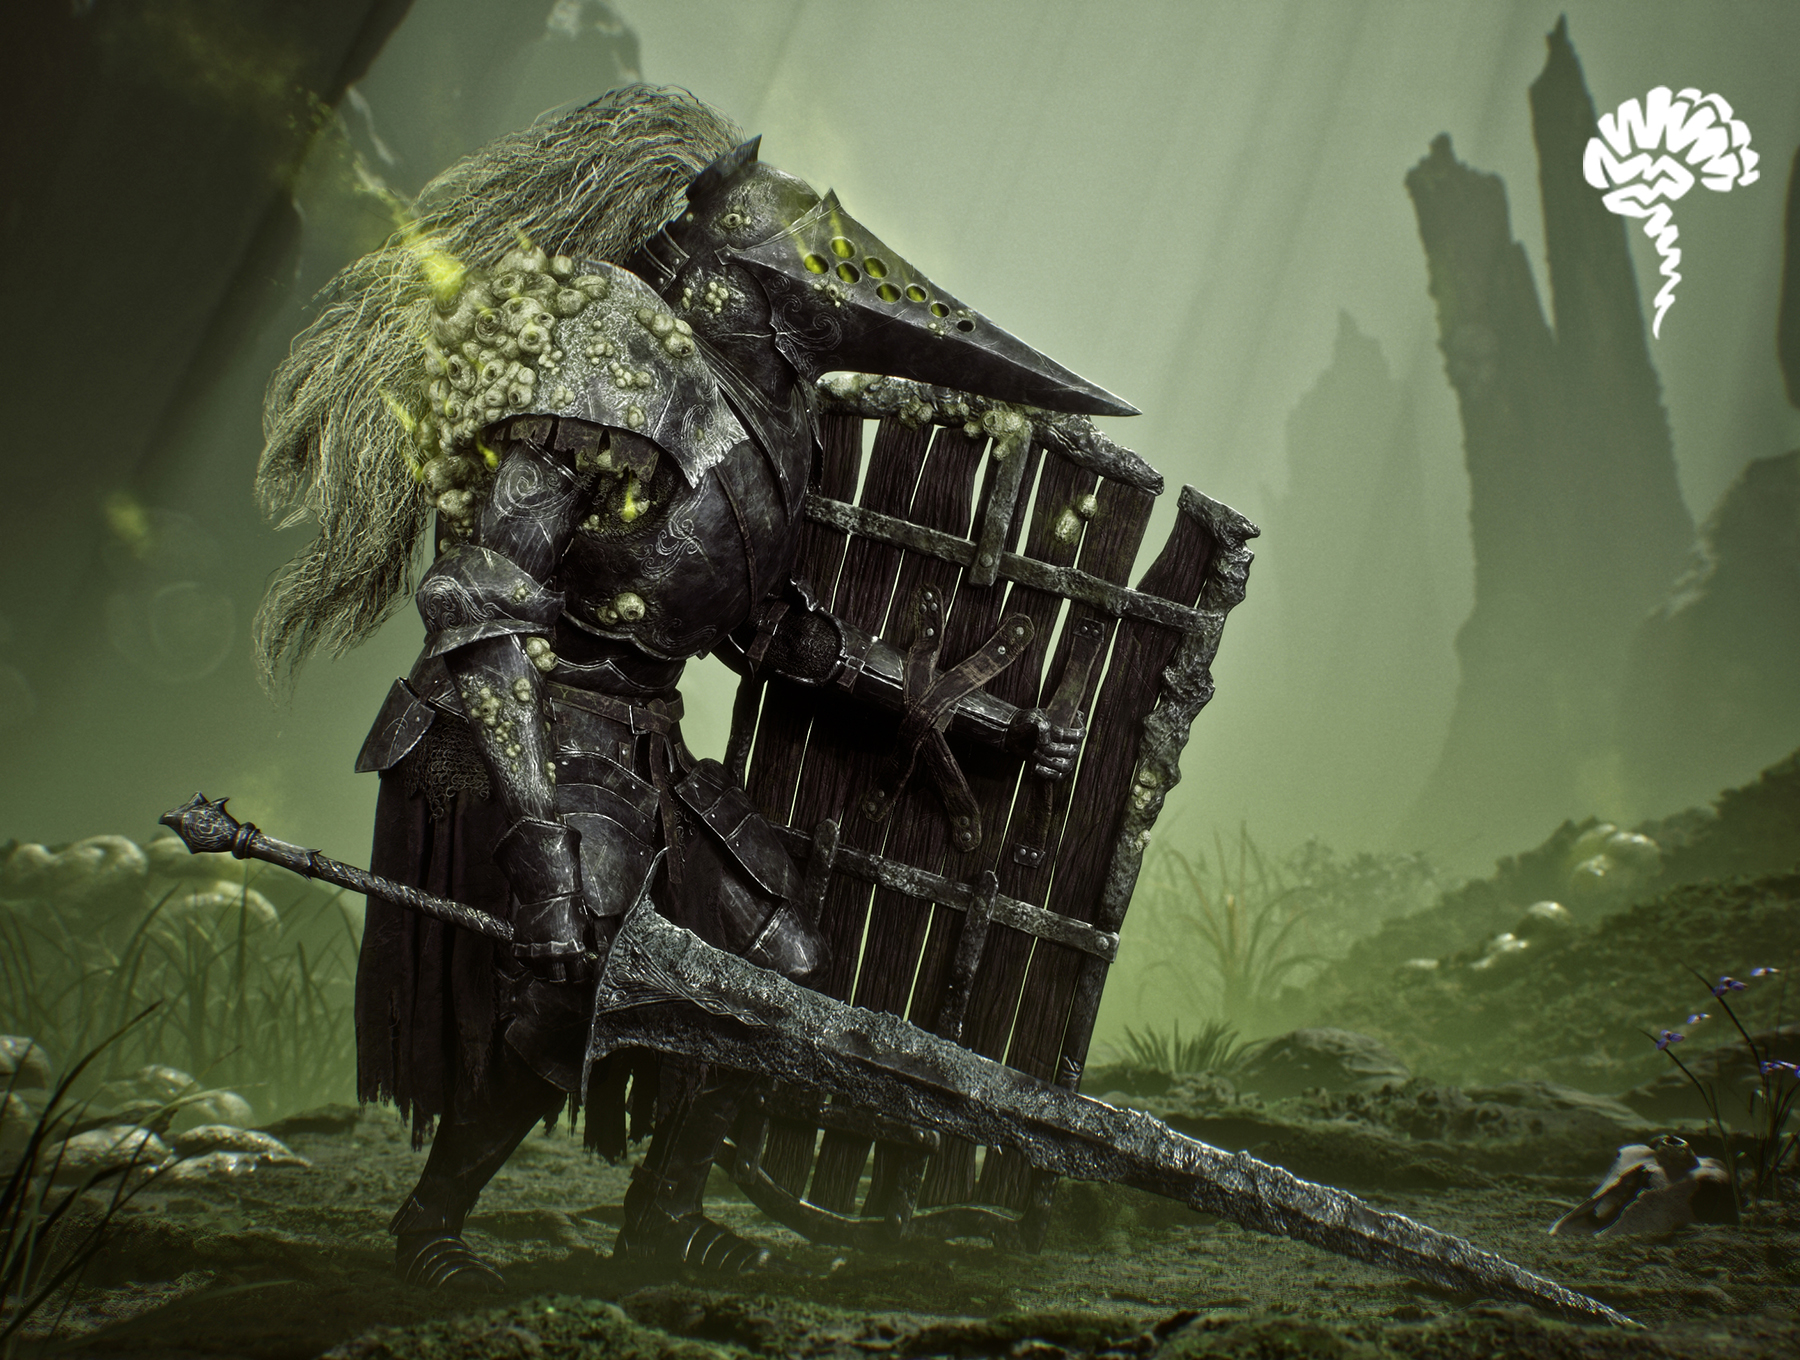
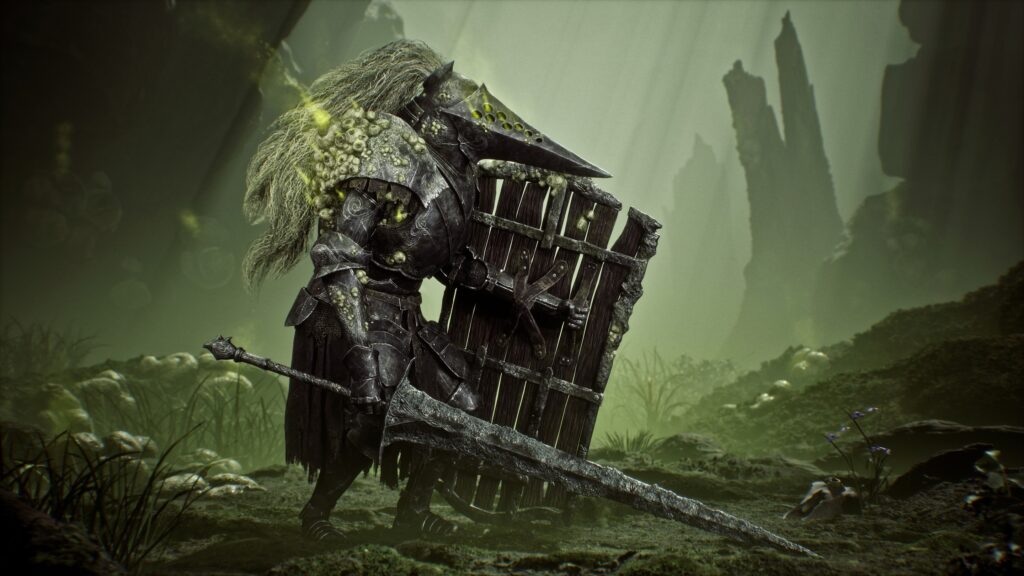
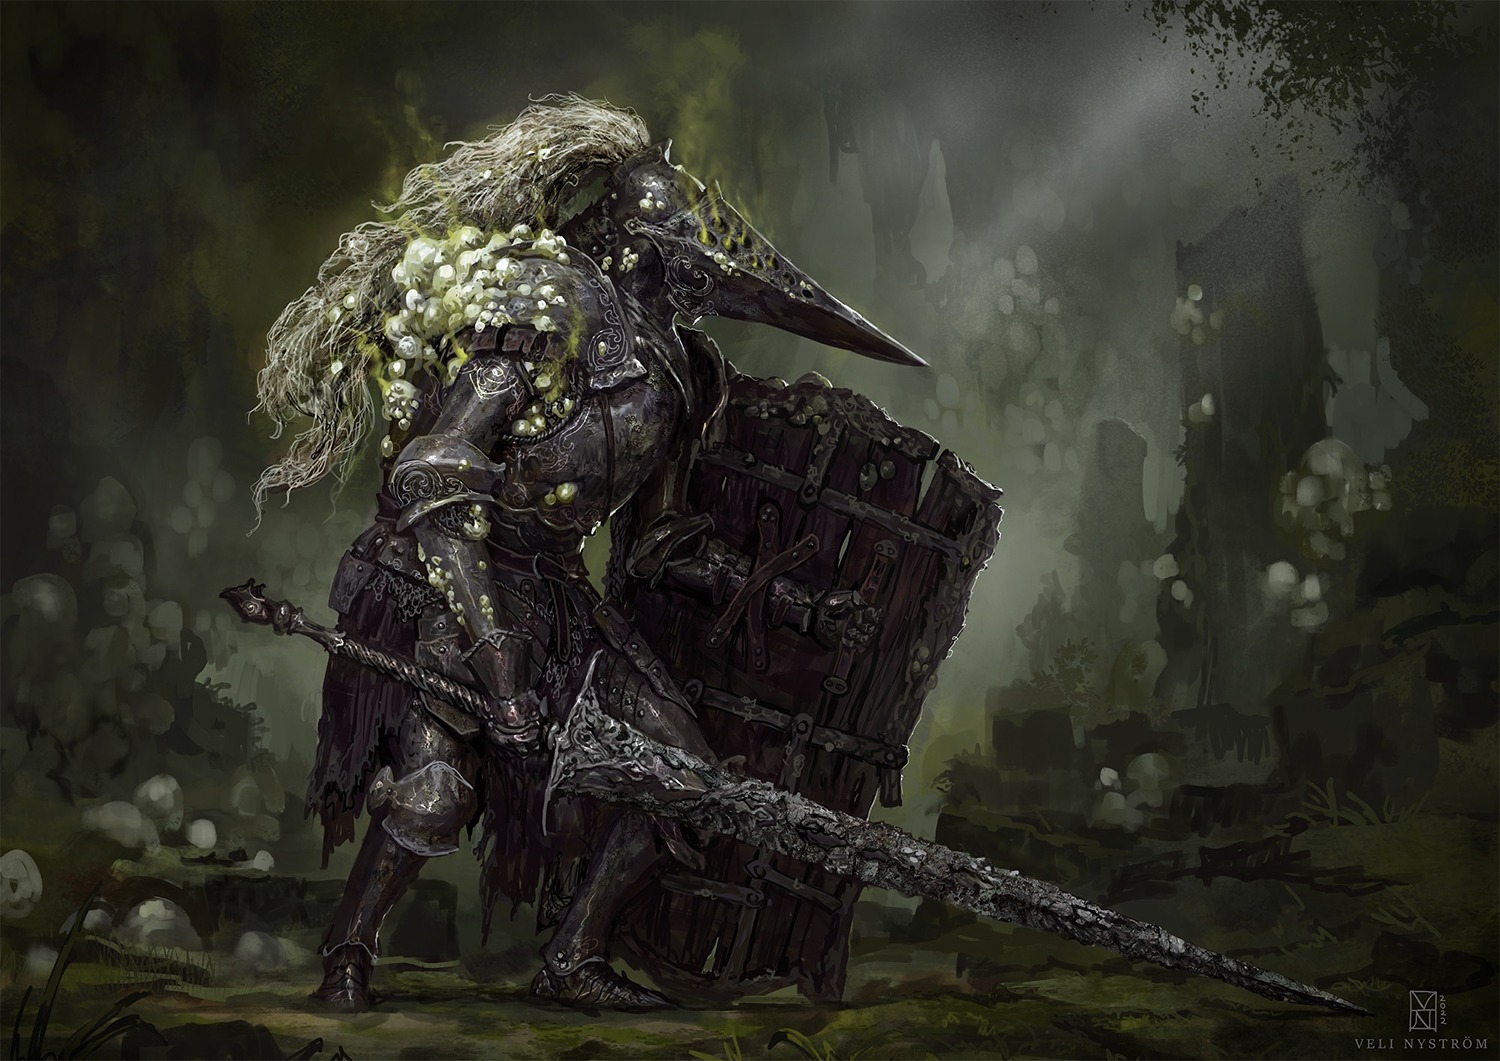
I’m heavily inspired by From Software’s games and the dark fantasy genre in general, so I was immediately drawn to the amazing concept by Veli Nyström.
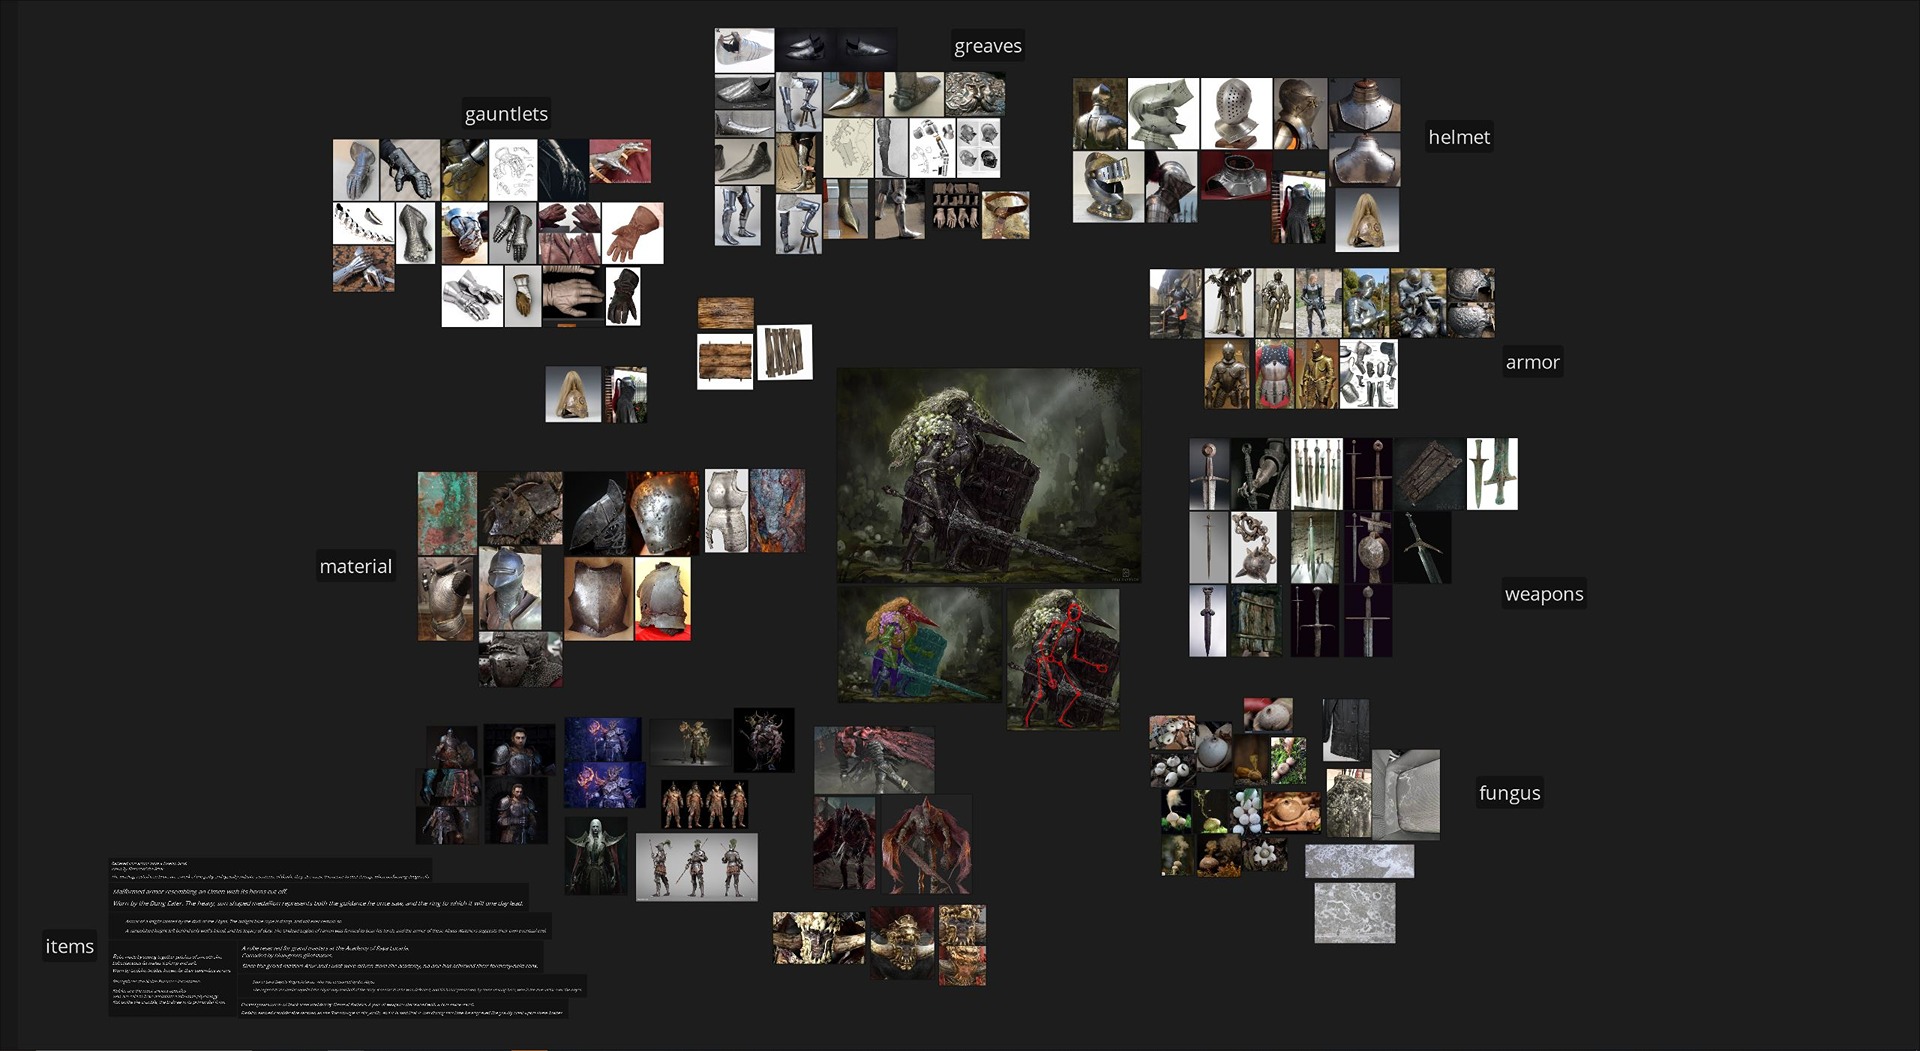
Reference Gathering
My first step is to gather references for every aspect of the character like the armor, weapons and materials in PureRef.
I also like to add some inspiration and fidelity goals to the board as well.
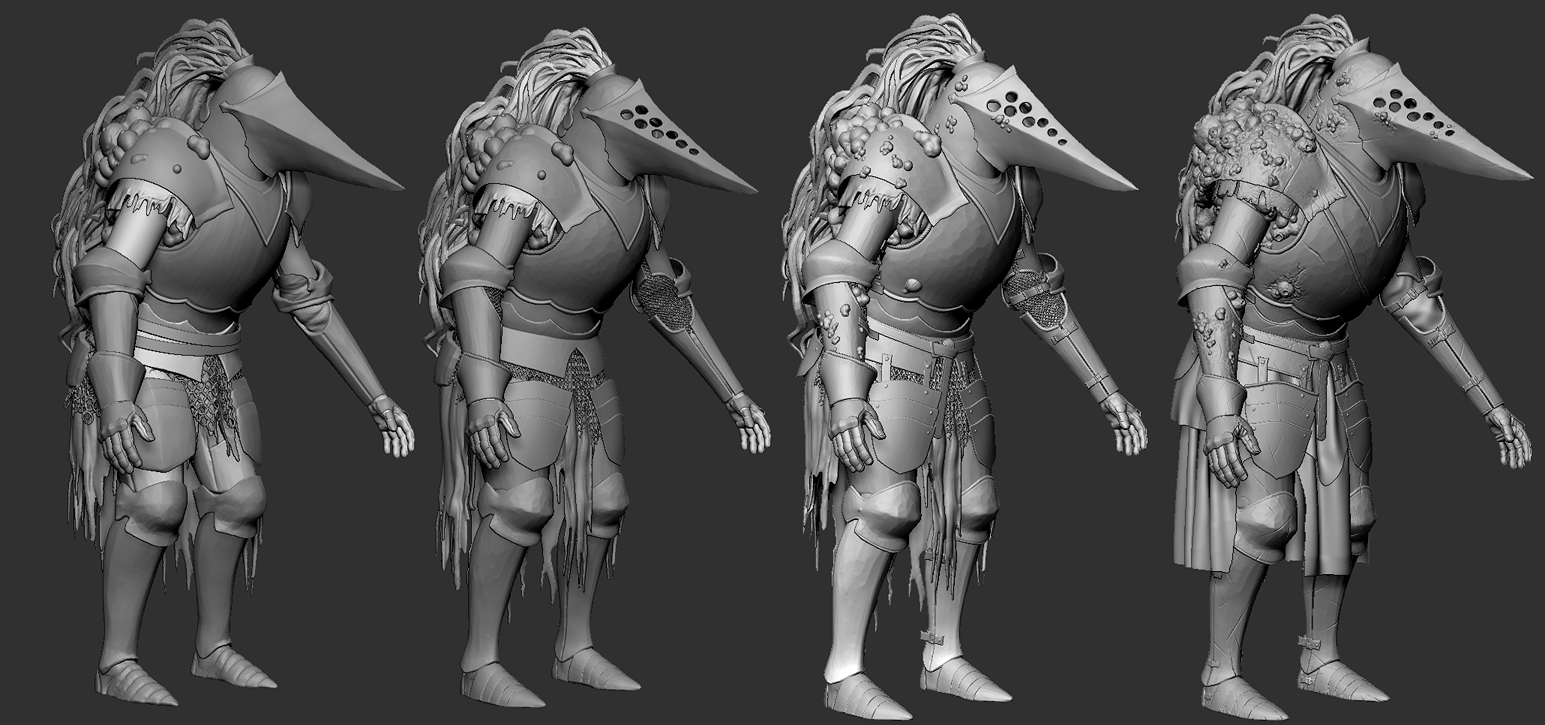
Blocking
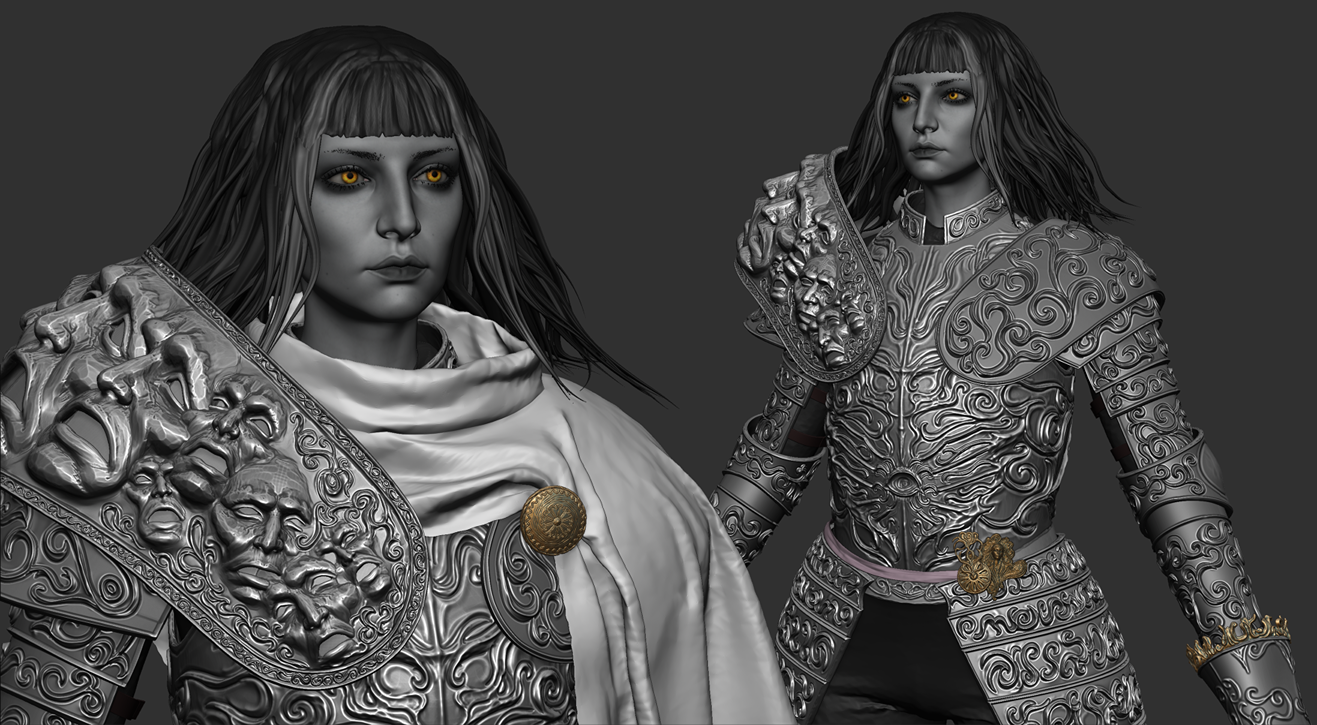
For the blockout, I start in Zbrush and keep things quite loose as I knew the silhouette and proportions would be hard to nail. The character has quite unique proportions, which adds to the mutated and corrupted feeling.
I make sure to start the blocking at the proper scale using a 182 cm tall rectangle from Maya.
During the blocking, I’ll go through the armor pieces and make sure to Zremesh them all for clean topology. For Dynameshed pieces, I will mask out the outer surface as a single-sided plane, Zremesh and extrude it to get a piece of armor with thickness and good topology to start refining.
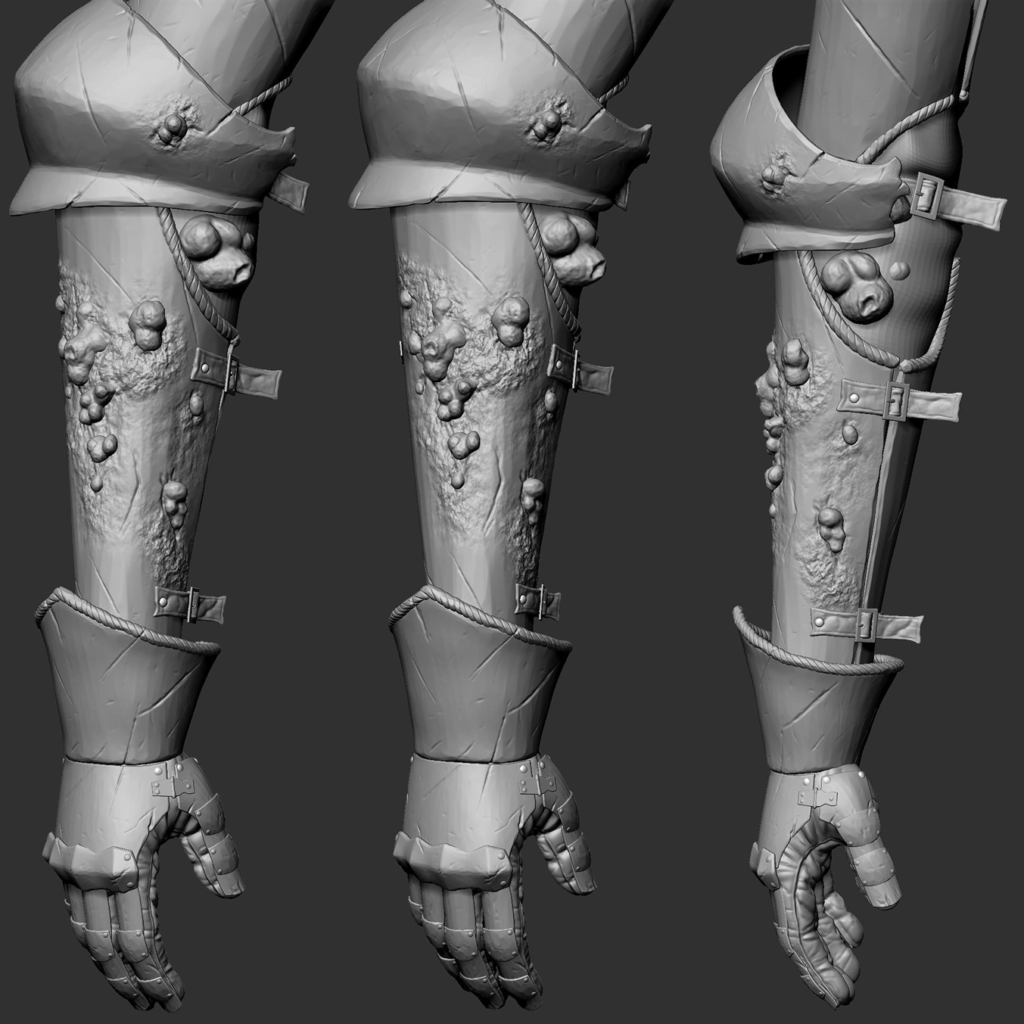
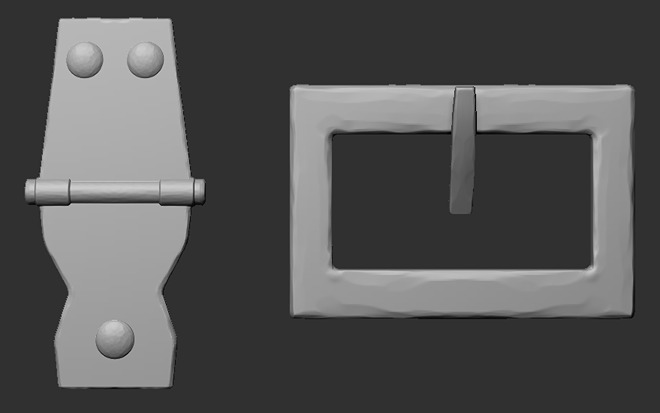
For certain meshes that will be repeated several times like belts, buckles, rivets and hinges, I start the blockout for them inside Maya or use ZModeler.
I’ll retopologize and UV them early on, so I won’t need to go back and do it several times over for every piece. Then, I imported the low poly/UVd mesh into Zbrush and sculpted some base detail into them to save time.
Next, duplicate the mesh and use it where needed on the model. I’ll then go through and add a breakup to them to differentiate the meshes.
High Poly
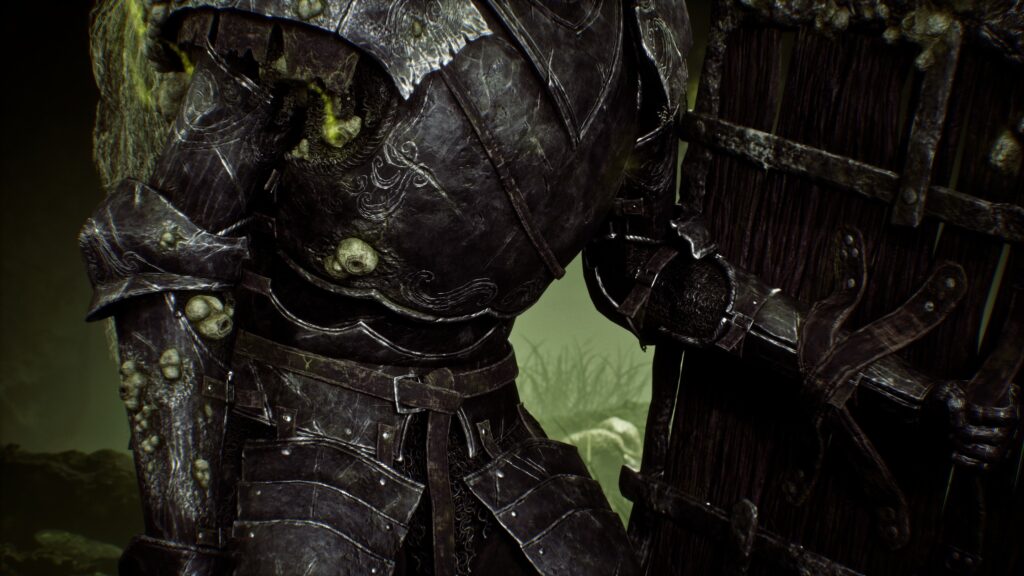
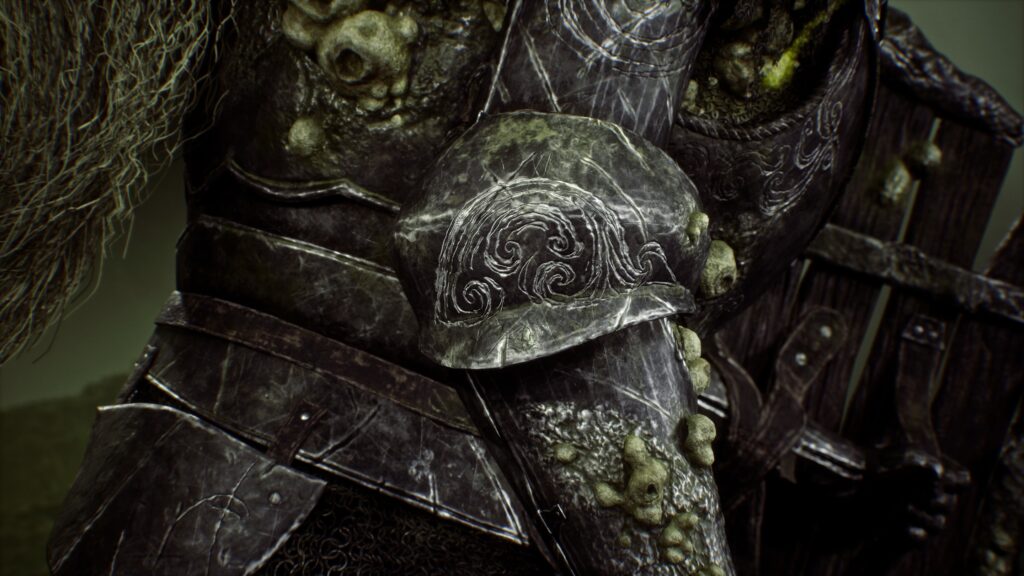
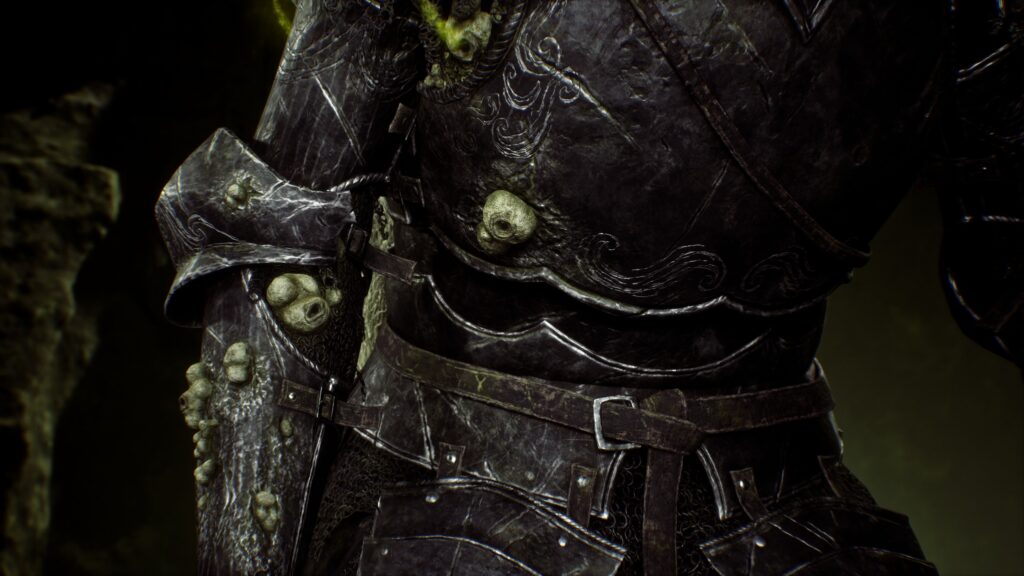
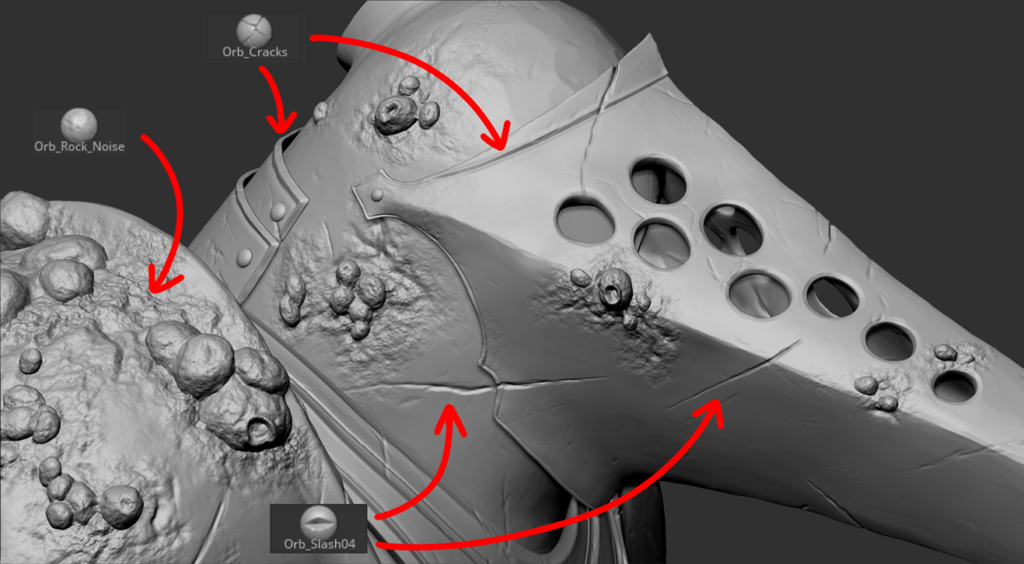
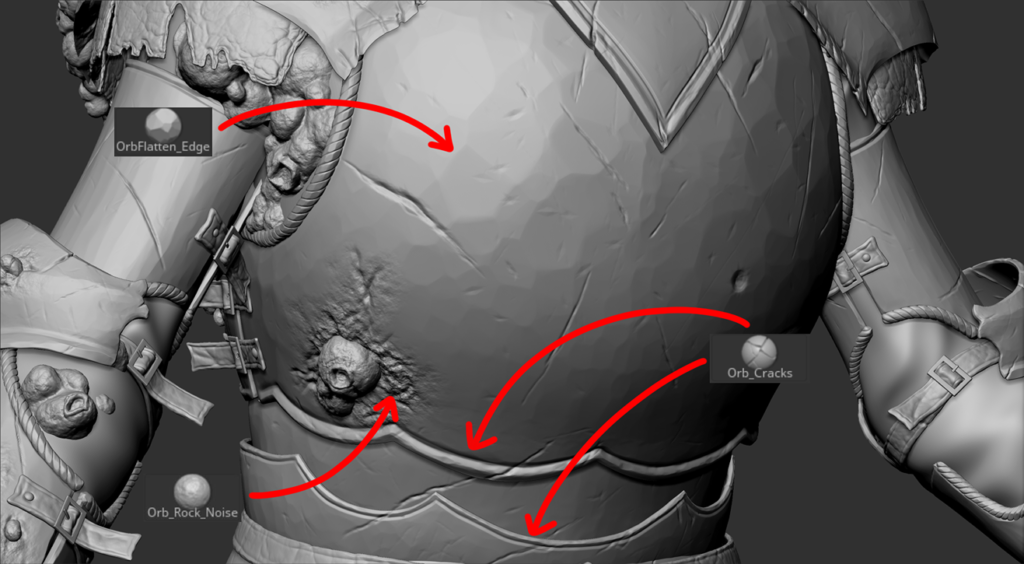
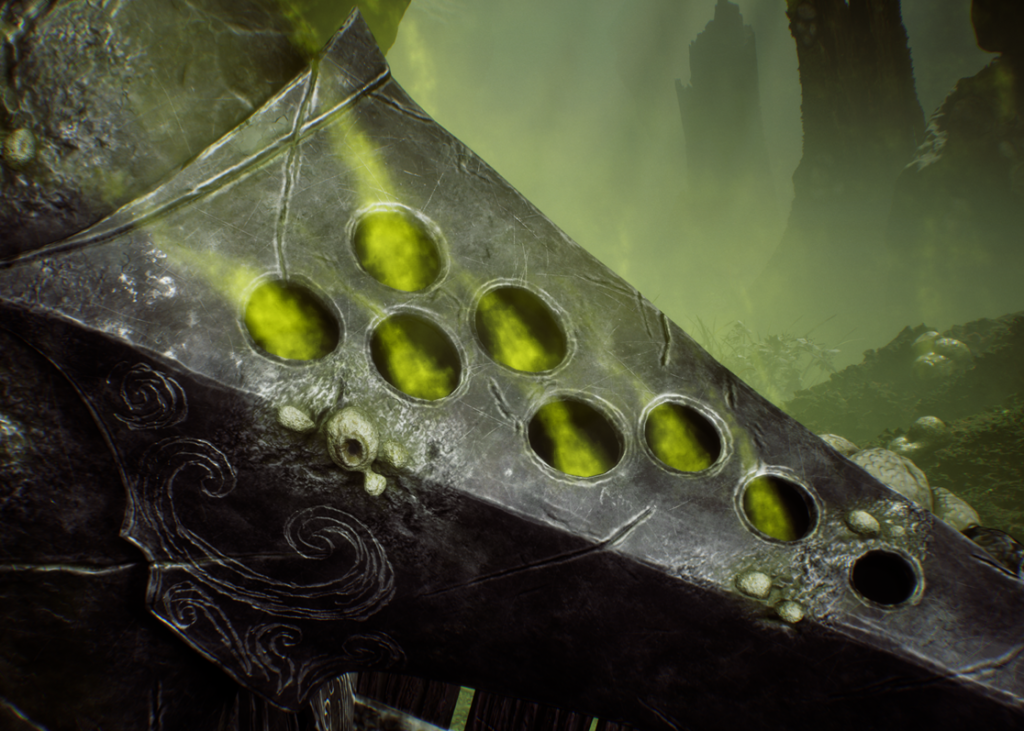
I wanted the armor for this character to have a crude and worn feeling. To do this, I used various brushes from the Orb Brush Pack. To start, I’ll go over the surface of the metal with the Orb Flatten brush to emulate wear or hammer marks. Next, I’ll go over the edges of the armor with Trim Dynamic to break up the clean lines.
For the armor trims I used a rope curve brush then used the Orb Flatten brush for some more breakup. The other trims were done with the Orb Cracks brush.
Adding to the worn and battle-scarred feeling, I did a pass of cuts and slashes on the armor pieces with the Orb Slash brush with freehand instead of drag rect.
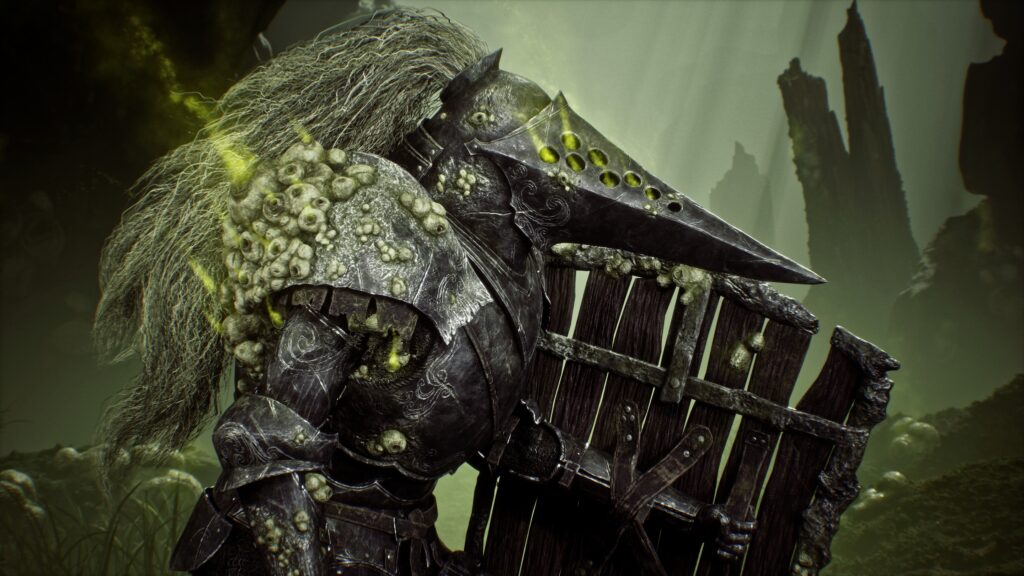
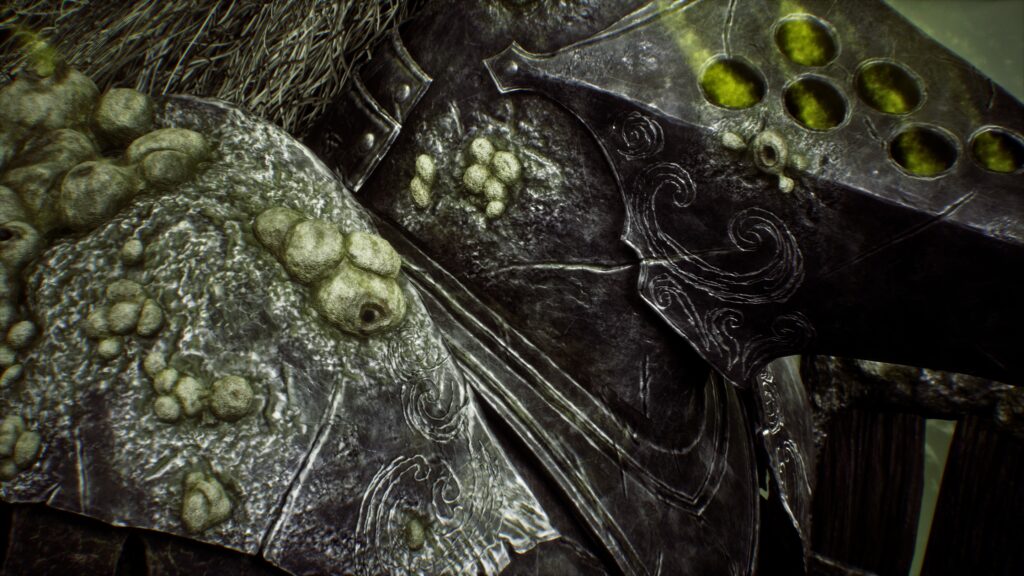
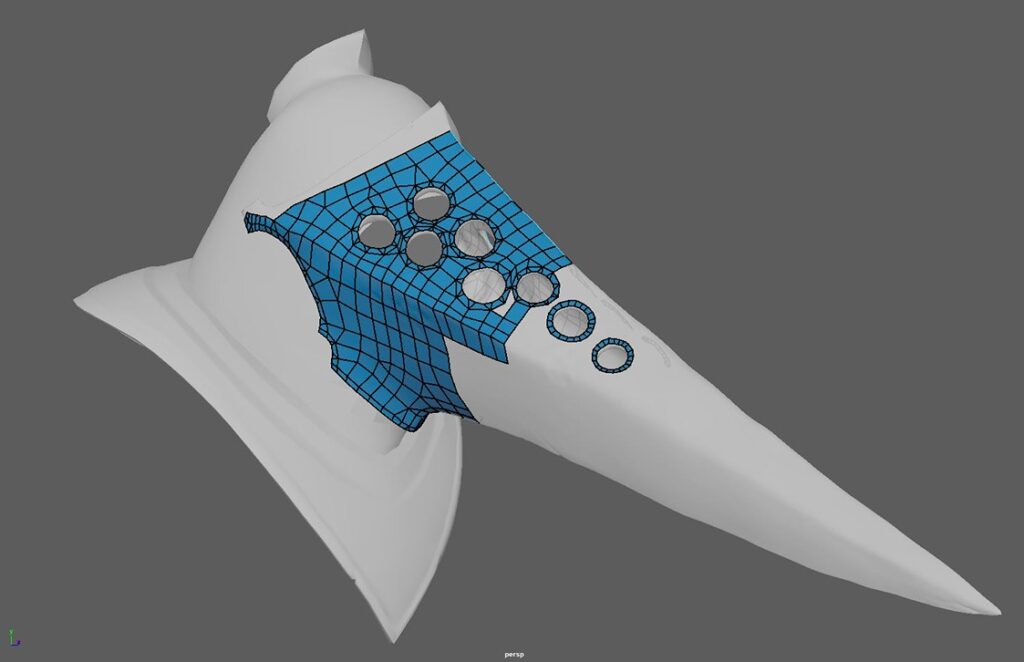
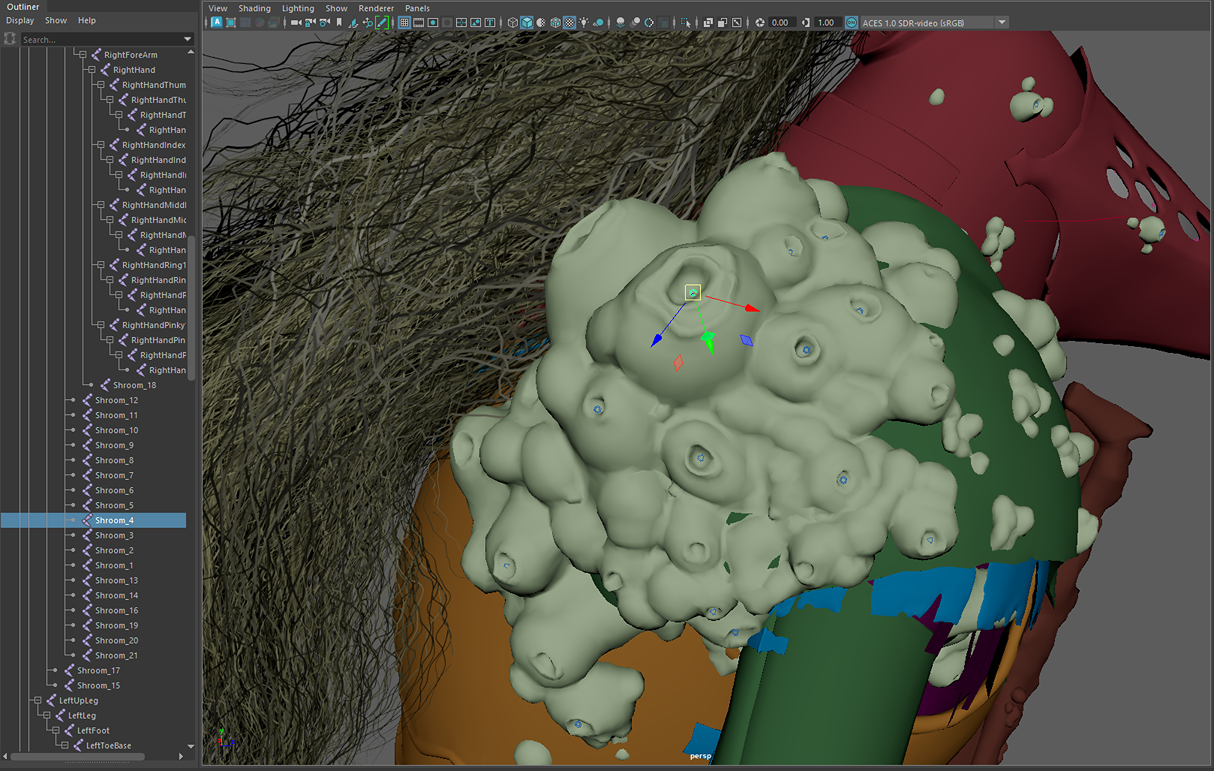
For the fungus I wanted it to aim for a combination between an infected fungal growth and puffball mushrooms that disperse spores. I stayed in dynamesh for longer than normal so I could continue to iterate the forms and add growths here and there.
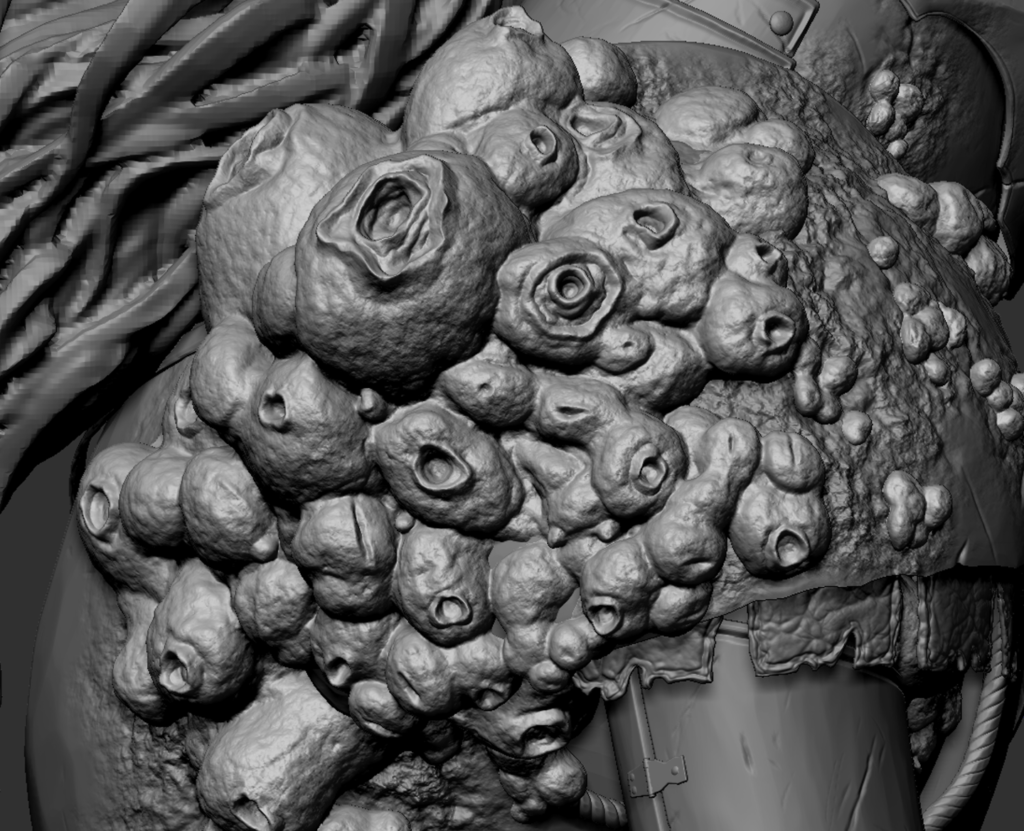
I used the Dam Standard brush to sculpt the openings, and for surface noise, I used a combination of brushes and the noise maker tool.
Where the growths contacted the metal, I wanted it to feel like the metal was corroding or being eaten away by using the Orb Rock Noise brush.
Hair
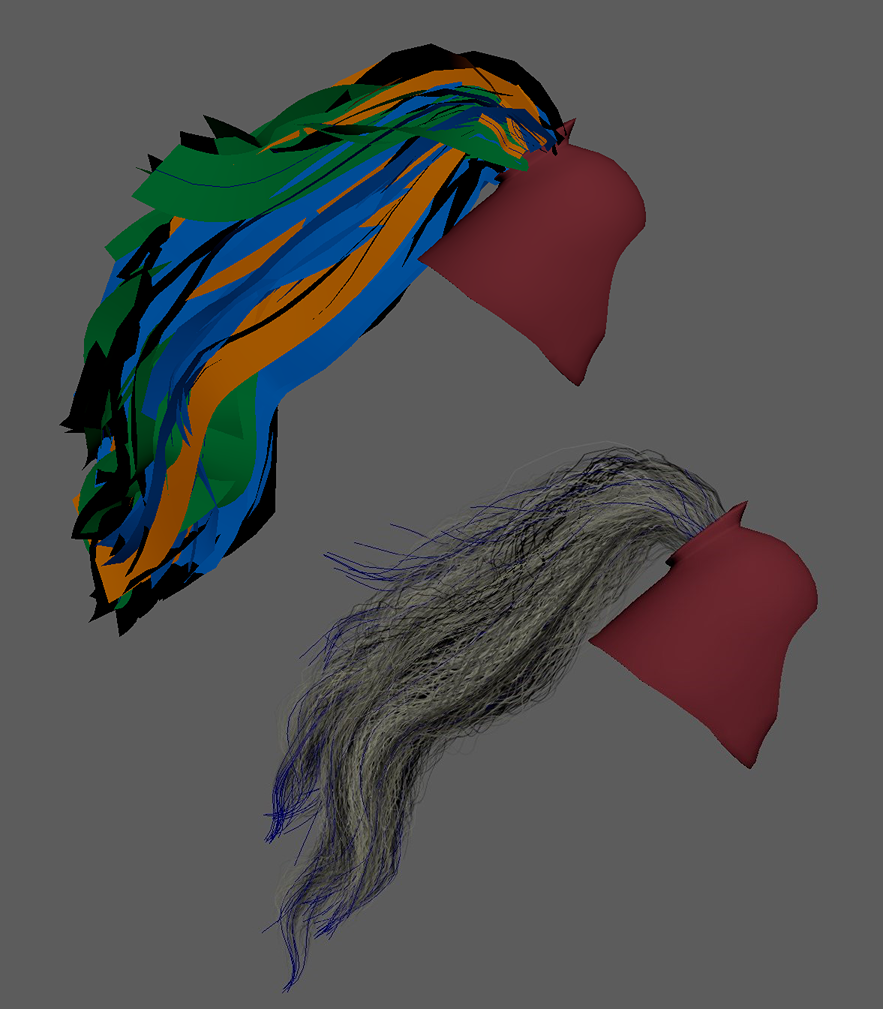
The hair was made using Fibershop and the GSCurve Tool. They are very useful tools I highly recommend to speed up the process of generating and placing hair cards.
I’ll make the base of the ponytail in a cylinder shape so it can’t be seen through easily, and then I’ll add a breakup to the cone with other cards. Once I’ve done that, I’ll add the additional clumps to match the concept and break up the silhouette.
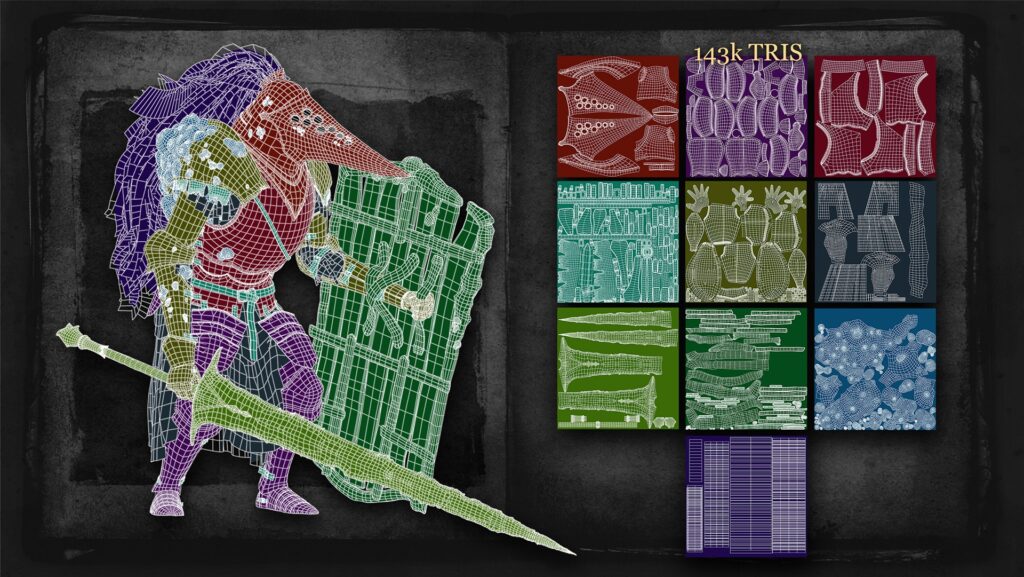
Retopology & UV
I retopologize the mesh in Maya using quad draw, utilizing triangles where needed to reduce the topology as much as I can while holding the shape and silhouette.
After UVing the character in Maya, I moved over to Marmoset to bake the High poly sculpt onto the Low poly. I also set up a scene in Marmoset that matches my camera in Unreal Engine so I can get clean images of my render passes and topology for my breakdowns.
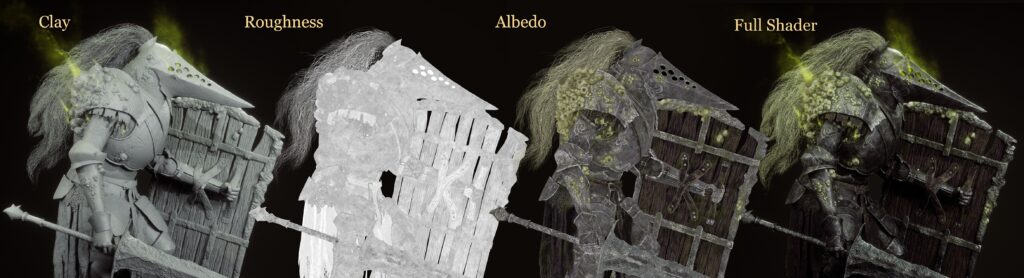
Texturing & Lookdev
My first step when texturing is to actually set up the scene that I’ll be rendering in; this helps me see what the textures will actually look like in the engine. For this project, I rendered in Unreal Engine 5.3.
I’ll start with basic materials or smart materials I’ve made from previous projects, then add more variation to them using grunge masks and several additional layers to break up the textures.
To achieve the final shader on the fungus, I used subsurface scattering for a softer feel and several color and roughness layers to add contrast to the shape of each growth. It was quite the challenge trying to balance real-world mushrooms and the look of a fantasy fungal growth.
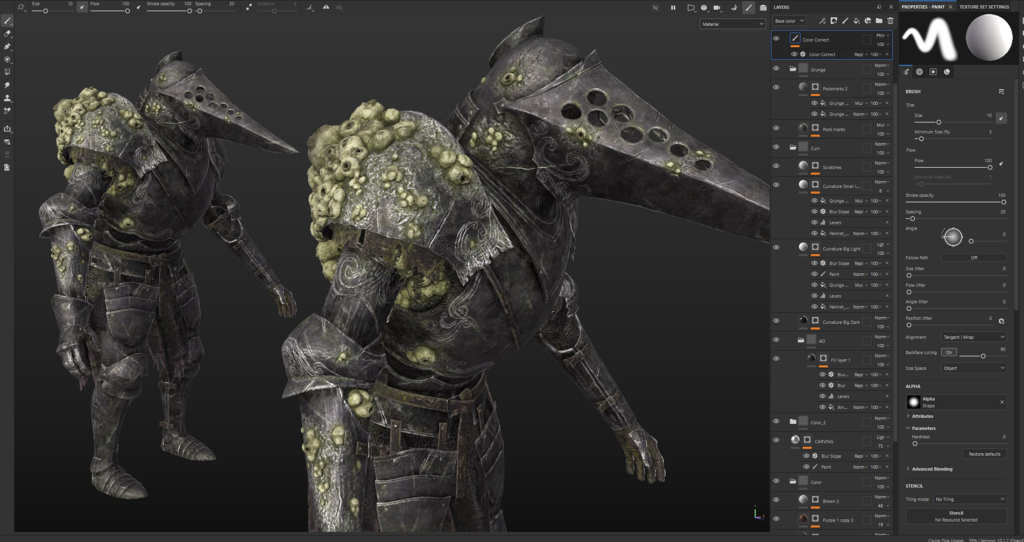
The concept has very interesting colors on the metal, so I tried my best to incorporate those while not overdoing it.
Once I have most of the colors down, I’ll go through the layers and turn on roughness and begin tweaking it more from there.
I use layers of curvature masks to accentuate certain parts of the character like scratches, grooves and the corroded areas. To help bring more contrast to the character, I’ll also add dirt layers to occluded areas. I’m also constantly exporting the textures from Substance and looking at them in my Unreal Engine scene.
Rigging & Animation
To pose the character I used HumanIk and ngSkin tools in Maya. To avoid spending a long time trying to fix skinning errors, I’ll rig the character and move him into pose, unbind the rig and fix stretching and clipping issues I couldn’t manage to fix with weight painting.
Next, I’ll bind the posed rig to the new mesh and use that for my animation. I’ll make a simple idle loop for the character to breathe some life into them.
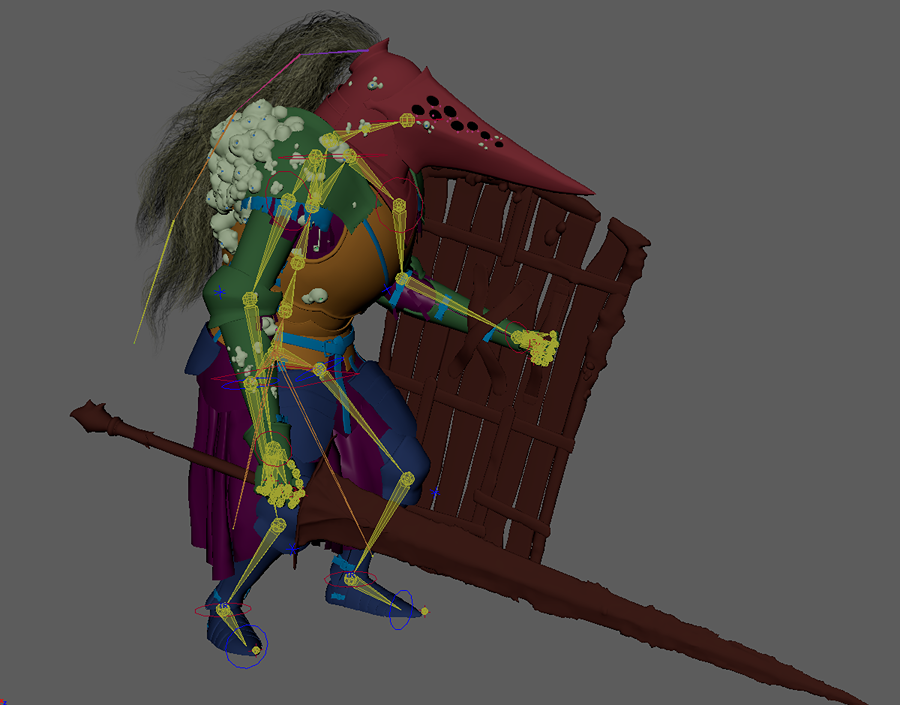
The other main portion of this rig was the fungus. I added a joint into the main holes of every opening and animated their scales to make the fungus move and breath.
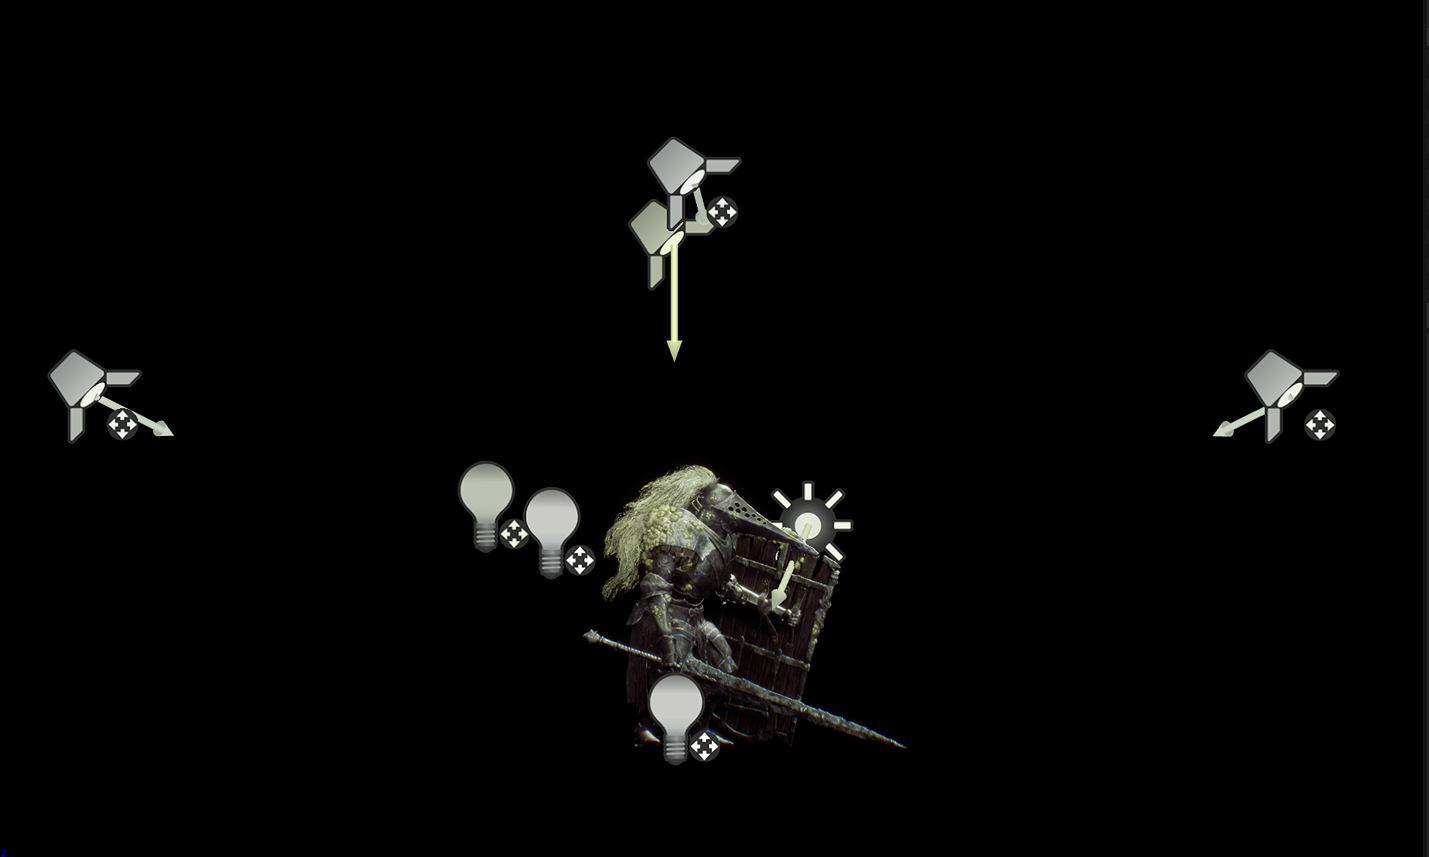
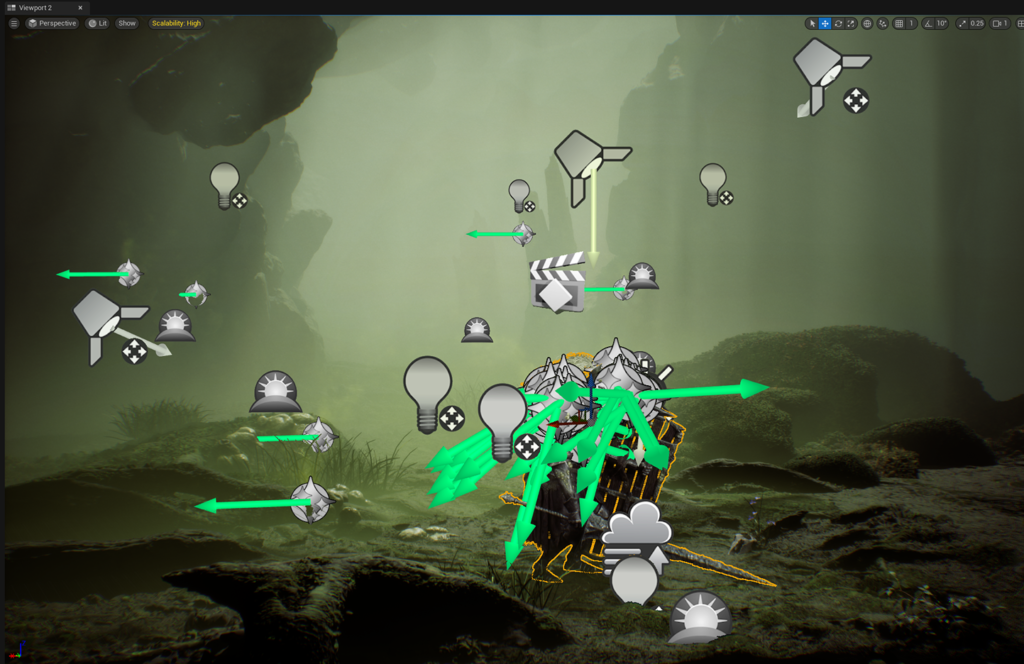
Lighting, Rendering & FX
While I’m lighting the character, it helps to keep in mind portrait photography lighting techniques such as Rim, Key and Fill Lighting.
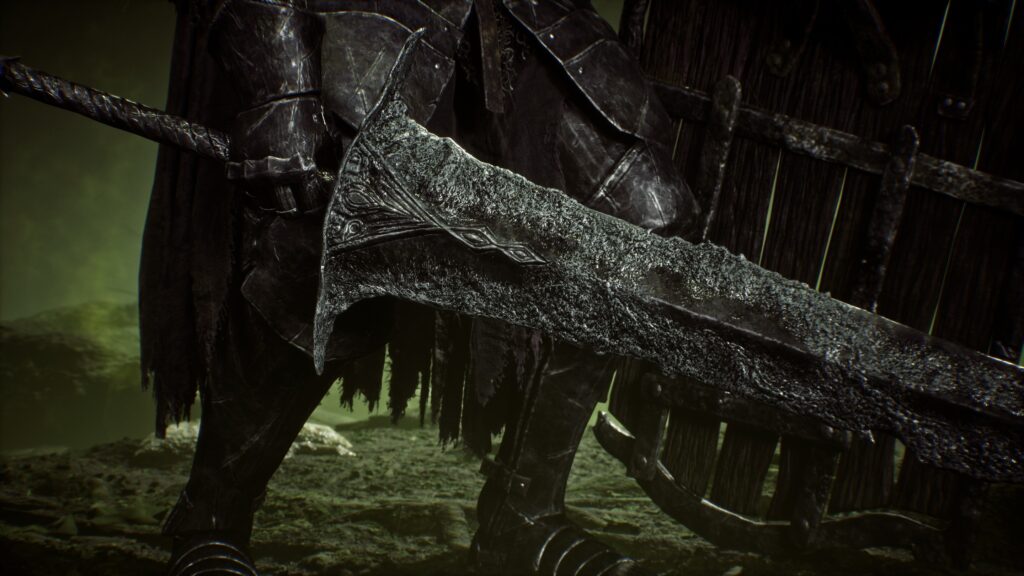
I also use lights to bring more attention to pieces of armor or areas I want to bring more focus to, like the sword or the elbow.
During the texturing stage, I also like to begin setting up an environment using Quixel megascans. I really enjoy telling a story when I make a character, so I like to make an environment alongside them to help ground them.
For the fog in the scene, I use a combination of volumetric fog to get some light shafts and local height fog for density on the ground. I also reused the fungus meshes from the character and placed them around the scene to save time.
The rest of the scene is made up of Megascan assets.
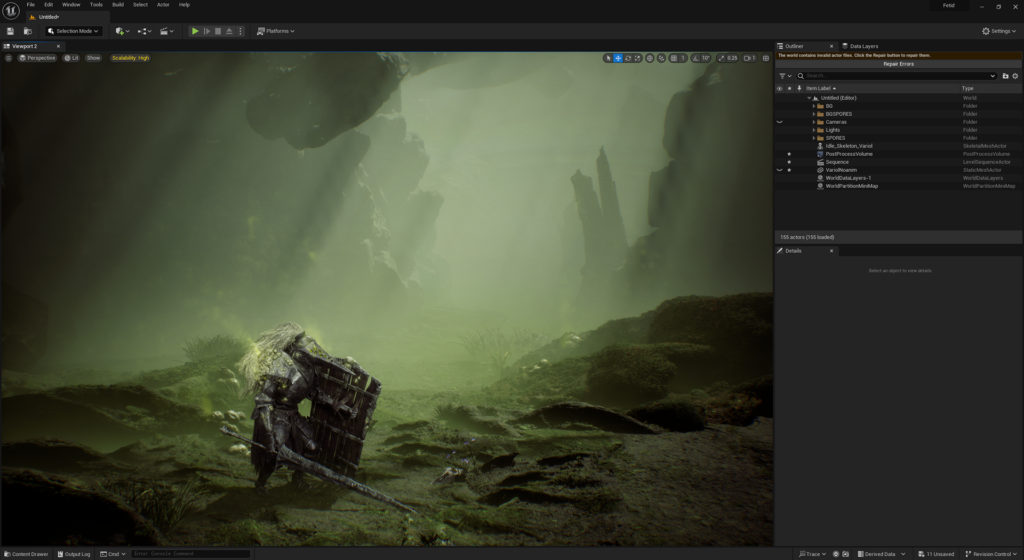

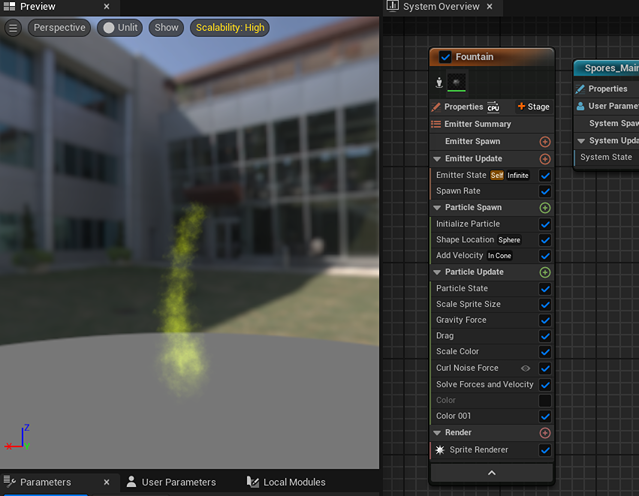
The Niagara simulation for the spores is a fairly simple fountain emitter, using scale and opacity to fade the spores off towards the top and a curl noise force to make it move back and forth.
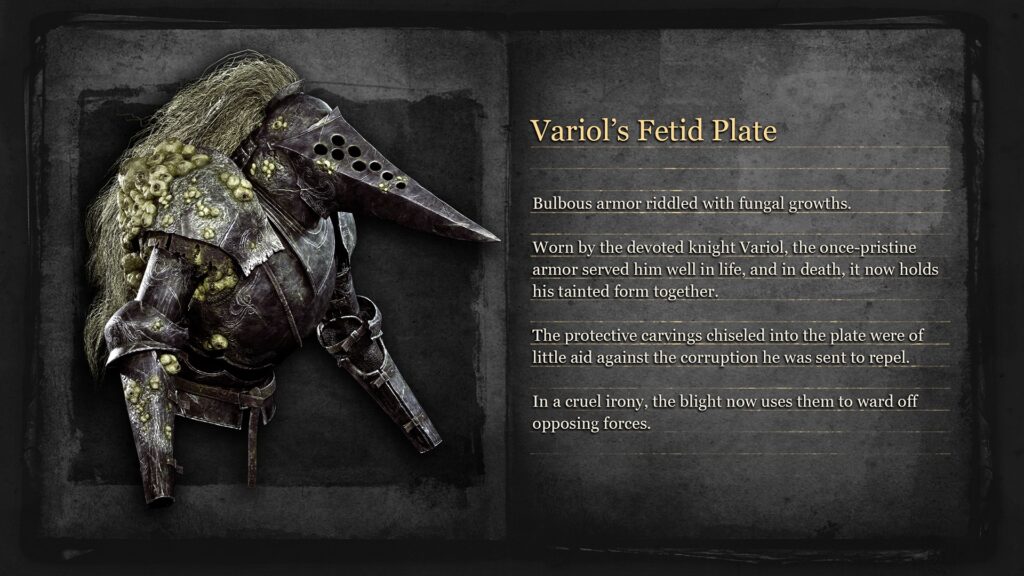
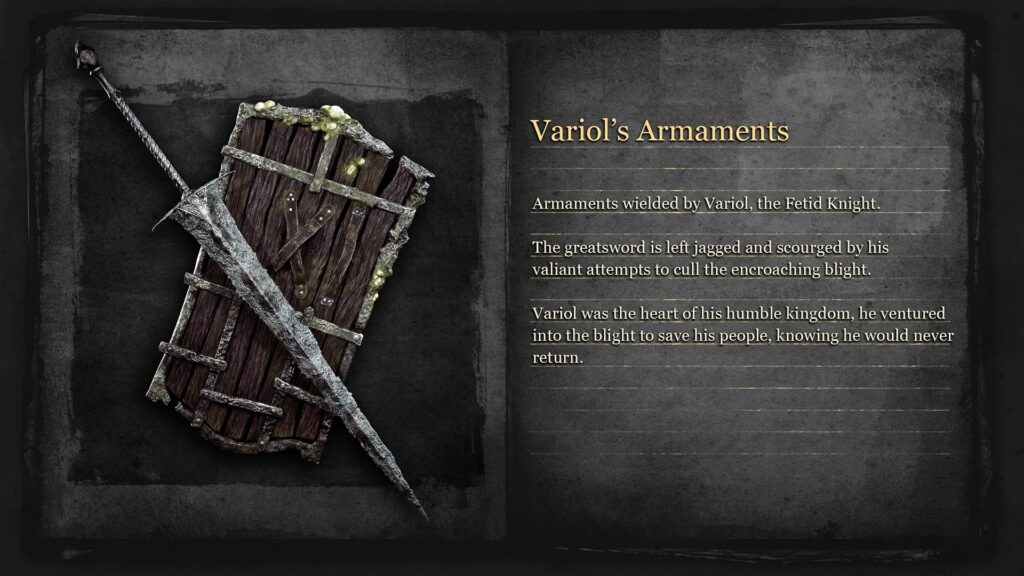
As a final touch I like to make some items and descriptions inspired by the storytelling of From Software titles.
Conclusion
Thanks for reading this far! I hope you enjoyed and learned something useful. Creating this character and his story was very fun and challenging.
I am currently making my Mentorship Final character at Think Tank, so keep an eye out for that on my socials in the coming months. Here’s a sneak peek!
If you have any questions, feel free to reach out to me on my Instagram or Artstation.
Huge thanks to Games Artist UK for this opportunity and my mentors and peers at Think Tank for all the feedback and help!
Read more articles
You might also like these articles.