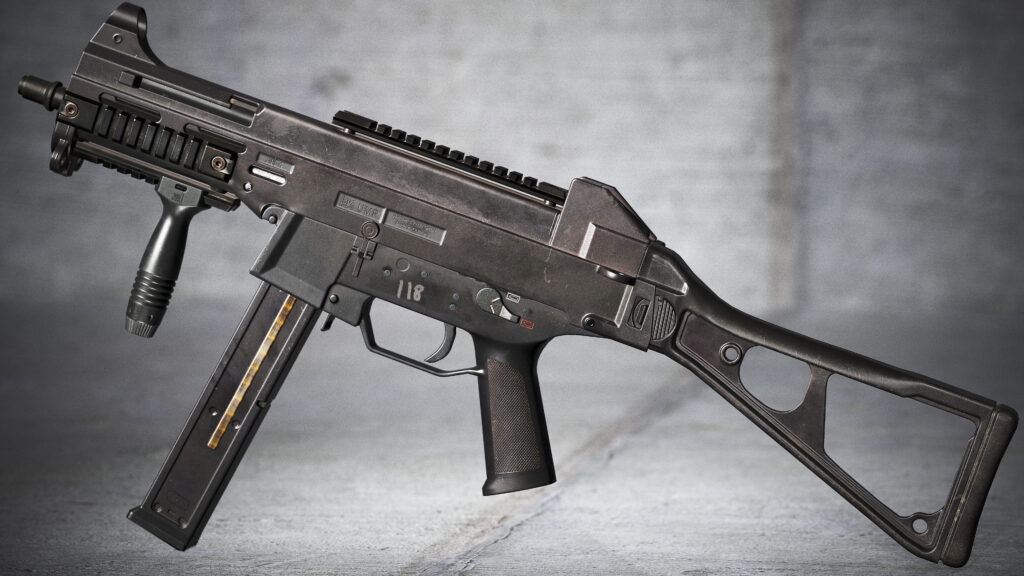
UMP-45


Introduction
Hi, my name is Tanraaj Cheema. I’m currently a 3D Environment Artist at EA Sports/Codemasters


Software
3Ds Max
Zbrush
Substance Painter
Substance Designer
Marmoset Toolbag
Photoshop
Goals
My goal for this project was to make a very high-quality piece that would really challenge my Texturing and lighting skills since those were the areas, I was slightly lacking in. Also, I wanted to make an asset that isn’t seen too much on Artstation.
References & Inspiration

When I start A new project, I always spend a few hours searching the internet for good references for example, in this case, Magazines, Release paddles, receivers, Stock, 45 ACP bullets and hand stops.
I would also refer to Youtube videos/channels such as forgotten weapons, to analyze how light reacts to surfaces, so I know what roughness/metallic values to apply for each element I work on.
Blockout
For the Blockout phase, I would model all the components to a low detail level so I can always go back and re-adjust the proportions and shapes if I got it wrong, I do this because I like to get all the shapes and general designs correct before I move onto the high to low poly modelling.

High & Low poly modelling techniques
When it comes to making the high poly, I use the max to Zbrush workflow where I model my low poly model first because all I want is the smooth edges that help catch lights in-game. Also, with this method, I don’t need to remake a low poly mesh after making the high poly is finished.
For the high poly mesh, I will first take my low poly mesh and add a turbosmooth with smoothing groups enabled so it doesn’t deform my shape and preserves all the general forms. Also, the mesh needs to be dense enough so you don’t get any smoothing errors when you use Dynamesh with Polish enabled.

The left model has no turbosmooth, the right-hand model has Turbosmooth with smoothing groups applied.
Then I would export the model in Zbrush and apply Dynamesh to a high resolution of 4096 and then once it’s in Dynamesh. I would use Polish with crisp edges to smooth out all the hard edges to become a lot softer.
The end result would be this from low to high in Zbrush.
Below are the Lowpoly and Highpoly.


UVing/Baking
For the UV section I would first set up all my smoothing groups to their correct polys and surfaces then I would relax different UV islands and align them to have them as straight as possible, finally I would use UV pack master to pack element to use all the UV space as much possible.
I also used 4 different UV maps for this weapon in order to have a good level of resolution across the mesh, ie one UV island or the Receiver, Magazine, Stock and Foregrip.

Lastly, for the baking section, I would use Marmoset Toolbag to render all my maps due to its amazing custom cage where I can change the size of each element of my weapon.

Texturing
When it comes to textures I would rearrange my reference board, so everything is nice and clear to look at. Afterwards, I would have very basic fill layers or basic textures that would be a basic normal map for adding in the base grain for my polymer.
The next task would be to add some material separation to each element so it does not share the exact same polymer material across the weapon, I would break them up by adding large amounts of dust to some areas, different colours assigned to certain elements and having the base roughness values slightly different.
Then I would work in a good base material with basic material definition to start off with such as features like Colour variation, roughness variation to break up surfaces with, normal information, large height data in needed areas and adding in large detail such as large scuff marks or dust. Another aspect to mention would be I usually paint out the polymer on some edges to give the appearance of a worn polymer.
The next step would be to add in medium-sized details such as adding larger grain details into my polymer such as white noise to add in different coloured grains such as reds, purples, blues and oranges, with these values I would use a very low subtle value in overlay layer in the base colour. Then I would add detailed scuff marks and oil stains to areas which have moving parts, or of which are touched a lot by the operator.
Lastly, for fine details, I would add fine colour variation to some areas of my polymer grain.
Below are images of material layering in painter & material separation.


Rendering, Lighting & Final Pass
Rendering in itself can be its very own article, but to cover the basic passes I did with my render setup would be to add a standard three-point lighting setup with a neutral skylight so it represents my textures to their true nature as it does in Painter. Then I would add in small-scale light to highlight key details such as the foregrip, and barrel or fine details such as the in-depth grain. Lastly, I would render my scene with raytracing turned on to get the most crips and high-quality images possible.

Conclusion
That’s about it for the project, thanks for reading and a big thanks to Game Artist for inviting me to write this article, cheers.
Read more articles
You might also like these articles.