Introduction
Hi guys! My name is Anastasia and I’m a Junior Character Artist from Russia.
I have been self-learning 3D for 2 years and I still have a long way to go to improve my skills, but I am very excited about it!
Project and Goals
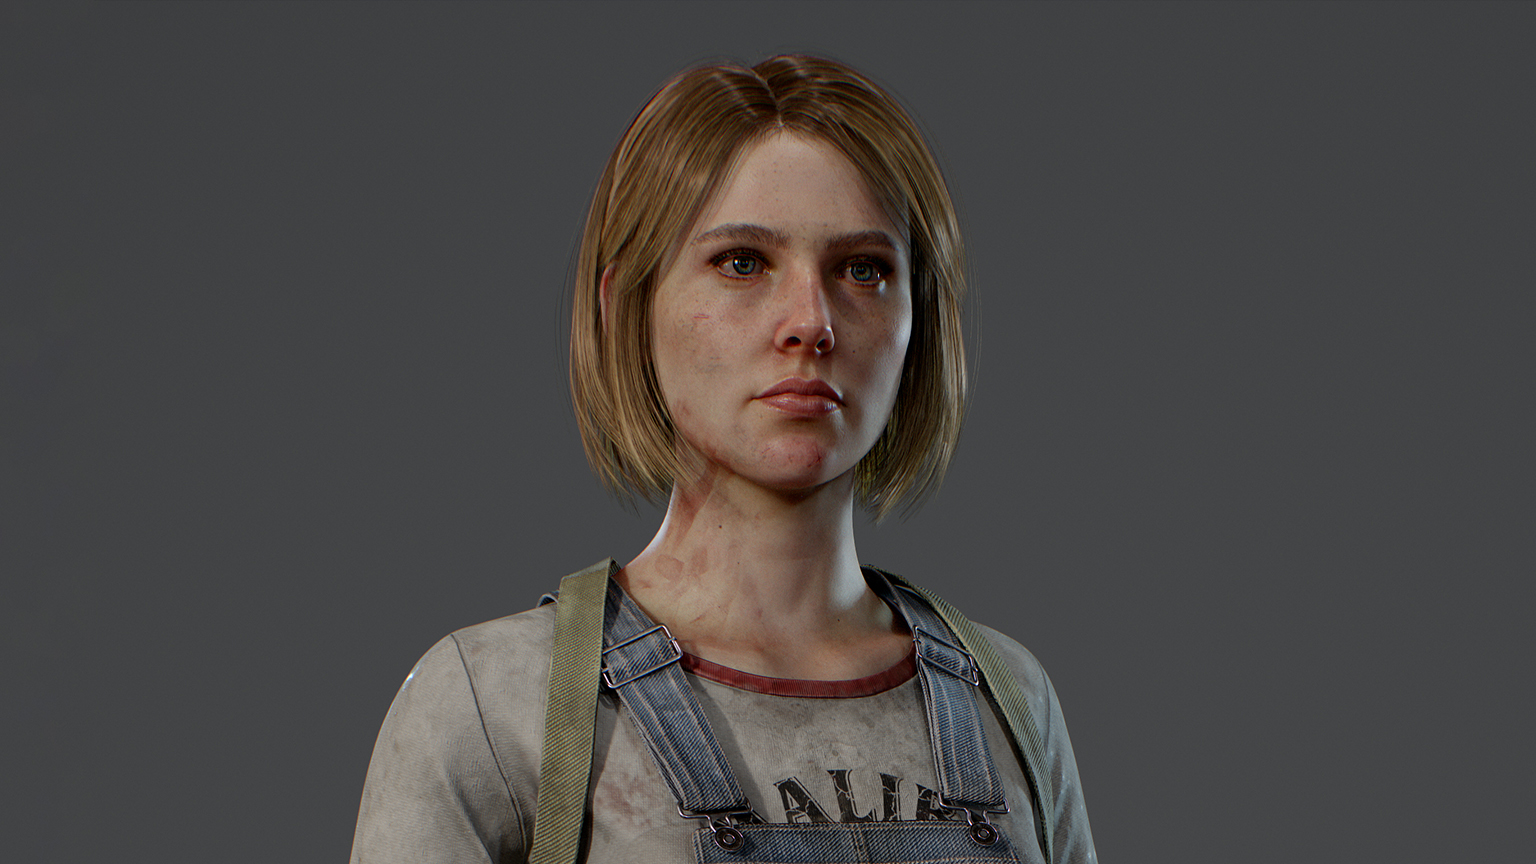
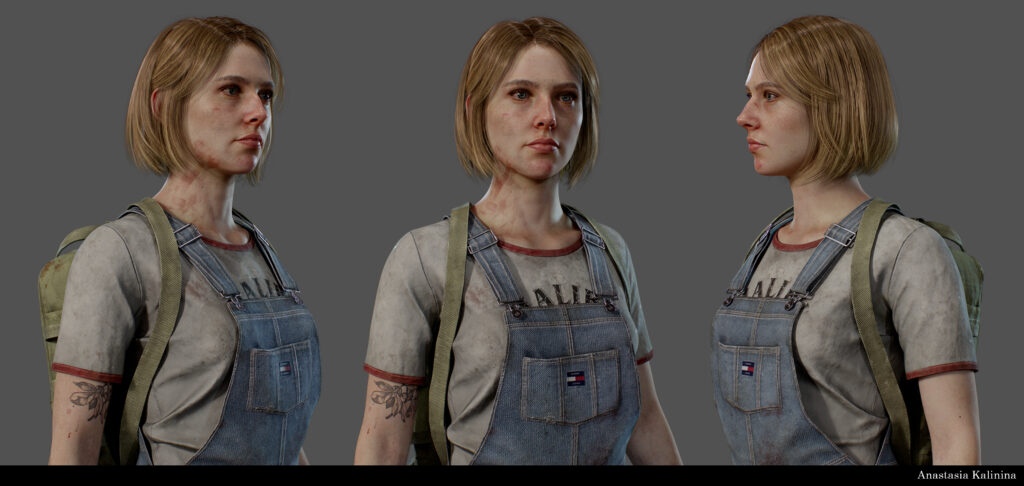
As a beginner I need to practice many things, so the main goal of this project was to make a good quality, stylish character. I wanted to focus on the character’s hair, I also wanted to practice texturing skin in Substance Painter without using an albedo map from the 3d scans, while of course improving my skills in texturing clothes/garments.
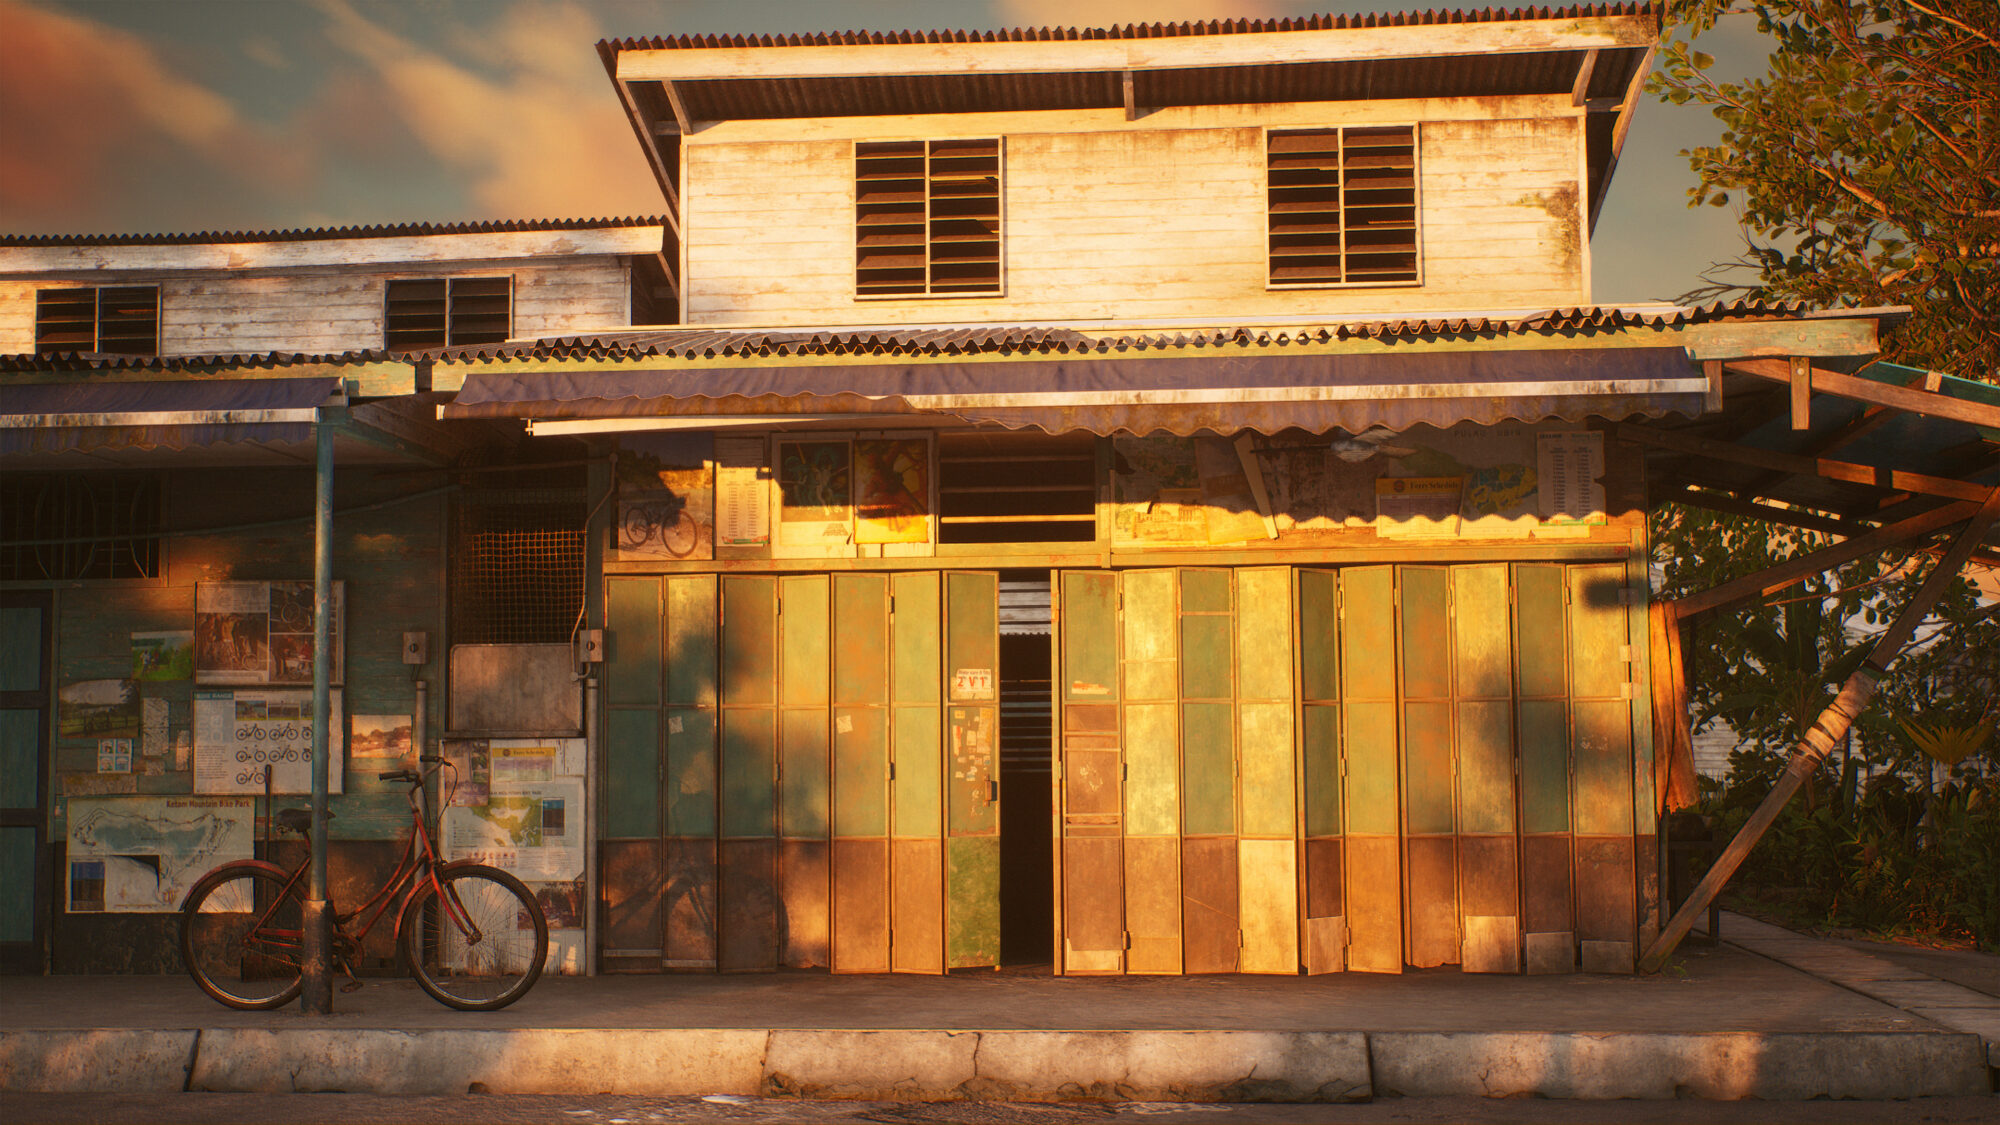
I absolutely love the character designs in “The Last of Us” so they were my mmain inspiration. They don’t have any intricate armor or cyber prostheses and yet they look like eye candy to me because of their incredible textures.
Software
● Zbrush
● Maya
● Marmoset Toolbag
● Substance Painter
● Fibershop
References
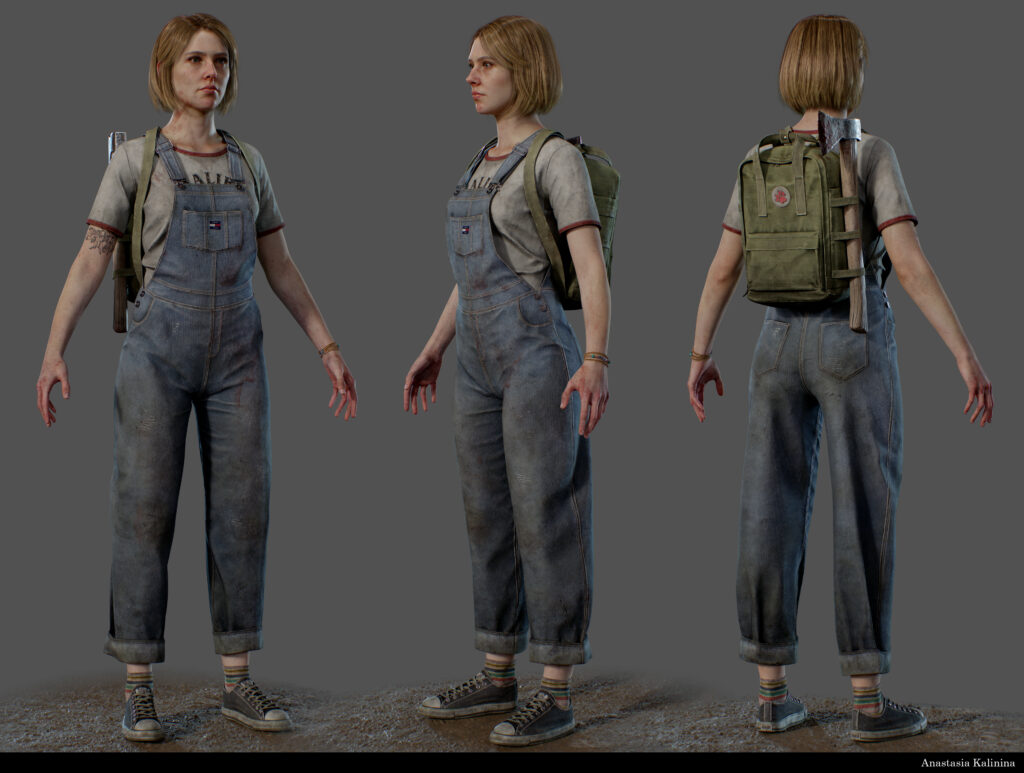
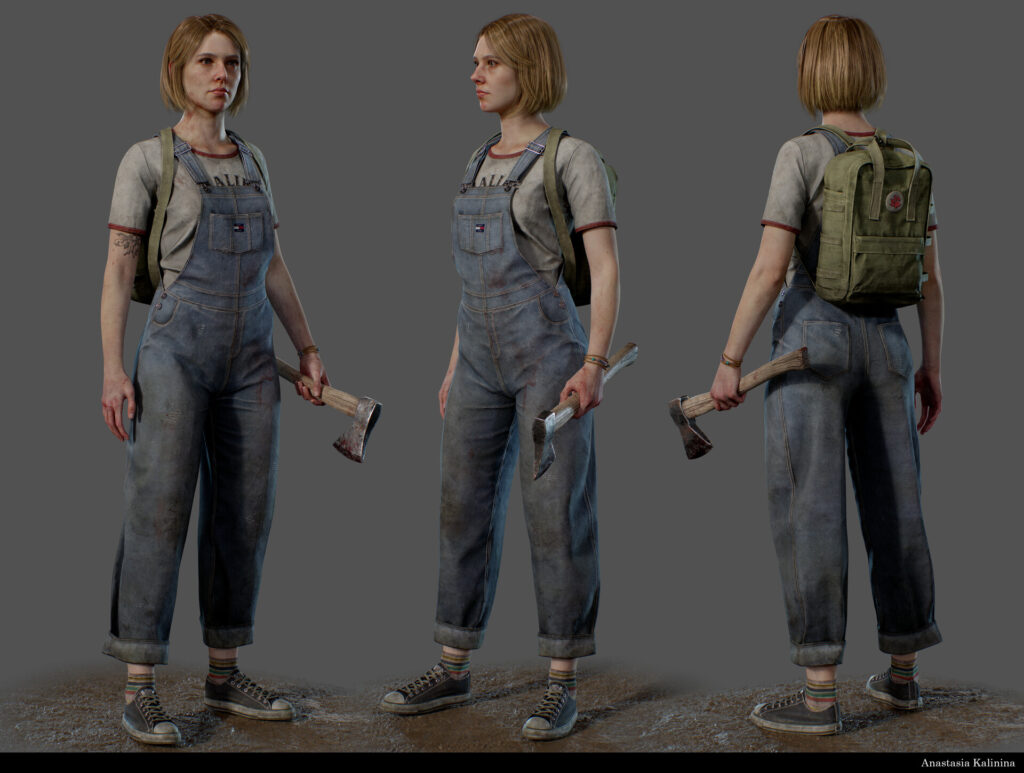
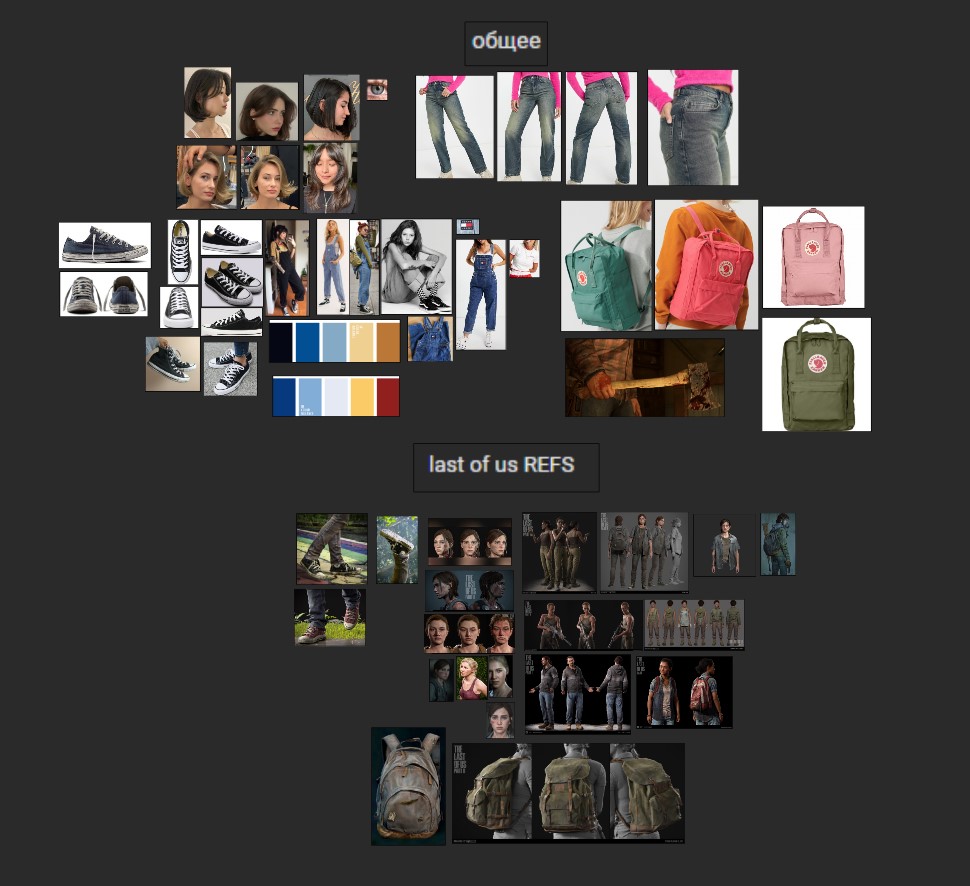
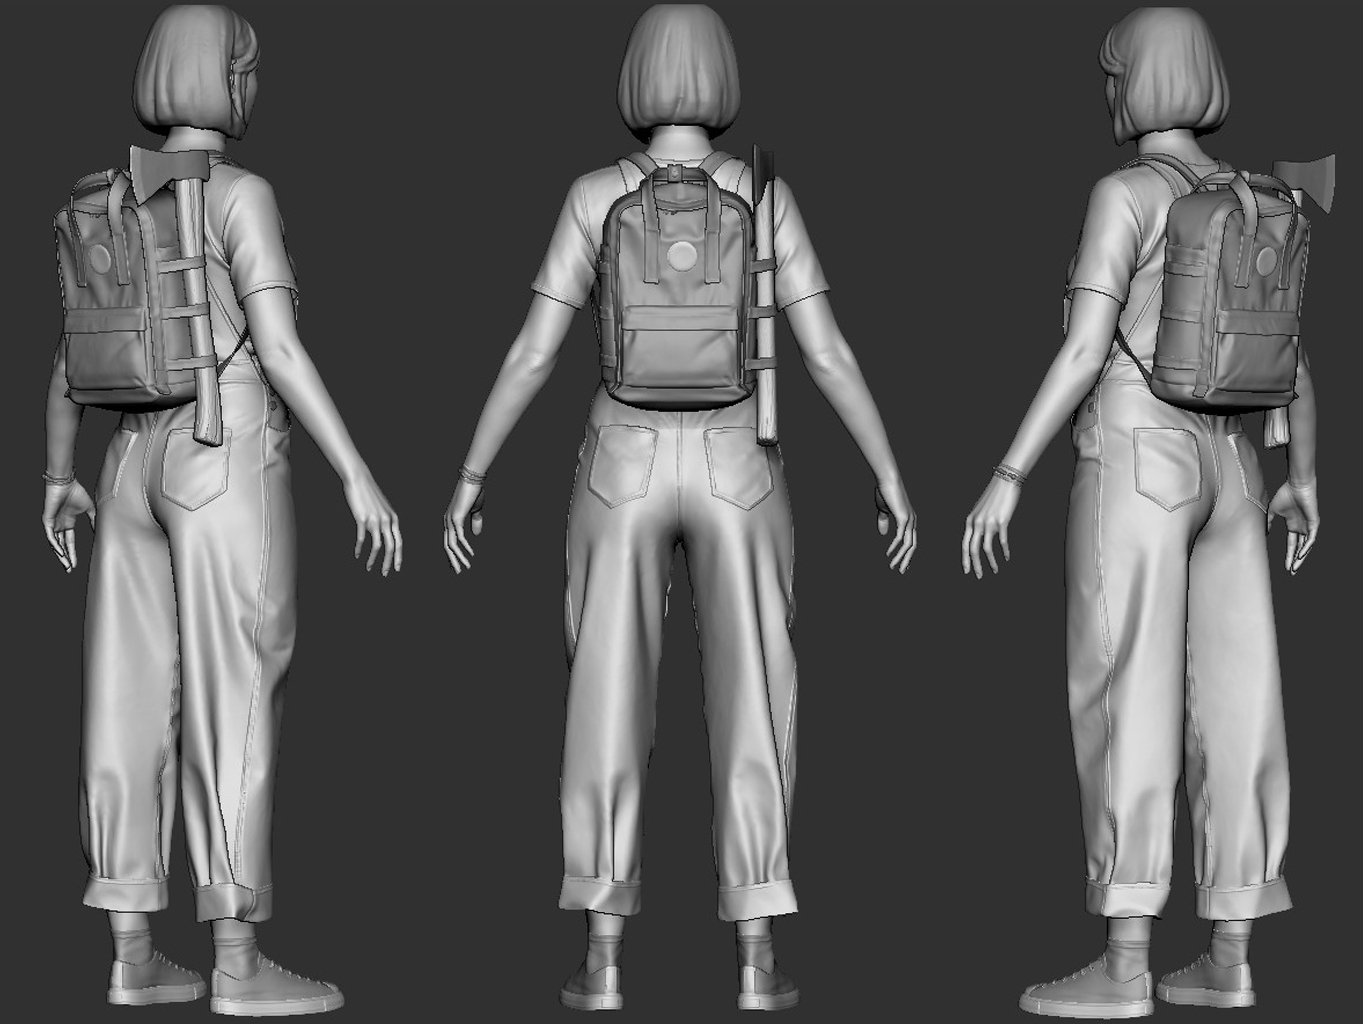
Because I planned to do something based on reality, I just looked at basic outfits on clothing online stores/Pinterest and chose the look of overalls, sneakers, a t-shirt and how could you go without a backpack and a weapon during a zombie apocalypse.
While I looked at many references, one of my biggest sources, as I already mentioned, was “The Last of Us”. Most of all these references perfectly show the logic of dirt placement and wear damage on clothes.
I also chose a palette of main colors that I tried to stick to.
Blockout
For the body, I used a base mesh from the 3d Scan Store and just tweaked the main proportions until I was happy with the result. Since her body is hidden under the clothes I stopped tweaking/sculpting it after secondary details.
I decided to skip clothes blocking out in Zbrush and jumped in Marvelous Designer to make them from scratch, but actually, it is not quite right to do so.
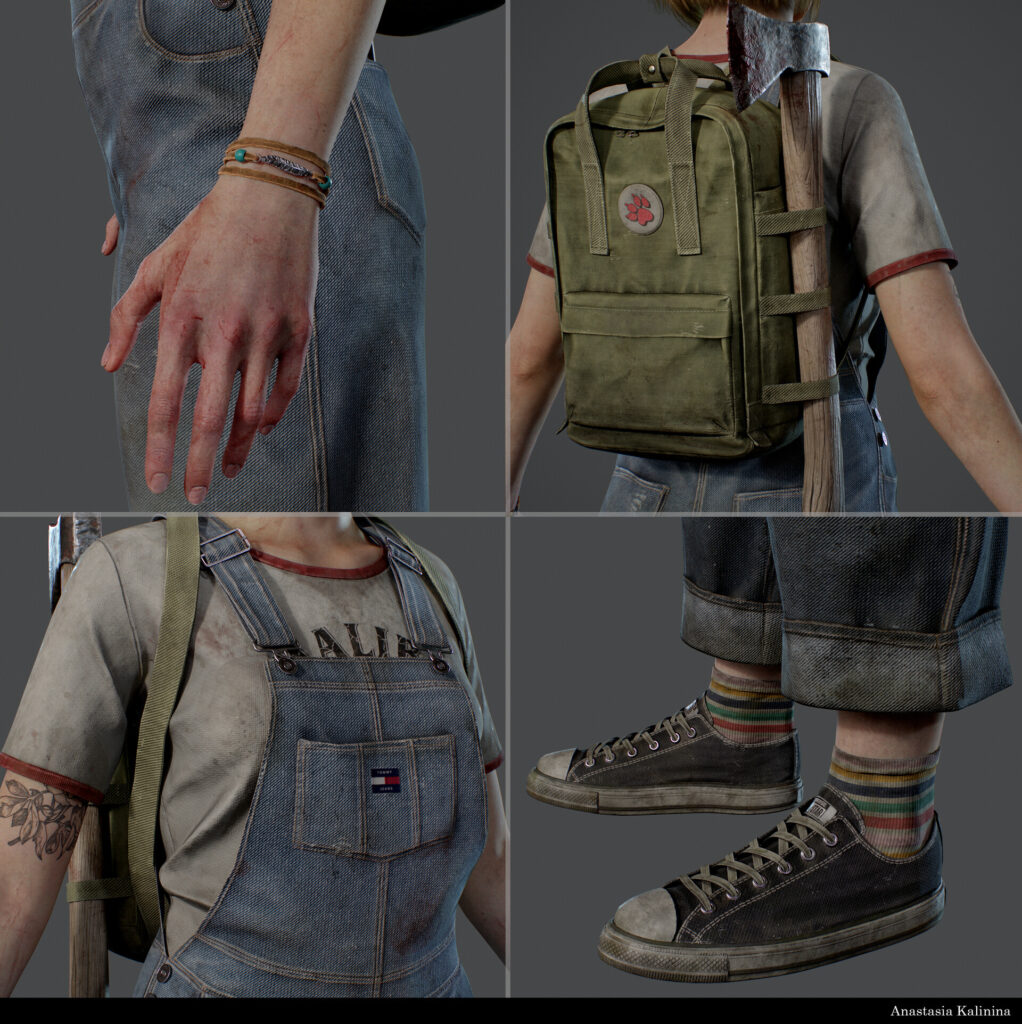
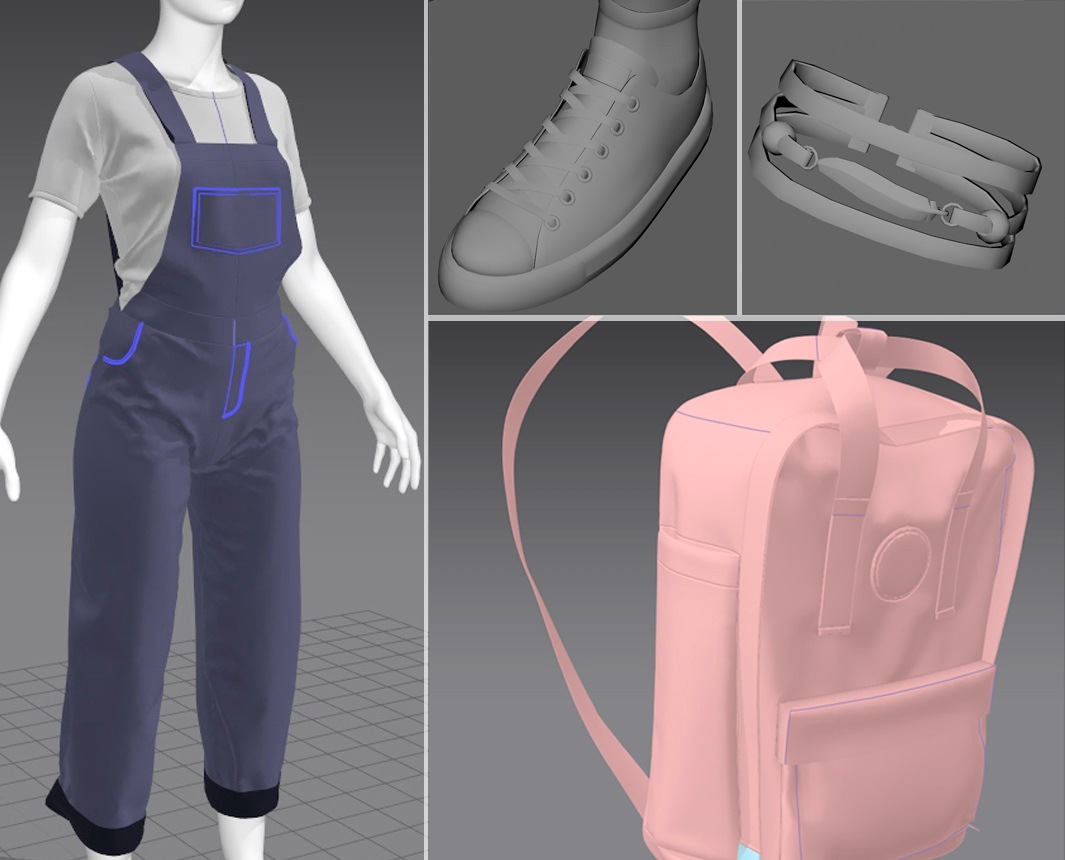
The base for socks and sneakers I made in Zbrush using Zmodeler. The base for the bracelet and shoelace I modeled in Maya.
Modelling
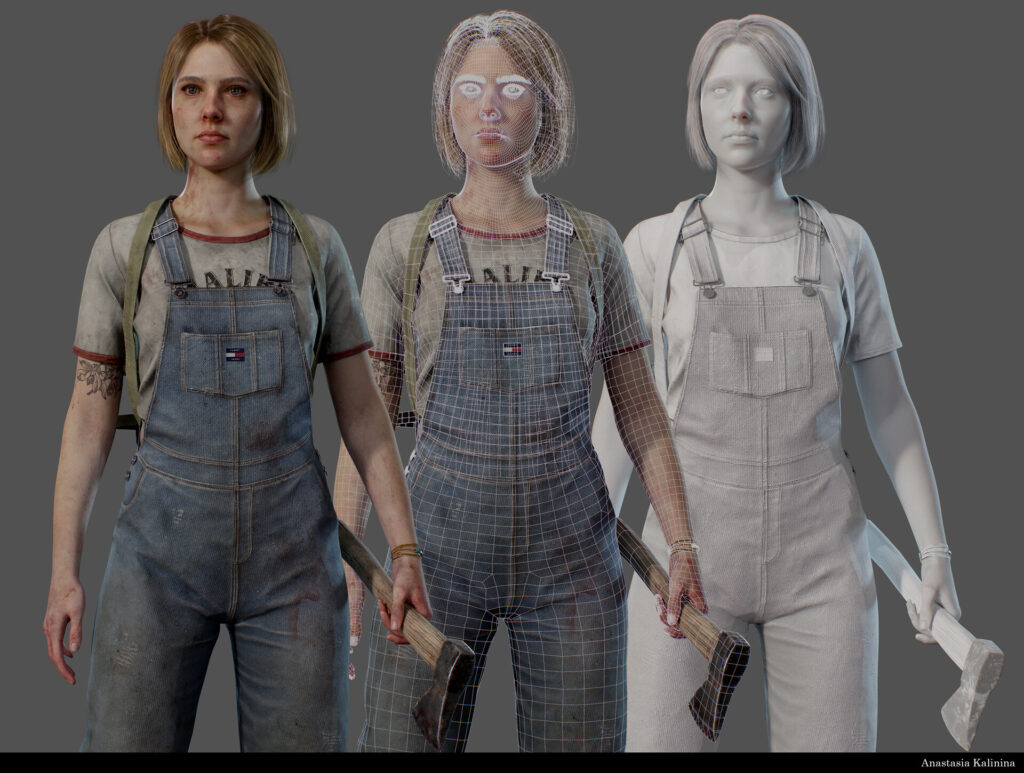
I got a good clothes base from Marvelous Designer, but anyway I added a lot of details in Zbrush such as – more folds, seams, some noise and imperfections.
I also adjusted the position of the back pockets, groin folds (they were too pulled up) and the length of the sleeves (for a better silhouette). Additionally, I added straps on both sides of the backpack.
There were very few hard-surface elements in this character, such as buttons, rivets, etc. The main hard-surface element was an axe. For all of these pieces I used Maya, and then in Zbrush made a high poly version (for example sculpted wood texture on the handle of an axe).

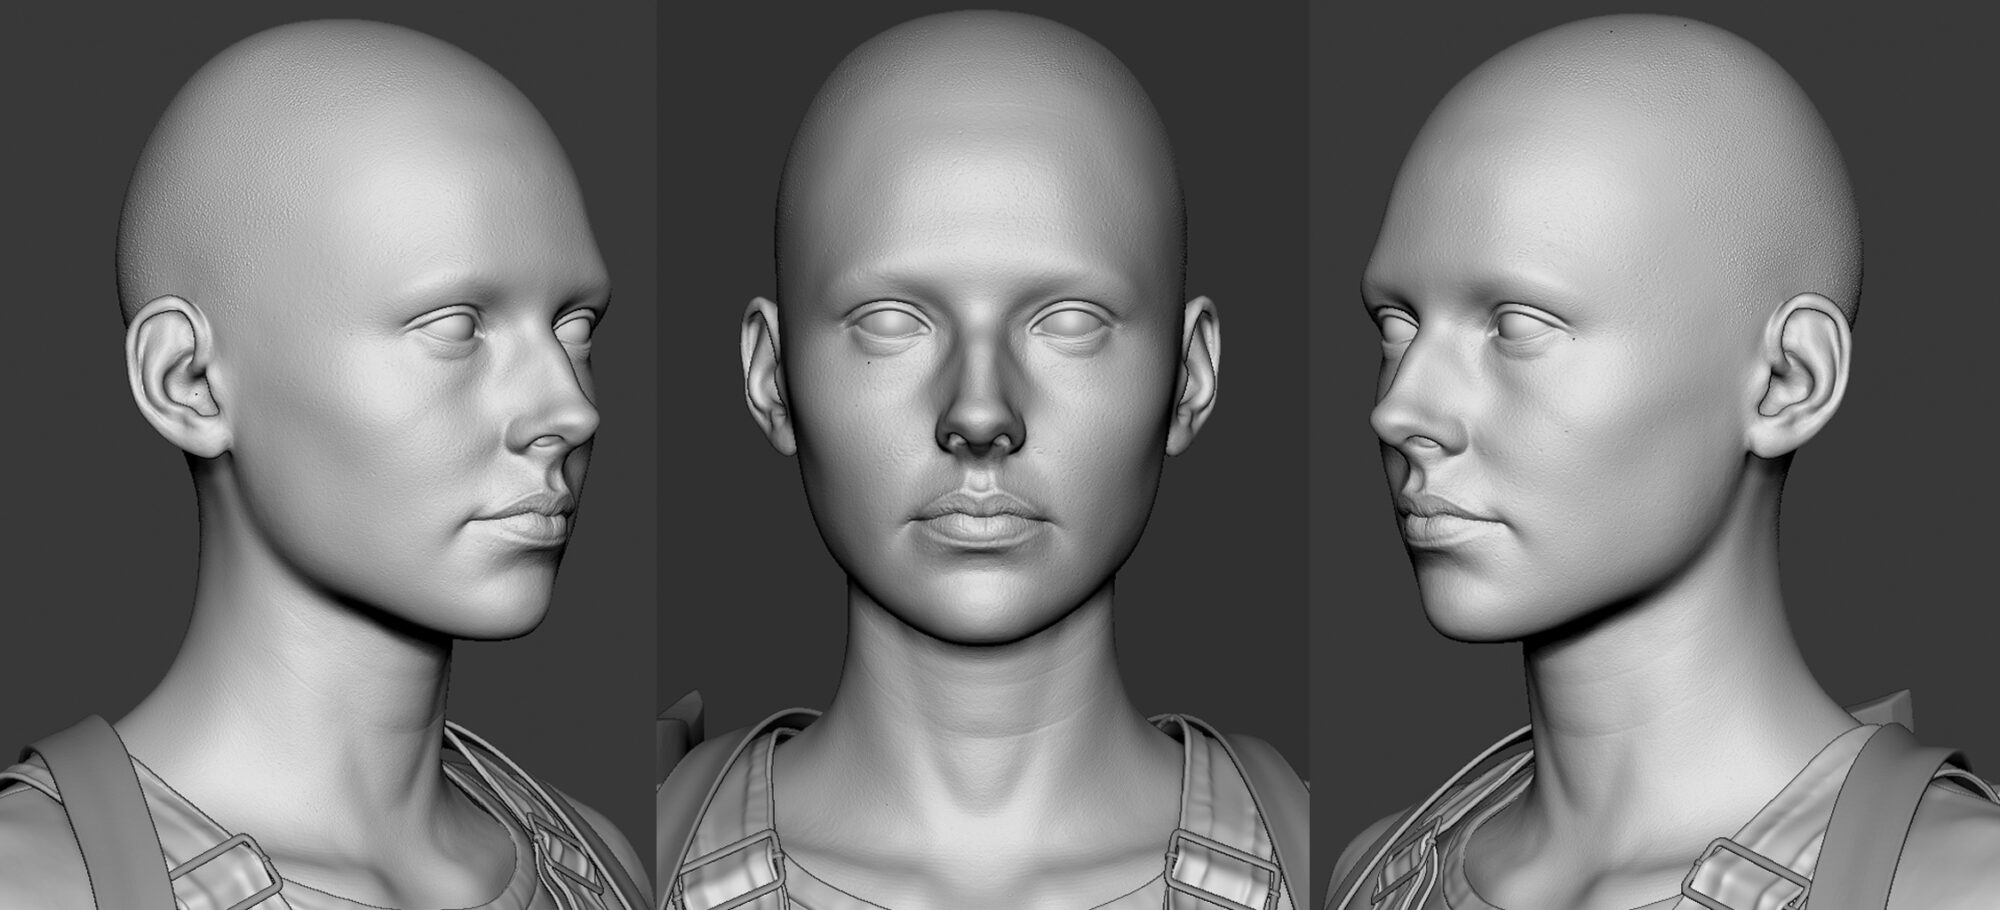
For the eyes, I used my own base mesh which consists of a pupil, a sclera and a lens. For the base of the iris, I used alpha and then added various details.
The displacement map for the body and head was created from the 3d Scan Store scan and applied to the model in Zbrush with the Zwrap plugin. Later I added small wrinkles under the eyes and some noise.
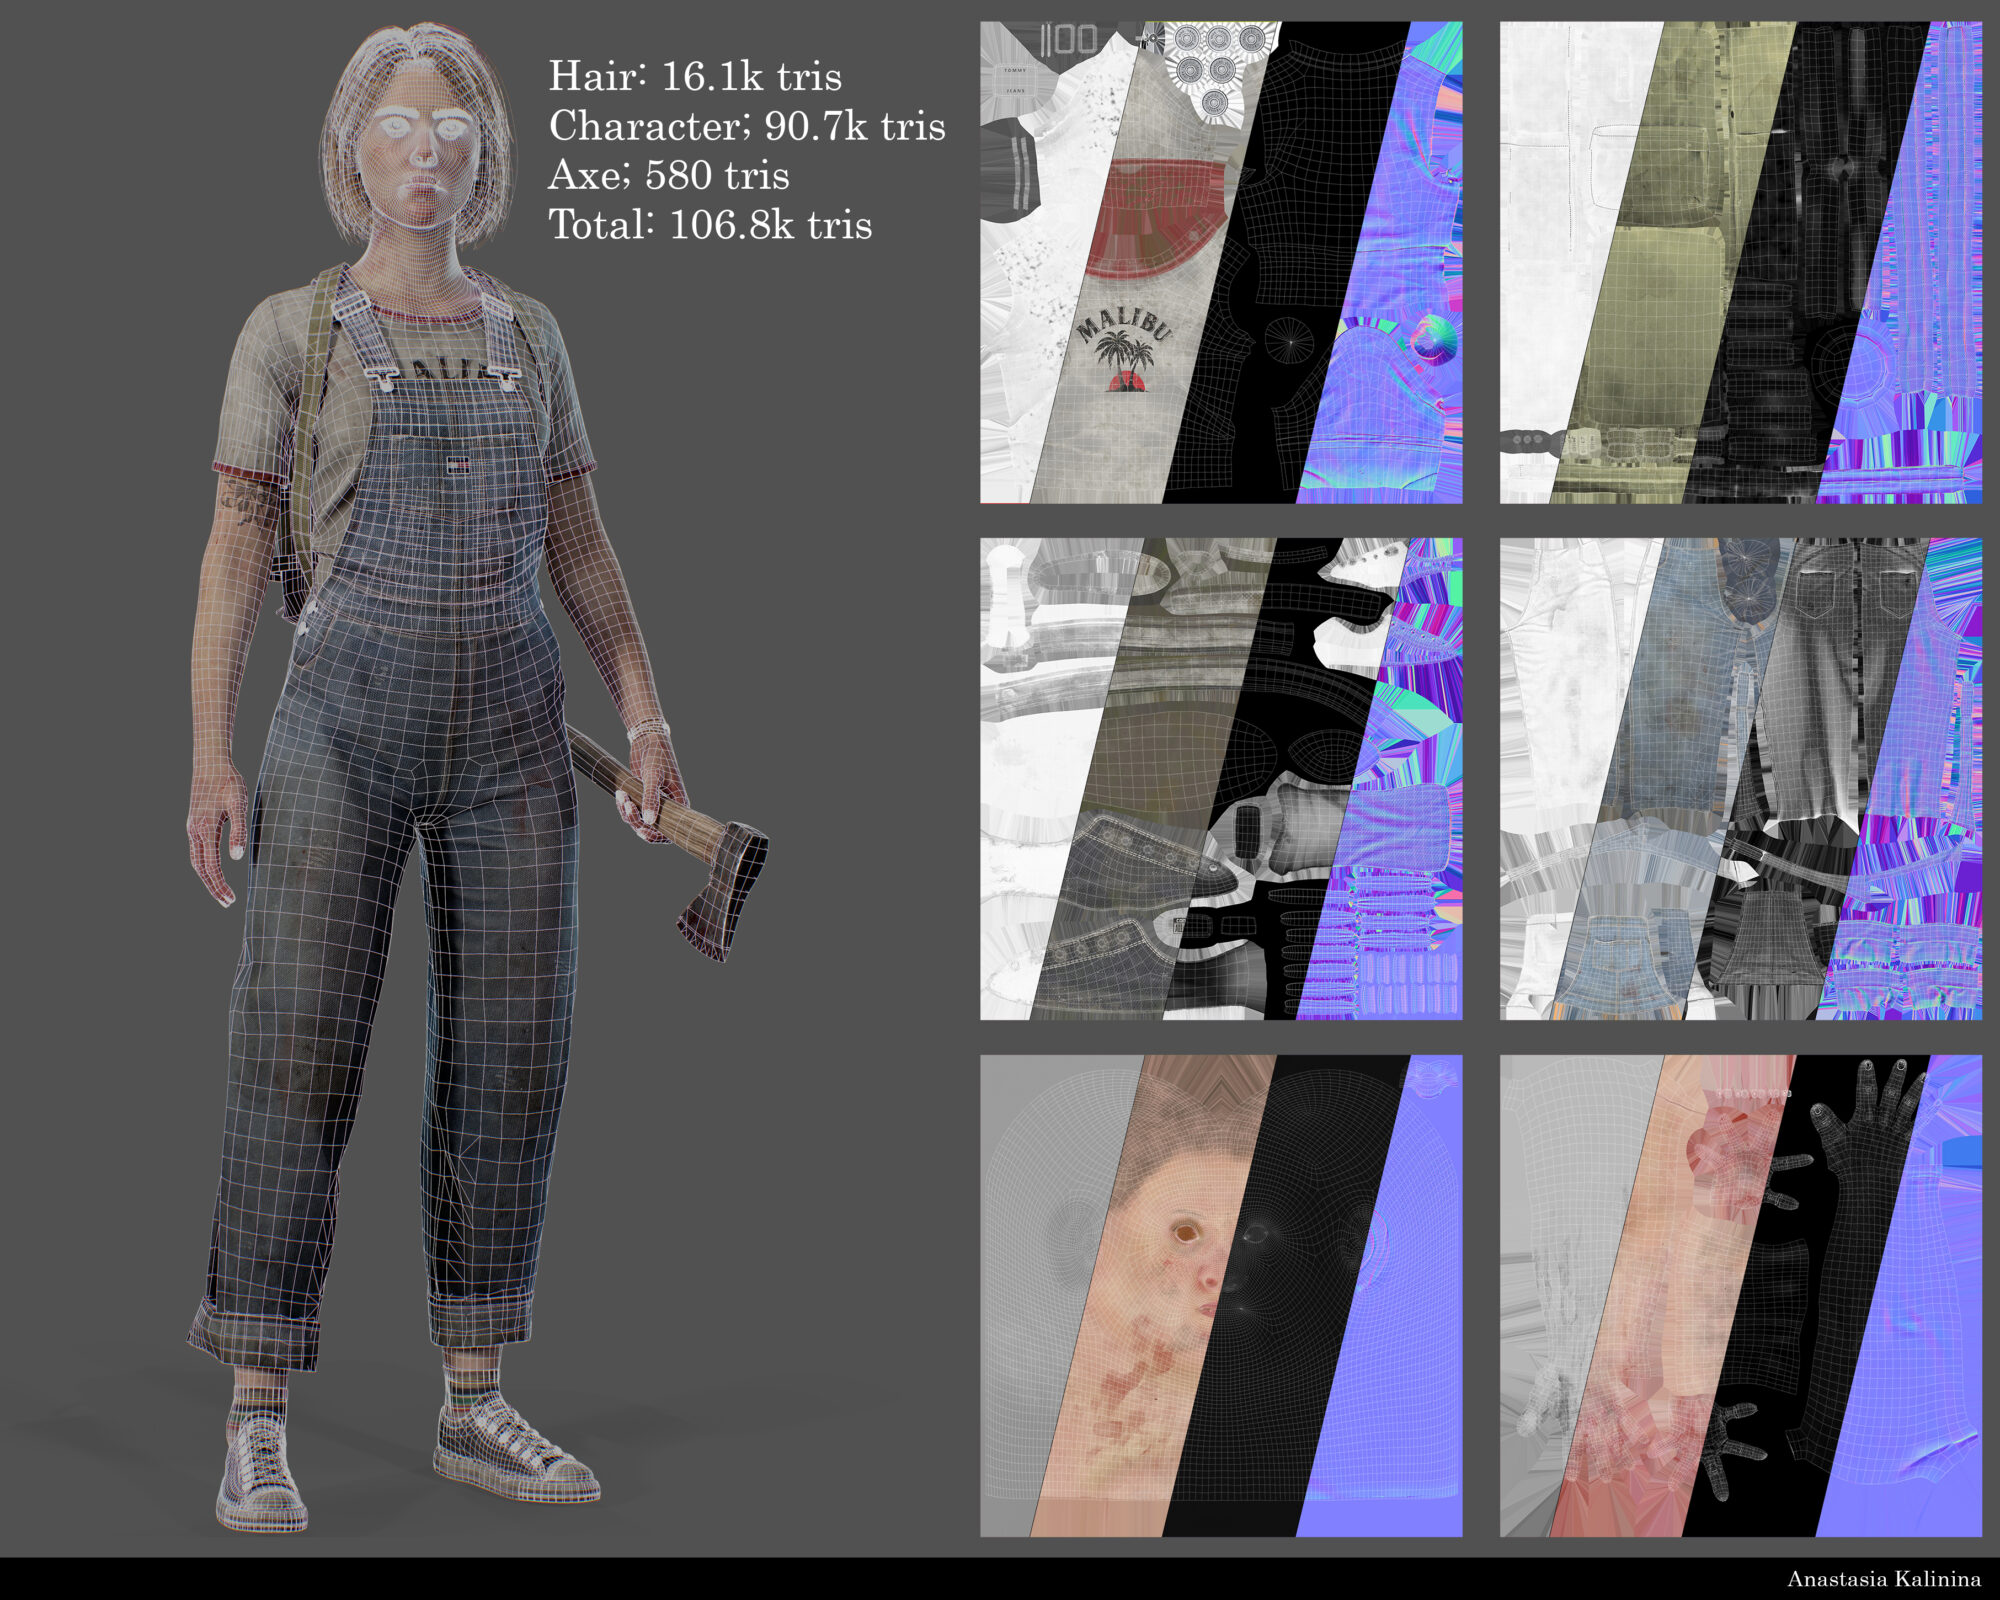
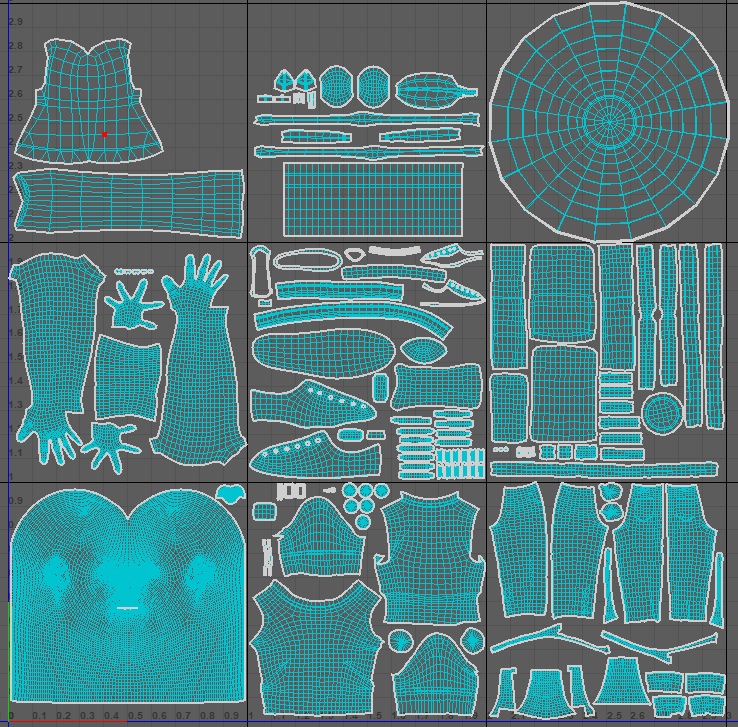
Topology & UVs
I retopologized decimated clones of hands and clothing in Maya using the quadraw tool. Almost every whole object was retopologized separately because I wasn’t limited in polycount. But on some assets, the topology turned out pretty dense.
Retopology of the head was already fine to me after I transferred the displacement map from the head scan in Zwrap.
I spent some time in Maya optimizing the UV sets – any place where I knew I would use tileable texture had to be oriented in the x-axis and y-axis. I baked everything in Marmoset Toolbag.
Texturing
Texturing was one of my favorite processes in this work, I relied on a bunch of tutorials on Youtube.
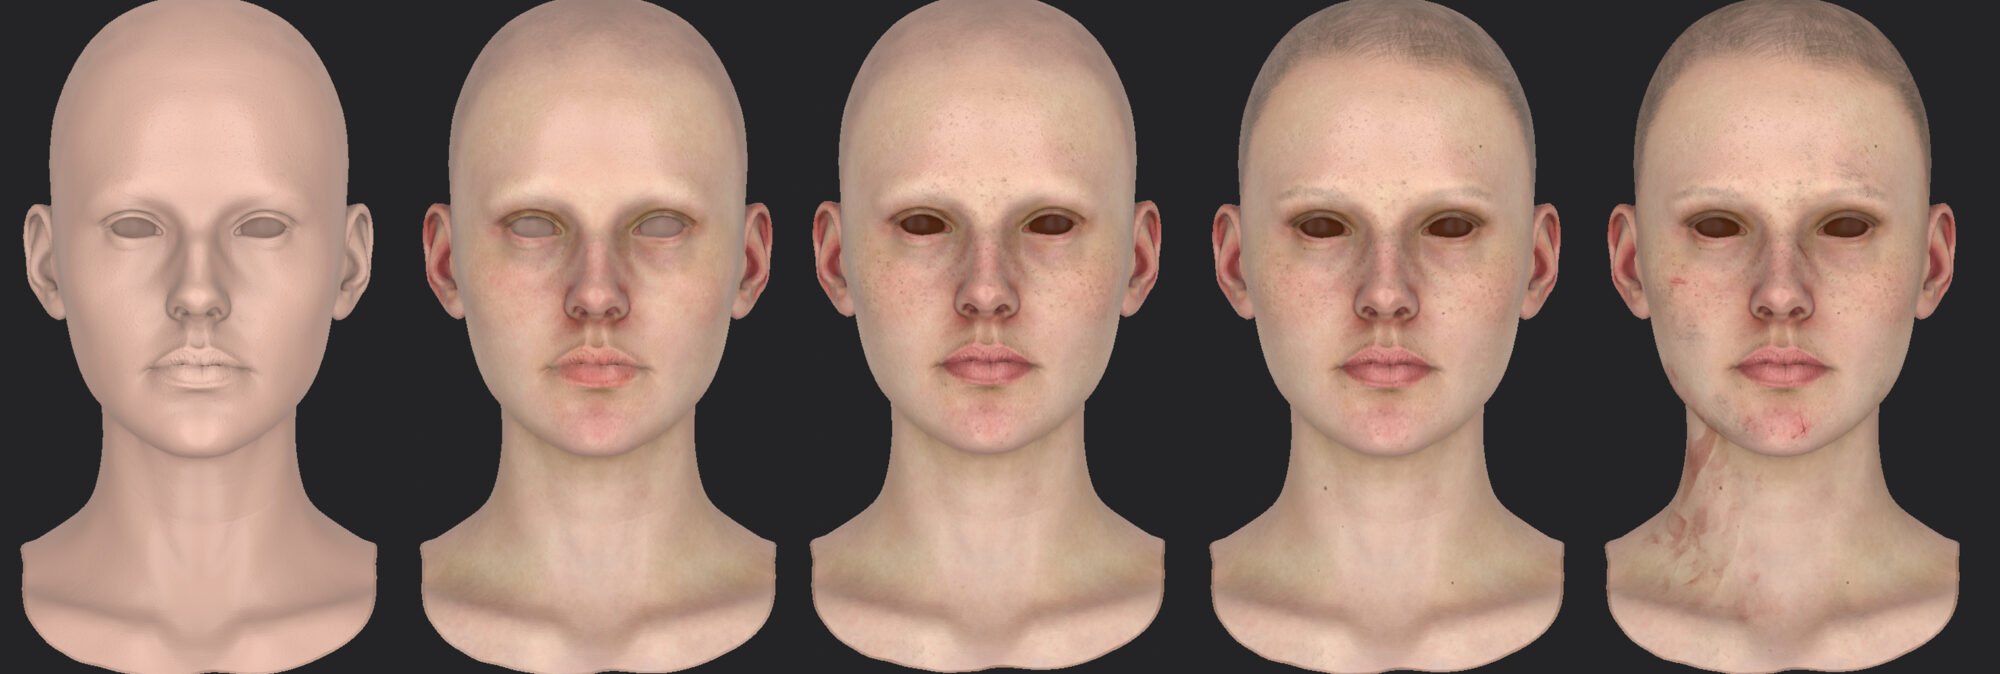
One of my goals was to try to achieve believable skin texture without using albedo from a 3d scan. Although I did use the scan as a reference – I created a layer with albedo and turned it on and off to see which areas of the skin to apply specific colors.
I started from a neutral base and then with a “Cotton” brush with very low opacity painted certain areas with reddish, yellowish and blue colors (for example).
Later I made layers with different variations and tones of these colors and added greenish and purplish colors.
When I prepared a good base I added some skin imperfections, freckles, small veins, moles and makeup.
And to complete the survivor’s look I put some dirt on her skin, scratches on the protruding parts of her face and blood smears.
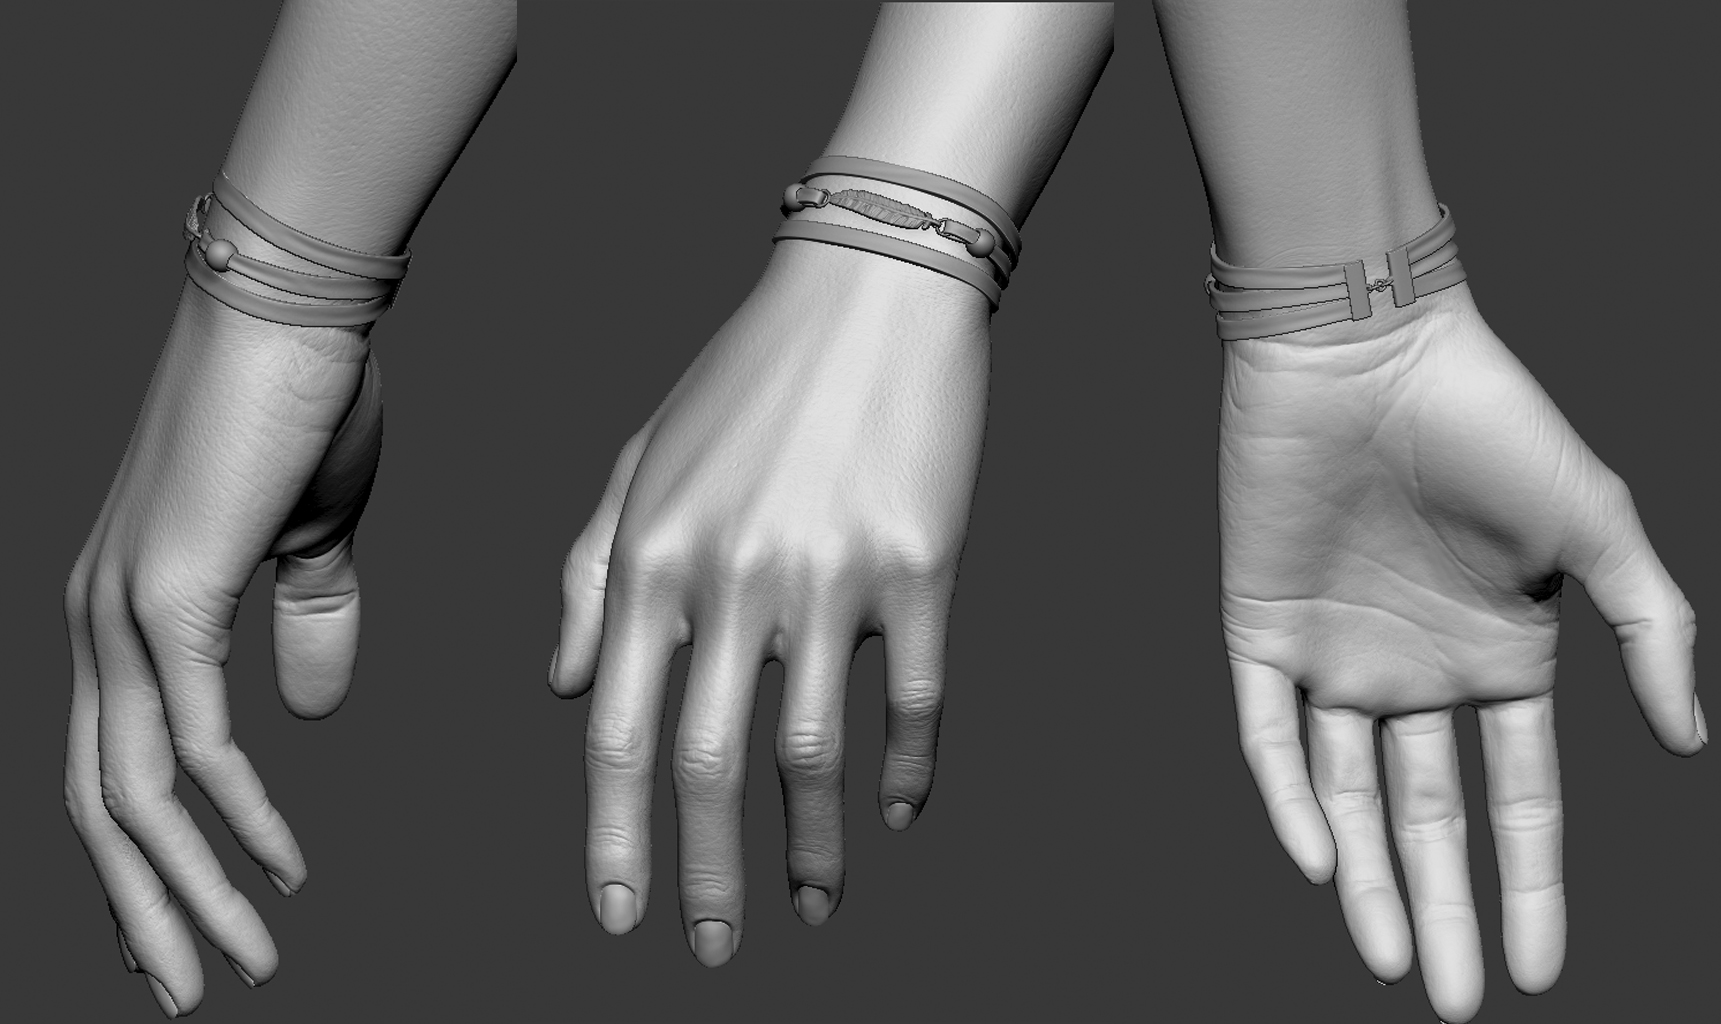
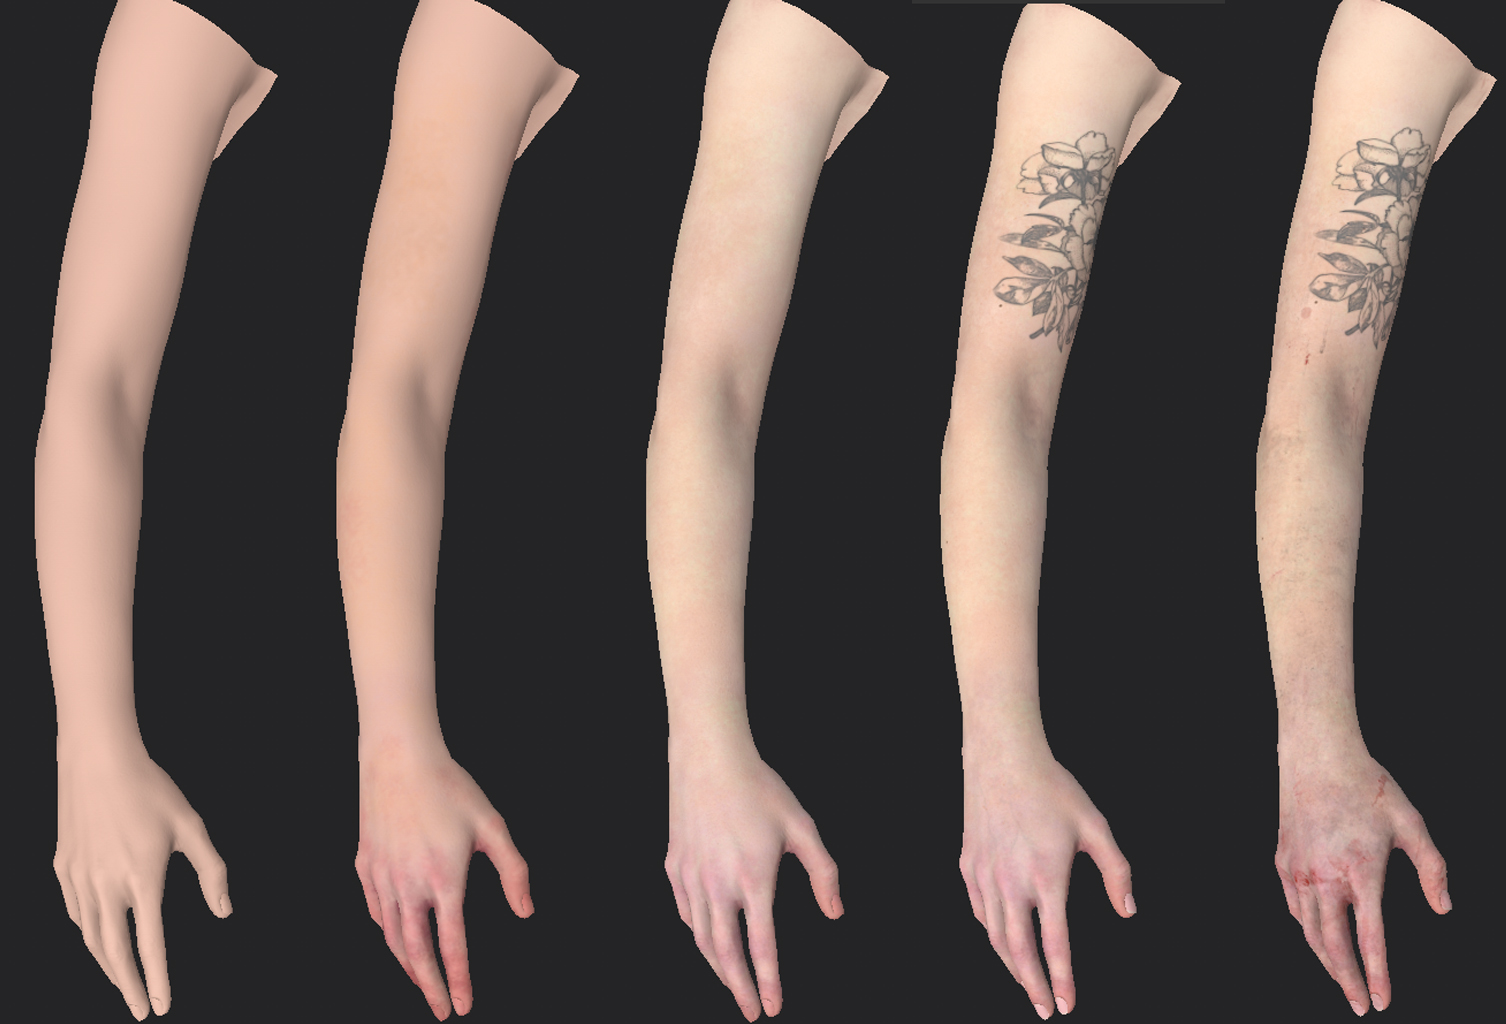
The exact process was applied to the hands, in the same way, I added layers with different color variations. The tattoo was created with a paint layer, a png picture I found online and a blur filter.
For blood stains and dirt, I used fill layers with procedural textures.
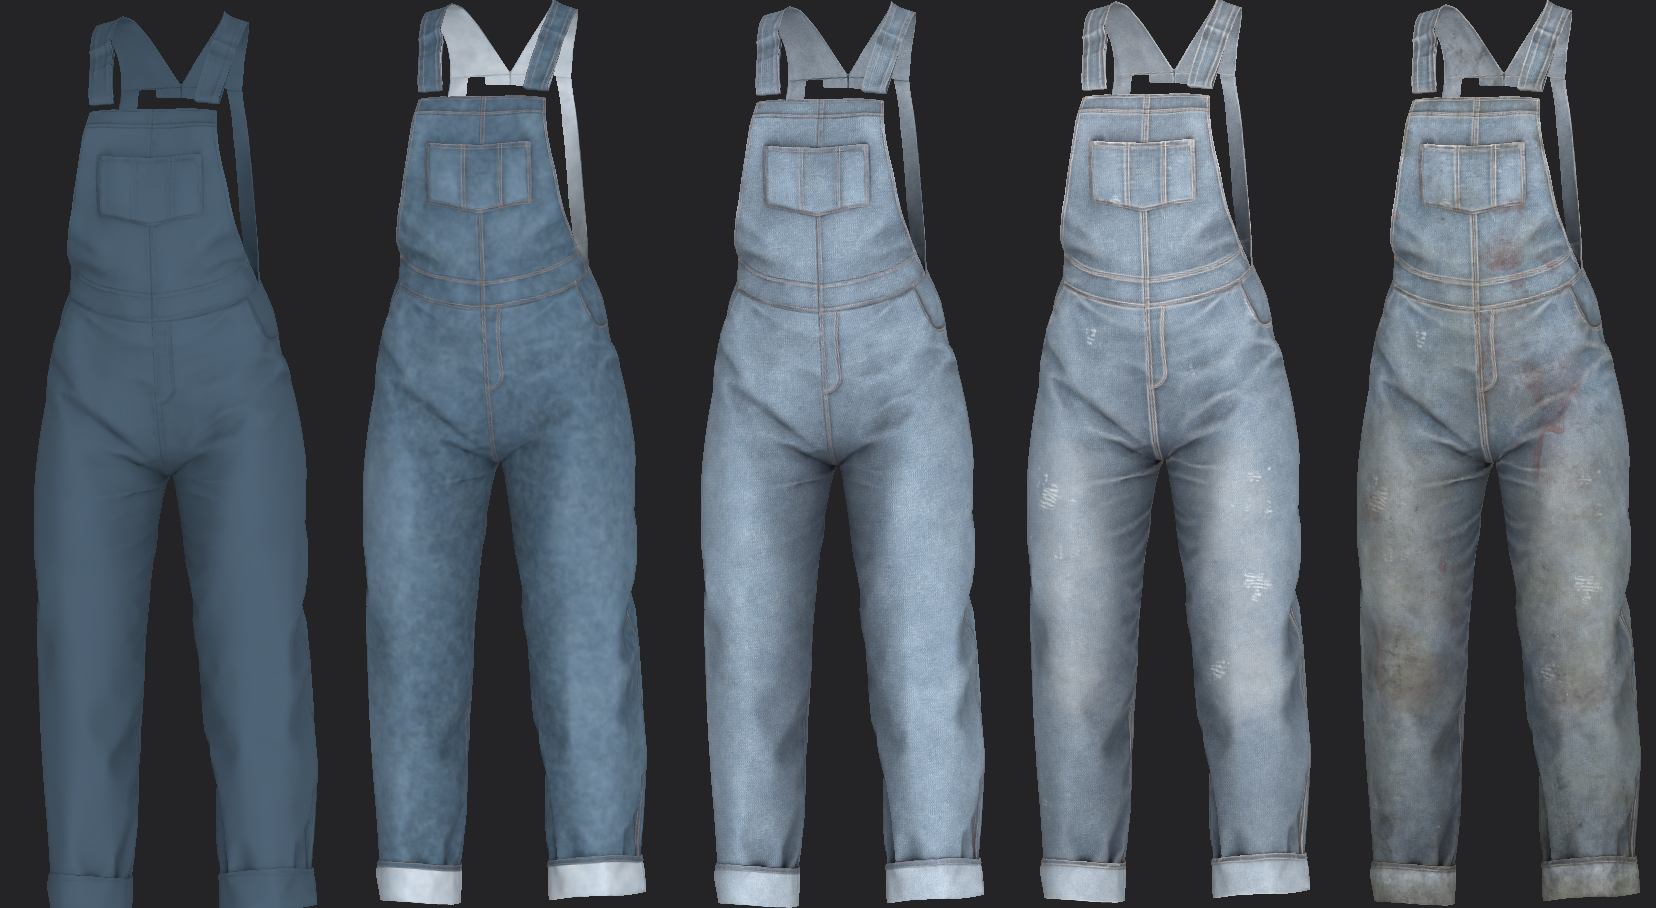
Clothing
I relied on this tutorial by Hossein Hamidi for the jeans texture process because I have never made denim texture before. It is all about an exciting variety of colors, gradients and lighter and darker parts – colors and tones can emphasize volumes and help achieve more realistic results.
With such manipulations, you can create real eye candy. In the examples of my pictures, you can really see how assets become less flat and more voluminous.
Also on all clothes and sneakers, I made fabric patterns larger than in real life so that the texture is read from afar.
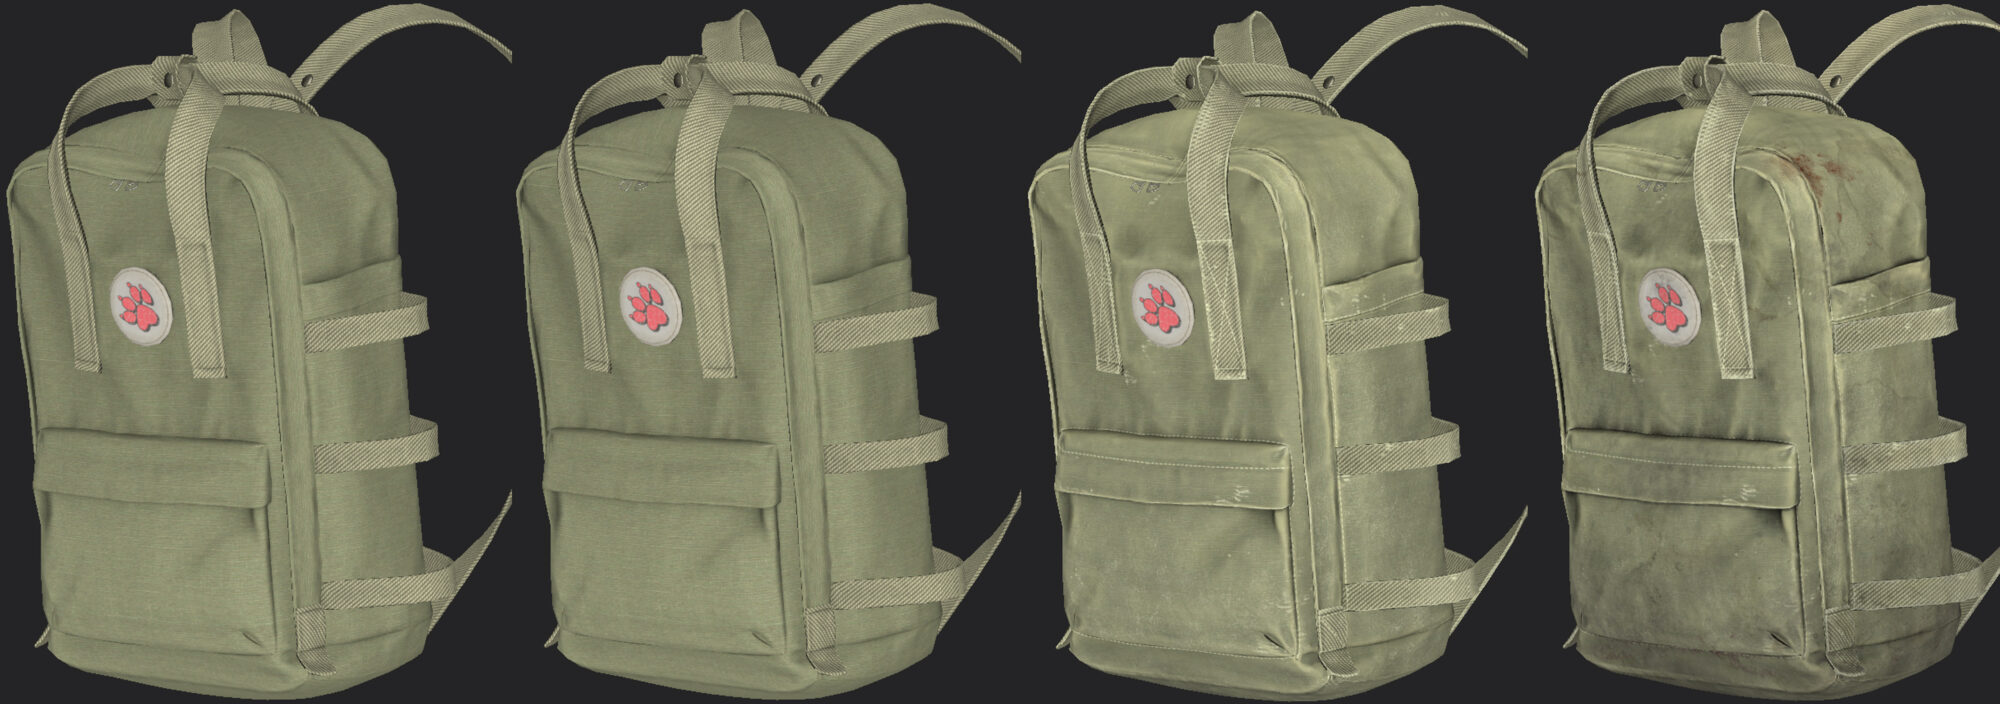
For the dirt, blood and worn fabric I used a lot of smart masks and procedurals.
And the logical location of stains – places that are most exposed to contact with dirt, such as the edges of clothes the bottom of a backpack, knees, etc.

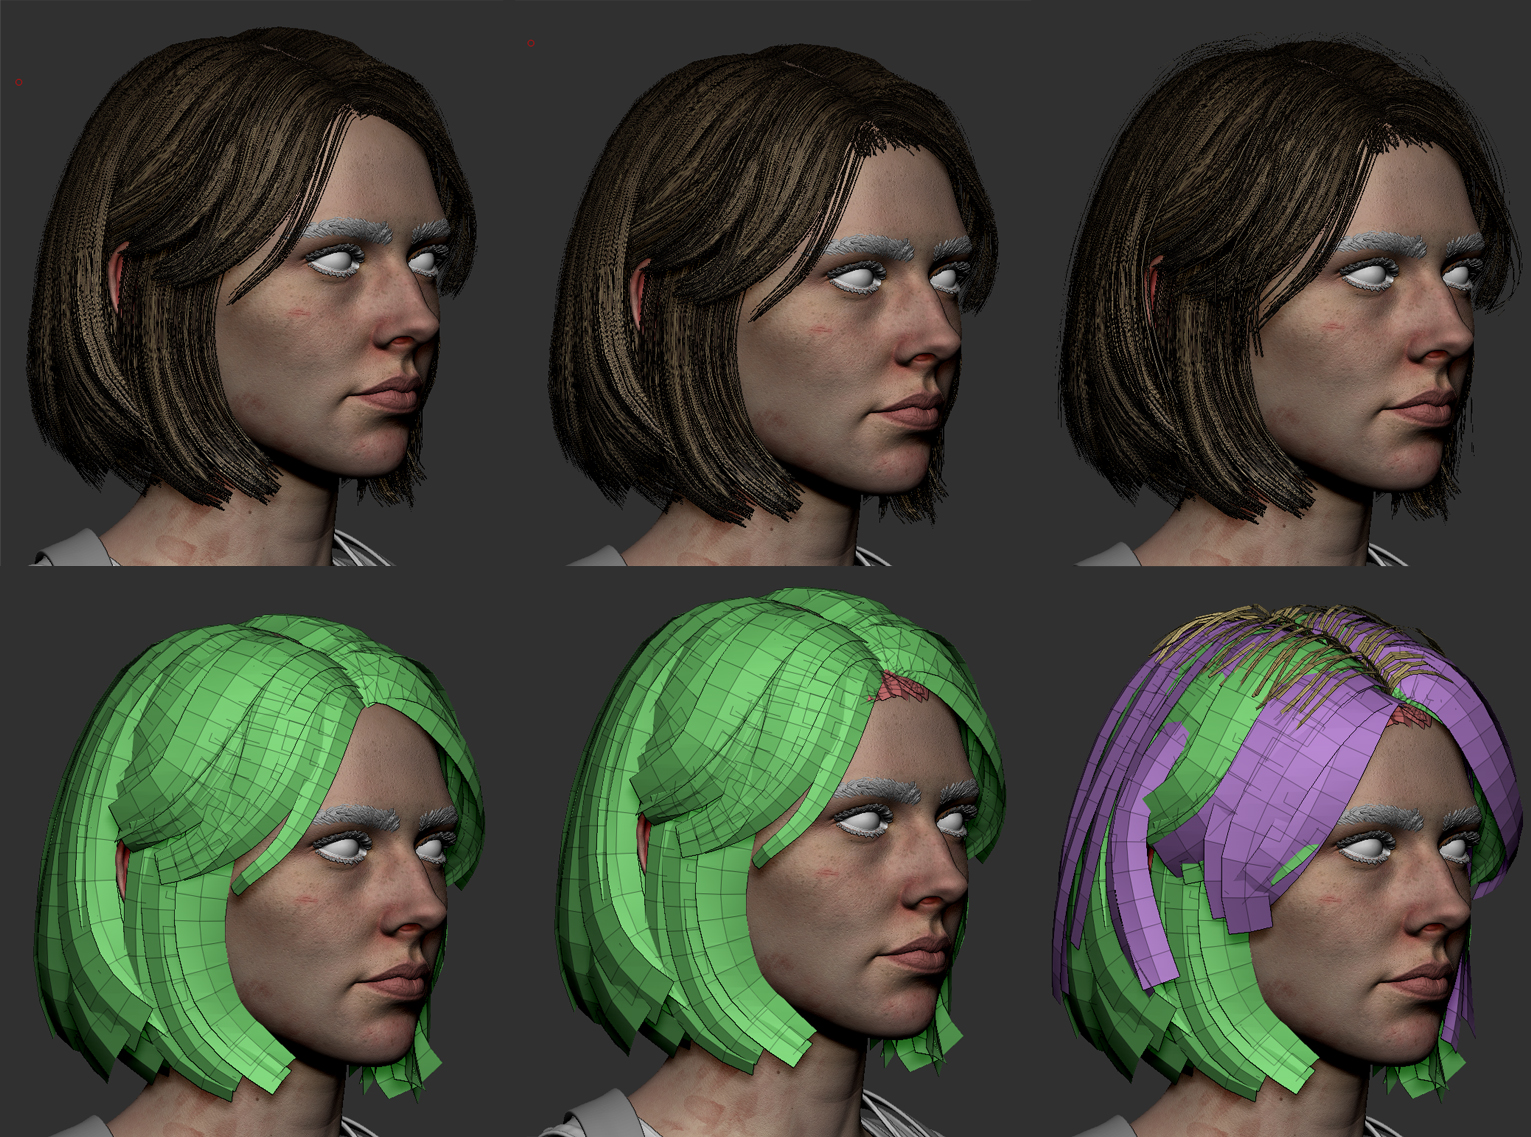
Hair
I did her hair according to the tutorial by amazing TriGon. I really recommend you check his channel, there is a lot of helpful information. I made the texture for the hair in Fibershop, and I used the GS Curve Tools plugin for the hair card placement.
I didn’t do many layers in her hair – only the main layer, baby hairs and flyaways.
Render (Marmoset)
During the rendering part, I understood that presentation for your work is incredibly important. It brings out the whole vibe of the character and emphasizes the virtues.
Don’t ruin the art you worked so hard on with a lousy presentation!
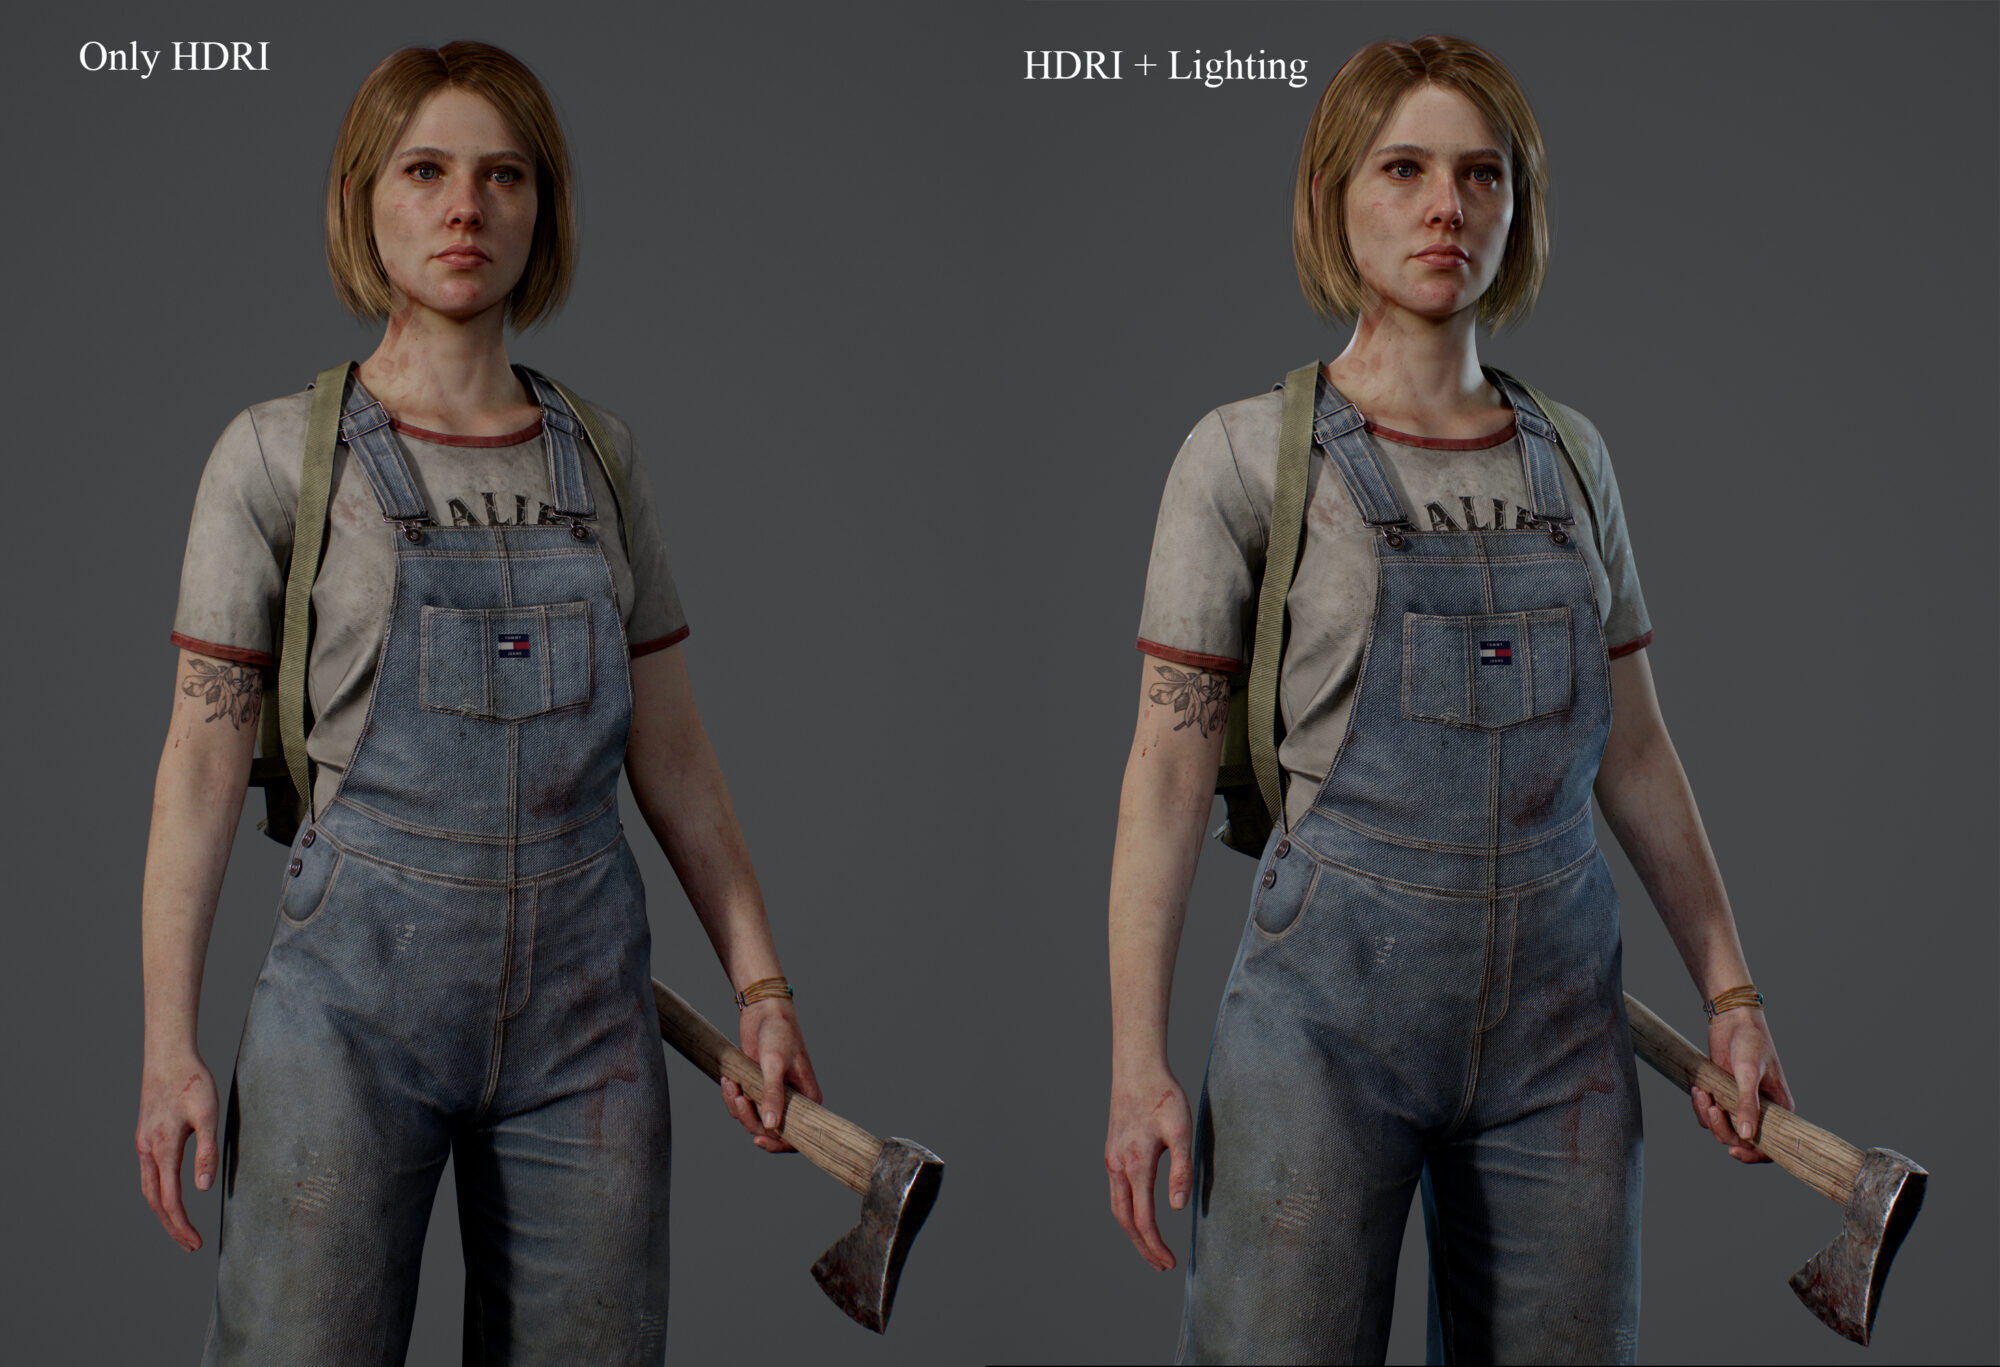
Lighting
I used HDRI + sky light, key light, 2 rim lights, 1 rim light for the head and 2 spotlights for the axe.
Conclusion
Thank you very much Games Artist for this opportunity to write a minor breakdown of my latest work! I’m pretty satisfied with how my character Survivor turned out and I learned and practiced many things during this work.
Now I’m ready to make more complex characters. And I wish you, who read this article, to be sure to achieve your goals!
Read more articles
You might also like these articles.
