The Abandoned Blowers

Introduction
Hello, my name is Aleksandra Zając. I come from Poland. Currently, I work as a Senior 3D Artist at Bloober Team and as a Contract 3D Artist at Dekogon Studios.
I've been working in the game development industry since 2014, and my biggest experience lies in creating vehicles and props.
However, for the past few months, I've also been exploring environment art.
Software
- Blender
- Substance Painter
- Unreal Engine 5
- Photoshop
- Marmoset Toolbag
- ZBrush


Idea
I decided to take the CGMA Modular Environments course by Clinton Crumpler. Each participant had the freedom to choose their own environment and even the stylistic approach.
Knowing that I had 10 weeks to complete the course and wanting to go through all the stages in a timely manner, I had to be careful in choosing the scale and level of detail for my location.
From the very beginning, I knew that I wanted to create an environment for a first-person perspective (FPP) horror game with a realistic style. Additionally, I have a passion for industrial, post-apocalyptic, and abandoned settings.
I love rust, which can form intricate patterns like brushstrokes on canvas and showcase fascinating colors and textures.

Dust, dirt, and debris are also interesting elements that add character and history to a location.
When combined with intriguing lighting, they create contrasting variations of roughness, especially noticeable on the floor.

I began my research, which lasted for about two days. I explored various urbex websites and photographs.
Here are some of the great sources I found: https://www.bcd-urbex.com/ and https://www.flickr.com/photos/urbexetorbi/.
Ultimately, I chose a French location called Soufflantes Decazeville.
I found plenty of references both inside and outside the location, which proved to be very helpful during the creation process. The place had everything I wanted to include in my environment, and I was particularly fascinated by a large symmetrical machine with a wheel.
I knew I had to incorporate it into my project.


I was struggling with thoughts of whether I would be able to handle such a complex and detailed location, especially as it was my first time working on such a large-scale environment.
Damaged places require a lot of work and effort. However, in the end, I decided to trust in my skills and pursue what I truly wanted to create, questioning whether I would actually be able to achieve it in such a short time.
I worked on the course after my regular work hours, but I set myself a great pace and used my free time to the limit to achieve my goal.
At every stage of my work, one of my main sources of reference and a benchmark for overall graphic quality were screenshots from The Last of Us.

Planning
It was very helpful right at the beginning to organize my work into separate parts on Trello, listing what needed to be done: assets, materials, damage, debris, etc. Additionally, I often jot down quick ideas or details on a piece of paper that I want to implement.
This way, I don’t waste time and energy trying to remember everything, and I don’t have to worry about forgetting something.


Blockout
To determine the scale of the building, I first used an external photo that included a person standing next to it, which is always helpful because it provides an easy point of reference.
I recreated the outline of the building in Blender, added a 180cm tall figure, and aligned it with the reference photo.

Knowing that the building is approximately 2200cm long and 2000cm wide, I could start planning the modular pieces of the walls.
In the original location, the distances between windows are not regular along the entire length (as seen in the external references), which I also took into account in my project.


I initiated the blockout process in Blender, ensuring everything was aligned correctly. In modular planning, the grid is vital, so I activated it before placing any elements.

After confirming a perfect fit, I blockout the remaining unique props and exported all elements to the engine.
The Blender For Unreal Engine addon is invaluable for this purpose. You can download it here.

For the Blower Machine, I divided it into four parts since the Lumen lighting struggles with large meshes. Additionally, maintaining a consistent naming convention, such as [SM_NameMesh_01a], is crucial for organization and ease of access.

Within the engine, I replicated my setup, with emphasis on using the grid. I also introduced a light-blocking mesh with window cutouts to prevent Directional Light from penetrating the walls.


Planning – Second Part
With the engine blockout ready, I meticulously mapped out the entire scene, focusing on trims, unique elements, tiles, and hybrid trims. This step was invaluable. I established a project texel density of 512 px/m minimum for a 2048 px texture, consistently checking the trim’s adherence.

Below, you can view a screenshot of this project’s modular elements and unique props.

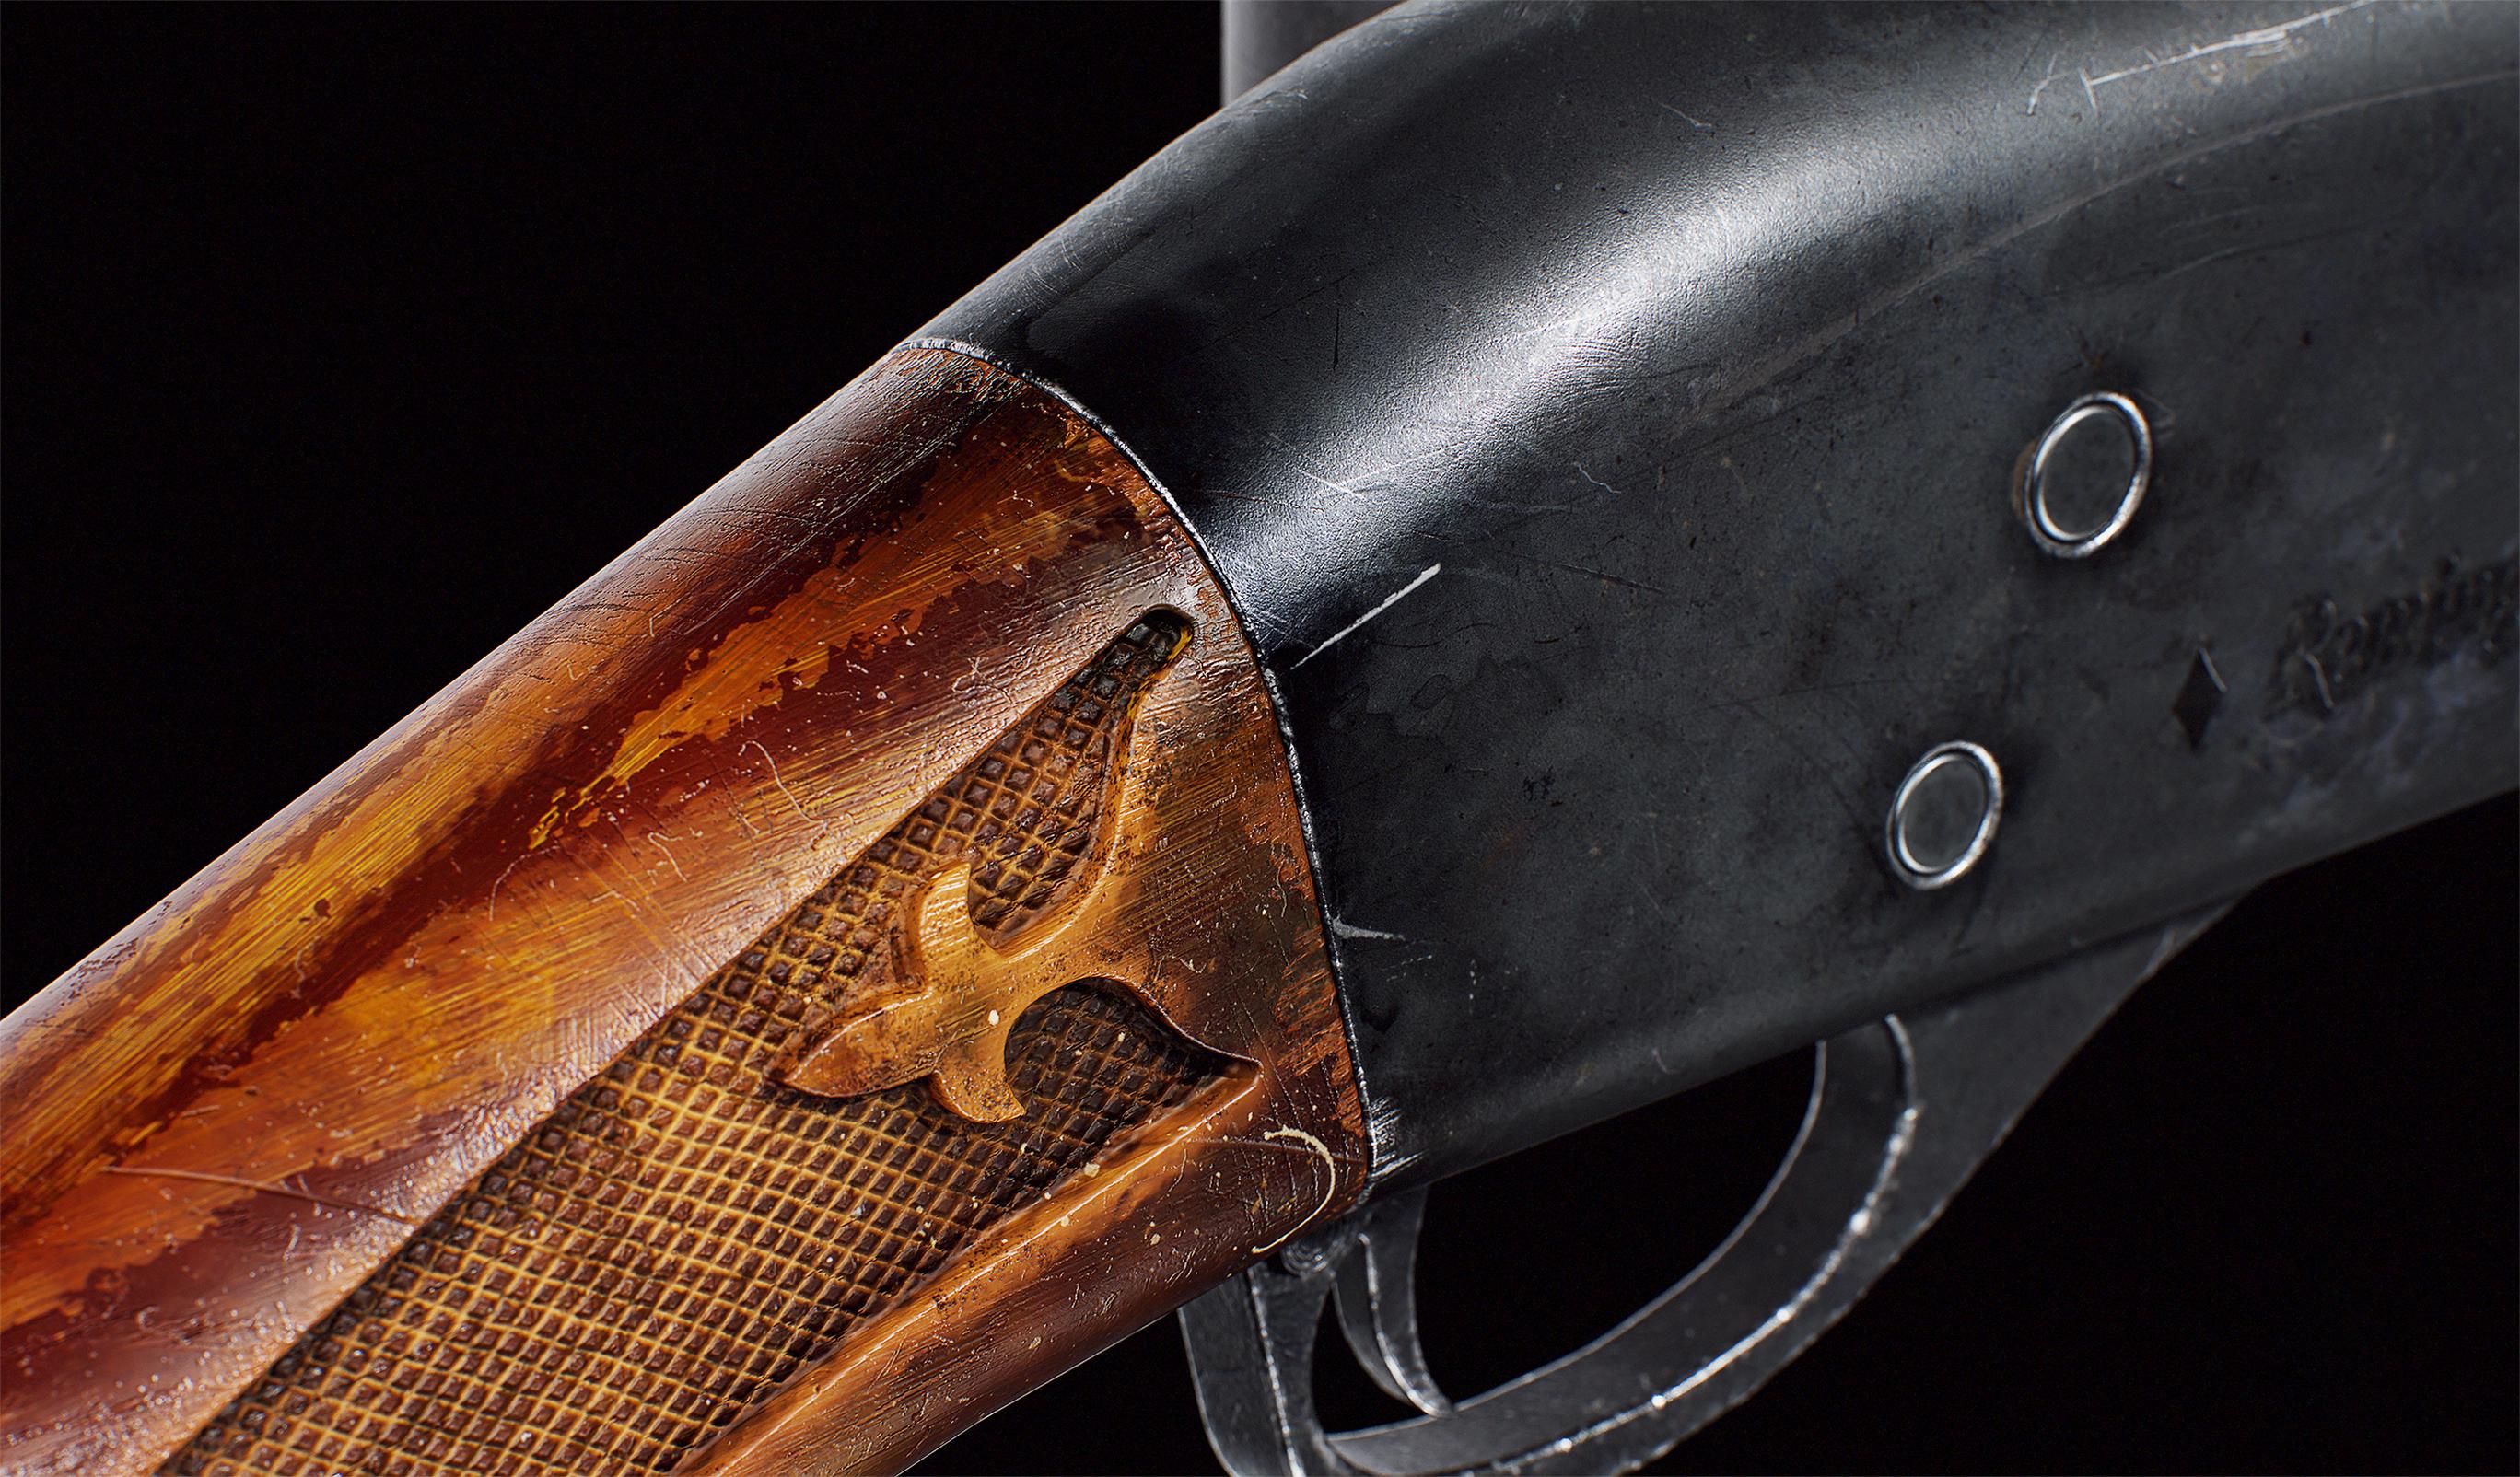
Modeling
I modeled trims traditionally, crafting high-poly strips, and placing them adjacently. These were then baked onto a flat plane in Marmoset. For a clearer understanding, refer to these Polygon Academy tutorials: Tutorial 1, Tutorial 2.

Decals
To achieve wall damage, I applied Decal Edges. In ZBrush, I crafted simple damages, baked them onto corner pieces, and positioned them on wall edges. For a detailed technique, consult Leonardo Iezzi’s description and The DiNusty Empire’s guide.

I used a similar approach for the cracked planks. I wanted to achieve the effect of protruding splinters at a low cost.
I quickly sculpted the broken plank, focusing only on its ends, in ZBrush. I baked it onto a piece of box geometry, which I placed over the end of the plank.
Additionally, I added a few planes with alpha textures in some areas to create the illusion of more splinters.

The Welder addon, available here, was a significant time-saver. It streamlined creating welds on the Blower Machine.

For more complex objects like the Blower Machine in this case, I use ZBrush to refine the Hi-Poly model by polishing the edges. The process is very simple, and you can achieve the desired effect quickly.
In Blender, I prepare the base mesh, often using booleans to cut out certain parts. Then I export it to ZBrush, where I use DynaMesh and polish the edges to achieve a smooth result. For those unfamiliar with this technique, I recommend checking out the Military Radio Tutorial by Simon Fuchs

I quickly create the Low-Poly model based on the Base Mesh that I used for creating the Hi-Poly model.

When modeling simpler meshes, I use the Bevel modifier combined with Subdivision. This approach is much faster than the traditional subdivision workflow because you don’t have to add support loops everywhere. If I encounter any limitations, I seamlessly blend these two techniques on the same object without any issues.

Vegetation
I downloaded vegetation for the area around the building from Megascans’ library to save time. For larger trees, I placed them manually.
While for grass and smaller elements, I scattered them using the brush tool in Foliage Mode. This allowed for a more efficient distribution of foliage throughout the scene.

Multiple UV Workflow
The Blower Machine asset was quite an interesting challenge. The Multiple UV Workflow is the ideal solution for large props like this, which is why I chose to use it. As I mentioned before, I aimed for a Texel Density of at least 512 px/m per 2048 px texture.
To meet this requirement, I divided the entire asset into three separate parts with distinct materials.

I prepared 3 UV sets for each of the 3 parts:
- 0UV – Normal Map + Ambient Occlusion Unwrapping the UV in this case, I made overlaps where possible to get the highest TD. I made mirrors literally everywhere it was possible.Overlaps don’t affect the texture channel in this case and are not noticeable in any way, but they allow for more efficient use of space. I applied this technique separately to all three parts of the Blower Machine.


- 1UV – Base Trim Before unwrapping the UV channel, I prepared a texture with 2 trims and then aligned the shells accordingly.For this specific channel, I used a single texture and applied it to all three parts of the Blower Machine.


- 2UV – RGBA Masks – Dirt, White Paint, Oil This stage was challenging because I couldn’t fit everything on the UVs to achieve a good TD.Here, I also used overlays, but in a way that wouldn’t be noticeable.I didn’t include certain elements on this channel at all to save space. I prepared three masks like this, corresponding to the three parts of the Blower Machine.


At around the same time, I was refining the Master Material and checking how the results of my work looked in the game engine.

The finished Blower Machine looks like the screenshots below:


The Multiple UV Workflow has been extensively covered online, and below I’m sharing links to the ones that were particularly helpful to me:
Vertex Painting
Another intriguing topic is Vertex Painting. I employed this technique on both the walls and floor. I also increased the mesh density of these elements to enable painting. Below, you can find short videos demonstrating how the Master Material I developed for this environment functions.
For vertex painting, I utilized all available channels. I added the Parallax Occlusion Mapping option to each material, and I employed masks to control the painting, allowing for additional surface details based on the prepared masks assigned to specific channels.
In the case of the floor, I followed this process:
- R – Detached Tiles
- G – Rubble Tiles
- B – Dirt
- A – Water


I recommend acquainting yourself with these tutorials on Vertex Painting, which served as the foundation for my work:
Texturing Tiles
When creating the base texture for the tiles, I incorporated variations in the normal map to replicate their wear and tear, as well as the micro-details and porosity on their surface.
To replicate the pattern found in the original location, I designed an alpha in Photoshop and applied it in a manner that allowed it to tile across each tile.
I also introduced some dirt to enhance the diversity in roughness and cracks, while still exercising caution to prevent it from becoming overly prominent when observing the entire floor.


Texturing Props
When texturing props, I frequently rely on anchors, generators, and a significant amount of hand-painting to break up repetition and add distinctive details. Additionally, I extensively utilize stencils, which significantly expedite the workflow and enhance realism.
I will outline my workflow for painting rust using the example of the lamp depicted below, alongside the reference photo I used for inspiration.

To achieve rust beneath the damaged surface, I followed these steps:
- I created an empty Fill Layer called “MASK RUST HOLE” and manually painted the damages in its mask. I positioned an anchor on top of it.
- I created another Fill Layer called “Rust Hole – Edges Subtract” with the blending mode set to pass through. I added an HLS Perceptive filter with a high Lightness value and set the Height to 0.02.This layer aims to accentuate the edges of the holes and lighten them to create contrast. In the mask of this layer, I linked it to the previously created “MASK RUST HOLE” anchor.I used a Blur filter to expand the mask’s boundaries, and then duplicated it without the blur, setting the blending mode to subtract in order to extract only the center and obtain the outline.
- Following that, I added a shadow within the holes, right along the edges. I created another Fill layer named “Rust Hole AO” with a black color, roughness set to 1 and Height set to -0.03. I also masked this layer with the “MASK RUST HOLE” anchor.
- Lastly, I introduced the rust material, once again masked with the “MASK RUST HOLE” anchor.

I also incorporated a different type of rust, this time on the surface. In a similar fashion, I created a Fill Layer containing masks linked to the “MASK RUST ON SURFACE” anchor.
I connected it to two layers with distinct colors: yellow and orange. To achieve a smooth transition based on the grayscale values painted with a brush, the sliders in the corresponding sub-layers linked to the anchor can be adjusted.
In the mask of the yellow color layer, set low-level values, and in the subsequent color layer, set high-level values.
By manipulating the levels in the masks, a seamless color transition based on grayscale values can be achieved, effectively simulating rust on the prop’s surface.

Regarding texturing, I recommend the following tutorials:
Composition
The most significant work in the final review of the entire scene is done with Vertex Paint, decals, and lighting. I adjusted the walls and floors to best reflect the real location in terms of materials.
The composition of stains on the walls in the references looked very interesting, and I didn’t want to change anything. I recreated those stains similarly to the original.
I used many decals and placed them where they made sense: cracks on the walls, debris, and dirt that accumulate the most in corners or hard-to-reach areas.
I also scattered a small amount of rubble to create contrast and generate shadows on the floor, which cannot be achieved with decals alone.
To make the scene more engaging and not just a boring representation of the real location, I added storytelling elements. As I mentioned before, I have a strong resonance with the horror genre, so I could indulge in creating a heavy atmosphere and a sense of unease.
To break the symmetry of the room, intensified by the symmetrical Blower Machine, I decided to stretch a large bloodstain from the building’s entrance to the most illuminated spot under the hook.
At this point, at the end of the blood trail, I placed large entrails for which I made a model, and the texture was taken from Quixel Megascans. I enriched the walls with graffiti decals, also sourced from Megascans.
I created the blood trail using a spline in the engine and textured it in Substance Painter.


Lighting & Rendering
I chose to use Unreal Engine 5 due to its excellent performance and new features like Nanite and Lumen. This is a popular choice as many companies completed projects in Unreal Engine 4 and are transitioning to Unreal Engine 5.
This choice is natural, considering the updated interface and new technologies available in the latest version of the engine.
When building the atmosphere with lighting, I once again took inspiration from references from The Last Of Us.

I set the main light, Directional Light, to a very high value and added an Exponential Height Fog, creating a sense of atmosphere and adding realism to the environment.
I illuminated the scene using Rectangular Area Lights placed in the windows. I also lit two lamps by the door. In the Post Process Volume, I didn’t make many changes except for adding Color Grading LUT and the Sharpen material.


Conclusion
Creating The Abandoned Blowers posed several challenges for me, but I progressed smoothly at each stage of production. One significant challenge I faced was the glass material for the windows.
I struggled with it for a while, but eventually achieved a satisfactory result. Another challenge was creating the Vertex Painting material to meet my requirements.
I had limited experience in creating materials in the engine before, so I wanted to learn everything from scratch. I tested various techniques to see how they worked, which also opened my eyes to many things.
Creating hero props is my main area of expertise, and on top of that, I am a perfectionist. It can be very demanding when you have the need to achieve excellence in everything, but I have learned that sometimes it’s better to let go and finish the project within the given deadline if it looks decent.
It’s better to move on to the next topic and continue growing, rather than endlessly focusing on the same thing. I realized that in the case of environments, it’s the entirety that matters, not individual elements.
The most important thing is the general reception, so you shouldn’t force everything to be a hero prop. It’s important to be aware that many things need to be done, so it’s crucial not to focus on less significant details that could hinder the project’s completion within the specified time.
I believe that the ability to set priorities and stick to established goals is extremely important in projects of this kind.
I spent a long time experimenting with lighting, but I only set it up towards the end, and that’s when the environment came to life. Up until that point, everything looked flat and unappealing.
Therefore, I would recommend setting up preliminary lighting early on in the level design process so that the atmosphere of the location can be gradually built along with the rest of the elements.
As this was my first project of this kind, I felt a bit uncertain throughout the process. For a long time, the level didn’t seem appealing to me until I set up the lighting and added final touches such as vertex painting, decals, and storytelling elements.
What I can advise is to trust the creative process and your own skills. In reality, projects often start to look nice only toward the end, which can be frustrating or discouraging for some.
I highly recommend dedicating a significant amount of time to creating a solid blockout, and I strongly suggest planning out trims by colorizing based on reference photos.
Personally, I can’t imagine working on an environment without these steps. I’ve discovered that investing enough time in these preparations pays off greatly in the subsequent production stages.
If you have the opportunity, I highly recommend exploring courses like CGMA. They are highly intensive, but if you put maximum effort and passion into them, the results will be impressive.
Such courses can help further develop artistic and technical skills. Hard work pays off, but from my experience, I know how important it is not to get lost in it and take care of eye and body health.
I recommend using the 20-20-20 technique. Personally, I use the Pomy app, which is designed in a way that is not distracting but prevents eye strain during long hours in front of a monitor.
Using a vertical mouse to protect the wrist and a sit/stand desk that relieves the spine will also be a great idea. Personally, I am an advocate of ergonomic solutions and have been working on such a setup for a long time, which brings many benefits to my body.

You can find more screenshots, videos, and a full presentation of The Abandoned Blowers here.
Thank you to all the readers! I hope the article was helpful and interesting to you. If you have any questions or would like to get in touch, you can find me here:
Read more articles
You might also like these articles.