Introduction
Hello! My name is Eugene Lukashevich.
I'm a character artist from Zaporizhzhia, Ukraine. My experience in the gaming industry for over 10 years.


Goals
Since I am a user of Vray+ 3Dmax and Marmoset Toolbag, my main goal was to create a new character with a lot of organic elements using Arnold render.
Arnold has always impressed me with its capabilities and realism, especially for skin shading.
Software
- Zbrush: High-poly sculpting
- 3dsMax
- Arnold Render
- RizomUV
- Substance Painter: Baking, texturing
- Photoshop
References
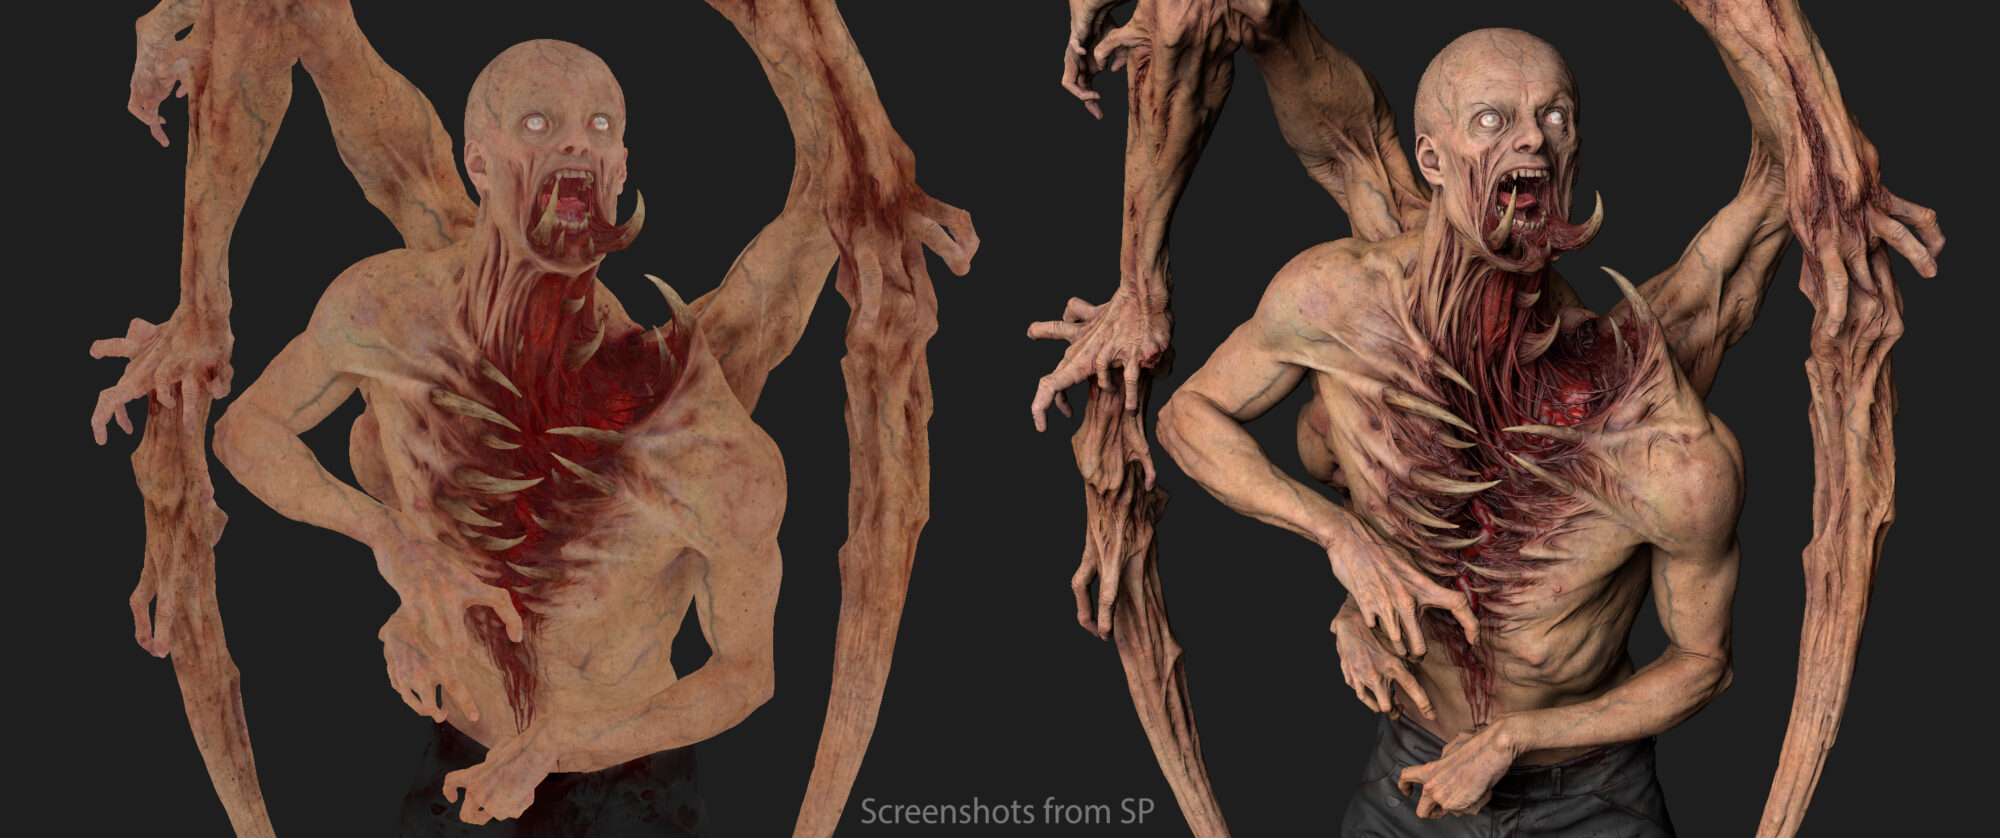
After playing the game Dead Space Remake and, after some time, watching the movie “The Thing” (2011), I came across a YouTube video on how to create mechanized props or animatronics for movies. I was so impressed that I immediately knew what I wanted to do next: create a Necromorph.
It had lots of organic shapes for me to practice sculpting and lots of exaggerated shapes where I could experiment with design and silhouette, and it was the perfect subject for testing SSS (Subsurface Scattering) for skin realism.
For reference, I collected all the necessary screenshots from the video on creating monsters from the 2011 movie and some old concepts from the 2008 Dead Space game. I tried to combine these two types of monsters.
Yes, they belong to different universes and have different concepts, but they helped me a lot in creating my own concept.

Blockout
As always, I started with the base forms of the character and worked my way up to the secondary forms until I achieved something solid. Initially, the design of the character was not well-defined, only a general concept.
For example, the third hand was not initially planned, but after analyzing the monsters from the Dead Space game, I decided to add a third hand with slight modifications. Limbs from behind the back were defined from the beginning because this is one of the classic features of monsters in the Dead Space universe.

I made several changes during the modeling stage, removing or adding certain parts of the body. When thinking about design, it’s important not to get stuck for too long. With experience, you can make design decisions more quickly.
It’s also good practice to do quick sketches and explore different solutions.
Sculpting
Since the character was originally in a very asymmetrical pose, I had to sculpt each part separately in stages. However, for the hands, I saved some time.
I created one fully articulated hand in a pose, then mirrored it and used it as a base model.

For the fingers, everything was much simpler. I separated them and manually placed them in the right positions on the back limbs.


In order to create an interesting silhouette, I tried to follow the rule of negative and positive space.
Positive space is the space within the area of an object or shape.
Negative space is the space around the object.
Contrast – Positive and negative space can help create contrast.
In art, contrast is a combination of light + dark, large + small, and rough + smooth forms.

In an interesting book by Betty Edwards, “Drawing on the Artist Within,” published in 1979, she provides a method of drawing using negative spaces.
The idea is to specifically shift the mode of perception from the object to the surrounding spaces.
In this case, we have the opportunity to move away from stereotypes of perception and more accurately see the proportions and configurations of the form that we are modeling.
For example, when modeling complex hand shapes, shift your attention from the fingers to the gaps between them.

These shapes are simpler and easier to measure and control while sculpting.
Of course, this also applies to the general form. I also tried to follow the rules of rhythm and movement of the form in order to add tension and variety, but at the same time, to follow human anatomy.

Sculpting Details
At this stage, I try to focus on secondary and tertiary forms, trying to find movement and balance of forms. A good basic model with the right proportions is important for further detailed work.
After that, for details, I used a couple of XYZ-Alphas, Pablander ZBrush Skin Brushes Pack, and FlippedNormals alphas; this gave me excellent basic detail, after which all the areas were finalized by hand.

UVs
For this character, I used the UDIM pipeline only for the body to make texturing and high details easier to manage.
For the unwrapping, I used RizomUV software.

Texturing
For the textures, I used polypaint and albedo textures from XYZ Textures. To begin with, I made a basic polypaint in Zbrush, and then I projected the necessary sections of the XYZ textures in Substance and mixed them together.
Later, I added more skin pigmentation, spots, dots, additional colors, dirt, etc., also in Substance.

Shaders & Technical
This was my first experience with Arnold render, but I really liked the result of this amazing render. Many thanks to the developers. I started to study the official documentation and watched tutorials on YouTube.
After some testing, I got closer to creating the eyes. The eyes consist of several parts: Cornea_eyeball, Caruncle, Iris with pupil hole and Tearline.
It was not necessary to detail the pupil because the character has a thorn in both eyes, and it is almost invisible, but I decided to make it because it’s fun.


Eye setup
When rendering skin, you should use values like 1.0, 0.35, 0.2, indicating that red should scatter the deepest and green and blue less.
This would replace the three-layer workflow (deep, mid, and shallow layers) for skin where you would make the deep layer red to indicate that deep should scatter with a larger radius.
Setting scatter_radius.R to a larger value would correspond to that.
Eye part shaders look like this:
Cornea

Caruncle

Tearline

The render documentation has all the necessary information. The shader is easy to set up; you only need a few tests to understand how the shader works and the influence of light sources on it.
I prefer to use the Randomwalk v2 scatter method. This method gives a more accurate and deeper light dispersion in the object, which creates SSS with more saturated colors around fine surface details.
Also, RWv2 is more costly in terms of rendering time but gives an excellent result. For the micro-detail, I used a tiled normal texture; my settings look like this:

Lighting
For the lighting, I chose a suitable HDRI with the right hue and no sharp shadows, reduced the intensity by about 10%. Next, I set up a few light sources for backlighting.
In fact, I used the rules of studio lighting, where there is a main source and a few more to emphasize the silhouette if necessary for the character.
For this character, the main work was done by HDRI; the rest of the sources worked as backlight and side light.

Conclusion
I learned a lot from the Arnold renderer, and it was really interesting to sculpt and put the project together. Set yourself goals to learn new tools and step by step solve the problems that will inevitably arise in your way.
But this is no reason to stop because solving the problem will bring real satisfaction from the completed work.
Thank you all for reading, and good luck with your work.
Read more articles
You might also like these articles.