

Introduction
My name is Rosanna Perrucci, born in a small town in the south of Italy. I’ve been passionate about art and video games since a was a kid, but just as an adult, I realized that those two passions, combined, could lead to a real job (such a quick brain right?)
I’m a super extrovert person, and before deciding on becoming a character artist I always worked in contact with people, which I love, so this path was really something new for me.
What goals did you have in mind when making the character?
My main goal was to learn how to make a realistic character, and I started by choosing a concept that I love because I felt I would have to stick to it for quite a while (it was soo true!).
I then searched for the most appropriate pipeline and toolchain, and I started working on the character by myself, without a real understanding of anatomy and with just background as a 2d artist, which honestly didn’t help at all.
Once the first attempt was done I found Georgian Avasilcutei’s twitch channel (https://www.twitch.tv/nimlot26), in which I asked for the first feedback…
First attempt

My first attempt on Rick, I failed so hard and I knew that, but I had no clue how to do better. Georgian’s face during the feedback was priceless, he tried so hard to be encouraging, poor thing.
Obviously everything needed to be redone from scratch. So with him tutoring me, I went through the whole procedure again. He’s been a key person in this process, and I’m still currently in his mentorship program
(https://www.patreon.com/nimlot).
What software did you use?
I used Zbrush and (Zwrap), Maya, Topogun, RizomUV, Marmoset Toolbag, Krita, Substance Painter and PureRef.
References/Inspiration
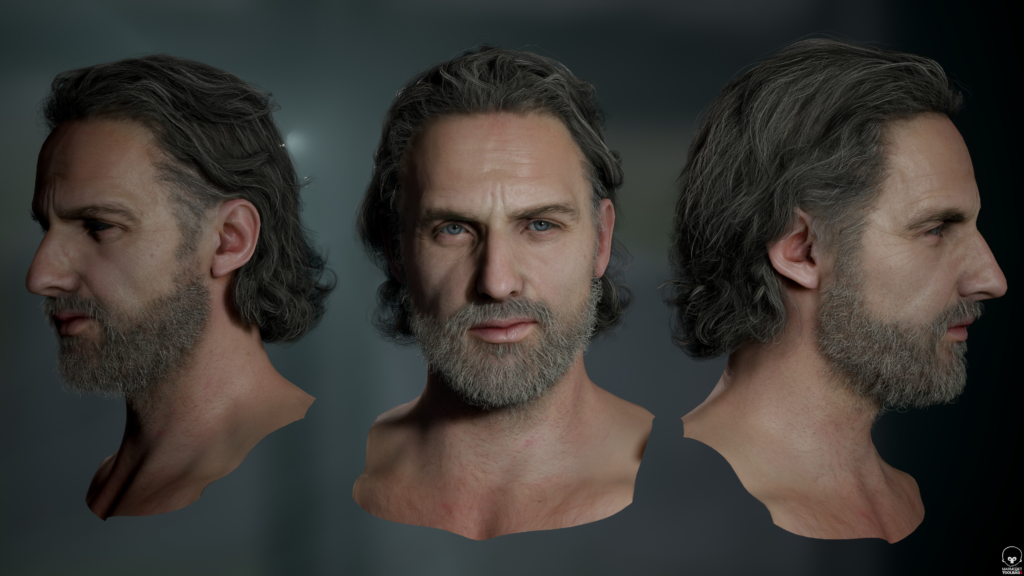
I’m a big fan of The Last of Us and The Walking Dead, and I wanted it to be a character that could potentially fit in both universes. So I finally decided on Rick Grimes, which is one of my favourite characters.
Sculpting the high poly
After choosing the character I started gathering references for the likeness from Getty images.
My folder consists of 1.892 files, 43 subfolders and 5,44 GB. Seriously, it was madness. The first time a selected the pictures I was going to use I ended up with a huge PurRef file, and just after my mentor feedback I realized a needed very few pics with the same age, same focal length and from the same photoshoot if possible. My PureRef file went from “all in” to a more manageable size.
“All in” PureRef


After this, it was time to sculpt and let me say I had no idea what human anatomy was about, so I took a whole month to dig into a Scott Eaton course.
It took me more than 200 iterations to get from Neanderthal to actual Homo Sapiens, and the other 300 till the actual likeness. And I’m not even kidding. It took me 1 year just for the likeness, and I think most people that don’t work with 3D never realize how much effort it takes to learn, sadly misled by speed sculpts and renders with photoshop retouch.


Hair
Once the face was almost done, I started working on the hair. I used Ornatrix, managing to groom proper strands after a few attempts, baking just the albedo in Maya software and using Krita to extract a decent normal map and an alpha map. I used just those three in the Marmoset toolbag shader, and it was more than enough.


(Here are all the strands I used on Rick’s hair)
I then created and placed the cards and the clumps with George Sladkovsky’s GS Curve Tools
(https://sladkovsky3d.artstation.com/store/zzR2), a great time-saver in this situation. It allows you to bind a card or a clump of cards to a curve, and then you can manually place the curve and add every sort of variation on twist, tape, curvature, giving you a really powerful tool to work with. It was really good to use, and it gave me all the time to focus on the artistic part of the process. I also learned, in the worst way possible, to keep every clump’s group in a separate layer, ready to be modified without too much stress and without going through the horrible process of cherry-picking cards and clumps one by one.
Again, the hair took me several months to be properly made, working on the overall shapes first with the clumps, filling the biggest spaces with the main shapes, checking the silohuette multiple times and saving for the final touch the carefully placed single hair cards. I mostly used Georgian Avasilcutei’s Braveheart hairstyle for reference, you can find the whole process on his Patreon.
(On the left I had the single cards, and on the right the clumps I manually made, combining multiple cards. )

Texturing
Texturing started while the sculpt and the hair were still in a WIP stage. I used a base mesh from https://www.3dscanstore.com/, ZWrapped it on my sculpt and used the albedo and the details it comes with to put some pores information on my higher subdivision level. I then had just to work a bit more on the UVs and some minor cleanups. I ended up with a raw albedo, that was really far from what I needed but was a good start. I baked the high poly on the low poly in Marmoset, and imported the maps in SubstancePainter, starting to paint the albedo, then the specular level and the roughness.
You can see, the skin has a lot of colour variations, and sometimes it’s really hard to notice this if you look at a sharp picture. But if you blur it a bit, you’ll be surprised to see how much your eye can now recognize, in terms of colours, since it’s now mostly ignoring the blurred shapes.


The beard
For the beard, the process was, at least for the texture part, pretty similar to the one I used for the hair. I created some strands in Ornatrix but this time I baked them on a plane in Marmoset, creating also a cool colour variation on the strands, assigning to every different hair
a certain vertex colour in Maya. Then I created the hair cards for the beard, adding some depth to them by curving a bit the cards and placing them by hand. Like the hair, every card type for the beard had its own layer, which is pretty useful if you want to change the UVs’ placement of some of the cards. The same process was used for the eyebrows as well.


Presentation: lighting, posing, rendering
First thing first, it’s important to have a reference for the presentation. The worst thing you can do is to do something by memory, or imagination because it will not end well.
I love dramatic lightning, so I picked the picture I liked the most and tried to replicate the mood. Not copying 1 to 1 every light or expression, but just the overall feeling.
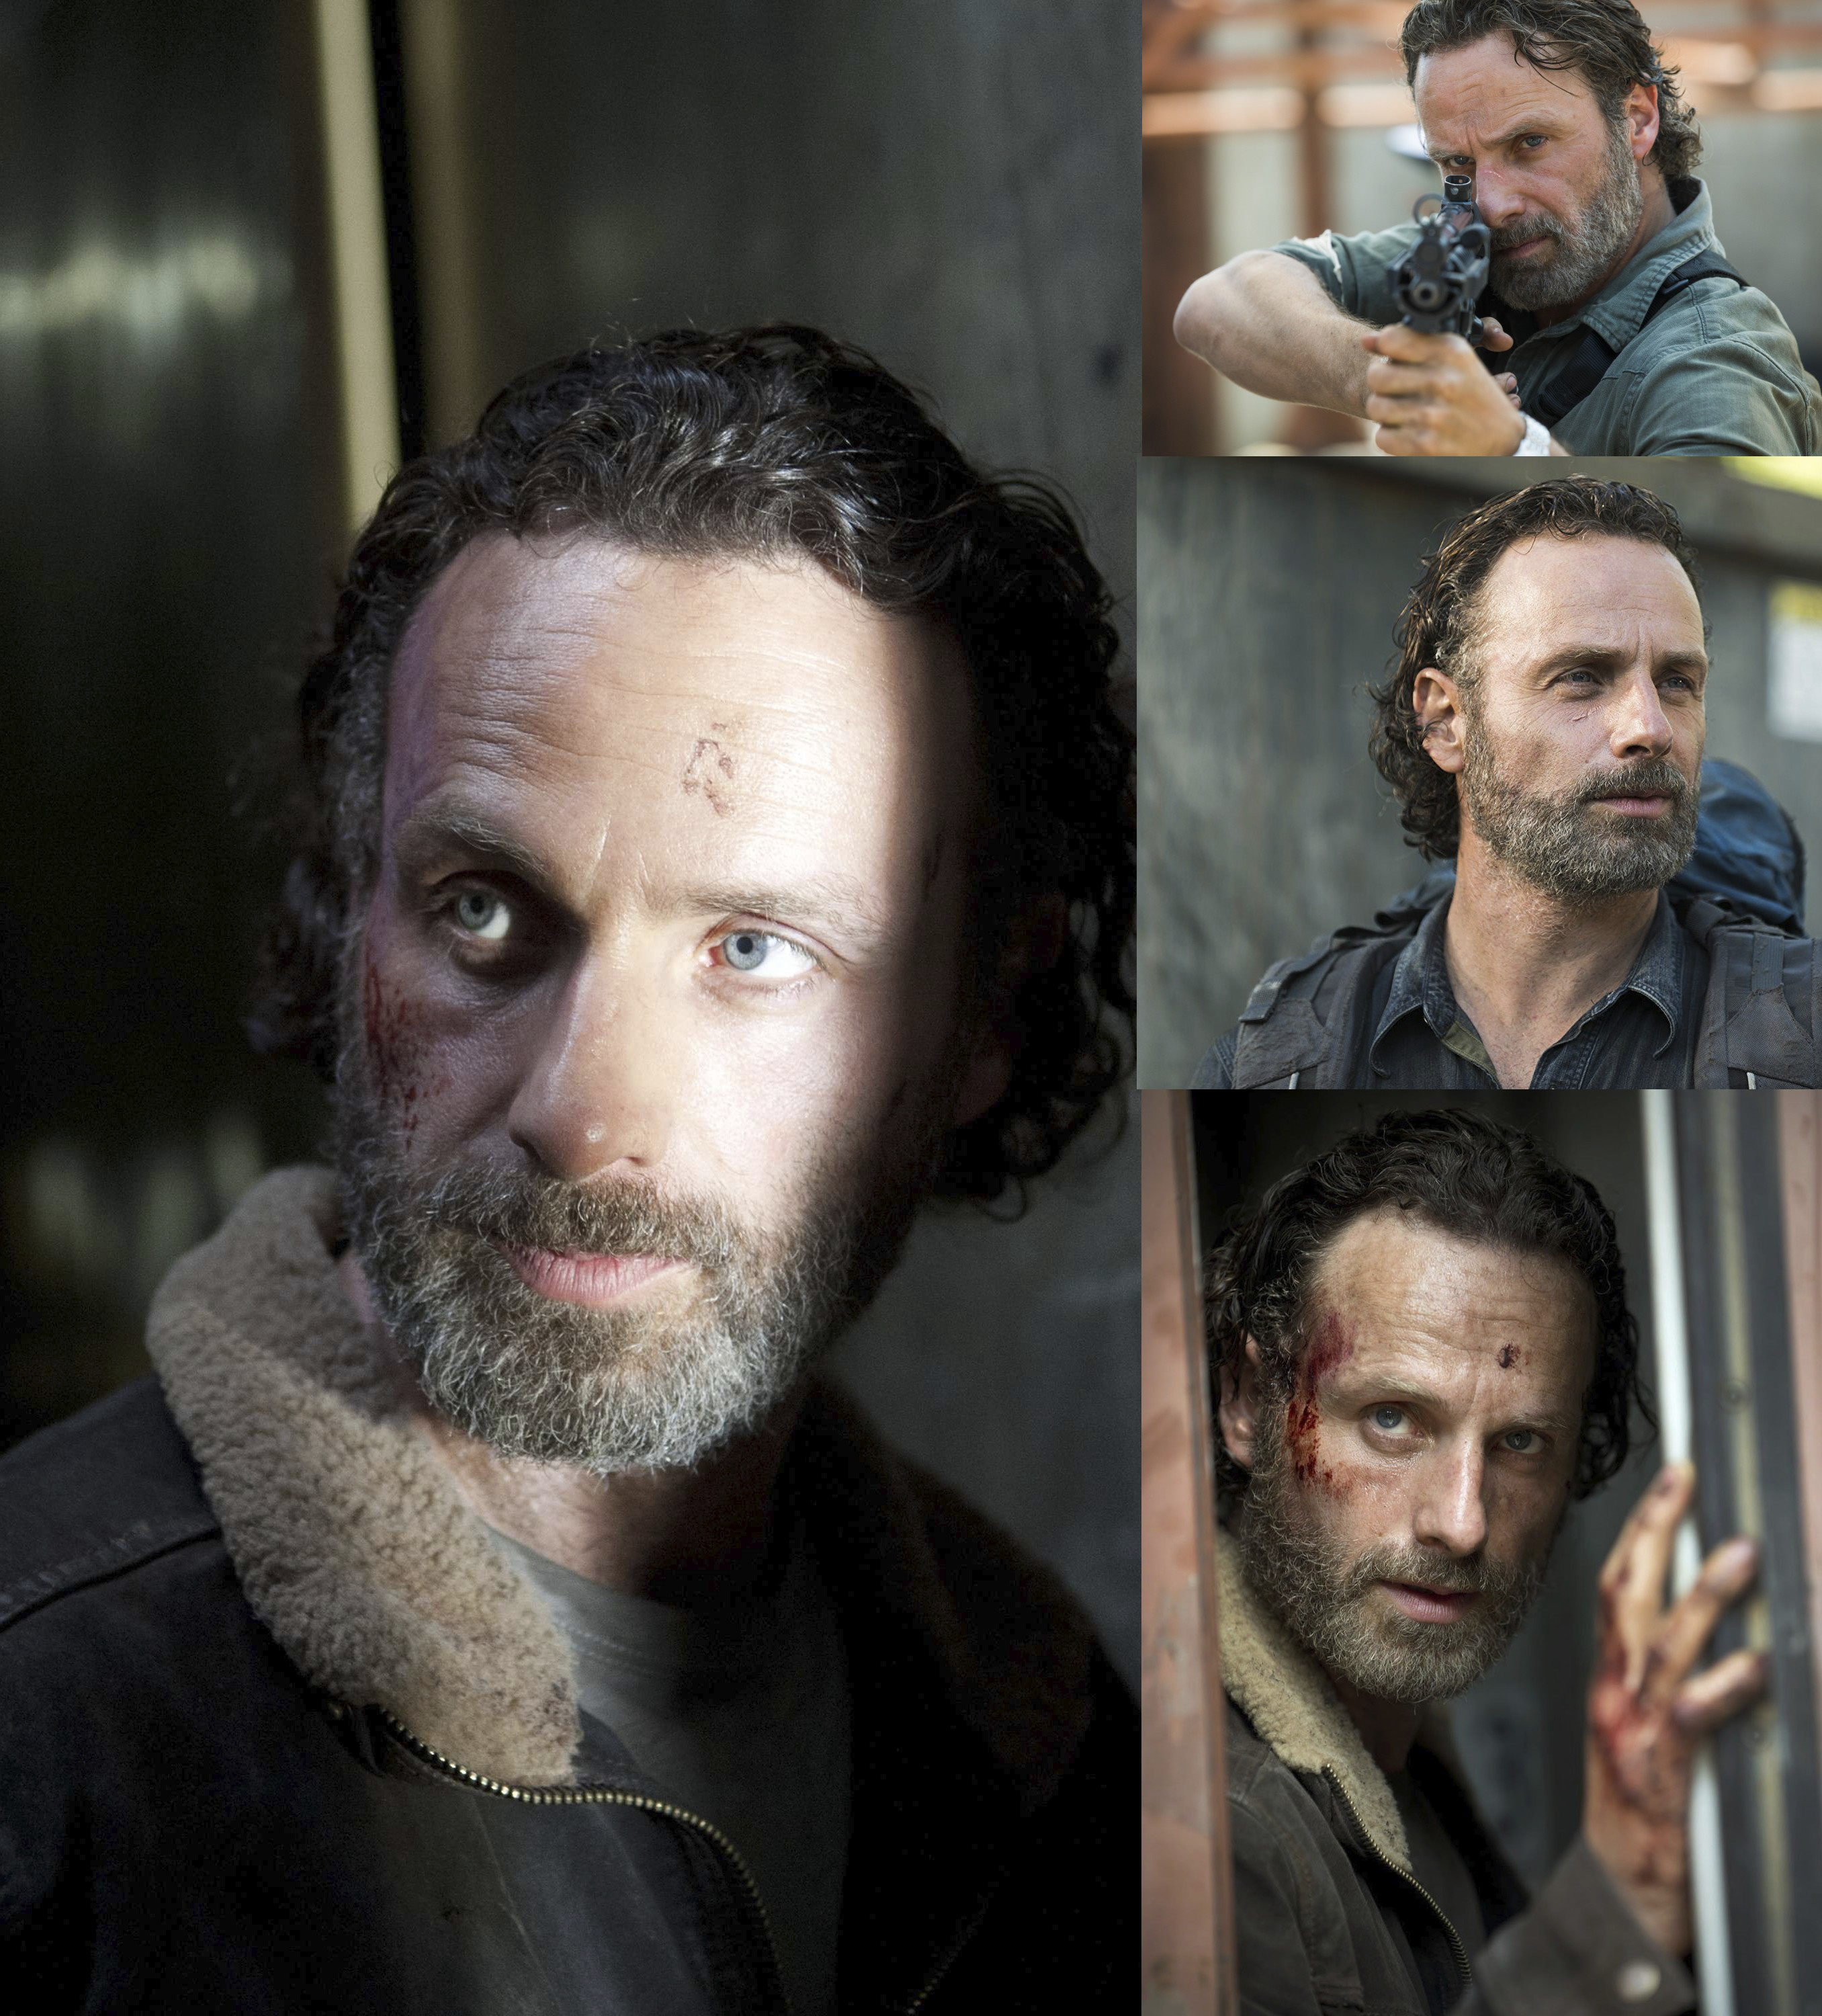
I used just two lights, key light and a rim light, a tiny bit of fog and a bit more contrast in the camera settings and then I took my shots.


Tips
Always keep your stuff organized, with proper tags and names that actually can tell what’s in that file, or in that folder.
Always work in layers: you have them in every software, use them! You really want to delete old files sometimes, you don’t want your folder to be huge! Mine was over 170 GB! And that was just my ZBrush folder, Always backup your last file project, just in case…
Conclusion
The road is long, the path is not straight and you’ll feel miserable most of the time. It will look bad, ugly, until one day it will not look bad anymore, as my mentor always says, and he’s damn right on it.
I tried to show all the moments of this process, also the “unappealing” ones, streaming every time I had the possibility to do so on my twitch account (https://www.twitch.tv/tucanoblu), with the amazing team, the Potatoes United. (https://www.twitch.tv/team/potatoesunited).
I would love to see more people embracing the grinding process without shame, and see consistent, talented artists filling the fields of the industry.
Stay tuned (https://www.artstation.com/tucanoblu)
And thanks to GameArtist, it was fun to share my journey with you all!
Read more articles
You might also like these articles.


