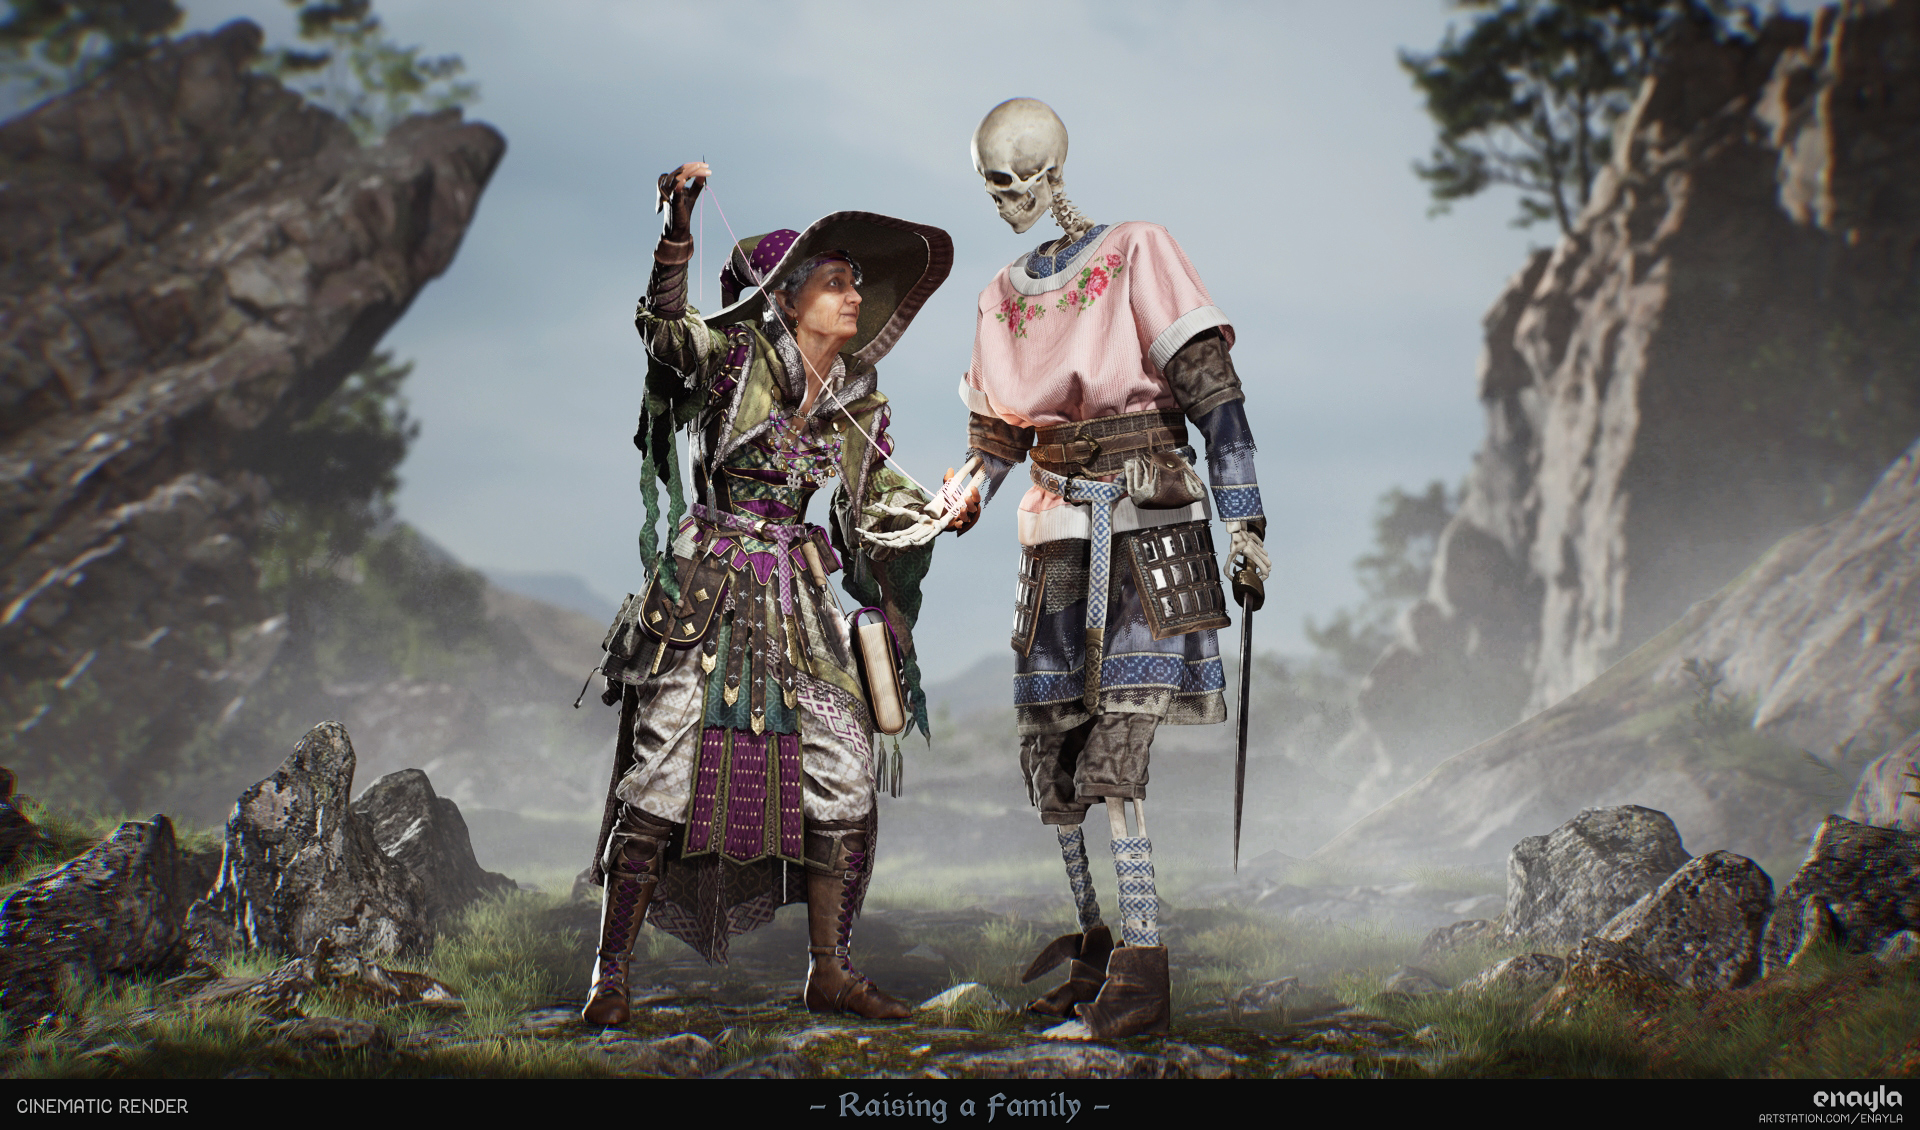
Raising a Family
Introduction
Hello! My name is Athena Cole and I’m a recent 3D Character Art graduate from the UK.
My background is in real-world costuming and prop-making, so that tends to be the focus of the characters I create.

Project & Goals
My final master’s degree project at university involved inventing characters and taking them through most stages of the game art pipeline, from initial design to rendering in the engine.
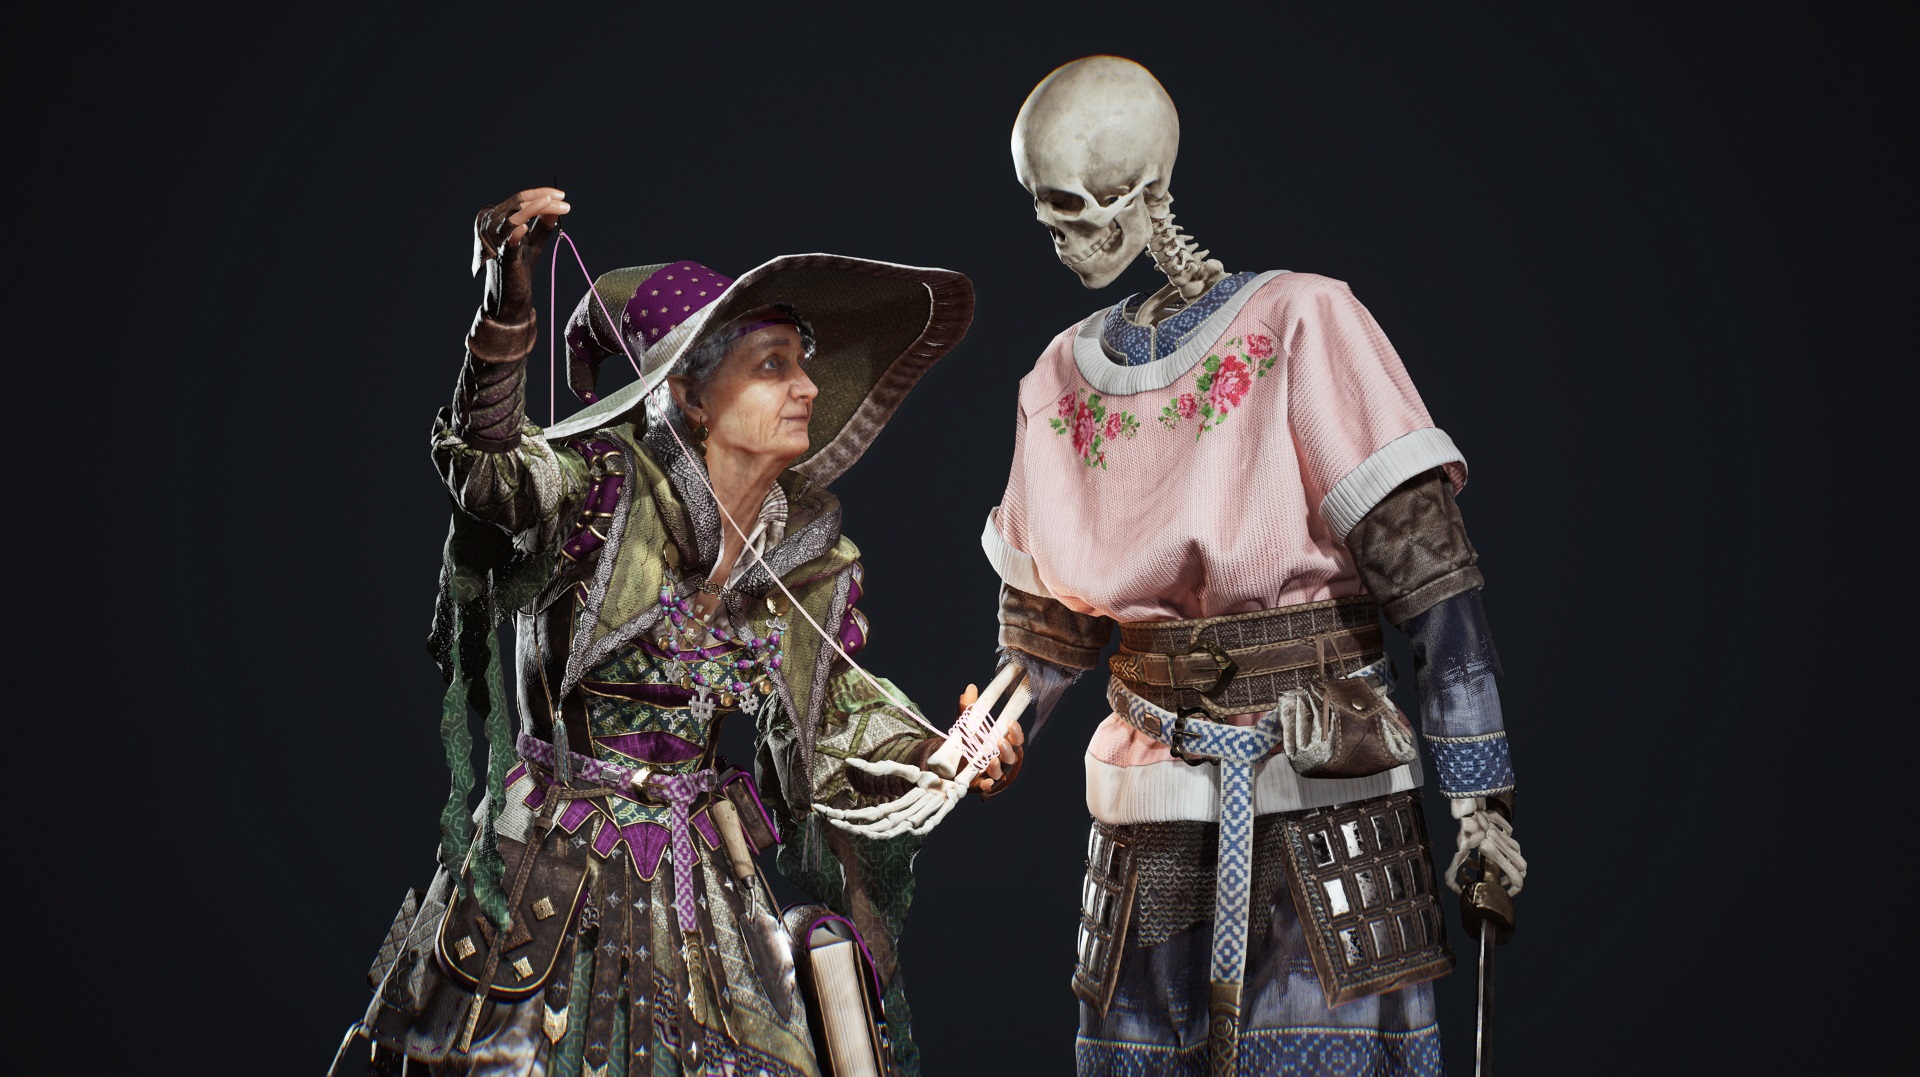
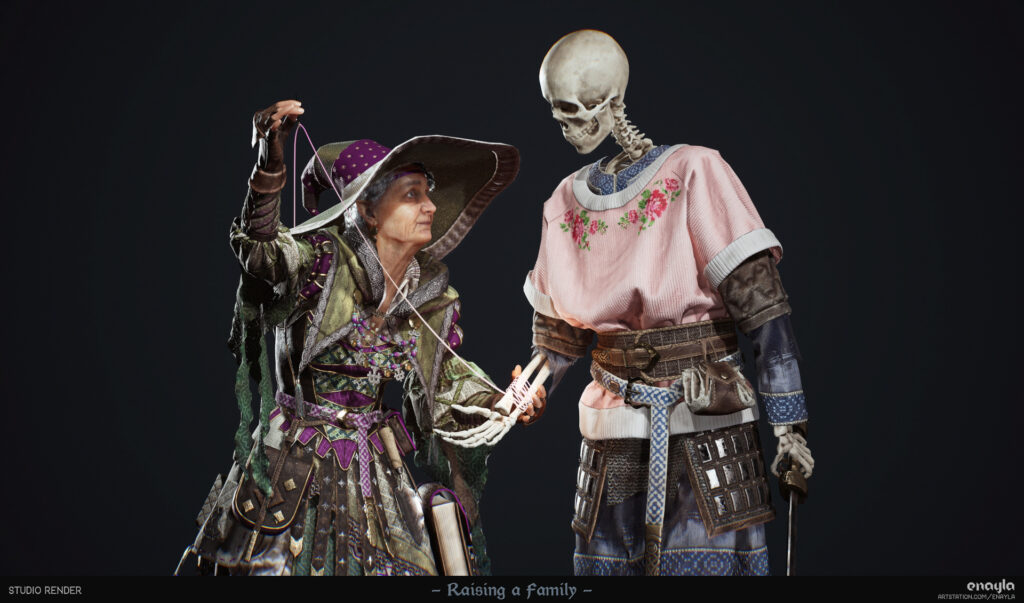
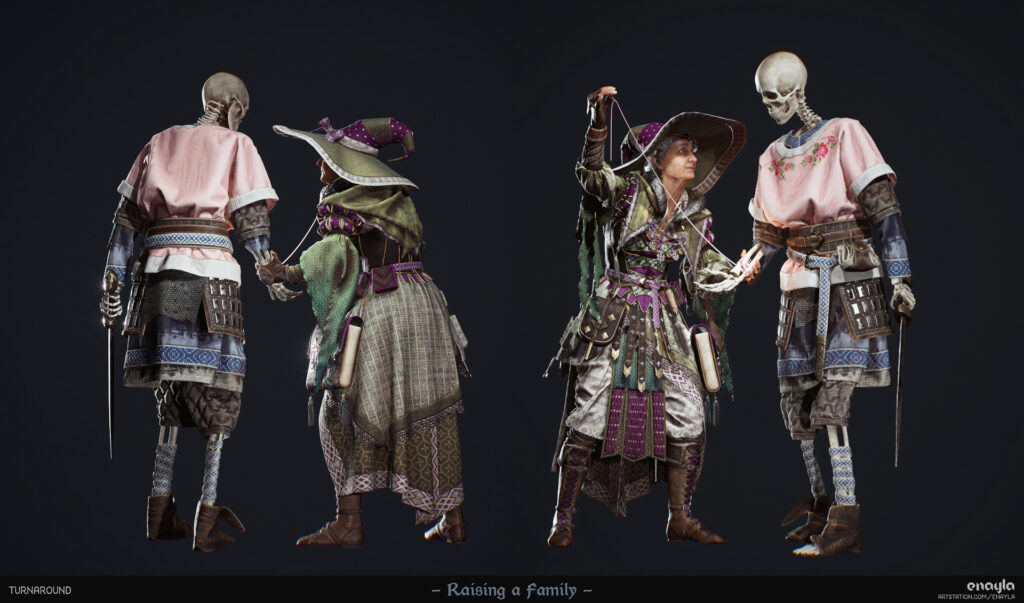
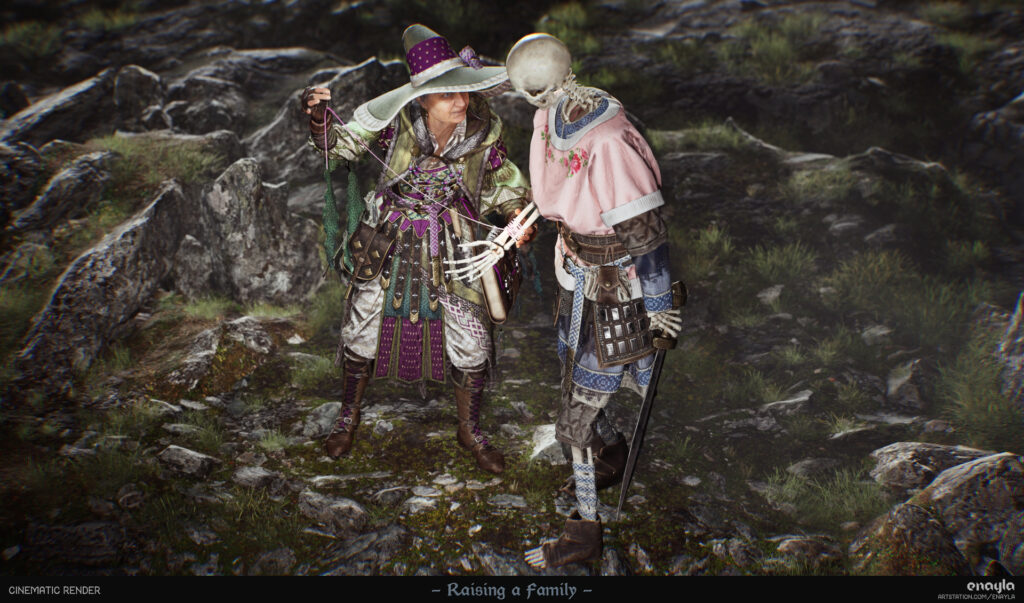
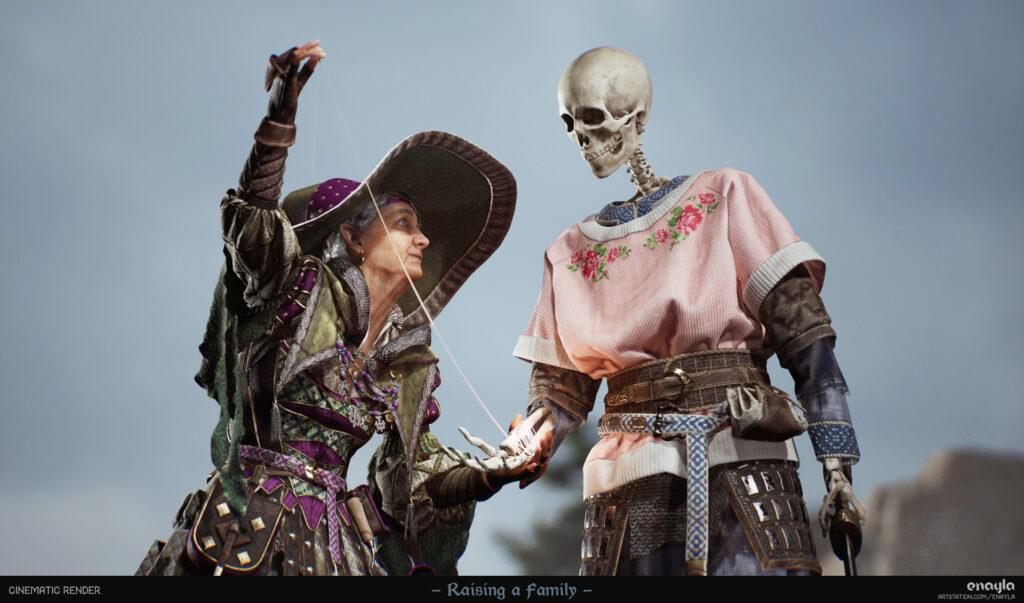
I sculpted my two DnD characters: a grandmotherly necromancer and the skeleton familiar she dotes upon.
I wanted to explore an unexpected dynamic between character archetypes and so my necromancer is a kindly elderly woman who spends her time babying the skeletons she raises from the dead. She prefers to remain on the sidelines, sending her minions off to battle for her and patching them up afterward.
This helped define the final scene I sculpted: a moment of respite after a fight, the skeleton looking disheveled and childlike while the necromancer stitches up his injury.
I had a few main goals in mind for this project:
- Explore the full scope of 3D clothing creation tools, incorporating complex textile manipulation and garment patterning work.
- Match the style and technical aspects of some of my favorite current-gen games, especially in regards to toeing the line between realism and fantasy (reasonable patterns and practical-ish clothing, with some dramatic flair).
- Study methods to convey character roles and relationships through dress, appearance, and pose (i.e. can someone take a look at these characters and immediately understand something of their story).
This was very much a learning experience for me, so I’m sure there are a few things that could be done more efficiently (And some I can already see that I’d like to improve!).
But I hope that laying out my process might be helpful to someone.
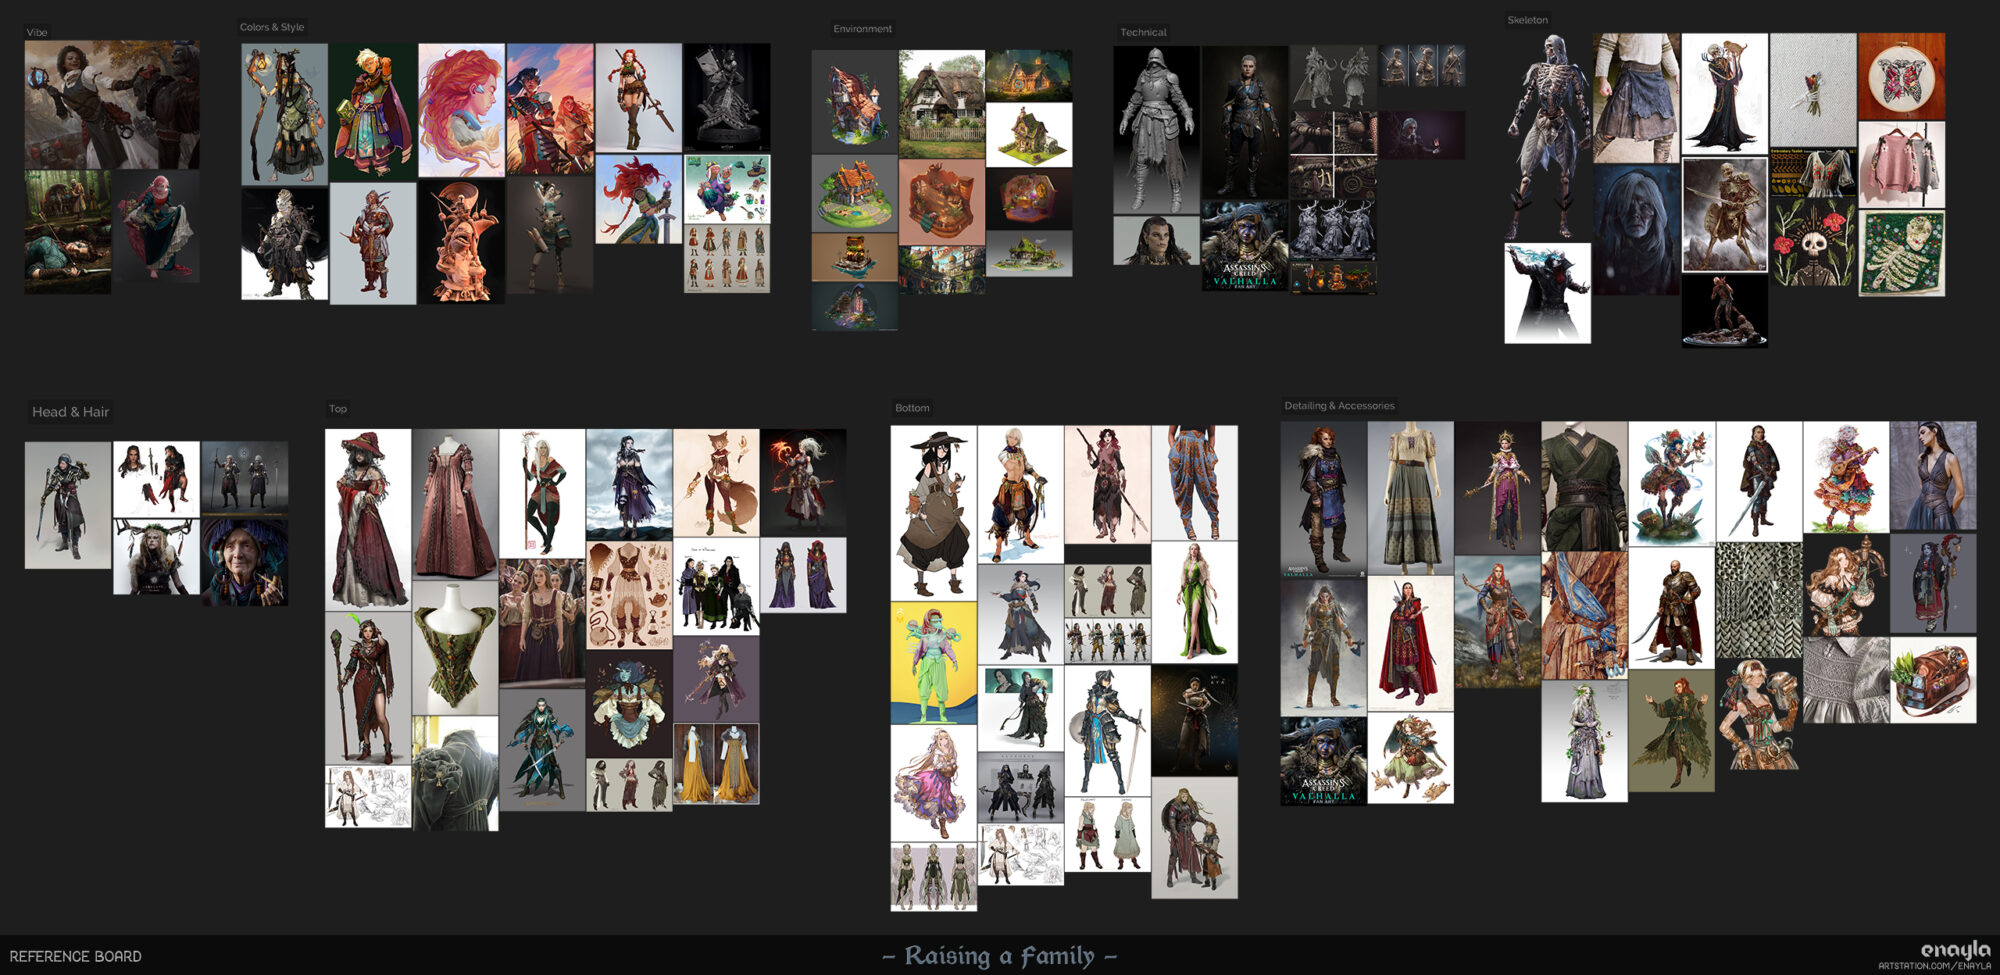
References and Inspiration
I’d been collecting reference images for many months before starting this project simply to have an idea
in my head while playing them, but finalizing their designs still ended up being a very long, iterative
process.
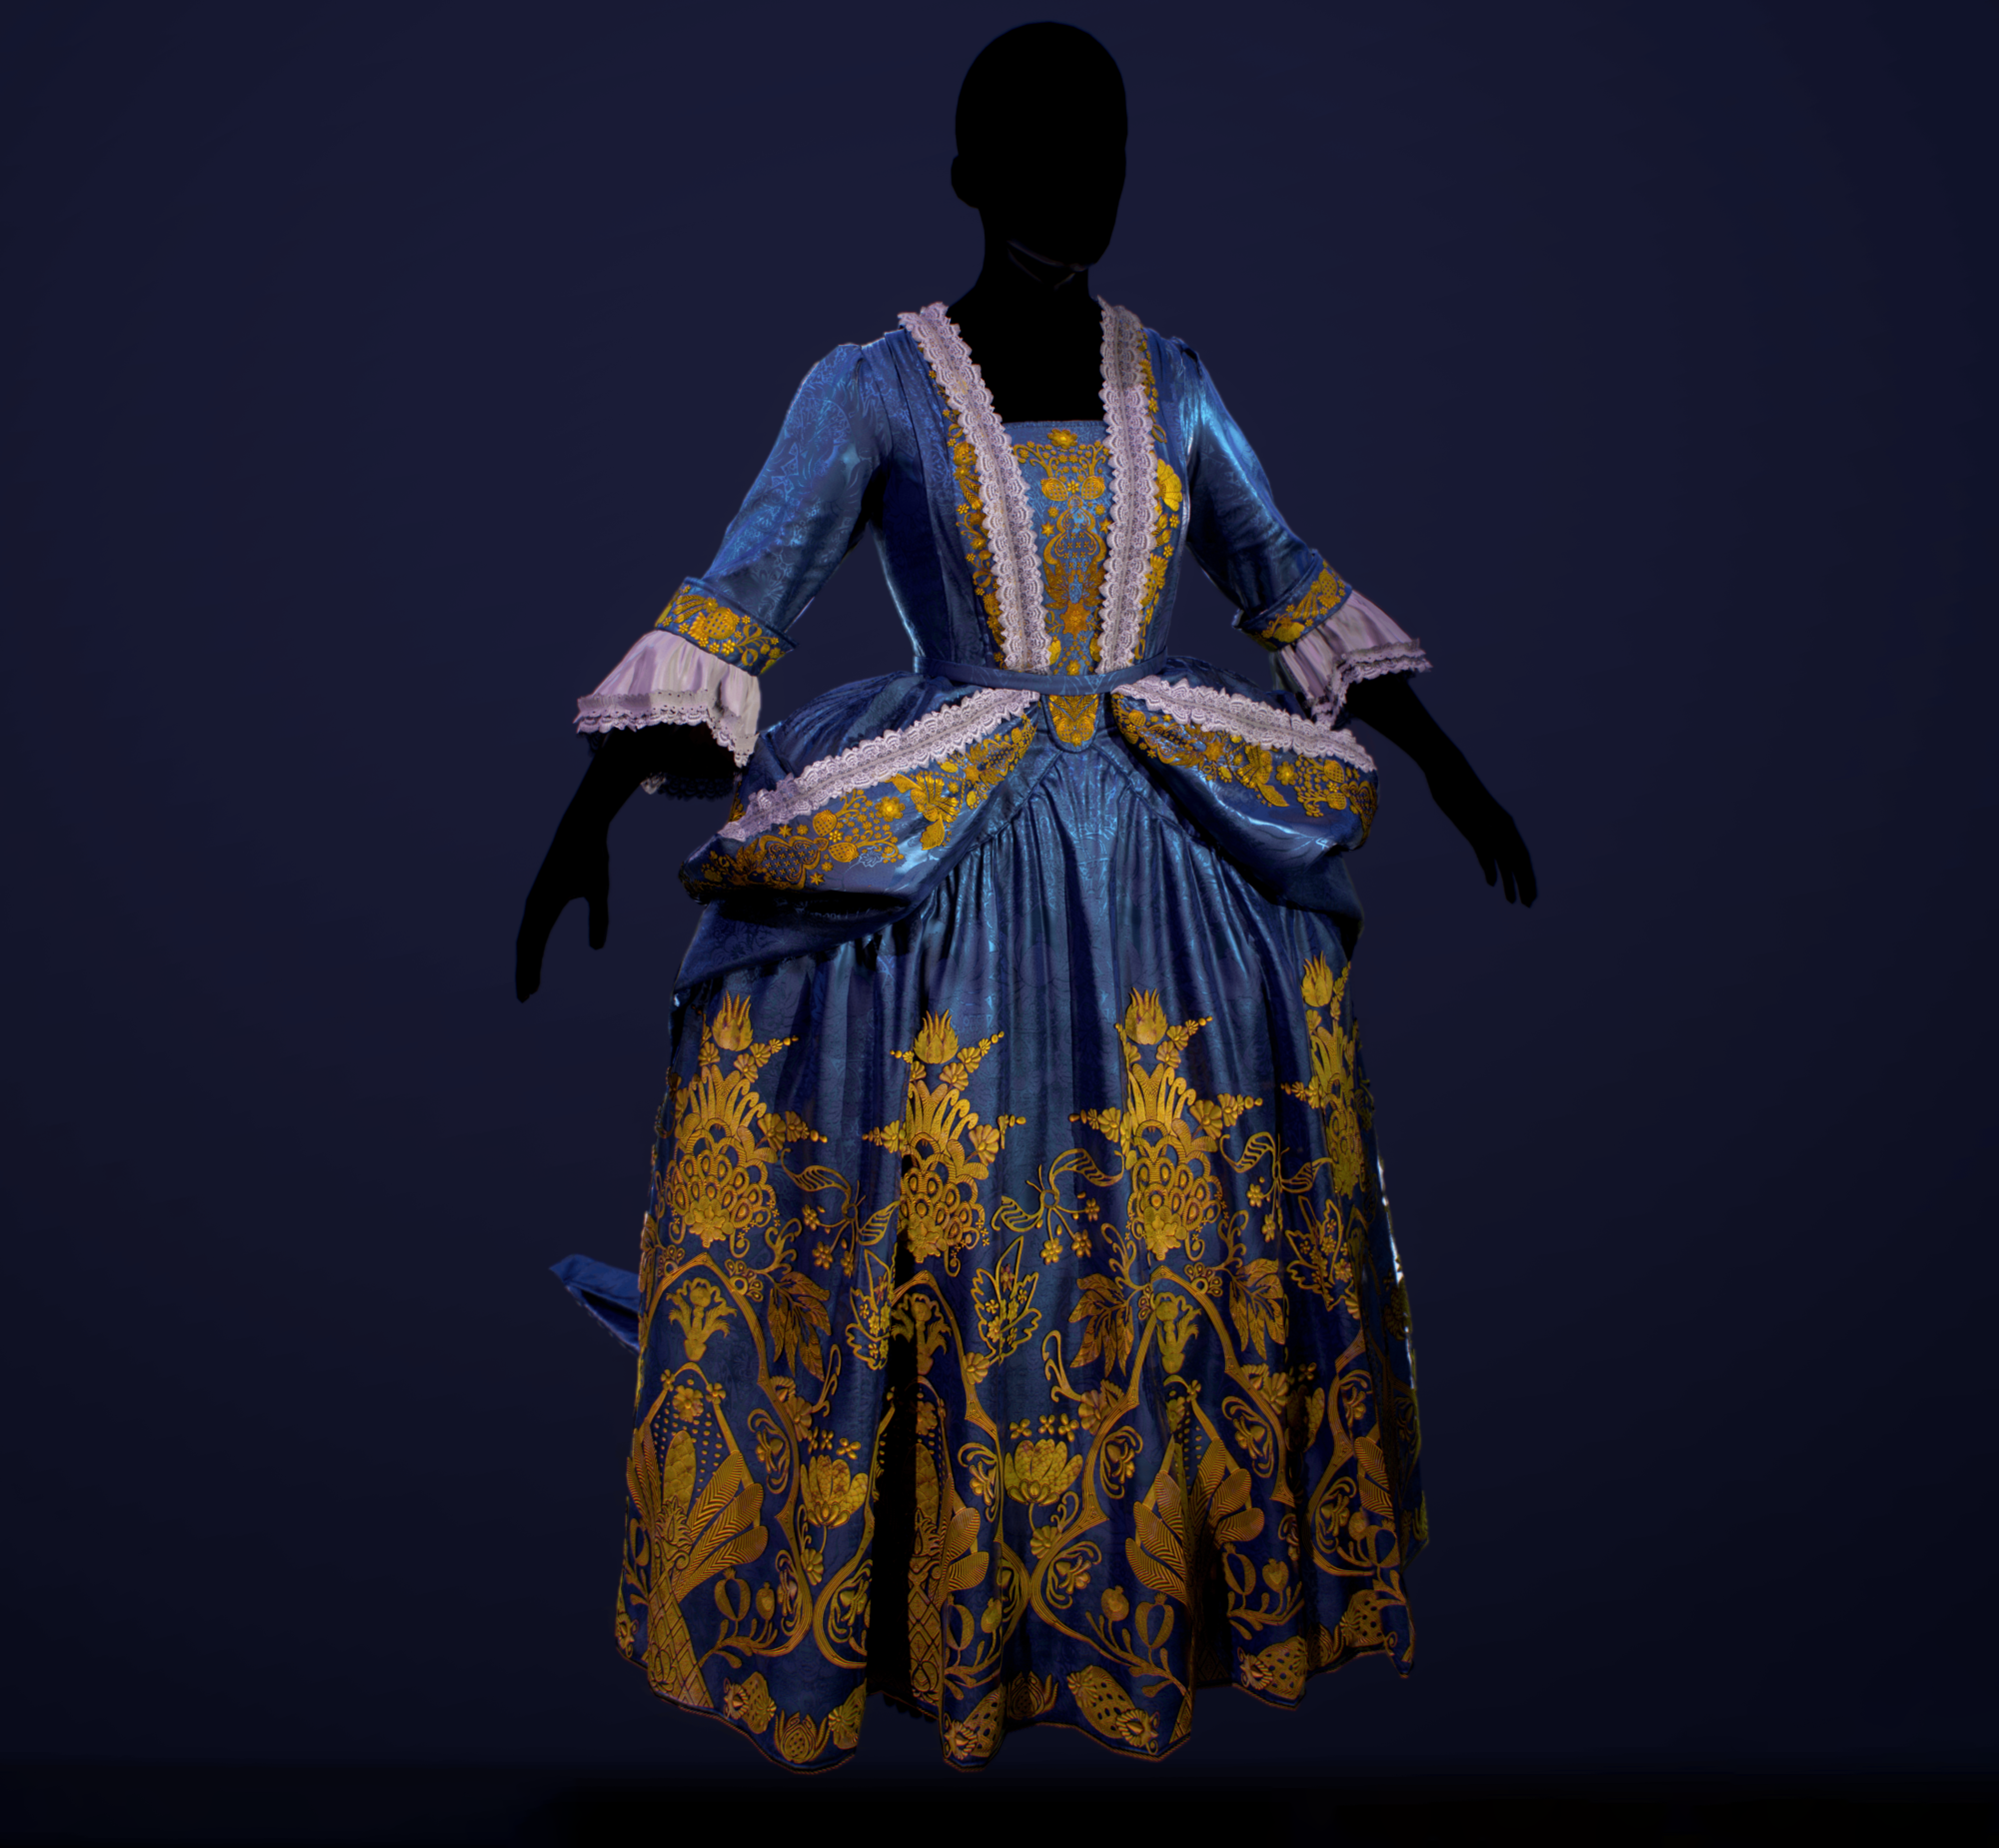
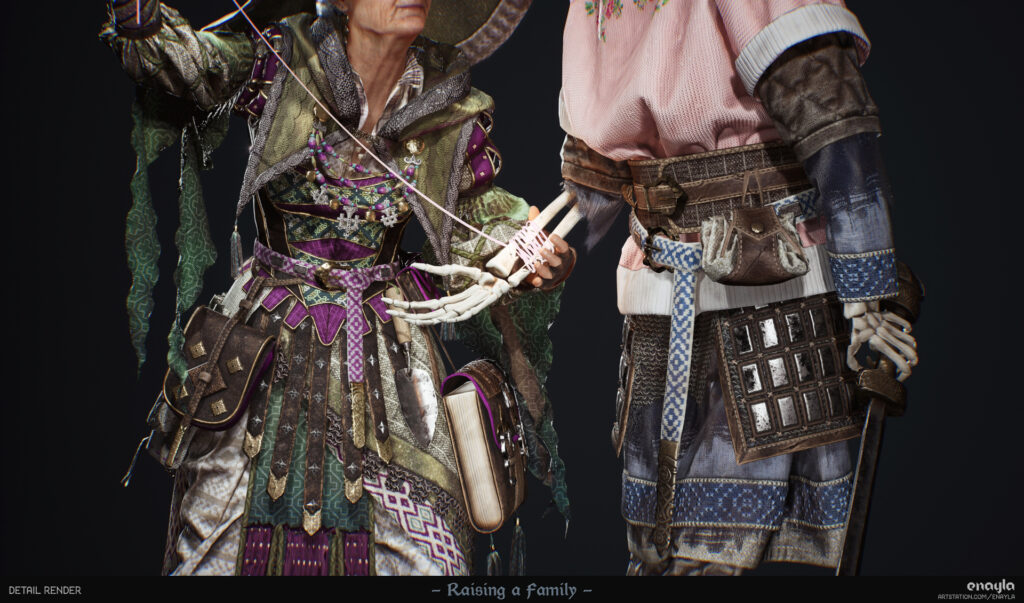
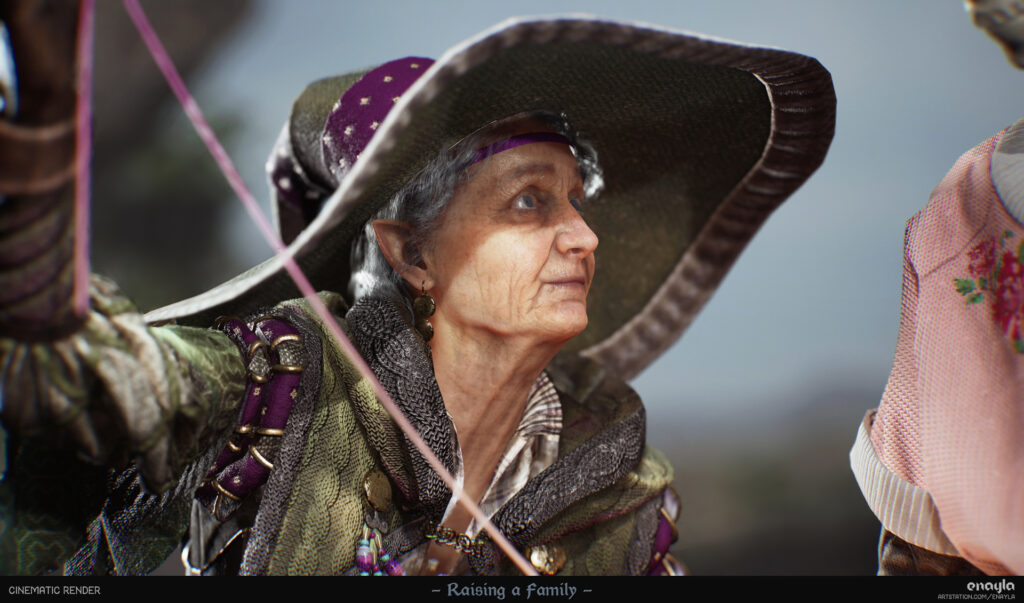
I envisioned the necromancer’s clothing to be cluttered and eclectic, with many layers and details. She’s
a graverobber, looting corpses for additional trinkets to add to her collection, and so her maximalist
outfit reflects that hoarding tendency. I did want to make sure she had some practical elements:
modular garments to keep her comfortable in various climates, with bags and tools easily accessible. To
convey her great age and frequent travel, I wanted her clothing to be a mixture of fashion from different
time periods and regions. My initial style reference was eastern European folk dress, but I ended up
incorporating aspects of Italian Renaissance, Nordic Viking, and 18th century western fashion in her
clothing.
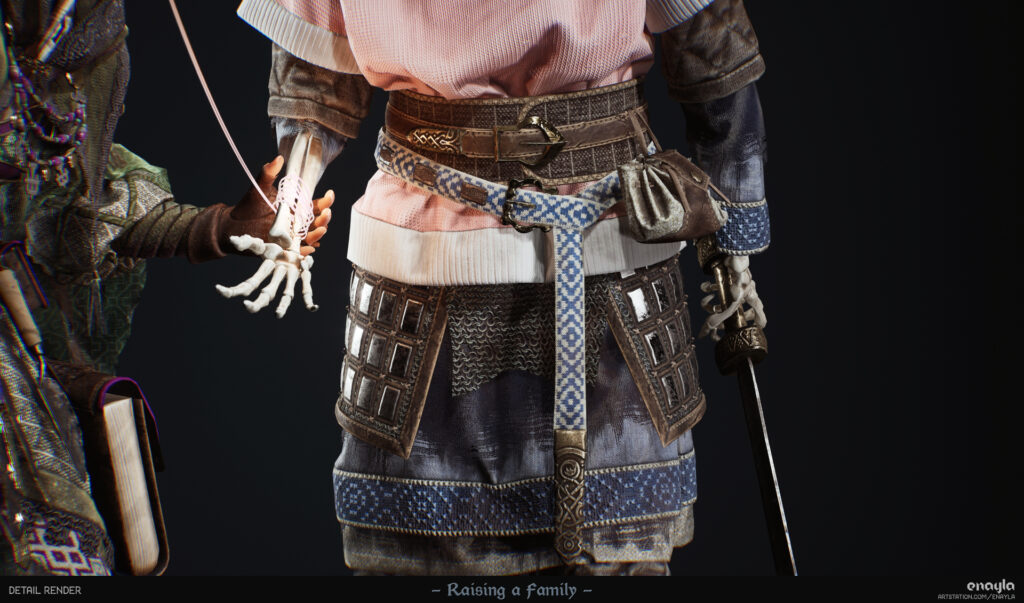
On the other hand, I designed the skeleton to be very simple and cohesive. He’s essentially wearing
what he was buried in: a long tunic and trousers, decrepit and weathered, with minimal armor and
embellishment. I decided on a muted color scheme, faded and generally unobtrusive. I wanted to
create a sharp contrast to his main garment: a far more pristine, hand-made and embroidered sweater,
obviously gifted to him by his doting patron. This idea started out as a joke – when I thought about
showing the relationship between these characters, the first image that popped into my head was an old
family photo of a child wearing Grandma’s oversized, mismatched sweater – and it kind of stuck!
Clothing Experimentation and Iteration
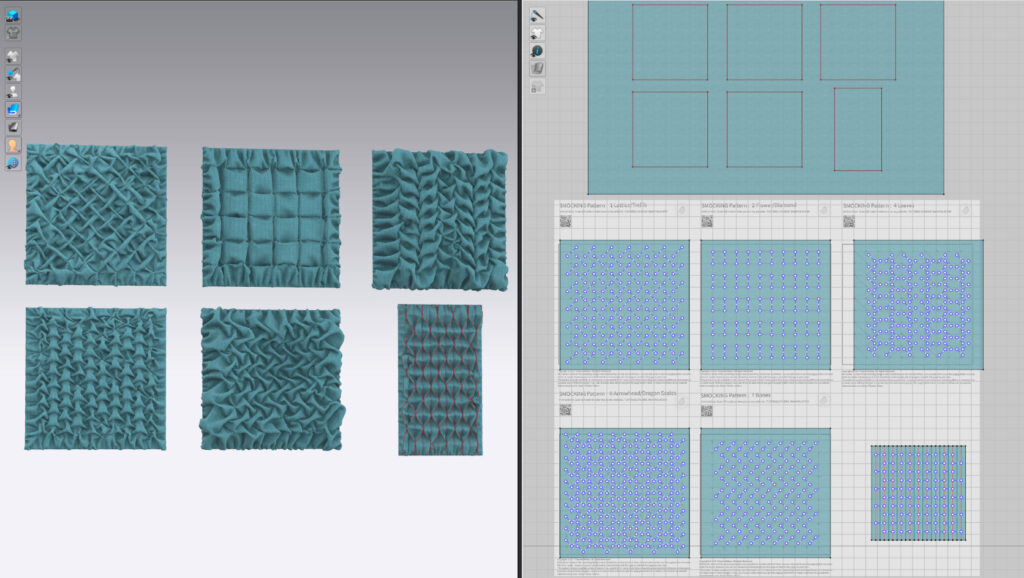
I had worked on a few garment-heavy characters sculpts previously, but I really wanted to see how many of the real-world textile skills I could recreate in Marvelous Designer. Some of my favorite detailing methods are pleating and smocking, so I tested out a few patterns using the tacking tool and it worked quite well!
This just involved me tracing over diagrams with the pins in various orientations, and then manually manipulating the tucks while simulating.
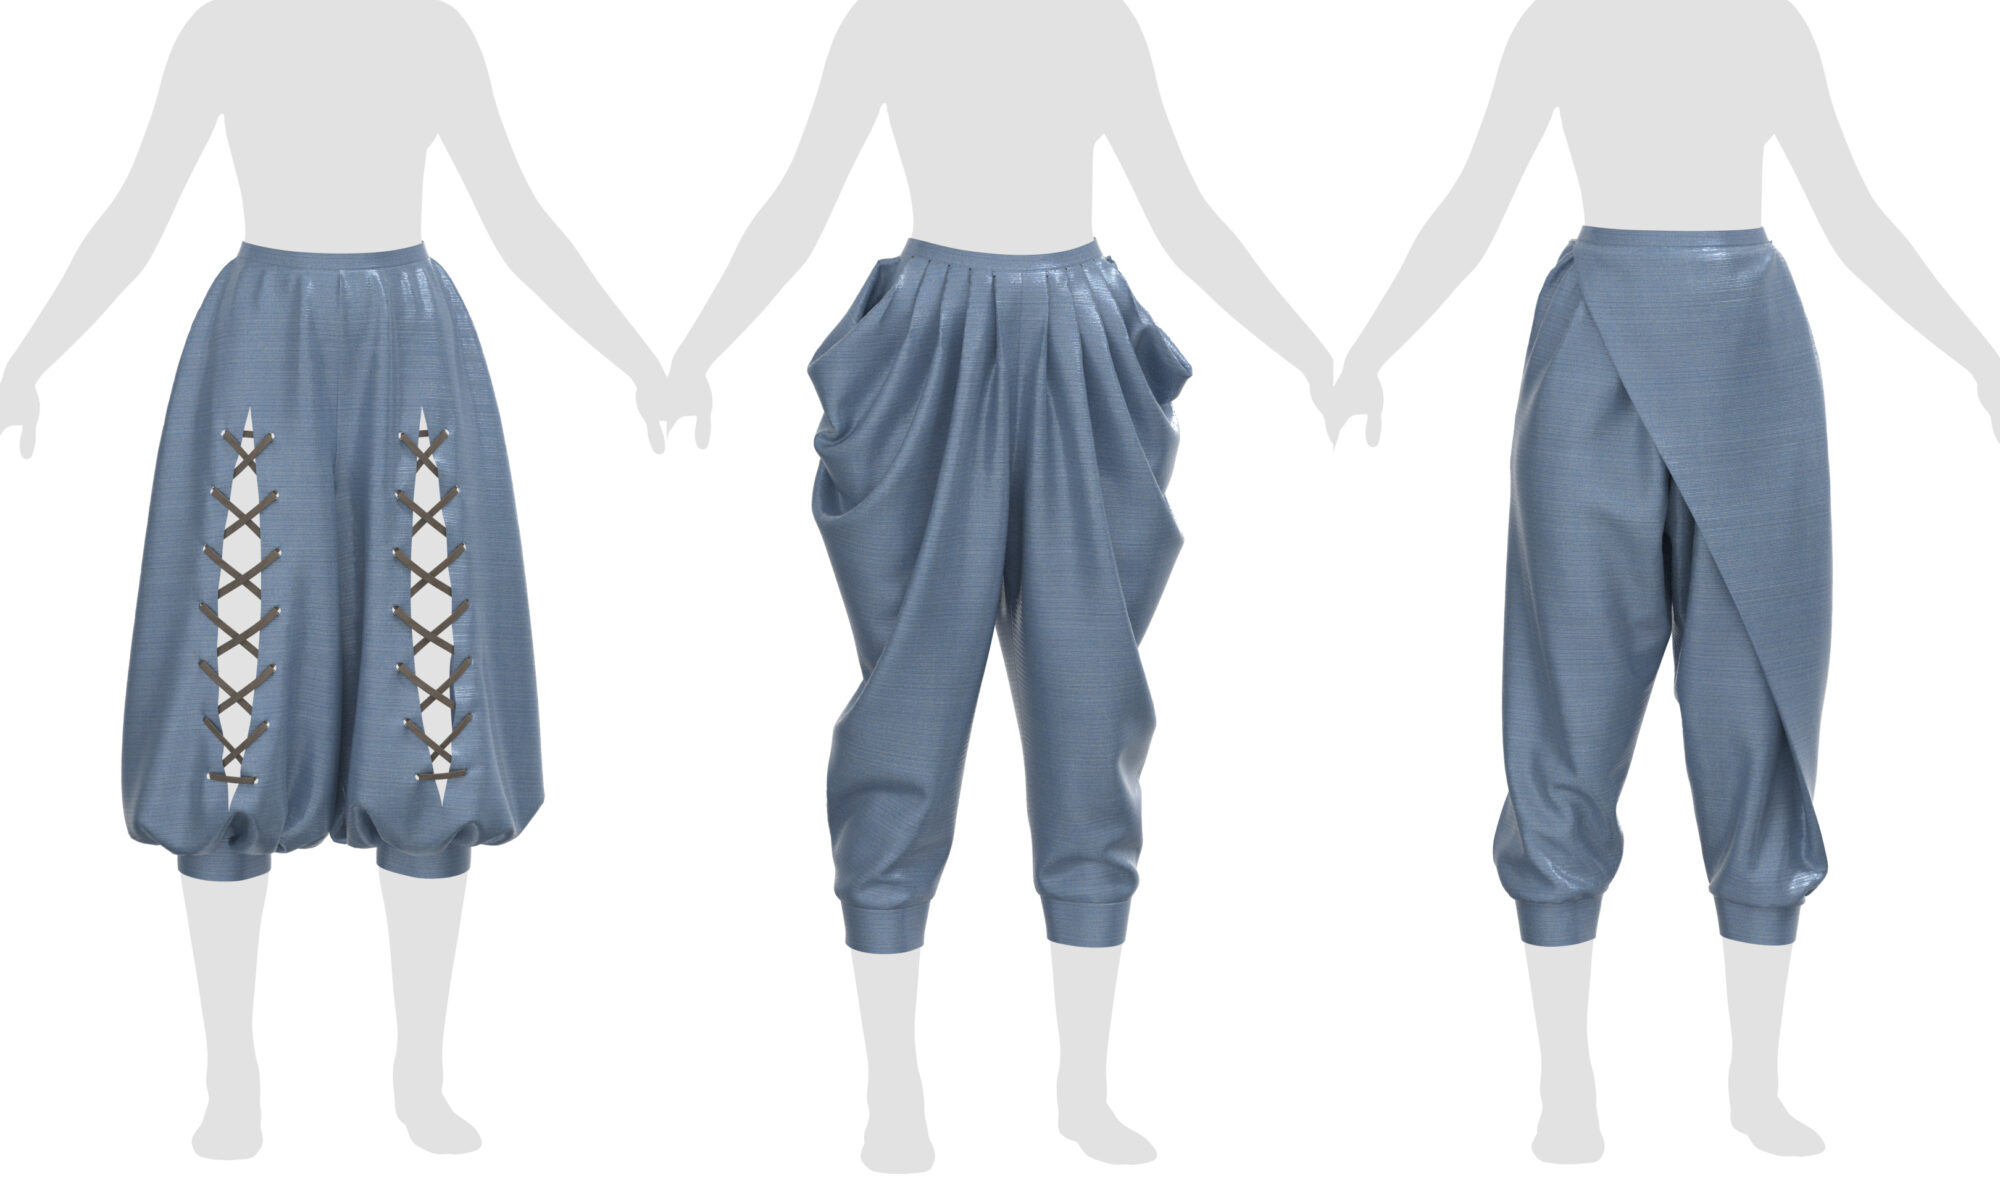
I also tried out a few interesting draped trouser designs based on my references and settled on the middle one with some side lacing. Not much of them is visible in the final design but they peak out a little behind her other garments for some visual interest.
I was working with a tight deadline on this project and wanted the focus to be on the clothing and detail sculpting work, so I chose to start patterning on existing base meshes for the two characters.
The necromancer woman is from the 3D Scan Store (which I modified heavily), and the skeleton is a wonderful mesh by Fabricio Works which was left mostly intact.
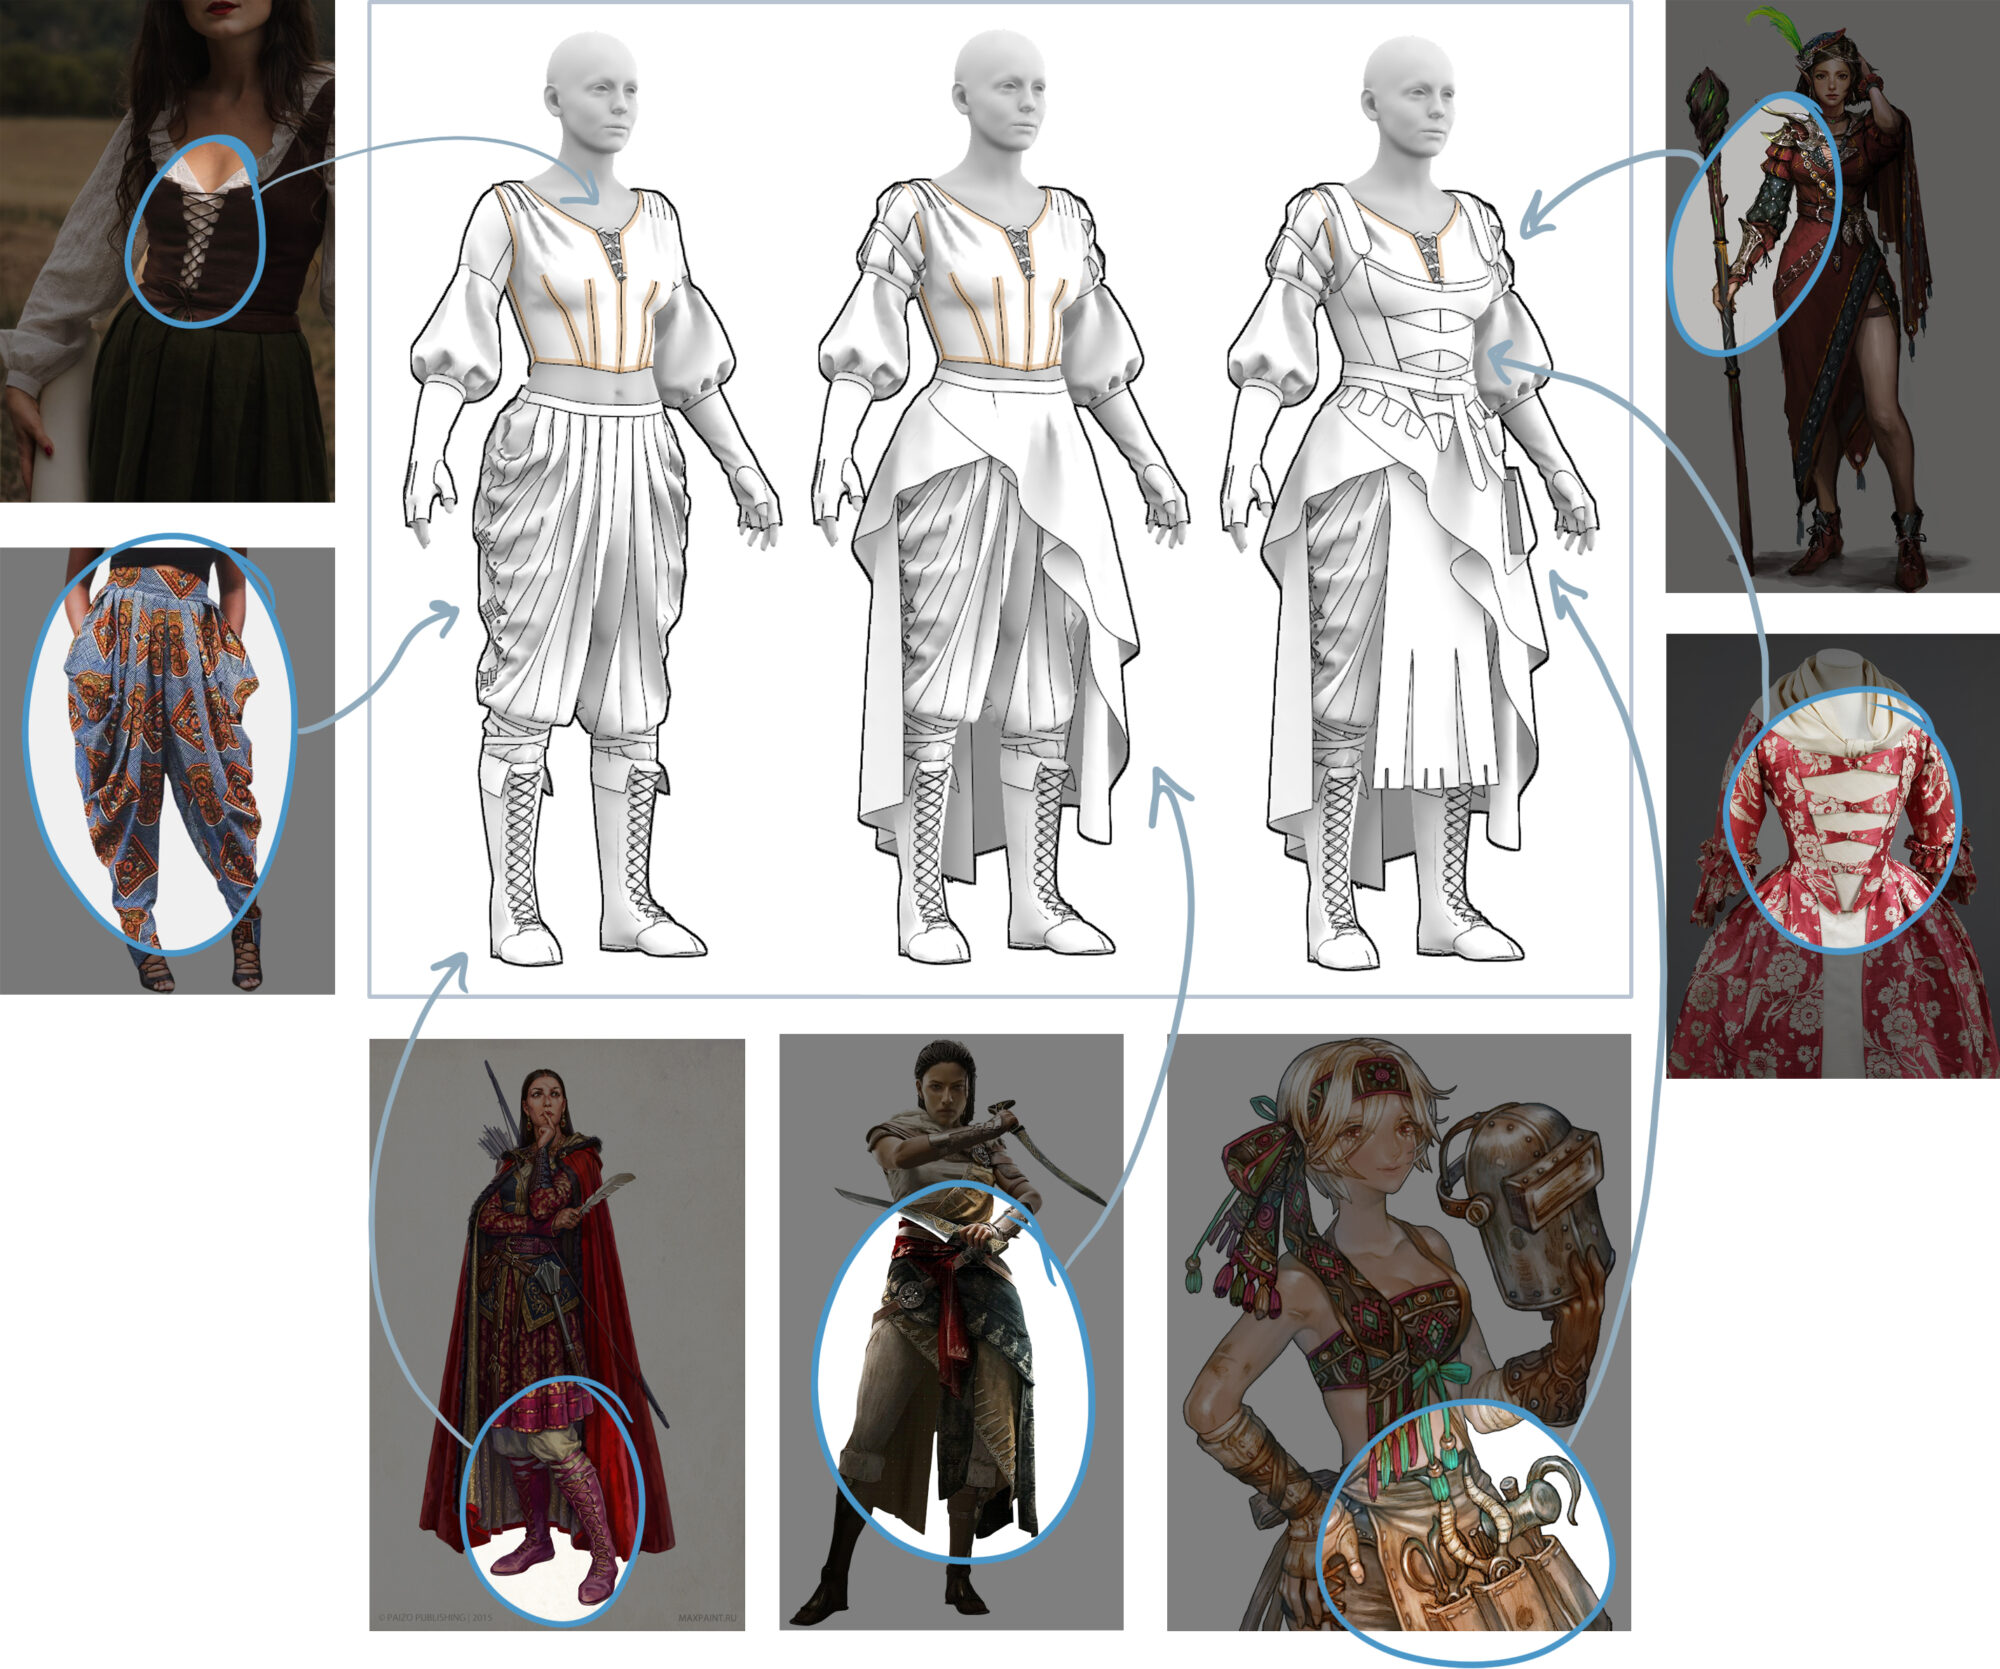
The necromancer’s outfit was born from experimenting with pieces from my reference board and mashing them together.
I incorporated elements from some of my favorite art and fashion pieces, modifying them to fit with the overall design. This shows some of my inspiration partway through the design process.
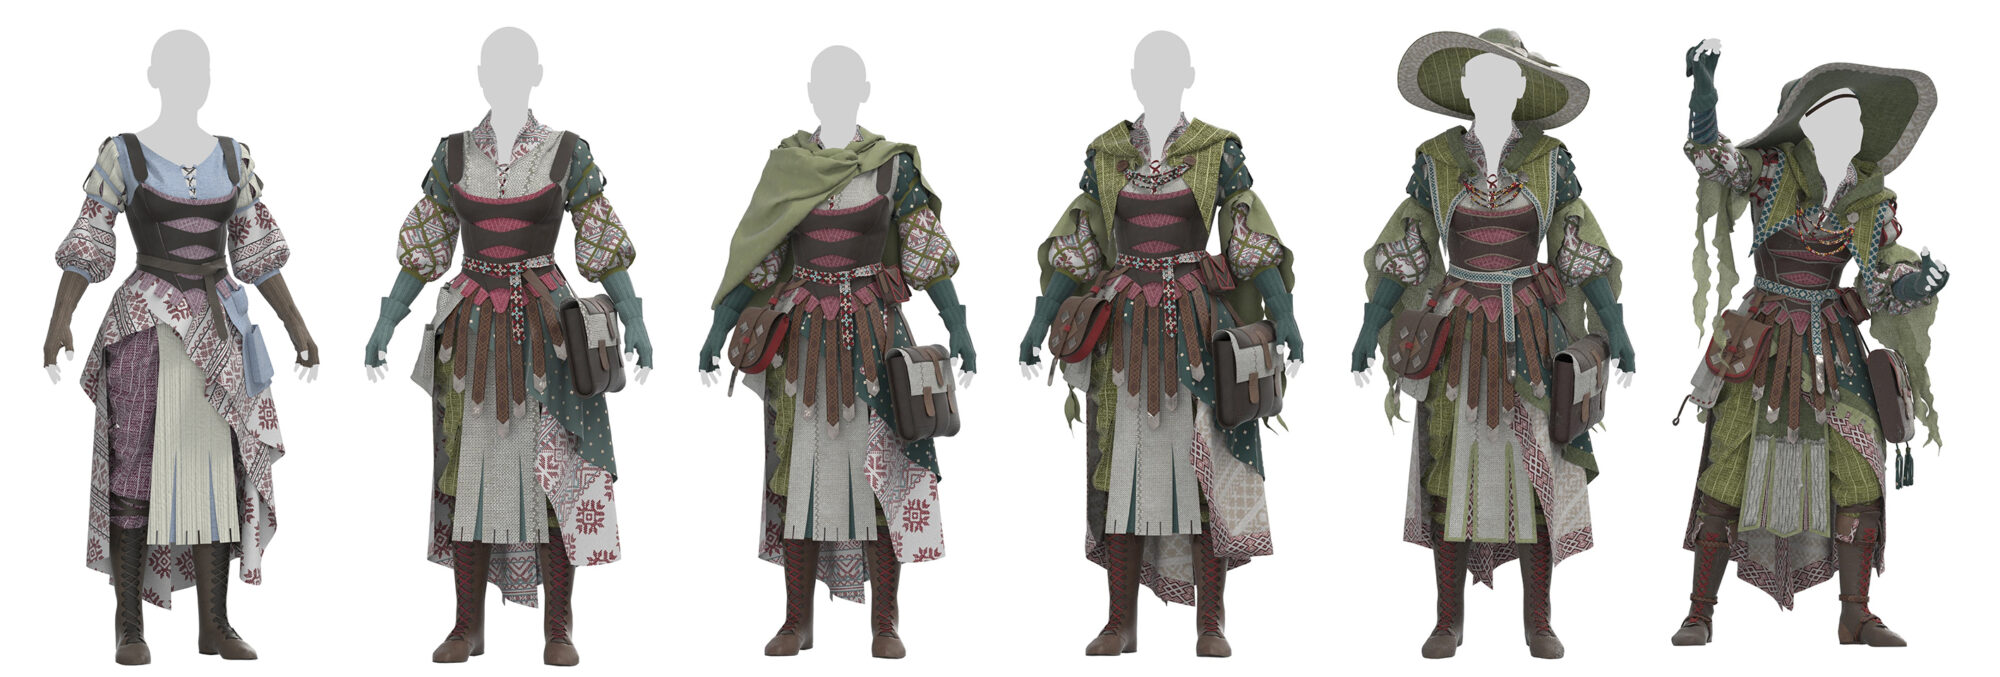
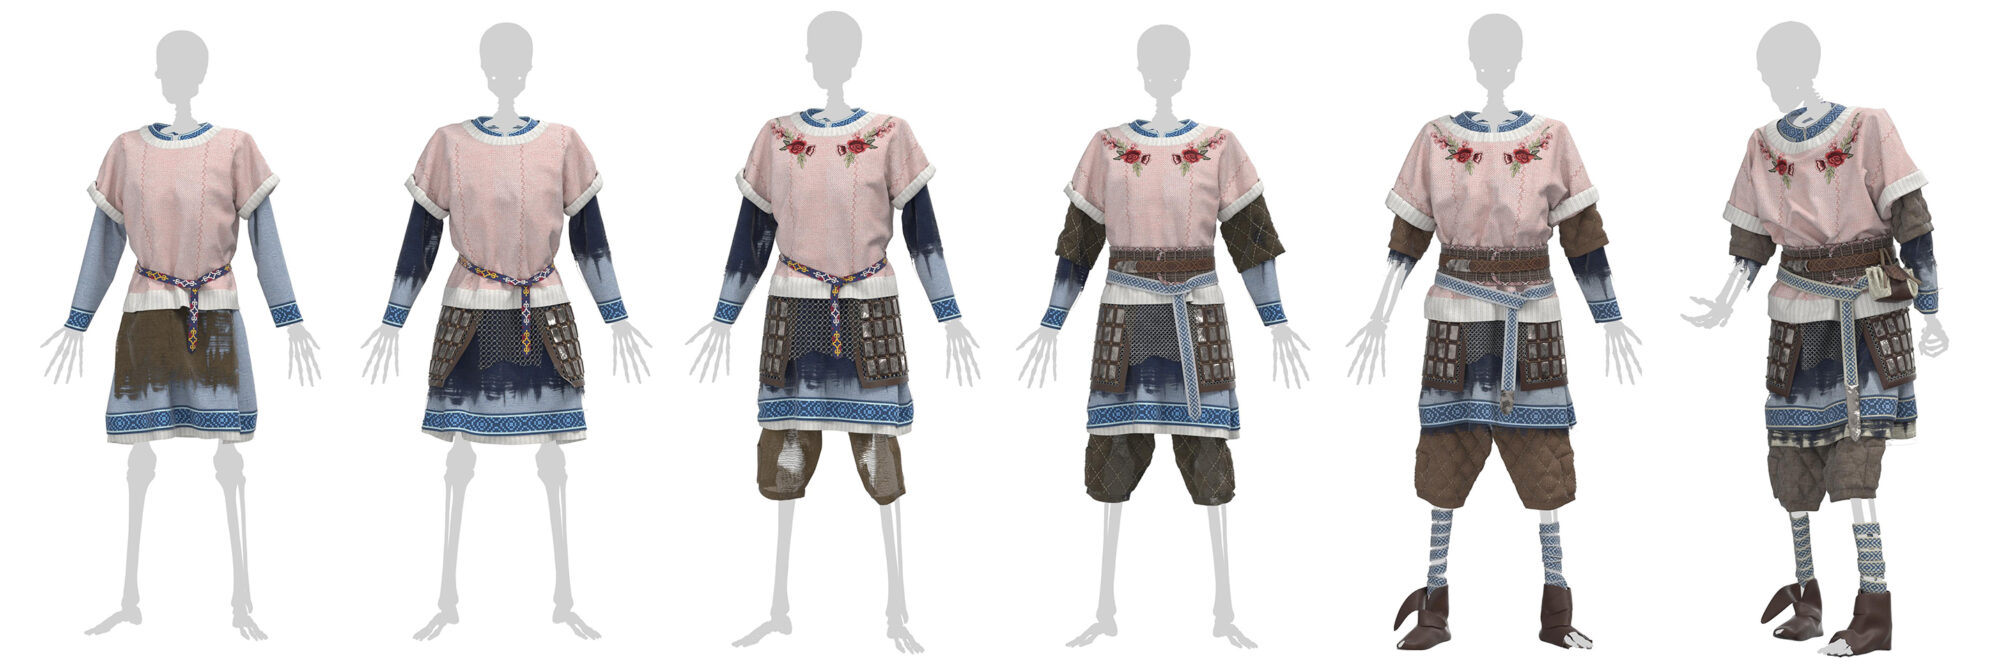
As you can see, the designs evolved quite a lot as I worked on this project! The skeleton came together fairly quickly since I was mostly referencing one or two historical clothing styles, but the necromancer went through a bunch of changes before I was happy with her look.
As I was working, I played around with basic material texturing in Marvelous just to get an idea for the different textures and fabric types, although I did end up changing many of these later on.
Rigging and Posing
Once I had the characters’ clothing nearly finalized in Marvelous Designer, I ran into a crossroads regarding at which stage to put the characters into their final pose. For games, the full character sculpt is typically done in T or A pose for rigging and animation after the fact. However, my characters were covered in layers of draping fabric, and I knew that I wanted them to be in particularly dynamic poses for
the final scene.
It quickly became apparent that I hadn’t made the best design choices for functional game characters; if I didn’t pose them before doing the final MD cloth simulation, then I’d either have to sculpt all the folds and drape by hand or figure out the enormous task of cloth rigging (?) a few dozen complex garments.
I was limited in time, and still learning quite a few new skills on this project, so I opted to pose first and let MD do that work. This means that the characters are unfortunately locked into place in the pose that I’ve set (or perhaps they’ve just fought a basilisk?).

I used Maya’s rigging tools to create a simple rig for both characters, painting in custom skin weights and manipulating them until I was happy with their pose.
Since the vast majority of both bodies were going to be covered by loose clothing, I wasn’t too careful with deforming around shoulders and other joints.
Finalizing Clothing (MD)
Once both characters were in their final poses, it was time to re-import them into Marvelous Designer for the final cloth simulation. Rather than importing new avatars and having to manually adjust the clothing mto the new pose, I created a morph target from the posed mesh in Maya and imported that into MD.
Now when I redid my simulation, the avatar moved slowly from the neutral to dynamic pose, allowing the fabric to re-drape and move along with it, keeping my design intact.
I then did some final detail work and cleanup in Marvelous to prepare for the final export. I’ll highlight a few techniques that I made use of for adding detail and realism to my garments.
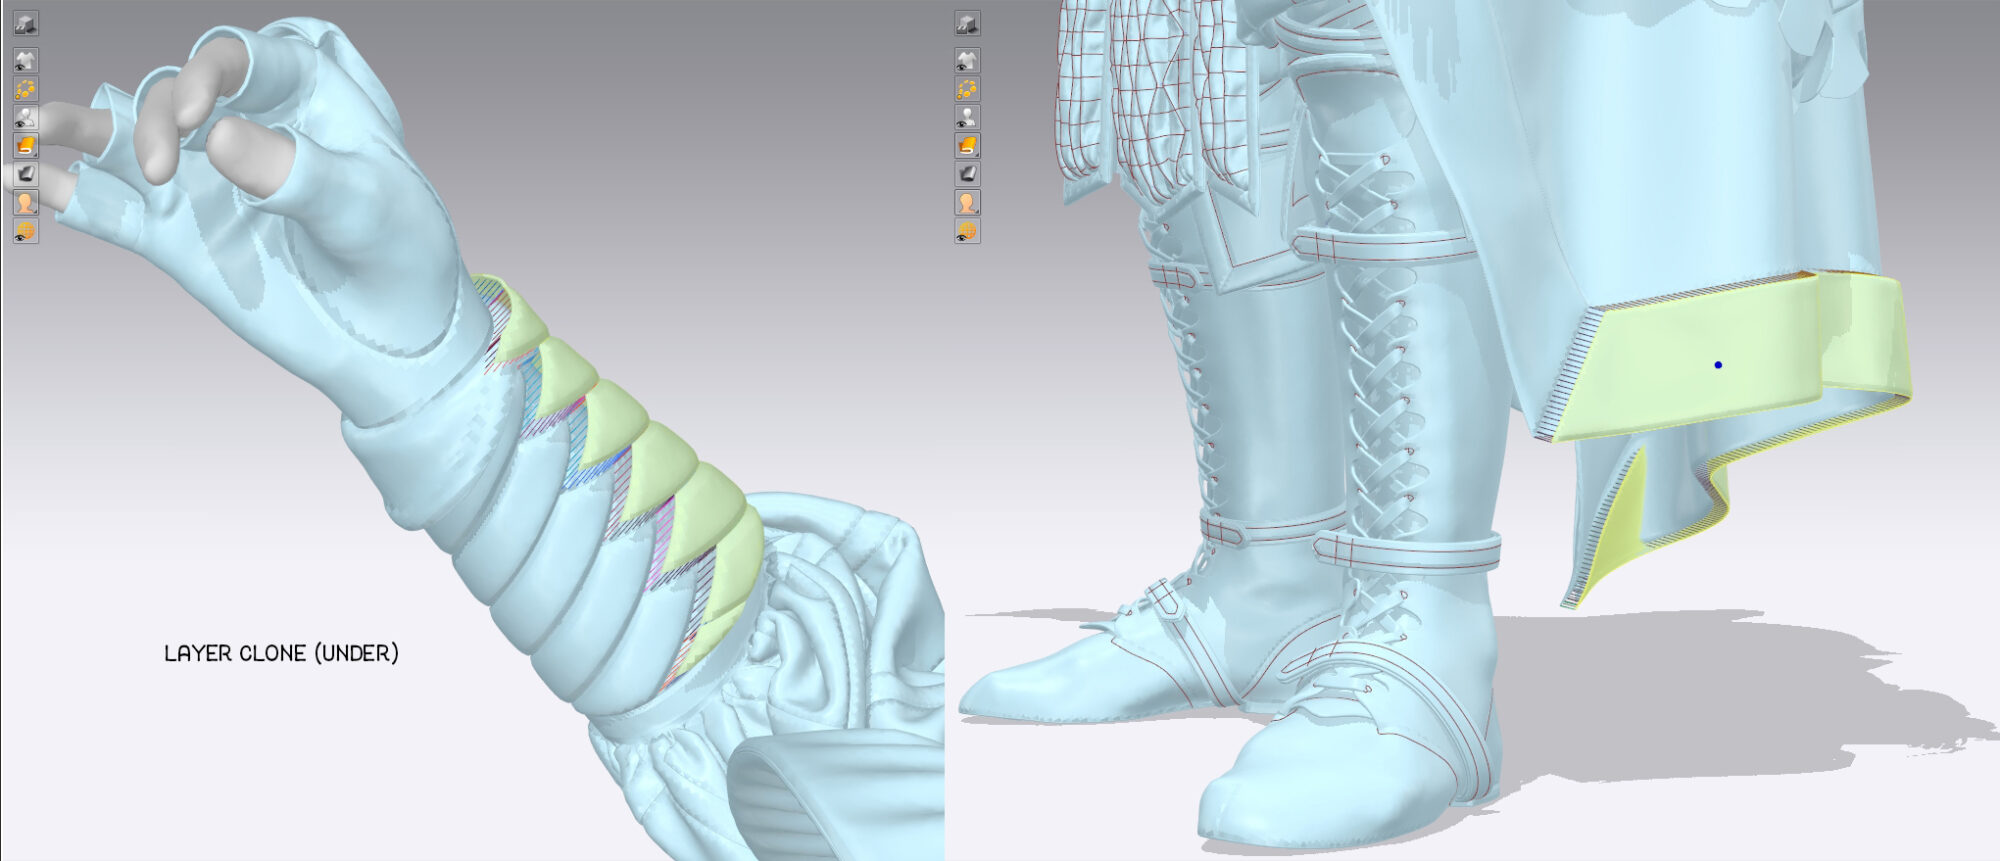
My favorite way to make fabric feel solid and as if it could exist in real life is to give it some thickness. MD has a visual thickness that renders in the software, but once exported, that thick leather or knit becomes a single-sided plane. To combat this, I often will make thicker pieces, or ones with visible edges, as double-layered garments using the ‘layer clone under’ tool.
Now when exported (with the ‘weld’ setting checked), these pieces will have a lip on the edge to indicate that depth, even if it’s simply baked down during later stages of development.
For the necromancer’s gloves and skirt trim, I ended up deleting the internal geometry after exporting as it wasn’t necessary for anything but that initial simulation.
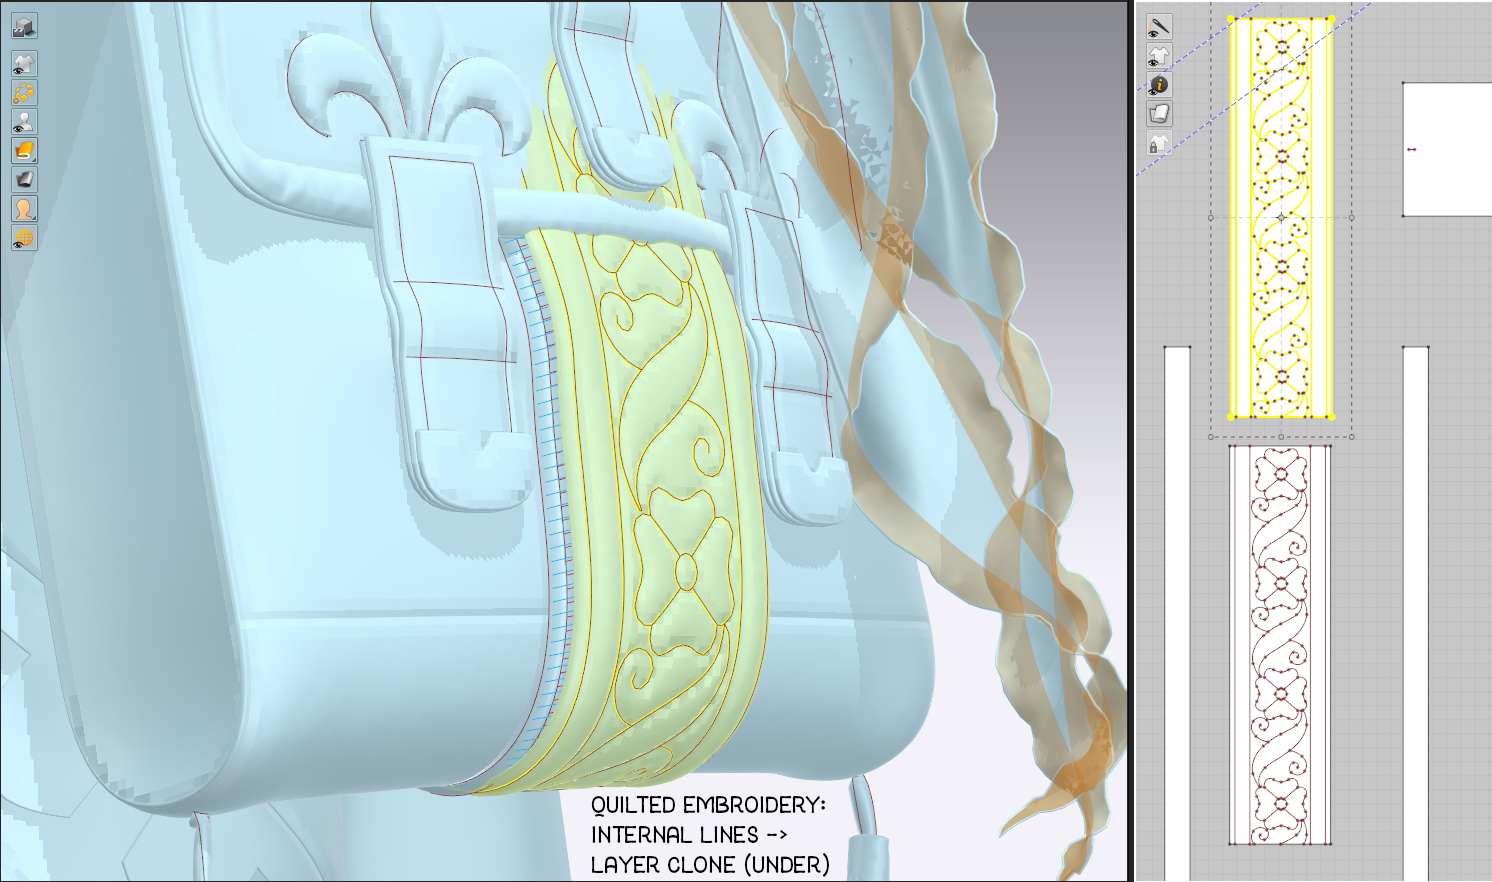
Adding that duplicate layer is particularly important for doing techniques like quilting or embroidery.
For this, I traced over a reference design using the internal line tool. When cloning the layer, all of those internal lines will also be stitched to the under layer and the combined thickness creates a puffed-out effect.
I adjusted how intense it was by changing the ‘Add’l Thickness – Collision’ setting on the individual pattern pieces, or in the ‘Thickness’ of the fabric properties.
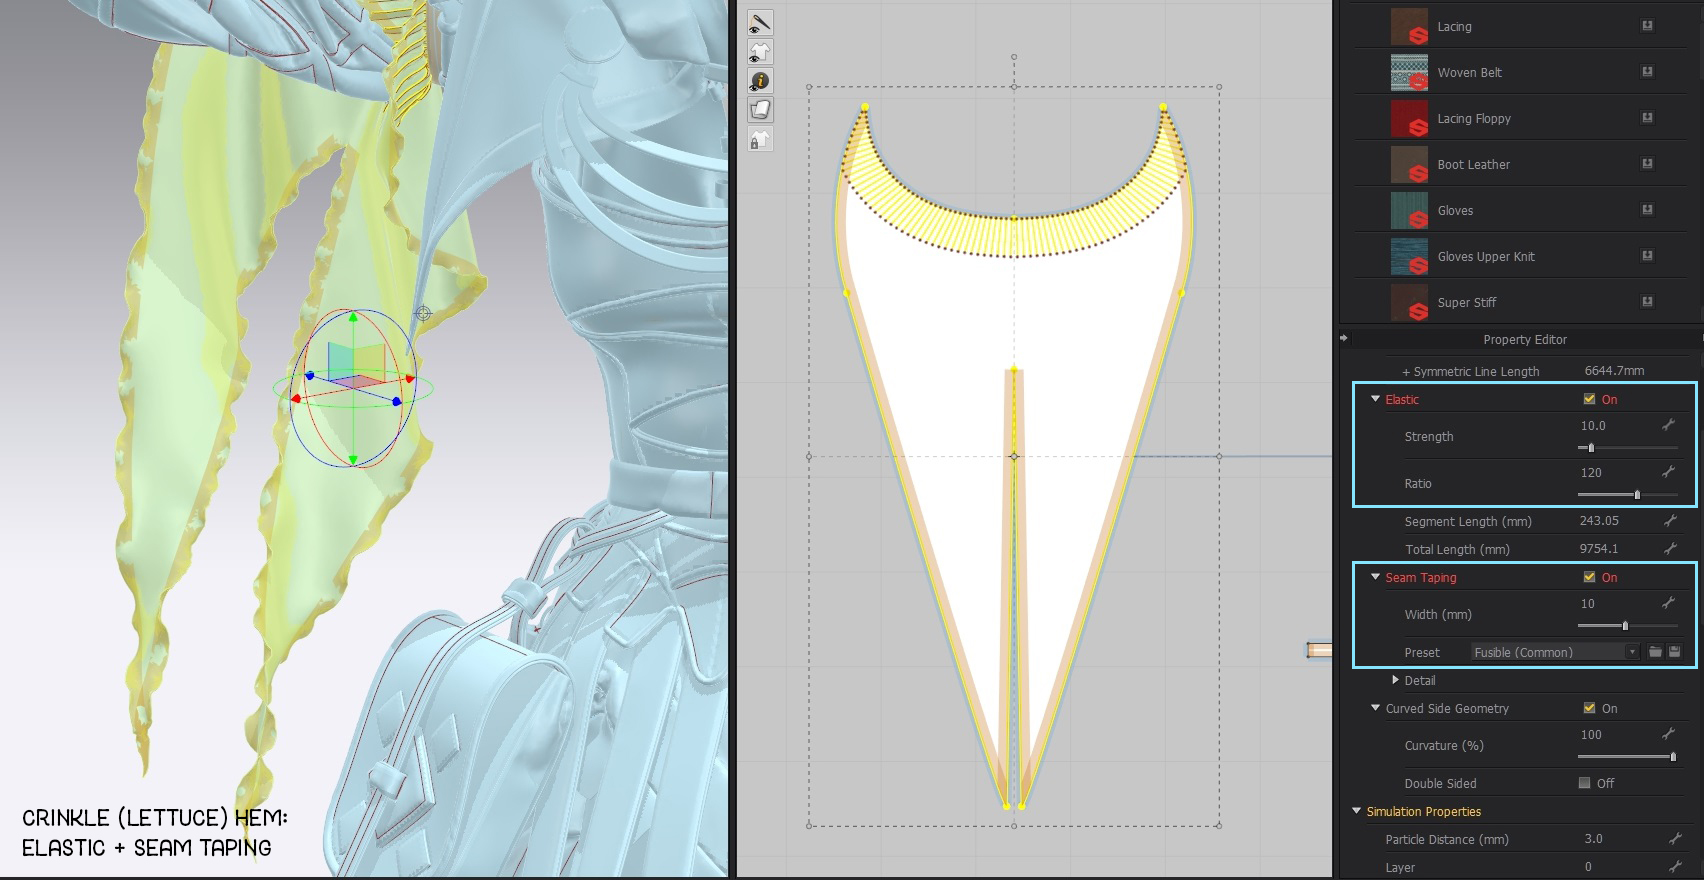
I wanted to add some visual interest to the edges of the necromancer’s oversleeves without adding thickness to sheer, floaty pieces of fabric, so I opted for a ‘lettuce hem’ look.
To emulate this effect, I selected the edges and added positive (over 100%) elastic as well as seam taping. This effectively ‘stretched’ the outer edges along a supportive tape and created that distinct wavy hemline.
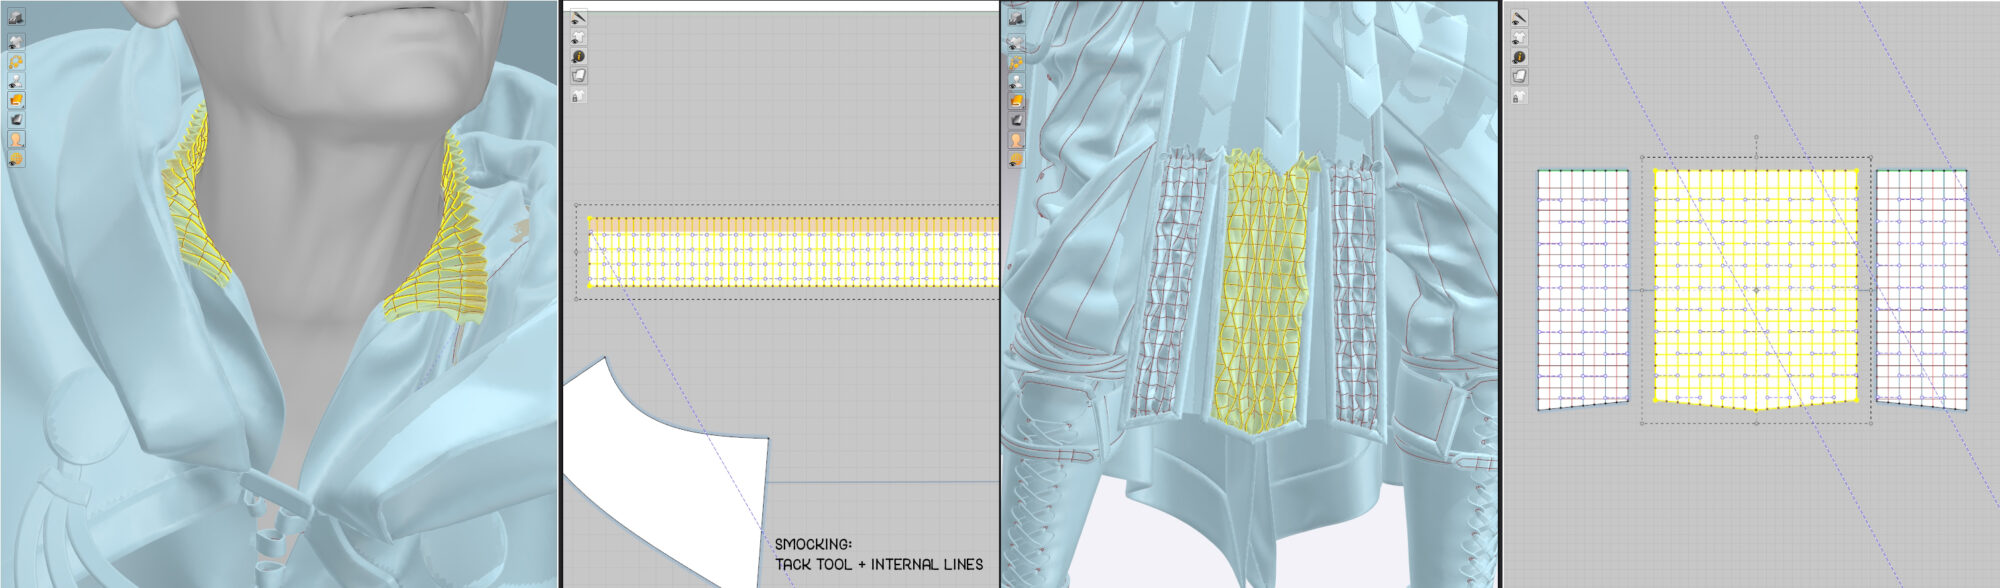
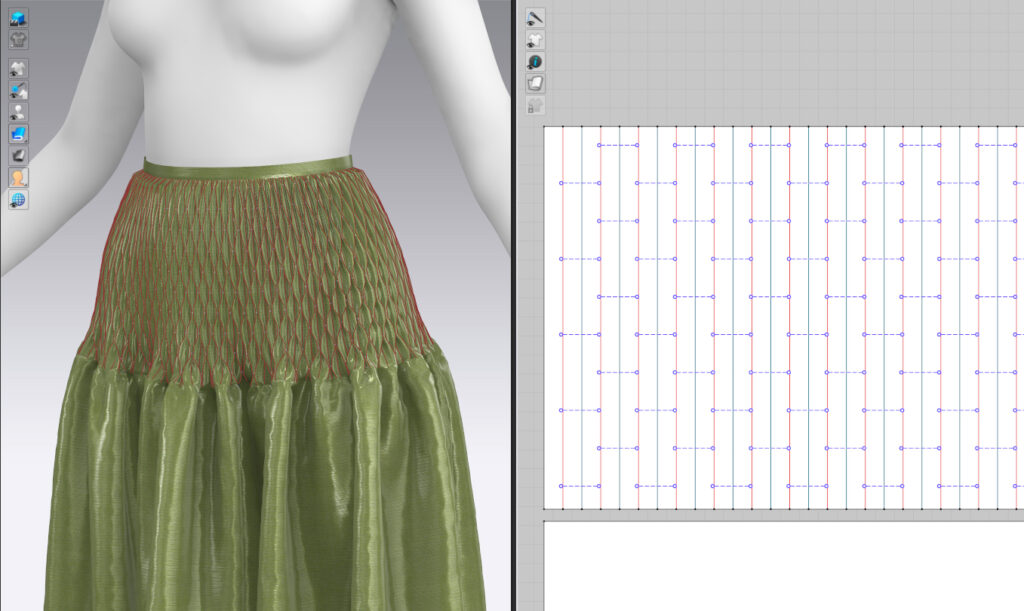
I knew I wanted to incorporate some of the smocking techniques I had experimented with earlier, so I opted to add details to her collar and tabard skirt.
I went with a basic ‘honeycomb’ design involving alternating horizontal tacks on a grid system.
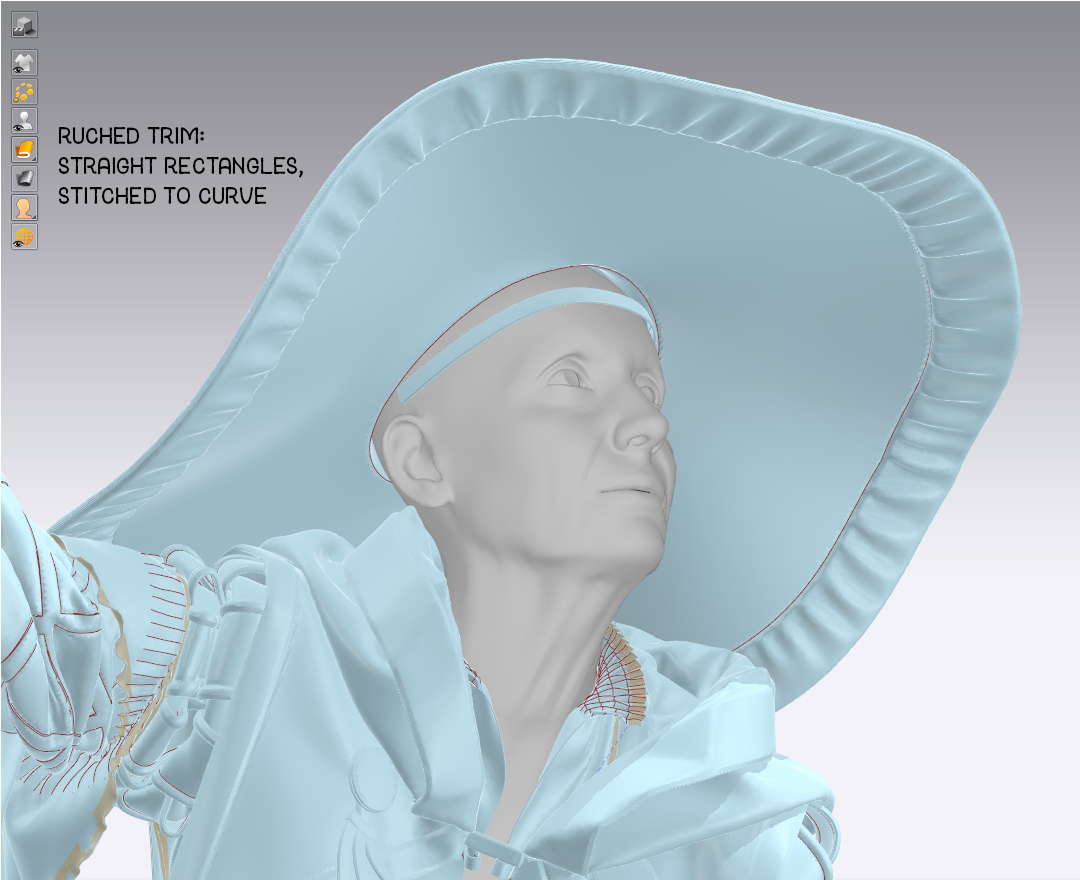
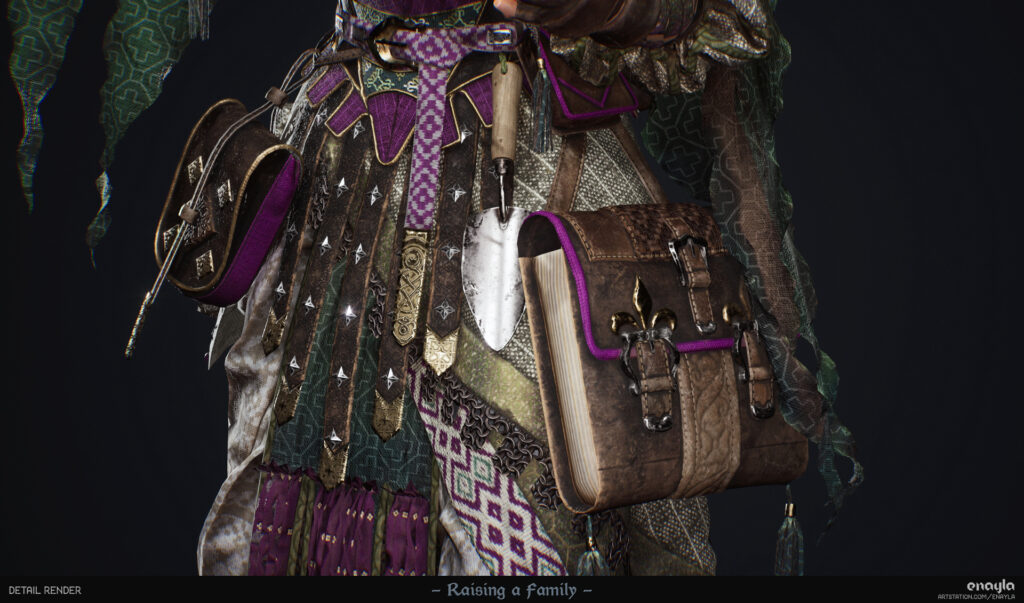
The necromancer has all sorts of decorative trims on her costume, which I created by stitching rectangular (non-curved) strips of fabric over the top and bottom of curved surfaces, sandwiching the base in between.
I made sure to match the trim length to the longer edge it would be sewn to (in this case, the outer edge of the necromancer’s hat) so it was gathered along the slightly smaller inner circle.
This made texturing far more straightforward, as I could place interesting designs along a straight line rather than a custom curve, and make use of trim sheets and repeating texture space.
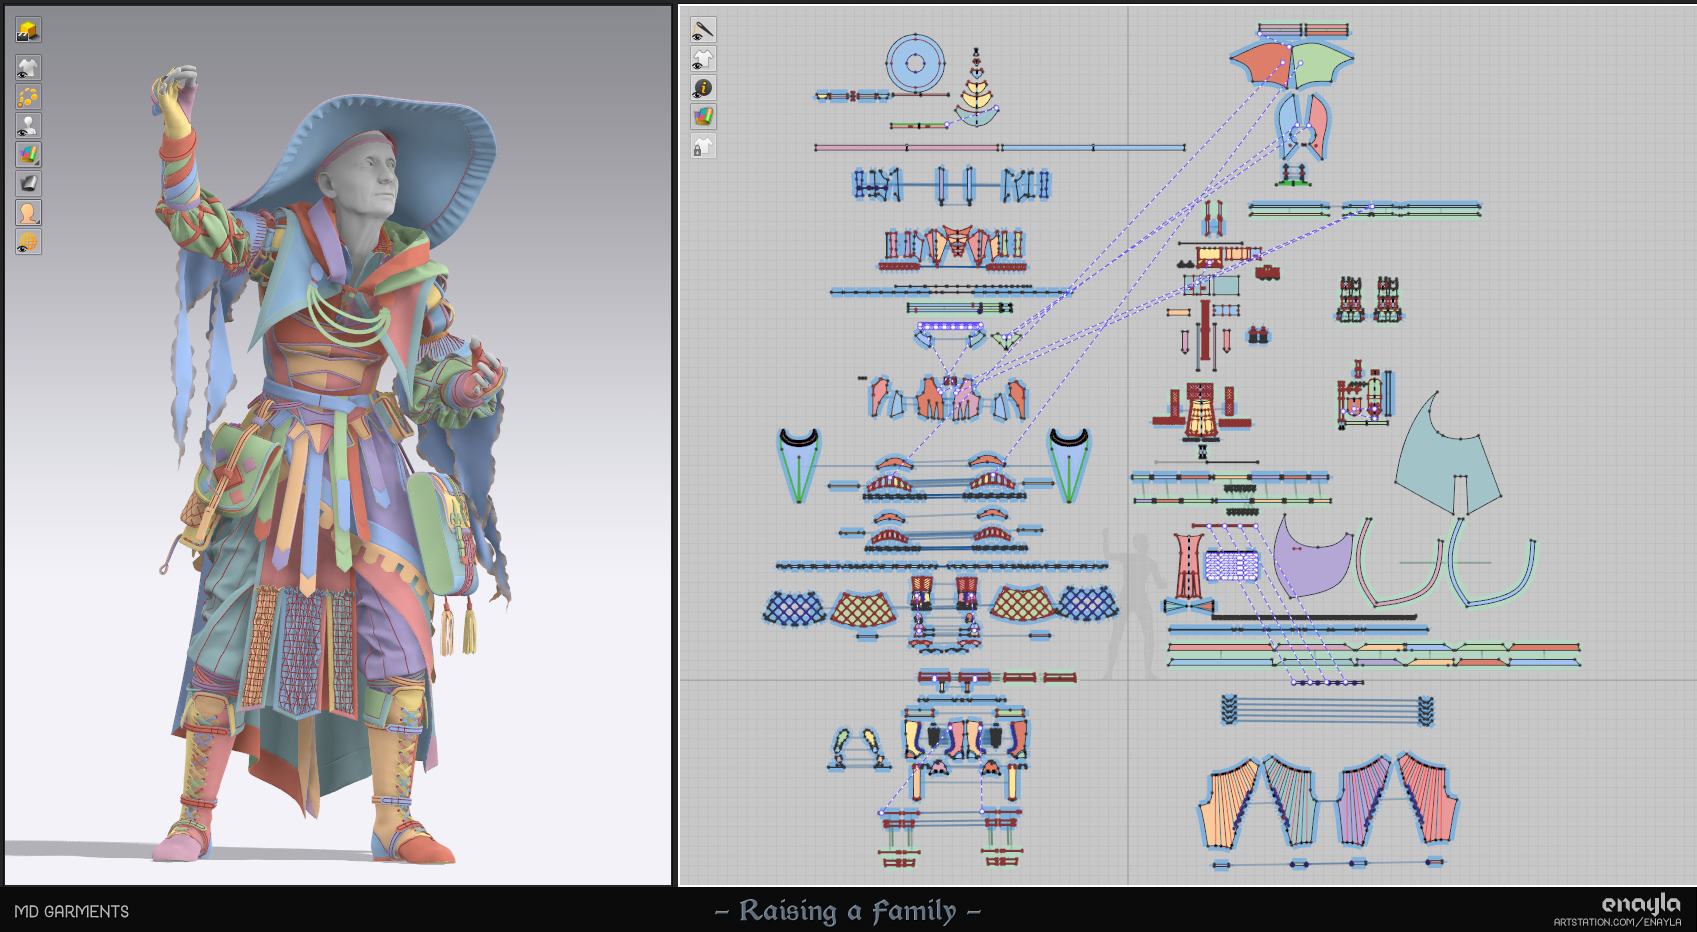
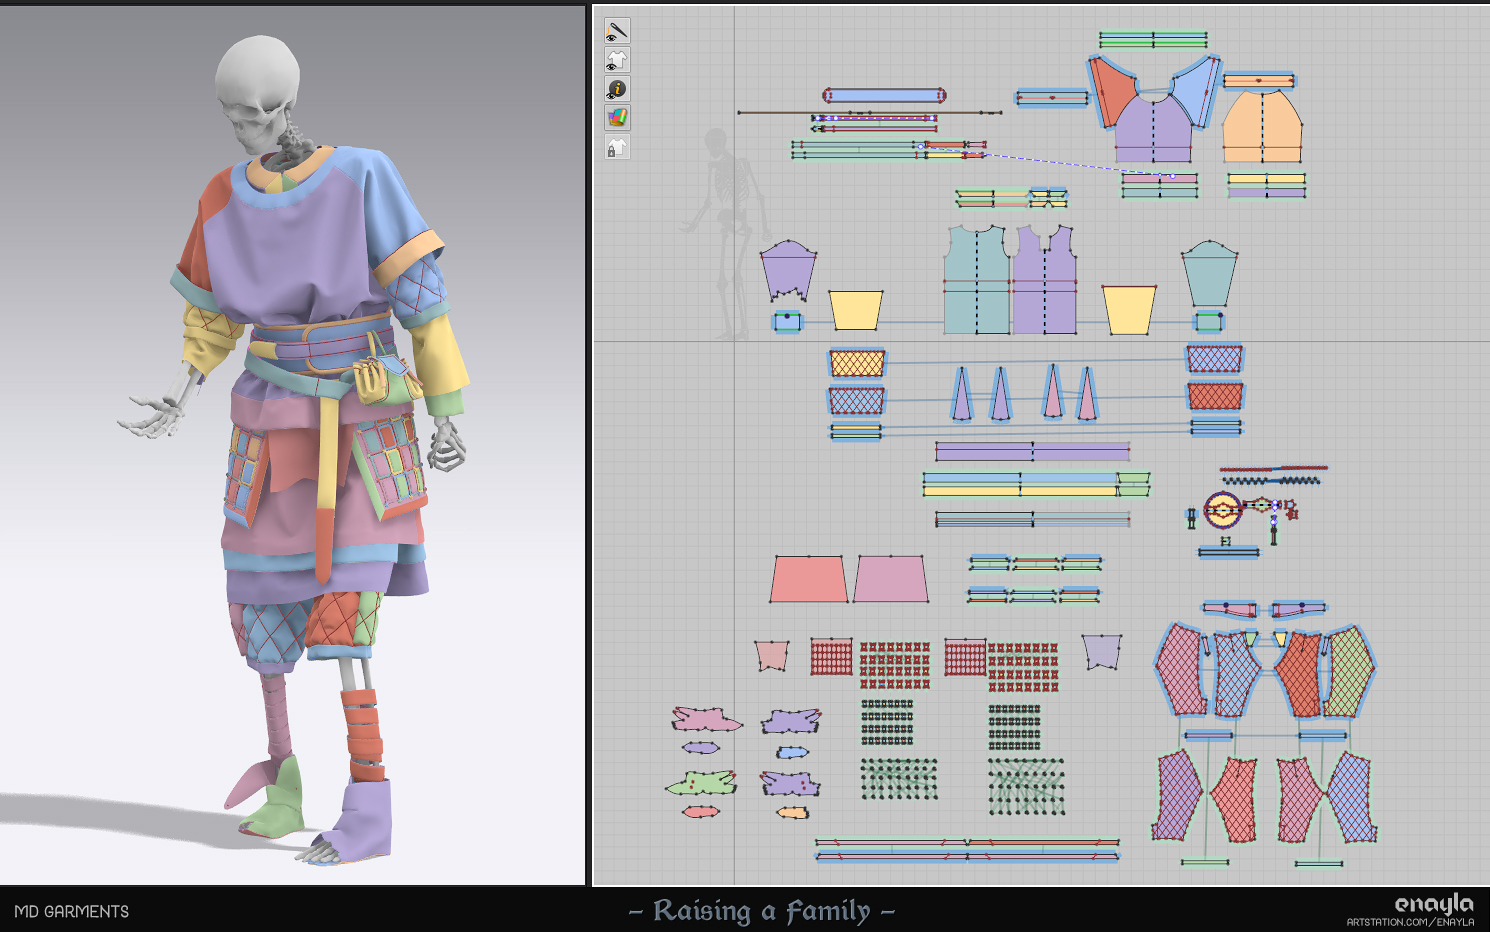
And these are the final scenes in Marvelous Designer before export to sculpting software. Definitely the most complex pieces I’ve done to date!
I’m working on a fairly low-spec computer, so I did struggle with managing this many pieces, especially when I raised the particle distance in the end.
I combatted this by only working in smaller sections while freezing/deactivating other garments that wouldn’t interact. I created the most detailed parts, such as the boots, in a separate file and imported them in as a garment for the final simulation.
ZBrush Export and Cloth Retopology
One big advantage of doing nearly all of the base pieces in MD is that I could do most of the retopology of the clothing at this stage using a wonderful method described by Laura Gallagher of Outgang Studios:
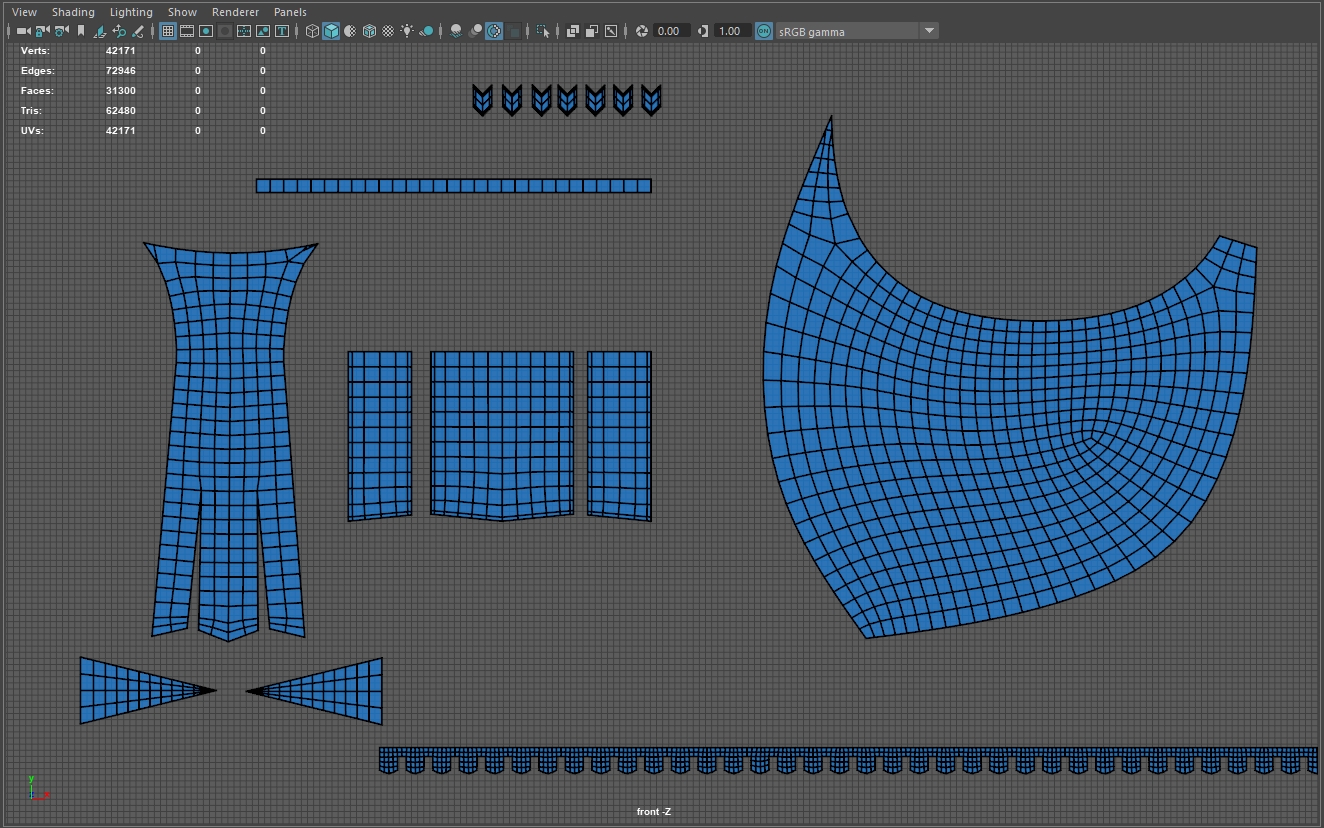
The above tutorial suggests two possible methods for retopology: on either the 3D garments or on the flat components. I chose to retopologize all of the clothing while flat, as I could create cleaner quads.
This involved resetting the garments from Marvelous Designer into their unsimulated state (as pattern pieces) and exporting, retopologizing, and then transferring attributes in Maya to ‘wrap’ them into their 3D form.
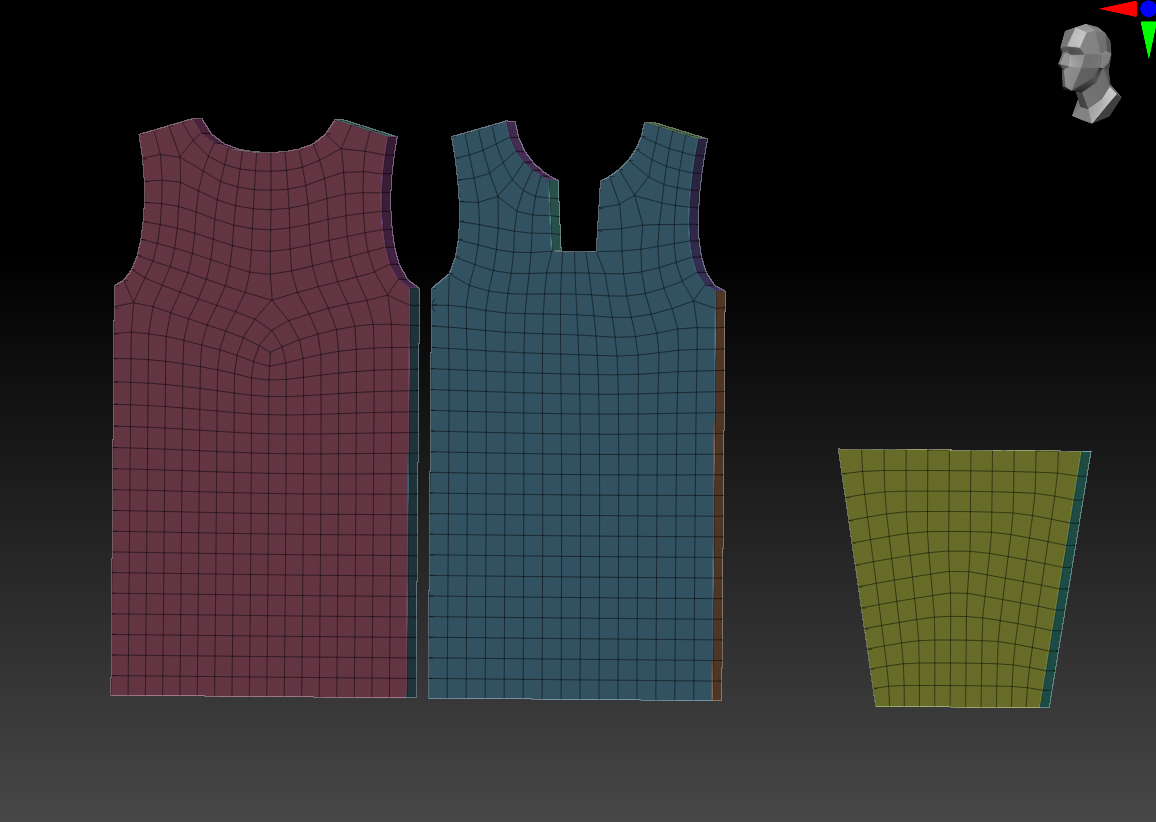
For the retopo itself, I opted for a mixture of automated ZRemesher retopology and manual cleanup using Maya’s Quad Draw tool. I started by importing the flat pattern pieces as geometry into ZBrush.
Running ZRemesher right away led to a bunch of issues with some of the smaller pieces being deleted entirely and generally geometry becoming more rounded on corners and edges. To resolve this, I added a thickness to the geometry using ZModeler’s QMesh function. Then I re-ran ZRemesher with results that much better matched the original flat pieces, and simply deleted the extra thickness geometry at the end.
I still needed to do some more cleanup, so I imported the low-poly and high-poly flat geometry into Maya and went in with Quad Draw.
This mainly involved pulling the corners and edges of the low-poly to match the high-poly copy, and adjusting some of the quad density for areas with more detail.
I was particularly careful to make sure that there was the same number of vertices on any seams that would later be sewn together, such as the edges on the shirt; otherwise, this method leaves small gaps along seam lines.
The downside is that the perfect grid system might not necessarily follow the actual creases and topography of the 3D garments. If this is ignored, it can lead to some awkward stair-stepping effects in the low-poly.
I tried to resolve some of this after transferring attributes by adding diagonal cuts that followed the contours and sharper creases of the draped areas, such as on the skeleton’s sweater (WIP) shown above.
This introduced some triangles, but I was careful to avoid ngons.
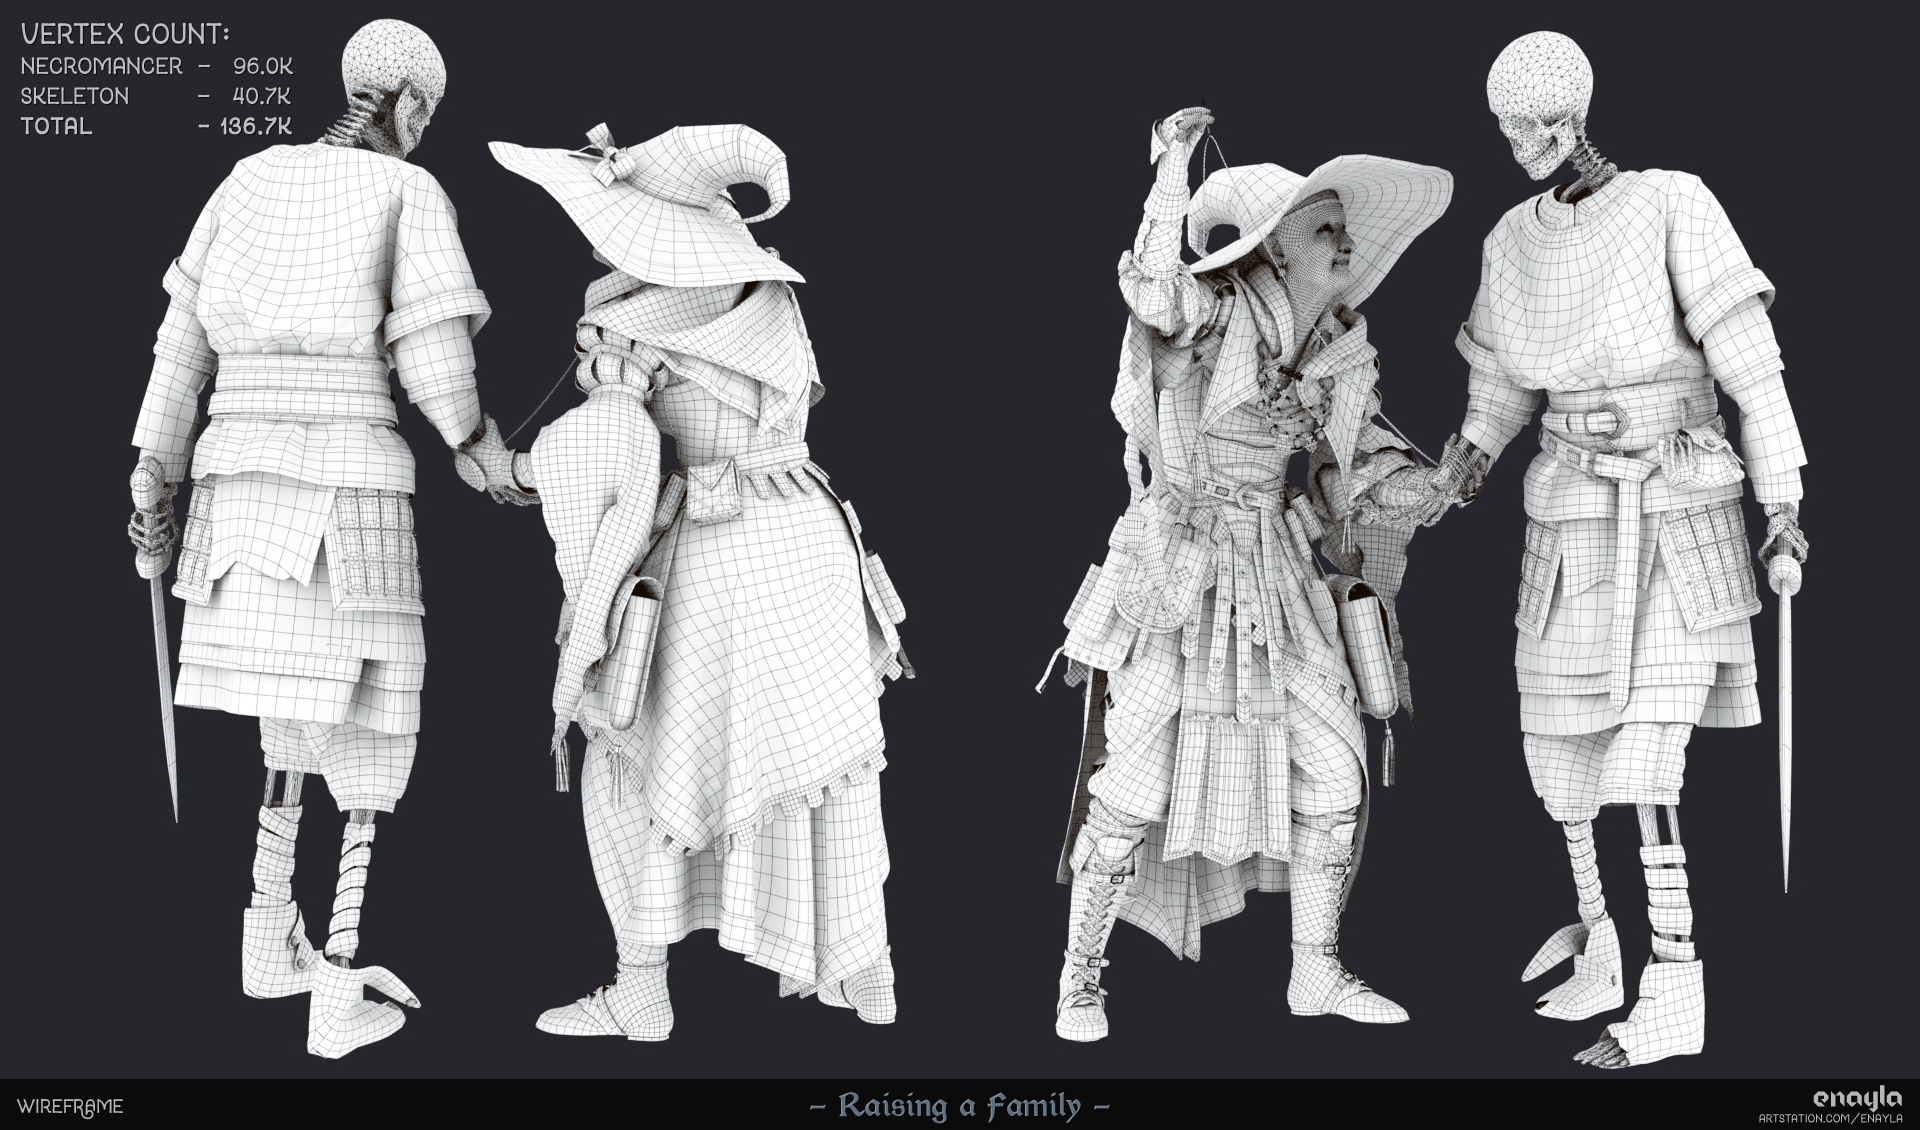
And this is the final topology I ended up with! I could have reduced the polycount further by baking down some trim and other details, but I’m generally happy with the clean grid system.
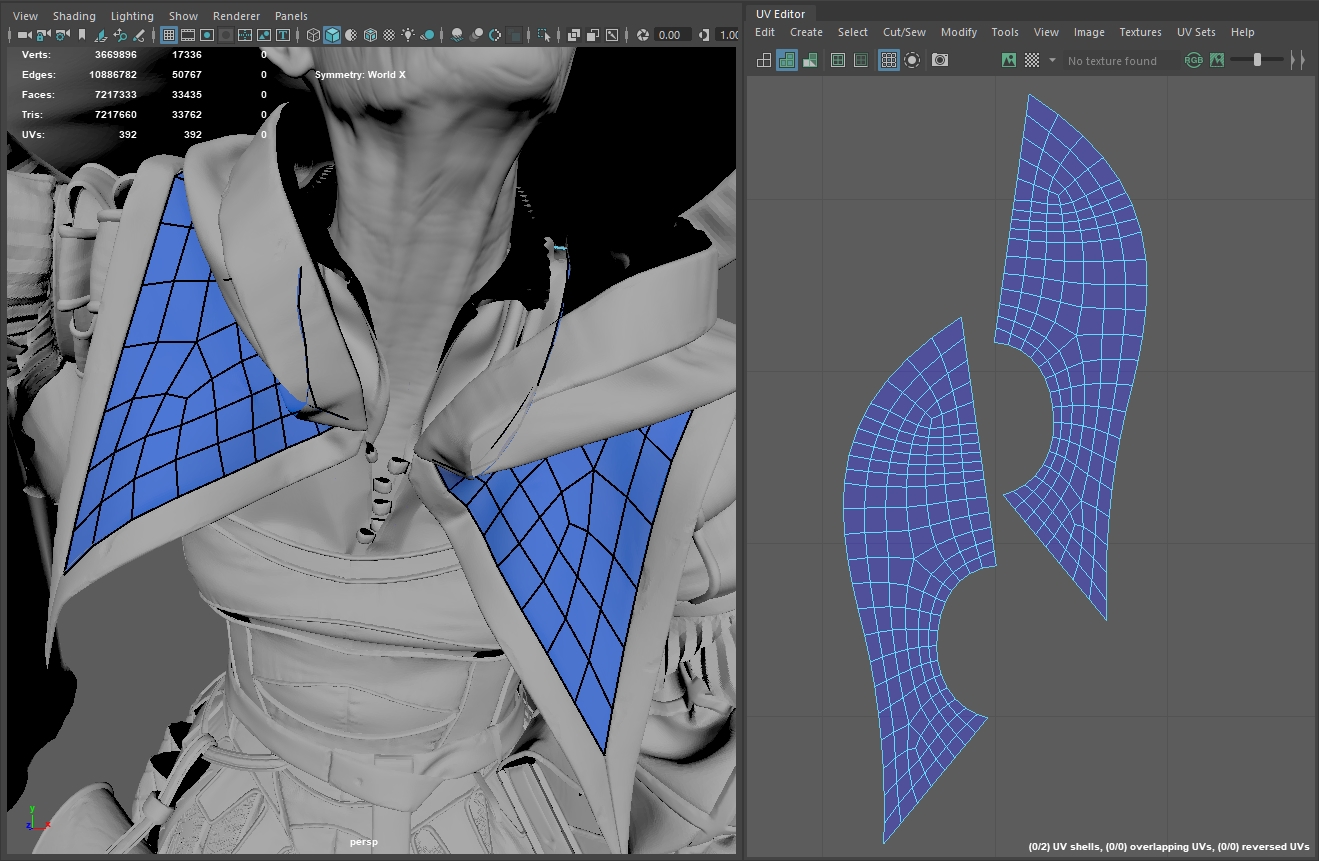
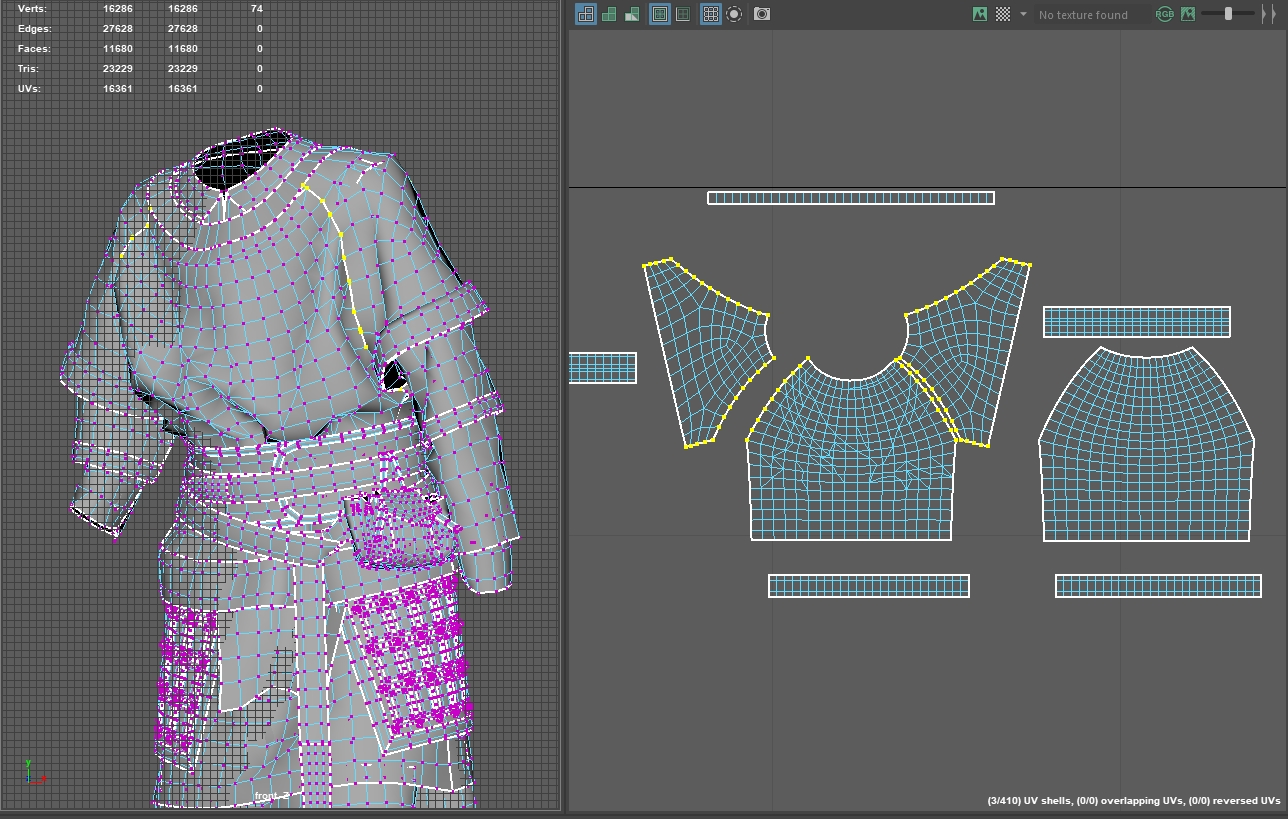
The biggest benefit of doing the retopology this way is that the garments keep the original UVs from the MD patterns, meaning that there is no distortion or stretching when texturing.
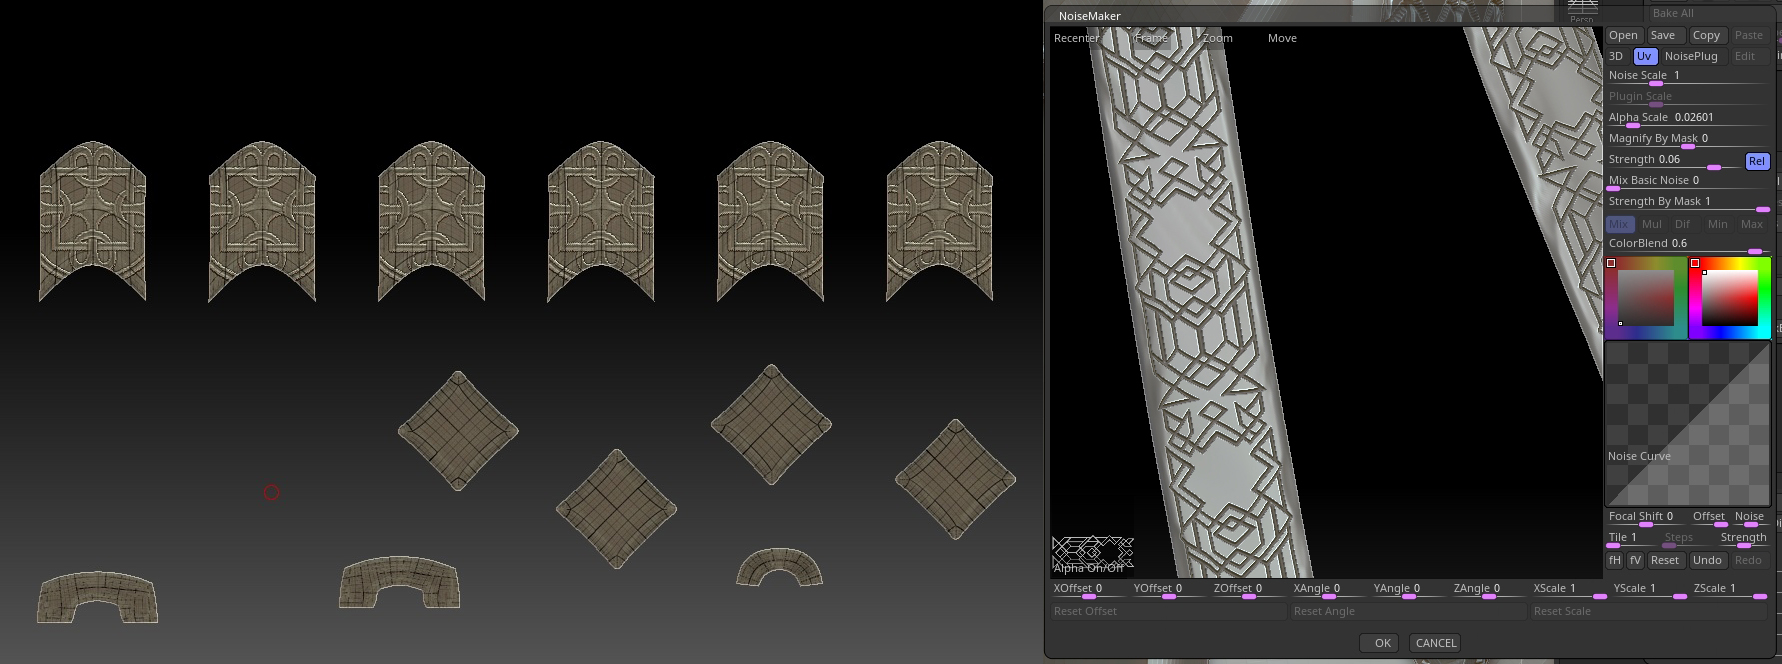
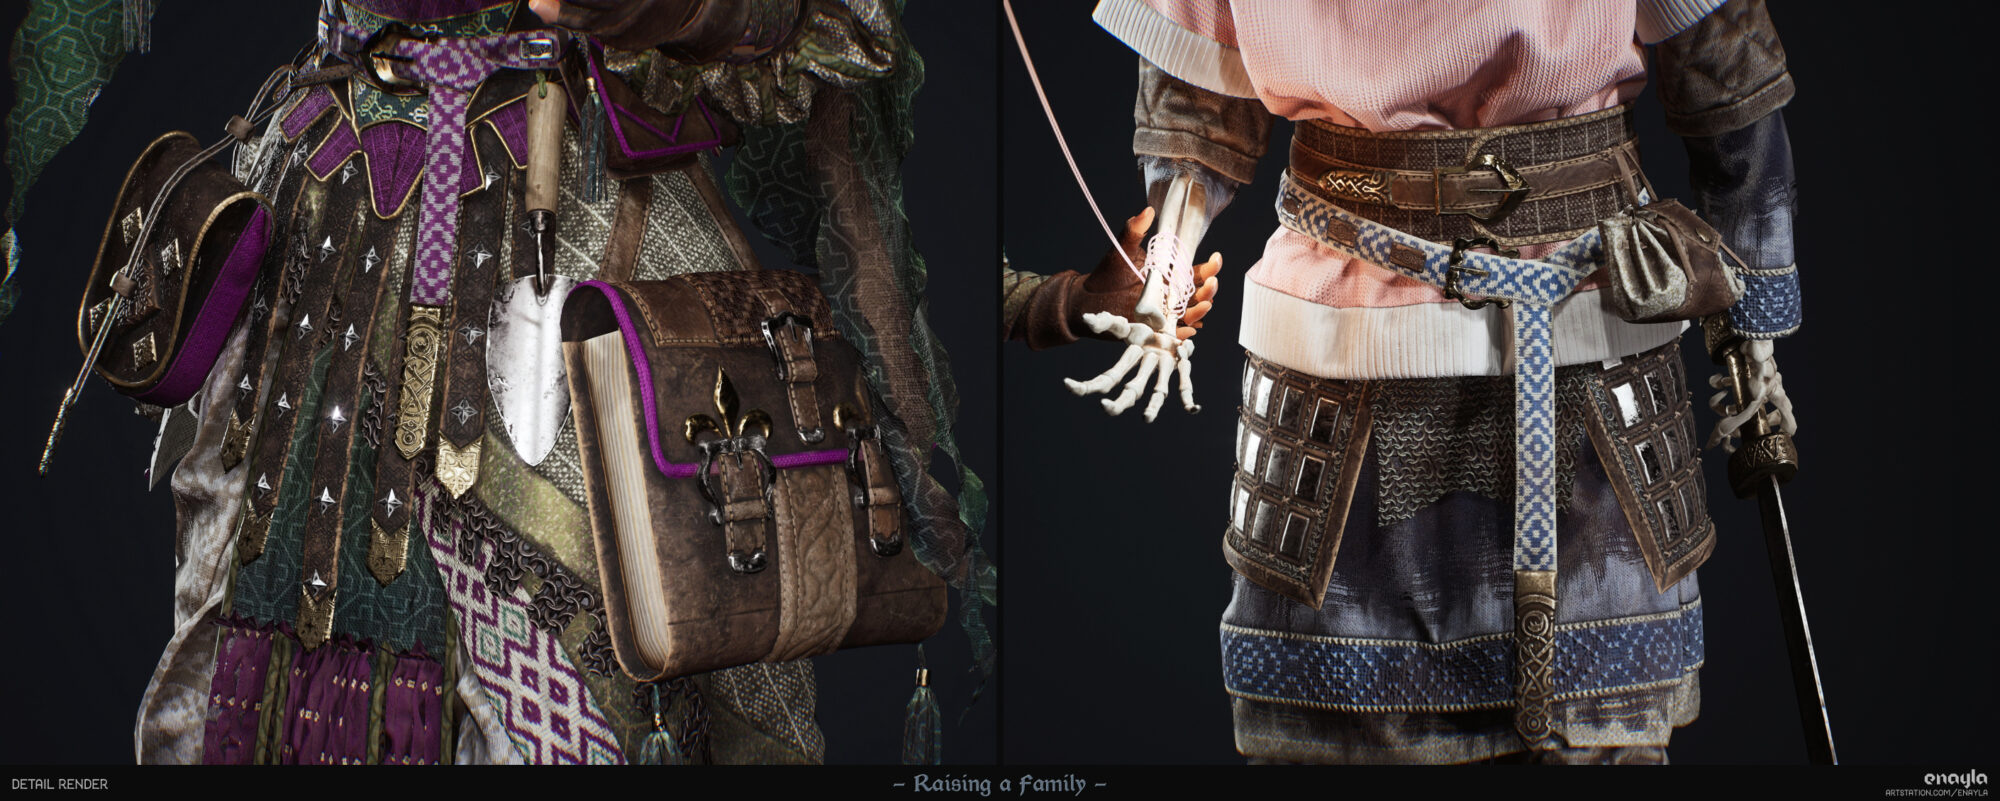
I created the props and hard-surface elements (decorative metal pieces, jewelry) in ZBrush. Since I had made the base shapes for most in MD, I was able to simply add surface details by hand-sculpting, extruding painted masks, or dragging alpha brushes. I did most of this work flat in ZBrush’s ‘morph to UV’ mode for the most consistent results.
For repeating alphas, such as the leather detailing on the necromancer’s belt, I used the ‘noisemaker’ tool (also on the UVs) so I could play around with scale and placement across all similar pieces. This was a major benefit of doing most of my retopology first: I was able to jump between high- and low-poly versions of all my sub tools in ZBrush with UVs intact.
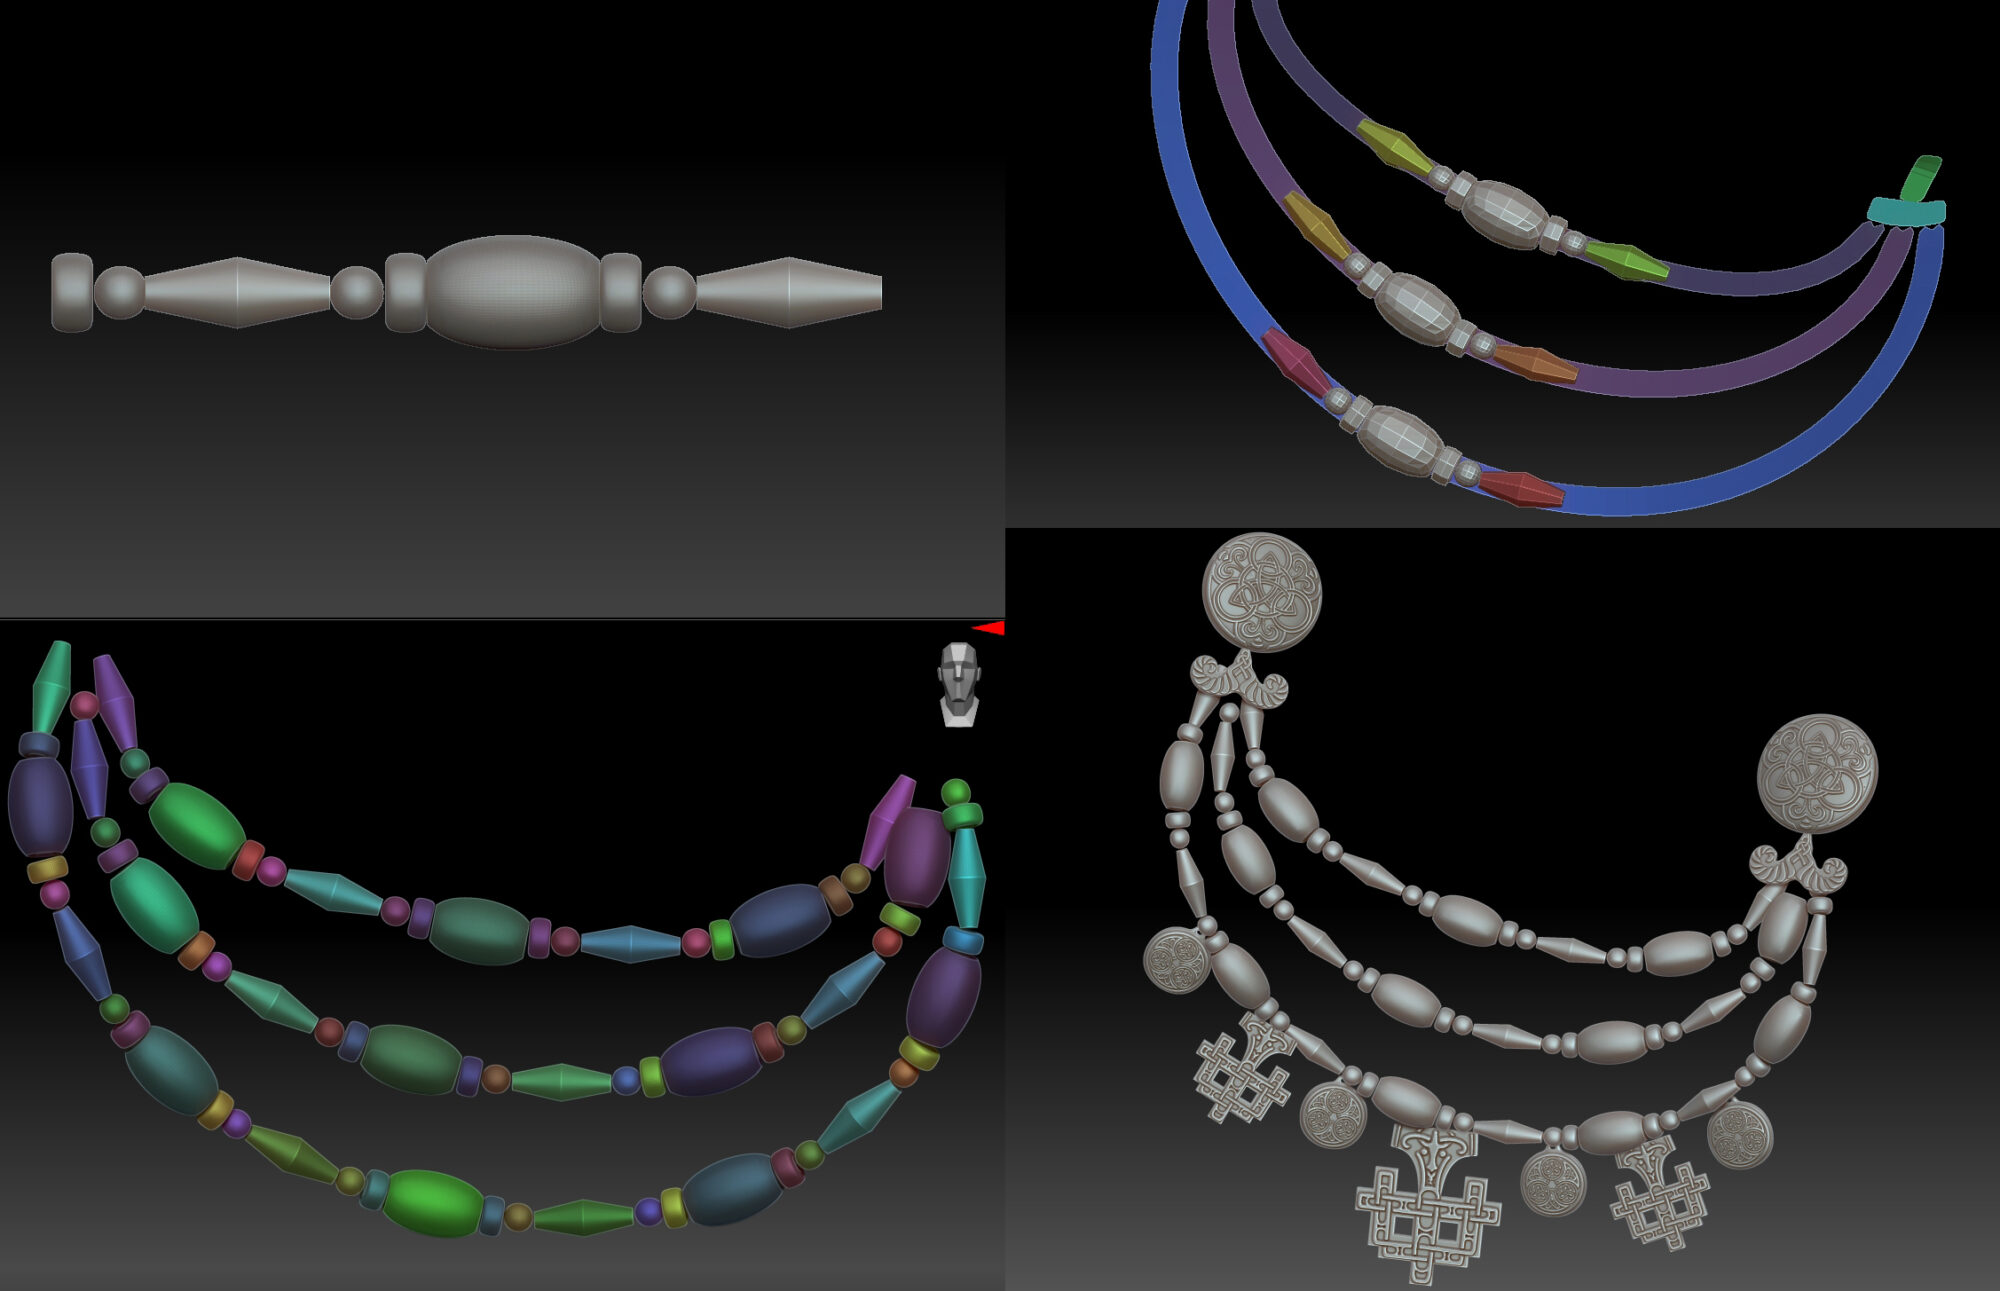
For the necklaces, I created a few simple bead shapes and converted them into IMM curve brushes to ‘string’ the beads along my guide mesh. I tried to re-use texture space as much as possible and so many of the trinkets are duplicated throughout the costume.
I did my retopology of the hard-surface pieces as I went, keeping them all to a separate texture map to avoid any overlap with the clothing pieces I had already arranged.
Final Garment Detailing (ZBrush)
My last step in ZBrush was to add some detail and polish to the characters. I went in with a variety of custom wrinkle brushes and scanned fabric alphas to emulate tension and pulling along stitch lines, along with basic wear on the fabric. All of the repeating micro details like visible threads and topstitching would be added later during texturing.
I then added channels in all the seam lines to deepen and emphasize the seams. The image above shows the before (straight export from MD) and after – as you can see, all that detailing work done via the patterns themselves paid off, as I didn’t have much sculpting to do at this stage.
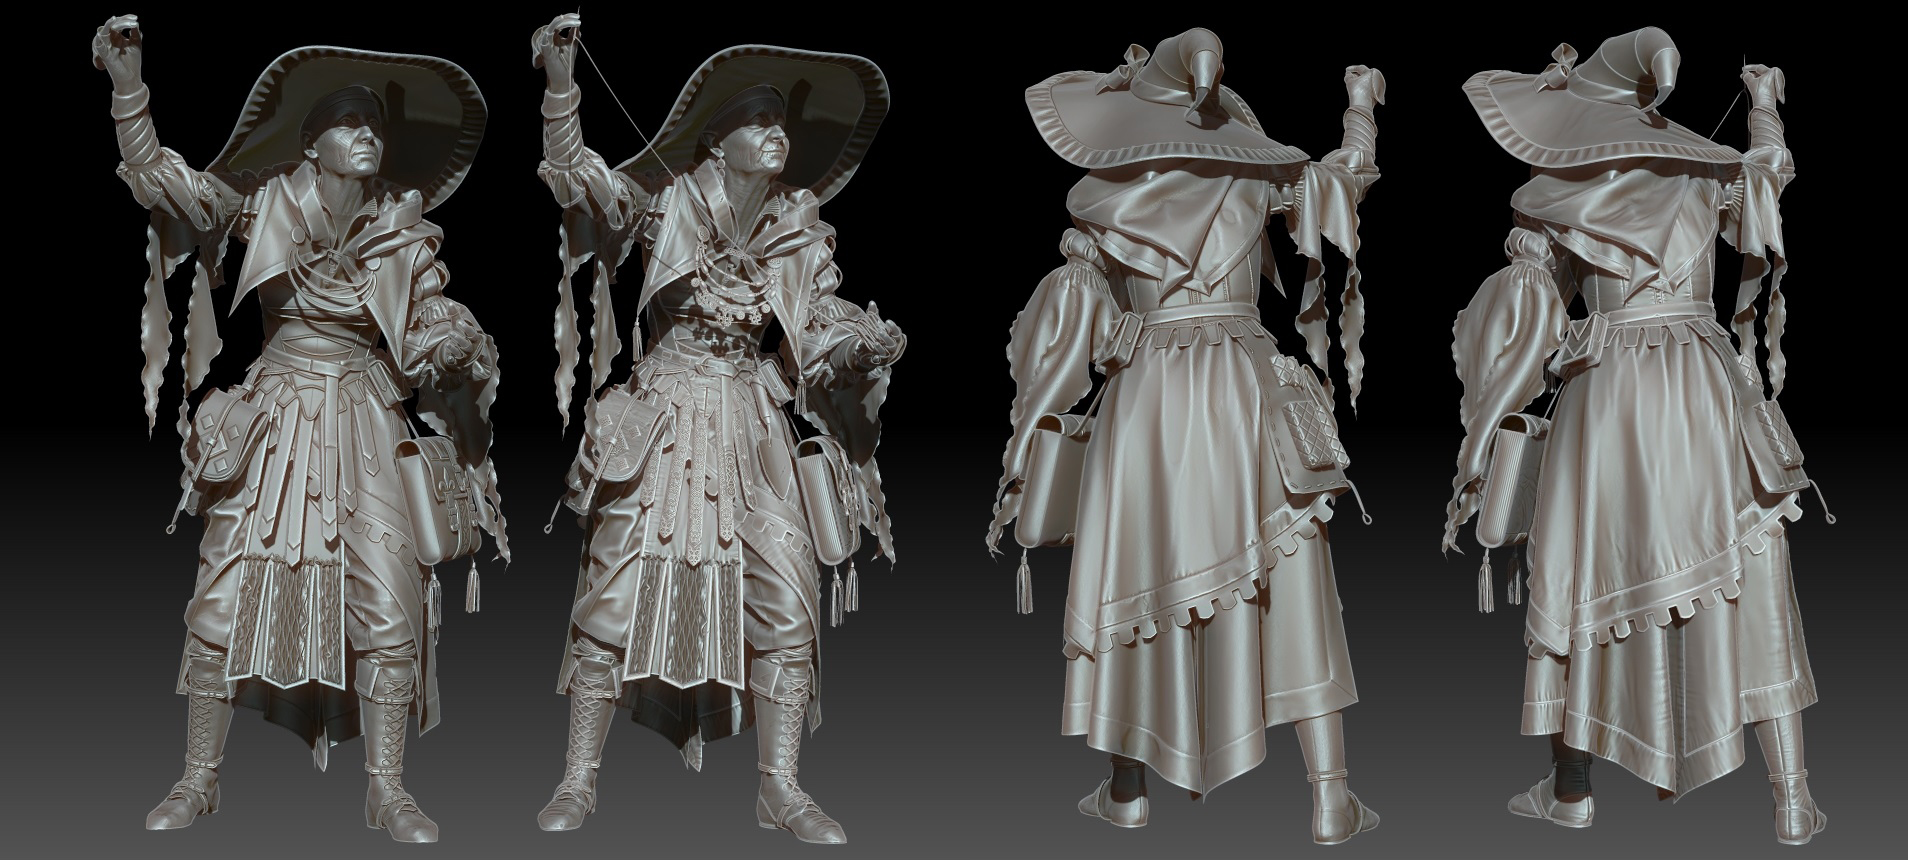
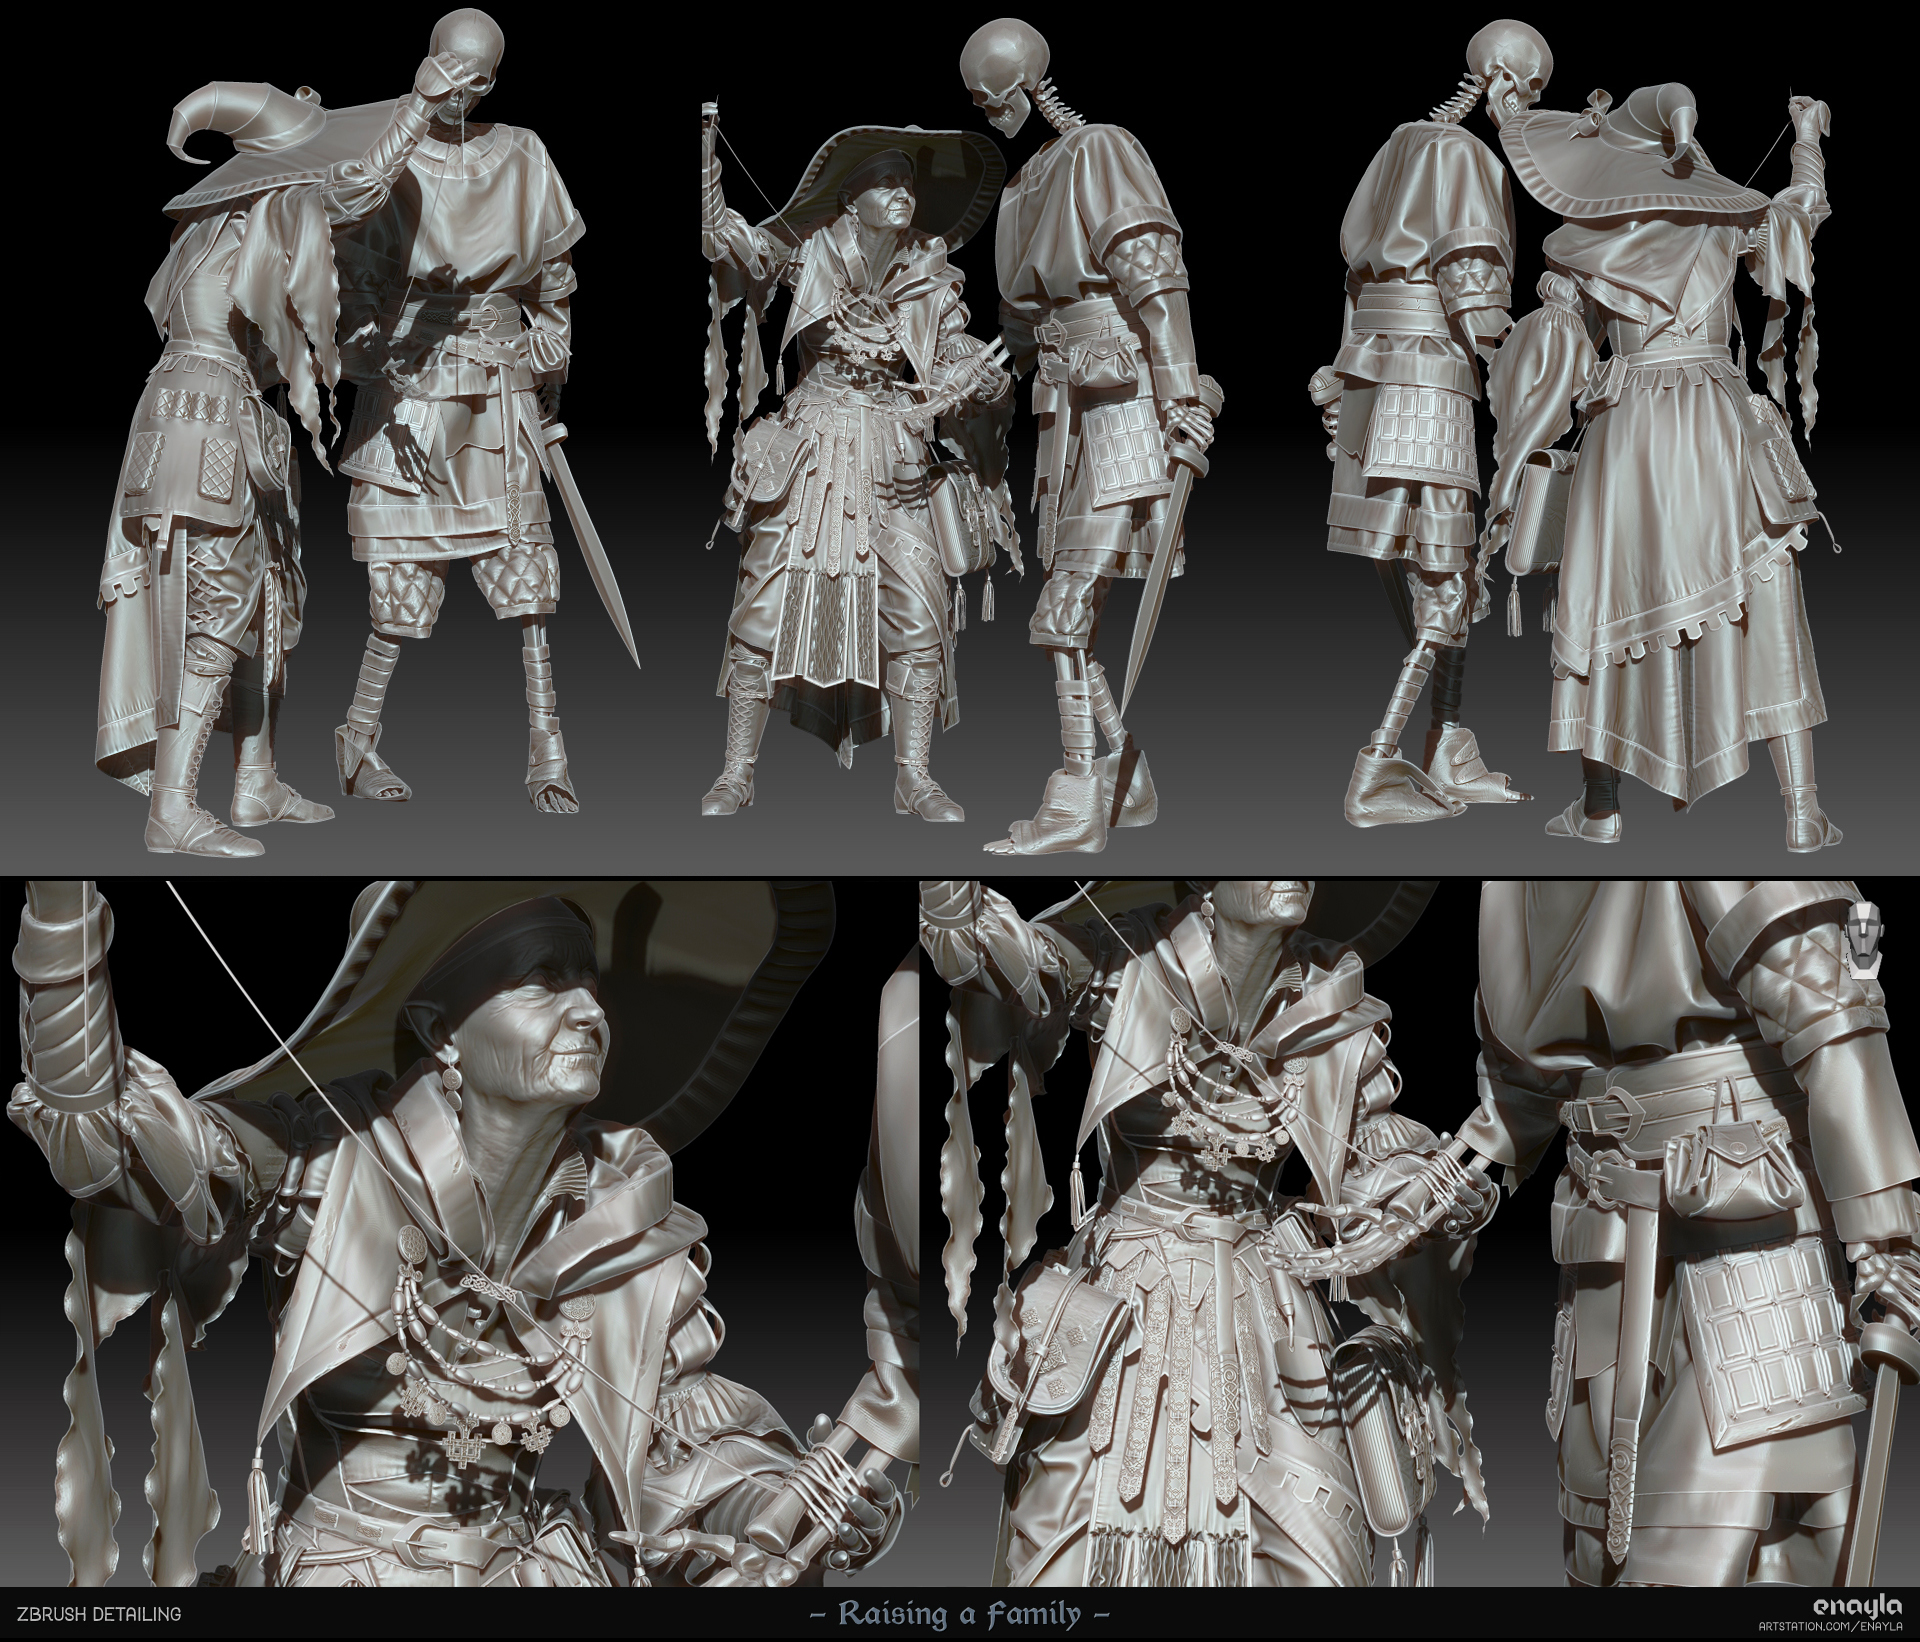
Here are some details from the final high-poly sculpt. I added a small amount of wear to most pieces, focusing mainly on the leather and other areas that might see more use.
I didn’t bother with the skeleton’s fabric overlay as it would later be textured with ripped and damaged cloth.
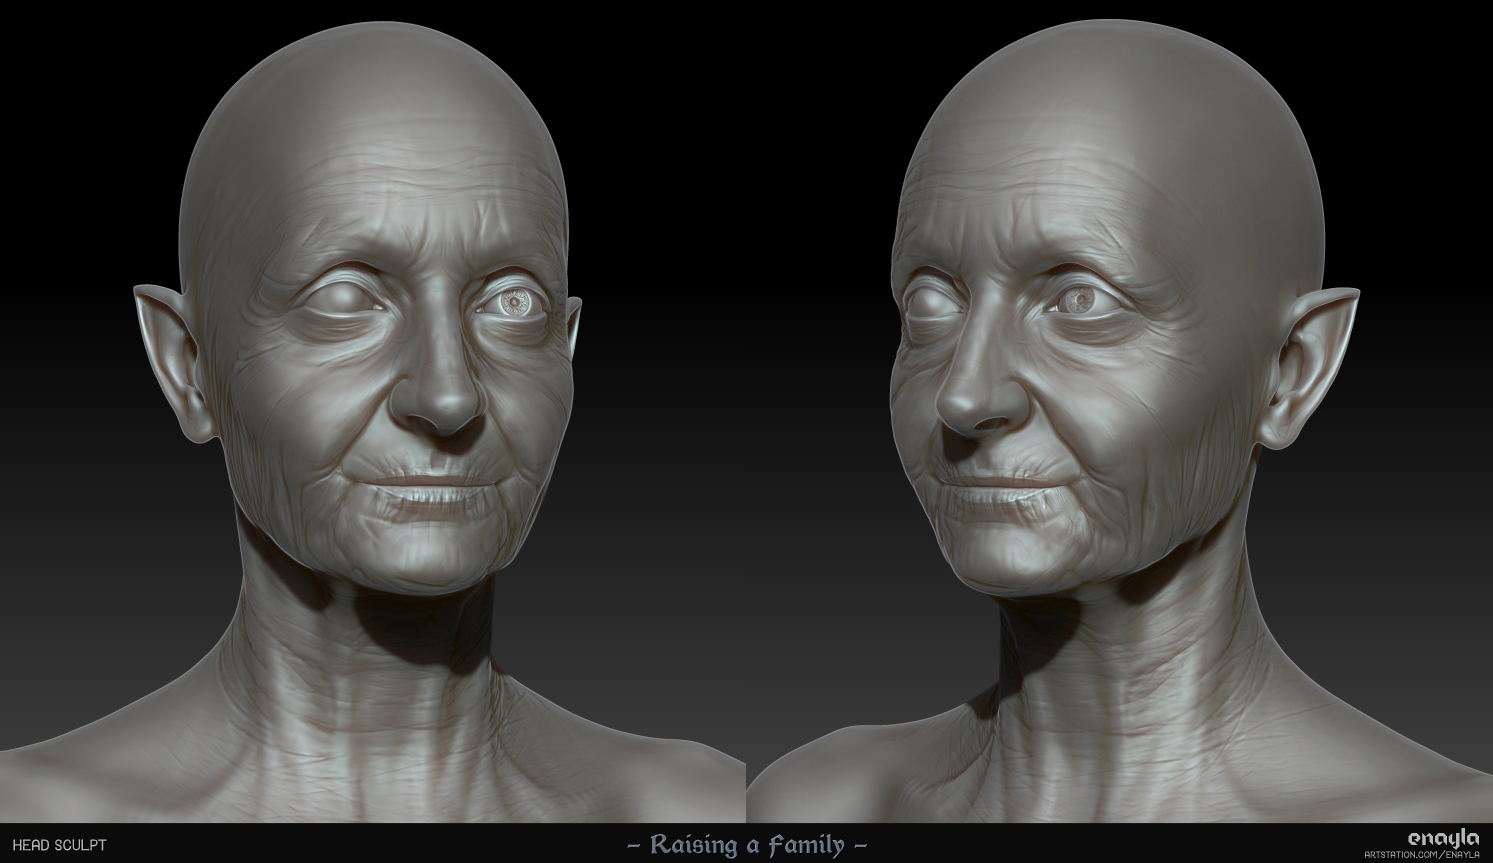
Face Sculpting
I sculpted the necromancer’s face as a mishmash of a few different reference images. I added in some wrinkles but didn’t bother with any finer detail as I planned to use a scanned displacement map. Having
created the clothing ahead of time, I was able to focus only on the small parts of skin that would be visible.
The skeleton I left was mainly untouched from Fabricio Works’ original base mesh, apart from some minor cleanup.
UVing and Baking
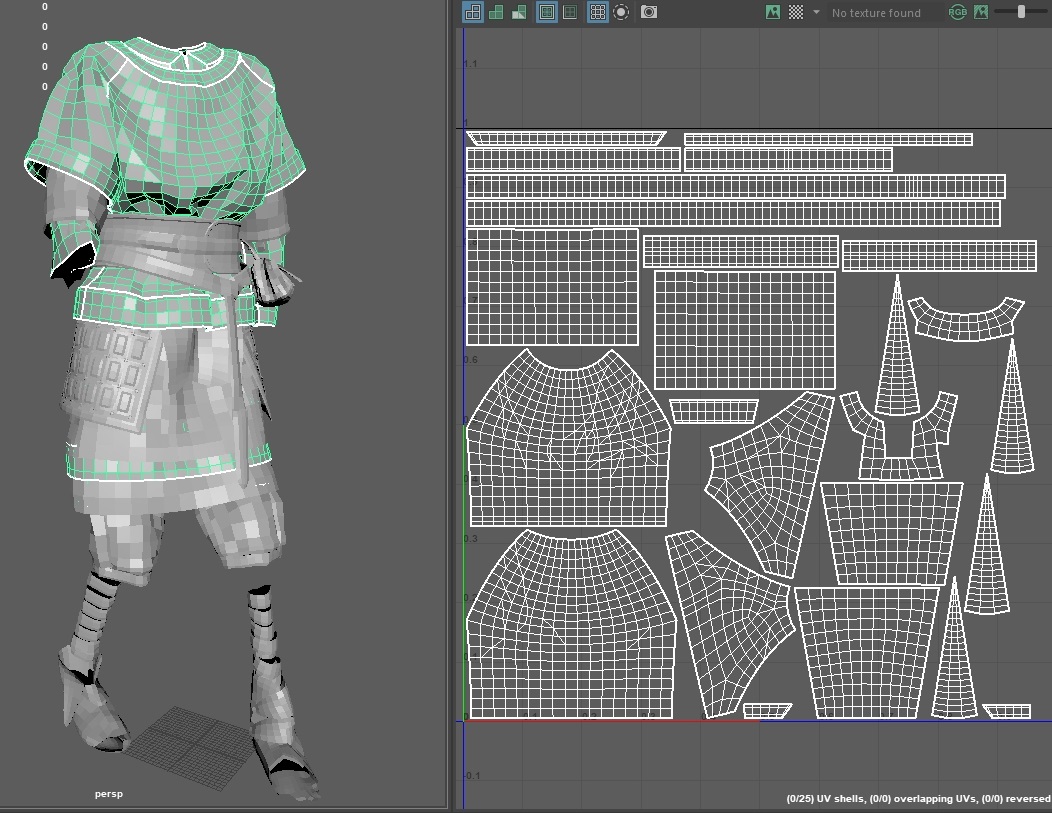
Prep for texturing was done in Maya, where it’s easier to rename and organize all of the pieces of both characters.
I first separated out all sections of the model that might have conflicts when baking and gave them ‘_high’ and ‘_low’ names in anticipation of baking by mesh name in Substance Painter. It was important to me to keep consistent naming conventions as there were so many individual elements.
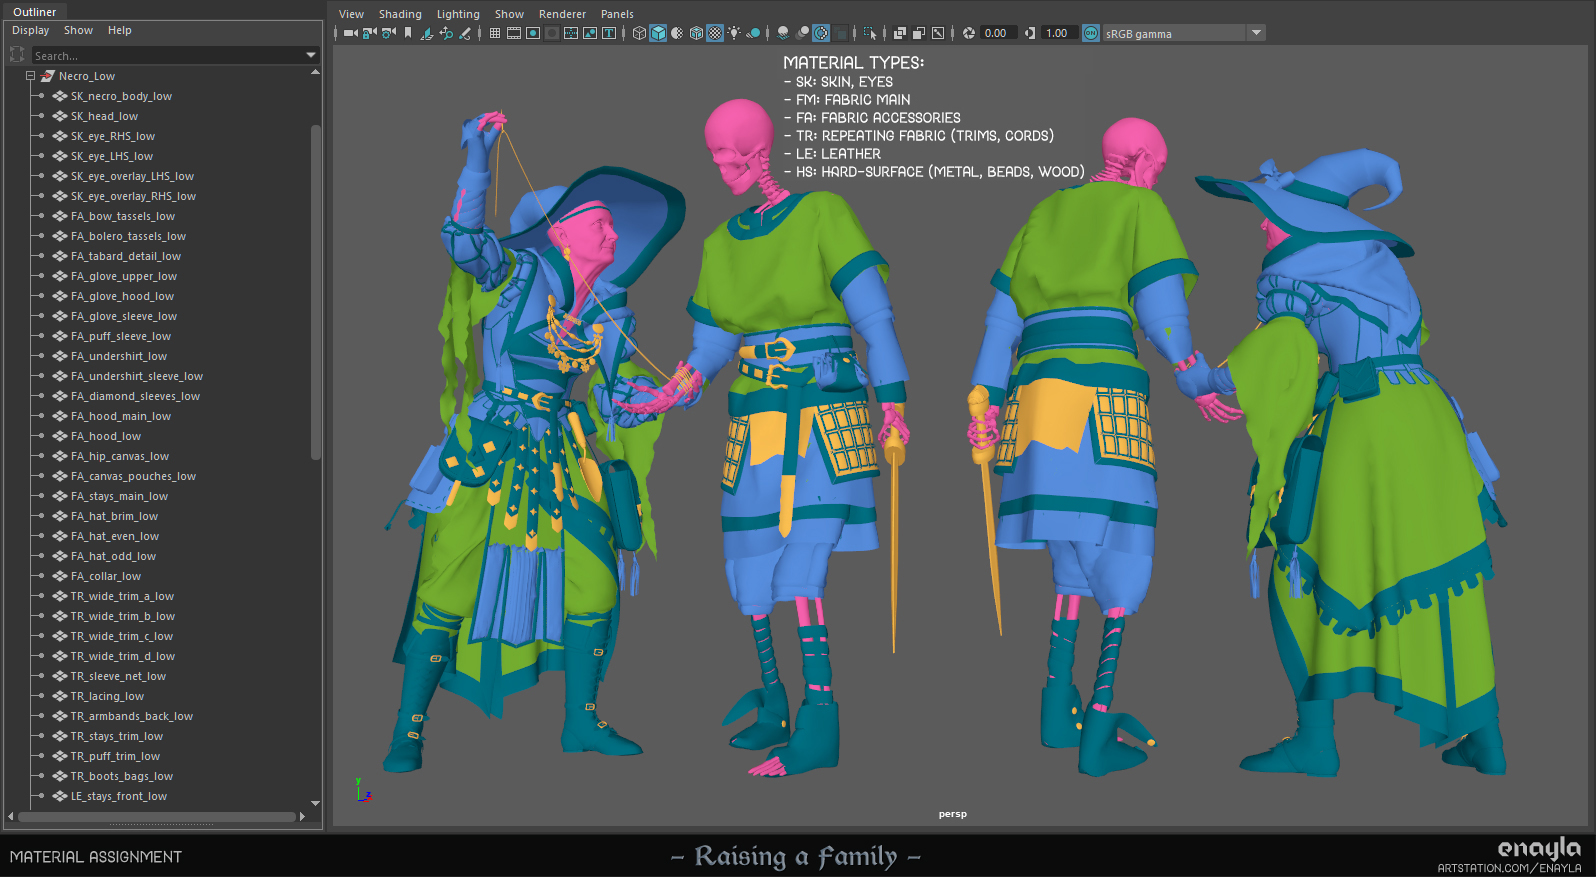
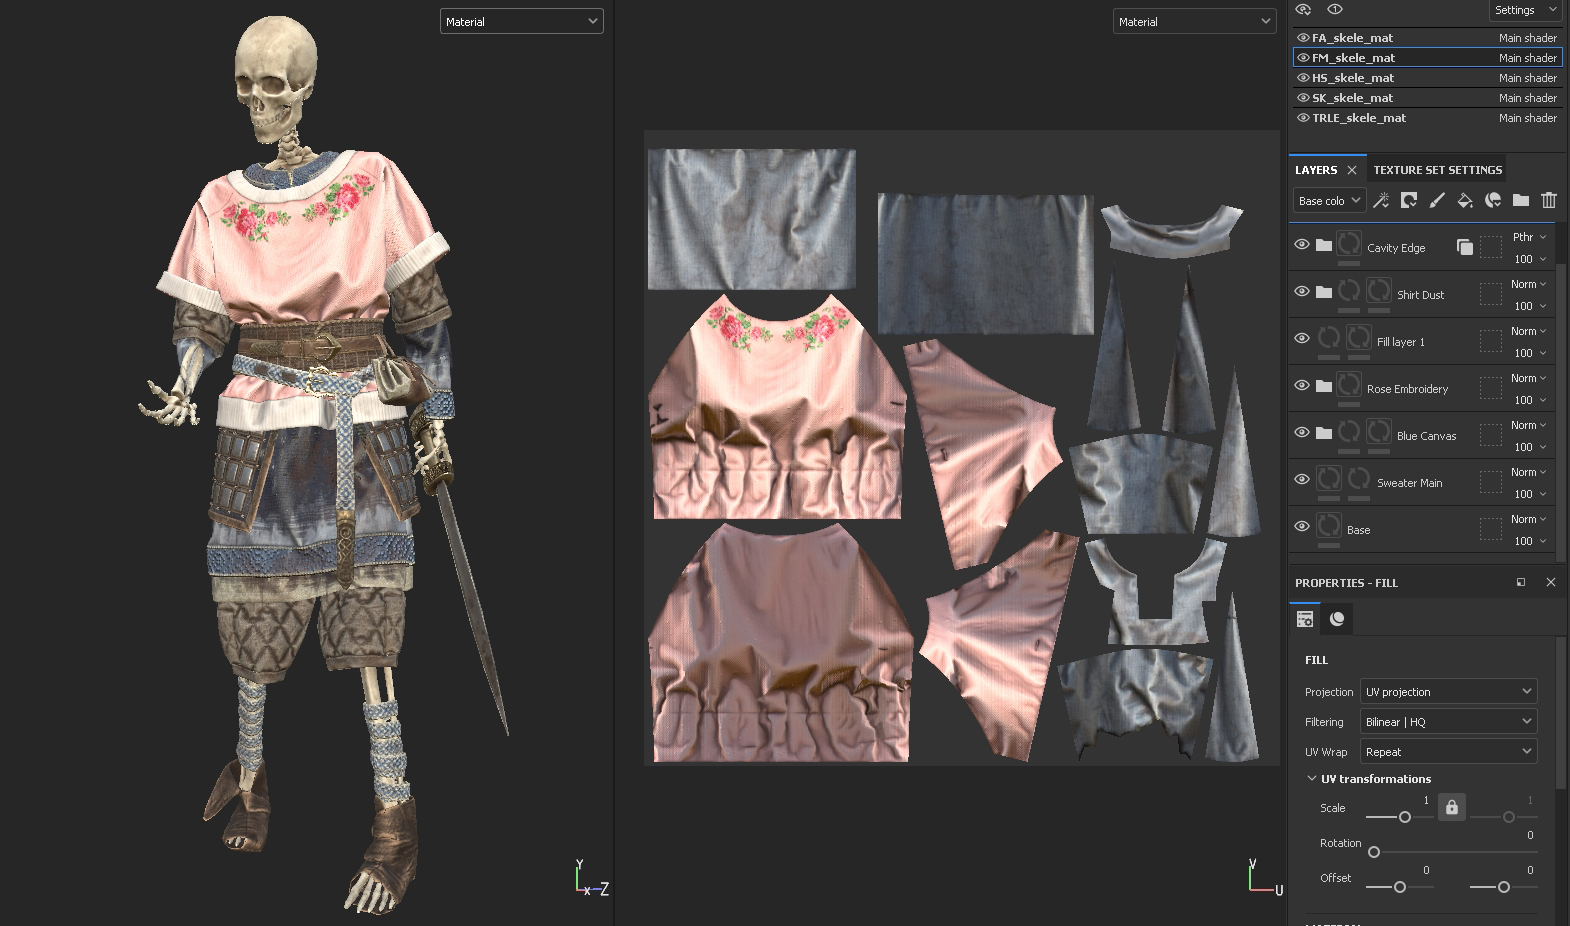
I divided my meshes up into five materials for texturing (and therefore five sets of texture maps): head/body, main large fabric parts, additional smaller clothing pieces, trim and leather, and hard surface.
Each of these became a single UV map and I tried my best to distribute the pieces across texture sets so that the texel density was similar, with the exception of the hard-surface pieces that got a little extra detail (for things like jewelry and embossed metal).
Baking was straightforward – I baked all the textures in Substance Painter and only tweaked some settings like the front/back distance to capture all the detail without having artifacts in narrow creases. I always set the position map to bake only on the Y axis so I can easily put top-down gradients across the whole character.
Texturing
Now for the fun part! I started with some base fabric and leather materials, mainly from Substance Source, and started layering geometric designs, dirt, gradients, embossed patterns, and other overlays for added interest. I went in and hand-painted on additional weathering and details like stitching along all of my baked seams.
I also added lighter edge wear to the leather and AO grunge to bring out the creases where dirt might accumulate.
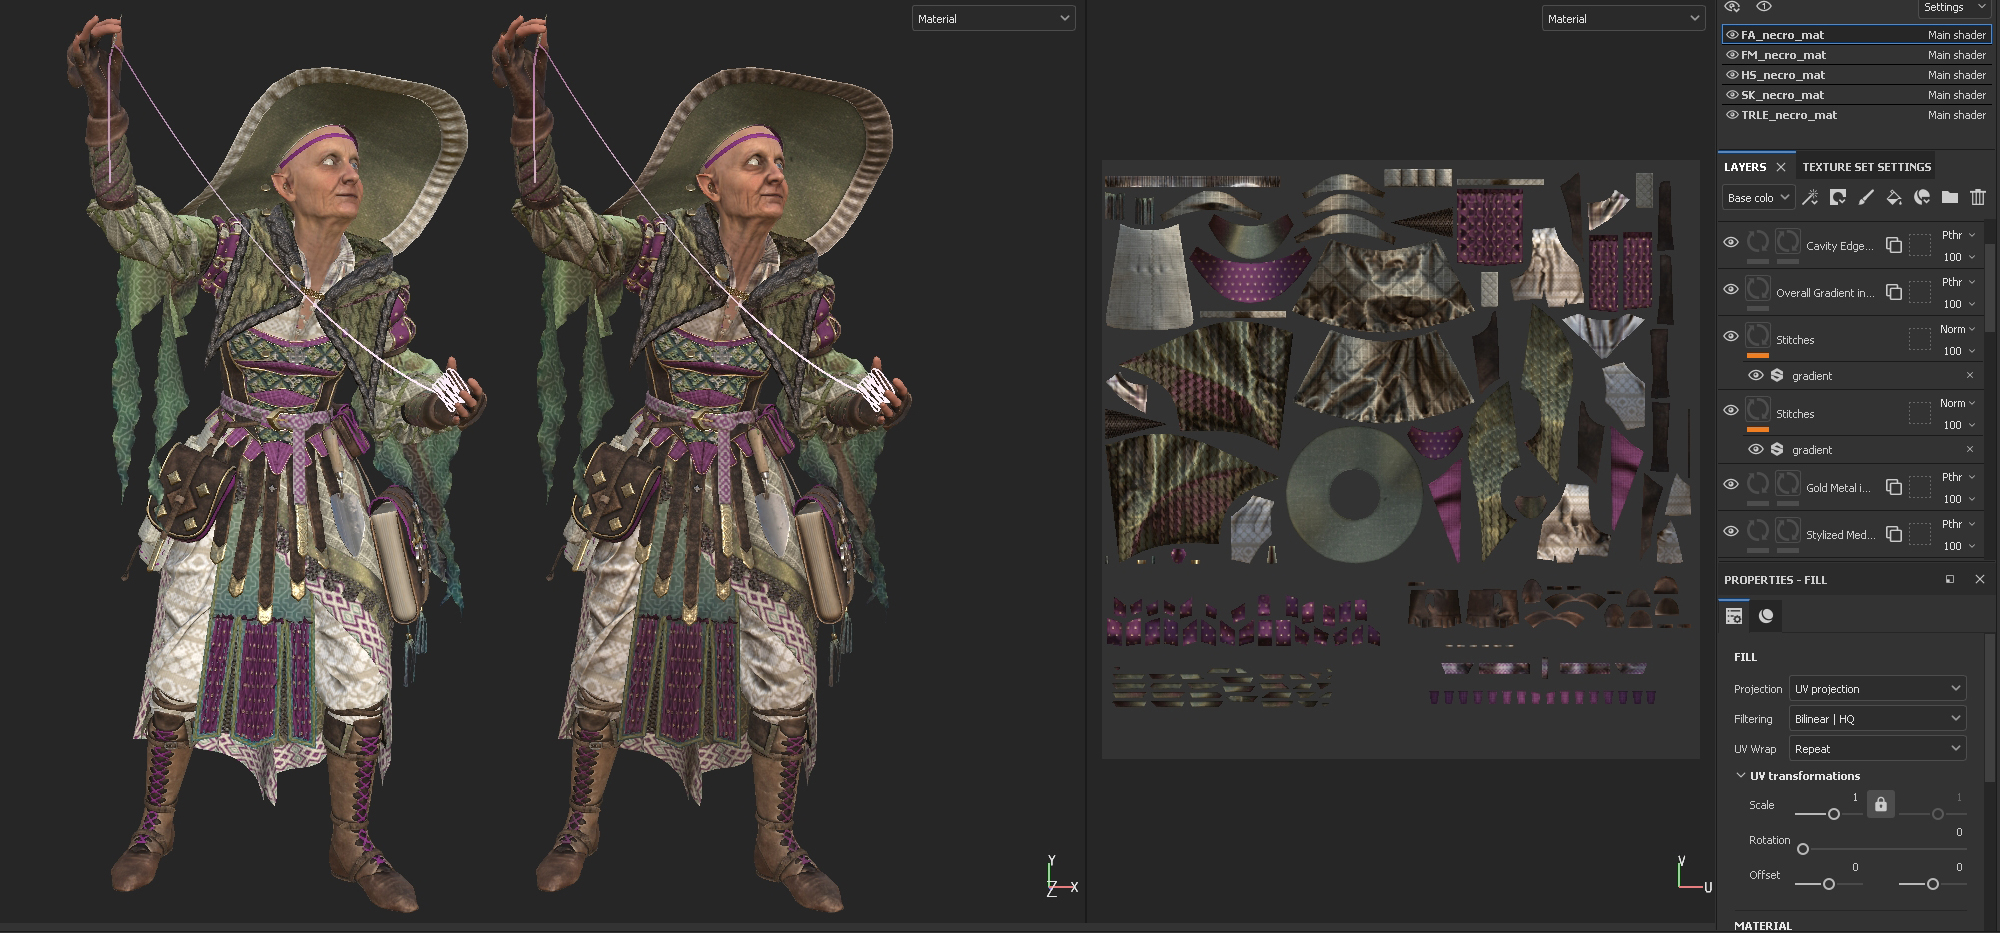
One of my favorite ways to add depth to characters is to create subtle highlights and lowlights as well as overall top-to-bottom gradients. I made liberal use of cavity masks to lighten high points and darken folds.
This overlay was applied across all texture sets; the above screenshot shows the difference it makes.
I’m also a big fan of using baked lighting on fabric, as garments exposed to the sun tend to be lighter and more faded on the high points; it adds a lived-in look and more contrast even in flat lighting.
I followed similar principles for the skeleton, even re-using a bunch of the custom materials I had made; he’s simply a lot dirtier and more worn.
For the torn fabric, I placed various ripped fabric alphas along the decaying edges as transparency and normal maps.
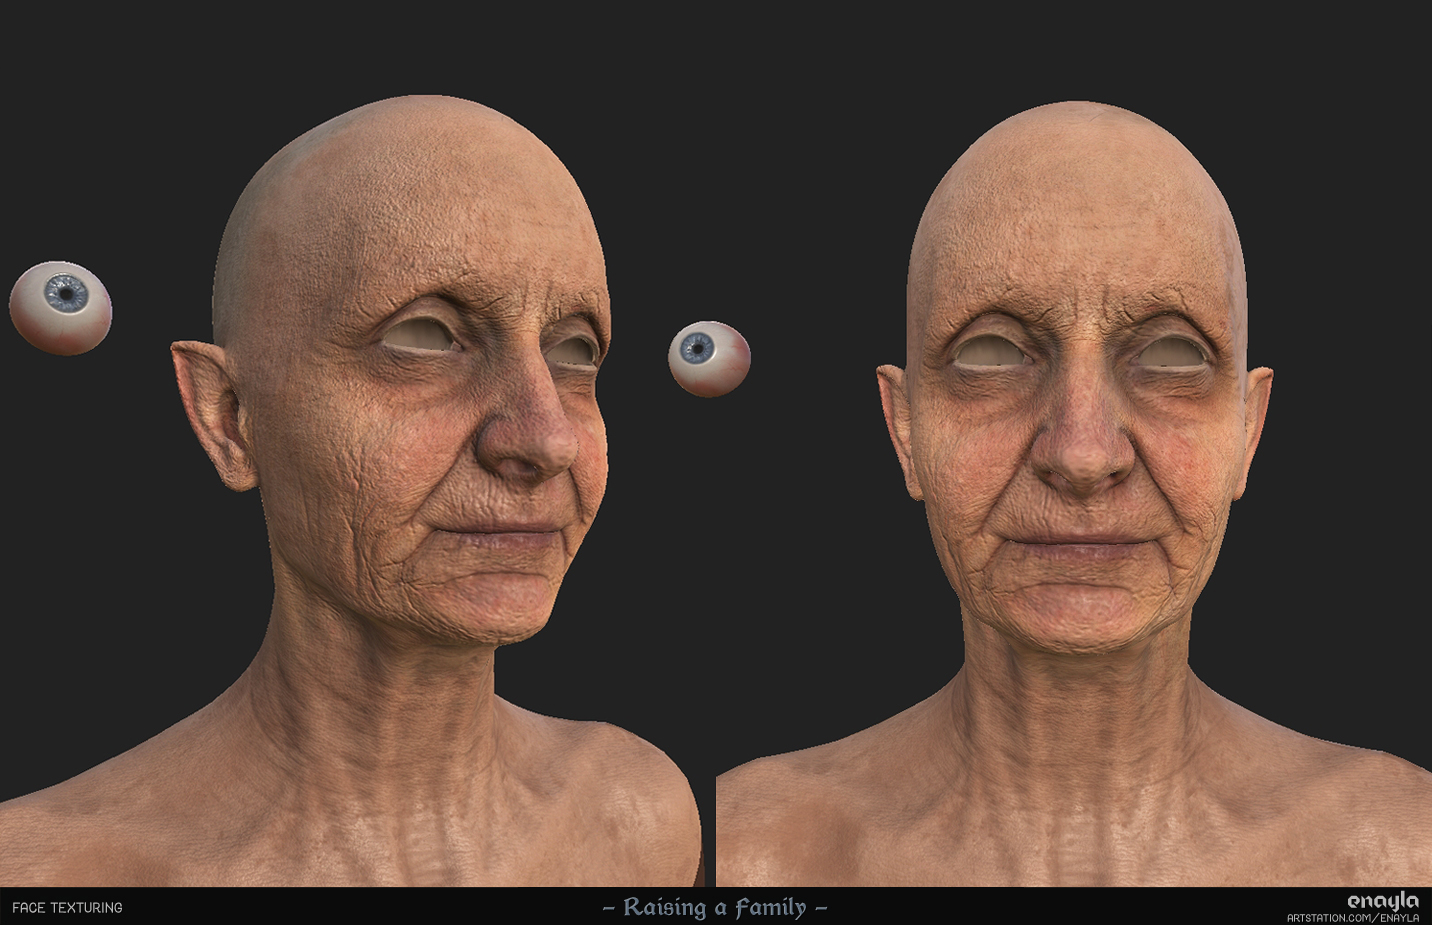
The necromancer’s face, skin, and eyes I painted in a separate file where I used my A-posed version to capture the most detail. I gave her an overall skin tone with a slightly mottled overlay to emulate sunspots and brought out some of the creases with cavity masks.
For her face, I used a displacement map from 3DScanStore, manually adjusted to match my head UVs in Photoshop (absolutely not the best way to do this, but I didn’t have access to other software). I hand-painted other details around her lips, eyes, and fingers.

The pores and wrinkles appear quite dramatic in Substance but are much more natural when rendered in UE5, especially with the slight blurring effect from a subsurface scattering skin shader.
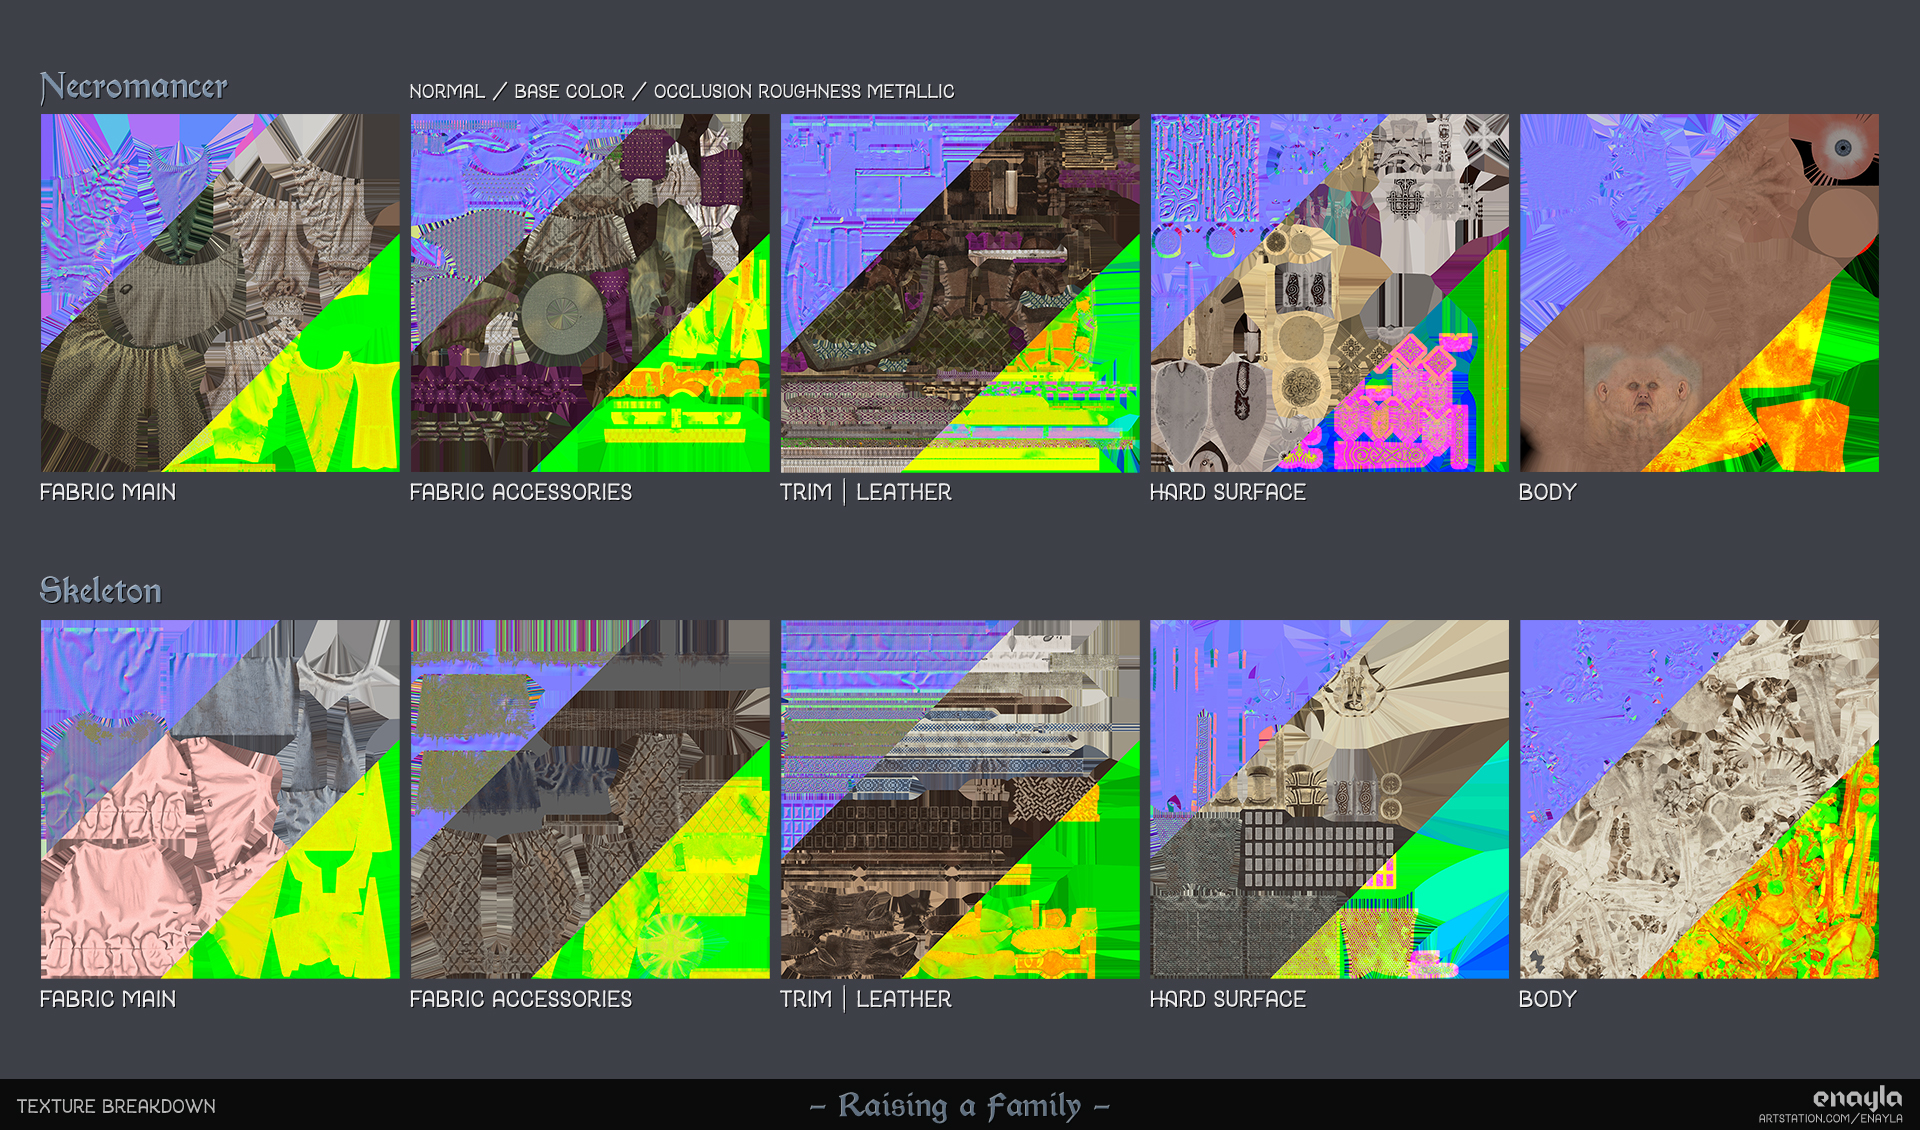
These are the final texture maps for the two characters. I was more concerned with keeping all the pieces organized than achieving the most efficient use of texture space, but there were certainly areas where I could have packed my UVs tighter and made more use of tiling or UDIMS.
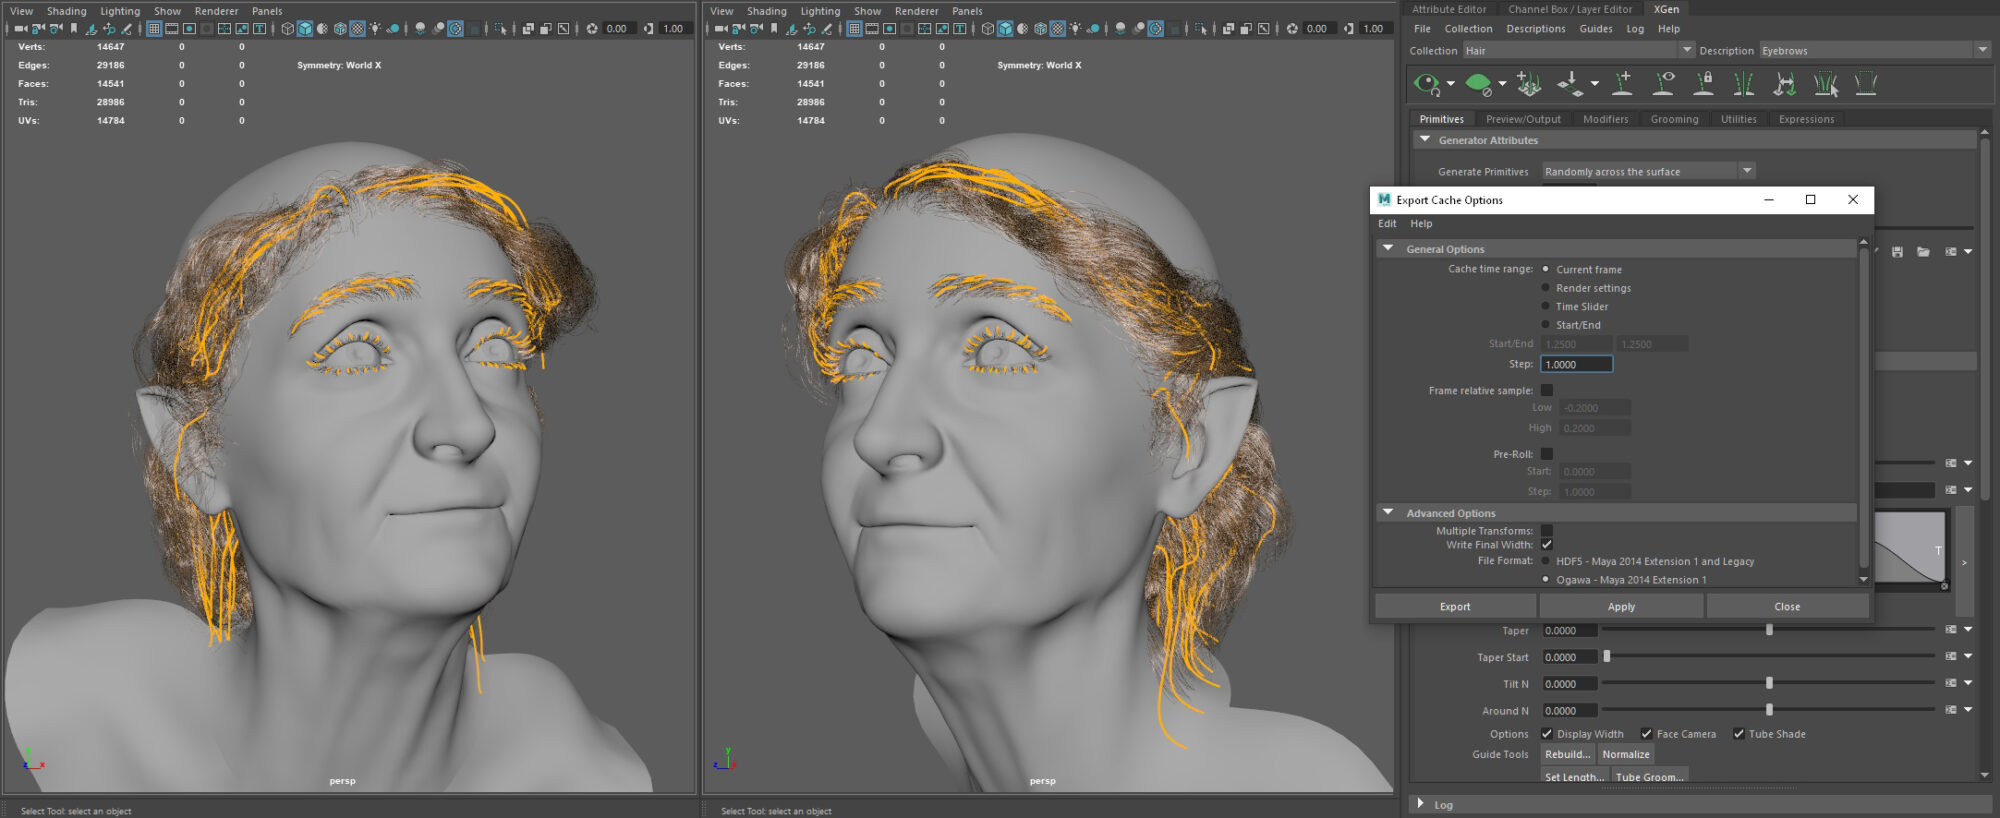
By this point, I was really running close to my deadline, so I wasn’t able to learn the new skill of hair cards for this project. Instead, I went back to a familiar XGen and created a simple groom for the necromancer (only the parts that would show underneath her hat).
UE5 has a fantastic feature where you can export XGen as an alembic cache with a tiny filesize and plenty of customization options in-engine, so that’s what I went for. I’m calling it real-time but I don’t know whether this would actually be viable for use in games.
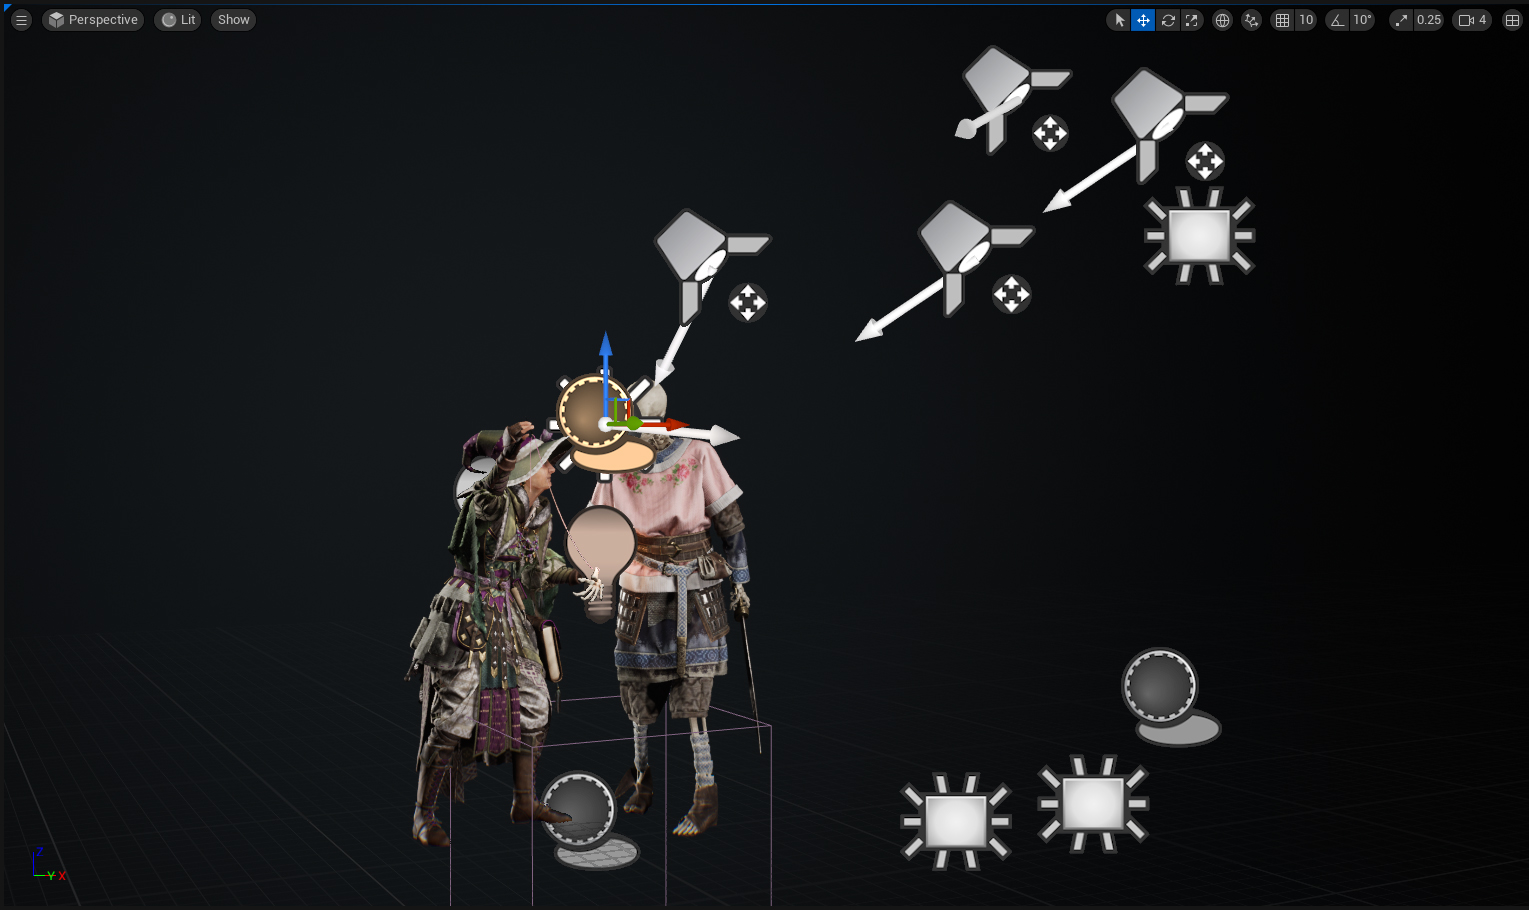
UE5 Environment and Lighting
I created two scenes in Unreal Engine 5 to show off my characters: one simple studio and one environment. For the in-world scene, I found a free HDRI from Polyhaven for the overall backdrop and
then arranged various Megascans assets and foliage for the rest of the environment.
I had a few specific angles in mind for these shots so I didn’t bother fleshing out the scene fully, hence all the floating islands! To bring the characters away from the busyness of the background, I created a few fog sheets placed behind them and set up shaders with depth fade.
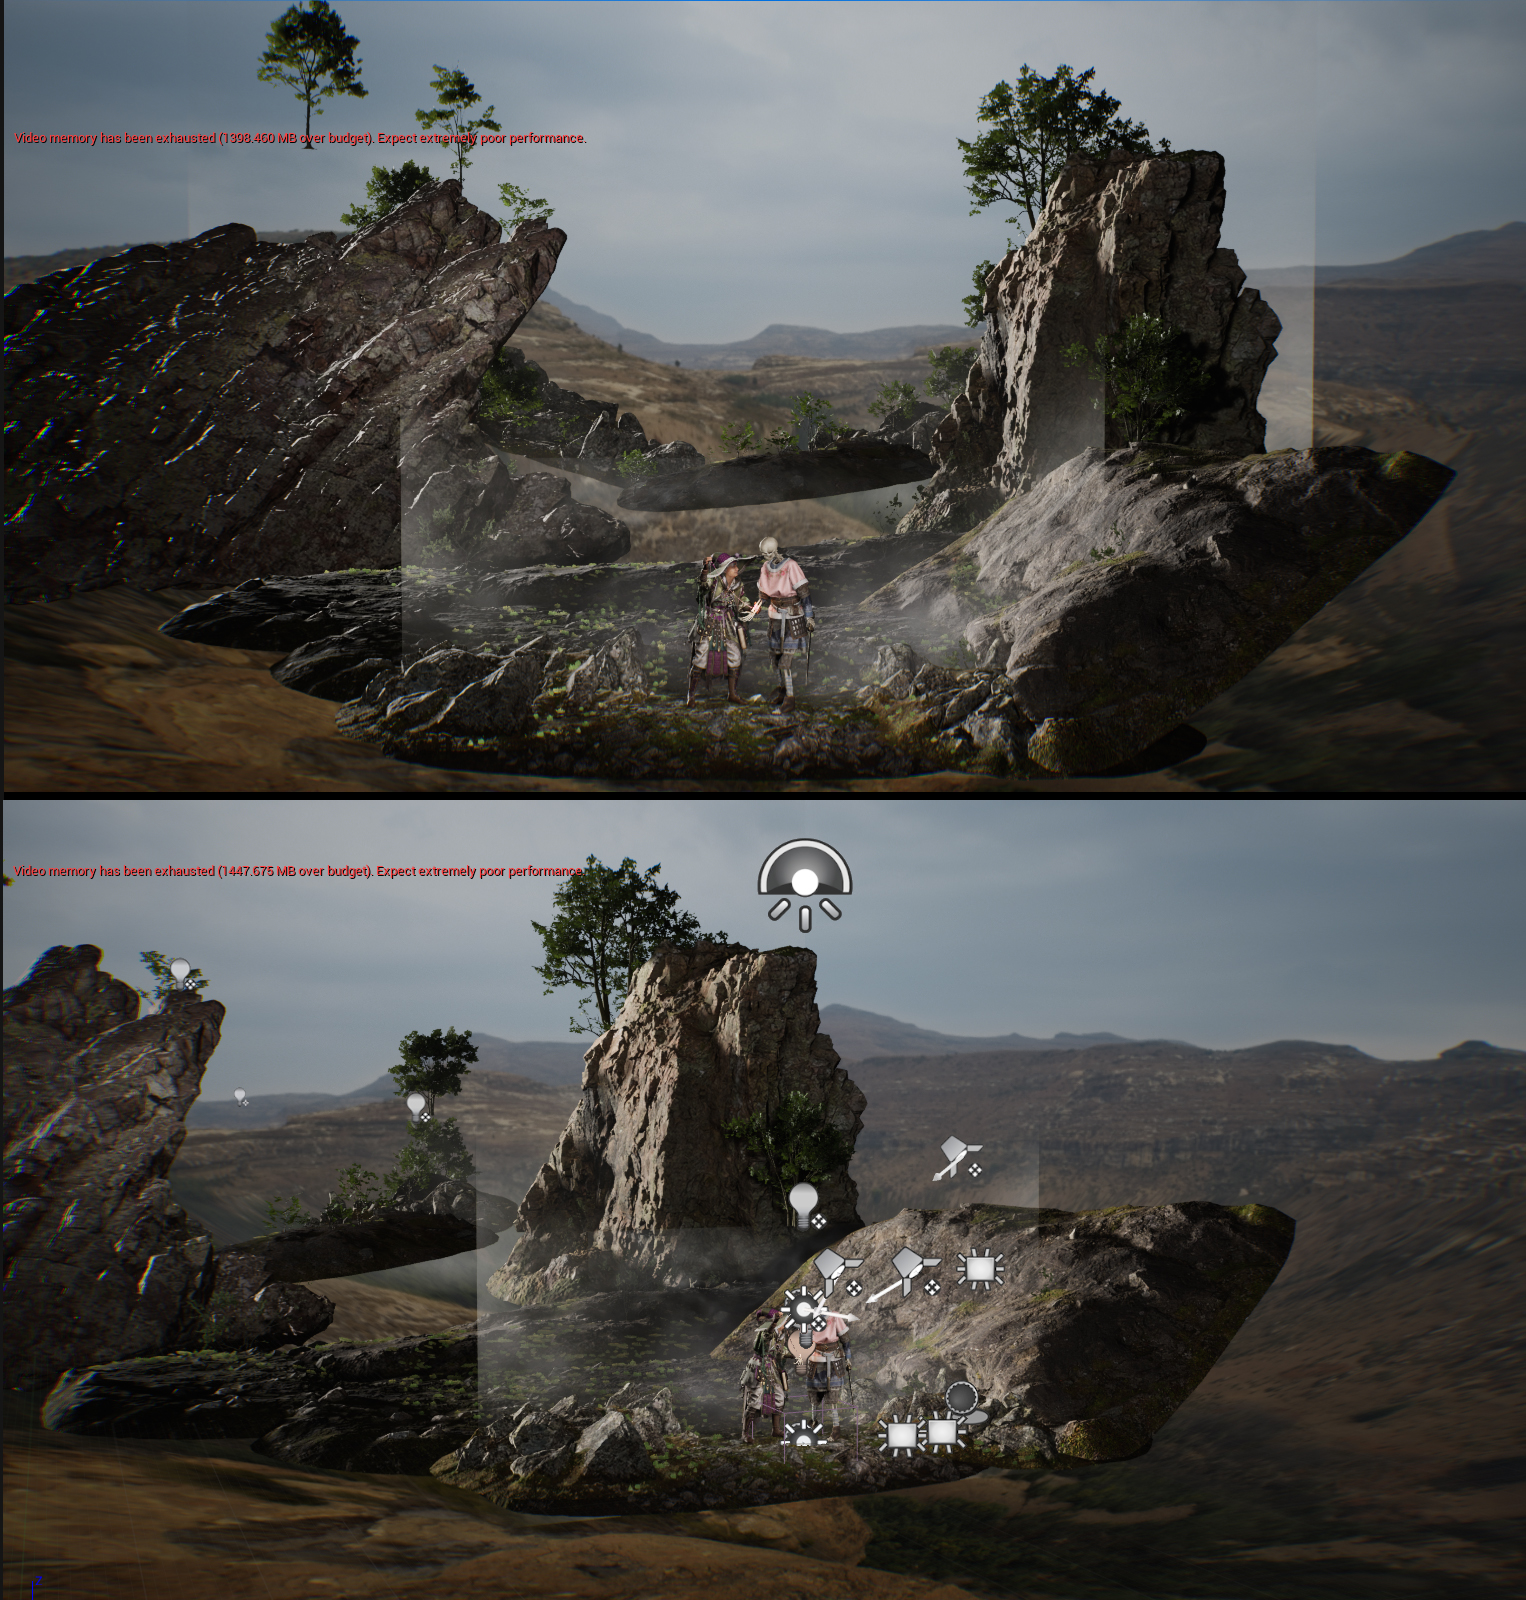
Both scenes have similar lighting: rimlights to emphasize the edges of the characters, a strong directional
light for dramatic effect, and some soft fill lights to bring out the details. The skeleton also has a colored
glow where his arm is being repaired to draw the eye and create that magical effect.
The environment ended up being less fleshed out than I had initially imagined (I had a whole scene in mind and even started constructing a little house!).
But I think it serves as a decent backdrop to ground the characters in their world.
Conclusion
Although I can find a thousand things to nitpick, I am ultimately very proud of this piece. I learned a ton of new skills and had the chance to really explore various aspects of 3D character production.
On a personal level, it was such a rewarding experience being able to bring my DnD characters, which had only existed in my head, to life.
Read more articles
You might also like these articles.