

Introduction
Hi guys! My name is Louis Squara and I am a Character artist working at Expression Games on Hell Let Loose.
I have been doing many personal projects to push my skill and the quality of my work!


Inspiration
The goal of this project is to bring a plaster sculpture that I adored to life, Herakles. One of the elements was his amazing hair. Curly hair is often not covered much in video games. Traditionally this is due to the complexity and cost in the engine.

This will cover a short tutorial and tips on how to make Curly hair for games. From my piece Herakles. My aim is to be concise for easy reading and will link more relevant sources for further reading.

Sculpt
So the first part of the pipeline is a really expressive one, we make a quick sculpt sketch of the hair, it’s a blockout.

Blockout
I do this to establish important primary forms, where the hairline ends and the flow/direction of the hair. Anatomy for sculptors did a really good diagram of how hair grows from the crown in a radial direction.

Flow
The radial direction is key to the flow of the hairstyle, every form should consider this. I like to think about where the root of this hair clump starts and ends. If you follow that rule you are able to make informed decisions on how the hair would realistically work.
This became really important on Herakles as the curly clumps are a lot more complex to keep track of than a straight hairstyle.
Here is an example in the early stages of my card placement:

I really like to use the concept of rhythm in my art. That being that all forms connect to one another. They flow from one form to the next.
Giving the audience this read where everything is as coherent as possible.
This allows something that is really messy like this curly style a much more appealing read.
Silhouette
Silhouettes are important and not just the outline. Especially how it changes the face it is sitting on. Hair, generally, creates a lot of contrast on the face. Aging a character, adding depth and of course a lot more personally. So it is useful to have a preview of how it will change your character.
The blockout is easier to manipulate than lots of cards, it is a quick way to get feedback and review if your style is working.

Texturing
Groom Texturing Mindset
The hair workflow means you have to work in reverse, textures come first. This can be tricky as you have to understand how the texture will be used, before using it.
Basically, look at references and create cards from real-life clumps of hair.

Making hair textures
I will make this a short overview as this could be a big article on its own.
There are different approaches to this but I found a quick Photoshop drawing plan to map out where you want your cards. Use your reference to draw some cards out!

Xgen Interactive
Maya’s Xgen Interactive groom editor is how I sculpt my cards. Always thought this was a good overview tutorial.
You just use your sketch as the guide and sculpt the guides into the right shape. Using the modifiers to add randomness and realism.

Render
Then I render the spline groom in Maya. Different AOVs applied are as materials and rendered out.
I then process the images through Photoshop to tweak them. For example, the albedo is one which I would want to tailor more in the Photoshop side of the pipeline.
Here is a good break down here and the shuma AOVs.

Working with the cards
This process gets more tricky when you think about layering these cards and how each of these cards serves a purpose.
So I will give a brief overview of how mine function.

Big curl cards
Red & Orange
Designed for the rolled-up cards as well as for being layered (stacked on top of one another to create depth/variation).
These create big geo forms for the hair of Herakles and give awesome specularity as light is being reflected accurately. It is also the most expensive card used here, due to needing more topology to support the shape.

Layering cards
Red & Orange
Less opaque and sparse cards are for variations and reducing solid opaque edges on the silhouette. (This adds realism and removes that game feel). This is the style with just the big curls

Transition layer cards
Purple Cards
Short cards are for the shorter clumps of hair found on the sides of people’s heads and transition areas, where the hair is not as long and slightly curled.
They also require less topology.

Facade Curl Cards
Yellow Cards: My facade curl cards are used as single planes to add to the silhouette from certain angles.
Since loops and curves on the silhouette are a big part of getting curly hair to look correct. It is a very cheap way to get lots of curls.
Fly away cards
Blue cards
Flys are for those hairs that don’t follow the main direction of the hair. They create randomness and catch the light at off angles which makes them like the icing on the cake.
Beard E begging
Green
Beard and mustache cards were for the beard which I won’t cover here. If this post does well I might do an explanation of that so please retweet.
Additional Reference
This is a fairly common workflow and documented really well by Tomos Hywel Evans and Andreea Scubli so please check them out for more information:
Placement
Crown and hairline
When it comes to placement I just use my sculpt as a guide. Then the crown and hairline positions as my start and finish line.
Start with the bigger clumps of hair and place them starting from the hairline and back to the crown.

GS Curve tool
The Maya tool I used was the GScurve tool which makes this process much easier with the utility it provides.
Use the flow from the sculpt
Again when it comes to placement I follow the flow from my sculpt. I also really like the rhythm concepts from drawing schools of thought. I like cards feeding into the ones below it to have this dynamic read which carries the eyes.

Big forms
When placing I look at the structure and think of the big forms first, like we do when sculpting.
Here you can see the layers of the hair-like steps.

Layering tip
GS curve tool allows you to stack your cards really easily by duplication and switching the UVs.
This allows you to set out all your big primary cards and then simply stack the different layers on top of each other as well as fill in the gaps.
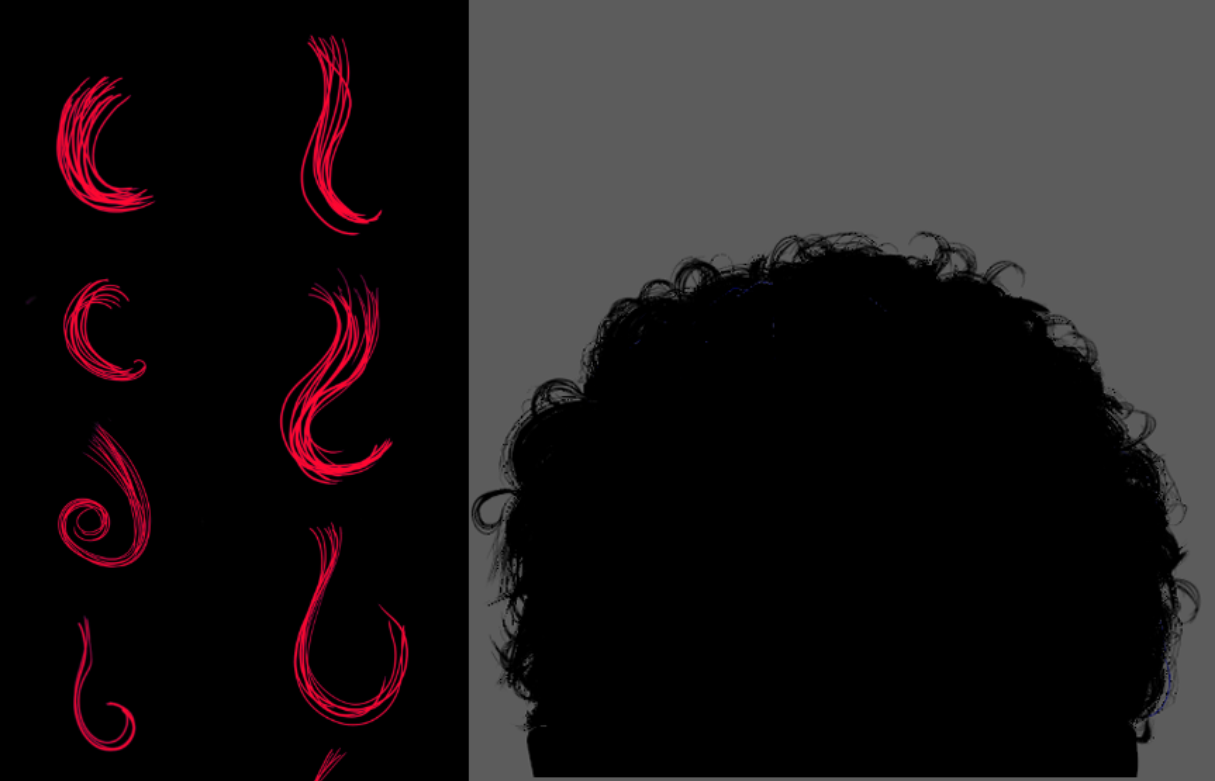
Rim placement tip
A quick tip for placing cards for the silhouette is enabling lighting in Maya (hotkey 7) which turns your model black completely.
You can use this to place cards along the rim that will affect your silhouette.
Facade Curl Cards
My facade curl cards work in a very similar way to how fly-away cards act. Firstly adding to a more random silhouette for realism.
Secondly, I like to cover up any hard edges that my bottom-tier cards show on the silhouette.
Lastly, they are way cheaper on the topology budget as they can literally be a single face or two.

Fly Aways
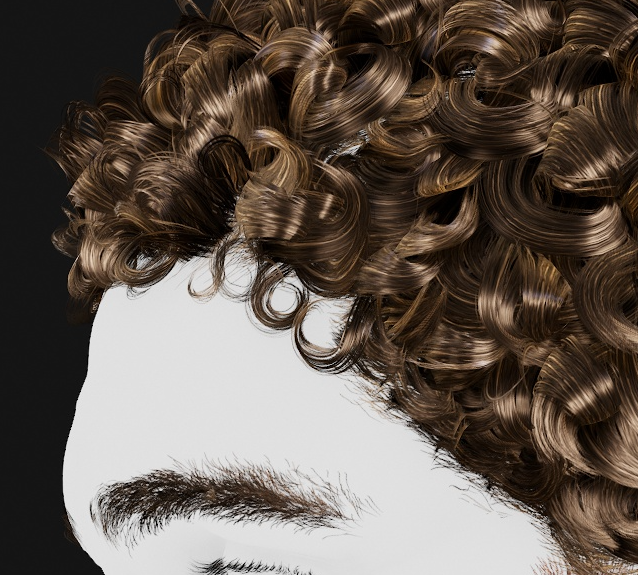
Finally, I did a layer of fly-away cards adding that thin random fuzzy mess of hairs. These cards can break a lot of placement rules as they are truly random.
As you layer more of these hairs together and create more visual variation it will become far more natural and contain more realistic depth.

Conclusion
In conclusion, I hope this helps, these tips and techniques are ones I have learned from a variety of awesome people and sources. Hopefully, this pays it back in a small way.
Thank you for reading. Here is a (‿ˠ‿) for making it to the end!
Read more articles
You might also like these articles.


