Car Trailer


Introduction
Hi everyone! My name is Simon Kleitsch and I am a 3D Artist from Germany. After studying Game Design in England I now focus on sharpening my skills in 3D Environment Art and Props Creation for my portfolio.


Goals
For my first portfolio piece after University, I focused on realism and details. The main goal was to take an everyday object that is often disregarded and make it enjoyable to look at. From the start, I knew details in both textures and high-poly were the key.
Software
- Cinema 4D: Block-out, Low-poly, SubD high-poly, Cloth simulation
- ZBrush: Sculpting folds
- Maya: Unwrapping
- Substance Painter: Baking, Texturing
- Photoshop: Textures, Stencils, Decals
- Unreal Engine 5: Lighting, Rendering
Idea & References
On the hunt for interesting-looking objects in the real world, I often go for walks or hikes near my home. One day, unaware of the impact it would eventually have, I snapped a picture of this somewhat rundown car trailer:

Two days later I finally brought myself to go through all the photos I had taken the past weeks and looked at the trailer again. Intricate details, a combination of hard surfaces and organic cloth – definitely something I had never approached before. The decision was easy at that point. I wanted to do it.
Ironically, it was the only object I had taken a single picture of. So I had to go back and take dozens of photos while trying not to look exorbitantly suspicious.
One night, I found myself (rightfully) being yelled at by the owner, as I was crouching and shining a flashlight at the underside of the trailer. You could say I was desperate, maybe a bit obsessed with being precise.
After that, I decided to gather all the remaining references in a less adventurous online fashion.
Finding as many references as possible is significant and helps you out a lot with accuracy during the modeling phase!
I spent many hours browsing websites for specific axle parts, finding the correct stickers, bolts, backlights, coupling devices and much more.

Block-out and Modelling
I started blocking out the main shapes using primitive objects such as cylinders and boxes. It is important to look closely at the silhouette and your reference during this stage. That way you can ensure the proportions are correct.
I knew I would need the frame underneath the tarp as well, in case I wanted to use this prop later on as a game asset, that the player can open and get inside. The frame also served as a good anchor point for the cloth simulation later on.
As the last block-out step, I added a plane on top of the frame with evenly distributed quads for better results in the cloth simulation.


Moving on to the high-poly mesh, I decided to use subdivision modelling for every part of the trailer; every screw, nut and hinge. There are standardized parts available as kit bashes but I wanted to improve on my subdivision modelling workflow so I modelled everything myself from scratch.


I created my own little kit for the small and repeating parts like screws, rings, reflectors, etc. A car trailer has a surprising amount of these.


The most challenging bits to model were definitely the continuous, seamless metal parts such as the coupling area and the wheel rims. Making sure the topology is correct on shiny metal objects is very important since unwanted dents that are baked into the normal map are very visible later on.


Exceptions in which I used sculpting in Zbrush were the tarp, the wooden board, the welds, the tapes and the bumps/dents in the metal sheet underneath the number plate.


The retopology/low-poly process was very straight forward. Thanks to subdivision modeling I was mostly able to use the base meshes, remove loops and simplify as much as possible. Don’t be afraid to use triangles for non-deforming meshes!
My goal for the final low poly mesh was to ensure that there were as few visible corners and pointy edges as possible. This car trailer should become my first high detailed portfolio piece so I allowed myself to keep the polycount rather high (~100k).


Modelling the Tarp
I split the detailing into 2 parts: Overall shape and base deformations through simulation in Cinema 4D and fine details via sculpting in ZBrush.
In hindsight, I should have used Marvellous Designer instead. C4D’s cloth tools do not offer the same level of control. Lesson learned.
First attempt (a loose cloth simulation to get realistic falling shapes):
Second attempt (using Cloth Belt Tags to tie specific vertices to the rings):
The second method produced less interesting deformations but I ended up using this one as the base for ZBrush since I needed the holes in the tarp to accurately match the locations of the rings that I had prepared beforehand.
After a lot of fiddling around to get a good starting mesh, I used ZBrush to sculpt and subdivide further. The cloth brushes are good at lower resolutions but soon I used the standard, move and clay brushes in order to direct the folds according to my reference and rings. This process took quite a bit of time, especially since it was my first time sculpting folds.


I followed the reference very closely in some areas but deviated from it in others. Trying to recreate this corner and many of the folds/stretches definitely helped me to improve my sculpting skills and gave the model a less generic look:


For the final low poly, I took the lowest subdivision level out of ZBrush and added a few polygons to make the two areas a bit less pointy.
Corrugated Wire
First I modeled a small segment of the wire and checked if it looked nice with the subdivision on.

Then I used the Cloner tool to control the length and directed it along a spline via Spline Wrap. In case small gaps between segments occur, you can use the Connect tool to close them.
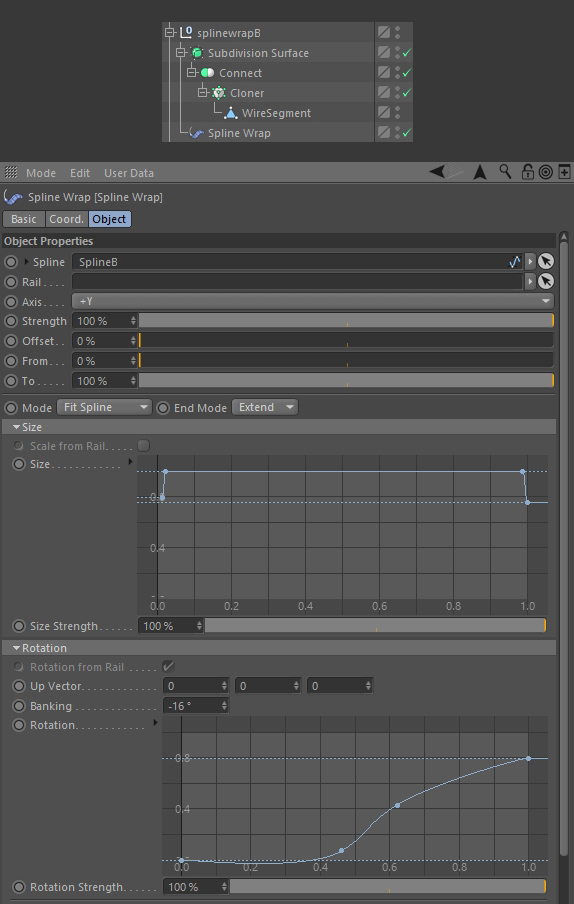
Since this setup allows you to dynamically change the number of segments and the rotation along the spline, I was able to have the notch run along the wire non-uniformly, creating a more interesting look. I changed both the size (beginning/end of the wire) and rotation via curves.


For the tape, I used Shrink Wrap to wrap stretched cylinders around the corrugated wires. Then I smoothed the result out, switched to ZBrush to sculpt stretching folds and remesh.


UVs
In order to get artifact-free bakes inside Substance Painter, it is very important to create clean UVs: Seams at hard edges, straight UV borders following the X and Y axis and as little distortion as possible.
I work with Maya’s standard UV editor since it gives you many options for pinning, straightening and relaxing/optimizing.
I always use the auto-packing option first and manually improve the layout afterward.
To achieve the high level of detail I wanted; I ended up with many texture sets. Most at 2k resolution, some at 1k or 4k and even one at 8k for the tarp.
Some UV examples:


Baking

GPU baking in Substance Painter is easy and fast. Just for the wooden board, I had to switch to CPU baking since the high-poly didn’t fit into my video memory.
I baked the tarp, the wheels and parts of the metal chassis separately in order to avoid dark spots in the AO map.
Naming all your meshes correctly and using the Match by Mesh Name option is good practice and helps keep everything tidy.
There is no magical recipe for baking settings – the default values are pretty good though. For smaller details it can be helpful to lower the Max Frontal/Rear Distance.


Texturing
Texturing is probably my favorite part of the entire creation process. There is something magical about bringing all the hard work you put into the object to life. I love the creative freedom I have when working on complex details. Many of the ideas literally just spark while working on the textures.
In my opinion, a captivating look can be achieved by putting effort into imperfections. In the real world, there is no such thing as a perfect surface or edge. An interesting roughness map alone can draw the viewer’s eyes toward details they otherwise might have overlooked.


In Substance Painter, I usually combine procedural methods (generators/smart masks/filters) with painting methods (brushes/stencils/alphas).
Often times I find myself picking layers from already existing smart materials. I think it is a great way of learning by looking at materials other professionals created – no need to reinvent everything yourself.
Generally, it is a good idea to work from the bottom up. Starting with the base material, then adding more and more details and finishing with a grime/dirt/dust/rust pass on top. This method has been talked about many times here on Games Artist, that’s why I will only briefly show the general process most of the objects went through until the final result.
I’ll use the clamp at the support wheel to demonstrate.
First I thoroughly analyzed my reference images to understand how all the materials should be built up.
On the left, you can see the reference image I took myself. I did not get close enough to really see how the material looked though so I included 3 additional references I found online.
All 3 show a distinct difference in surface noise between the front and back parts of the clamp. I decided I wanted to achieve the same grainy look and edge damage but retain the smooth/dull surface for the rusty areas.

As a base, I used Painter’s “Iron Rough” material. I added edge wear (colour, normal, roughness, metallic). Some edge rust, cavity imperfections + welding (colour, normal, roughness, metallic). Surface scratches and bumps (normal). Surface grain (normal). Dust (colour and roughness). And at the end, two rust passes (colour, roughness, metallic).
I noticed many screws and bolts in my reference images had small standardization numbers on their heads. While walking outside, I kept taking pictures of similar screw heads like this one:


I turned them into masks inside Photoshop until I had enough variety for several different screws and bolts.

Masks like these make for nice stamped textures when used in the height channel. Adding them into the “Micro Details” inside a Generator via Anchor Points can improve the dirt/dust around the stamped area.

I used the same technique for the font on the side of the tires.


Throughout the entire project, I created a lot of custom decals, alphas and stencils.
In this example, the picture I took was at an angle. I warped it inside Photoshop to get rid of the perspectival distortion. Then I extracted roughness, metallic, height and a mask by changing levels and curves.


Here are some other examples:


Belts


I didn’t get great reference images for the material structure of the belt’s strap. Yet I still wanted to create something similar to what it looks like. It surely must be some sort of plastic material with a pattern woven inside.

As a base, I added a fill layer with the appropriate color and roughness values. Looking at the reference I created a mask for the pattern. In the mask, I started with a “Fill” called “Fabric Medieval Flower”. On top, a Curvature Generator is set to subtract to mask out the borders. Continuing with Warp, Blur Slope and Blur filters to make it less uniform and the edges less harsh. That gave me a good but subtle height layer.
For the color pattern, I duplicated the layer, changed it from height to a dark brown-green color and added another Curvature Generator underneath the first one, this time set to Linear dodge. Since it is underneath it creates a nice thin inner rim but still leaves the outer border intact. On top sits another slight Blur and grunge Fill set to Multiply for some variation.
Above I put a simple grunge layer with 2 different maps and at the very top a light dust layer to add more depth.
For the metal parts, I proceeded in a similar, simpler way.


Rust
During the detailing phase, I thought that some metal parts seemed a bit empty. I looked at my reference and spotted rust leaking down on this pole. The reference image at the left is a bit blurry since it’s just a small snippet of the main reference photo but it sparked ideas on how it could look.

After adding some darker dirt to the galvanized metal base I started painting a mask for the rust. On top of the red rust layer, I put a color variation and a normal detail layer. Time for another mask. This time with crisper edges for my height layer in order to separate the rust nicely from the metal.
Next a dark and a light color + roughness layer for more contrast on the edges of the rust and less uniform metal. At the very top come several painted leaking layers ranging from green to black.


For painting these masks and layers I used many different brushes, stencils and alphas. It takes significantly more time compared to using generators but also gives you a lot more control and accuracy.
Coupling Surface
Metal surfaces can have different finishes. Sometimes the default Filters within Substance Painter don’t quite give you the desired result. Here is a simple method to create the following effect:
I use a Fill Layer with only “normal” ticked.
For the mask: BnW Spots 2, Warp, Levels, Fill (Grunge White grainy), Sharpen and Fill (black, opacity set to 65)

Rendering
I used UE5 to present my car trailer. Initially, I wanted to render in Marmoset Toolbag but since I had been working with Unreal for a while now and also wanted this Trailer to be a real-time asset, in the end, I gave Unreal Engine a shot.
I can only recommend it!
The final images are nearly as high in quality as if I had used a traditional non-real-time renderer such as Arnold or Redshift. The time UE5 takes to render is significantly lower though. This allows for more iterations in a shorter time. With the real-time viewport looking pretty close to the final renders (thank you Lumen), choosing the right angles and lighting scenarios was a smooth process. I had never tried rendering one of my assets in such detail before, yet I am very happy with the results.
I highly recommend this video from pwnisher if you want to get into rendering inside UE5
I imported a plane in the shape of a studio backdrop, took an HDR from Poly Haven and started placing lights.
I always had at least one key light, one fill light and one rim light. Often times I had 2 rim lights, multiple key lights and even a top light.
For most images this was the standard lighting setup:

As you can see here I also used one warm and one cold Rect Light to create an interesting contrast:

Unreal allows you to load multiple maps into a Level. This helps a lot to with quickly switching between lighting scenarios.
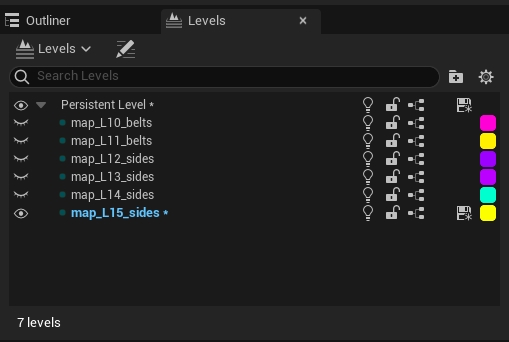
Here you can see me using 4 smaller Rect lights (the ones on the floor) to have the backlights catch more diverse reflections.

Here are some of the Console Variables I used for the turntable video. If you want to learn more about that I recommend watching the above-linked video.

Conclusion
A big thank you to the awesome Games Artist Team for giving me the opportunity to write about my workflow!
Props to everyone reading until the end of this article. I hope you enjoyed the read and learned something new!
Finishing my first-ever prop at this level of detail taught me many things and I learned a lot of new techniques along the way. The main takeaways are:
- Planning ahead in regard to what shots will ultimately be shown → spend less time on details no one will see
- Tackling tasks that seem out of your reach will oftentimes make you grow the most
- ZBrush is your friend and not your enemy
Feel free to follow me on Artstation or send me a DM there if you have any questions or feedback.
Read more articles
You might also like these articles.