Asian Garden

Introduction
Hello everyone! I'm Théo Longeac and I'm a 3D environment artist from Paris, France.
I have always been passionate about the worlds that some artists manage to create through their illustration and their history. When I moved into the video game industry, I quickly wanted to focus on Environment creation, because it's a specialty where storytelling and atmosphere are highly important.
First Approach to the Project
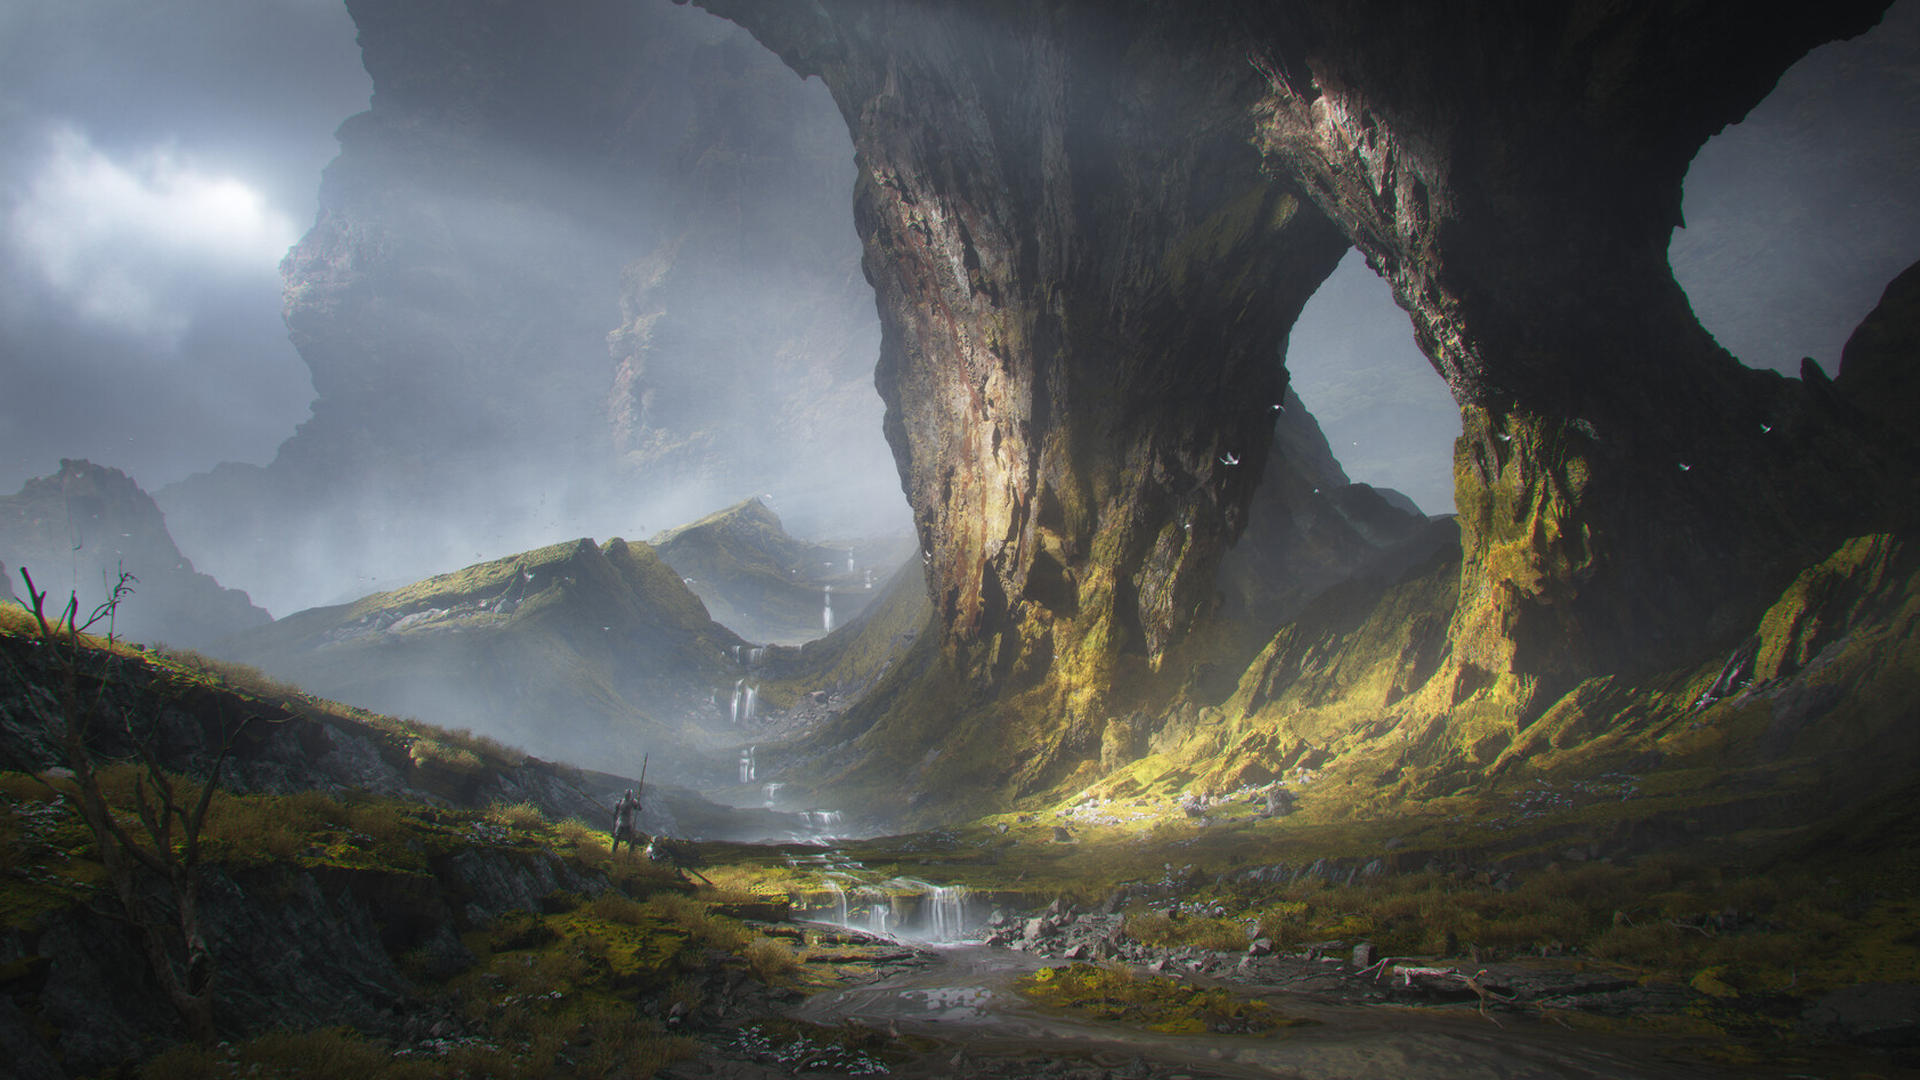
For this project, I had in mind to make a rather stylized environment. After looking at several concepts, a lot of Studio Ghibli’s art impressed me. I wanted to convey a soft and soothing atmosphere with a touch of nostalgia in my illustrations.
I started by gathering many references, in order to enrich my basic idea by adding many details to get a more realistic rendering that makes the project comes alive. Here, I used several types of references: some quite global photos of Asian houses and gardens, but also some more precise ones on assets I will have to model, like stone lamps for example. I also gathered artwork from different artists in the same style. I used PureRef, which is an excellent software to organize these ideas quickly.

Blockout & Composition
I started to work directly in UE4, with primitives, a camera and simple lighting. This may be the most important part. After several tests, I found a composition that I liked, a lighting intention, and a camera angle to focus on.
In this project, I haven’t necessarily tried to create a complete environment but rather to focus on 2 or 3 points of view that would give a particular identity to the scene. From this stage, I drew a certain number of specific assets that I would later need to concretize my work.

Modeling, Integration
Once the desired atmosphere was obtained, I switched to 3Ds Max, in order to start modeling my assets quickly and integrate them in UE. At that step, these assets were not perfect, but they can be retouched and optimized afterwards. The idea was to have a Blocking 2.0, more accurate, and to be able to adjust my camera and lighting on it.
At that stage, I had modeled the main assets of my composition: Several parts of the building to assemble, the tree, the rocks and the fence. I tried to model in a modular way, which allowed me to save time and to be able to test several configurations for my scene.
For example, I had thought of integrating a small pond, but I finally gave up this idea, because the scene was too busy, and became more difficult to read.


Then I could optimize all the elements that required it. I’d rather delay the optimization because often enough I modified my assets in the previous steps, so it was a waste of time to optimize assets before I was sure to use them. So you have to find the right balance between looking for improvements for the scene, which is always possible, and the need to move forward in the creation of the scene.

I gradually started to add texture to my scene. I tried not to touch my composition too much anymore, but I kept on adjusting the elements.
I also retouched my camera, in order to have a low angle shot, which seemed more dynamic and made the scene more imposing.

Then I added the props that would dress my scene and the secondary vegetation. For example, I added some flowers to bring bright colors and contrast with the brown/green already present.


Texture
I worked my textures mostly on Substance Painter.
Here is an example:
I started by applying my base color, then I added a wood texture to create variations in color and shape. Then I added other color variations with a fill layer and an AO. Then I started working on the roughness with several layer blender together. I worked on micro details and increased contrasts.
Finally, I lightened the edges to give them an aged look.
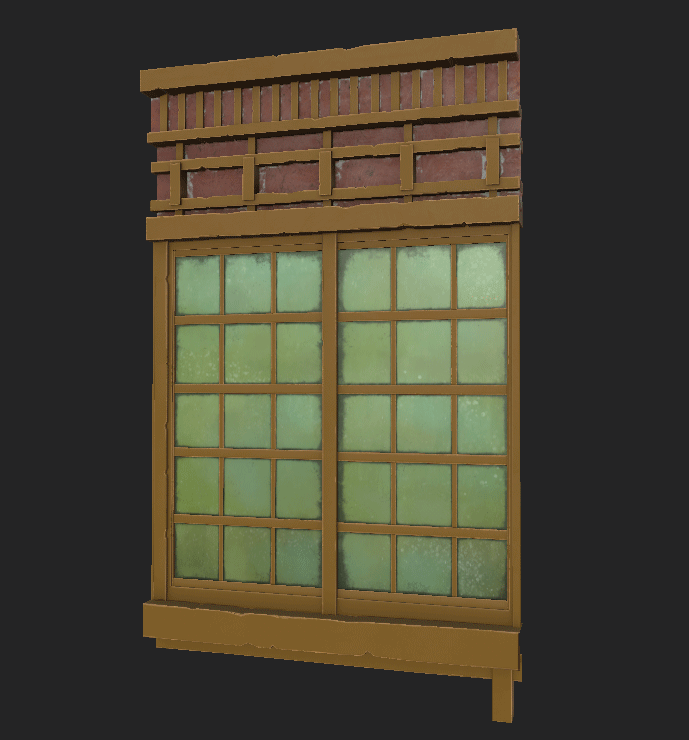


In substance I tried to work in a procedural way as much as possible by creating smarts materials, which I could use in this project but also in others. It allowed me to respect a coherence between the different materials of the scene (for example the wood of the building and the wood of the barriers have a similar basis).

I also used substance designer for the texture of the floor. On bigger projects I usually work on designer, but here, as I had quite few assets, I opted for painter, on which I feel freer artistically, and which allowed me to go further in the details I wanted to bring into my assets.
Final lighting and Post Process.
I tried to keep my lighting as simple and efficient as possible. I started by adjusting the general brightness with an ambient light in UE4, then I added a directional light, in order to find satisfactory light/shadow contrasts. I lightly tinted my lights for an early evening atmosphere which, according to me, is the calmest and warmest moment of the day.
I also used an exponential fog, which I set at the same time as my final lighting. It serves to tinkle my stage and to create a softer atmosphere.
I also tried to keep the post process as light as possible, I added vignetting and a bit of grain to start with.
I slightly modified the tint and contrast to give a slightly aged side to my image.
Then, I added some dust particles and some fake godray.
Finally, I could go through photoshop to adjust the last details on my image, it’s was just a step that allowed me to put some finishing touches.


I have worked on this project for about 3 weeks. It was an iterative process.
Looking at it today, I have found some flaws, which will be avenues of improvement for my future work. I was used to ask for feedback from people around me, whether they are familiar with 3d or not, and this allowed me to push it much further, to see my composition from a new angle and especially to check what catches the eye of the neophyte during his first (and often decisive) glance.
Here are a few lessons that I’ve learned and that, far from being good practices in their own right, may be able to inspire you in your organization and your achievements:
-Set a time limit and do the best you can during this period. I could still spend days improving details,
but you have to know when to finish your project.
-The step of looking for references is very important, it is a great source of inspiration that allows you
to flesh out a scene.
-It is important not to have too many assets. It is better to look for relevance rather than quantity.
-Don’t hesitate to ask for feedbacks, when you work hours on a project, you don’t see some mistakes
that could be avoided. Moreover, it seems important for me to take a step back from time to time on
one’s work, and then come back to it with a new look.
I hope that you have learnt some tips from this article. Don’t hesitate to follow me on Artstation
(https://www.artstation.com/tlongeac) to see my other projects, present and future.
Thank you for reading.
Read more articles
You might also like these articles.