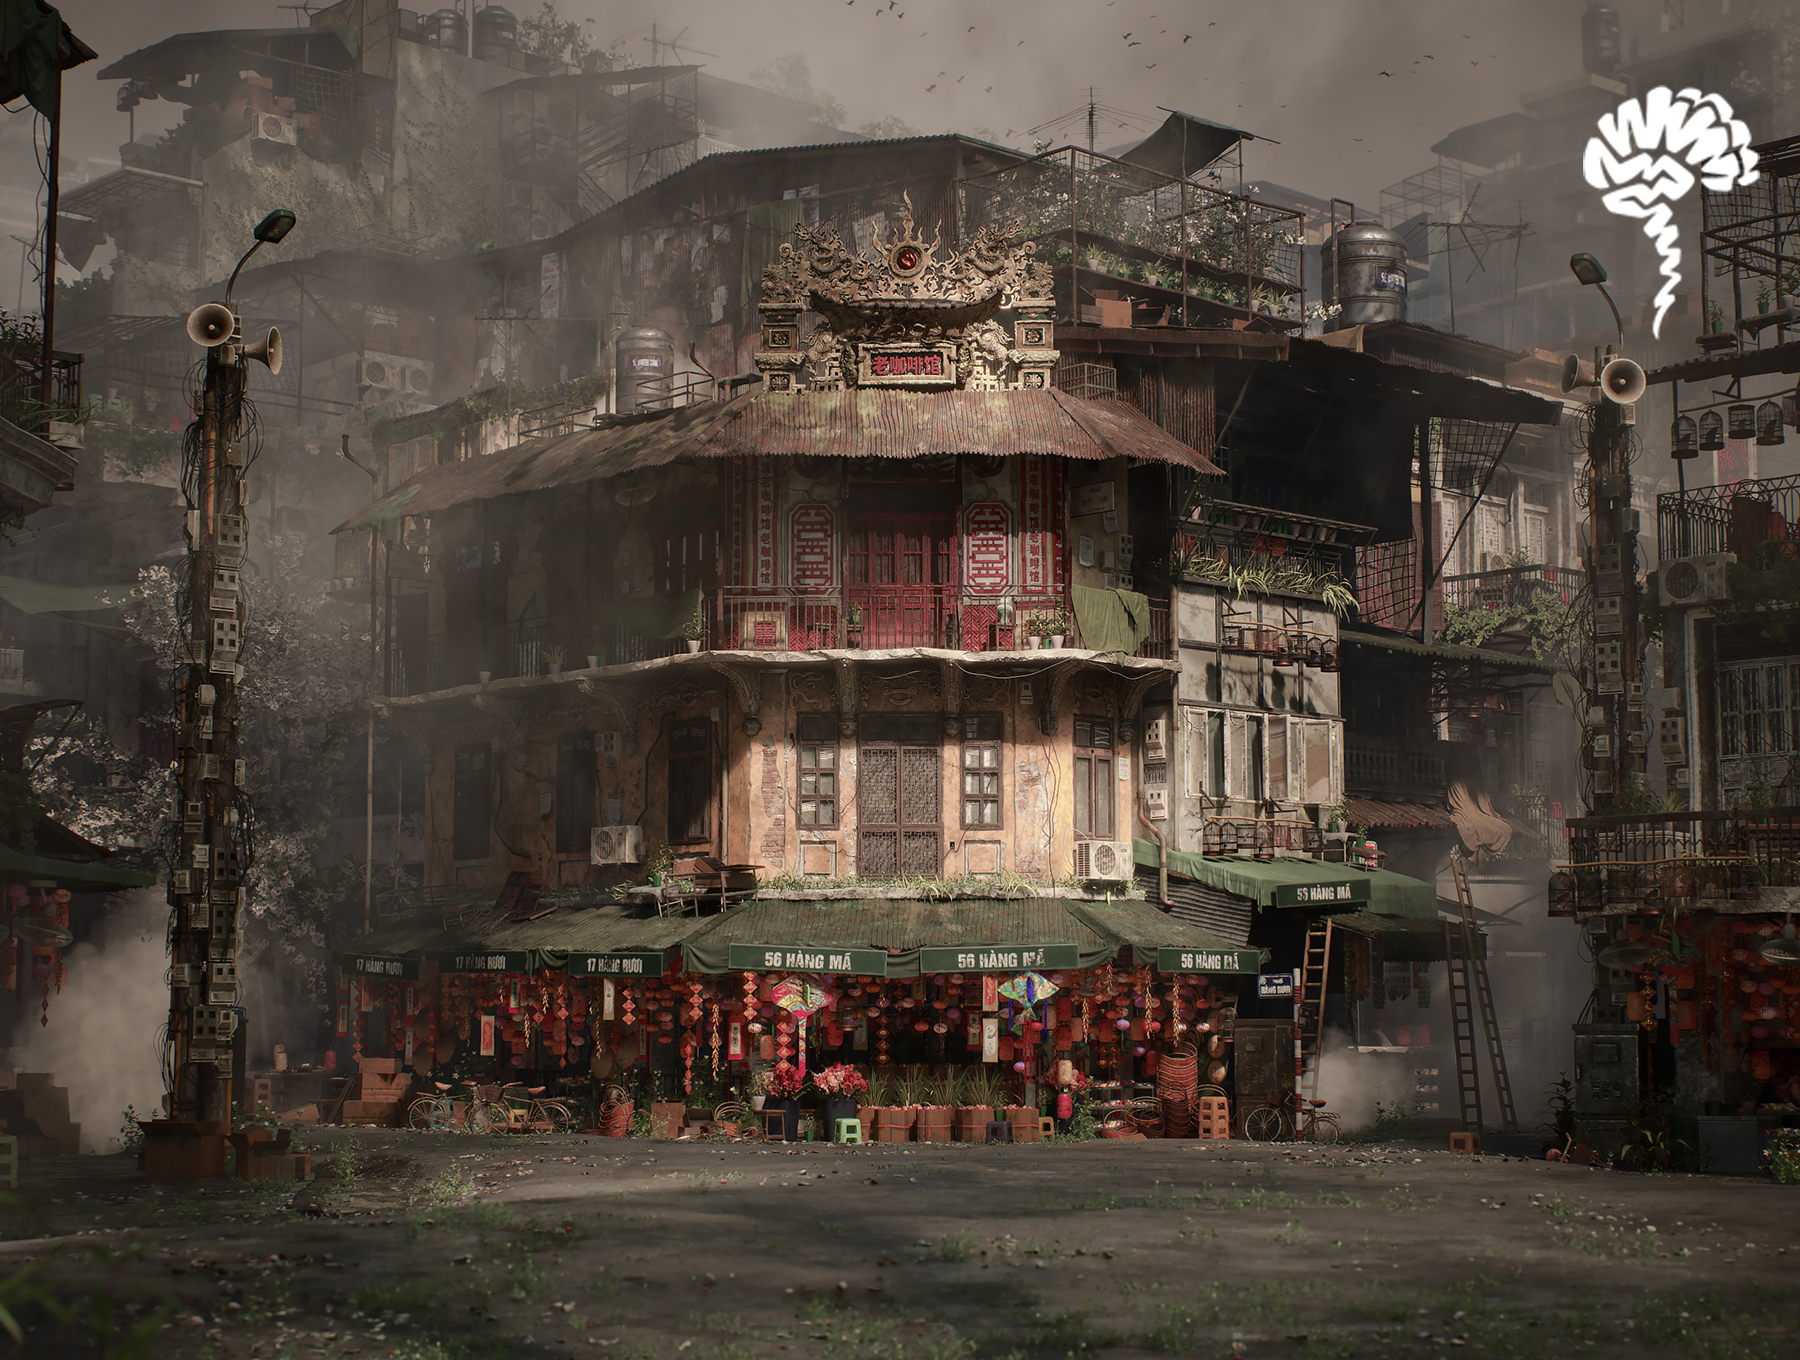
Crash Site


Goals
First, I wanted to make something that looked really unique and would stand out, it also had to be a big exterior scene in nature with natural light.
Second, I wanted to test many separate skills and techniques I learned over the years and combine them into a solid workflow for 4k resolution running in real-time.
But most importantly, I wanted to push myself to the limit and test how far I could go and what I could achieve, not only art-wise but also in terms of project management.


Software
For the rendering and the materials creation, I used Unreal Engine 5 as it was the natural step forward due to its unprecedented quality and performance. I used 3ds Max for modeling, I relied heavily on the modifier stack to allow myself to go back and tweak the models quickly. I created mesh masks in Substance Painter, to use with Unreal’s layered material workflow.
References, Inspiration & Storytelling
It was difficult at first to find a concept art that I really wanted to do an adaptation of, but as soon as I saw the artwork from Michael Xu, I knew it was that scene I wanted to make. I needed to be sure first though, so I gathered some more images and discussed with peers about them.
I chose this one because it has all the things I was looking for: it is a unique idea, it is an exterior scene, it has great composition and most important, it looked like it would be very fun to recreate.
The idea of someone finding a wrecked plane and building a fort around it is something that really caught me. Or maybe it’s a survivor of the crash?
If you have a keen eye for scale, you’ll notice how the plane is much bigger than it would be in real-world, it gives this sense of mystery, and I would hate to change such a beautiful composition.
[Below: Concept Credit, Michael Xu]


Blockout & Modelling
I started with a blockout to match proportions and have a good idea of how much work it would take, how the shapes would look, try some camera angles and see how the structure would interact with the terrain.
I divided this process into two steps: the first one was a “pre-blockout”, I just got into Unreal and started placing cubes and transforming them to get the overall size correct.
When I was satisfied with that, I merged the whole thing and exported it to Max, where I started the actual blockout process. At this moment I wanted to decide what I was going to create and find out how much work it would take.


Sculpting & Hardsurface
In some of my previous projects, I’ve been experimenting with different techniques to make models look more realistic, especially constructions, wood, concrete, etc.
One thing that I took from it is that nothing is straight, there are always bumps or irregular lines and I wanted to explore that, even exaggerate it.
This is where Max’s modifier stack came most in handy, I could model the pieces as usual and add irregularity to them in a procedural way on top of everything.
So, I had this wood beam, for example, just a regular cuboid mesh. I would add a noise modifier to it, displacing the vertices, and I just needed to add some edge loops here and there to create very different and interesting shapes.
On top of it, adding a chamfer modifier allowed me to have rounded edges without committing the changes to the geometry while also being able to use face weighted normals and in the end, these bevels are still light.


UVing
Before I began UVing anything, I already had in mind I wanted to have baked mesh masks to separate the layers in my materials, which requires “unique” UVs (they couldn’t overlap and had to be contained within the 0-1 UV space). The problem was that I wanted my material layers to use tiling textures and not having a set specific texel density would make it hard to keep a consistent look.
The first thing that came to my mind was having two sets of UVs, one unique and one tiling; but I quickly gave up on this as it would be much more time-consuming than simply adjusting the texture tiling on each material instance.
In the end, I didn’t do anything special with my UVs, just the regular non-overlapping and 0-1 contained for mask baking.

Baking
I wanted to make these masks as quickly as possible and export only one file. The reasoning is that if I had to spend too long on it, there would be no time benefit of using this workflow; and the more files I had to use, the less would be the benefit of making the texturing in Unreal.
I avoided setting specific purposes for each channel (such as red for dirt, blue for rust, etc) and instead focused on what that type of surface would need art-directed details, setting the materials on a case-by-case basis.
The wood materials, for example, most had one channel for the scraped-off edges, one channel for dirt, and one channel for accumulating sand. For those, I used, in the same order, convexity masks, ao + concavity masks, and up vector masks.
But more complex materials, such as the airplane hull, used all the RGBA channels. This one and some other special cases also used a unique normal map, not baked from high poly though, just art directed with some very specific things.
The hull material used a channel for generic distorted metal, a channel for stains, one for rust, and finally one for bolts and scratches.
I combined the baked maps, such as ambient occlusion and curvature, with grunge masks to get some interesting variations and believable looks.
In the end, I used very low resolution for these mesh masks, most were 256×256. Inside Unreal I would combine these with other textures to get more detail up close.


Materials
I wanted this project to look great in 4k, I needed to have very crisp-looking material and well-defined surfaces, but I didn’t want to simply use large textures.
A few weeks before beginning this project, I played Resident Evil 8 and was completely amazed by their material work, I wanted to make something on that level of detail and did some research inside the game.
I’m not sure of the specifics but I knew they were using a layered material workflow; I could see texture tiling of the layers and the masks but it was so sophisticated and well executed that it looked magical.
I did a lot of experimentation and in the end, I was very satisfied with the workflow I achieved. Basically, it consists of individual material instances that rely on masks to decide where they appear or not, all combined in one asset in an easy-to-use native interface in Unreal 5.


Let’s get back to my airplane hull material: it starts with a simple shiny metal material layer. This material instance uses tiling textures, and if you pay attention, you can see it repeats and looks weird. So, there’s my brand-new shiny airplane, but its surface looks too pristine as if it has never left the factory.
I add another material instance on top of it, this material is of metal too, but this time it is less shiny and tinted bronze-ish. I want this to appear as stains and not just take the whole surface, so I add a mask. This mask is low-res and looks blurry, so I add a tiling mask on top of this mask and everything looks magically sharp and unique.
Now my plane looks like it has seen some flights and the metal has got some stains or tarnishes, but it looks like someone just washed it.
On the hierarchy of surface details now comes the rust. I add a rust layer with some art-directed rust mask and our plane looks old. But still clean.
I’d love to get it dirty by now, but first I want to break the look of the entire surface by having even colors. I add a “color variation” layer, this just blends an image over the whole material, making it more believable.
I add a special layer that only affects the normal attribute of the material, I want to have this metal be distorted in some areas.
Ok, now I’m adding the dirt layer and it makes our plane look like it’s been sitting there for a while and nobody washed it.
Finally, I add the unique normal map on top of all.


This workflow allowed me to be able to know instantly the final result in-engine, and though I went back and forth with Painter sometimes to get the right look for the masks, this connection was as fast as it was just one file to reimport.
I was also able to take one material and use it as a base for another just by changing the mesh mask and creating variations very quickly by just creating an instance and adding more layers.
This layered material workflow is not limited to baked mesh masks though, some of them I just used tiling masks to get random details and some I just relied on vertex paint. This helped me to focus my time on what was most important and create materials for less important assets very quickly.
While it might seem cumbersome to set up the master materials to work with this system, it eventually pays off on large projects. It basically consists of three types of assets: the master material, the material layers and the blend assets.
The master material is mostly empty, it just has the setup of how the layers will be read and react to the blend assets. When you create an instance of this master, you’ll be able to add material layers to it, and this instance is what you’ll apply to meshes.
The material layers are not usual material, they are created in a very specific way and are a different type of asset (you can’t just drop them on a mesh, you need to use an instance of the master material with them inside), but they have all the properties of surfaces like base color and roughness.
The blend assets are the assets that generate the masks for the layers, you can just put a texture there and output it as the mask or you can create all sorts of complex behavior, like blending unique masks with tiling masks.
Ground, Cliff, Terrain & Foliage
For the overall landscape of the scene, I used Megascans assets, mostly the ones that shipped with the Valley of the Ancients demo. The best thing about this step of the process was that Nanite allowed me to not have to worry about making the scene too heavy, I used around nine thousand different static mesh actors to build the landscape and it still ran in real-time. There are not many different meshes though, I hid repetition and reuse by rotating and overlapping them a lot.
The foliage is also from Megascans and it fits perfectly with the environment, but I had to be cautious with it as Nanite doesn’t support translucency and also doesn’t like thin meshes.
I had in my mind that my terrain had to complement the centerpiece of the scene and direct the viewer’s eye to it, but in the end, a lot of people were more impressed with the terrain for its level of details (credits to Quixel and Epic for that).


Other Software
For the glasses present in the scene, I used the Broken Glass Generator by Yutaka, it works on Substance Player and can generate a wide variety of broken glass textures. I used Pureref to organize my reference images and self-feedback. I also used Photoshop to compare my scene with the concept art and edit some of the tiling textures I used. The Datasmith plugin for 3ds Max was also very important for my workflow, as I saved countless hours from exporting/importing, I just had to save one file and reimport one file on Unreal while keeping local space pivots, transforms and material assignments. I couldn’t imagine tackling such a large scene without this tool. I used the Tether plugin by Sam Bonifacio on Unreal Engine to create all the cables and wires on the scene.


Texturing, Substance & Megascans
Most of the textures I used were from Megascans, but some of them I got from Poliigon. Photogrammetry textures are a great starting point, but I like to always edit in one way or another to either make tiling harder to see or to get more information out of it. For example, I almost always edit the roughness textures to get more contrast or to art direct the look I want for that surface. Sometimes I increase or decrease contrast on base color textures too, I think it’s important to have surfaces that look noisy but also some that look cleaner to counterbalance.
For normal maps, I always try to avoid small details (high frequency) which cause the surface to look too bumpy, relying more on the other textures to differentiate between details, such as a paint splatter. In this scene, I’m not using baked normal for things such as round edges.


Asset Placement
Right from the start, I knew this project would take a long time to execute and I needed to use Datasmith to avoid having to model everything in place in 3ds Max and then have to reposition everything on Unreal afterward.
All the assets I created myself were only positioned and placed on Max, the instanced ones were instanced in Max and Datasmith kept these instances when imported in Unreal. I would also change the scale of some pieces and this was also kept.
The smaller assets that I got from other sources were placed directly in Unreal. I always tried to have a good composition while placing anything. Even though sometimes I didn’t have an asset exactly like what was in the concept art, I tried to replace it with something that would have a similar impact on the scene, in shape and color.


Use of outsourced assets
A big part of my commercial projects involves using outsourced assets to save time, so I wanted this to be explored on this project too. I needed to find ways to match these assets with custom made pieces.
Some were very easy to fit, like photogrammetry assets, because even though the modelling of the scene was custom, the textures were all photogrammetry too. Some assets that had very simple modelling meant for games, gained new life with some texture edits.
The pickup truck, for example, has a very simple low poly modelling and at first look completely off on the scene, so I used its own textures on my custom material layers to create a completely new look to it, making it more in tune with everything else.


Polish & Final Pass
After I had gotten every part of the scene to a “good enough” level, I gathered all my self-feedback and started to categorize it to find out what changes would have the most impact while having the lowest time cost. There were some things I would really love to have redone or edited, but in the end, I had set a time budget for myself and if I went over it, it would mean I would have failed if this was a commercial project. Regardless, I was very happy with the end result and I don’t think it would’ve made this scene any greater if kept working on it.


Lighting
Lighting is one of the parts I love most and definitely the one I studied most, so I wanted to make sure this scene would reflect that. I created 4 main variations of lighting for this scene, which then I iterated on. I’ll call these variations: sunny, red moon, pink sunset, and grey cloudy. They’re pretty self-explanatory, so I won’t go into details.
I shared these variations and their iterations with peers and got their feedback to improve them. My initial goal was to release the sunny version first, then release the other ones which I had found more interesting over time with different cinematics.
The sunny version is quite simple, there’s a directional light and a skylight. I didn’t go for physically-based values, I tried to explore a more artistic look, taking into consideration the hues and values of where the sun hits and where only the skylight hits.
I tested countless positions for the sun before settling on the one that I found would highlight the material features most and cast some interesting shadows. It’s also important to take shadows into account in composition, as they can have a great impact on it, for good or for worse.
The pink sunset version is the one I found most interesting, for it, I used a directional light and a skylight as a starting point, then added many spotlights and rect lights to accentuate the features of the environment. I learned many old-school light tricks that gaffers would use in live-action sets while working on virtual production and it sure came in handy for this scene.
For example, I had the sun in a position where its light wouldn’t touch one of the propellers, but I wanted to have this part lit for a better look, so I just added a spotlight there with the same color as the sun and it worked great. It’s almost impossible for a person to spot that the angles don’t match, only another lighting artist would notice it, with difficulty even.
When going for more artistic lighting, I think it’s important to not be caged by logic, it doesn’t really matter if it doesn’t make sense if it looks good.


Rendering
This scene runs in real-time at 1080p on a Rtx 2070s gpu, around 50 frames per second, which is great for video games. I also wanted this scene to work well in 4k for virtual production, but my gpu could only push around 15 frames per second in this resolution, so I had to use the Render Queue to render it offline. It was still incredibly fast though; I could iterate on it and have a new version rendered in 5 minutes.
For the cinematics I posted, I used a 24fps framerate to give it a movie like feel, Unreal’s great motion blur and depth of field really helped on that.


Conclusion
I couldn’t be happier with the reception this scene has received from the community, it was way greater than what I had imagined and I’m very thankful for it.
I think what was most important while working on this, was to keep myself organized and to manage time well. There were days I wasn’t motivated at all, but I had separated the most exciting tasks for these specific days, and when I was most motivated, I would work on boring stuff fast so I could get to the cool parts.
Looking back, I think I was mostly managing myself, trying to keep momentum as most as possible to never slow down and never give up. Having all the next steps well defined, not trying to follow a strict timeline and forcing myself to rest even when I wanted to keep working, was very important.
It’s also worthy of notice that from the very beginning, this project was meant to be a turning point for me, so I took it as an investment. I refused some freelance work to have time to work on it and kept tabs on how much time I was spending on it. If I weren’t taking such risks on this project, I don’t think it would have worked out so well in the end.
I’m very satisfied with the things I achieved on this project and I’m already looking forward to my next one, which will be 10x bigger!
I’d like to thank all my friends and colleagues that helped me through this process, I couldn’t have done it without you!
Read more articles
You might also like these articles.