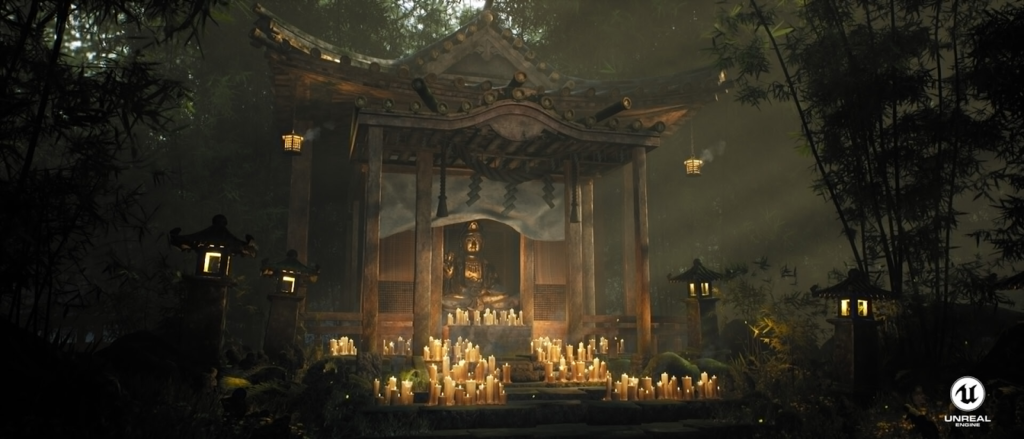
Bamboo Forest Shrine


Introduction
Hi, my name is Vivek and I am from India. I’m a self-taught artist trying to make compelling environments that tell stories. I started my 3D journey back in school as a hobby.
And now it’s something I want to do rest of my life. I just love Environment Art so much.
Goals
I have always had an interest in Japanese culture, food and architecture. And with this project, I wanted to challenge myself to make an environment using more effective and flexible ways. The deadline I set for myself was 45 days and thankfully, I was able to finish it in 50 days. I would like to thank all who have helped me with the project by giving me feedback.
I used concept art by amazing Huyang – https://www.artstation.com/aruariandance


Reference
Before starting to work on the scene, I studied the concept art and made a list of assets that I will need for the environment.

My checklist for reference was Color Pallete, Light and mood, Hero Asset Refs, Shrine Refs, Trim Sheet Ref, Props Ref and Foliage Refs.
Honestly collecting references is the most crucial part of any process. And it’s my favourite part too.
Let’s start with reference images for the shrine. I wanted to try using a “ Trim Sheet ” to model the entire shrine. I was so excited. My approach to making the shrine was modular, so I collected ref images for different parts.
i.e., roof, walls, floor, trim sheet, etc.

Since I was already using concept art, I had a lighting, mood and color palette ready from the start. I used “ https://color.adobe.com/ ” to extract colors from the image.

But as I saw different images on the web. I thought, maybe, let’s try a bit different approach with lighting.

This was my 3rd time doing an environment with foliage. So I had some idea on how to approach foliage. I will talk about it later so keep scrolling.
And here are some more refs of props which I think you can understand what they are about just from seeing them. Right?!
Modelling
I think a bit complex asset to model was the roof. I learned a lot of new techniques while making it. It was so much fun :). I use “ Blender 3D “ for most of my modelling and sculpting needs.


I used sculpted wood for wooden beams cause they were close to the camera so they needed more attention. As you can see I only gave it some minor corner details. I wanted woody details from textures.


For the rest of the props, I sculpted most of the models, made low poly versions of them, UV unwrapped, and baked them in substance painter, which is your typical process of making game-ready assets. Here are some high poly and low poy images of them. And I will talk about the foliage in its own section so chill and scroll.

I kept assets fairly high poly cause I wanted to use the new NANITE feature in UE5, which I didn’t, cause the performance was still solid, even in cinematic mode.
Textures and Materials
Before making any other textures, the first thing I started making was TrimSheet. I used a blender addon called GrabDoc, an amazing addon which is free and irreplaceable when it comes to making trim sheets. So here’s the quick rundown of TrimSheet.

First I made some IDs and sent them to Adobe Substance Painter, assigned different materials such as Rope, Cloth, Wood, Tiles, etc. Made some adjustments and tweaks to materials. And just like that, we have a fancy trim sheet ready to use.
And here is my trim material setup in Unreal Engine.

A quick TIP – use the “ NamedReroute ” node which is a sweet feature and helps to keep your material graphs organized.
I wanted to do less in Adobe Substance Painter and more in unreal engine, and keep materials highly customizable and tweakable which is frankly much better. It saves a lot of time and is easy to control. I love Quixel Mixer cause we can mix and tweak Megascans directly inside and get the result that was hard to do before. I used it to make moss and ground texture. And I really enjoyed this process.
For the next part, I would like to focus on the most important materials which were Moss layer material and Masks.

So here’s the summary, I made a basic moss material function and plugged it in with base material in “ MatLayerBlend_Standard “ Node.

IMPORTANT – Always clamp alpha values to keep them between the range of 0 to 1.
Now let’s talk about Masks. Recently I learned about something really amazing, using a second UV channel. We can use it to make masks, paint and other extra useful things. Surprisingly always had an idea but never tested it before. I used second UV channels for masks which were cavity, fall off and edge respectively. Here is an example mask for the roof-


And for some extra details, I used MacroVariation texture that comes as a starter content.

Foliage
Before I have been making foliage in Blender and it was such a hard job. For this project, I decided to use Speedtree again. And I’m glad I did.
I collected many bamboo references to get an idea of how they grow, are structured, and are arranged around each other. And for the style, I used Ghost of Tsushima foliage as a reference. It’s an amazing game, be sure to play it. I couldn’t play it, cause I don’t have a Playstation. Here are the references.

I studied how branches and leaves are arranged on the stem. And experimented a lot on how to make them fluffy and dense.
A TIP to help you with foliage, use DistanceField and DFAO. It gives amazing results. And be sure to turn on AffectDistanceFieldLighting on foliage props. You can learn more about it here:
https://docs.unrealengine.com/4.27/en-US/BuildingWorlds/LightingAndShadows/MeshDistanceFields/

After modelling them in Speedtree, I imported them in unreal. I am using material that comes default with the Speedtree plugin. But for the wind, I’m using the “ SimpleGrassWind “ node.

I used Quixel Megascans for the foliage texture. I could have modelled, sculpted, baked and painted them, to get those textures but I was on a deadline. So I gotta be fast. Right?!
An important thing to remember while making foliage is their “ VertexNormal Orientation “. You can read more about them here -” http://wiki.polycount.com/wiki/Foliage “.
I manually edited VertexNormals for smaller foliage cause I didn’t like the results Speetree was giving. And also used my custom material for them.
Lighting and Rendering
I have been using UE5 ever since its first preview was available. And with the release of the stable version, I was so hyped. I would like to confess that my love for Lumen is inflating day by day. I am using dynamic lights in my scene. And Only light which is casting shadows is DirecionalLight and the rest are just Fill lights.

Yes, I know there are so many Fill Lights but I’m still getting the targeted frame rates. So, all good. :). And not all of them are casting light.
And for background and sky, I am using an HDRi map.
The real protagonist of this story was ExponentialFog. After using it the scene got so much better. So, always try using fogs in your scene if you can.
And here are the settings for DirectionalLight, SkyLight, and ExponentialHeightFog.

Feedbacks
The most crucial step during production was getting constant feedback. I am part of this amazing community called “ Dinutsy Empire “. Everyone there is so cool and amazing. I was able to get these results thanks to them.
Here are some feedback shots:

I took screenshots of every feedback and saved them on Pureref.
Always remember to ask for feedback before moving forward. You definitely don’t wanna mess something up and do the work, all over again. Do you?!
Outro
It was so much fun to make this project and learned a lot. This project got more likes on Artstation than my Instagram posts combined hahaha!
After finishing a project, you always want to look back and see what could you have done to improve on the process and save time. And make a list of new things you tried and learned. It helps you keep motivated and feel good about yourself.
I hope I was able to provide you with any knowledge.
Thank you! And be sure to check out my Artstation.
Read more articles
You might also like these articles.