
Introduction
Hello everyone! My name is Nikita Vasilkov.
I'm a 3D Character Artist with five years of experience in the industry.
I specialize in creating characters for games and sometimes for cinematics.
Project
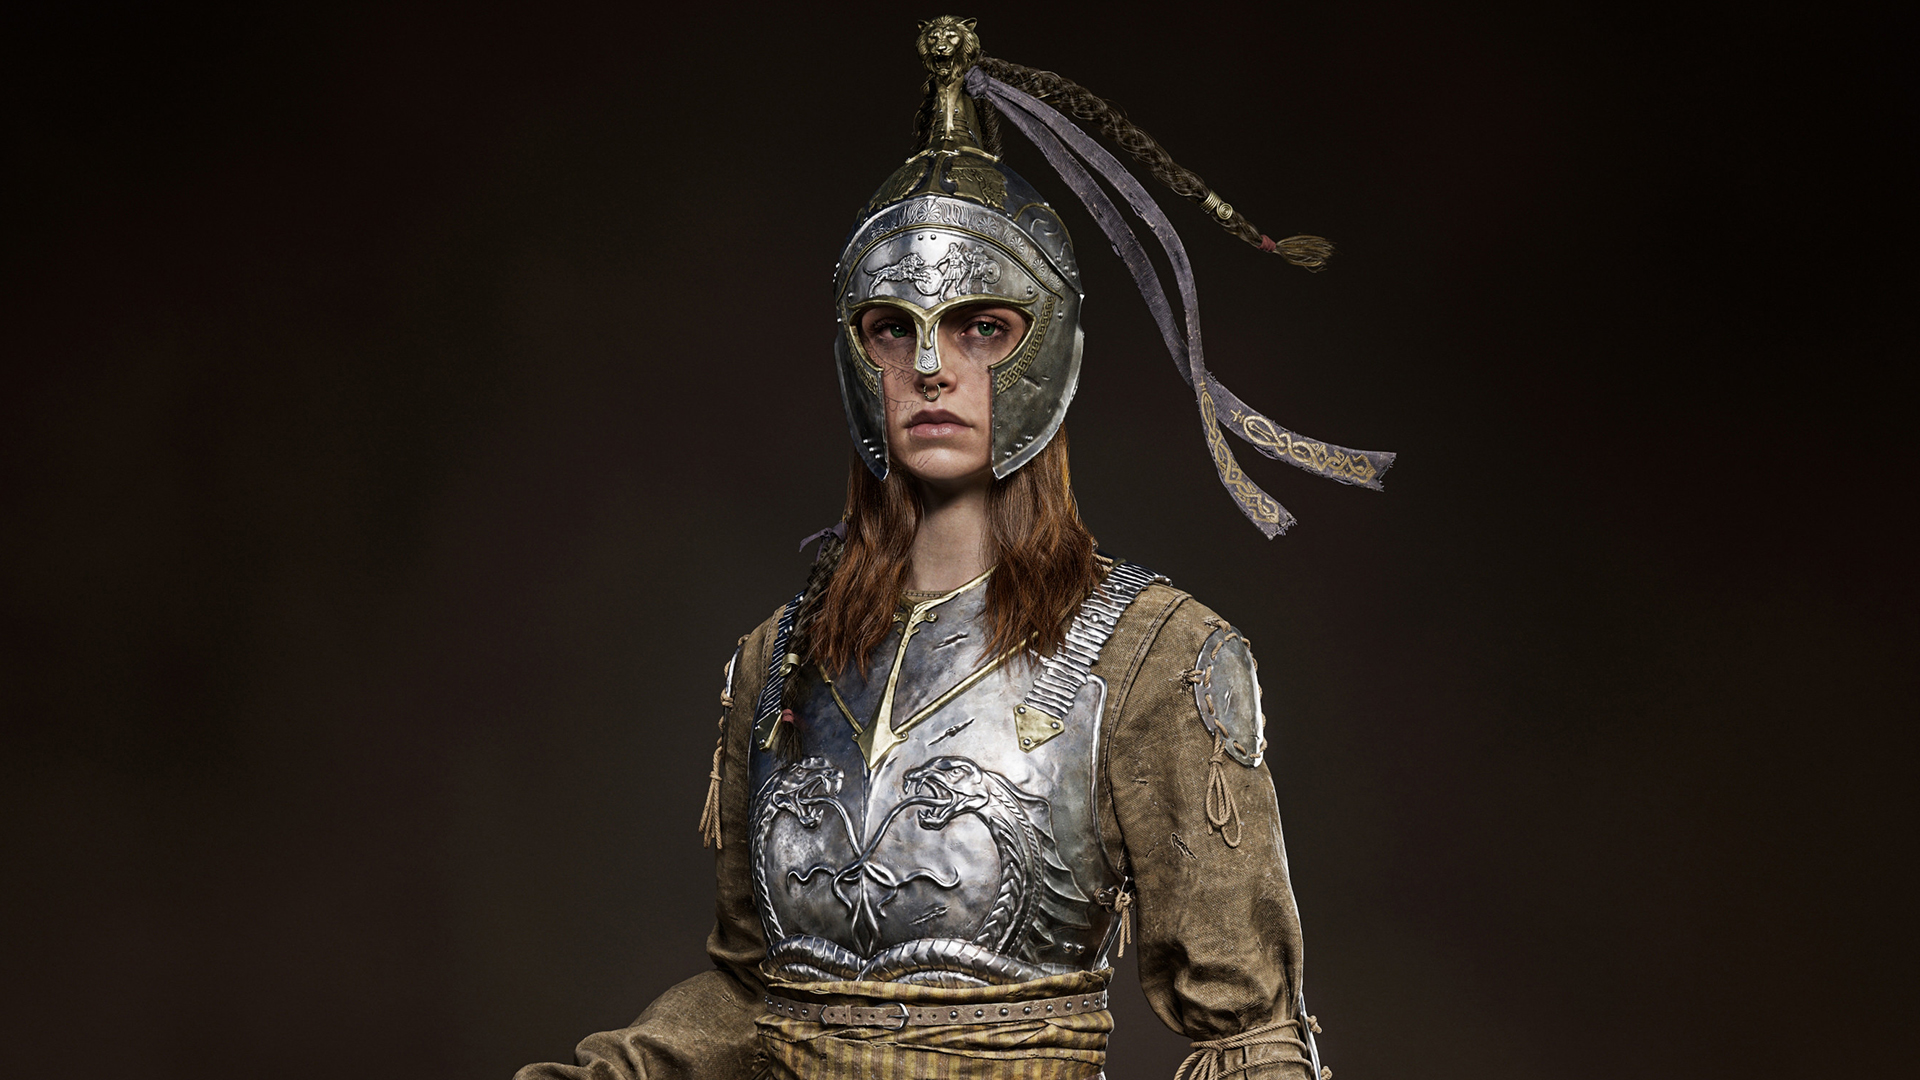
In this article, I will talk about how my latest work, Arlinoe, the Guardian of the Boy-King, was created.
And not for the first time, I want to say thank you to GameArtist.uk for this opportunity.
Concept Ideas
For this project, I chose a concept created by Simon Gocal.

When I first saw it, I really liked the heroine’s image. For me, she represents a tired, battle-hardened warrior who has seen a lot in life and humbly fulfills her duty. You could immediately feel a history and a certain inner weight in the character.
Both Greek and medieval settings have always been close to me, and here was a successful mix of these directions. This also played a big role in the choice.
Separately, I was attracted by the soft and calm colors of the equipment. Furthermore, the complexity of the helmet and its appearance aroused additional interest in me. Considering all of the above, I realized that I definitely wanted to recreate this character in 3D.
Goals
This project started as spontaneously as possible. I spent the first half of 2025 on another personal project, but at one point I got really bored with it. So, I decided to switch to a project with a faster timeframe. At the same time, I wanted to introduce new methods into the process and upgrade my skills.
I started making this character in October 2025 and finished at the end of December 2025. The whole work took about two and a half months. After that, I waited another month before publishing on ArtStation, as the end of the year is not considered the best time for a release.


The project had several key goals:
I wanted to render the character in Unreal Engine 5 because previously I rendered personal works in Marmoset, although I have been working with UE for many years. I wanted to understand the engine more deeply and reach the quality bar I needed.
Besides this, I wanted to try making hair not through Haircards, but through an Alembic groom. This approach yields a result that is much closer in quality to the level of cinematics and film.
I also allowed myself more freedom in optimization. Manual retopology here is done for about 60 percent of the character, and the rest is obtained through ZRemesher and other automated mesh generation methods. Plus, I decided to make a larger number of texture sets (around 10) to understand how noticeable the difference would be compared to the usual amount of 4-5 texture sets.
References
In terms of references, I don’t have much to tell. I didn’t pay much attention to collecting an extensive base for every element of the character, which is most likely not entirely correct.
I collected basic pictures of Greek helmets and armor elements, separately studied sabers, and also prepared a lot of materials on loose hair, since this time I grew it completely in XGen.
In general, I recommend always collecting as many references as possible, regardless of your skill level. I usually do this myself, but this time speed was the priority, so the reference search stage turned out to be fast.

Blockout
The blockout stage is incredibly important, but I confess, I don’t particularly like this stage. Due to its specifics, the character looks very simple and primitive, but this allows you to avoid mistakes in the future, when, for example, at the high poly stage, it suddenly turns out that one of the character’s elements does not fit the overall look at all.
I quickly sketch out most elements in ZBrush and Maya. As for the clothes, sometimes depending on my mood I simulate them in Marvelous Designer, and sometimes I just sculpt them in ZBrush with primitive folds to get the silhouette and image of the character in 3D in the shortest possible time.
The blockout is especially important if the hero has a lot of clothes. It helps to understand in advance which objects press the fabric in different places. It also gives an understanding of where in Marvelous you need to make a morph target or use proxy wraps to later get additional realistic folds from layering materials.

Cloth Simulation
My simulation process is not particularly different from the pipeline of other artists. I also create patterns in the 2D window and try to make sure they sit well on the avatar. After that, I lower the Particle Distance value and start getting secondary and tertiary folds.

But in this article, I want to talk about a couple of tricks that I have never mentioned anywhere before:
When I was simulating the dress, I understood that for the most realistic result, I needed to drop all the equipment elements into the scene right away. By layering, they will press the fabric in the right places and provide additional believable folds. In my case, these are the cuirass on the front and back, hanging belts, a bag, shoulder armor, and wraps on the elbows and wrists.
At first, I tried to just take these meshes from the blockout in ZBrush and use them as an avatar, but the simulation started to go crazy in Marvelous.
At a certain point, it became clear that the most stable option was to export these meshes without thickness so that they were in the 2D window as garments, assign layers to them, and only after that run the simulation. And that’s when everything started to behave much more predictably.

To simulate any wraps in Marvelous, I prefer to immediately turn on the fabric thickness and use a quad mesh instead of a triangular one. Based on my experience, this helps achieve a more realistic and neat result.
Then I export these wraps already with thickness to ZBrush and continue working there. But with the rest of the clothes, I always work without thickness.

High Poly
At the high poly stage, the main task is to let the viewer understand at a glance what materials your character consists of. And this should be readable at any distance, even if you turn off all the polypaint and leave only one gray material. I do not advise adding noise like fabric patterns or very fine wrinkles for leather goods. It is better to add this in Substance Painter.
If you do this on the high poly, then depending on the texel density on the low poly and the texture resolution, baking the maps can turn crisp details into a blurry mess.

On this character, I specifically wanted to level up in working with ornaments. I wanted them to look not just like pasted-on details, but organically integrated into the design. To do this, I started using the Bas Relief function in ZBrush more actively, although I had almost never turned to it before.
For example, I first sculpted the snake for the front cuirass as a regular mesh, then applied Bas Relief, and then stretched the resulting alpha onto the cuirass before refining it with sculpting. By the same principle, I created the heads of the lion and the human on the helmet, as well as the pattern underneath them.
But the scene with the lion pouncing on two warriors on the forehead of the helmet, I fully sculpted by hand, since this composition was too complex and would require a lot of time to use with Bas Relief.

If we talk about basic metal detailing, my absolute favorite is Easy Metal Surface Brushes. I most often use the Easy Metal Surface and Scratches 02 brushes. Then I go over it with a morph brush to remove repetition and make the damage feel more natural.
With fabric, I already have a couple of favorite brushes developed over the years. I treat leather with a similar approach to fabric, but with different alphas. It is important that in the end the material feels weighty, not like plasticine.

Low Poly
When creating the low poly, as I said earlier, I kept two goals in mind: to do everything quickly and to experiment a little with the mesh density and the number of texture sets.
The polycount of the model was 294 thousand triangles. In the screenshots, you can see that, for example, the snakes on the cuirass are fully retopologized and defined by the topology. The helmet is also, for the most part, one retopologized piece of geometry. In many places, I added density closer to the edges of the objects so that they would not look angular along the perimeter.
At the same time, all the fabric, except for the dress skirt, is ZRemesher or the 1st-2nd subdivision from ZBrush. I also didn’t skimp on the number of edge loops for round objects. If usually, I would give a cylinder for ropes five or six cross-sections; here, I used nine. All the rivets are made as separate geometry, but to be fair, this is also practiced on actual real-time models, even with polygon limits.
In addition, in many places I used support loops and bevels instead of hard and soft edges. As a result, the topology turned out mixed, but at the same time, with good shading.
As for texture sets, I made nine of them, including the head. The average texel density on all clothing and equipment was around 45 or 55. By the way, about the head: this is LOD0 from MetaHuman.


Baking
I can’t say anything special about baking. I use the classic baking pipeline in Marmoset with manual cage and skew adjustments.
I always bake the real high poly without decimation to preserve maximum quality after baking.
For personal projects, I bake maps in 4K 8-bit PNG format. At the same time, I bake the normal map in 16-bit for maximum quality.
The JPEG format is lighter in weight, but it does not support 16-bit. Moreover, if you compare 8-bit JPEG and PNG, especially in Substance Painter, you can notice that the normal map in JPEG often produces artifacts.
If you bake in PSD, each texture will weigh significantly more. When importing all bake maps into Substance Painter, the project immediately becomes very heavy.

Texturing
Texturing is the second most important stage after high poly modeling and simulation, if not on the same level altogether.

There is a basic rule: a good high poly can be killed by bad textures, and a weak high poly can be noticeably improved by quality texturing.
But when a well-modeled and simulated model receives strong texturing, the final result is amplified manifold, and a really cool piece of work turns out.
Every material does not necessarily have to consist of a huge number of layers. In general, I always adhere to the following structure for absolutely any material:
- Base layer with the desired color, roughness, and metallic.
- Layers with color fluctuations: one or two layers with color variations, where one will be lighter than the base and the other darker.
- Edges and cavities: then you can add edge highlights and cavity darkening. But be careful, arm yourself with patience, and manually refine procedural grunges and generators, as the eye of an experienced artist immediately recognizes repetition. I also want to note that the edges on leather items will usually be more matte than the base, while on metal they are the opposite and more shiny.
- Detailing: for the three main materials, such as fabric, leather, and metal, you can add scratches and cracks. The logic for roughness is absolutely the same as in the previous point.
- Gradients: you also need to add gradients and break tones into light and dark wherever possible.
- Dust and dirt: and at the end, you can always add layers with dirt and dust.
- Adaptation to the engine: I noticed that for Unreal Engine 5.6, you sometimes have to increase the brightness and color saturation of some layers so that everything looks juicy in the engine. At the same time, in Substance Painter, it can look too bright and unrealistic. In general, keep in mind that semi-realism and realism are usually built on faded shades and tones.
Hair
With the hair, there was a whole epic. I used XGen several times throughout my experience in 3D, sometimes for work and sometimes for myself, but I never delved into it on a serious level. This time I wanted to grow the hairstyle, eyelashes, eyebrows, braids, and the mane on the helmet entirely in XGen.
I will say right away that I have never encountered more unstable software. I dealt with a lot of crashes and corrupted saves while creating the groom, and I had to constantly google options on how to solve various problems or roll back to a previous save, losing precious time.

The biggest problem is that hair grown as classic XGen descriptions, and not an interactive groom, is much more capricious. When I grew the hairstyle and decided to pose the character, within one Maya session, the hairstyle accepted the new position of the head and helmet.
But after restarting the scene, the hairstyle returned to the A-pose, despite the fact that the character was already standing in the desired pose. This is a terrible situation in which iterativeness and procedurality are simply lost.
So my advice is: grow everything through interactive groom whenever possible and arm yourself with patience. It is a tedious task, but the result in terms of quality turns out to be very worthwhile.
I cannot fail to mention that a tutorial by Hadi Karimi helped me a lot. It’s simply a gold mine, and I highly recommend it to everyone.
Lookdev & Render in Unreal Engine 5
It’s no secret that Unreal Engine is currently the most popular engine in the industry. Before this, I rendered all my characters for my personal portfolio in Marmoset. The process goes about three times faster there, from setting up the scene and lighting to the overall speed of working with the interface.
Of course, on work projects, I already had to do character lookdev in Unreal. But back then, my tasks were kept to a minimum: import the model and assign textures. I hardly had to work with lighting, as the client usually provided a separate level with ready-made lighting.
This time, I set myself the goal of making a render in Unreal Engine that, in terms of quality, would be at least no worse and ideally would surpass my previous works from Marmoset.

You might be confused by the number of graphics settings in the engine itself.
But to simplify things, there are two main places where you will tweak image quality. The first is the Rendering section in Project Settings. Here, I also like to cap the FPS, since I don’t need 90 or 120 frames in the engine, and it will be much easier for the computer to work.

The second place is the Post Process Volume, which you need to add and configure yourself.
I will attach all the screenshots with my settings and clarify that there are many more available parameters there, but I showed exactly the ones I changed for better picture quality.
What is not shown remained standard.

I also wanted to add that I like to crank the Screen Percentage up to 100 because after that, I can see all the details right away, even at a medium distance on my 4K monitor. But at the same time, performance will drop compared to the 60-70 percent that the engine sets by default.
To balance the load at least a little bit, in the Viewport Scalability section, I set all values to Cinematic, but I set Post Processing, Global Illumination, and Shading to Epic.

Now to the settings of the scene itself. For the background, I created an HDRI Backdrop and inserted a manually created image in HDR format there.
Given the structural features of this dome, the fog at the bottom will flatten out a bit, but you have to understand that in the shots, you can simply avoid showing this.

Regarding lighting for the main full-body shot: I like to add as much light as needed, rather than limiting myself to the classic three-point setup.
Behind the character, I also used AirGlow, which you can grab from the render scene with MetaHuman. The fog on the ground was obtained through the cool EasyFog plugin.
I love to set up individual lighting for each shot and angle. If you do this on one level, the number of light sources can easily exceed a hundred. And every time Unreal is launched, they will be turned on by default, and I don’t like such chaos at all.
Therefore, I had to create a separate level for each shot. This is also not always convenient, as you have to constantly switch between these levels. But this is the way. As a result, I ended up with about 15 levels.
For the environment in the first shots, in addition to the fog, I used ground textures from the Poly Haven website. I assembled a material from them and applied it to a regular plane. Also from Quixel Megascans, I took a few grass assets and situationally placed them in the scene to achieve the desired effect.
However, for one of the angles, I decided to bother significantly more: I created a lot of assets manually, even though it was all for a single shot. I really wanted to pay tribute to the original concept, on which these props were present.

In the finale, I made another bonus shot: coins engraved with the character. Here the pipeline was quite classic: high poly, low poly, UVs, bake, and textures.
The only simplification was that I made the “low poly” through decimation, so as not to spend too much time at the final stage, when there was already little energy left for the project.

Conclusion
First of all, thank you very much to everyone who has read the article up to this point.
Finishing this project, I was once again convinced that trying new things is cool. Unusual tasks in 3D, be it a different render engine or a new optimization method, not only upgrade skills but also bring great pleasure. So don’t be afraid to step out of your comfort zone.
My main parting message: always give your 100 percent in 3D. Never work at half strength. Full dedication will definitely lead to a cool result, career growth, and self-confidence.
Wishing everyone great success in 3D!


Read more articles
You might also like these articles.


