
Introduction
Hi! I’m Manuel Sitompul, a 3D Character Artist working in the game industry.
Motivation
In 2024, I challenged myself to make more personal art and honor the franchises that influenced and shaped me as a kid. After completing a sculpt of Zelda, I realized I should pay tribute to the first Nintendo game that hooked me: Pokémon.
I was a huge fan of the anime, manga, trading cards, merch, and spin-off games. One of my favorite spin-off games was Pokémon Mystery Dungeon—a story-heavy Pokémon RPG that starts with a personality quiz that determines which Pokémon you play as.
And maybe you can guess: the first time I played it, the game picked Squirtle for me.
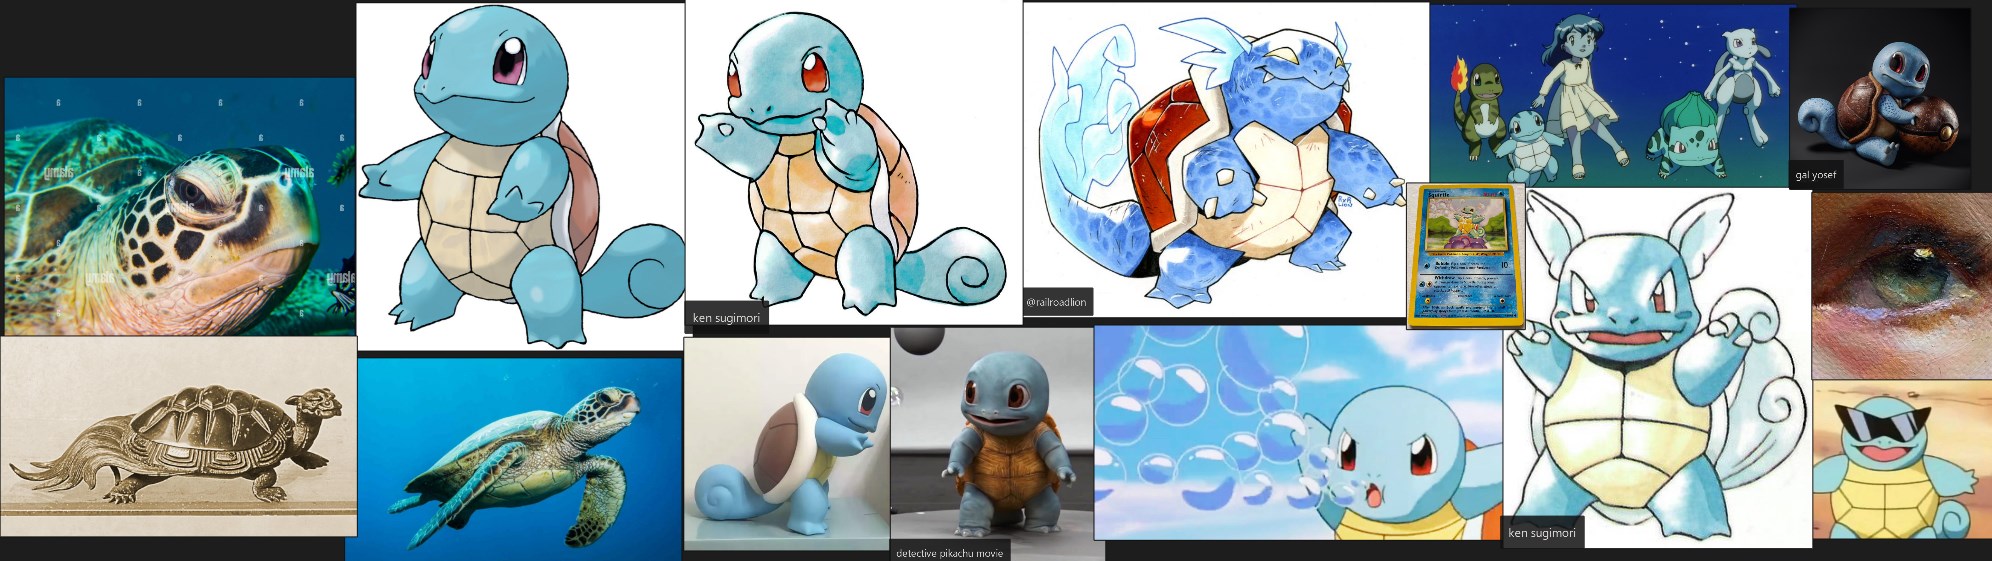
Inspiration
The internet is filled with tons of creative renditions of Pokémon, from pixel art to hyperrealism.
My favorite 3D art style lies in between—an artsy version that stays faithful to the faces and personality of the character, but with higher fidelity and more storytelling details.
Start of Project
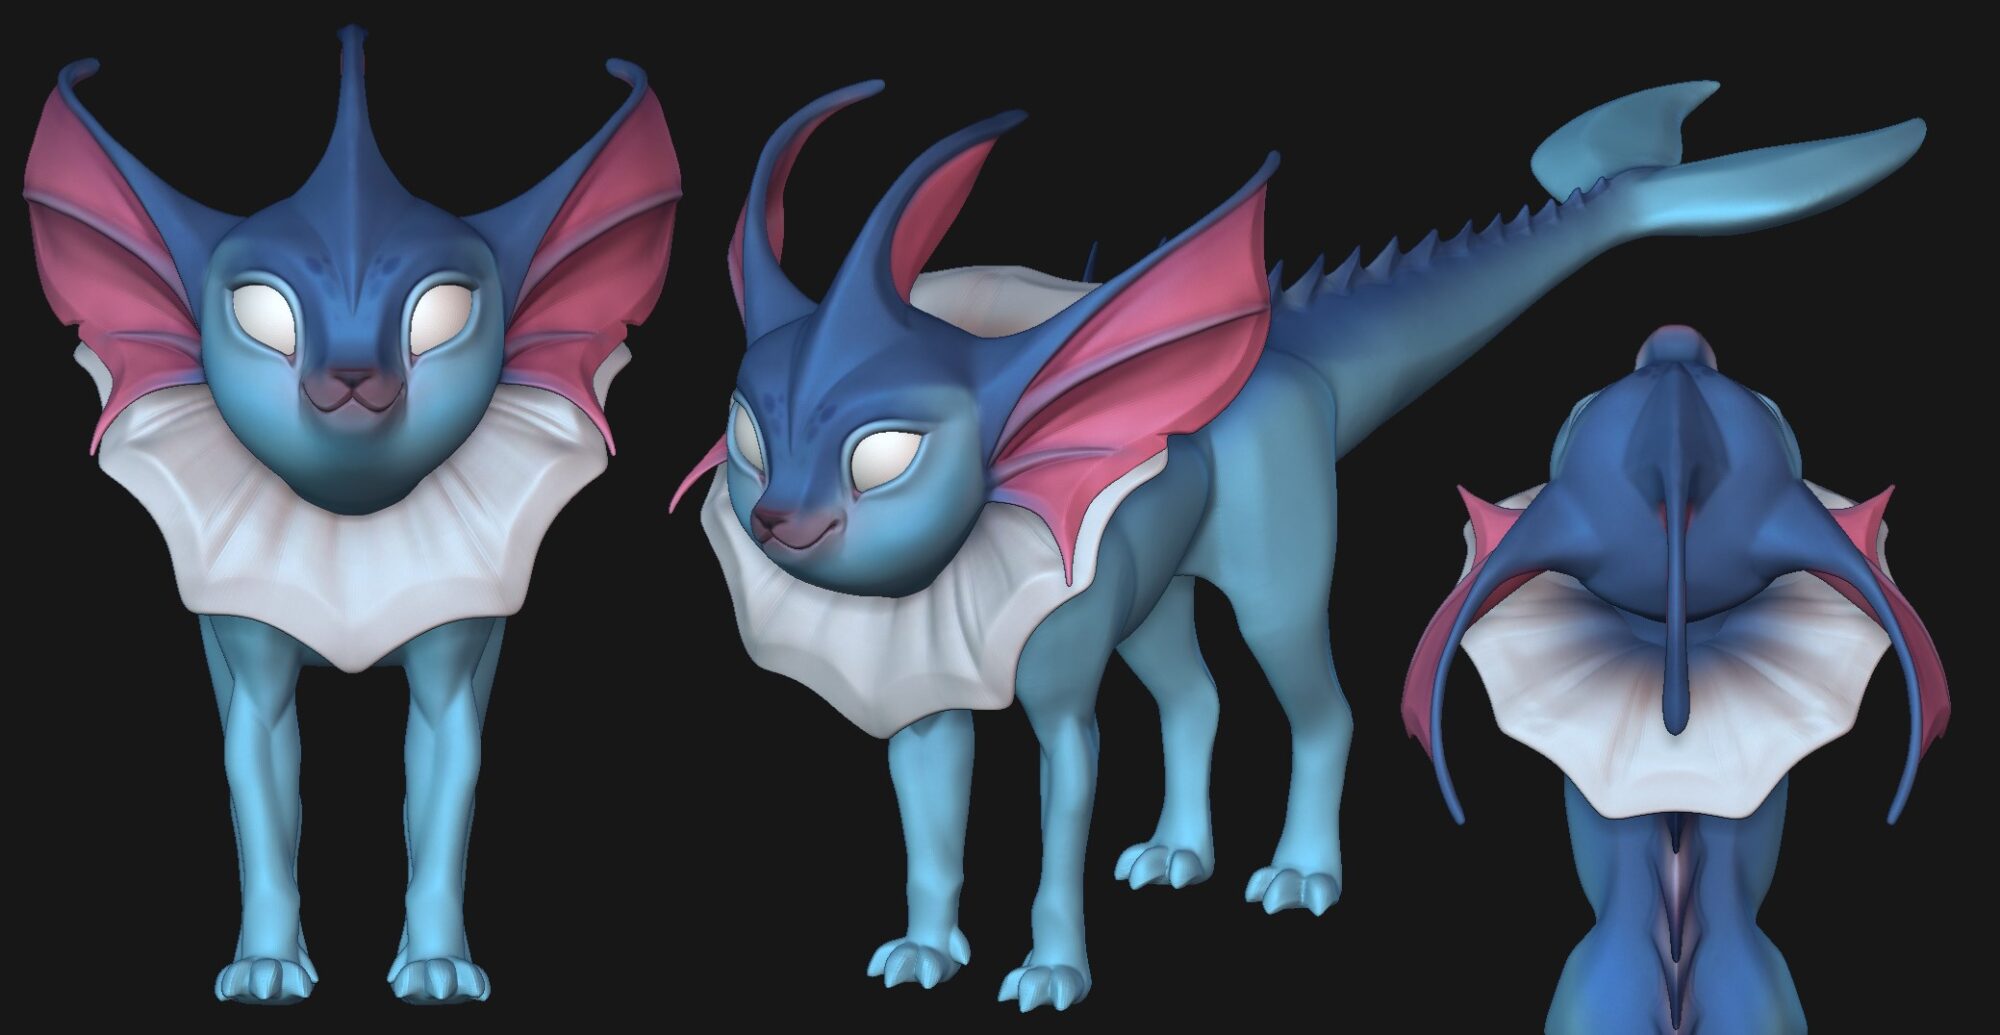
The project started with a sketch. I originally intended to create a line-up of four Pokémon: Poliwhirl, Squirtle, Porygon, and Vaporeon.

Before finishing Squirtle, I had made some progress on Vaporeon before ultimately dropping it.
I realized how over-scoped a full line-up was, considering how detailed the textures and sculpt were going to be.
Sculpting
This was my first time sculpting a character in this style, and so it took a while to find the sweet spot between uncanny realism and a faithful stylized rendition.
When sculpting a game-ready character, I ask myself a few questions that will determine my approach:
Q: Will I use the sculpt to bake a normal map?
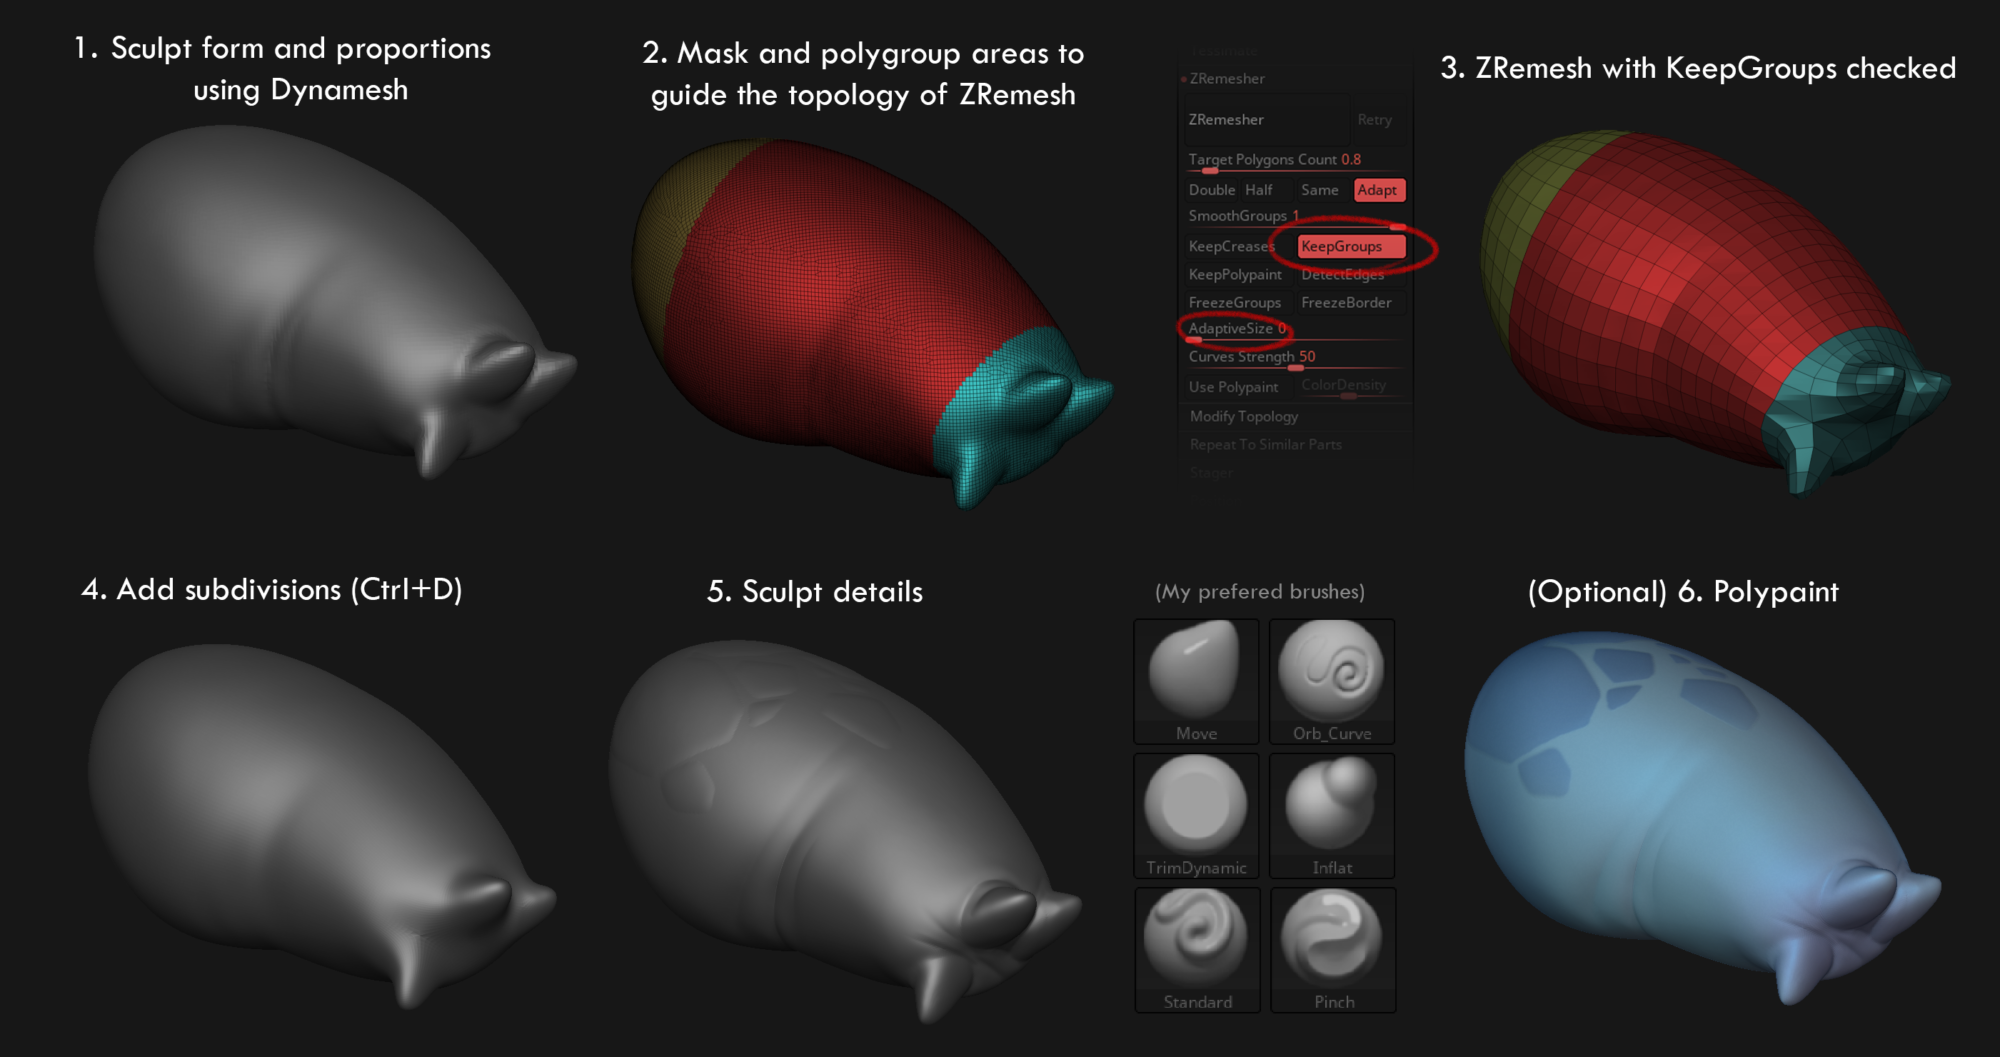
For this project, I planned to use a ‘clean’ PBR style. This requires a clean normal map without blobs or imperfections, which requires a clean high-poly. I find it easiest to create clean high-poly sculpts by using subdivided topology as a base to sculpt on.
To create this topology, I usually use a ZRemeshed or hand-modeled base mesh. (More about this in the next section).
Q: Is the concept finalized, or will I need to do a lot of exploration?
In cases of very exploratory projects, I tend to stick to Dynamesh topology longer, so I have the freedom to make more significant proportion and design changes. But in this case, I had enough reference and a clear enough vision to avoid making big design changes.
This allowed me to model the final base topology, so I could get started on the final high-poly polish pass earlier on in the process.
Q: Do I have time constraints?
In cases of a tight deadline, it can be useful to cut a few corners. For example: creating a clean base topology to sculpt on and later repurposing that as the in-game low-poly mesh.
In other instances where the style is very clean and less detailed, you can get away with not sculpting at all and immediately start modeling the final low-poly. You can then repurpose that low-poly into a subdividable high-poly by removing tris and adding clever edge loops.
Each project can utilize a different approach. But as a fan of sculpting, I tend to stay away from solely subdivision modeling and try to find excuses to include ZBrush in my workflow.
Sculpting Tips
Here are a few tips for creating clean sculpts:
-
Clean subdivided quad topology is incredibly helpful when you need to sculpt details. Meshes generally don’t stay clean when trying to use the smooth brush on top of surfaces with messy or uneven topology.
-
Simple forms can easily be ZRemeshed, but it might fail you if you’re working with more complex forms. In that case, you might need to model the topology by hand or use a mix of ZRemesh + manual modeling.
-
When sculpting on top of your subdivided mesh, try to create your details with the least amount of brush strokes. Similar to 2D drawing, where too many strokes will create messy ‘hairy lines’ and a feeling of indecisiveness, the cleanliness of your sculpt depends on how intentional your brush strokes are. Don’t be afraid of using LazyMouse, or spamming Ctrl+Z until your details are perfect.
-
Polypainting your sculpt is a great way to ‘preview’ the final product. Especially in faces, ‘previewing’ the colors or the face can help you make decisions about the facial proportions. You can even export your polypaint data as vertex color and use it as a base for your textures.
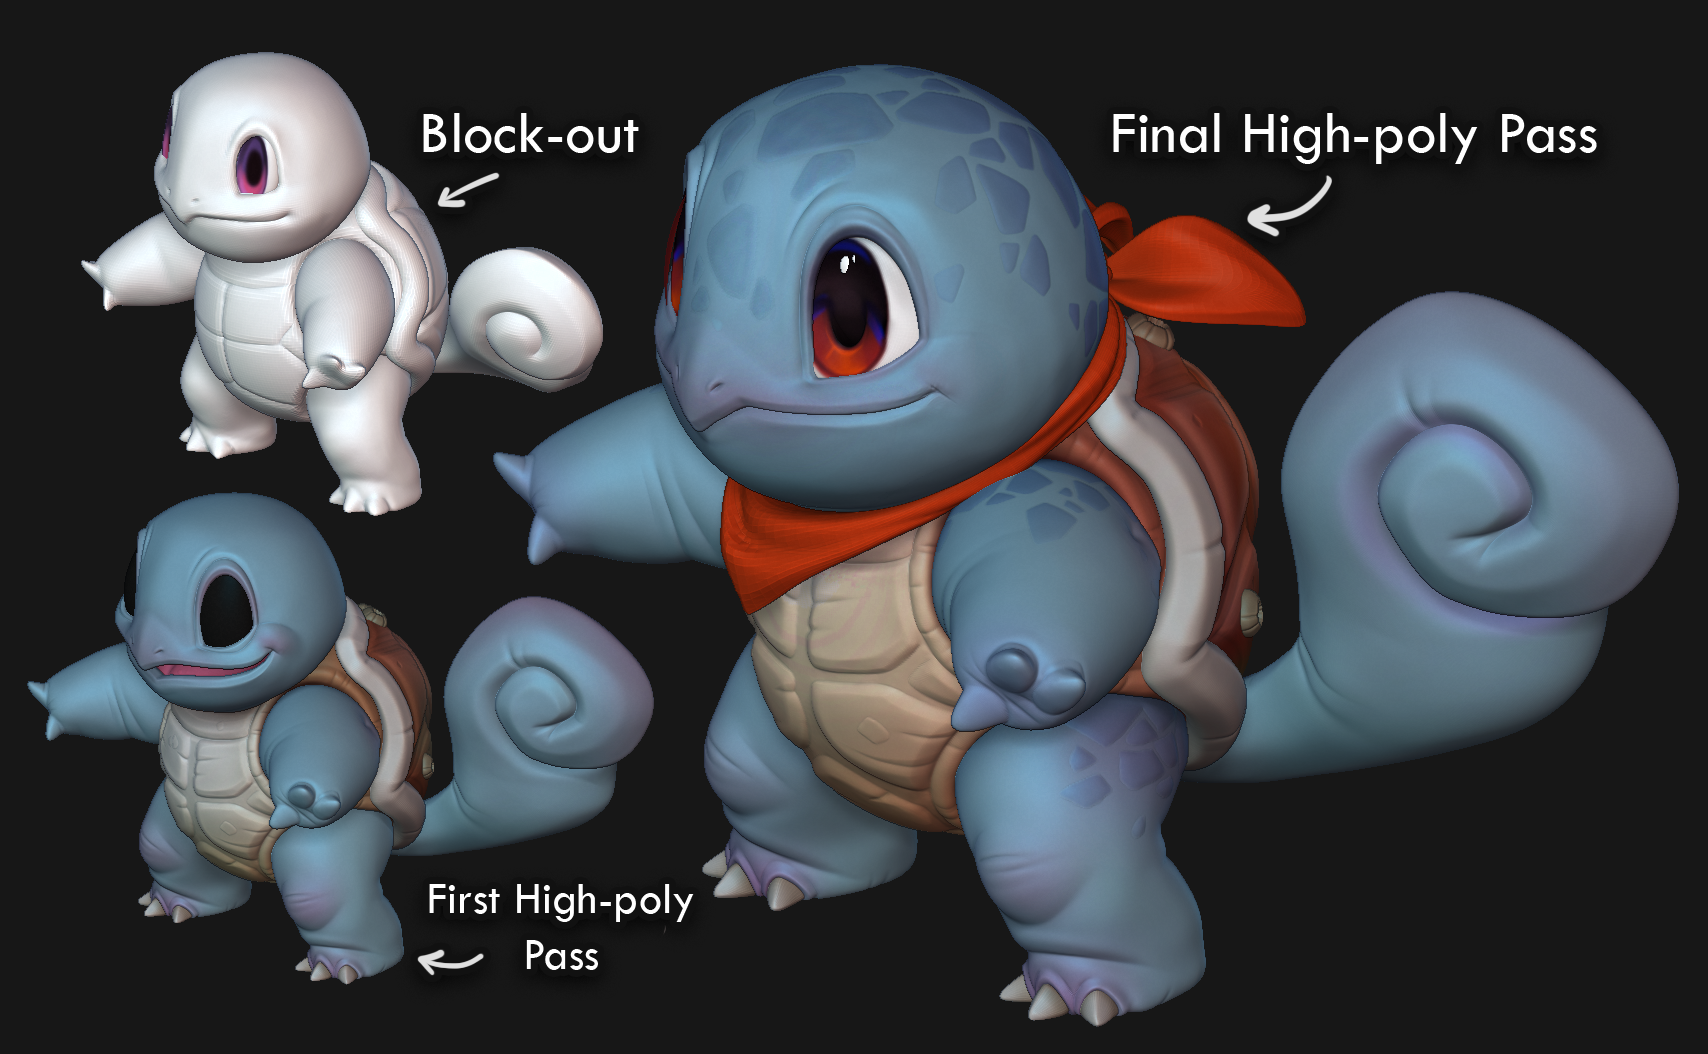
That being said, here’s a breakdown of how I approached most elements of Squirtle’s high-poly.
Low-poly
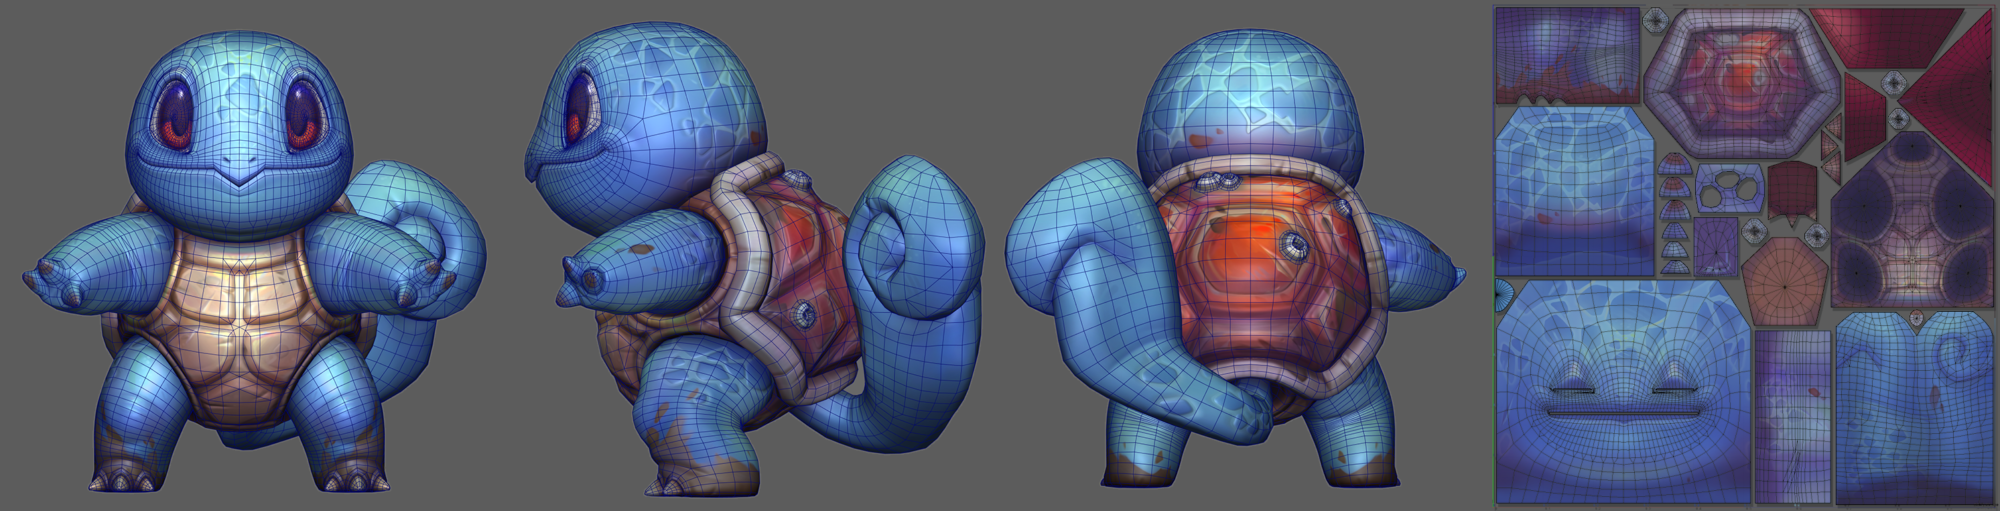
After finishing the high-poly, I could simply reuse the high-poly base meshes for the low-poly mesh, improving small things such as adding triangles and maintaining continuous edge flow across different meshes.
For UVs, I made sure to squarify them. Usually, this is beneficial when your mesh uses different LODs. That’s not the case for this project, but I just enjoy doing it because it looks neat.
Texturing
Squirtle’s art style went in different directions throughout the project. It started as standard stylized PBR, then full hand-painted, and ultimately landed on somewhat of a mix.
But no matter what the final style is, I always like to create a strong base, diffuse texture in Substance Painter. The goal there is to achieve good readability using gradients, AO, and color harmony.
The benefit of creating a base in Substance Painter is that you can use layers to build up the diffuse, but also Roughness, Metallicness, and Normal/Height maps simultaneously. For example, I tend to use lots of gradients in my diffuse, and in Painter, I can easily use those gradient layers to add gradients in my Roughness at the same time.
Creating the diffuse is usually the longest process, though. Here’s a quick breakdown of Squirtle’s head:

Unreal Implementation
For the final presentation, I created some master materials in Unreal to render the animated sequence and turntable. The material isn’t very complex, but it features separate colored fresnels on the shell and skin, and custom-colored gradients that I can tweak in-engine depending on the environment.
More work is done in the post-processing materials, where I add a subtle outline around the character and very subtle blurred cel shading. I recommend this video to learn more about it.
For all things related to Unreal shaders, I highly recommend Visual Tech Art’s YouTube channel.
Reflection
More often than not, there will be a discrepancy between your 3D character in Substance Painter and in Unreal. So as soon as the materials and lighting are blocked out, I like to take a moment to analyze if the character isn’t unintentionally straying too far away from the original vision.
I find that taking time to do an overpaint of your in-engine character is often worth it:
In this instance, I wasn’t satisfied with how the lighting in Unreal was creating white specular highlights on the forehead and iris. Also, by playing around in Photoshop, I found that drawing some subtle hatching on his scales could add some fun details.
With these suggestions, I went back to Maya to make some subtle changes to the cheeks and eyes, and did another pass on the textures.
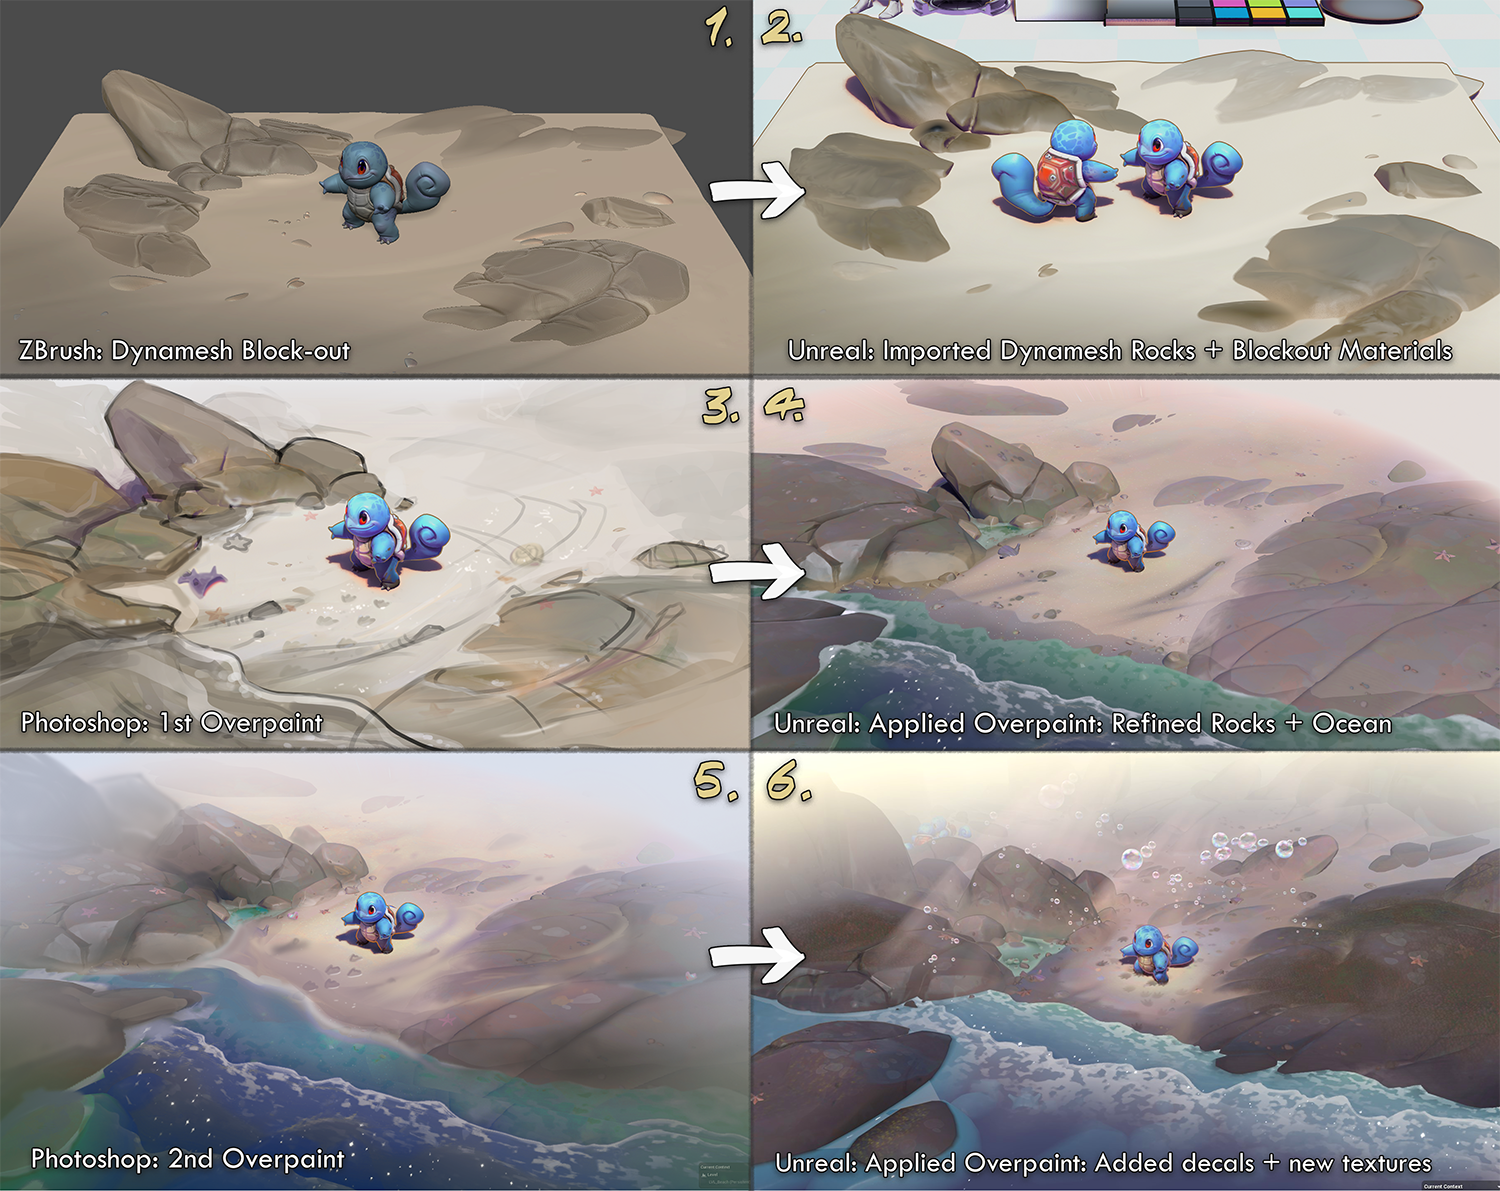
Environment
To complete the renders, I wanted to build a small environment around Squirtle. I created an environment asset kit and an ocean material to complete the scene.

Final Render
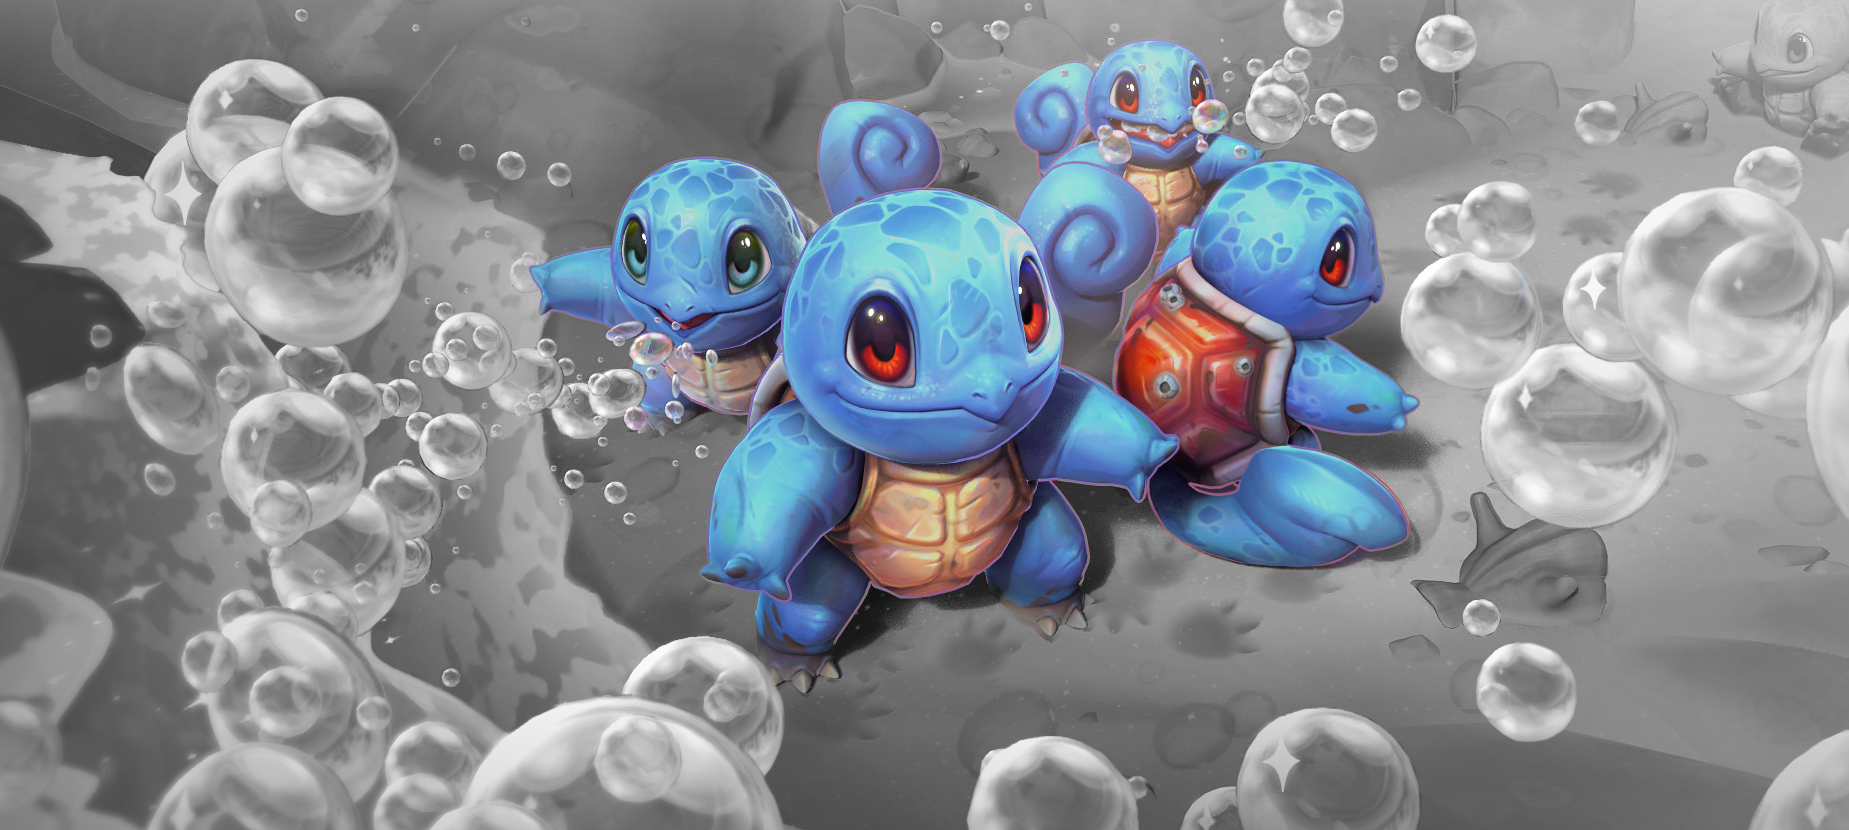
For the main render, I wanted to create an appealing narrative and pose for Squirtle. I experimented a bit with different compositions and poses until I settled on a bubble beam theme.

I wanted to make sure the composition showed the character from the front and back, as well as the inside of the mouth.
A good friend of mine helped me out by doing an overpaint, suggesting a better composition with a clearer shape hierarchy.
After doing some final color and value overpaints, I landed on the final composition!
Final Thoughts
This project went in many different directions, and I didn’t fully realize what the end product was going to look like from the start. Ideally, I want to have an idea of the final shot’s composition/lighting/story pretty early in the project.
This will help with modeling and texturing the character and environment, because you can base your artistic decisions on what the viewer is actually going to see in the final shot.
If I were to do this project over, I would’ve pushed myself more to design proper thumbnails and explorations of the final shot’s composition. It would’ve helped with creating clearer lighting, clearer value groups, and would’ve allowed for crazier ideas.
But all in all, considering this project was initially intended to be a small character turntable, this was a great learning opportunity!

Thanks for reading, and feel free to reach out on my socials if you have any questions!
Instagram: @maanunoo
X: @maanunoo
Artstation: https://www.artstation.com/maanu
Read more articles
You might also like these articles.


