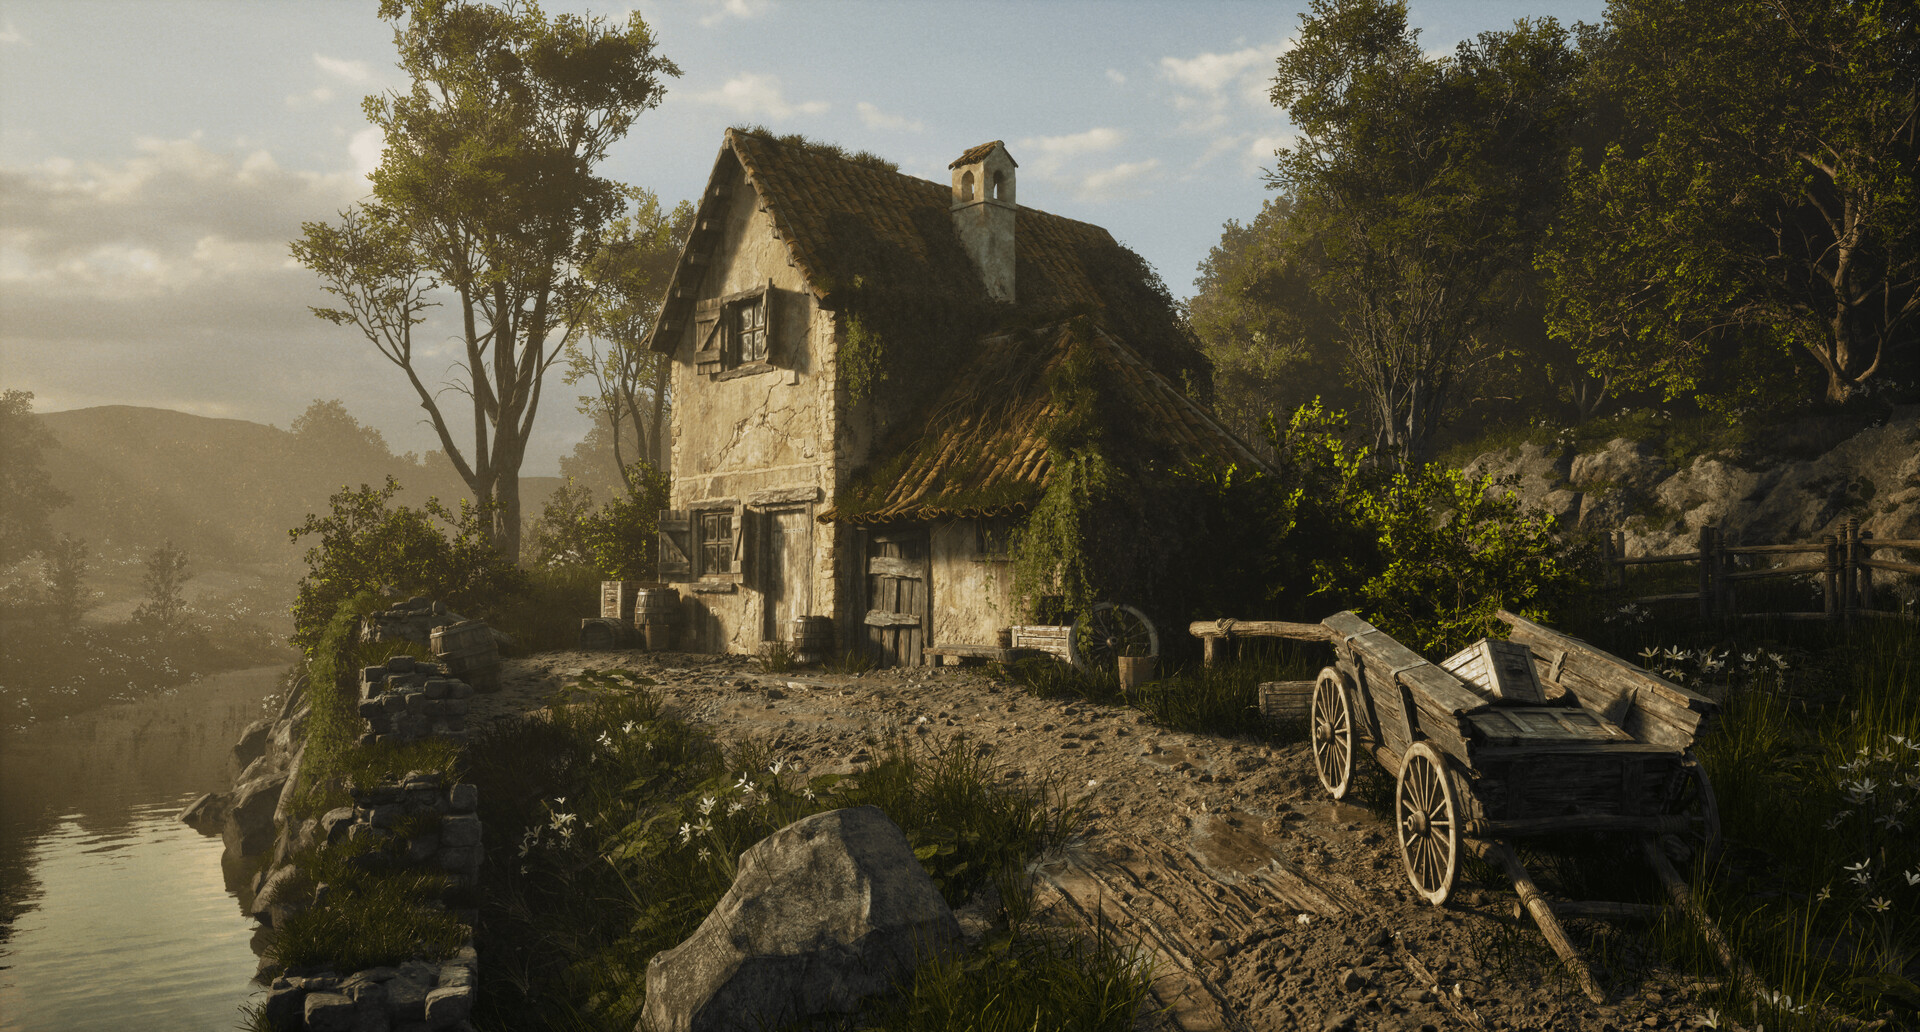
Sinner’s Forgotten Cottage

Introduction
Hi everyone! I'm John T. A. Haddock, a 3D Environment artist passionate about creating worlds that evoke emotion.
Project
I created this environment as a way to explore the intersection between classical art and modern real-time rendering. Inspired by the dramatic landscapes of 19th-century paintings and the atmospheric quality of Red Dead Redemption 2, my goal was to craft a scene that felt both painterly and immersive.
This project was an opportunity to refine my skills in composition, lighting, and environmental storytelling. I focused on balancing color, light, and atmosphere to create a sense of depth and emotion, while also ensuring technical efficiency through optimized assets and procedural techniques.
By breaking down my workflow in this article, I hope to provide insights into my approach to scene-building in Unreal Engine 5 and inspire other artists to experiment with blending traditional artistic influences with modern game development tools.

Goals
My main goal for this project was to achieve realistic lighting while capturing the painterly essence of 19th-century landscape paintings. I focused on refining my composition skills, creating high-quality assets, and developing believable vegetation to enhance the scene’s depth and atmosphere.
Beyond just being a visually appealing environment, I wanted the scene to tell a story, inviting the viewers to interpret its details and immerse themselves in its atmosphere.
Additionally, I aimed to build a cohesive and explorable game space with a strong sense of scale and natural flow. This project allowed me to push my artistic and technical skills, particularly in lighting, composition, and world-building.
Tools
- Unreal Engine 5 – as the game engine
- 3ds Max & ZBrush – modeling and UVs
- Substance 3D Painter – texturing
- SpeedTree – foliage creation
- Megascans – additional materials and details for realism
Inside of Unreal:
- Nanite
- Lumen
- Niagara
- Shader Graph – Master Materials creation
References & Inspiration
This project was heavily inspired by the dramatic landscapes of the Hudson River School, a 19th-century art movement known for its grand, atmospheric depictions of nature. I was particularly drawn to the way these paintings use light and composition to create depth and emotion, something I aimed to replicate in a real-time environment.
Another key influence was the landscapes of Red Dead Redemption 2. The game’s environments masterfully blend realism with an artistic sensibility, using lighting and color to enhance mood and storytelling.
Studying how Rockstar Games crafted its world helped me refine my own approach to composition, atmosphere, and natural world-building.
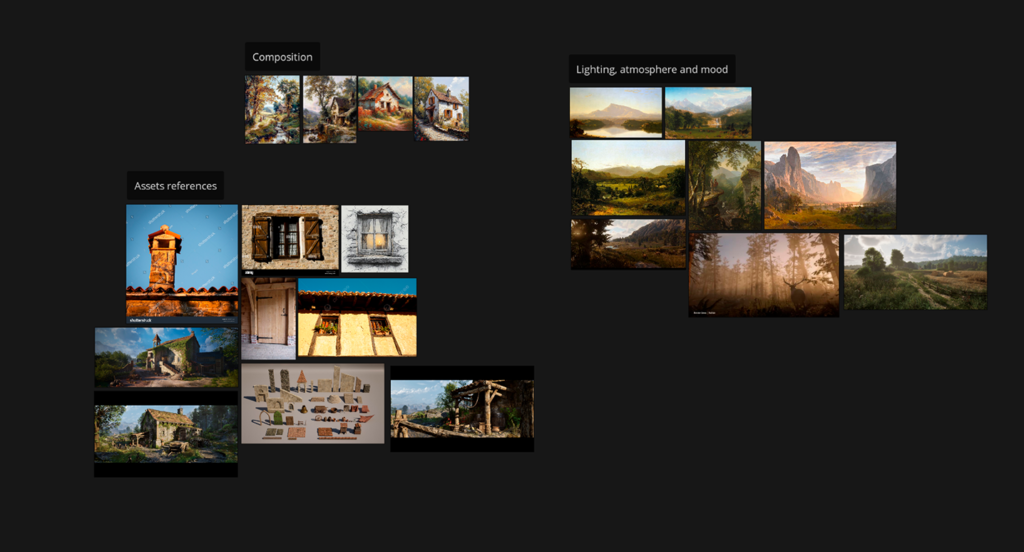
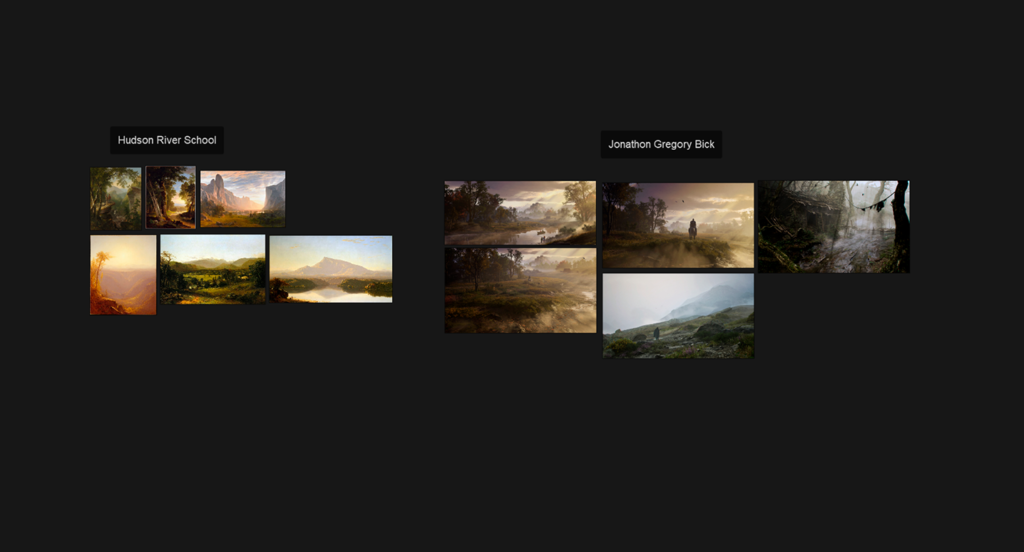
I was also greatly inspired by Senior Environment Artist Jonathon Gregory Bick, whose incredible work I highly recommend checking out.
Blockout
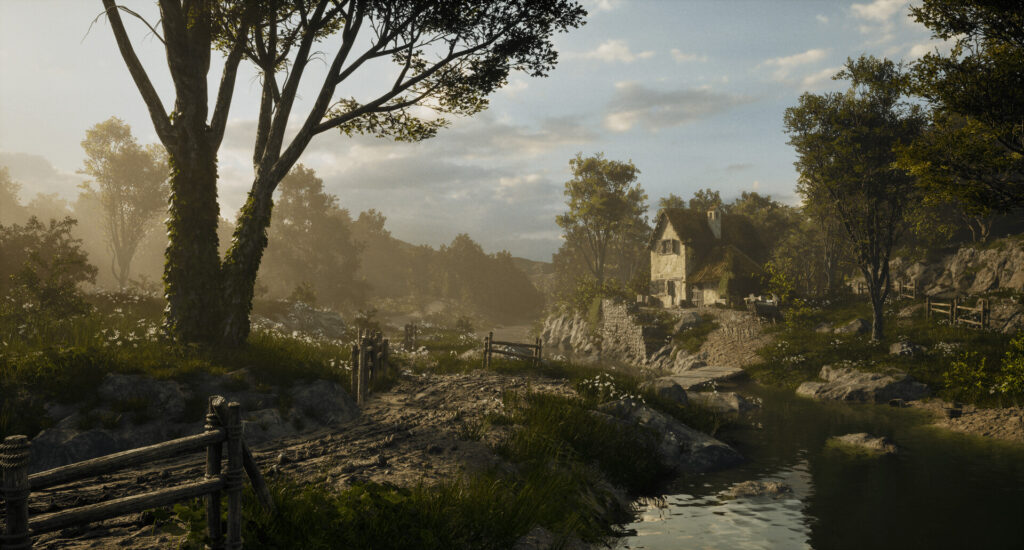
I started by creating a basic landscape in Unreal Engine, focusing purely on the shape and layout without materials. I sculpted the terrain, added the river and the main structure, and positioned the camera to establish the composition and visual flow I wanted for the scene.
This initial blockout phase set the foundation for the environment before refining the details.

After setting up the basic landscape, I quickly created blockouts for the trees in SpeedTree and the house structures using Unreal Engine’s modeling tools.
This allowed me to get a rough sense of the scale and placement of key elements within the scene.
These quick blockouts were essential in visualizing the scene’s layout and ensuring everything fit together cohesively before moving on to finer details.
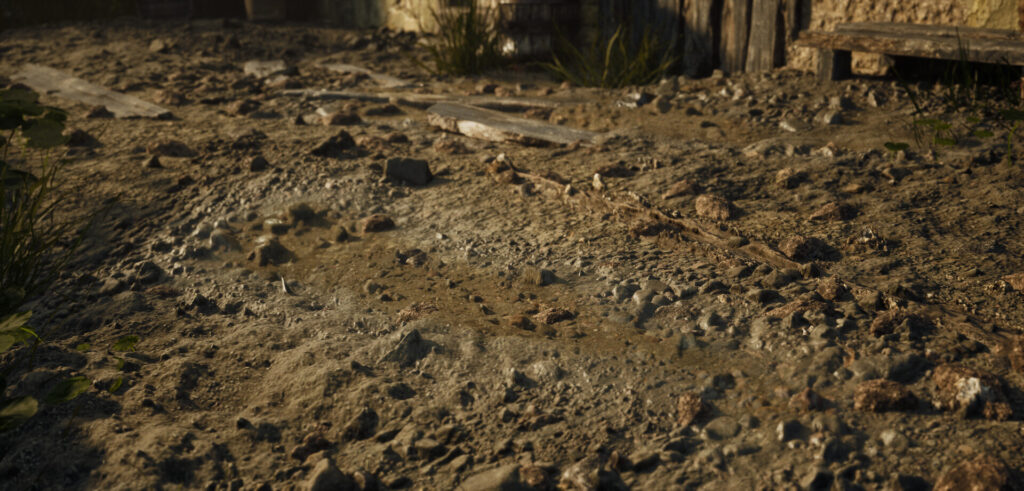
Landscape
For this project, I reused a landscape material I originally created for a previous project, Ancient Ruins. Since it’s a flexible and efficient setup, I tend to use it as a base for every new environment. The material consists of two independent layers—dirt and grass—which I can paint directly onto the landscape.
Each layer also has an assigned Landscape Grass Type, allowing me to automatically spawn meshes as I paint. The dirt layer scatters small rocks, while the grass layer generates patches of grass and flowers, adding natural variation to the terrain without needing manual placement.
This system helped me quickly establish the groundwork for the environment while maintaining artistic control over the distribution of natural elements.
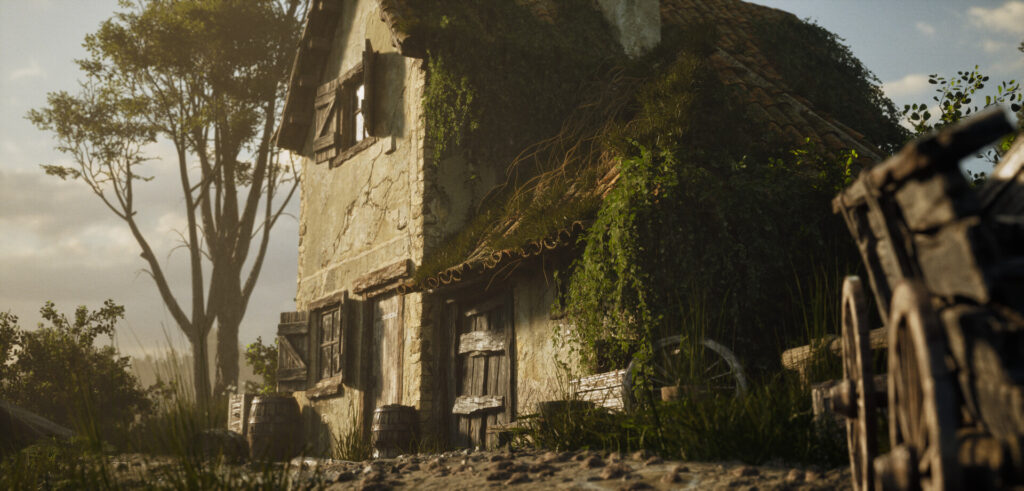
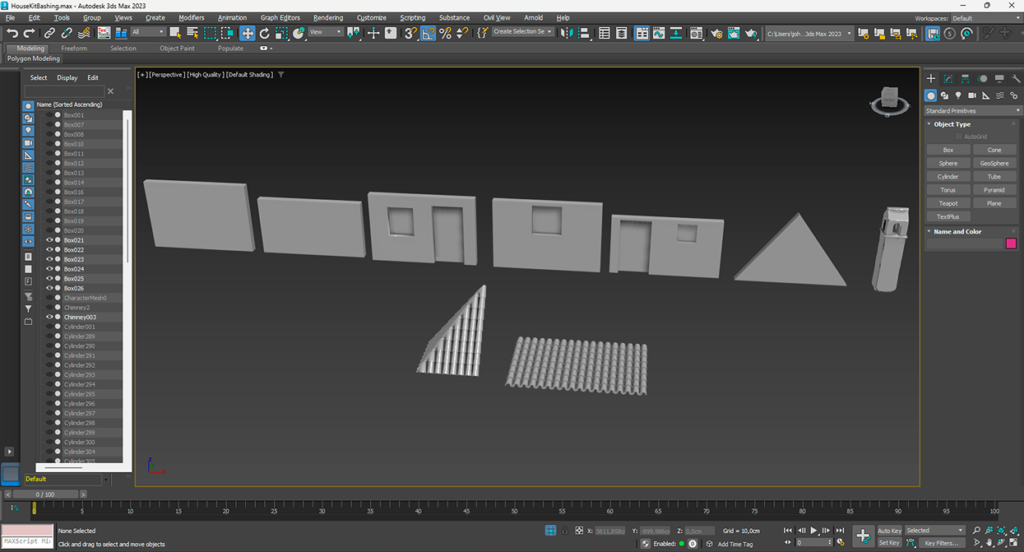
Buildings
I created the modular pieces in 3ds Max. For UVs, I used a cube projection with a UVW map, which is a quick and efficient method for these types of models, providing clean and reliable UVs without extra manual work.
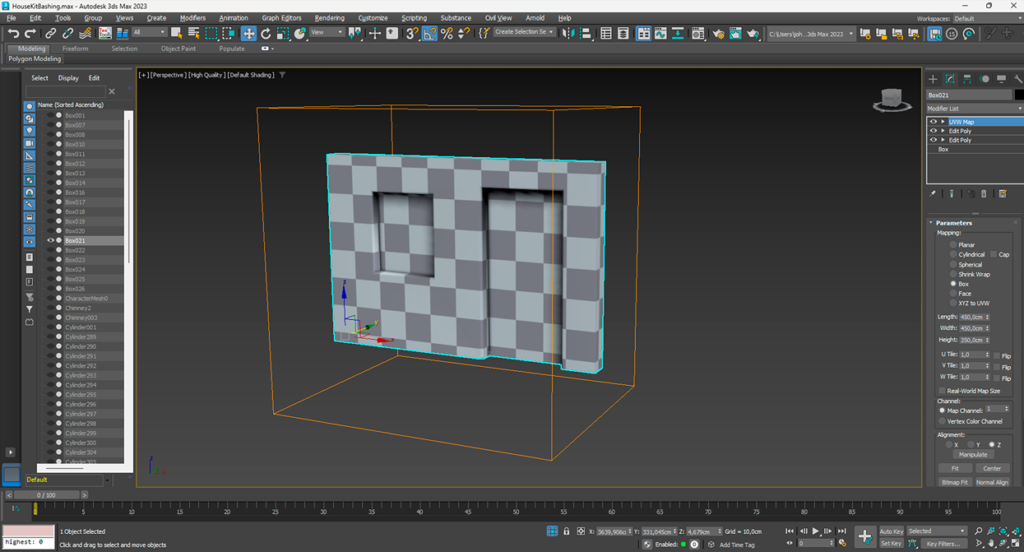
Once imported into Unreal Engine, I applied one of my master materials for assets to achieve the desired look. This material allowed me to add extra details, control tiling, and break up repetition using additional masks, ensuring a natural and varied surface.
For the wall texture, I took inspiration from the Medieval House scene by Angelina Pronina (in fact, I believe it’s the same texture she used). I highly recommend checking out her work!
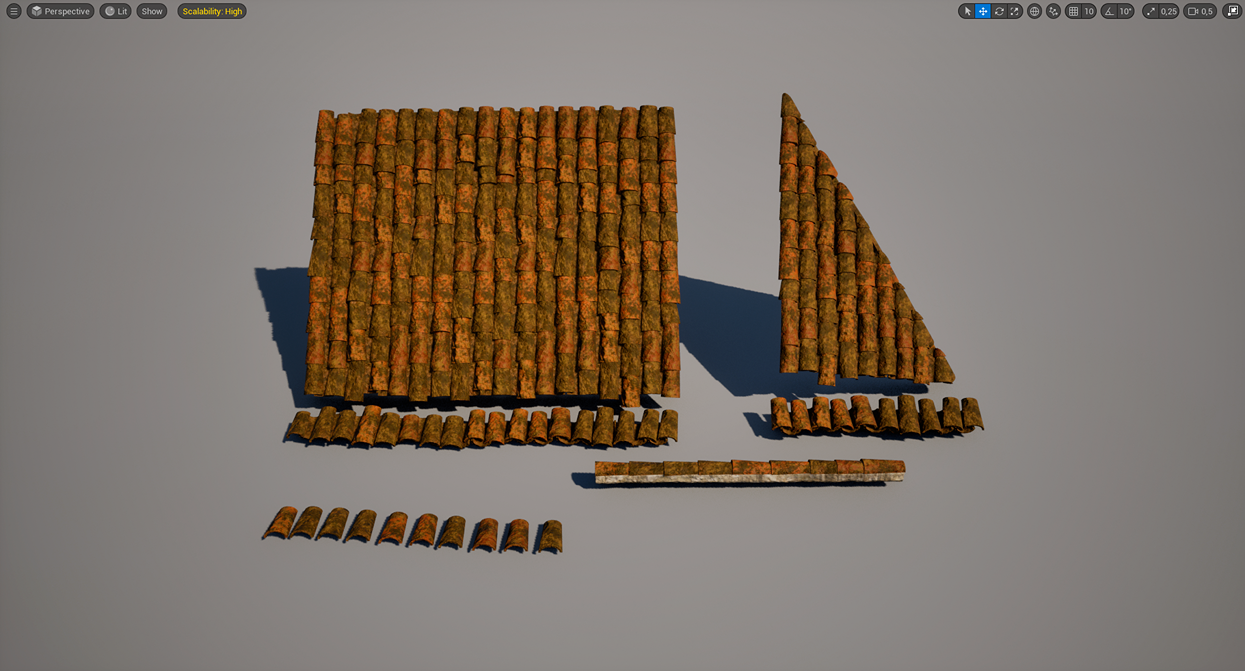
For the roof tiles, I modeled basic tile pieces and assembled them inside Unreal. I also used symmetry modifiers to create additional corner variations efficiently.
Modelling & Texturing
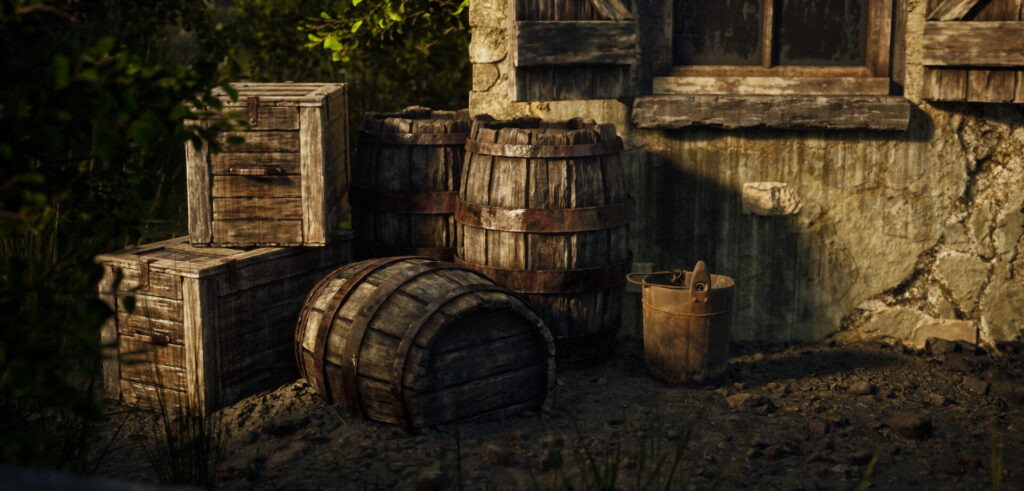
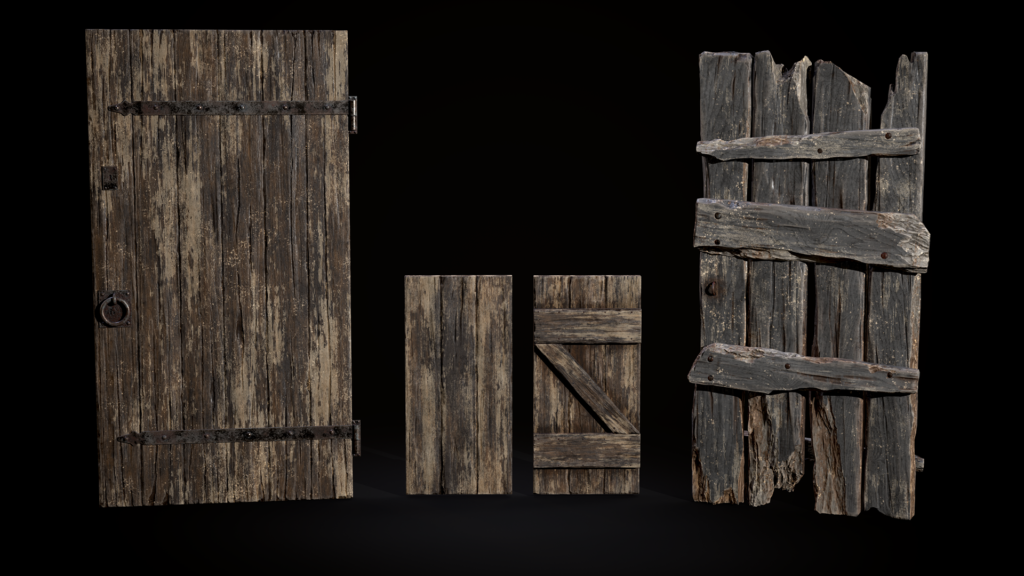
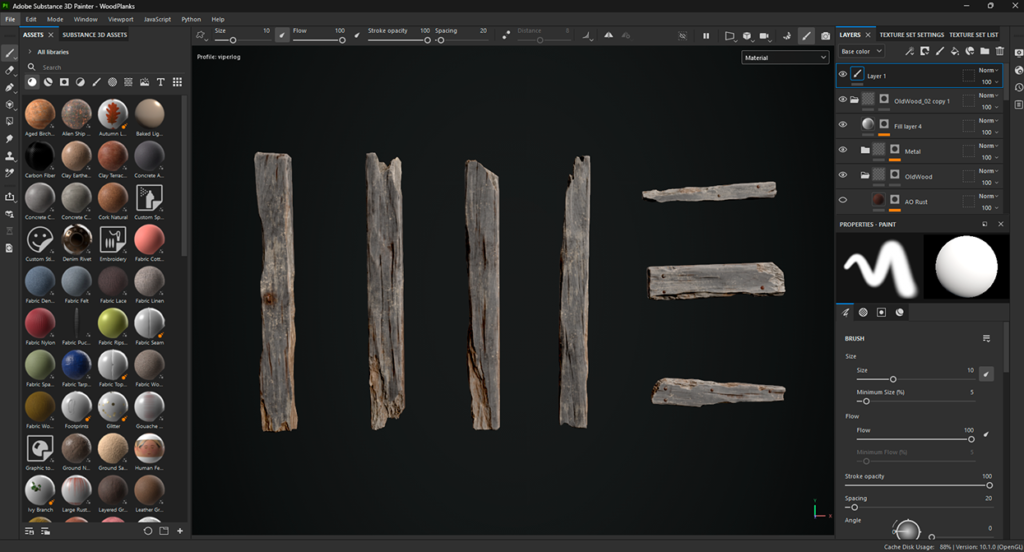
For unique assets like doors and windows, I modelled them in ZBrush and textured them in Substance Painter.
To achieve a natural wood grain effect in ZBrush, I primarily used the ClayBuildup and TrimSmoothBorder brushes, which helped create realistic depth and wear.
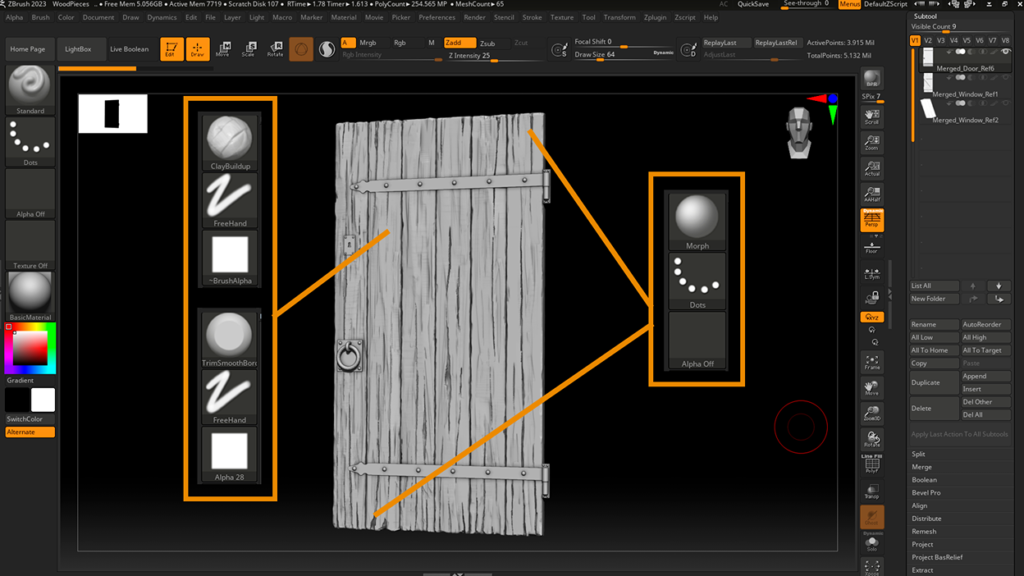
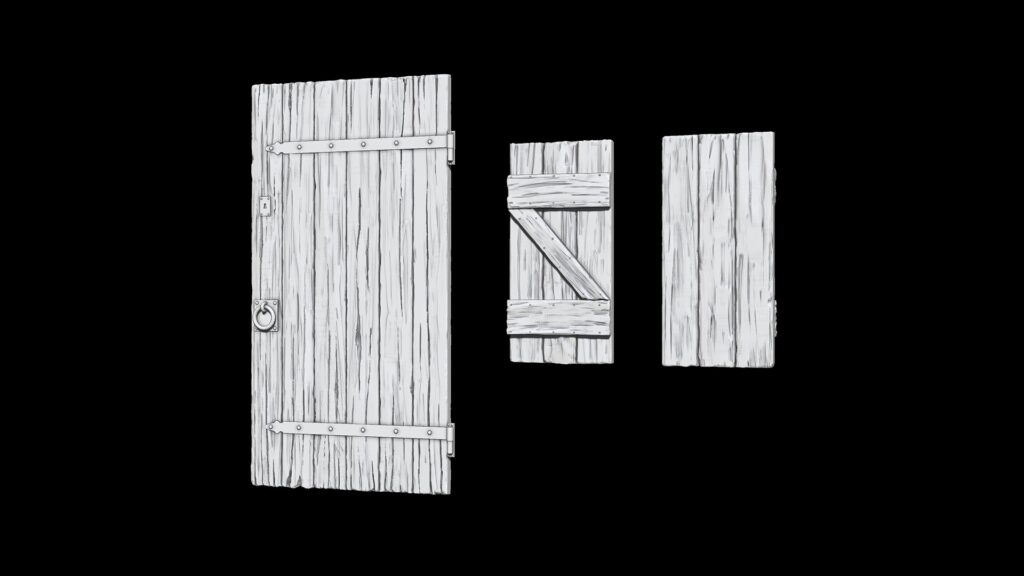

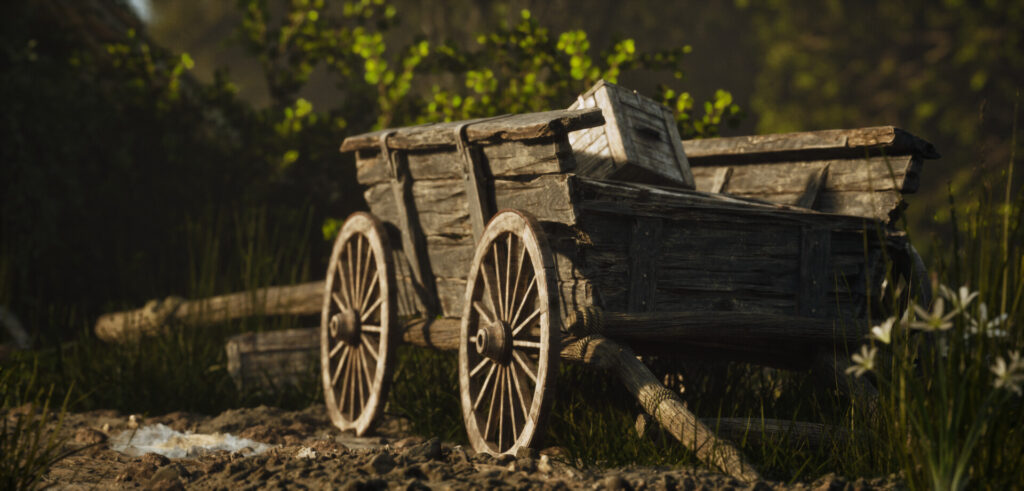
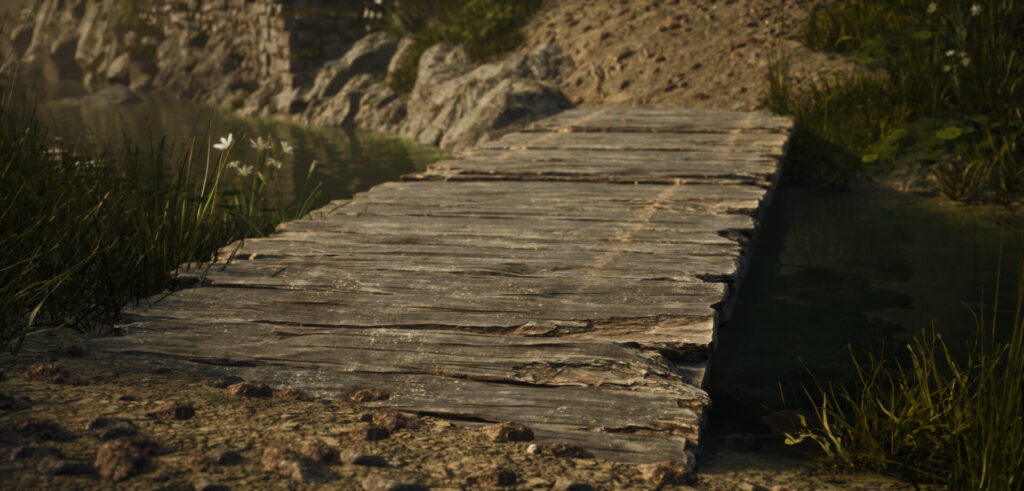
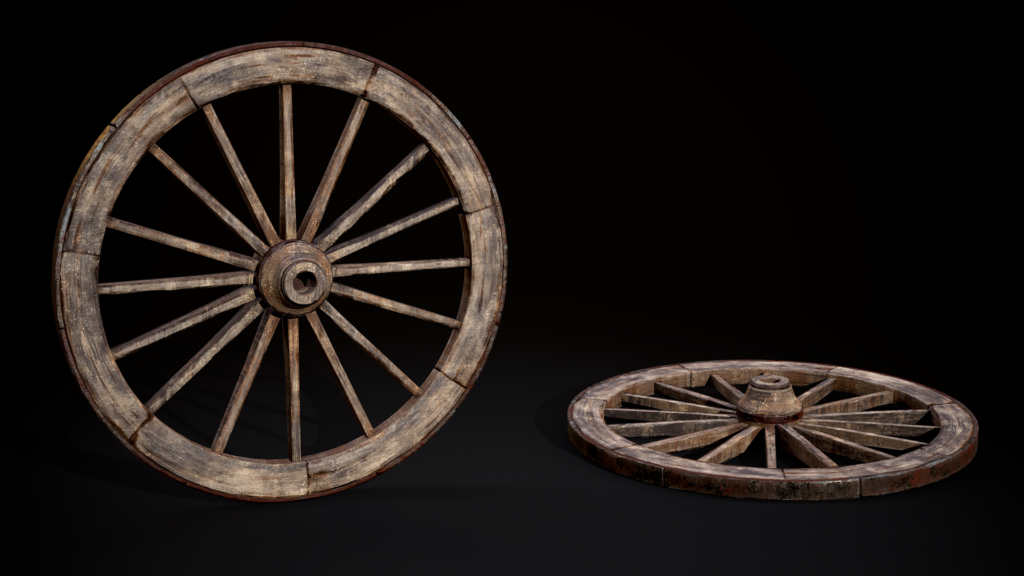
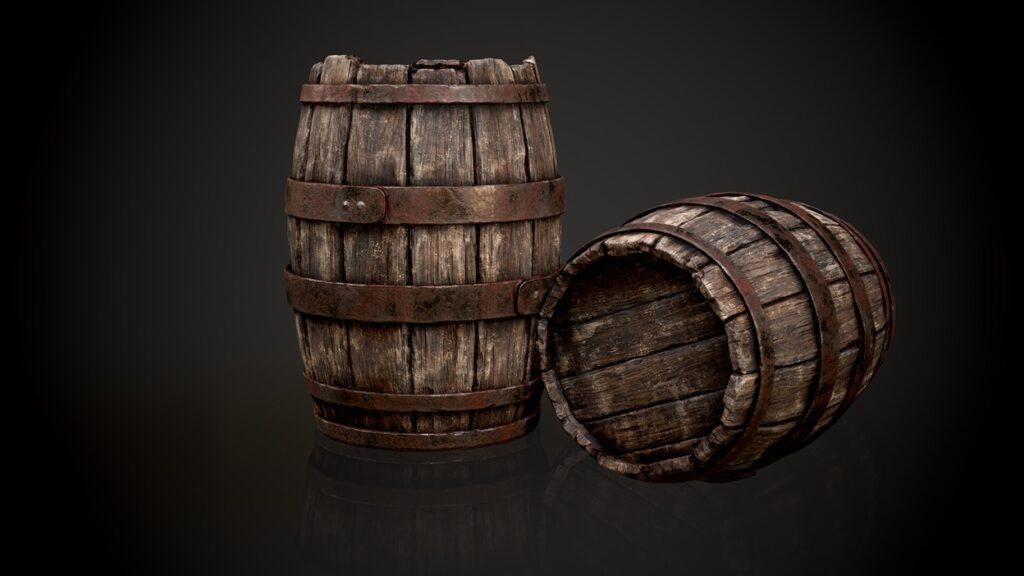
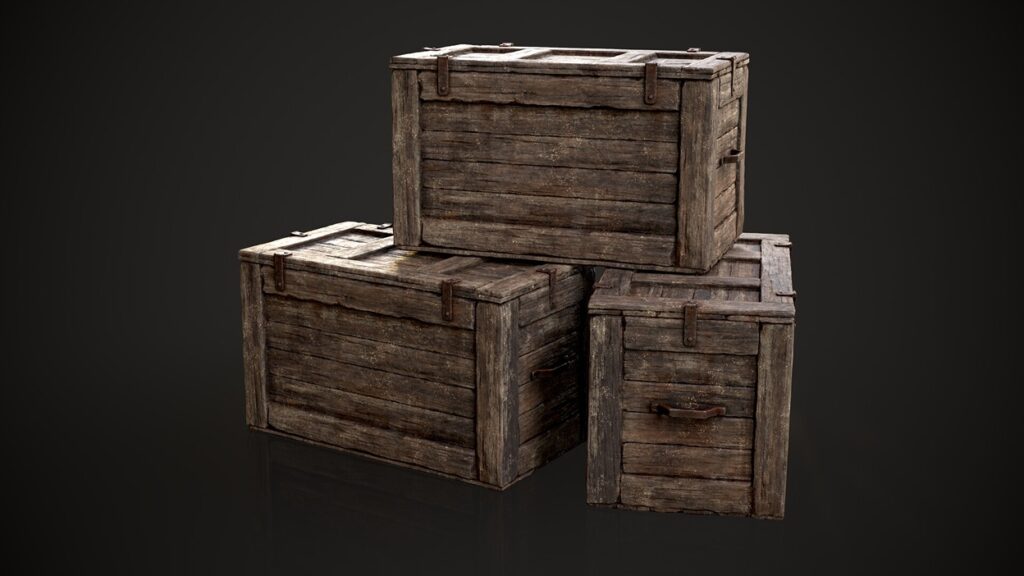
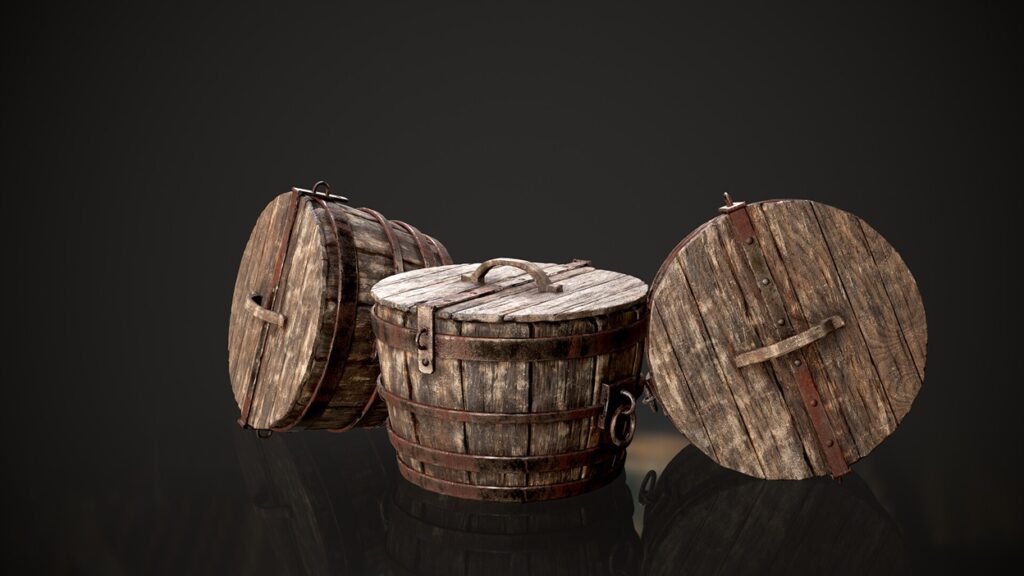
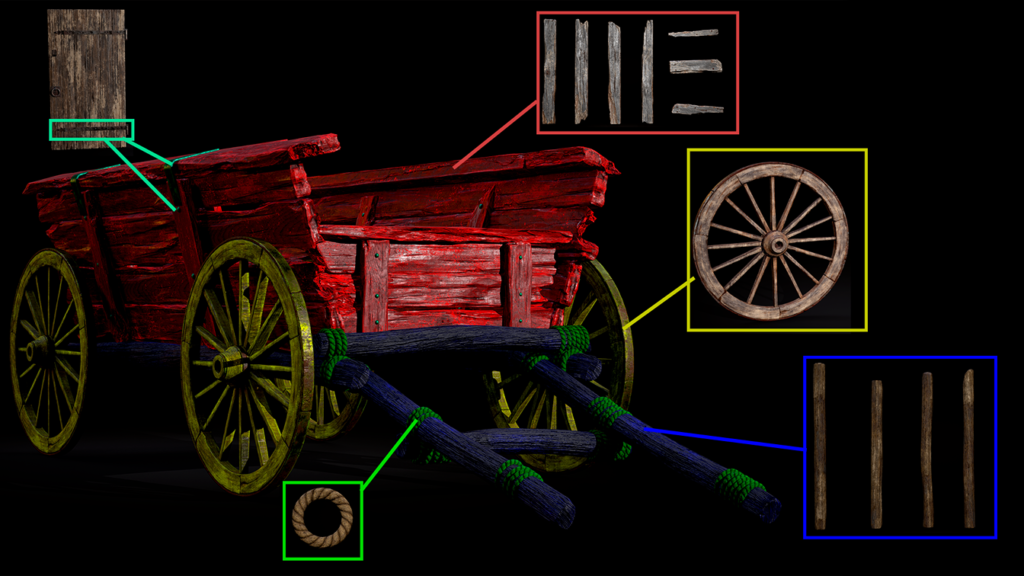
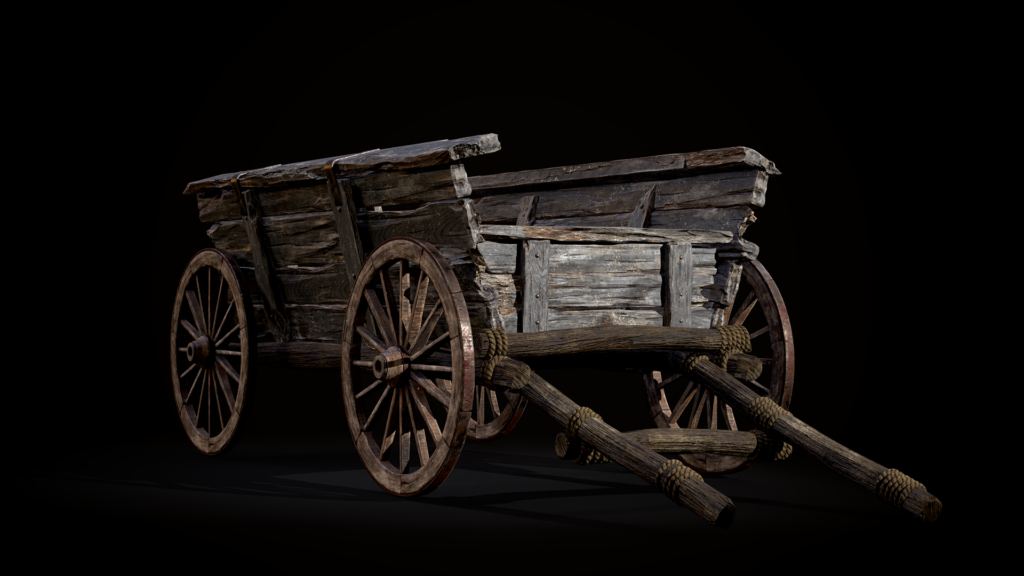
Additionally, I created wooden planks that were later used to assemble a door, a bridge, and a wooden cart.
These planks were designed to be reusable across different assets and could also be scattered individually throughout the scene. The planks were sculpted in ZBrush, following the same brush techniques.
Tip 💡
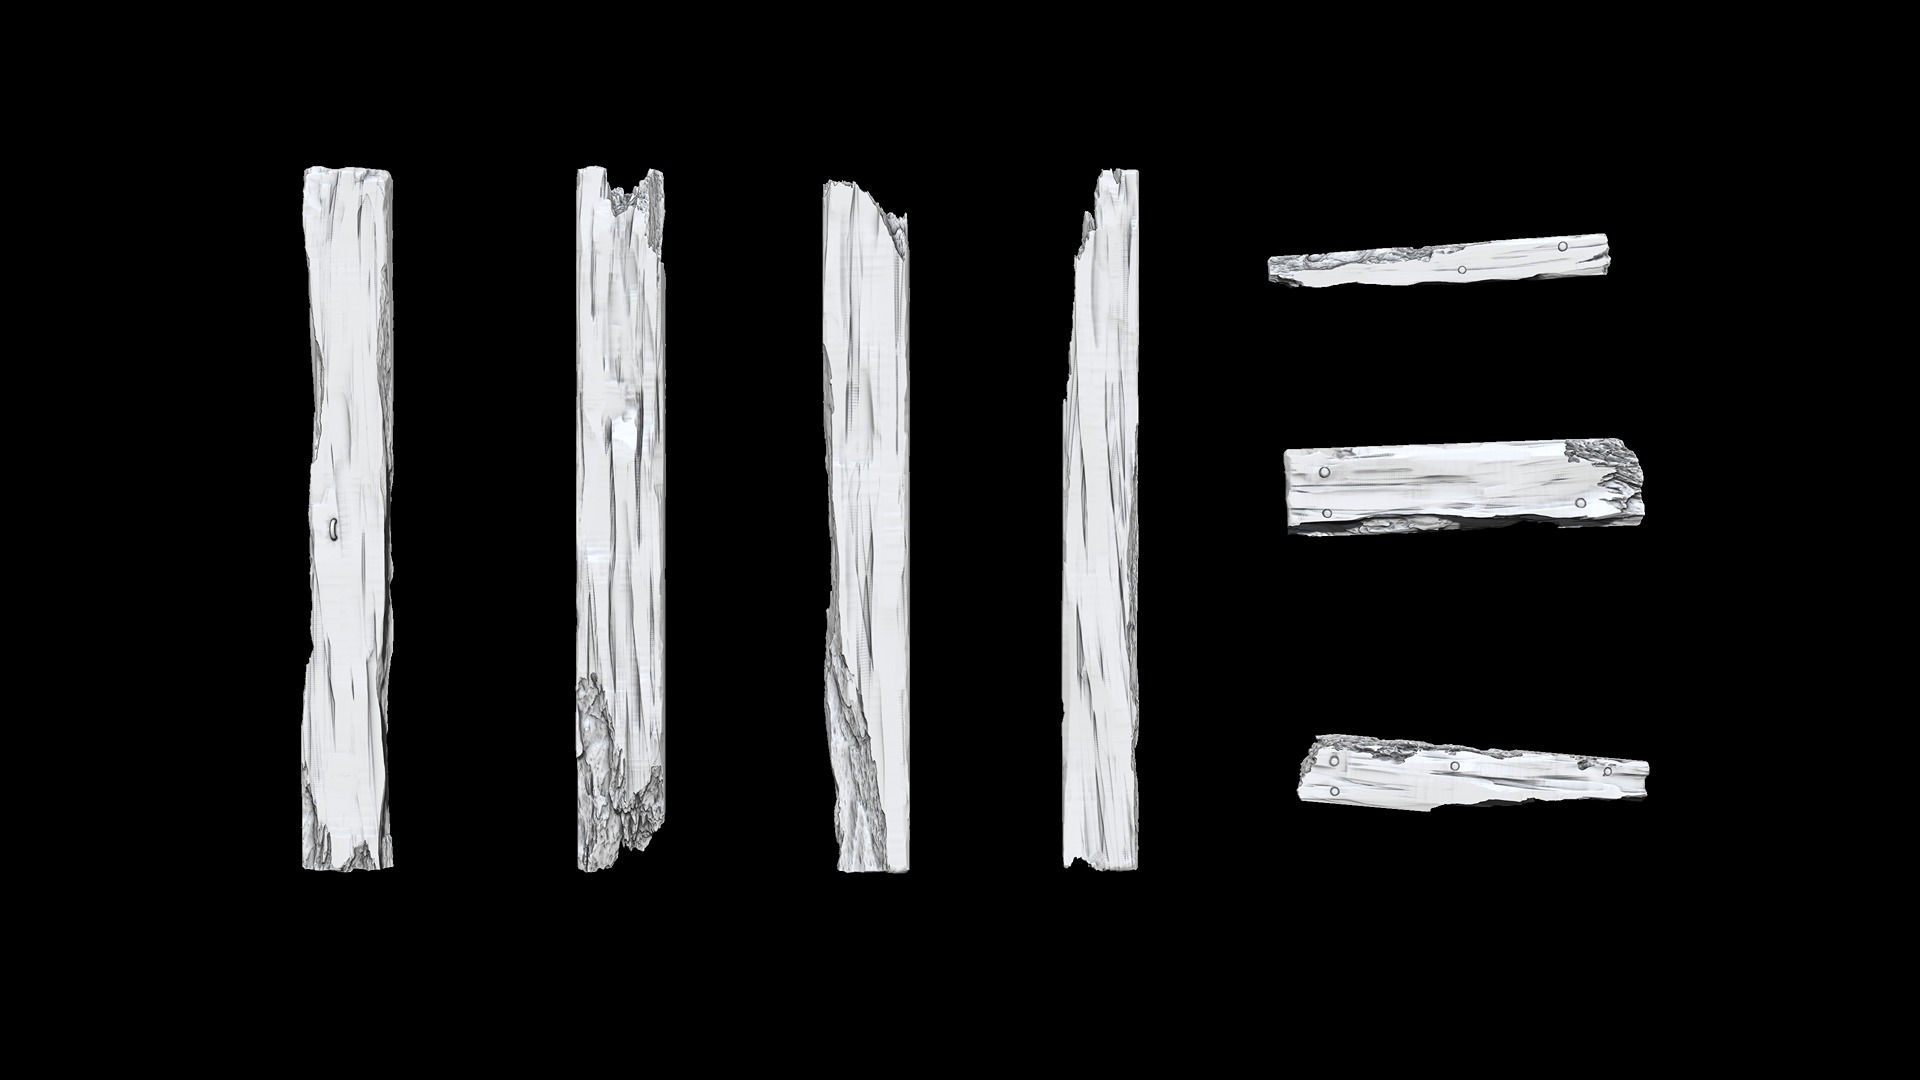
Boolean operations in ZBrush can produce amazing results!
For these planks, I used a Megascans wood piece as a subtraction mesh to carve out realistic cracks and splinters.
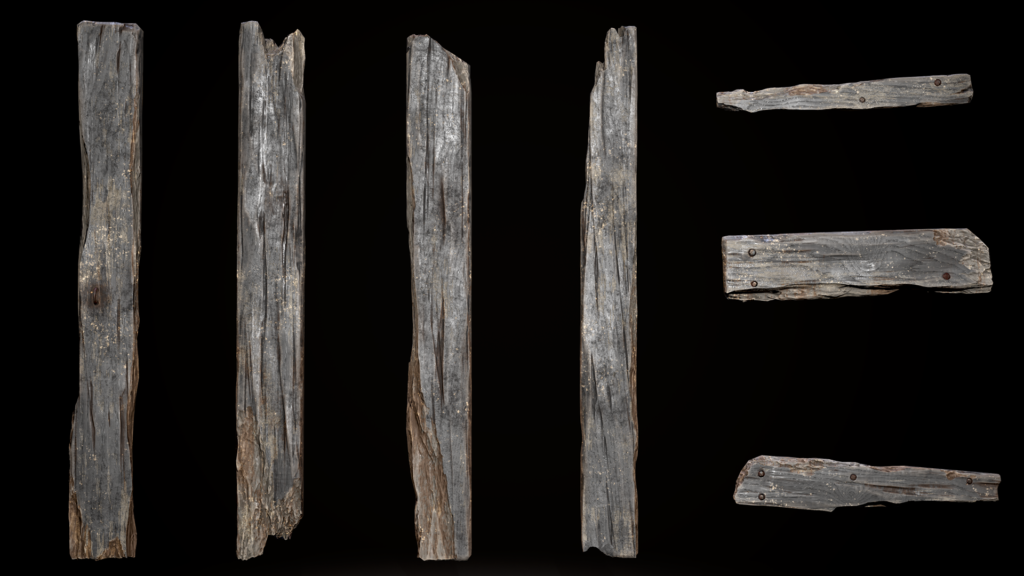
For texturing, I applied a custom smart material in Substance Painter for all unique models, ensuring consistency and realism.
Tip 💡
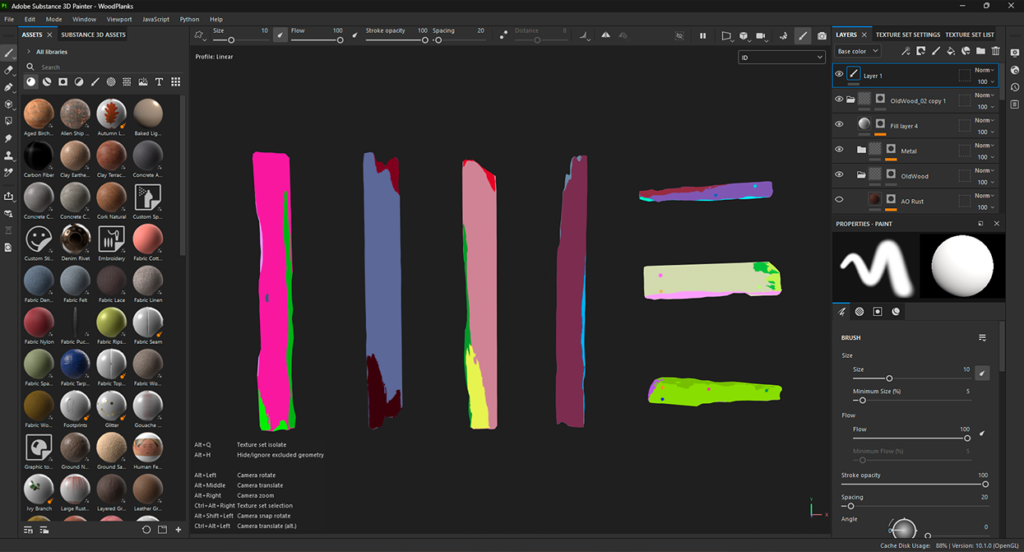
When performing a Boolean operation, ZBrush automatically creates a new polygroup. Avoid deleting or altering this polygroup, as it’s incredibly useful for baking color ID maps in Substance!
This makes assigning materials much easier—for example, when working with wood, you can quickly select cracks and damaged areas for more precise texturing.
Tip 💡
Using UV symmetry is a great way to maximize texel density and add finer details. In most cases, these symmetries are barely noticeable in-game!
I also reused small assets from my previous project, Wetlands Ruins, integrating them seamlessly into the scene.
This approach not only saved time but also helped maintain a consistent level of detail and quality across my work.
Kitbash
Kitbashing is a highly common practice in the video game industry as it allows us to save time and resources while creating new models quickly. For the wooden cart, I reused the wooden planks, ropes, and metal details from the doors, as well as some wooden sticks.
By combining these elements, I was able to create a high-quality asset in a very short amount of time.
Tip 💡
Always use kitbashing whenever possible! With a bit of creativity, you can produce amazing models in no time!
Vegetation
The trees were created in SpeedTree, using a default atlas that comes with the software.
I started by making a base tree, then created six variations from it to add diversity while maintaining a consistent look. These trees serve as the main vegetation in the scene.
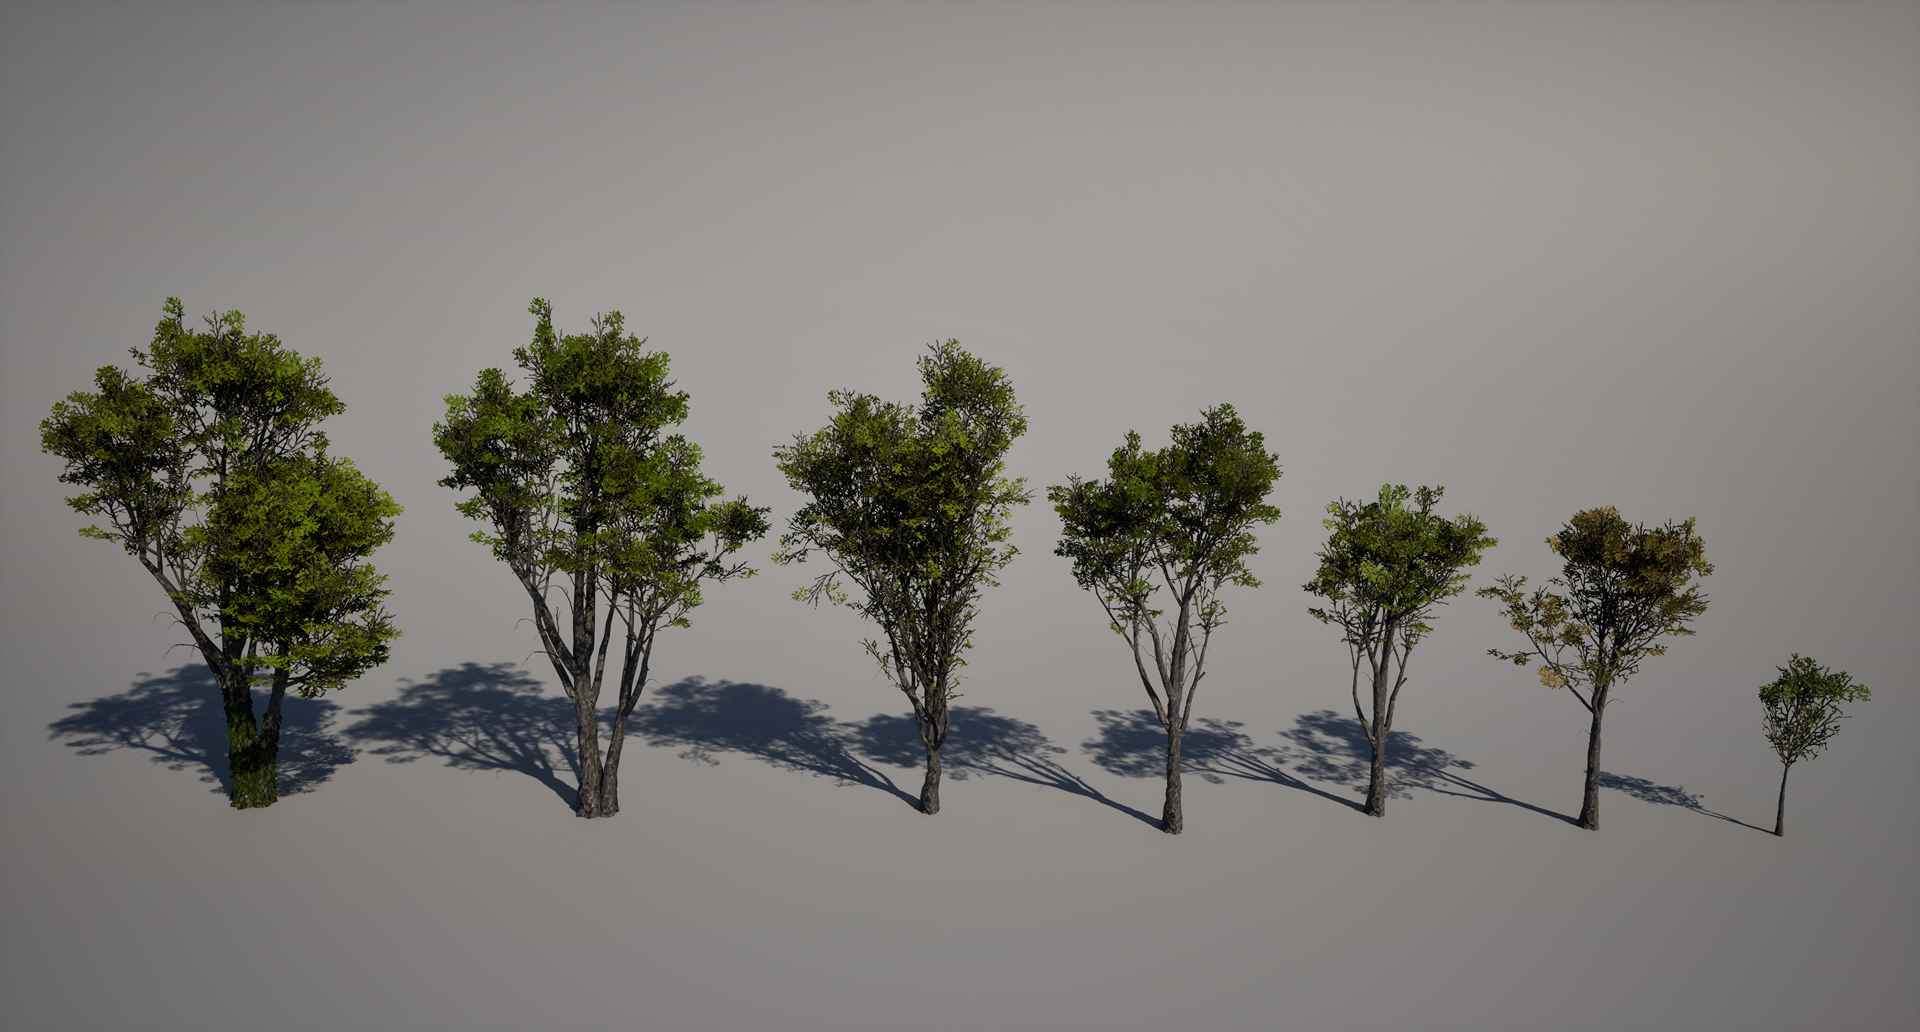
For background trees, filler vegetation, and some bushes, I used Megascans assets from the Black Alder pack.
This allowed me to quickly populate distant areas while keeping the focus on the handcrafted trees in the foreground.
The foliage master material I created allows me to add extra detail to the vegetation using a mask to vary the color. This helps achieve a more realistic and professional finish.
Rocks
For this new environment, I reused rocks from previous projects.
I sculpted them in ZBrush and then created RGB masks in Substance, allowing me to texture them directly within Unreal Engine. This is a common industry technique, as it enables fast and high-quality texturing while maintaining a good texel density.
Additionally, using masks allows for extra detail, and scaling the models won’t degrade their texture quality.

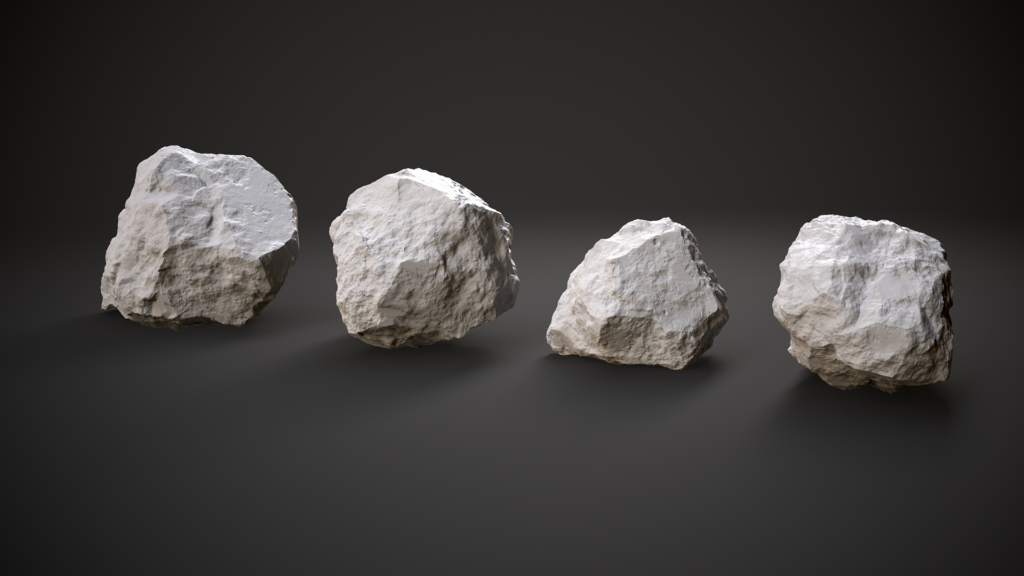
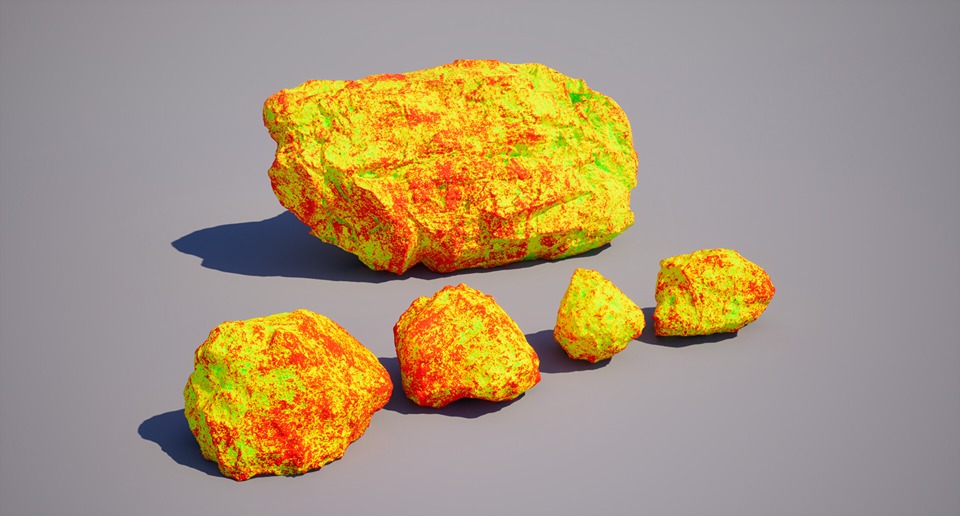

If you’re interested in a more detailed breakdown, you can check out one of my projects where I explain this method in depth.
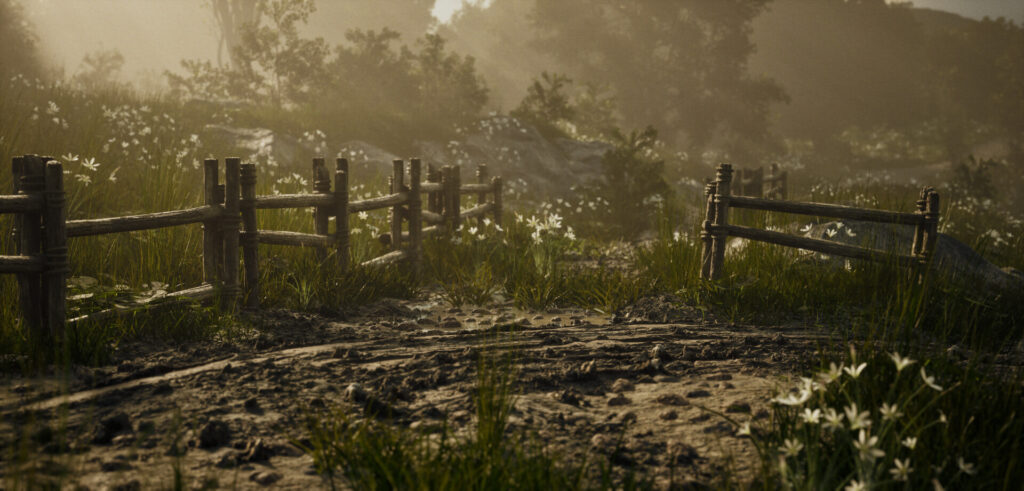
Level Packed Actors
I used Level Packed Actors to create prefabs for several pieces like fences, wooden bridge, and roofs. The great advantage of these prefabs is that they provide a non-destructive workflow, allowing us to edit them at any time without affecting the overall scene.
Additionally, by instantiating the models rather than creating new actors, Level Packed Actors are a good practice for efficient scene management and optimization.
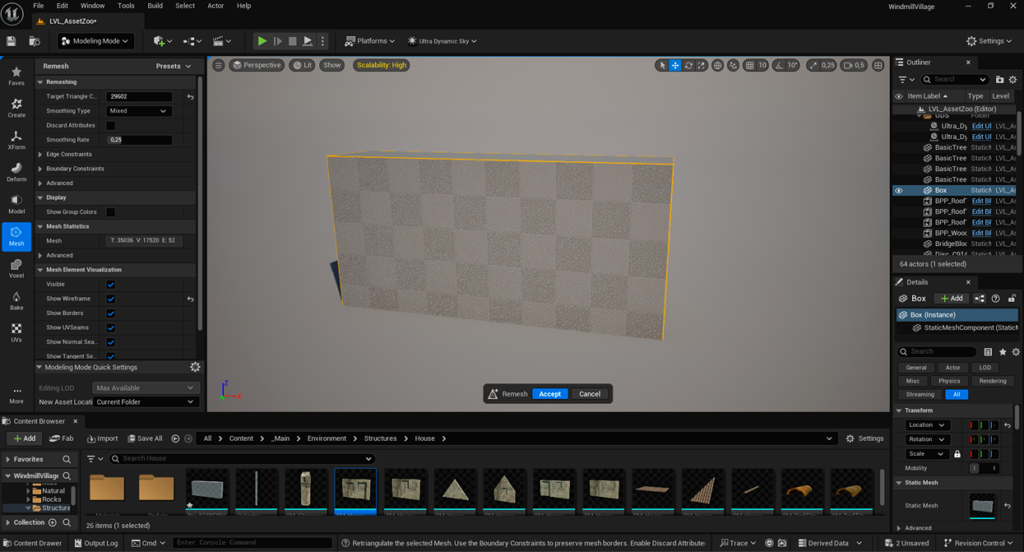
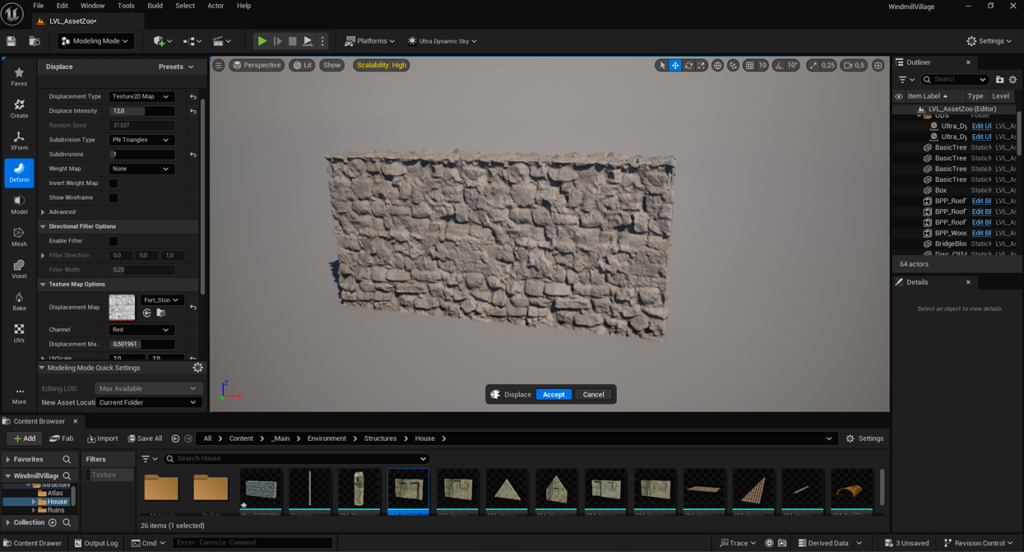
Ground meshes
To add more detail to the ground, I leveraged the power of Nanite to create ground meshes, using height maps to achieve a higher level of detail.
These pieces were fully modeled in Unreal Engine using the Modeling Tools and displacement tools, allowing for a more efficient workflow and ensuring top-notch quality in the terrain details.
Paths
I created a tileable path piece using Megascans textures and a height map for added detail. Then, I utilized a spline tool created by Tiedtke to easily place and adjust the paths within the scene.
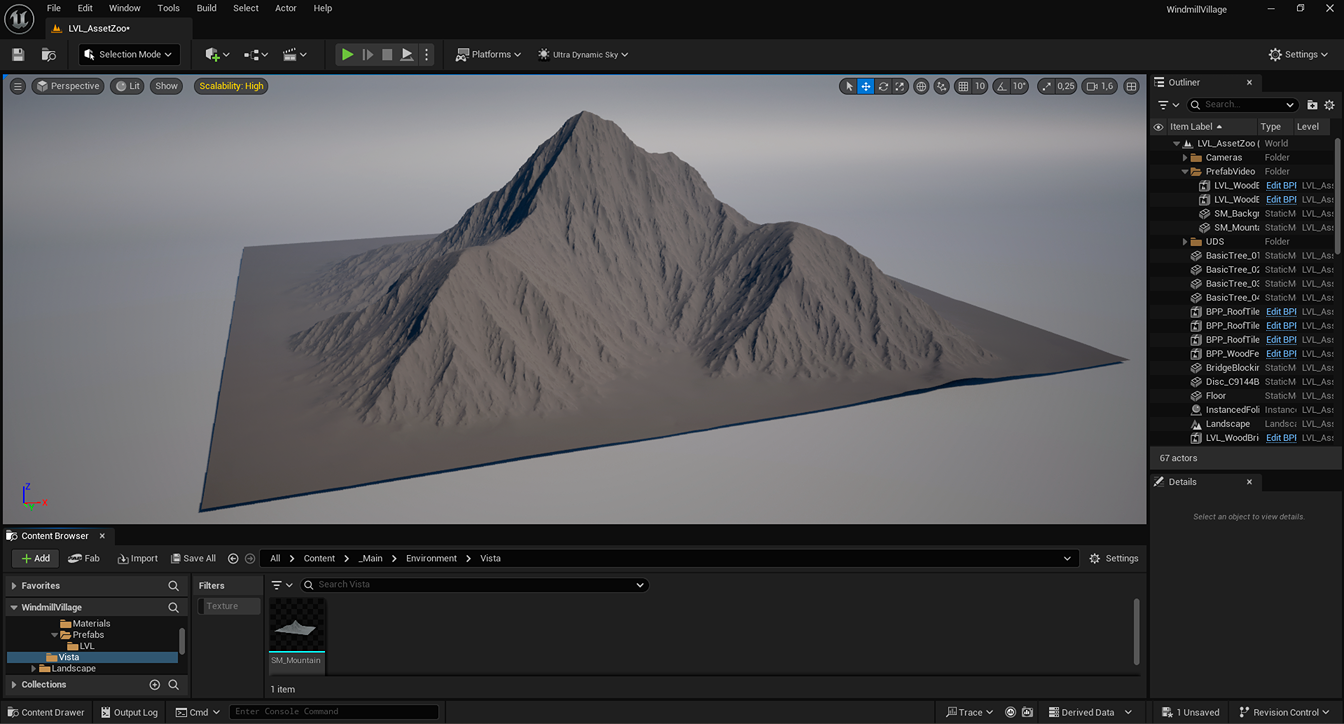
Background
For the distant mountains, I used the Mountain Terrain asset by JesterArts_. This mesh had enough detail to serve as a vista asset, making it a perfect choice for the background without hesitation.
Mountain Terrain Assets.
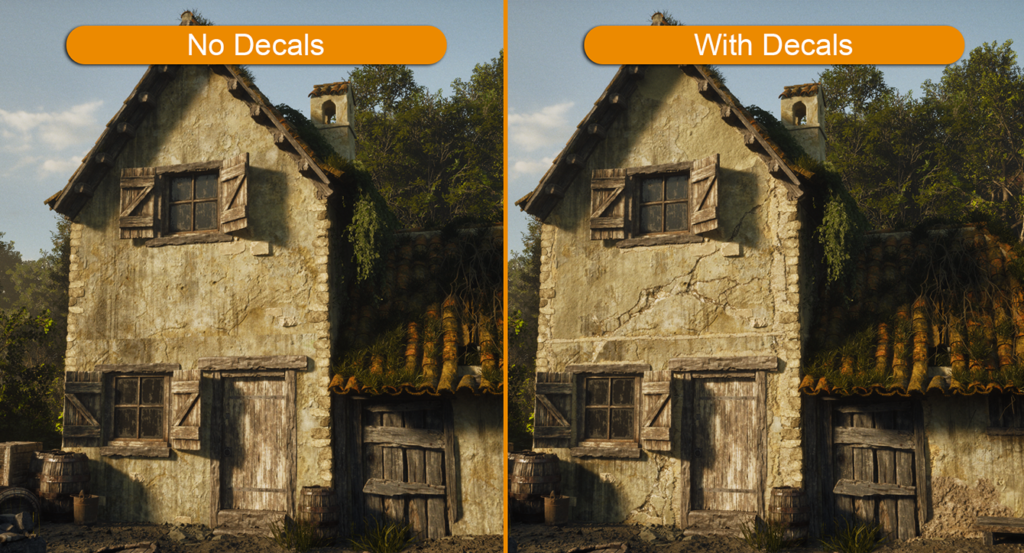
Decals & Particles
Once the scene was assembled, I added Megascans decals to enhance the level of detail and realism. For the puddle decals, I used a pack from Fab.

As for particles, I created a Niagara system for falling leaves to add an extra layer of realism to the wind in the scene. I based the setup on Aziel Arts’ tutorial.
Tip 💡
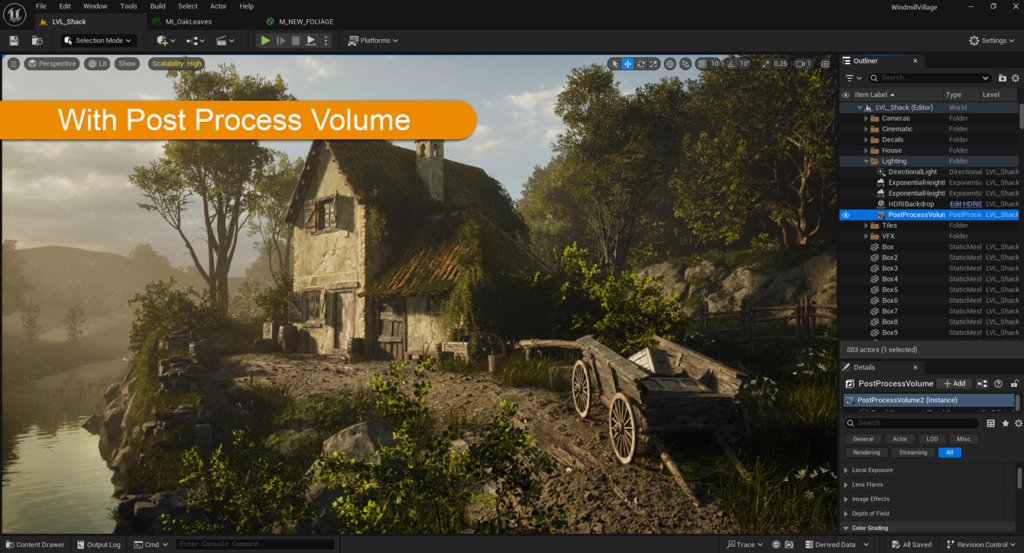
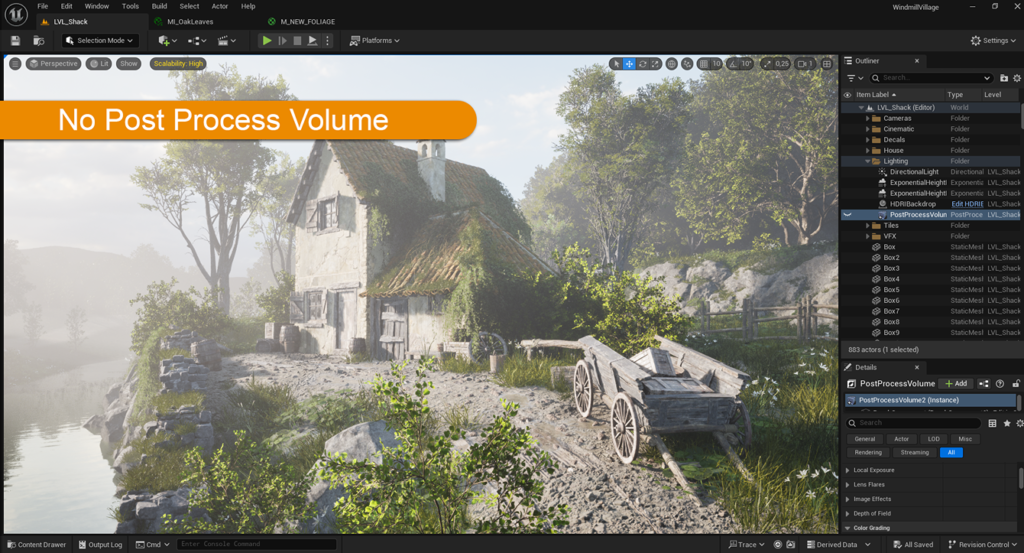
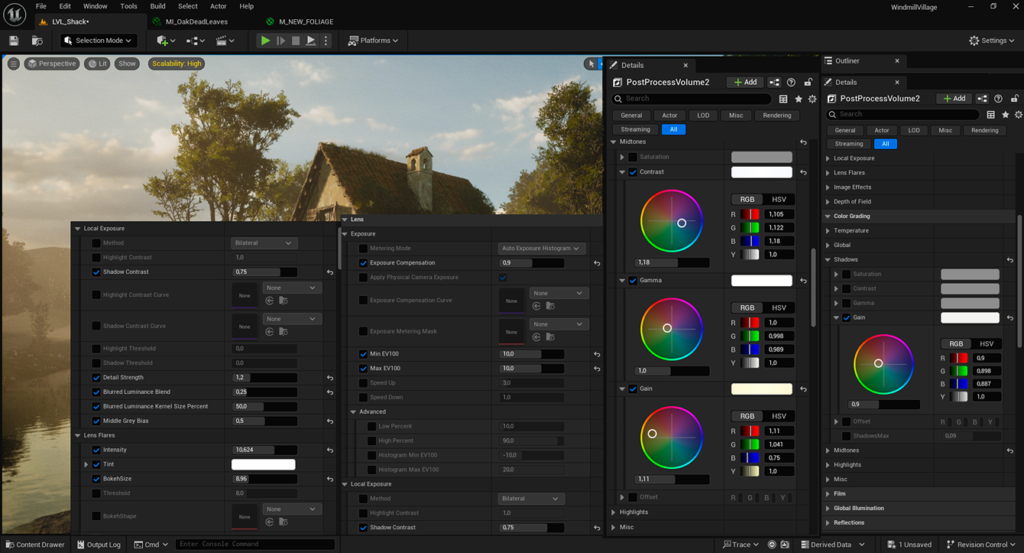
Lighting & Post Process
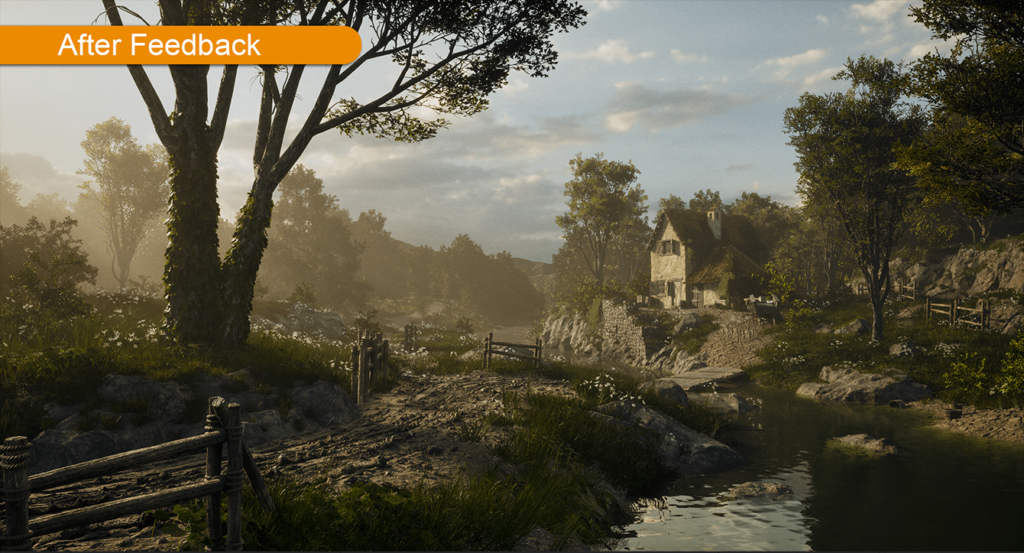
Once the scene was assembled, it was time to ask for feedback. I always follow the same routine when creating a scene: I build everything out and, once it’s almost complete but still needs lighting, I ask my colleagues for feedback. By this point, my eyes are quite accustomed to the work, so it’s easier to miss certain details.
I want to give a huge thanks to Samdax 3D and Alex Sanrey for their invaluable feedback, which helped me tremendously in achieving the final result with their insights and advice.
The scene was almost there, but something was still missing: the atmosphere. It lacked depth and wasn’t conveying anything yet.
It was time to focus on the final lighting, and for that, I drew on the incredible video tutorial from Karim Abou Shousha to achieve realistic, high-quality lighting.

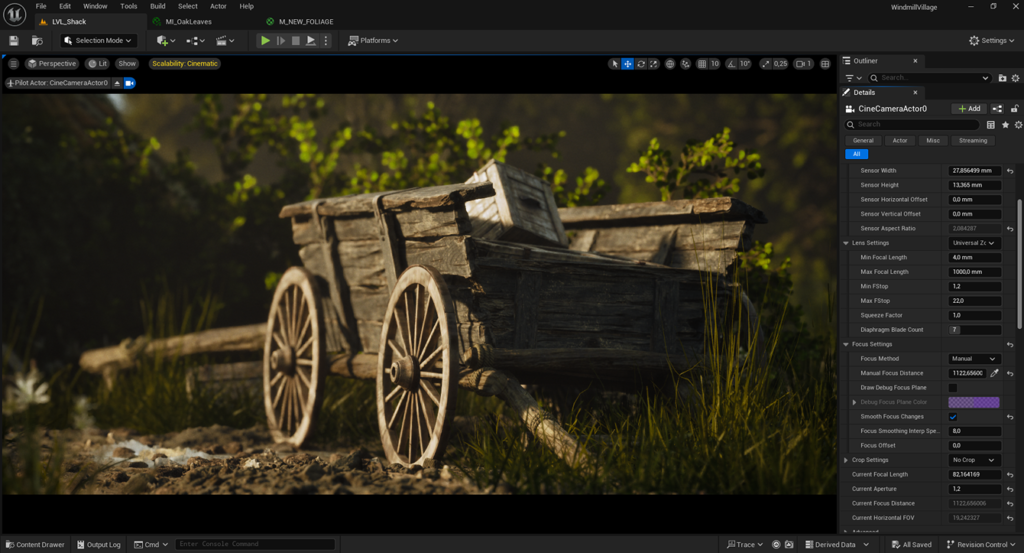
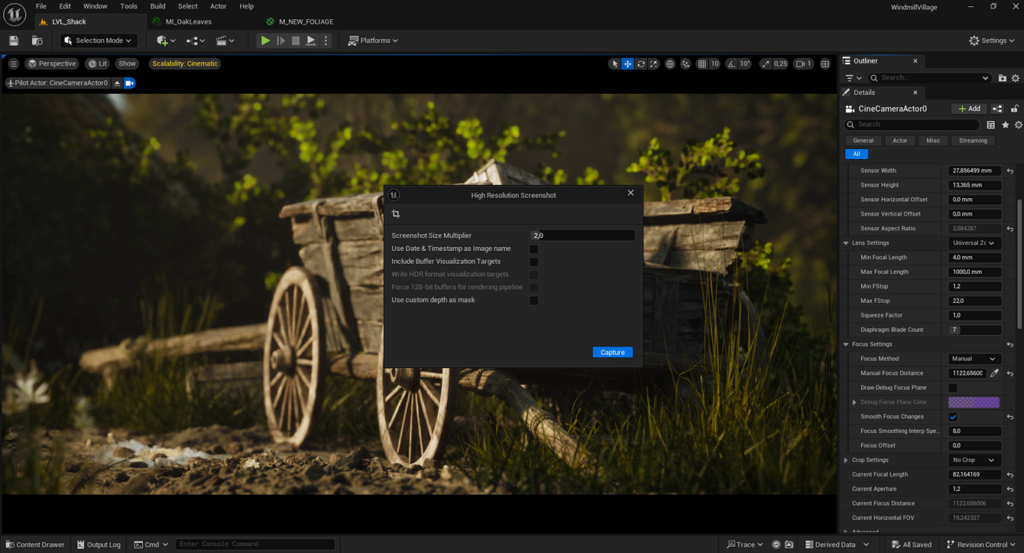
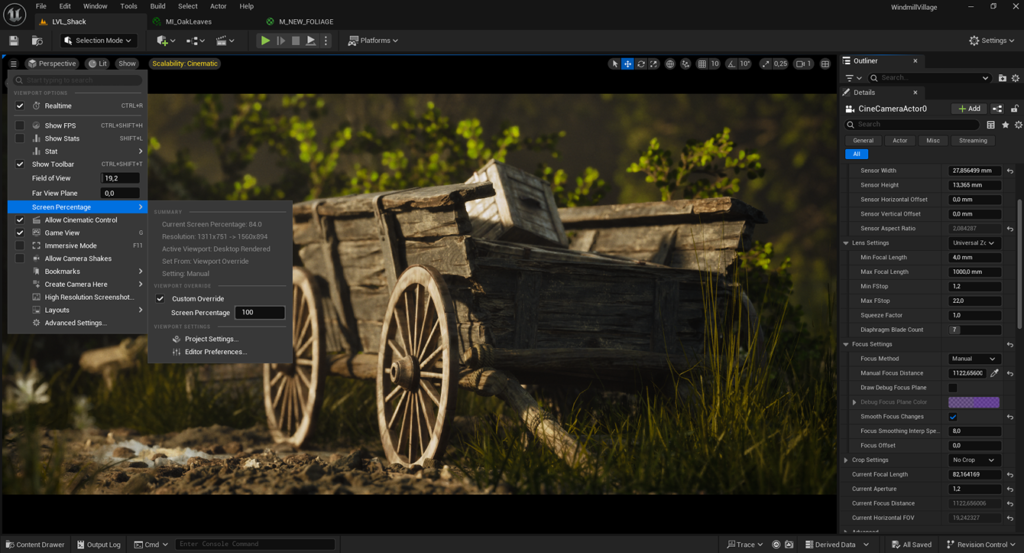
Screenshots
For capturing the screenshots, I used a Cine Camera Actor to achieve a more cinematic look, thanks to depth of field.
Before taking each shot, I made sure to set the Screen Percentage to 100 (you can increase it if your PC can handle it!) and the High Resolution Screenshot setting to 2 for sharper images.
Process & Gameplay
Below are videos of the “blockout to final” and “gameplay”.
Conclusion
This scene took me about a month and a half to create.
One of the main goals of this project, aside from the technical aspects, was to tell a story. I had been wanting to make my environments have more depth and backstory for a long time, so I finally decided to make it happen.
The description of the scene is as follows:
“A cottage of stone and wood, now forgotten, a silent witness to a crime that sealed its fate. Its structure remains strong, holding the echoes of a murder committed in its shadows. It is said that the one who sinned, marked by guilt and fleeing a wrath he could not escape, left behind this piece of paradise he never knew he had until it was lost forever.
The land around it continues to bloom, unaware of the sin that tainted it, yet those who pass feel the weight of the remorse still hidden in the breeze—a reminder of brotherhood lost and the price of envy’s wrath.”

This piece of lore is heavily inspired by the biblical tale of Cain and Abel, as well as Dostoyevsky’s Crime and Punishment, with Raskolnikov as the protagonist.
The idea was to portray the tragedy of a character consumed by envy, lies, and rage, who commits fratricide and flees from the paradise he didn’t even realize he had.
Where did this criminal flee to?
Well, that’s a story for future projects, as this is just the beginning of the tale of a man who descended deep down into hell.
Thank you so much for following me on this creative journey.
Read more articles
You might also like these articles.