Ruined Stairways


Introduction
Hi! I'm Nore, a 19-year-old aspiring 3D Artist currently studying Digital Arts & Entertainment at Howest.
I love everything 3D: from creating and texturing assets, to building procedural tools, to creating environments and working on full games.
With nearly two years of experience in 3D, I'll be looking for an internship next year!
My dream is to work in the gaming industry, where I can keep learning and growing, so that every time I look back, I can see how far I've come and what I'm able to create.
This project was made for a school assignment at Howest Digital Arts & Entertainment.
We were tasked to create an environment using foliage, self-made assets and Quixel assets.

Goals & Software
My goal for this project was to focus on lighting and composition. This was my first time creating an outside scene in Unreal Engine, so I wanted to learn all about making a nicely optimised natural/organic scene.
The software I used included PureRef for reference, Blender for modelling and unwrapping, ZBrush for sculpting, Substance Painter for texturing, and Unreal Engine to put it all together.
I distributed my work over 4 weeks: a week for gathering reference and creating blockouts and ideas, two weeks working on models and assembling the scene, and one week on polishing and presentation.
Workflow
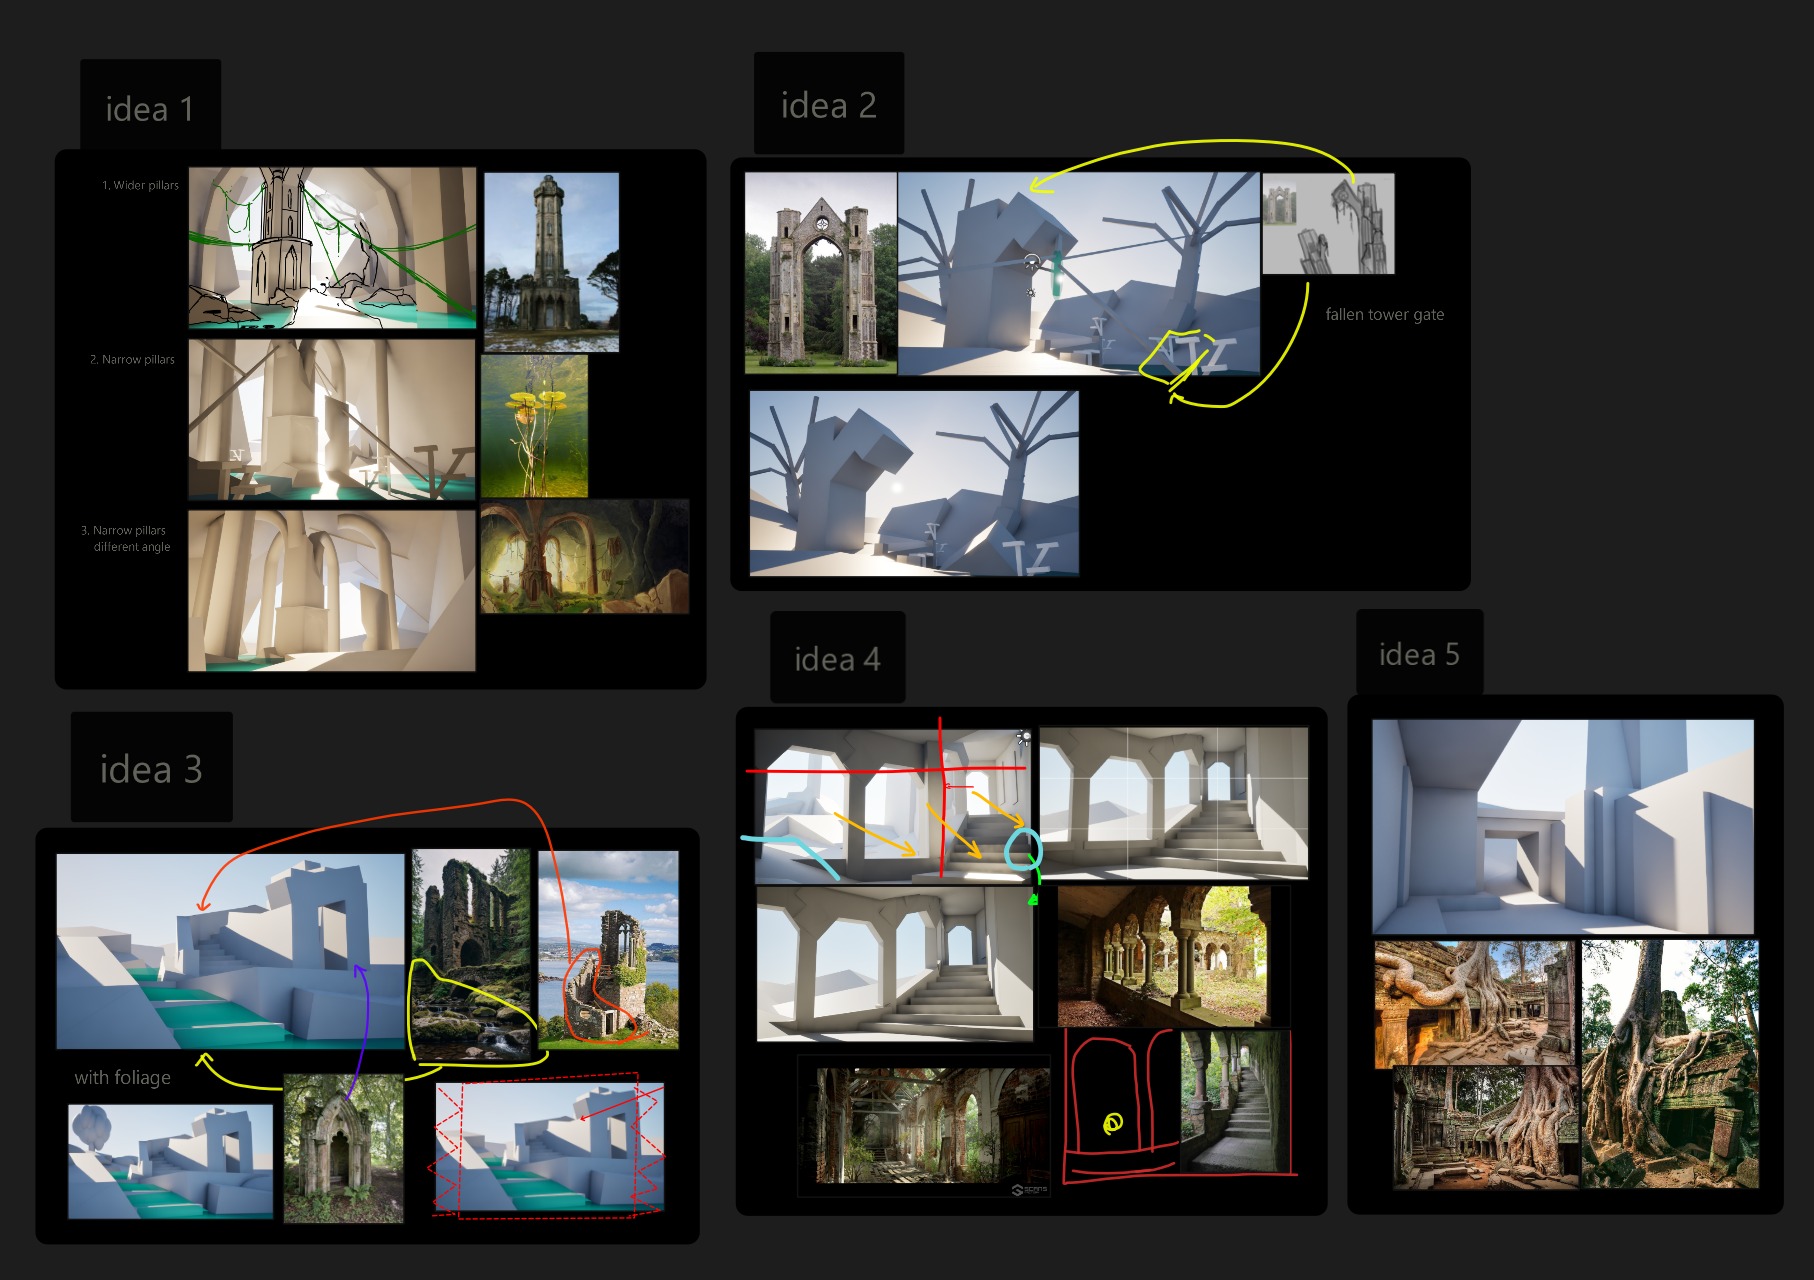
My workflow was pretty simple. A good start is to brainstorm ideas and gather references.
Then I went straight into making blockouts for my different ideas. I got feedback and analysed the blockouts I made to choose a final one to work with. Here, I already made sure my scale was correct.
After the blockout phase was over, I gradually replaced placeholder geometry with final meshes.
Lighting and optimisation are things you need to constantly think about while working on your project. They aren’t steps you leave until the end, but considerations throughout the entire process.
Making sure textures aren’t too big, meshes don’t have too many polygons, and that lighting and shaders aren’t too complex are all part of this.
Then, I moved on to the polishing phase, where I focused on minor tweaks. Here, I spotted a lot of optimisation issues and mesh mistakes and fixed them.
I also duplicated my level multiple times so I could try different lighting setups while being able to go back if it didn’t work out. I also experimented a lot with the post-process volume.
The final part is the most fun – the presentation. Here, I just focused on rendering nice videos and creating a breakdown.
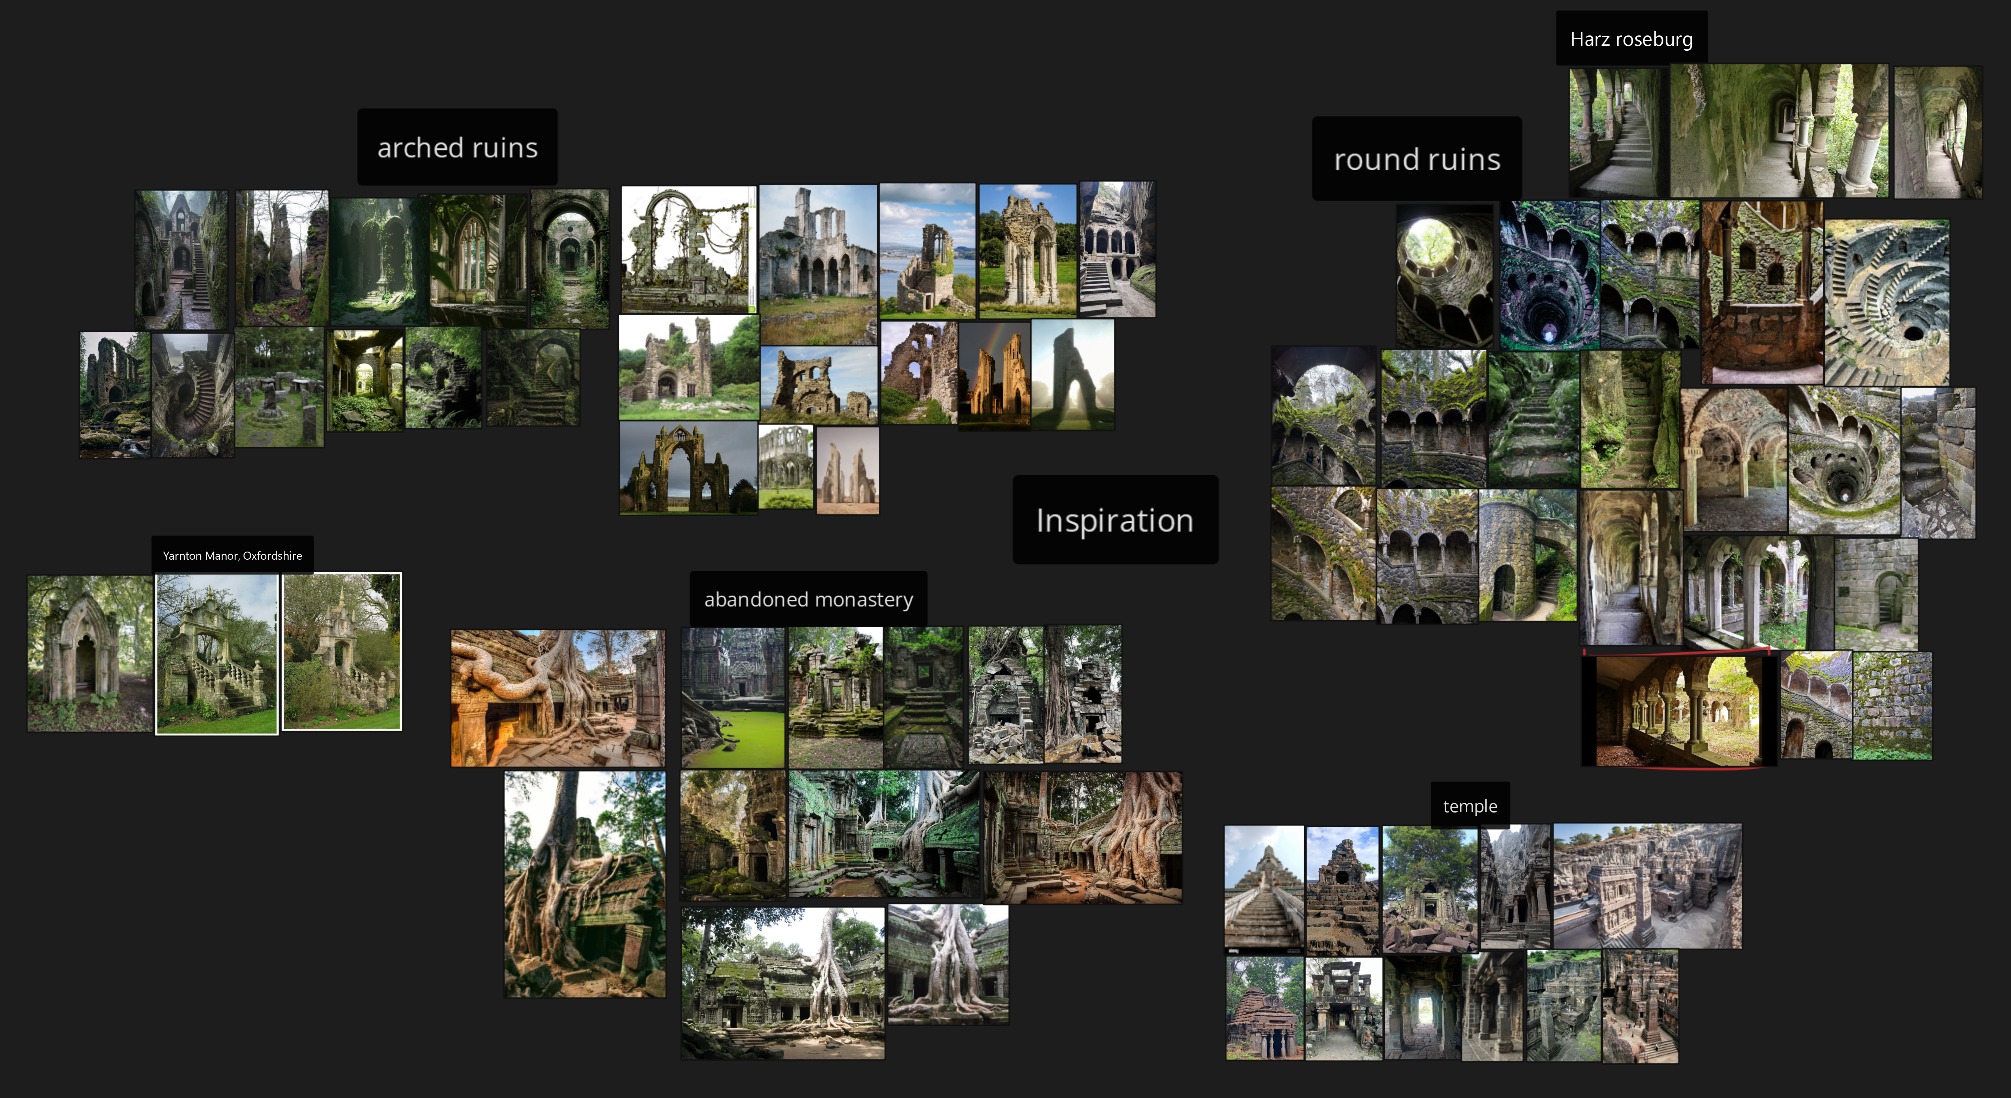
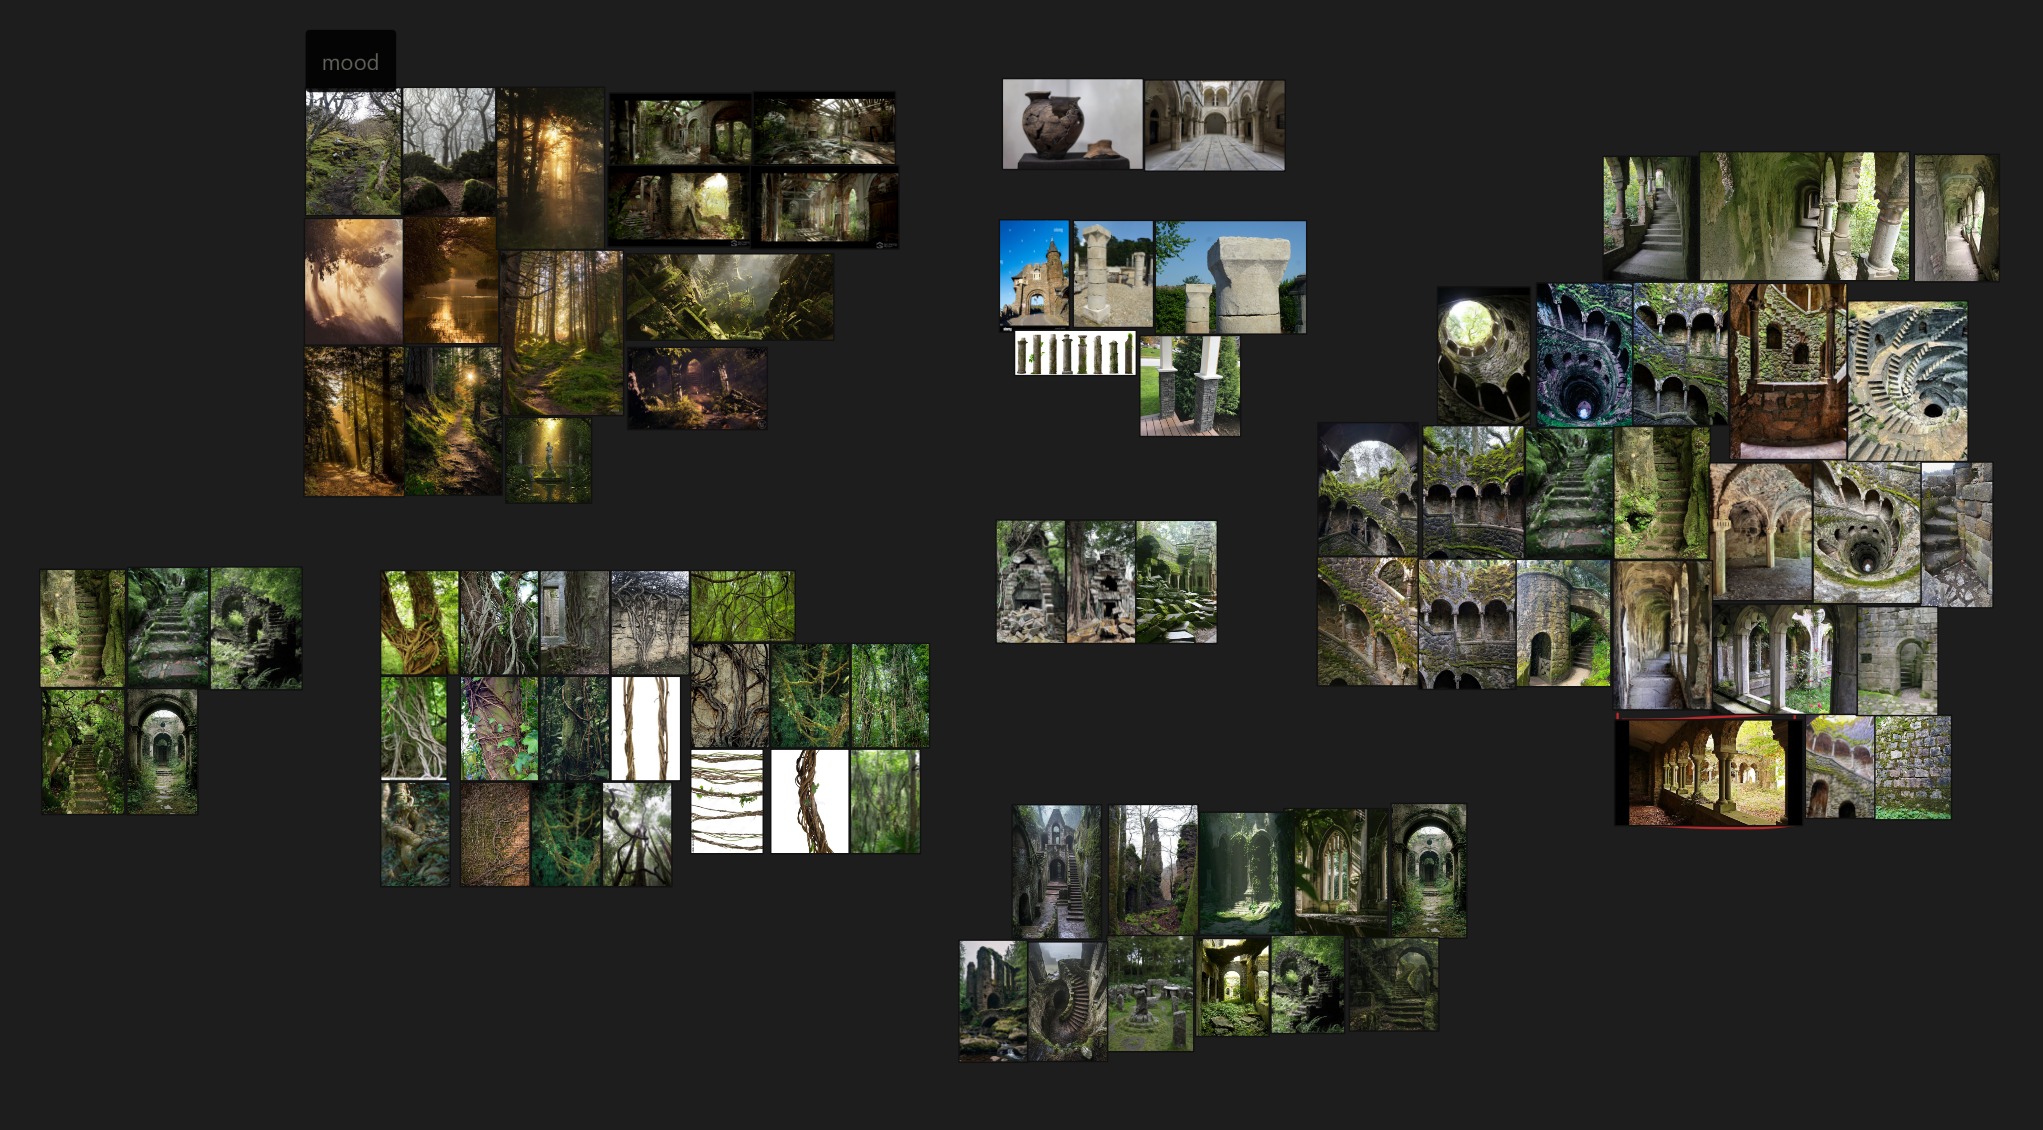
References & Inspiration
I researched a lot about different types of ruins, since that’s the direction I wanted to go in. In the end, I found pictures of a tower/castle in Harz Roseburg, which I really liked.
That place and some other similar images were the main inspiration for my scene.
I tend to jump quickly into 3D, so after gathering ideas, I wanted to test if they would work. For that, I went straight into Unreal Engine to make some quick blockouts with just cubes.
Then I did some draw-overs to analyse what I made and see what I could improve. In the end, I chose a smaller scale, because I really wanted to focus on details and make the most out of the space I had.
Reference doesn’t stop here. If I could go back, I would spend more time on it. It’s very important to have a clear idea before starting production.
Having references for mood, assets, composition, and lighting is a very big help!
Assets
The environment is made from a mix of Quixel and self-made assets.
I used Quixel wherever possible and created assets that I couldn’t find. Below are the assets that I made.
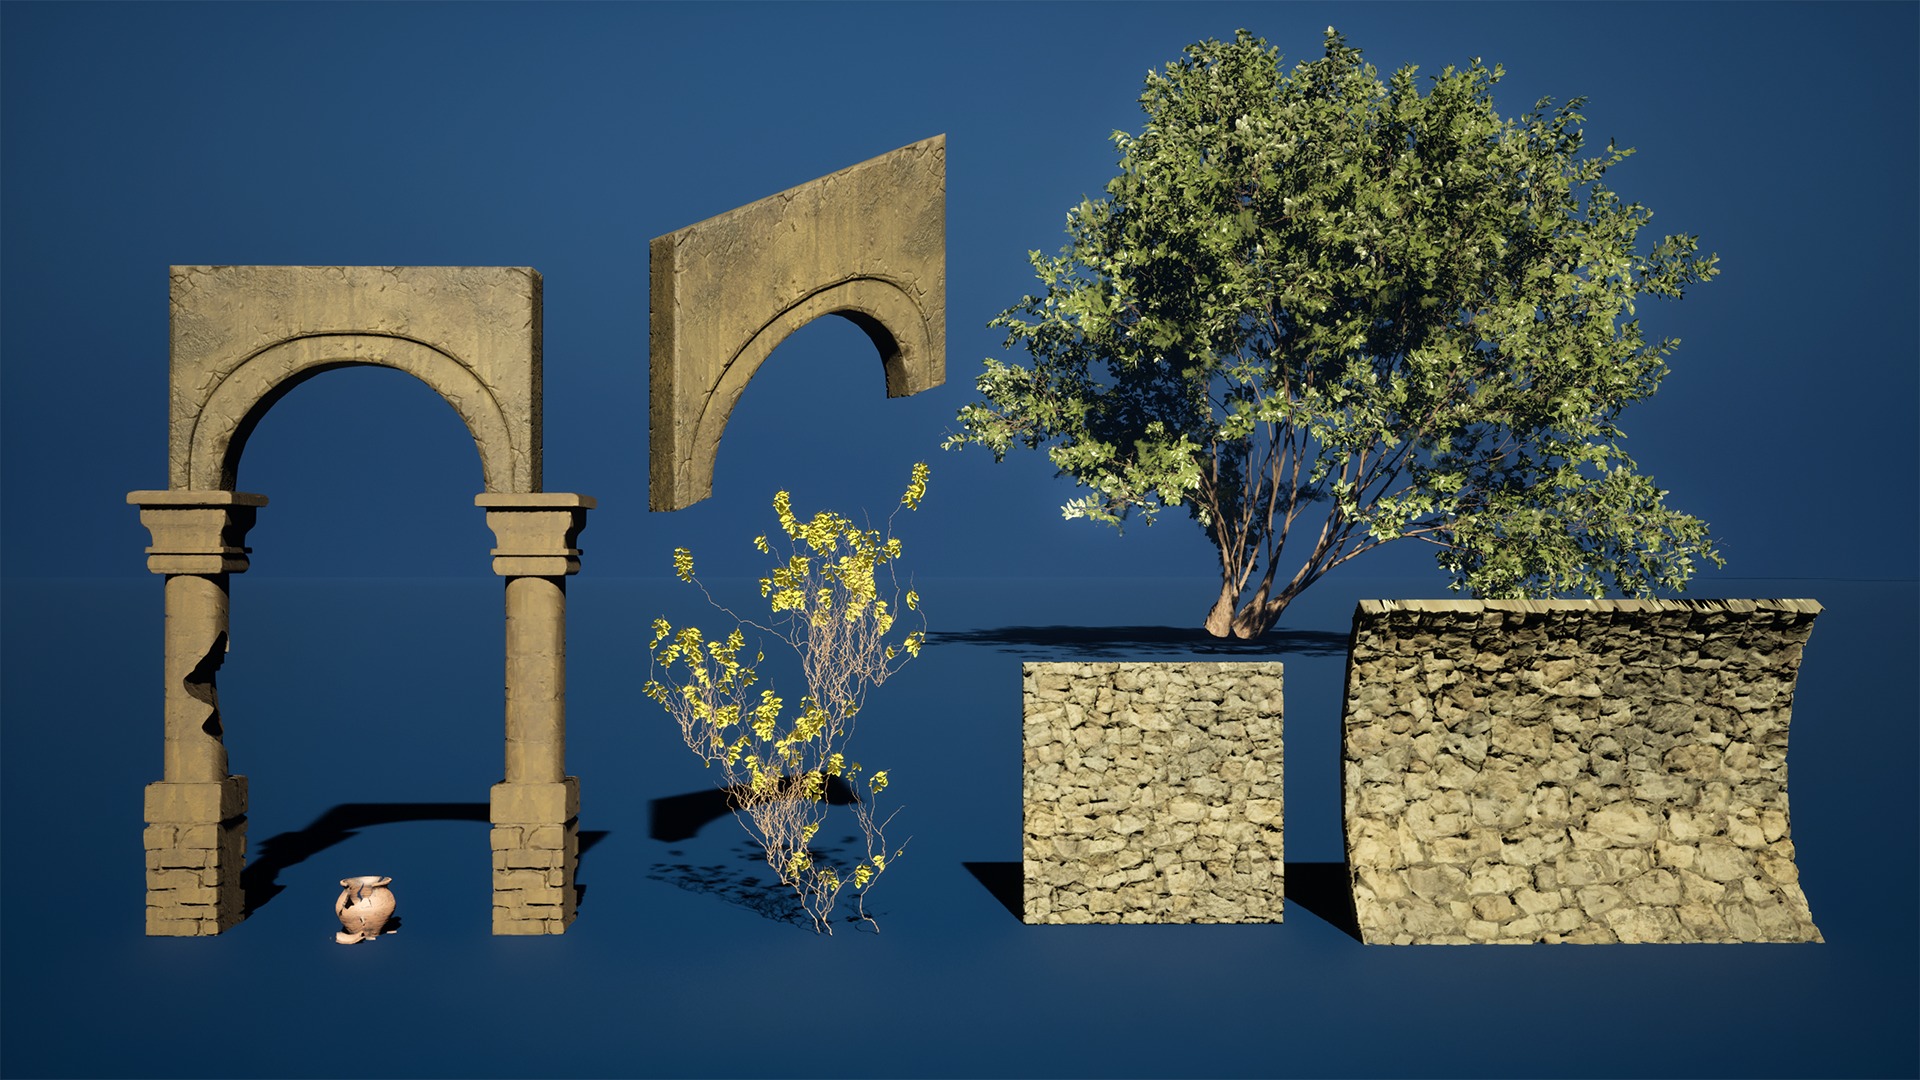
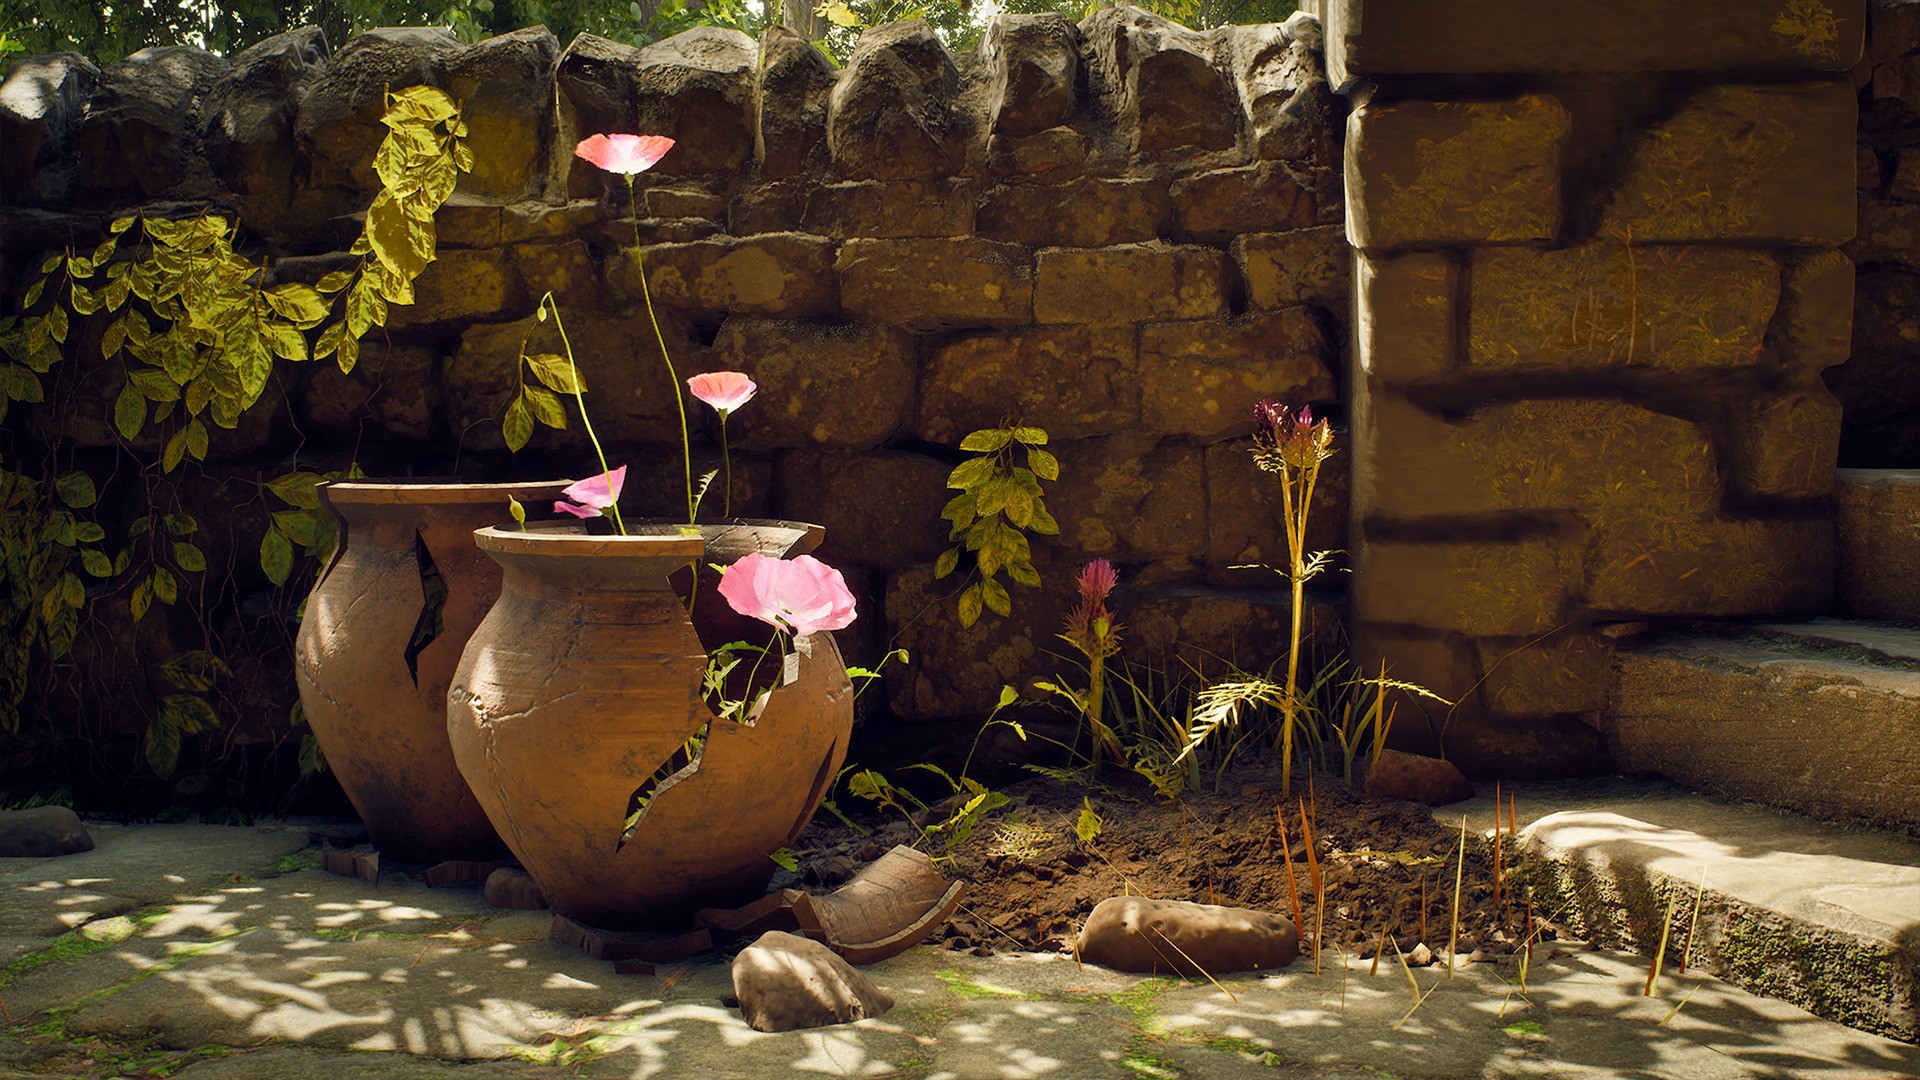
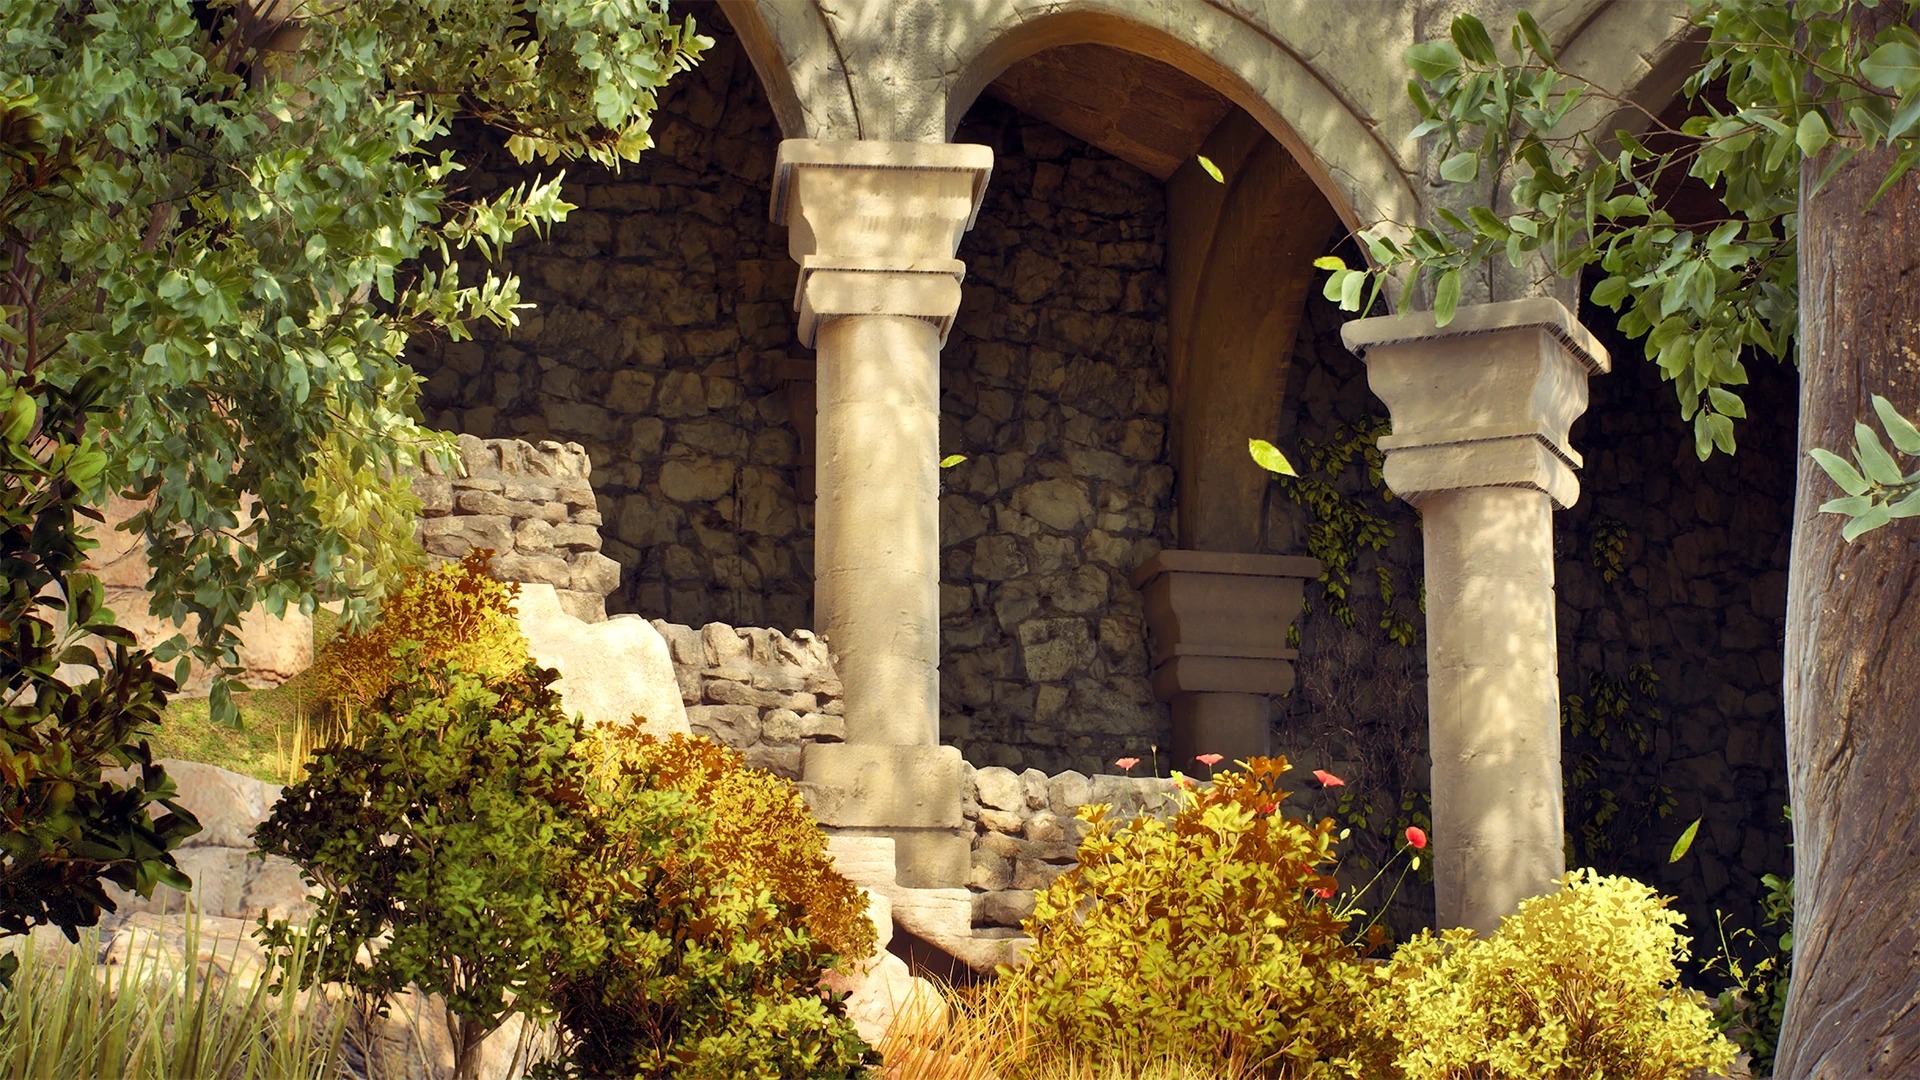
I couldn’t find nice stone arches on Quixel that would fit my scene, so I made them myself. I did some quick sculpts in ZBrush and baked them down on a low-poly mesh in Substance Painter.
I made the curved walls in Blender, using a displacement texture with the displace modifier. It’s super handy! The vase was simply modelled in Blender and textured in Substance Painter.
Foliage
For the foliage I tried some new things. The ivy was made with a Blender plugin, and I reused the textures from my trees.
The tree was made entirely in Unreal Engine using the Procedural Vegetation Editor plugin. This system is similar to Unity SpeedTree.
It allows you to tweak parameters to generate trees that fit your scene. It uses Nanite and it’s very easy to work with.

Textures
Most of my assets use Quixel textures. This helped save time so I could focus more on lighting, composition, and the overall look. For the arches, pillars, and vase, I created my own textures.
These assets were unwrapped in Blender and textured in Substance Painter.
Decals also played a big role in improving the scene. I scattered some moss here and there to get a more ruined look.
Asset Placement
Going from a blockout to the final scene can be intimidating. I started by replacing the boxes that represented the ground with a sculpted landscape.
Then I started replacing the blockout using as many Quixel assets as possible, then making some assets for things I couldn’t find on Fab.
This gif shows my progress from start to finish.
Composition
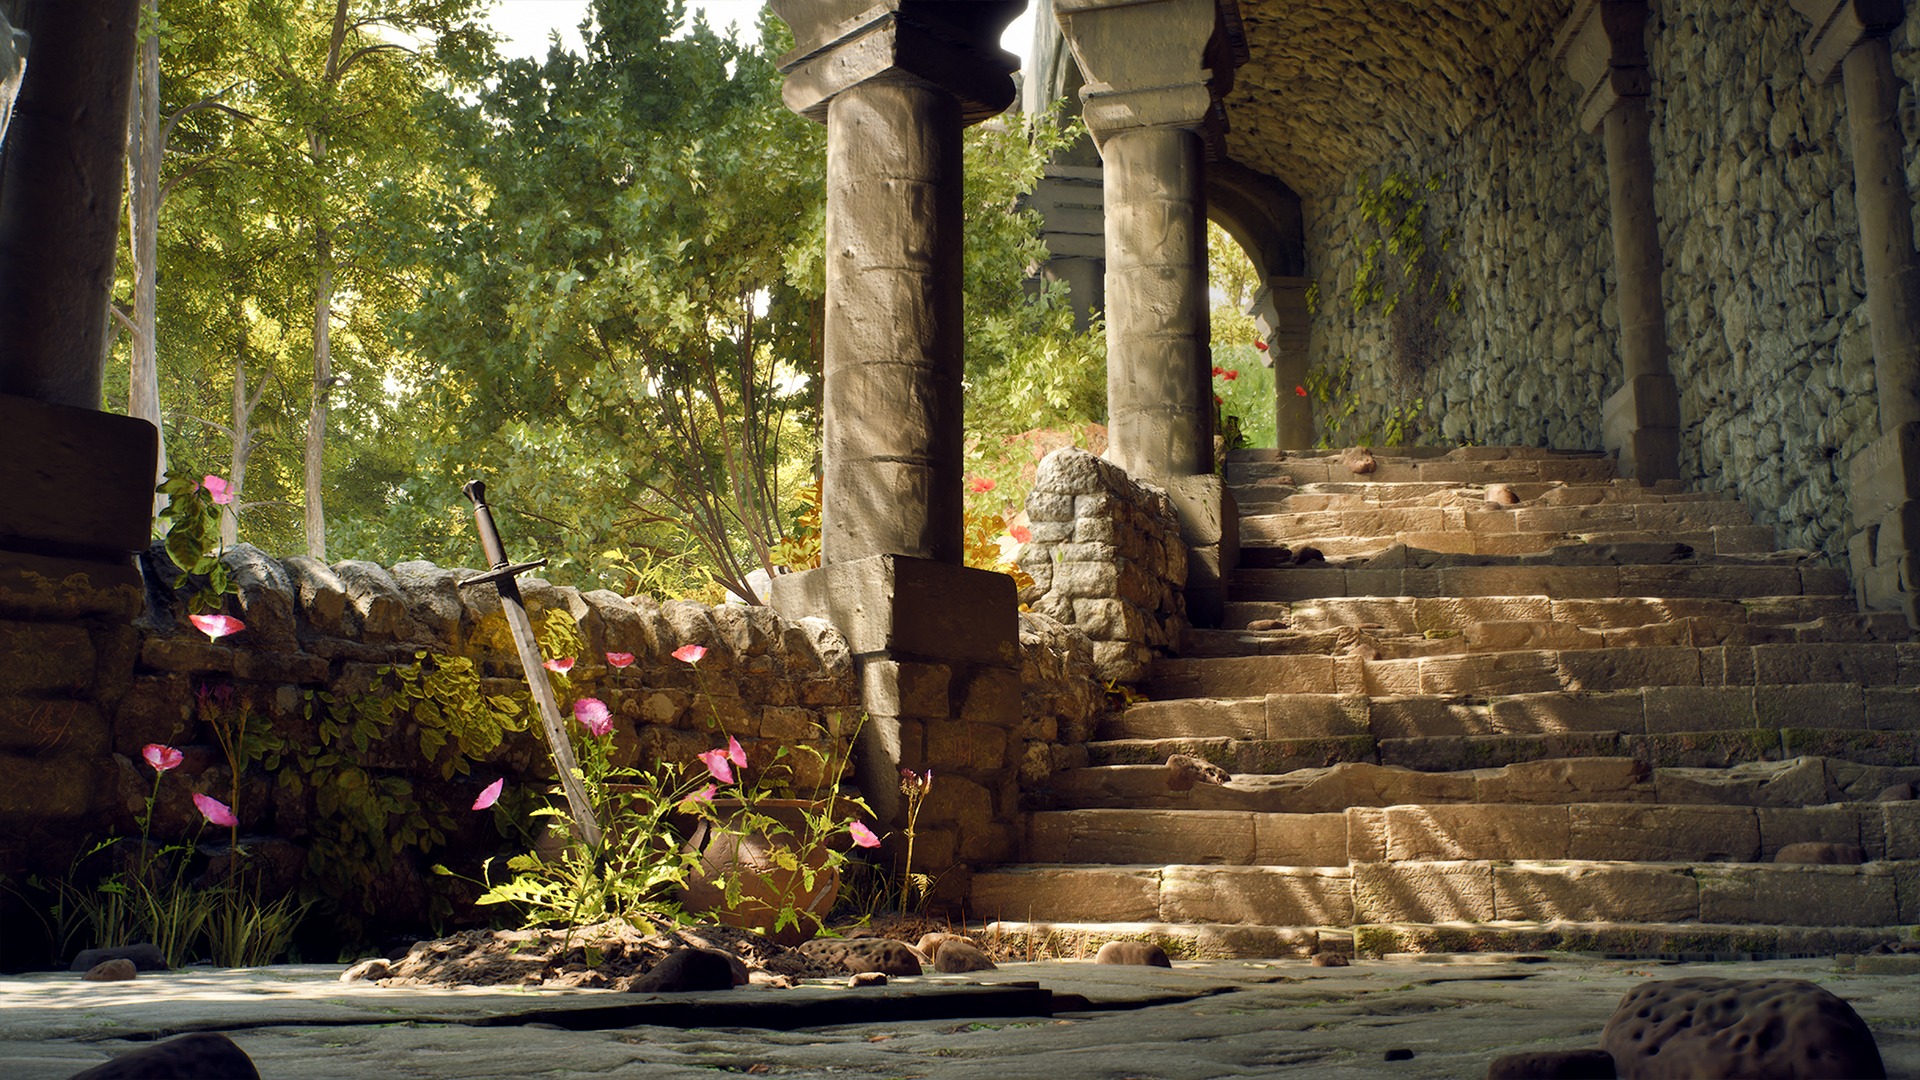
The project was built around a single main shot, so I always kept my camera view open in a separate viewport while working.
I placed my focal points according to the rule of thirds. The goal was to lead the viewer’s eyes to the arched entrance on top of the stairs. I achieved this using leading lines from the stairs and framing from the arches and foreground elements.
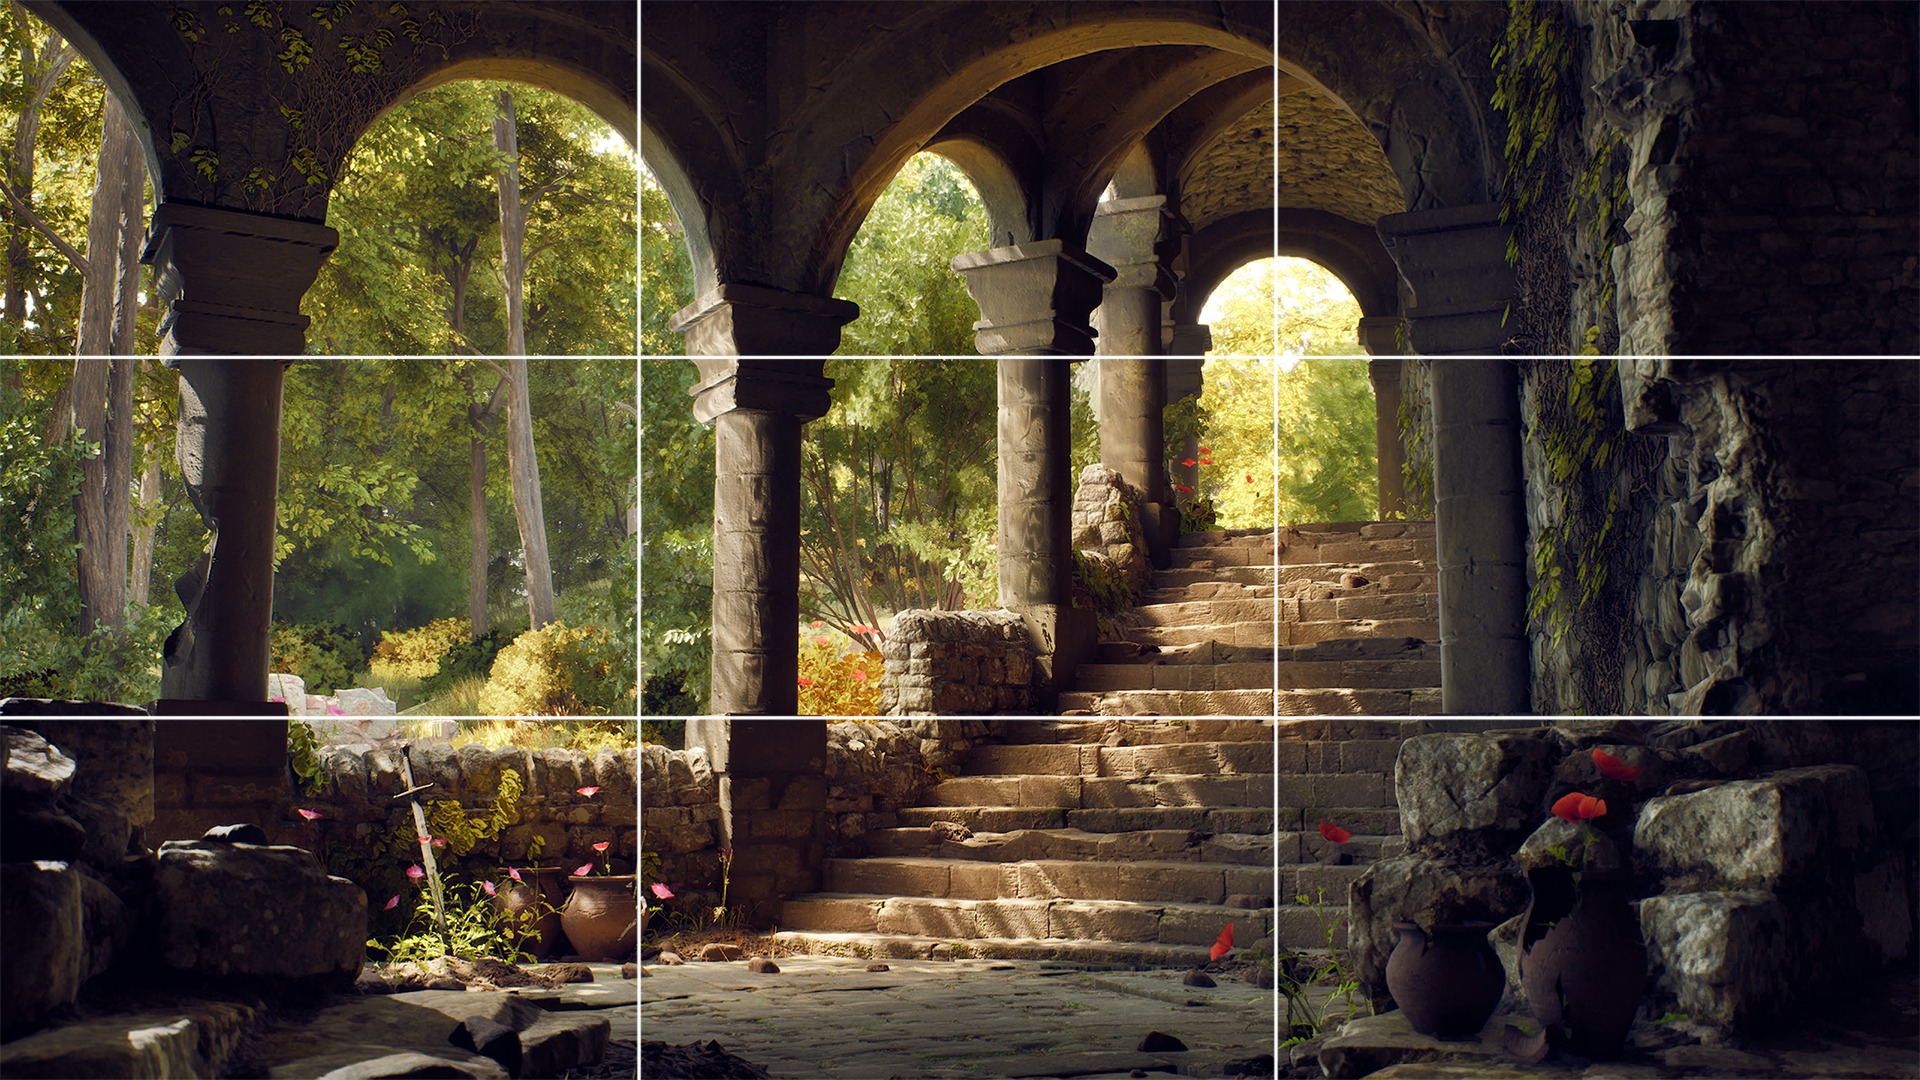
My scene was still lacking some flavour, especially on the left side. So I added another smaller focal point. I tried a bunch of different props, but I thought a sword was the coolest and most fitting idea. I made sure the lighting fell on it nicely.
I added some flowers to get some more colour.
Lighting
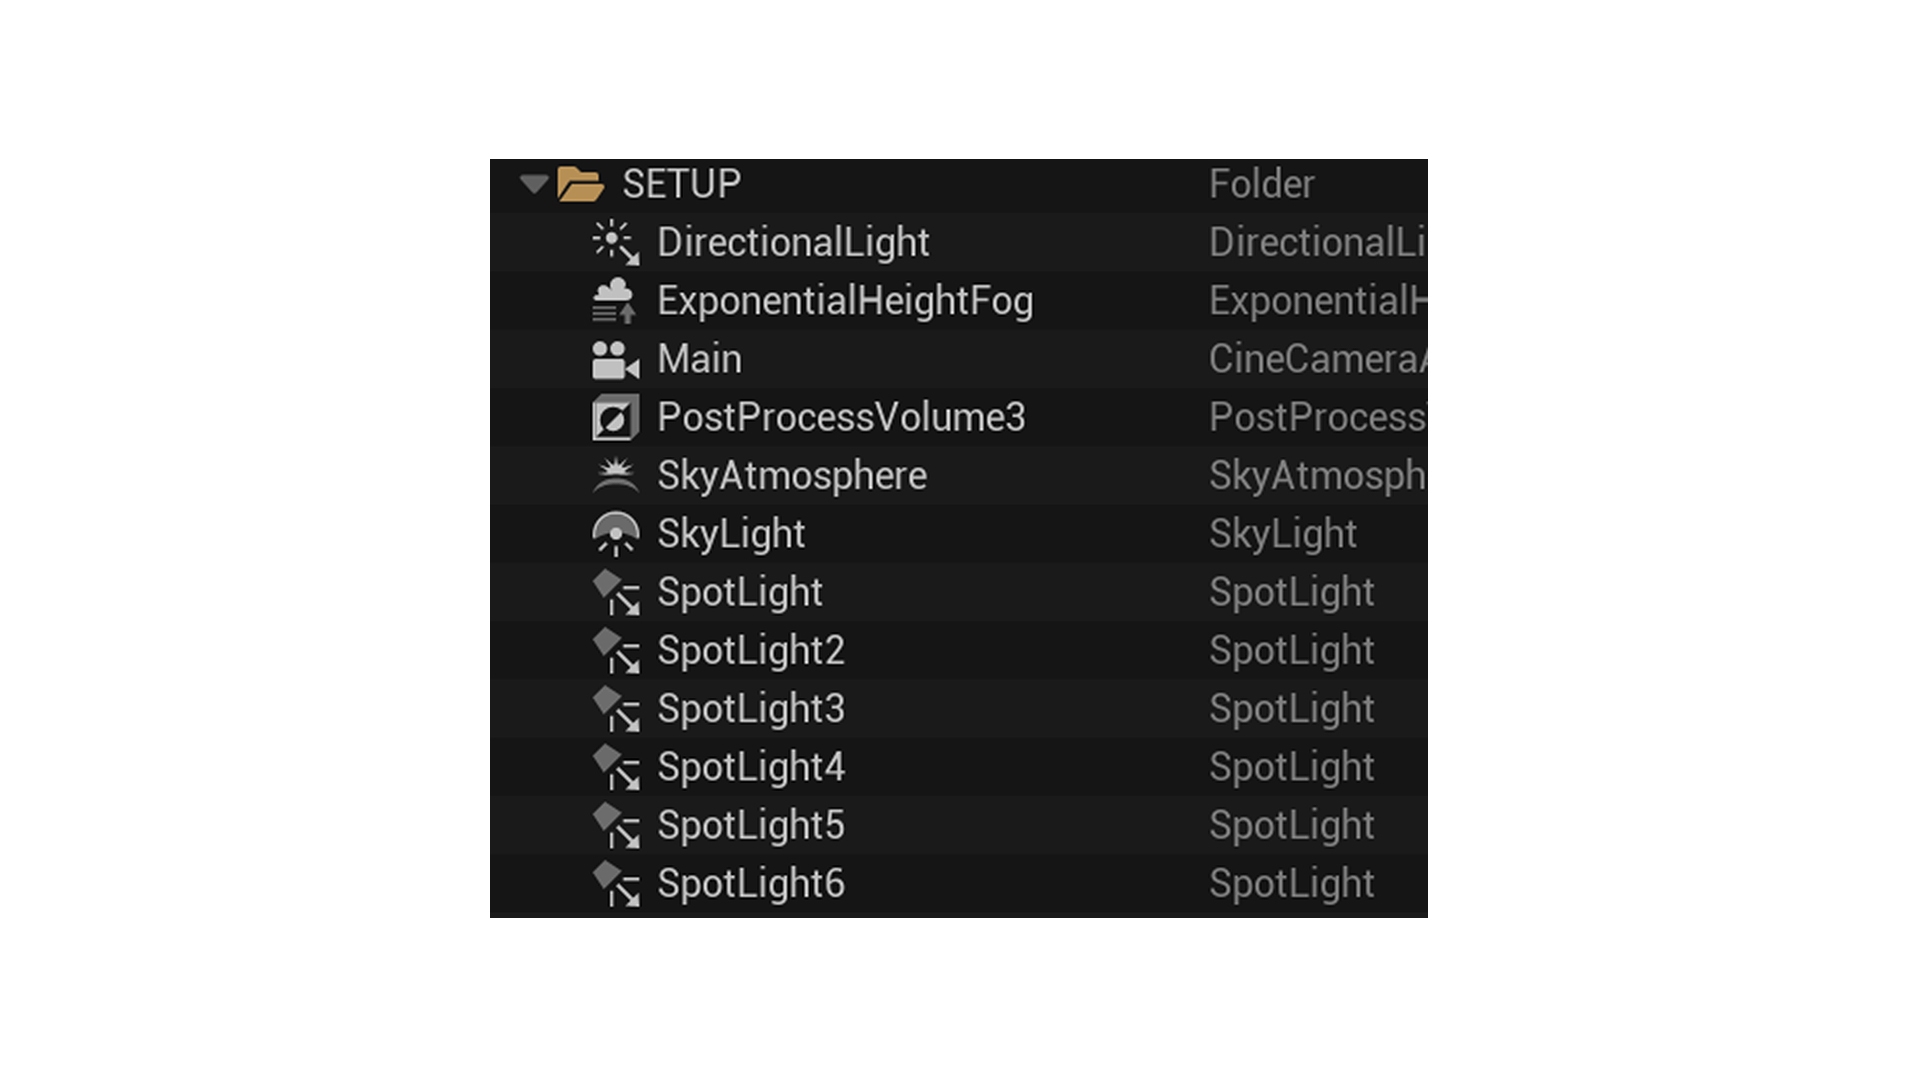
I started with only a directional light. As the scene developed, I added spotlights to put focus on the focal points and avoid completely dark areas. When lighting, there’s a lot of things to think about. I always ask myself these questions:
- Is there enough contrast?
- Is my focal point actually getting the attention?
- Is my scene overexposed or underexposed?
- Is my scene not too noisy?
- Is my scene still readable when I squint my eyes?
There’s always more to think about, but these were the main points for me.
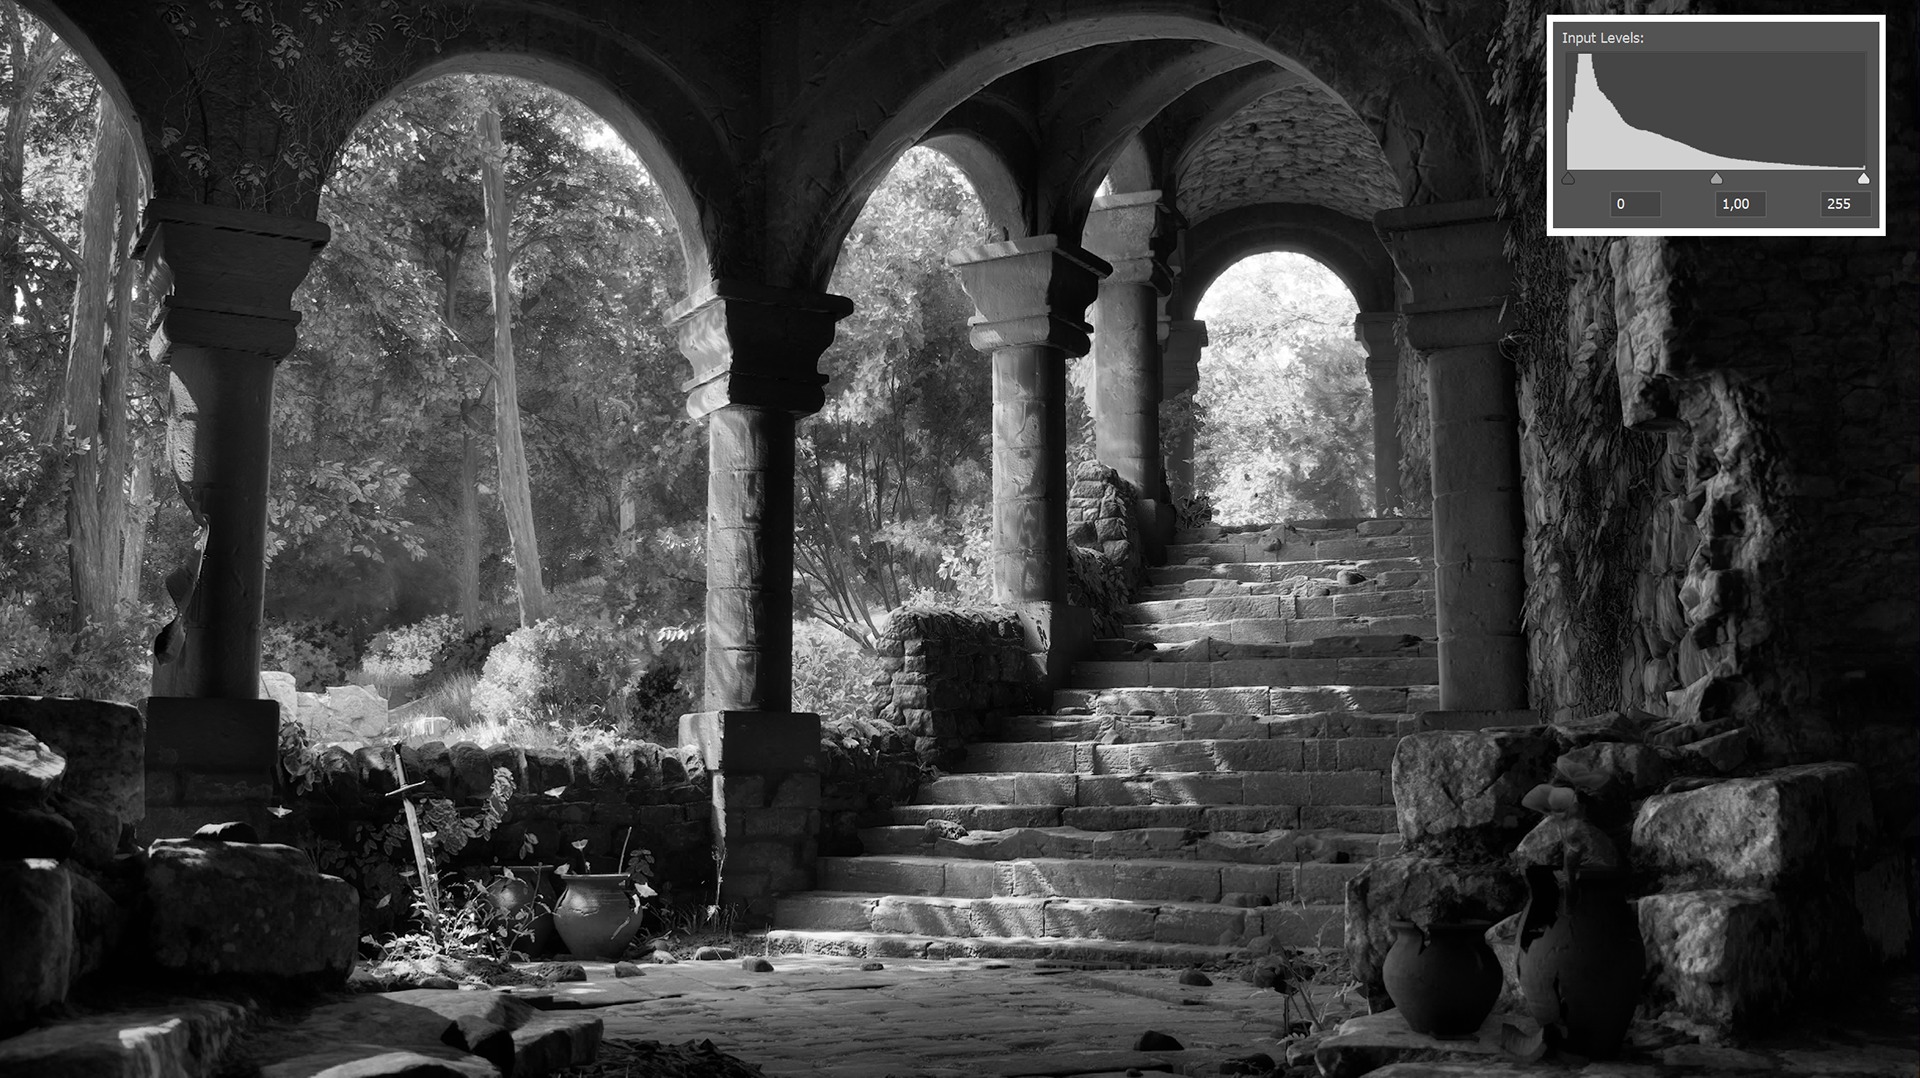
I made sure that the gateway is the brightest part of my scene. A useful trick is using grayscale mode (Ctrl + Windows + C) to check value contrast.
Making sure you have a nice contrast between light and dark will improve your scene a lot! Another nice way to check your values is by taking a screenshot and putting it into Photoshop. There you can check the levels with Ctrl + L.
Since my scene was inside with a big view on the outside forest, I had a lot of issues at first with my exposure. For this I had to tweak my post-process volume, mainly the shadow contrast and highlight contrast.
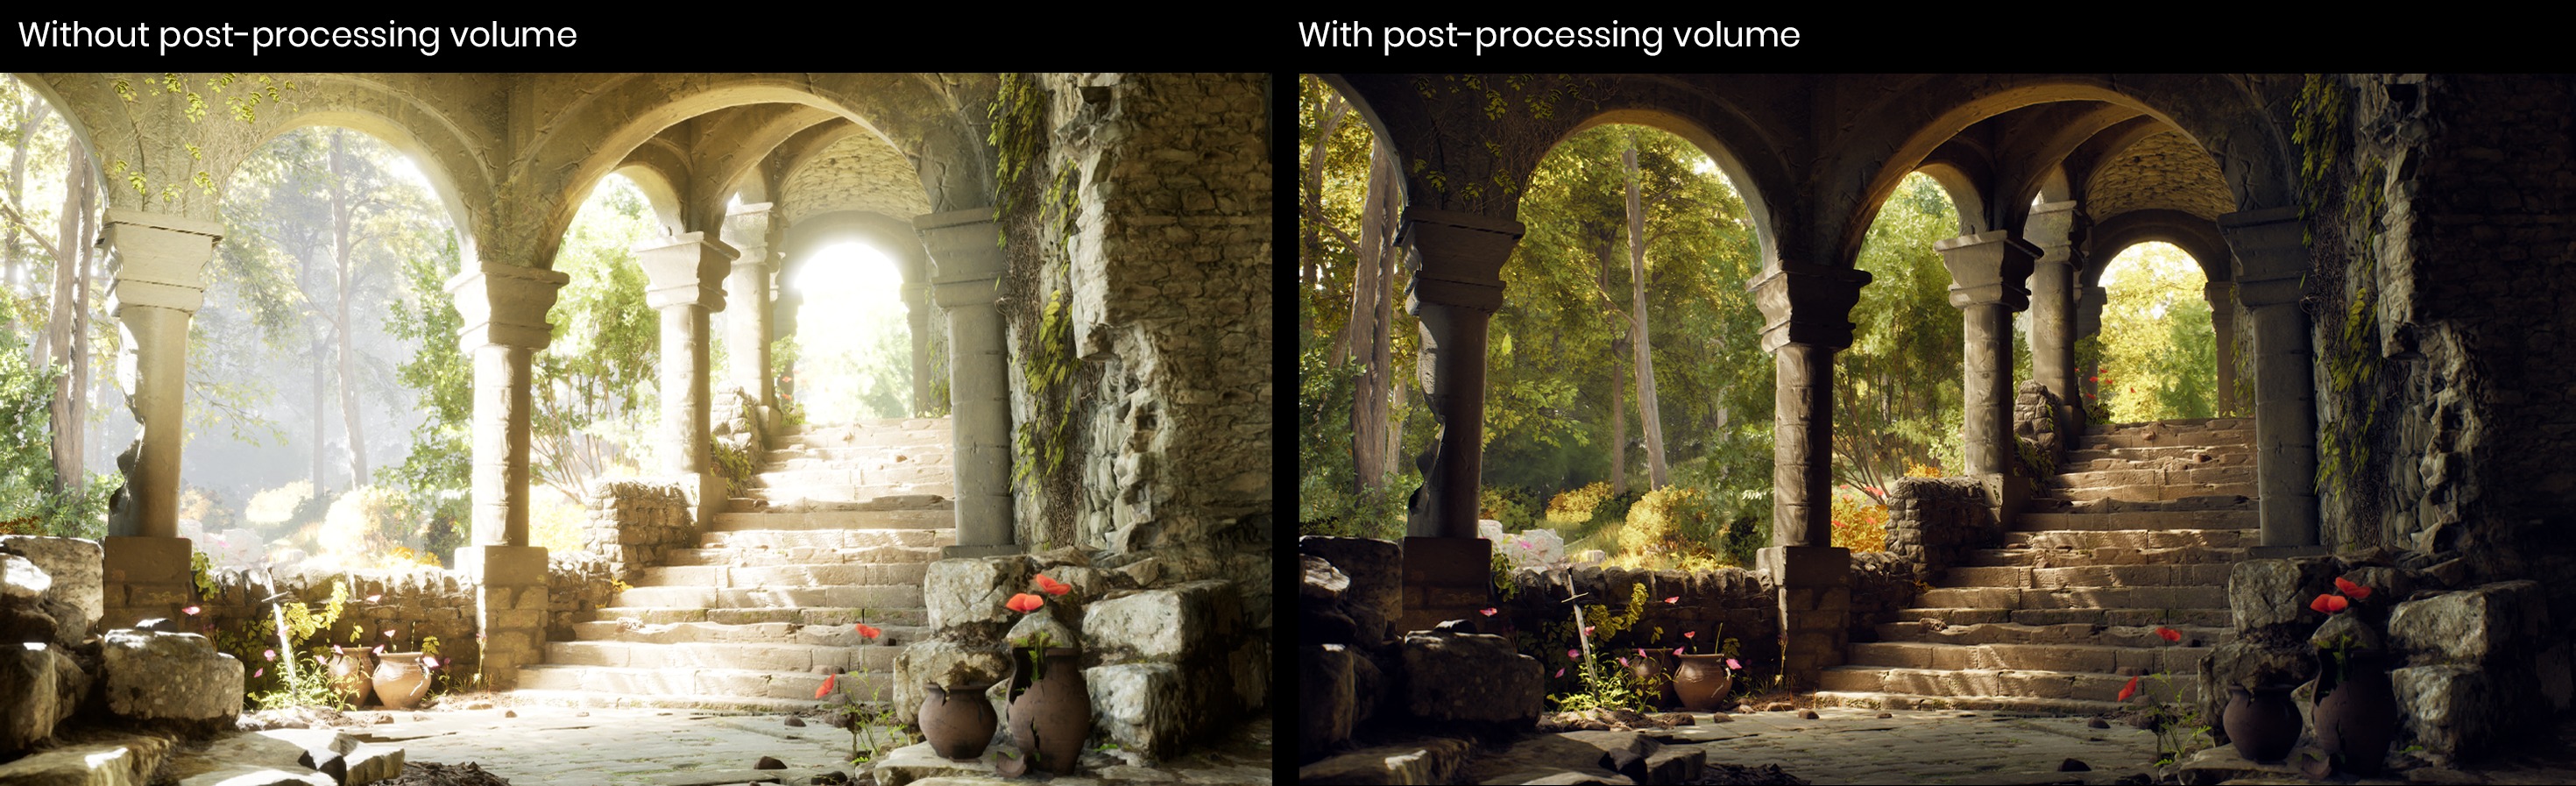
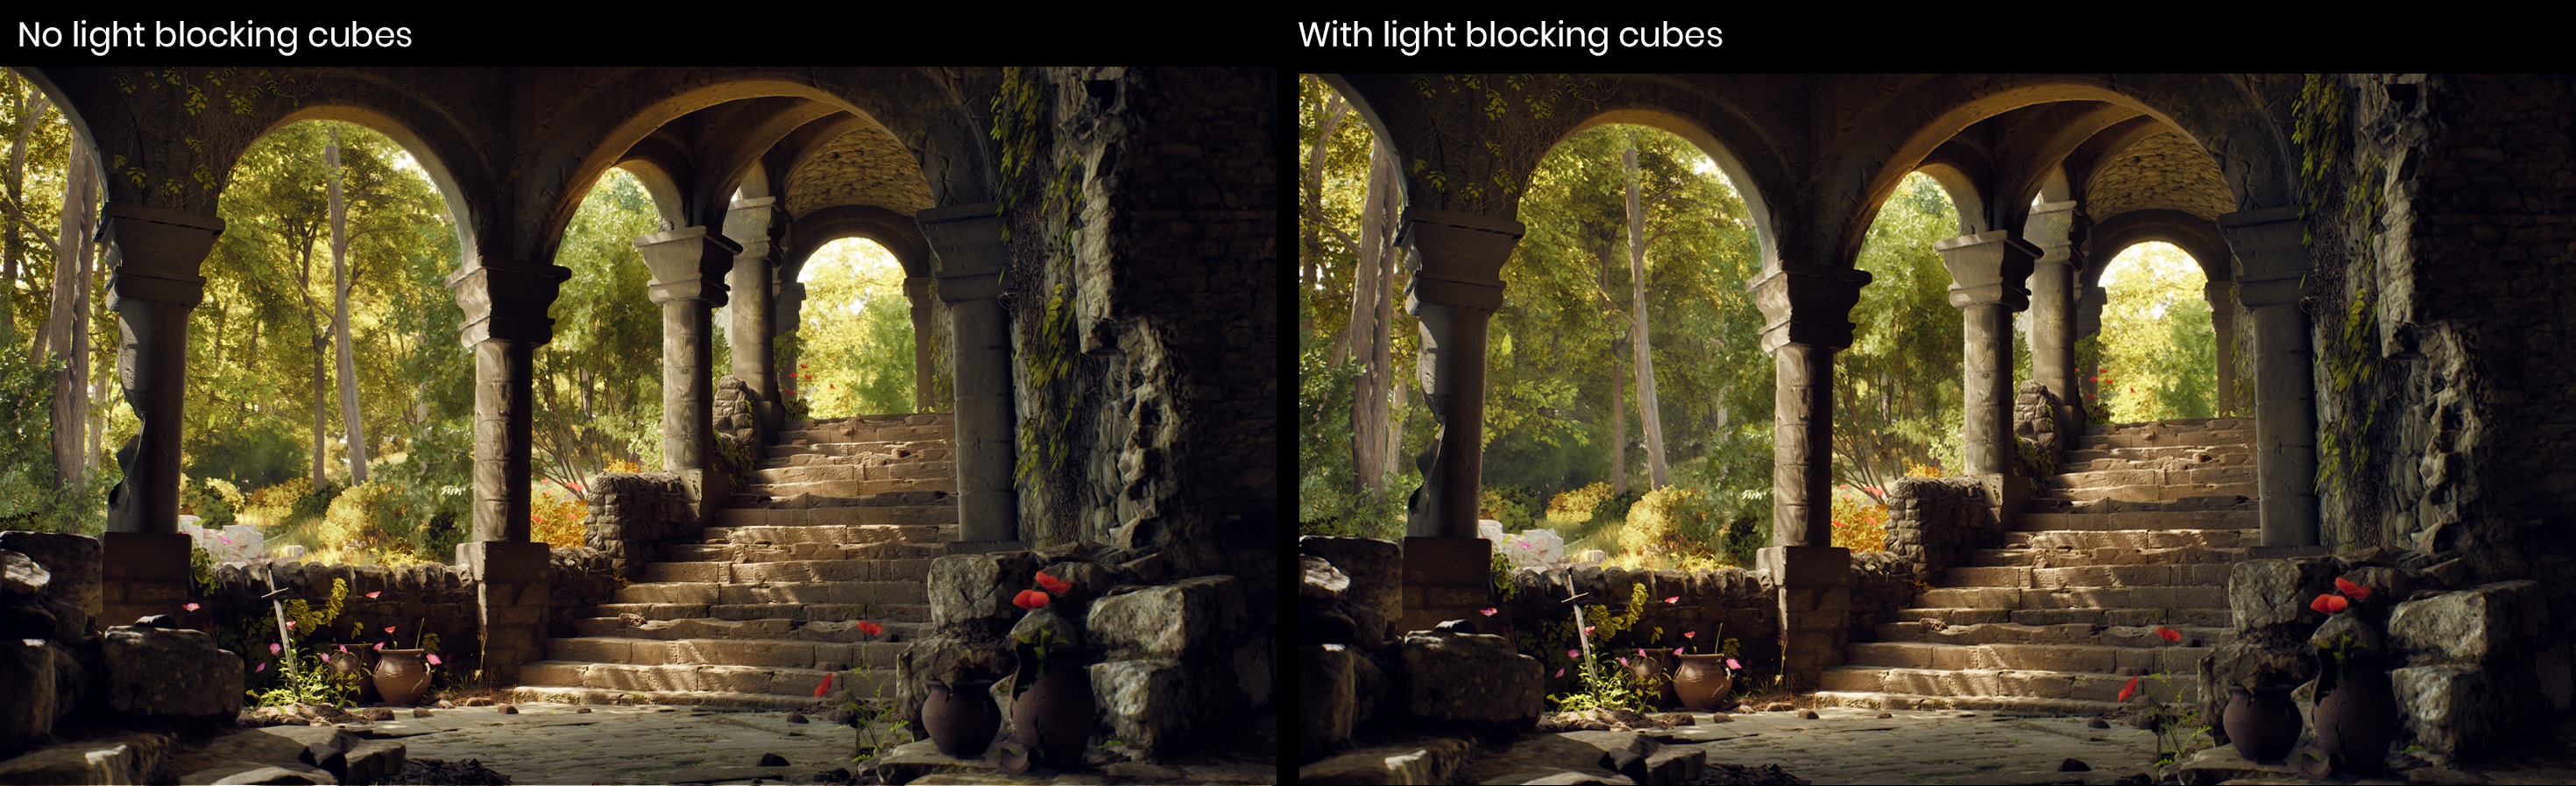
The forest also appeared too noisy. There was too much light on the left, which was taking away the attention from my focal points.
I fixed that by putting light-blocking meshes outside of the camera view to control shadow areas.
I also encountered issues with my directional light. Because I wanted soft shadows, I made my source angle bigger. But by doing that my shadows had some moving/glitching noise.
This is a very common Lumen problem in Unreal – there’s no easy way around it. I resolved it by turning the source angle down again until the shadows stopped glitching. I wasn’t happy with the sharp shadows, so I faked it with spotlights.
My spotlights didn’t look right at first – it was too obvious that the light was not made by the trees. To make the spotlights feel natural, I created a material with a blurred leaf mask and applied it to them, simulating light filtering through foliage.
This video shows the difference between only using a directional light versus using a directional light with spotlights:
Of course, always be careful not to overload your scene with spotlights – take performance into account!
This is everything I needed to light my final scene.
Besides fixing the exposure, I also used my post-process volume for colour grading. For me this was a lot of messing around and finding out. During this phase I always take a lot of screenshots so I can compare the changes I made with what I had before.
I also used a look up table (LUT). For this I took a screenshot of my scene into Photoshop and tweaked it there. Then I applied my post processing in Photoshop onto a default LUT and brought the changed one into my post-process volume.

Presentation & Rendering
I always make sure to put enough effort into rendering and presentation, since that’s what people see in the end. I used the Movie Render Queue plugin and tweaked a few settings, such as increasing the sample count and resolution, to get a cleaner and higher-quality result.
I also put time into creating clear breakdowns, trying to show as much of the process and important details as possible with a few images.
Conclusion
Firstly, I want to thank Games Artist for the opportunity to write this article!
This project was really fun to work on, and I feel like I’m improving at what I love. The support I received from friends, teachers, and others who interacted with my work has been incredibly motivating.
Thank you for reading my article! I hope I inspired you or helped you in some way.
P.S. I’m looking for an internship Q2 2027 😉
Feel free to connect with me or check out my ArtStation:
Read more articles
You might also like these articles.