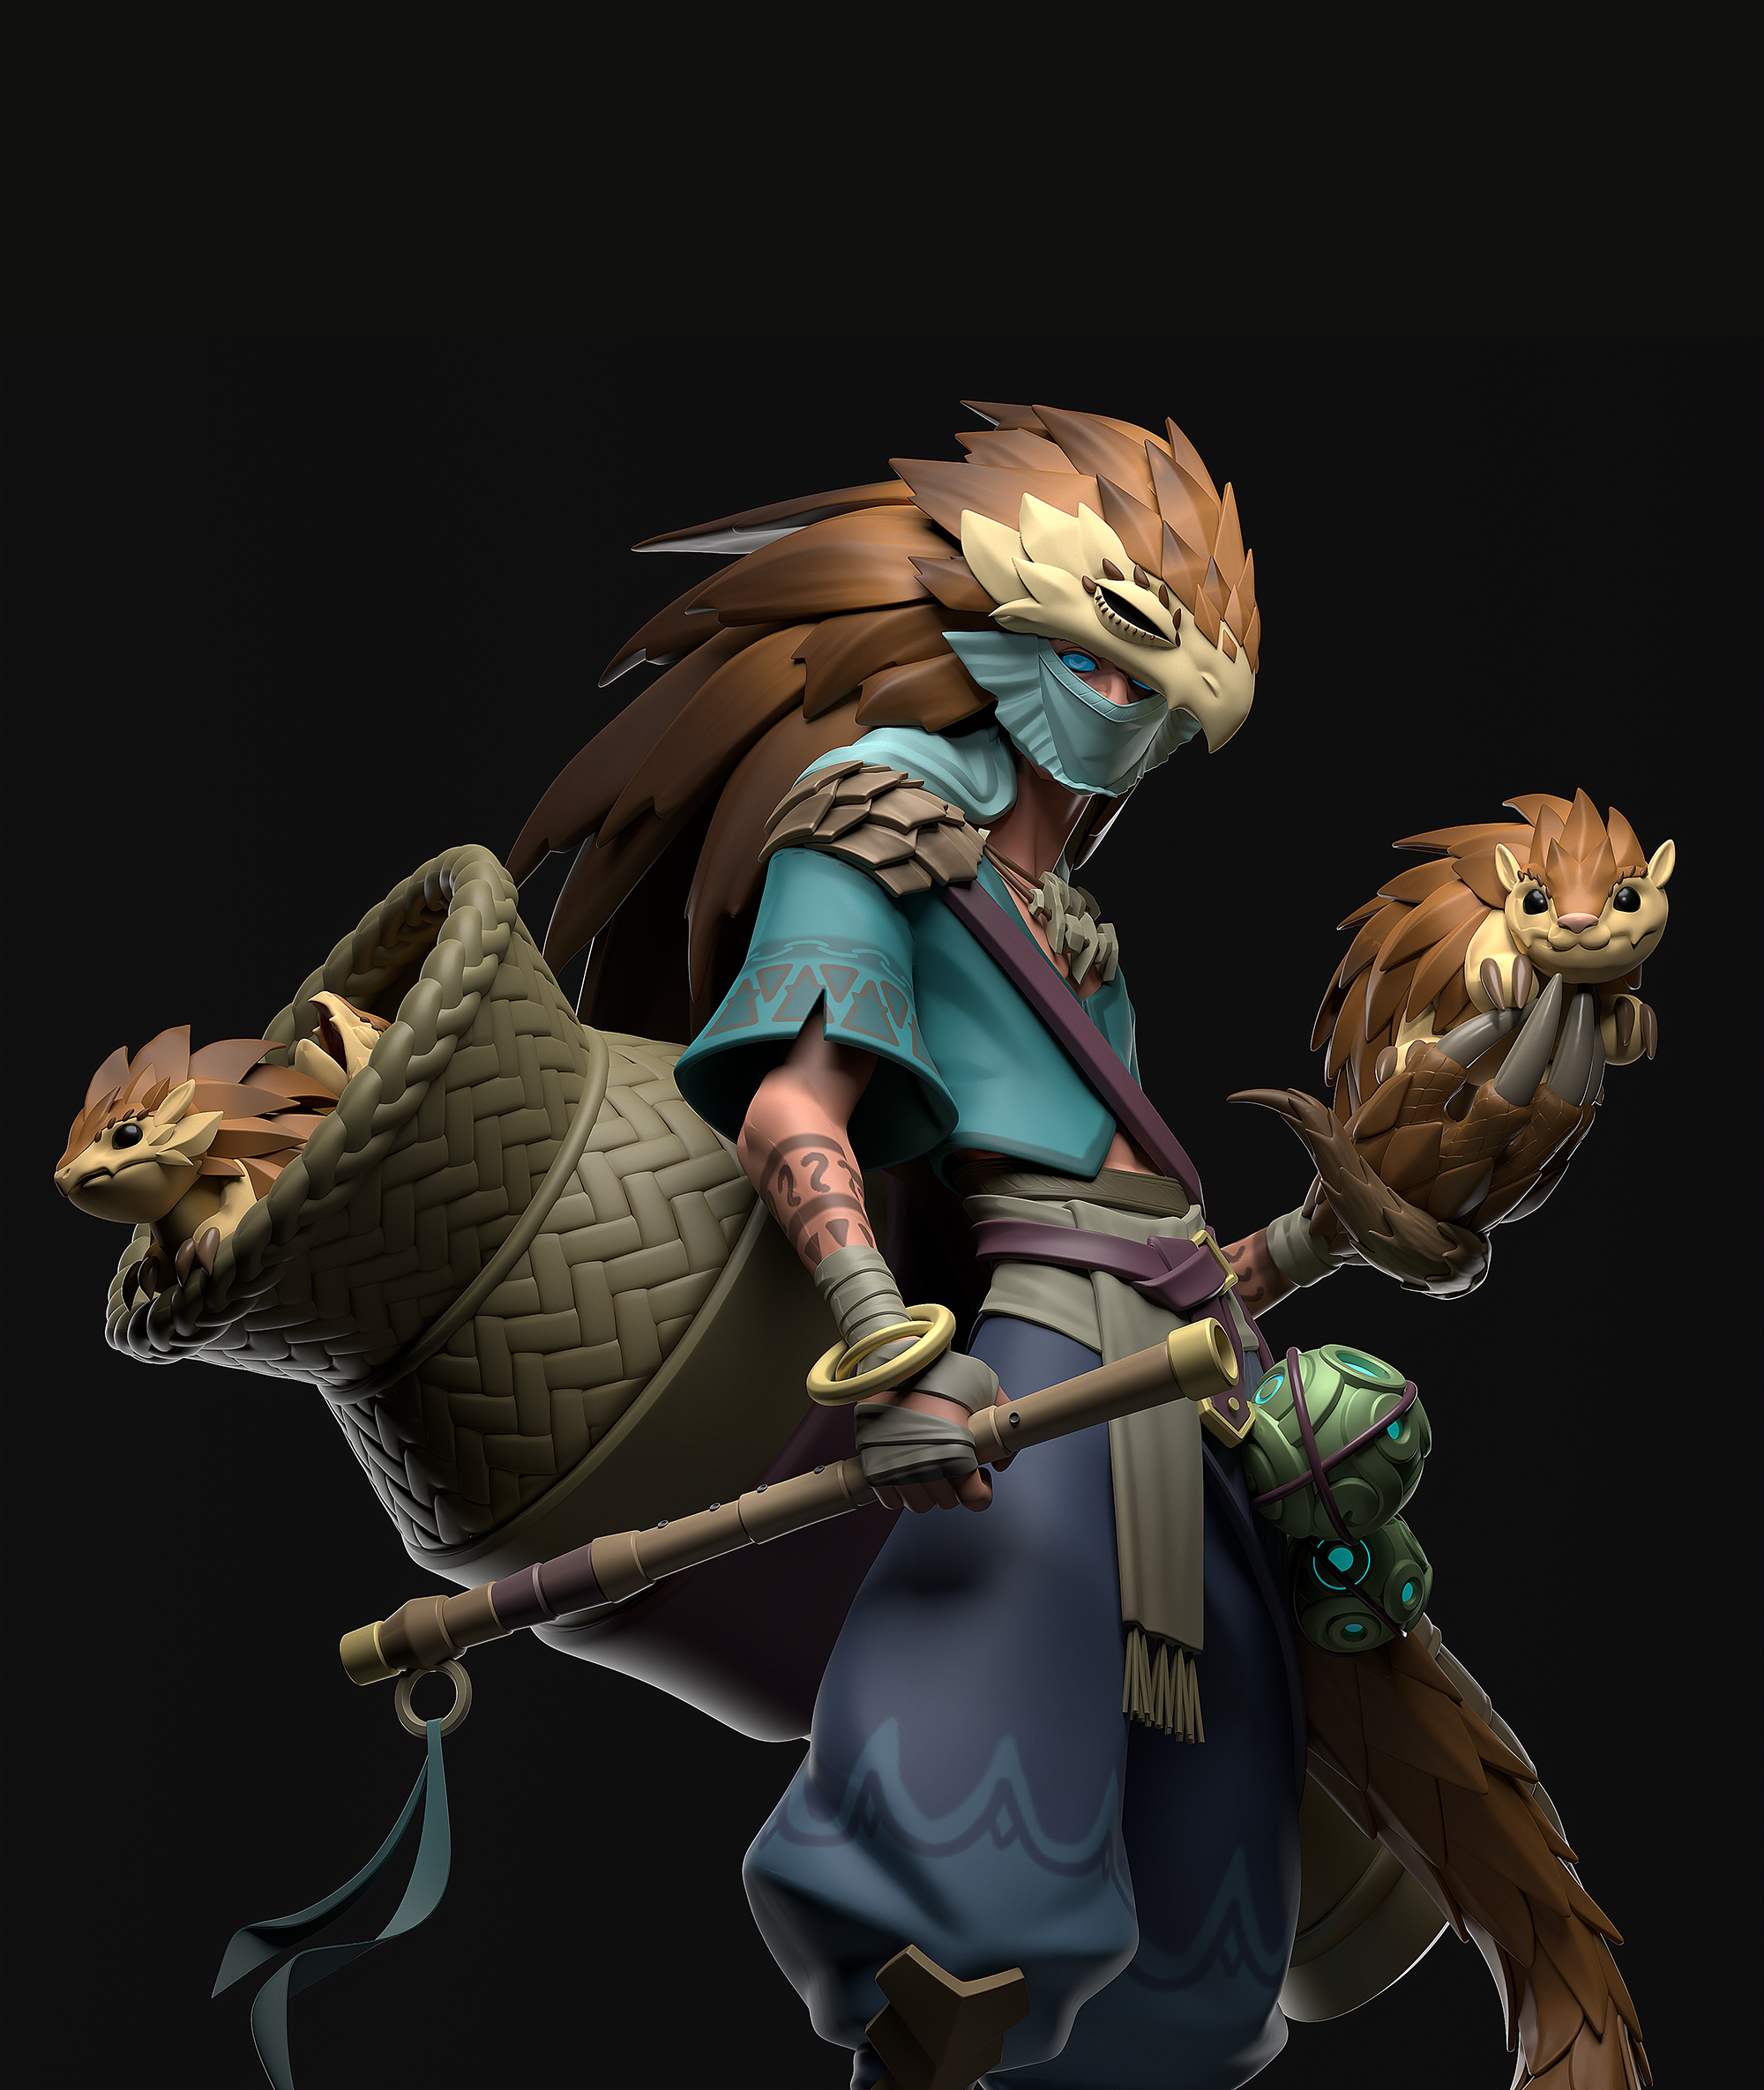
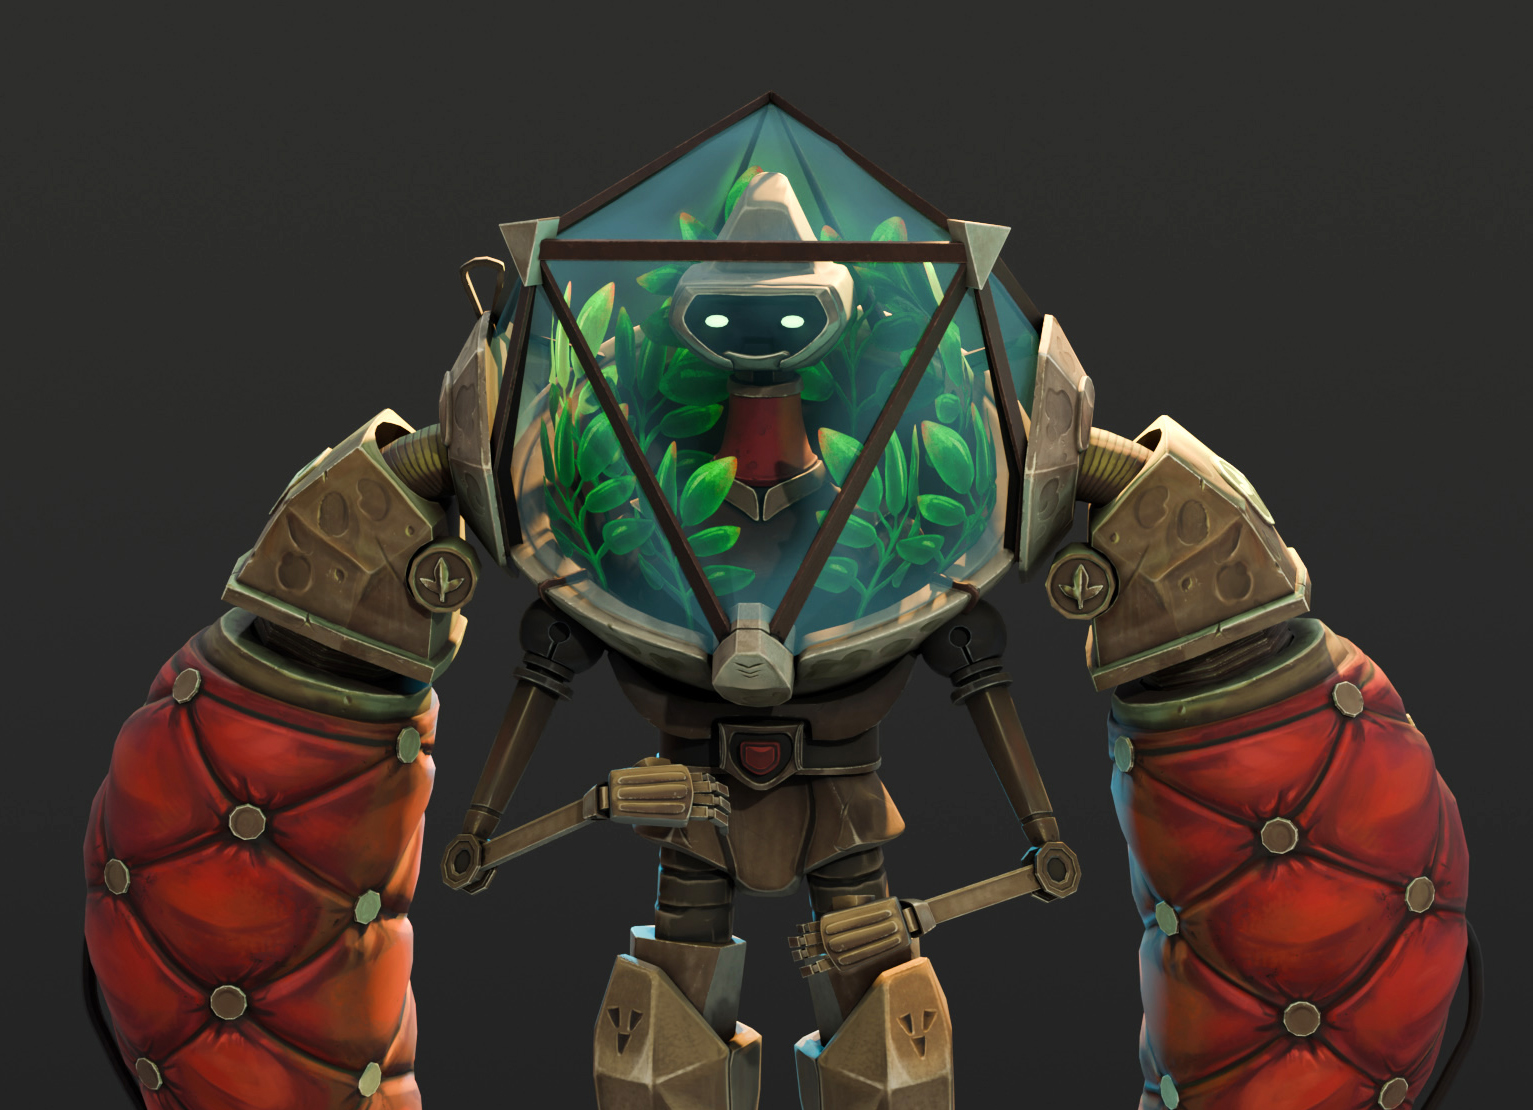
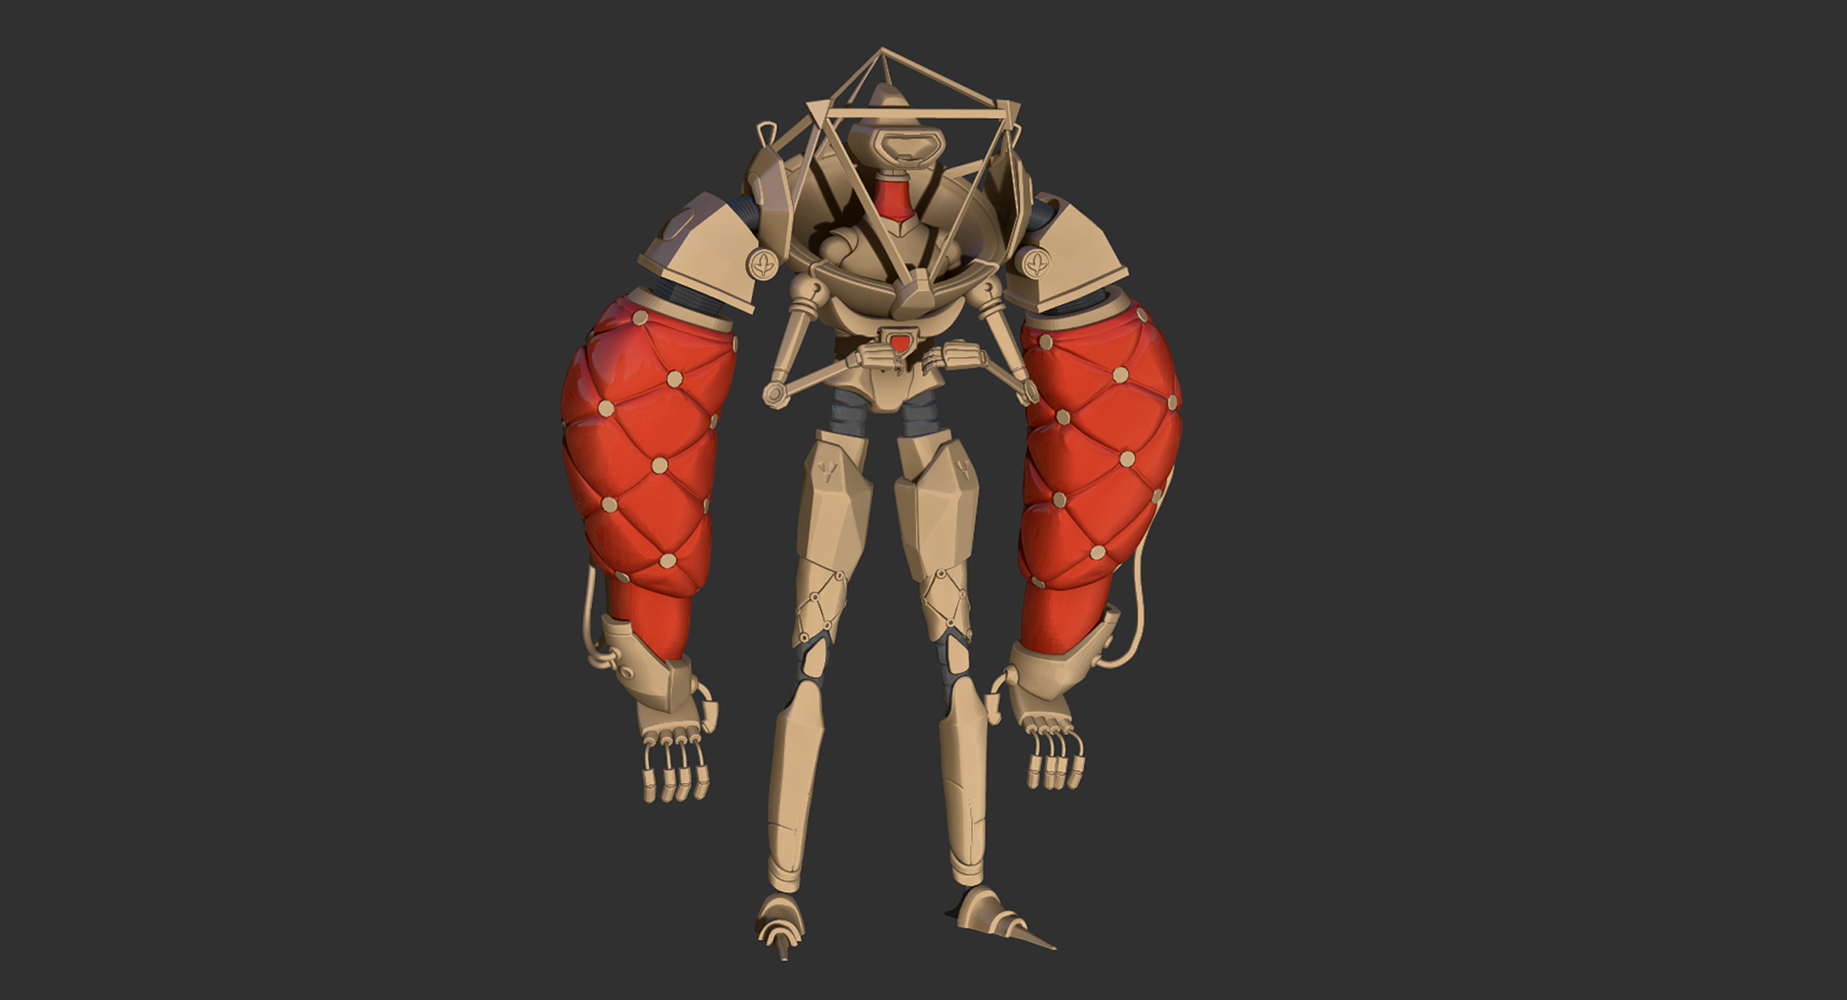
Plant Robot

Tanya Riarey
Introduction
Hi there, I'm Tanya, a generalist game artist based in the UK.
With over 10 years of experience in the game industry, I've collaborated with a wide range of clients—from small indie game developers to larger studios.
My most recent project was Broken Sword 1: Reforged, where I worked as a 2D/3D animator.
While 2D art has always been my primary focus in client work, I've been actively developing my 3D skills and expanding my 3D portfolio in my spare time.
Goals
The Cute Plant Keeper Robot was one such portfolio project. My goal was to practice ZBrush hard-surface techniques I learned from various courses (I’ll link my recommended courses at the end of this article) and to develop a pipeline for a complex hand-painted character. This involved working with multiple UDIMs, practicing manual retopology in Maya, and creating hand-painted textures in Substance Painter and 3DCoat.

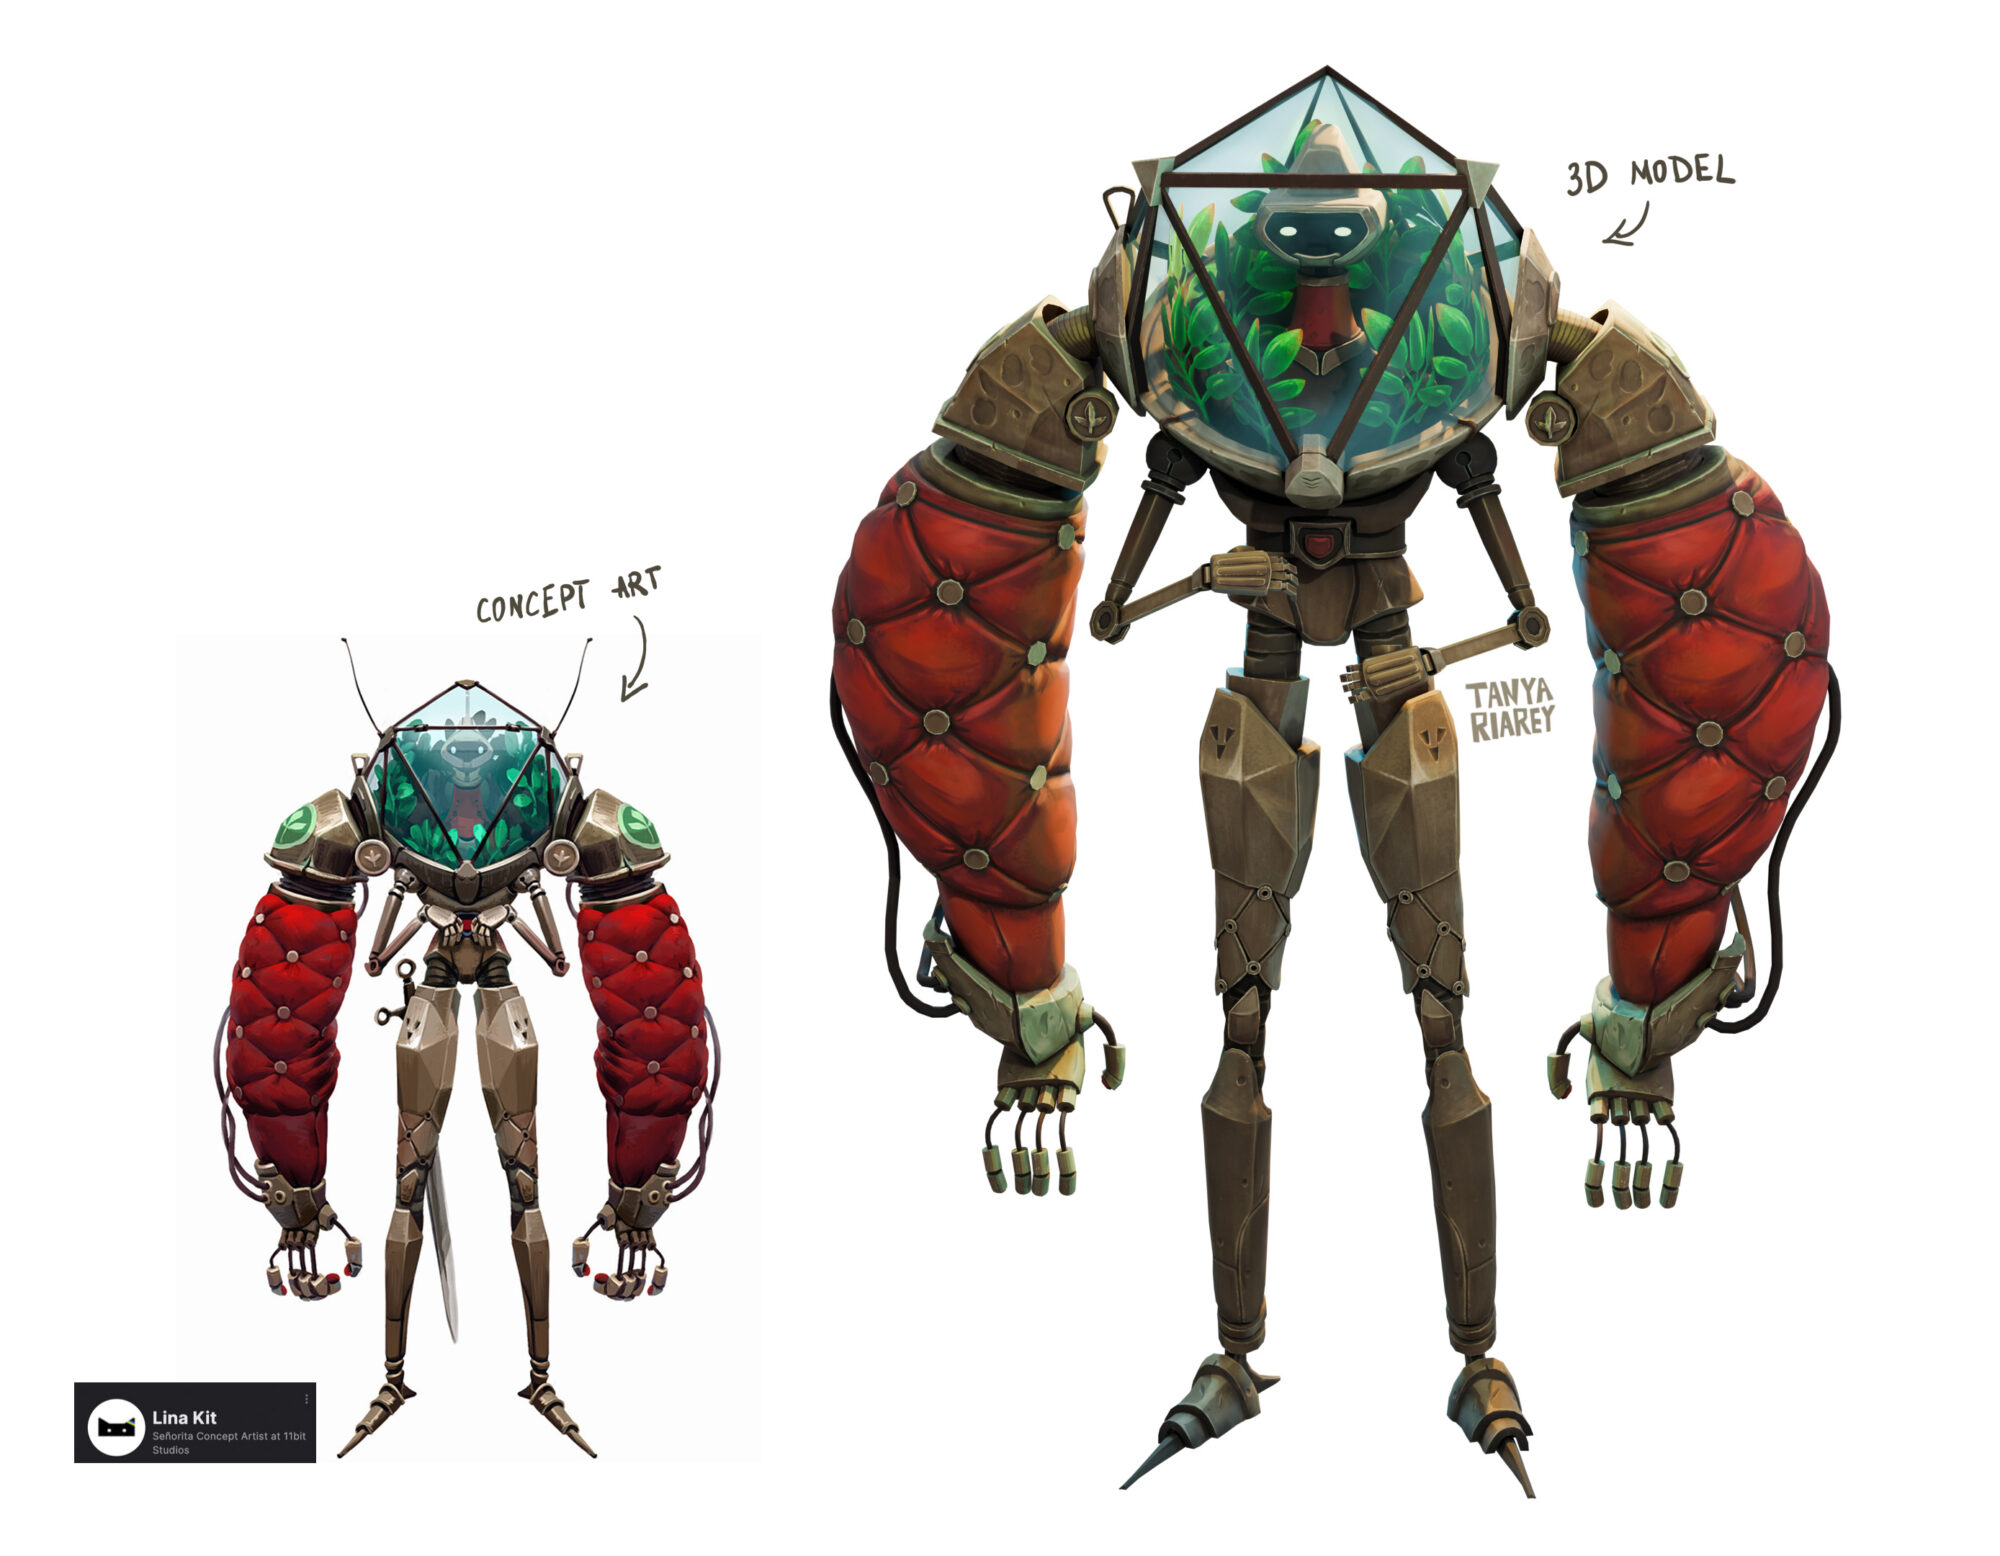
Inspiration & Concept
I also wanted to use concept art by another artist, Lina Kit, because I absolutely fell in love with this little guy and wanted to create a 3D model that would capture the same charm and overall cuteness of the original concept.
References
Unlike most projects where I gather many references, for this one, I relied solely on the concept art mentioned earlier.
The character’s non-anatomical nature and my background in 2D art made it much easier for me to focus directly on one reference image only.
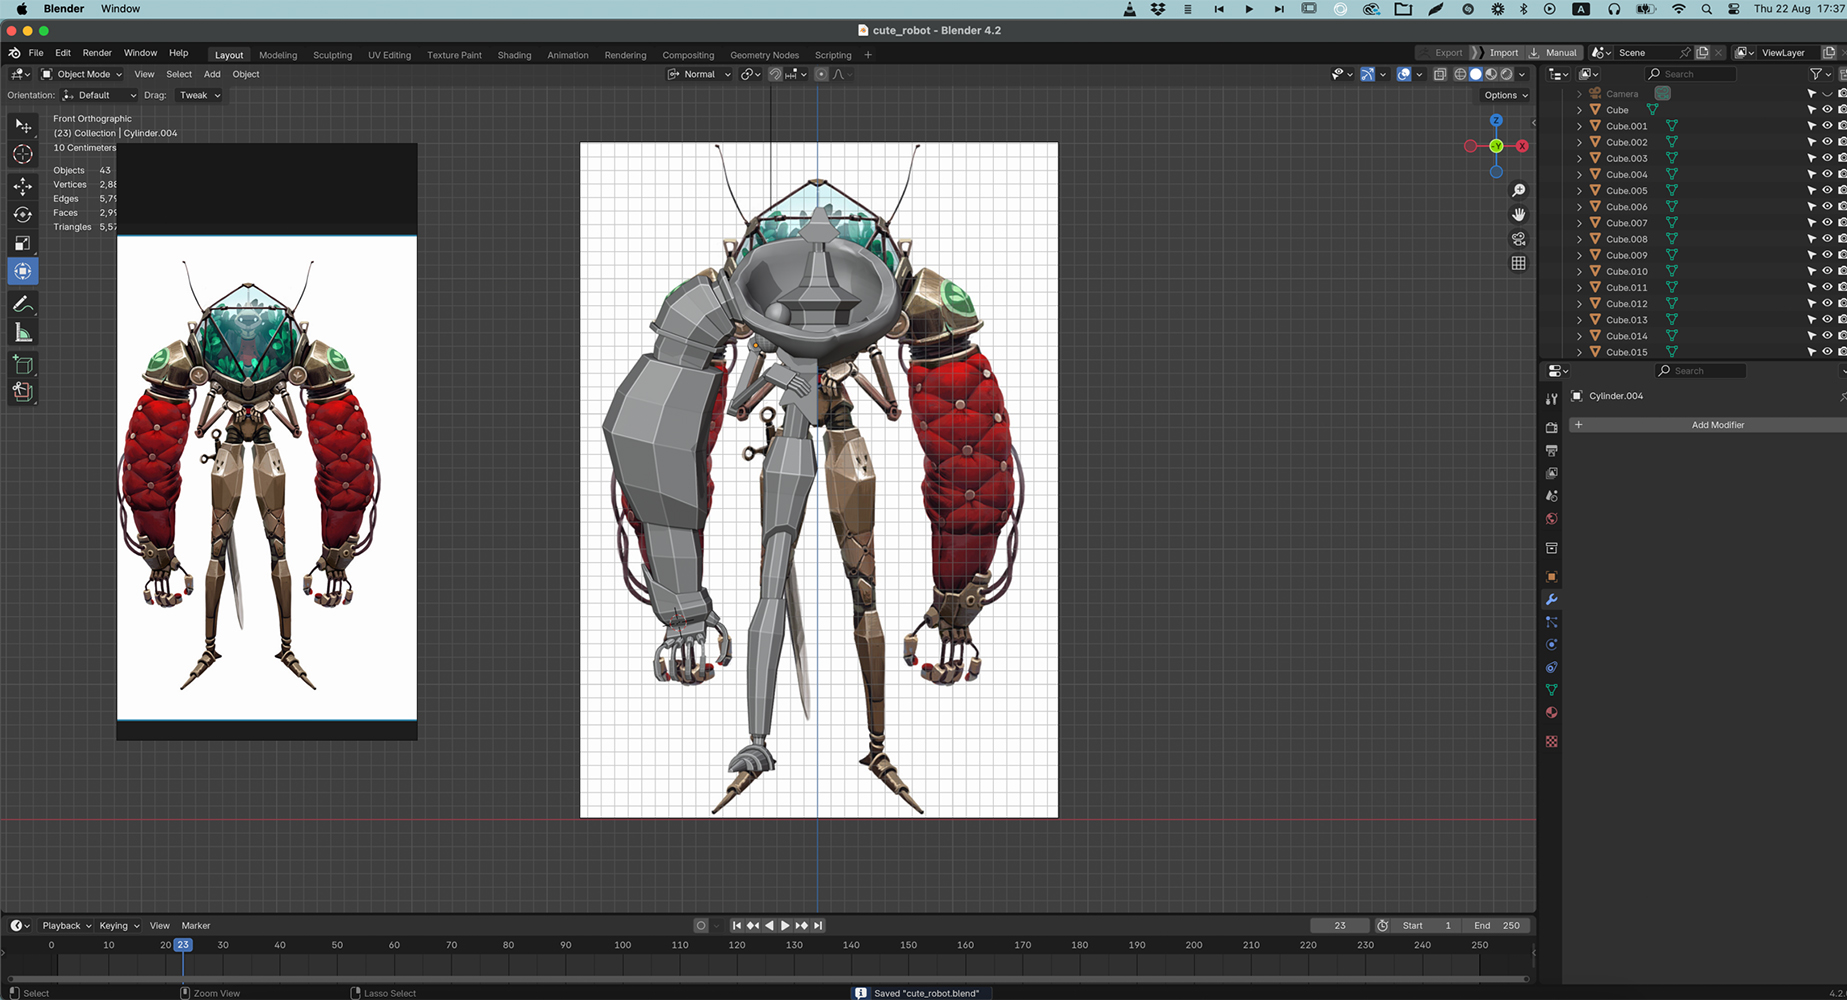
Blockout
For some reason, starting a new project always feels easier in Blender than in ZBrush. I made a very rough blockout in Blender, using my reference to ensure I kept the overall proportions right.
At this stage, I didn’t worry about topology as I was planning to use Dynamesh in ZBrush for most of the parts.
I also use an add-on for Blender called GoB and ZBrush’s GoZ applink to send meshes back and forth between Blender and ZBrush.
Sculpting the Base
ZBrush was the first 3D software I learned. About 7-8 years ago, I watched an entry-level course on Udemy and began incorporating 3D sculpting into my 2D art pipeline.
ZBrush has so many hidden features, and it’s impossible to know them all unless watching more advanced tutorials on how to do things.
This is especially true for sculpting hard surfaces and keeping everything smooth with sharp edges.
My general pipeline for sculpting any stylized hard surface begins with a basic shape, which could be something I’ve created in Blender or any default ZBrush primitive.
I then use Dynamesh and manually sculpt the shape I want using regular ZBrush sculpting brushes. At this stage, it looks quite unpolished and wobbly, but I’m only aiming to create the overall shape.
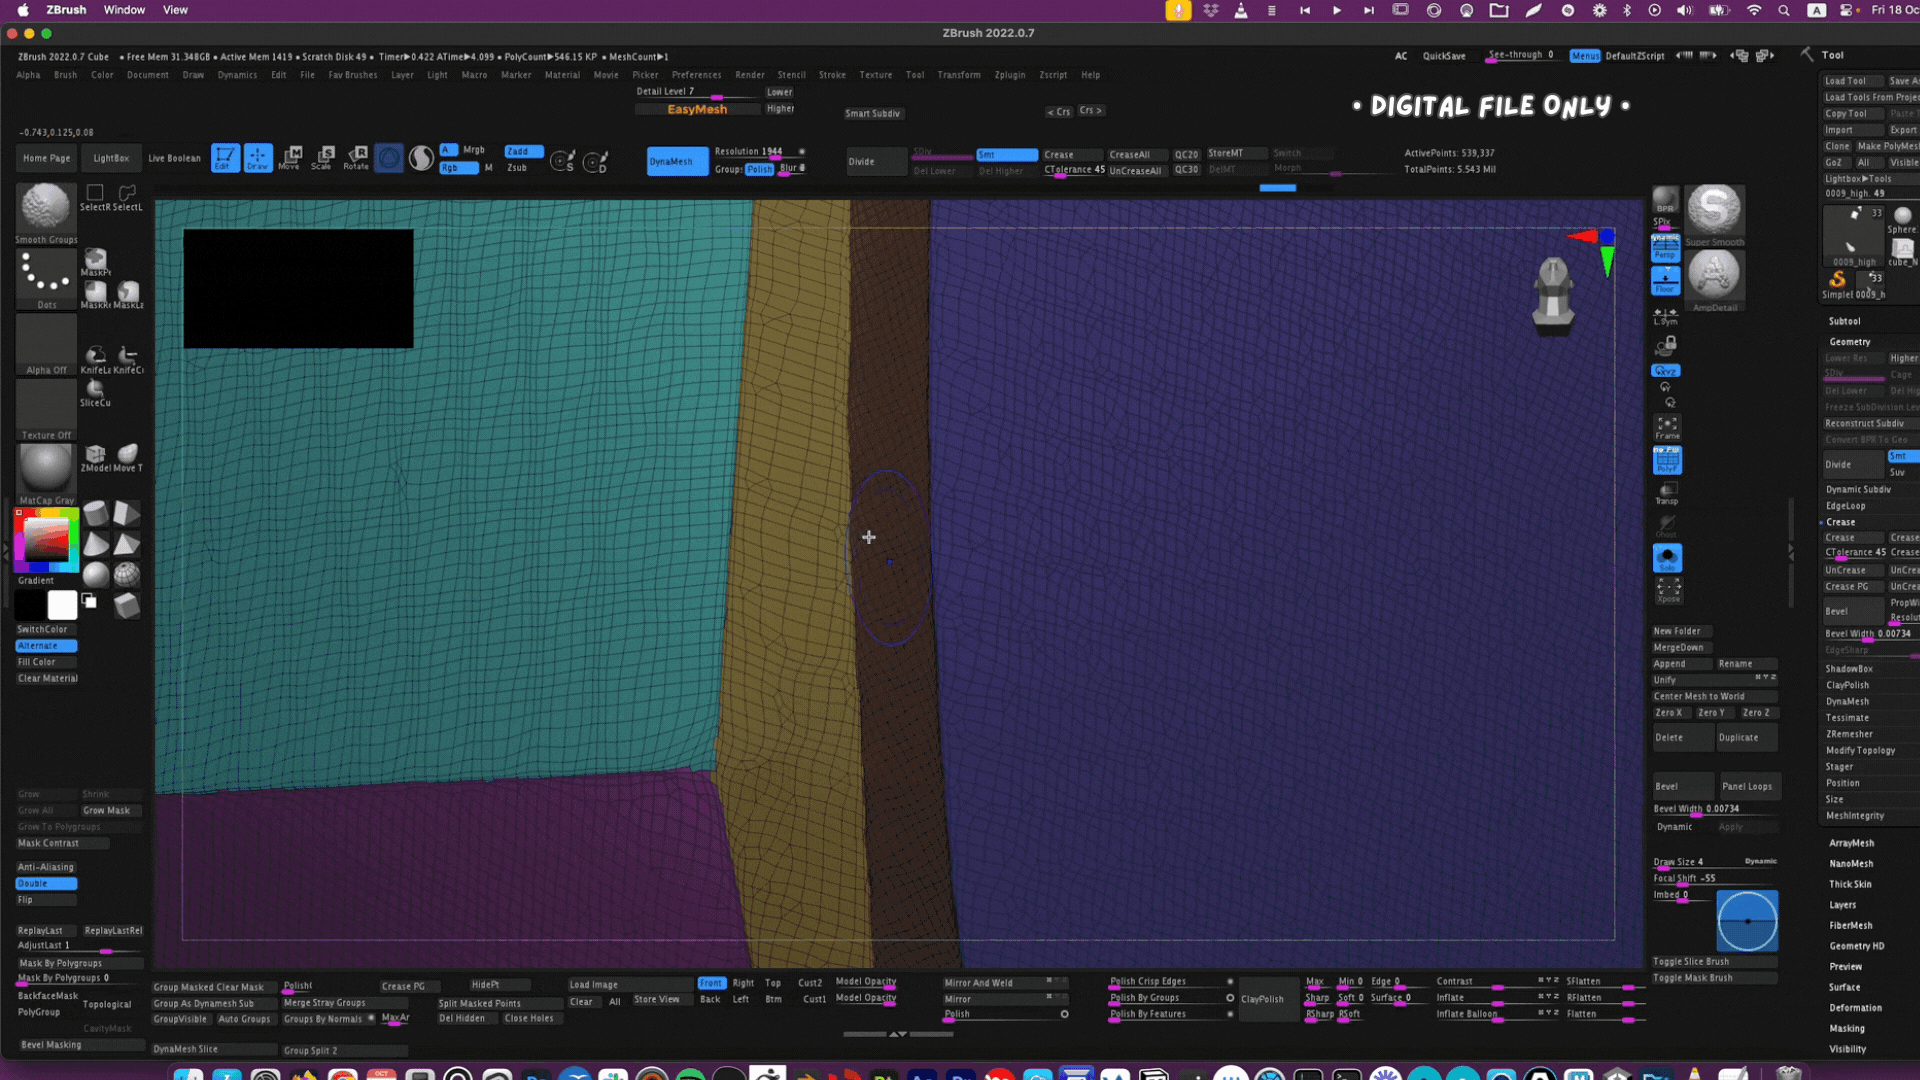
Next, I use a MaskPen brush to mask different parts of my shape and create polygroups from them (Polygroups panel – Group Masked). Polygroups are a very powerful tool in ZBrush.
You can smooth and polish them, separate and combine or extrude them, create polyloops between them, and use them as guides for ZRemesh when you clean up the topology.
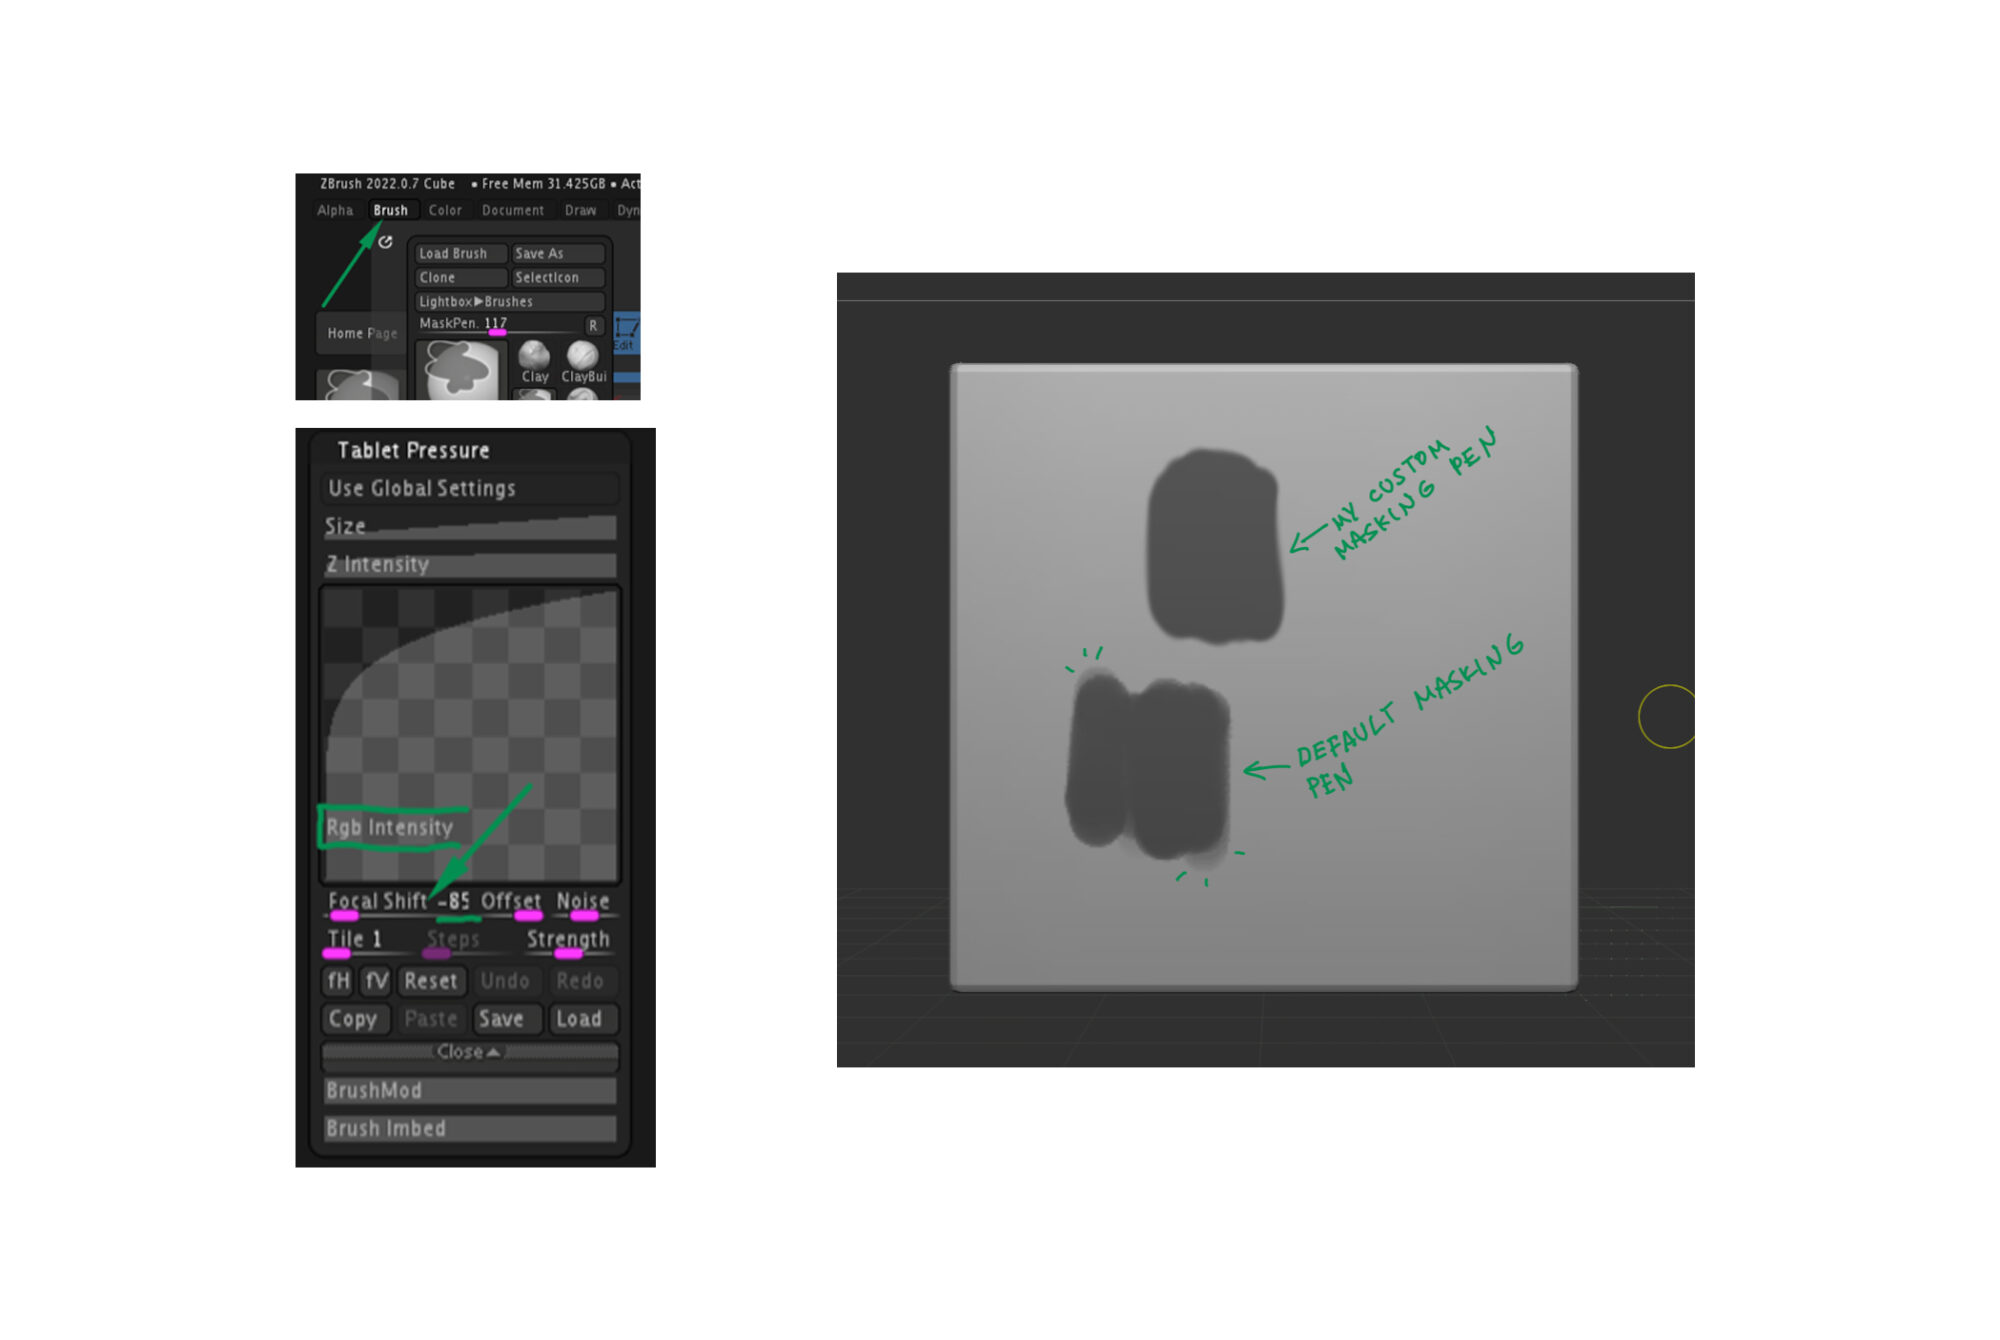
Tip #1
Custom MaskPen brush (I learned this from a tutorial by Henry Chervenka; I’ll add the link at the end). If you’re using your tablet with a drawing pen for sculpting, you’ll know that it’s difficult to paint sharp, solid masks, even if you remove Focal Shift completely.
I ended up creating a separate masking pen brush that works much better than a regular one, as it won’t be sensitive to tablet pressure.
You’ll see the difference if you try it! Choose your default MaskPen brush, then open the Brush panel.
While holding Control, find Tablet Pressure and open RGB Intensity, then move Focal Shift to -85.
Tip #2
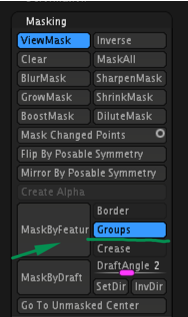
You can smooth polygroup edges using the Deformation panel—Polish by Groups or Polish by Features—but this will affect the entire model, not just the edges between polygroups. To smooth only the borders of different polygroups, use Mask by Features with Groups highlighted first.
This will mask the borders between different polygroups. You can then grow the mask and invert it, and use Polish by Group’s deformation again. This time, it will only affect the unmasked borders.
Tip #3
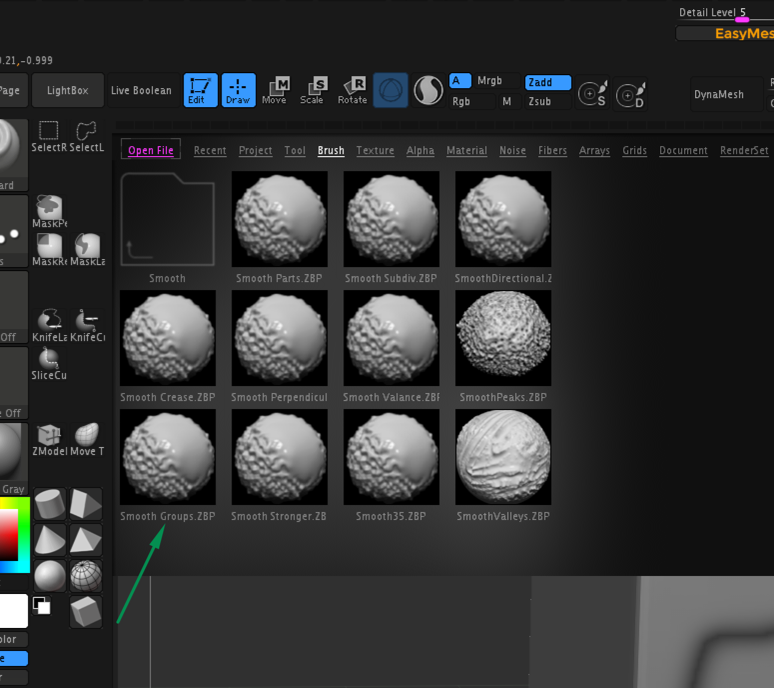
Another method to smooth polygroup borders is by using the SmoothGroup brush.
This useful brush is included in ZBrush, but it’s not in the default brush palette. To find it, go to Lightbox – Brush – Smooth brushes, and there you’ll find the SmoothGroups brush.
This brush works as a regular smooth brush and smooths polygroup borders in the areas where you use it. I use it frequently when I need to smooth polygroup borders; I think it’s quicker than using masks.
After setting my polygroups, I use ZRemesh (with KeepGroup highlighted) to achieve really smooth shapes and edges.
I can further refine them using the Deformation panel—Polish by Groups option.
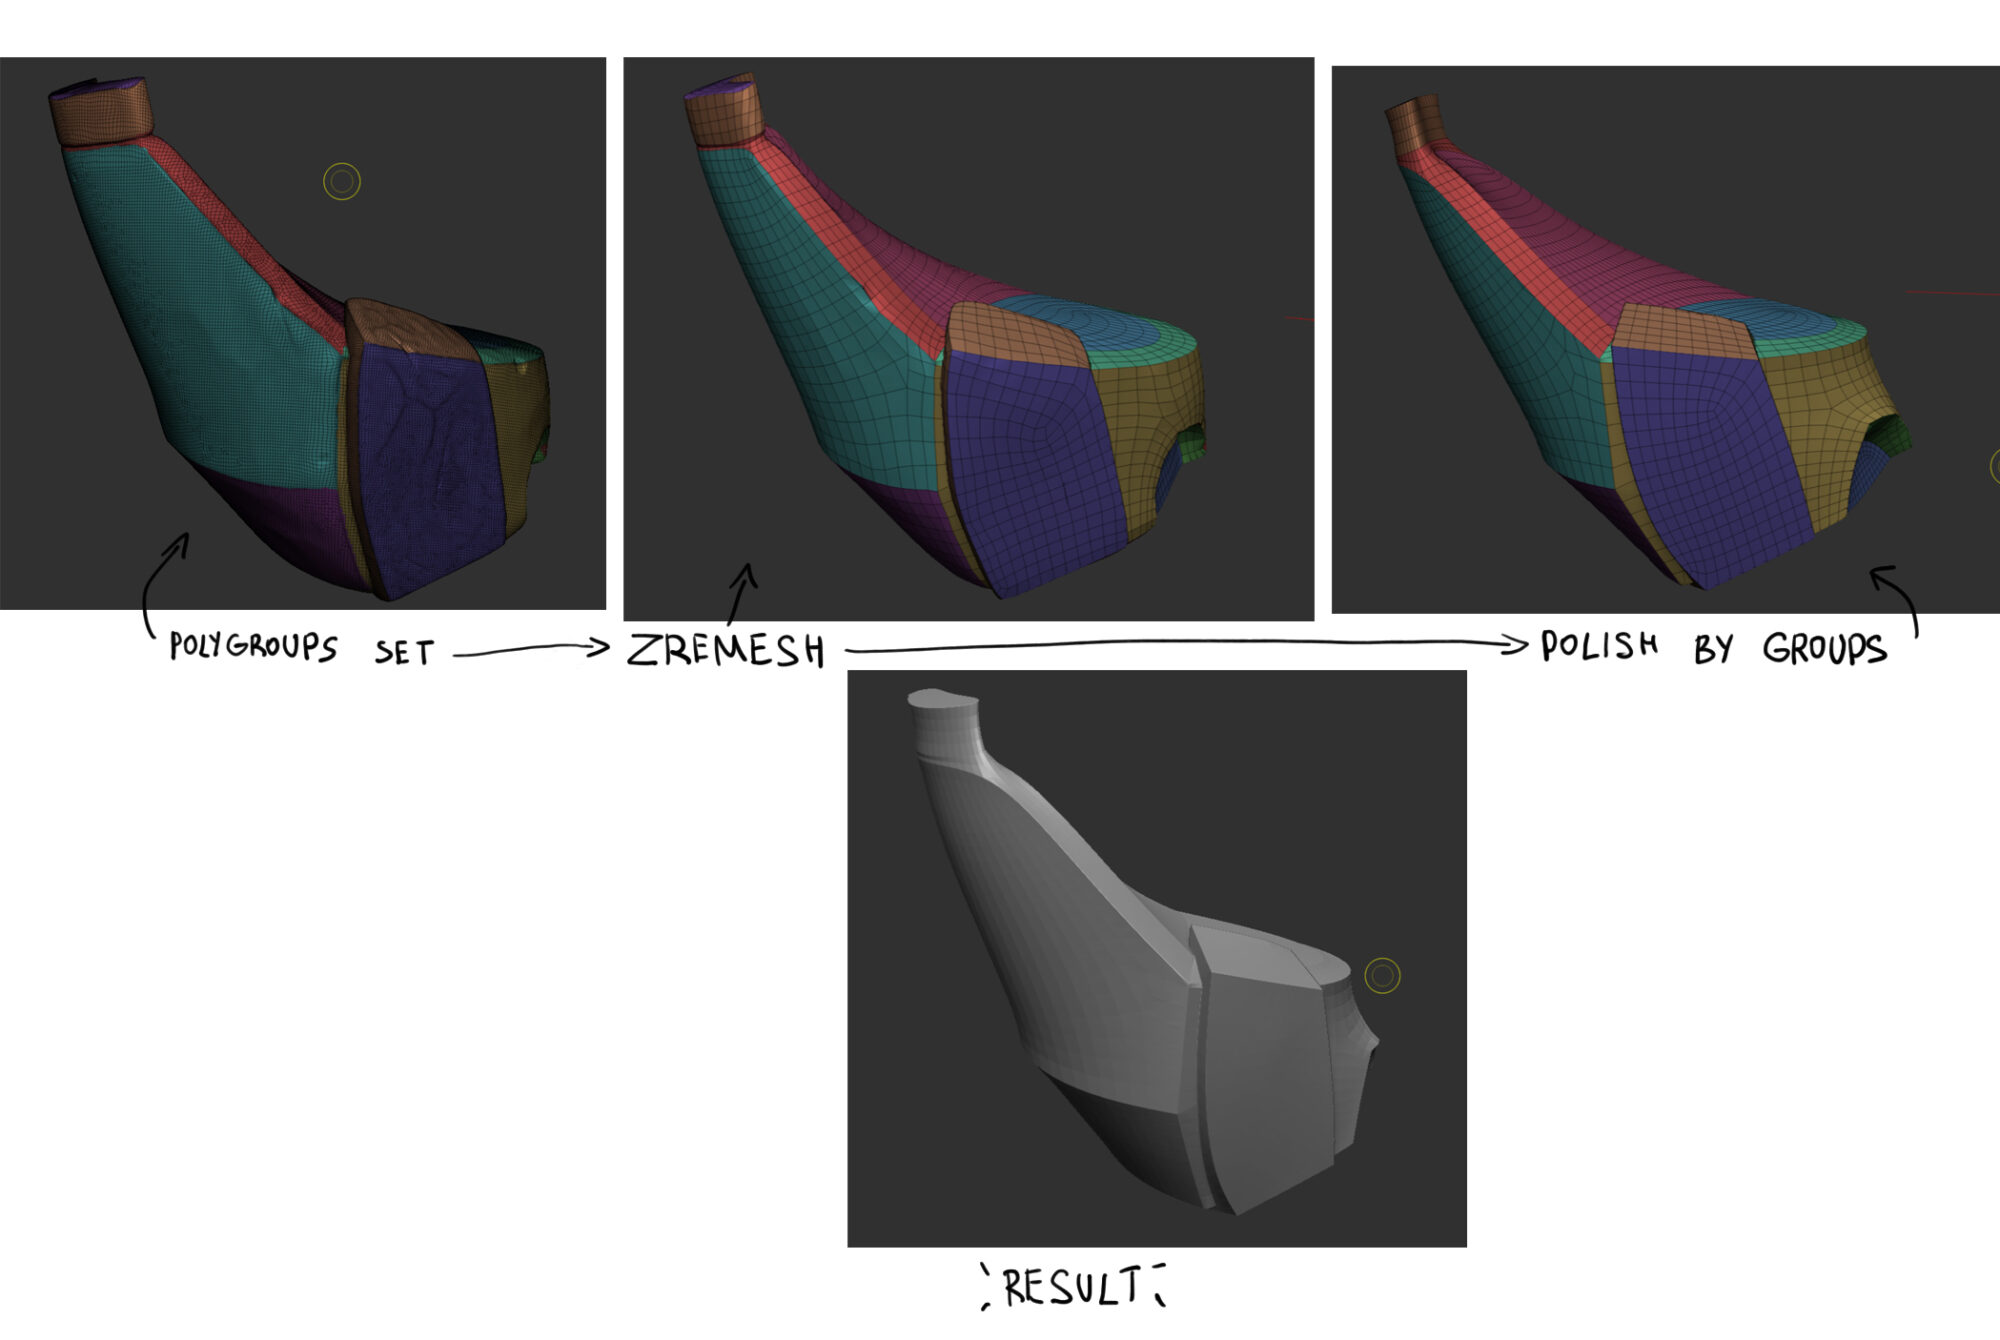
The next step is to crease the polygroup borders (in the Crease panel) and then to divide it a few times (Geometry – Divide with Smooth (SMT) highlighted).
This process removes the poly lines across the smooth surface while maintaining the sharp edges.
This provides an excellent base for me to return to Dynamesh (or Subdivide more) and sculpt finer details or add imperfect edges. I prefer Dynamesh for more flexibility, and for the final step, I delete the lower subdivisions and apply Dynamesh once more.
It keeps the existing polygroups, and if I have any small issues after Dynamesh, I can use the SmoothGroup brush to smooth those polygroup borders again.
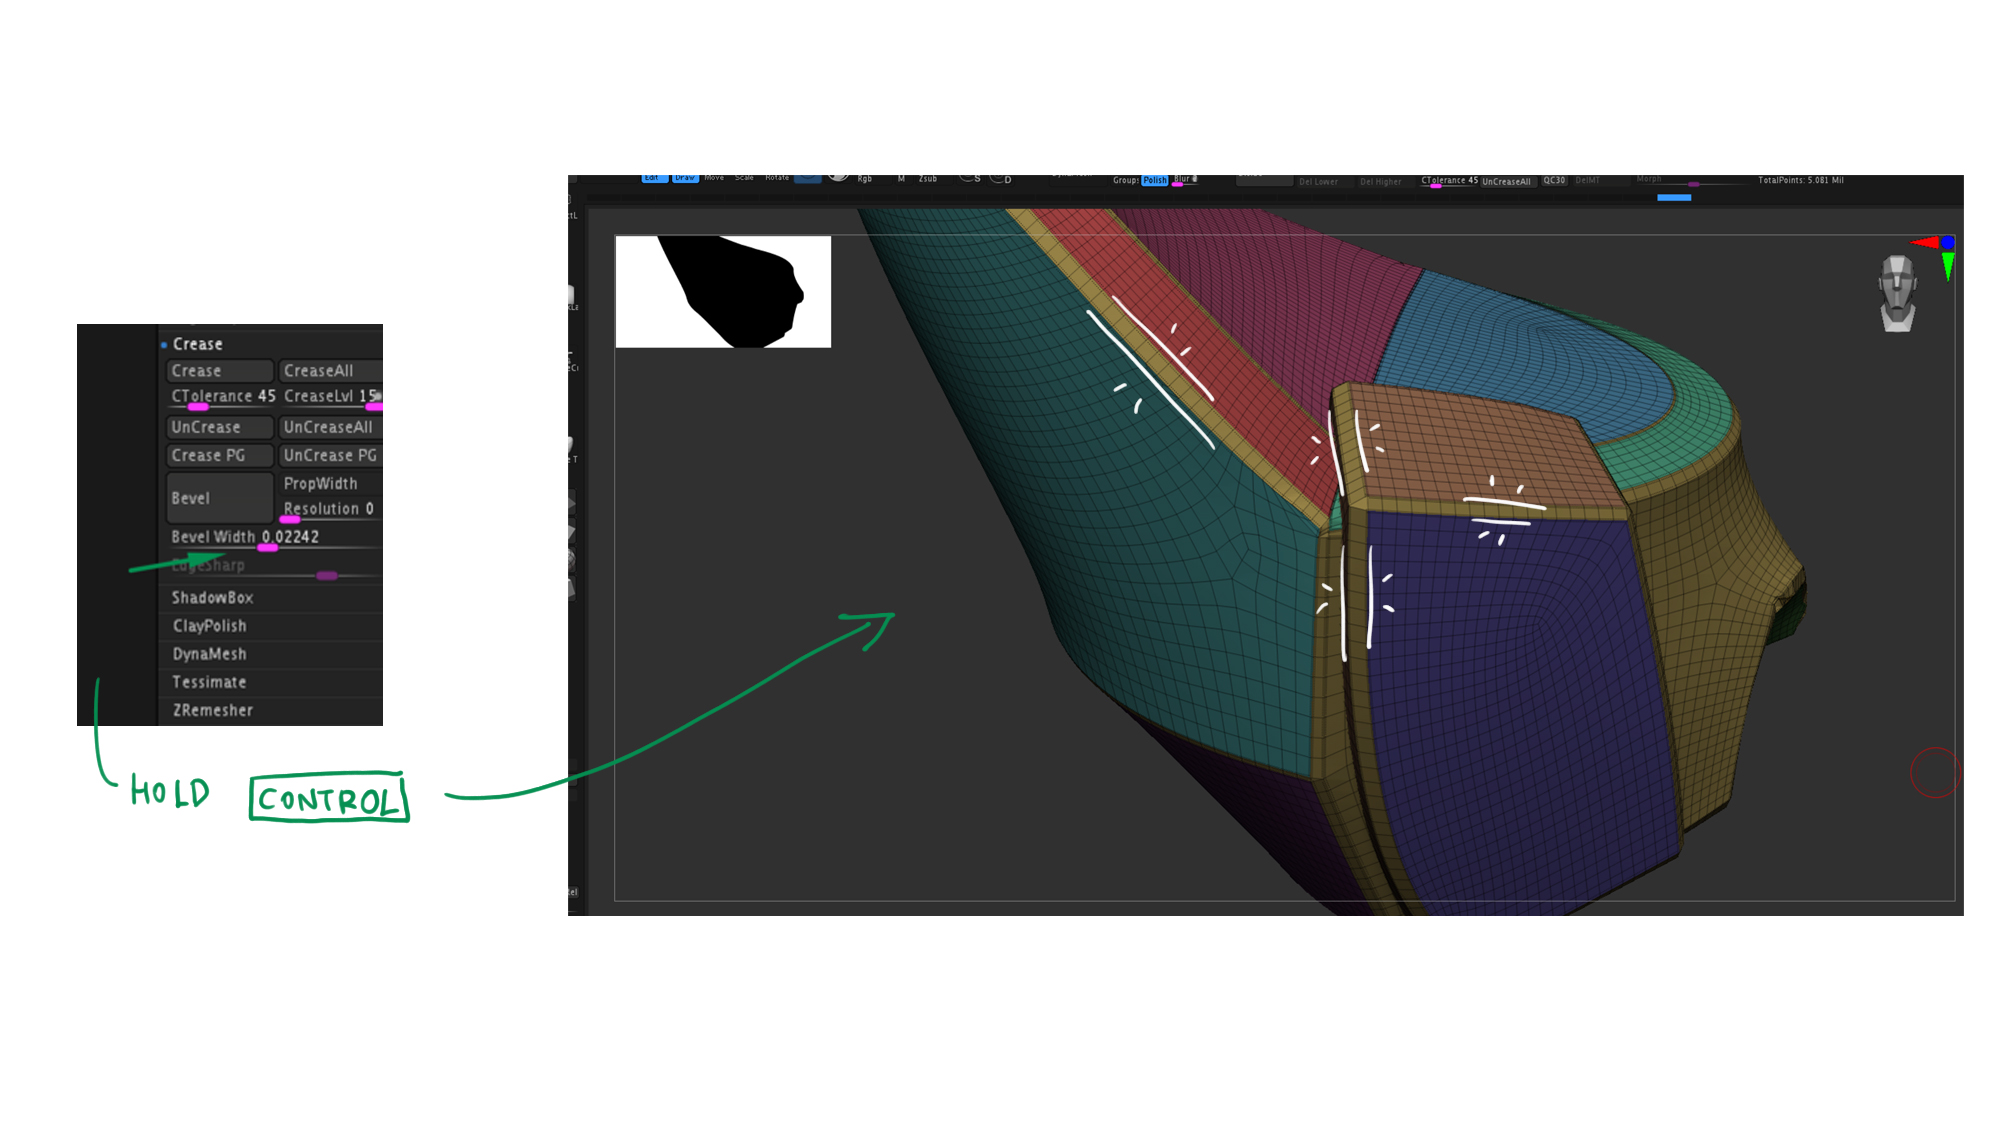
Here’s another small tip:
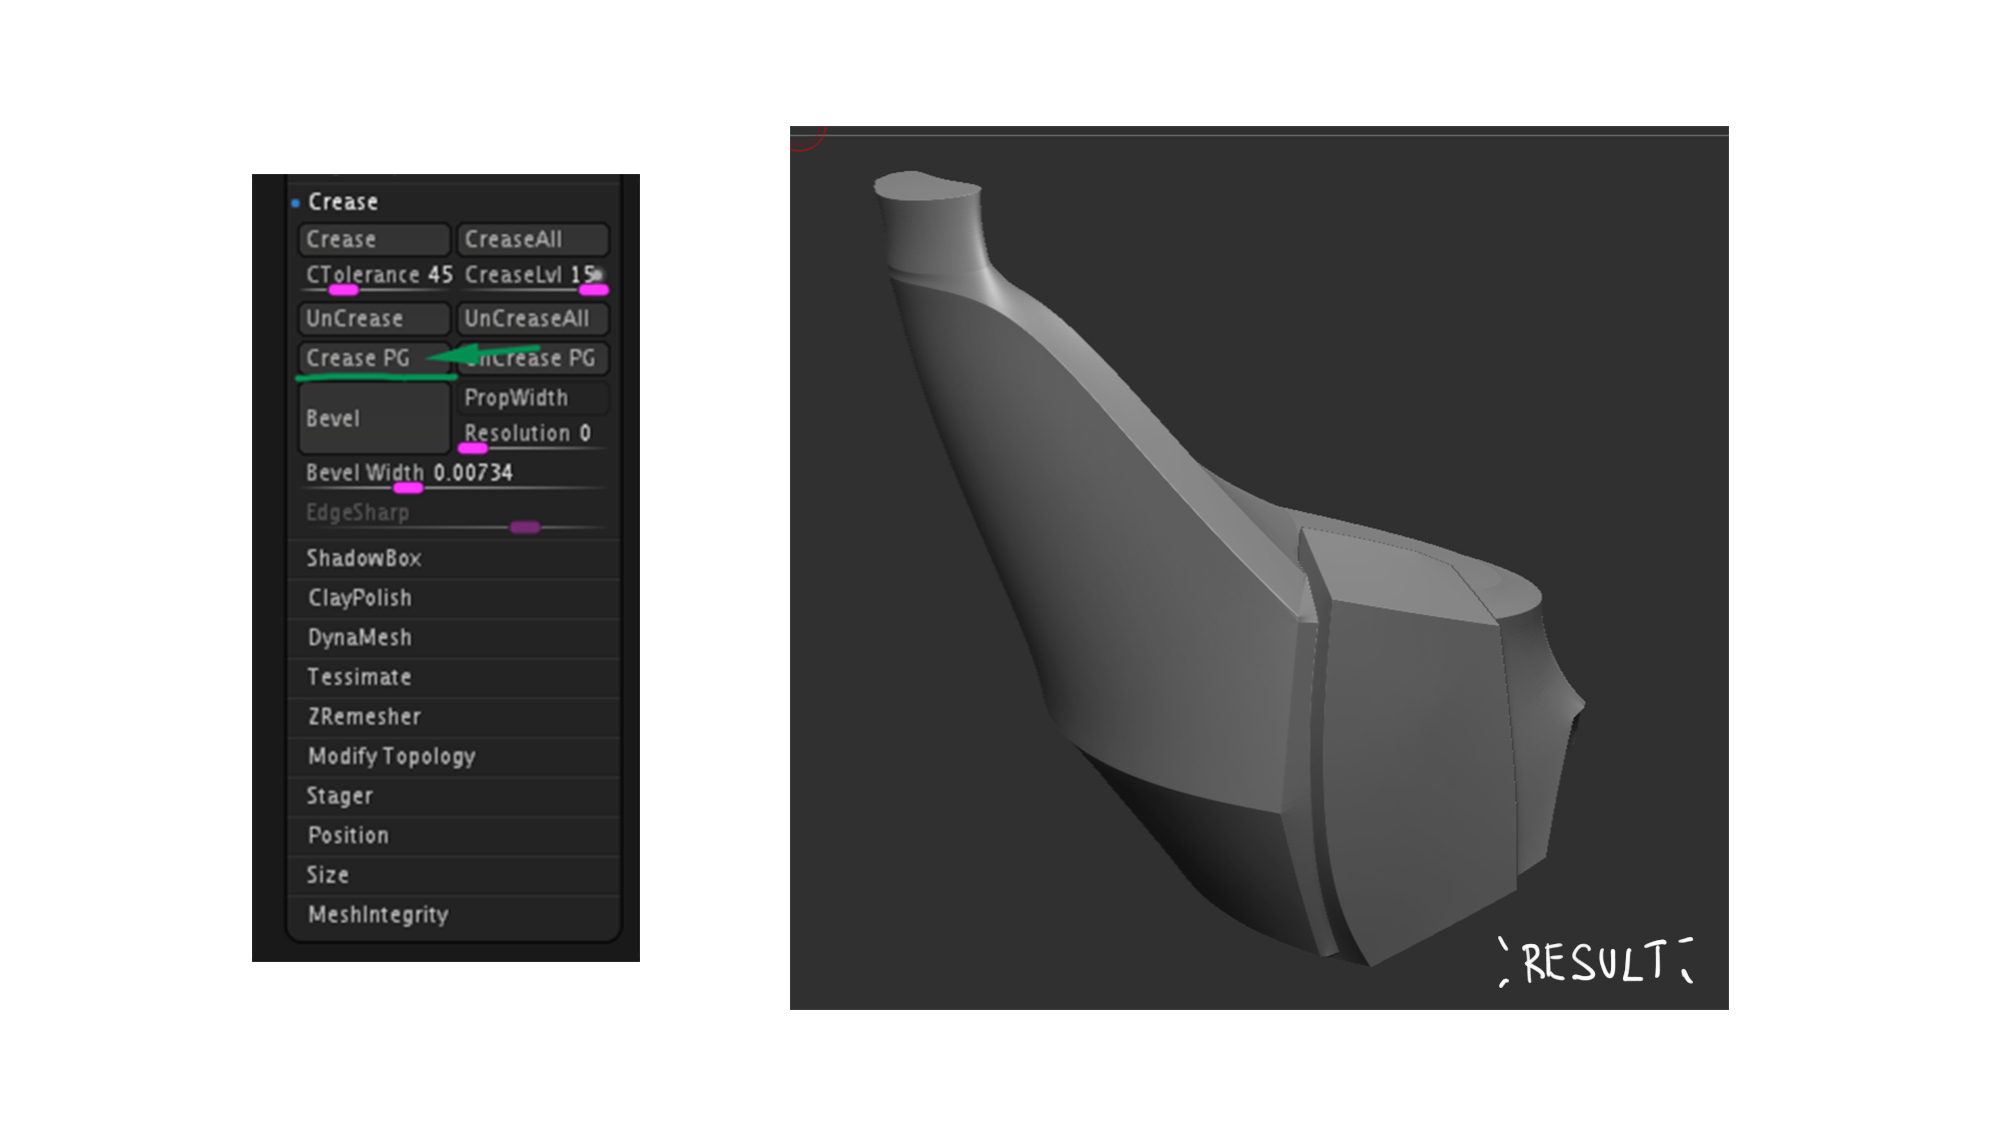
If you want to quickly add beveled edges between your polygroups (you can also hide the polygroups you don’t want to bevel), go to the Geometry panel, select Crease, and then move the Bevel Width slider while holding Control.
This will create polygroup bevels.
It’s important to note that you should do this after using ZRemesher or if your topology is looking good, otherwise these bevels will appear quite jiggly.
Sofa Cushion Arms
Some people asked me in the comments why I decided to model cushions instead of adding them later in Substance Painter.
I wanted to have that wobbly silhouette, and if I had just added them to a normal map, it would only look right in the middle but not on the edges.
Surprisingly, it was a rather quick task, and I made them in ZBrush using cloth dynamics. I began with a rounded, smooth shape and masked all the lines between the prominent parts of the cushions.
Then, I polygrouped them the same way I explained before and used cloth dynamics to inflate unmasked parts. At the end, I used a few cloth wrinkle alphas to add some folds here and there.
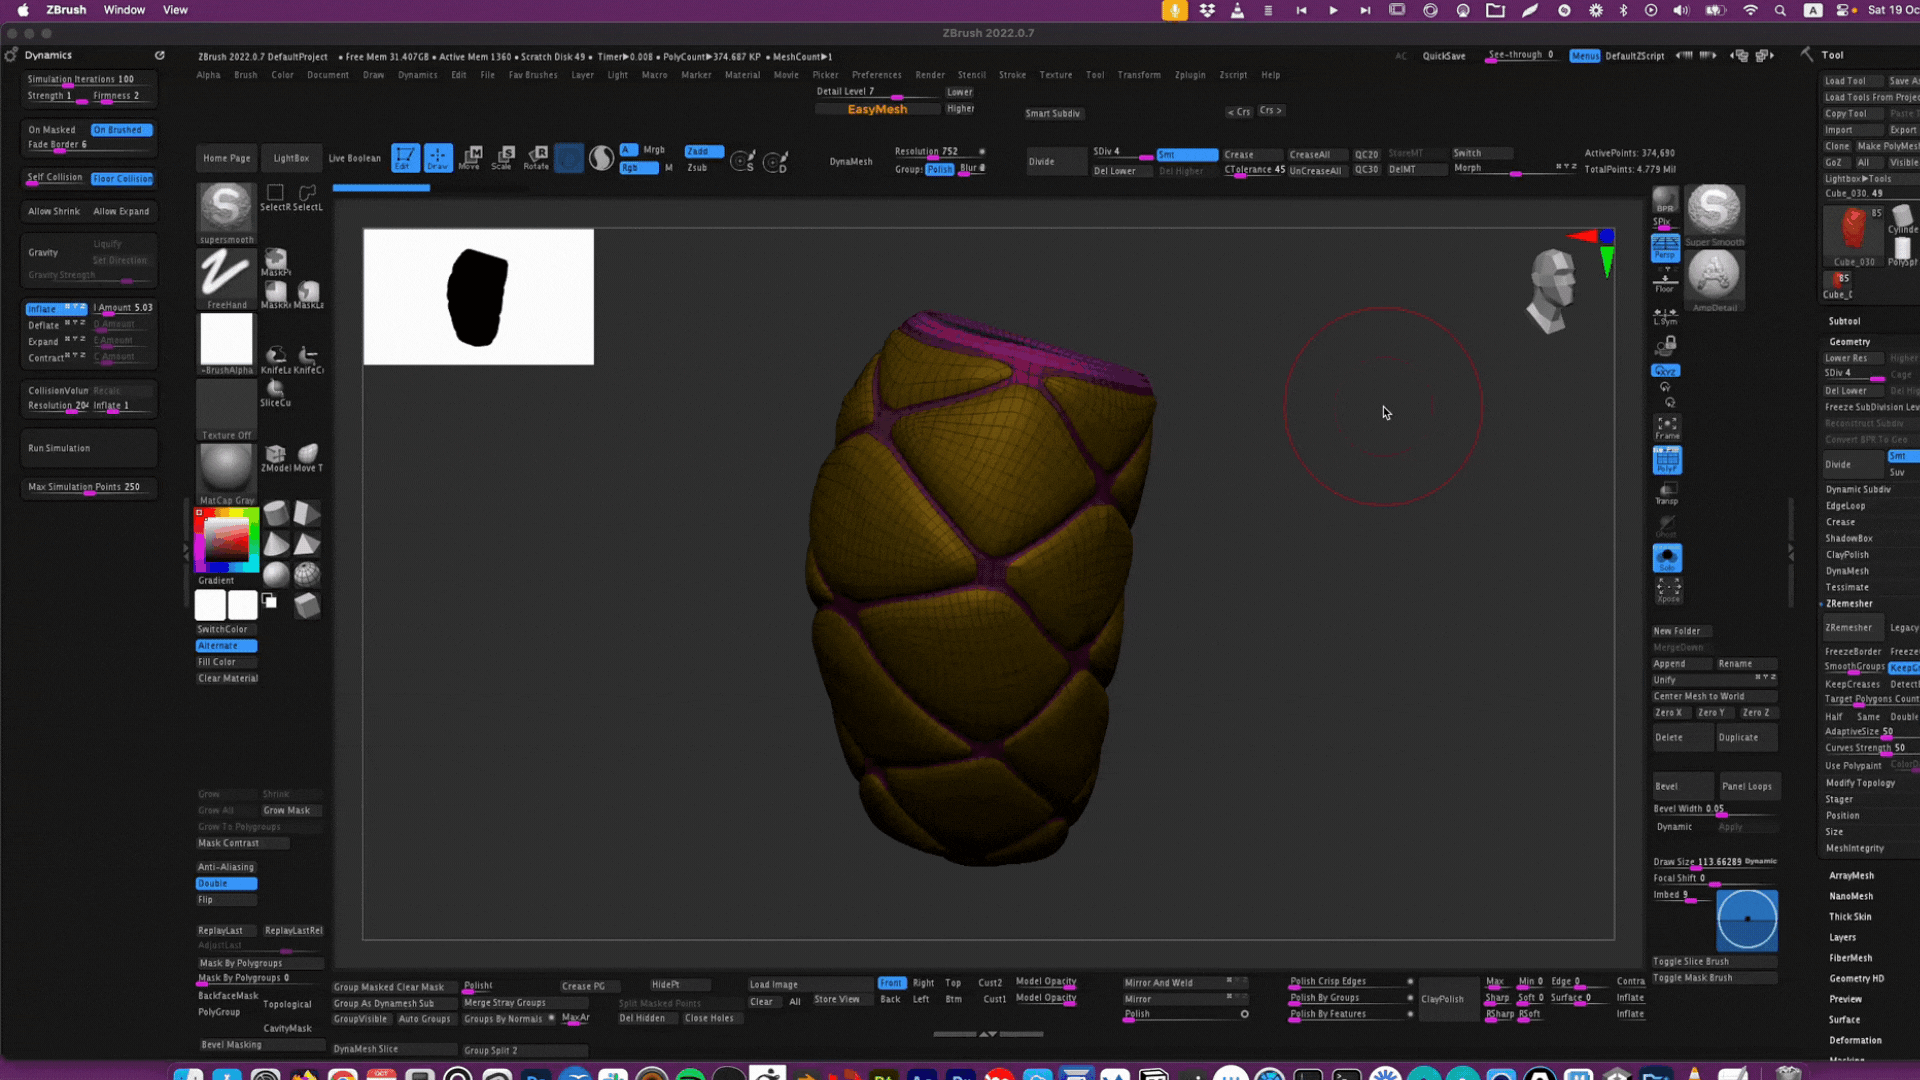
This image shows my ZBrush model at the pre-final stage, just before I added the final small details.
Sculpting Small Details
To achieve the hand-painted look I wanted, I decided to add some imperfections and small details in ZBrush during the sculpting stage. I considered simply painting them later, but having them on my high-poly model and baking them into my normal and AO maps helped in texturing.
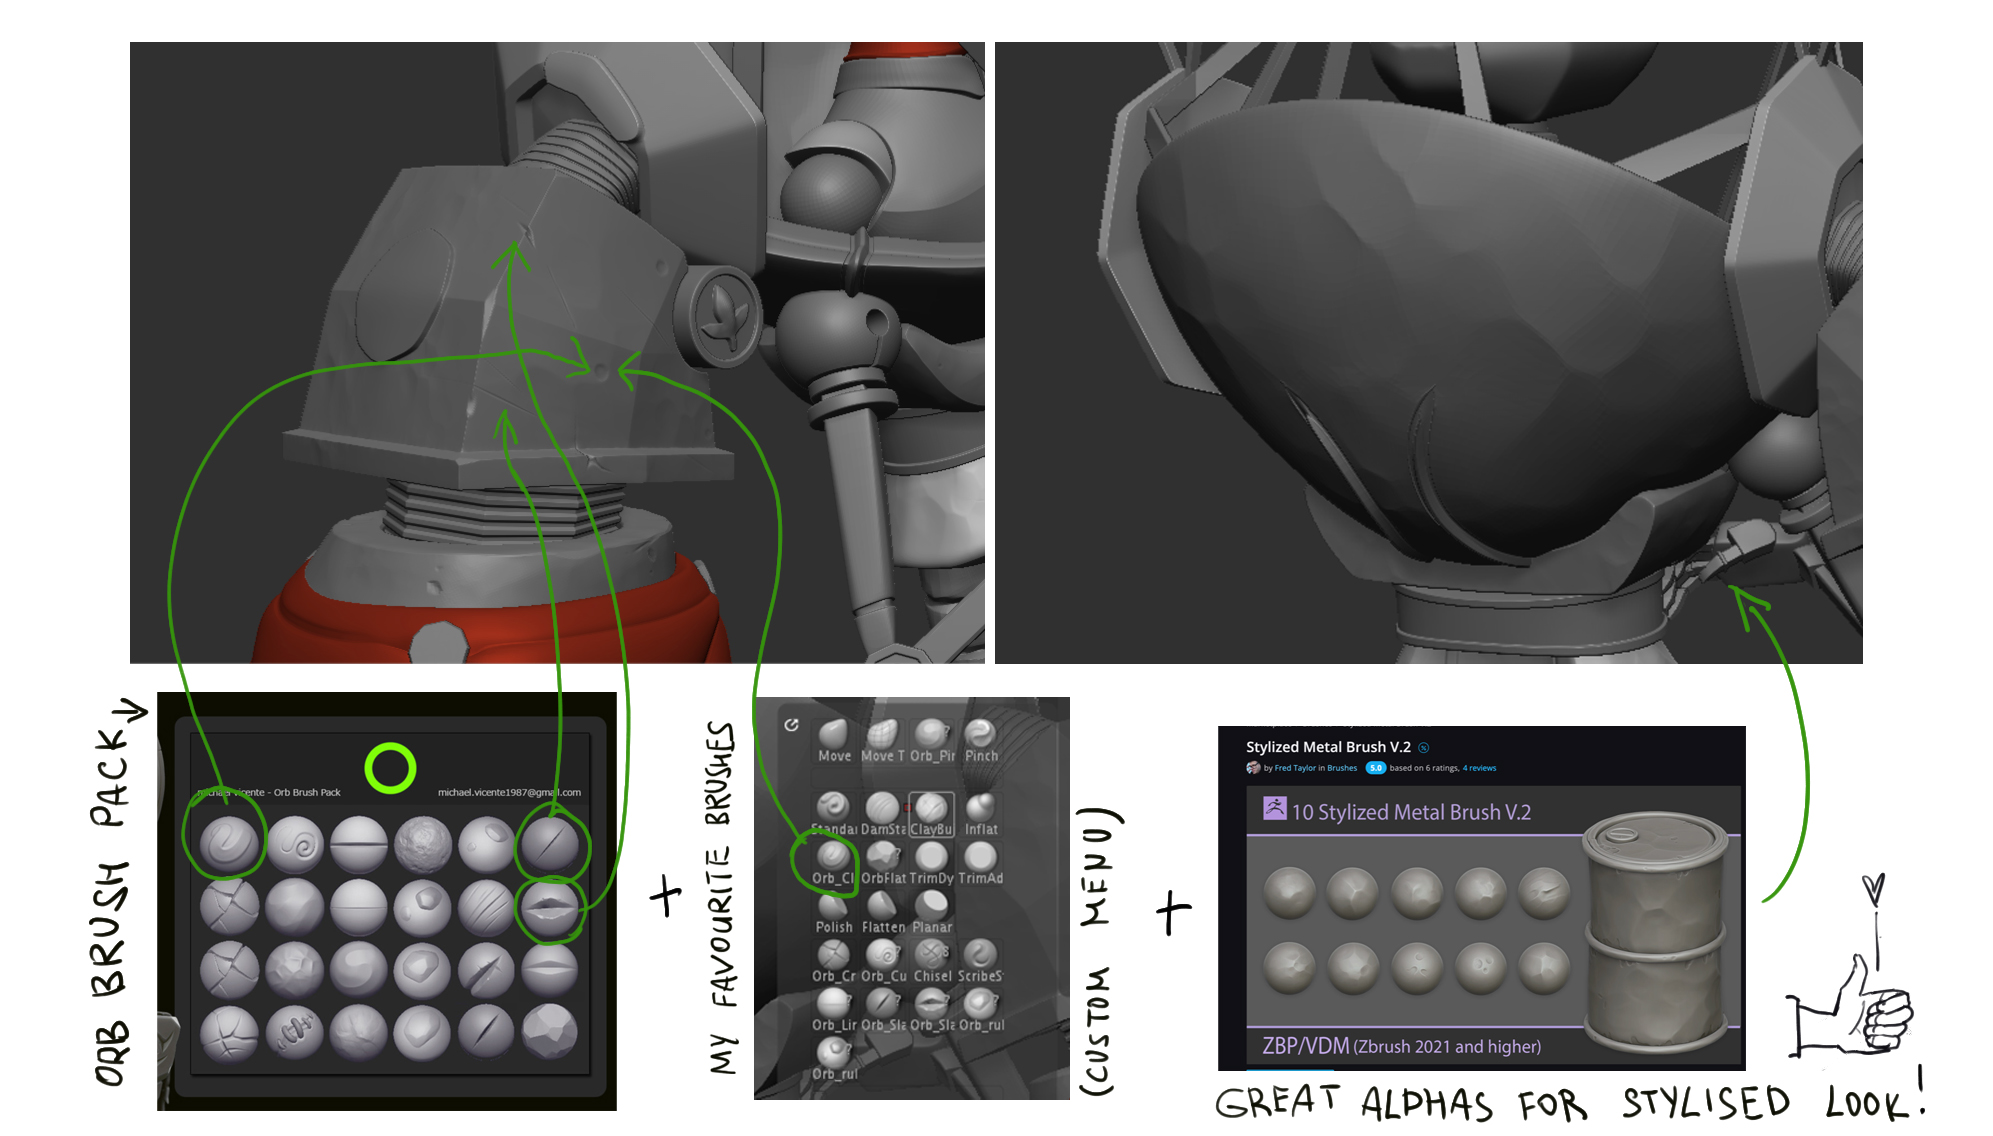
I also used a few custom brushes and alphas during that stage. One of my favourite brush sets for a stylized look is the Orb Brush Pack, which I use quite frequently.
I also ended up purchasing and using a few pre-made alphas from Fred Taylor, and I particularly love his Stylized Metal Brush V.2.
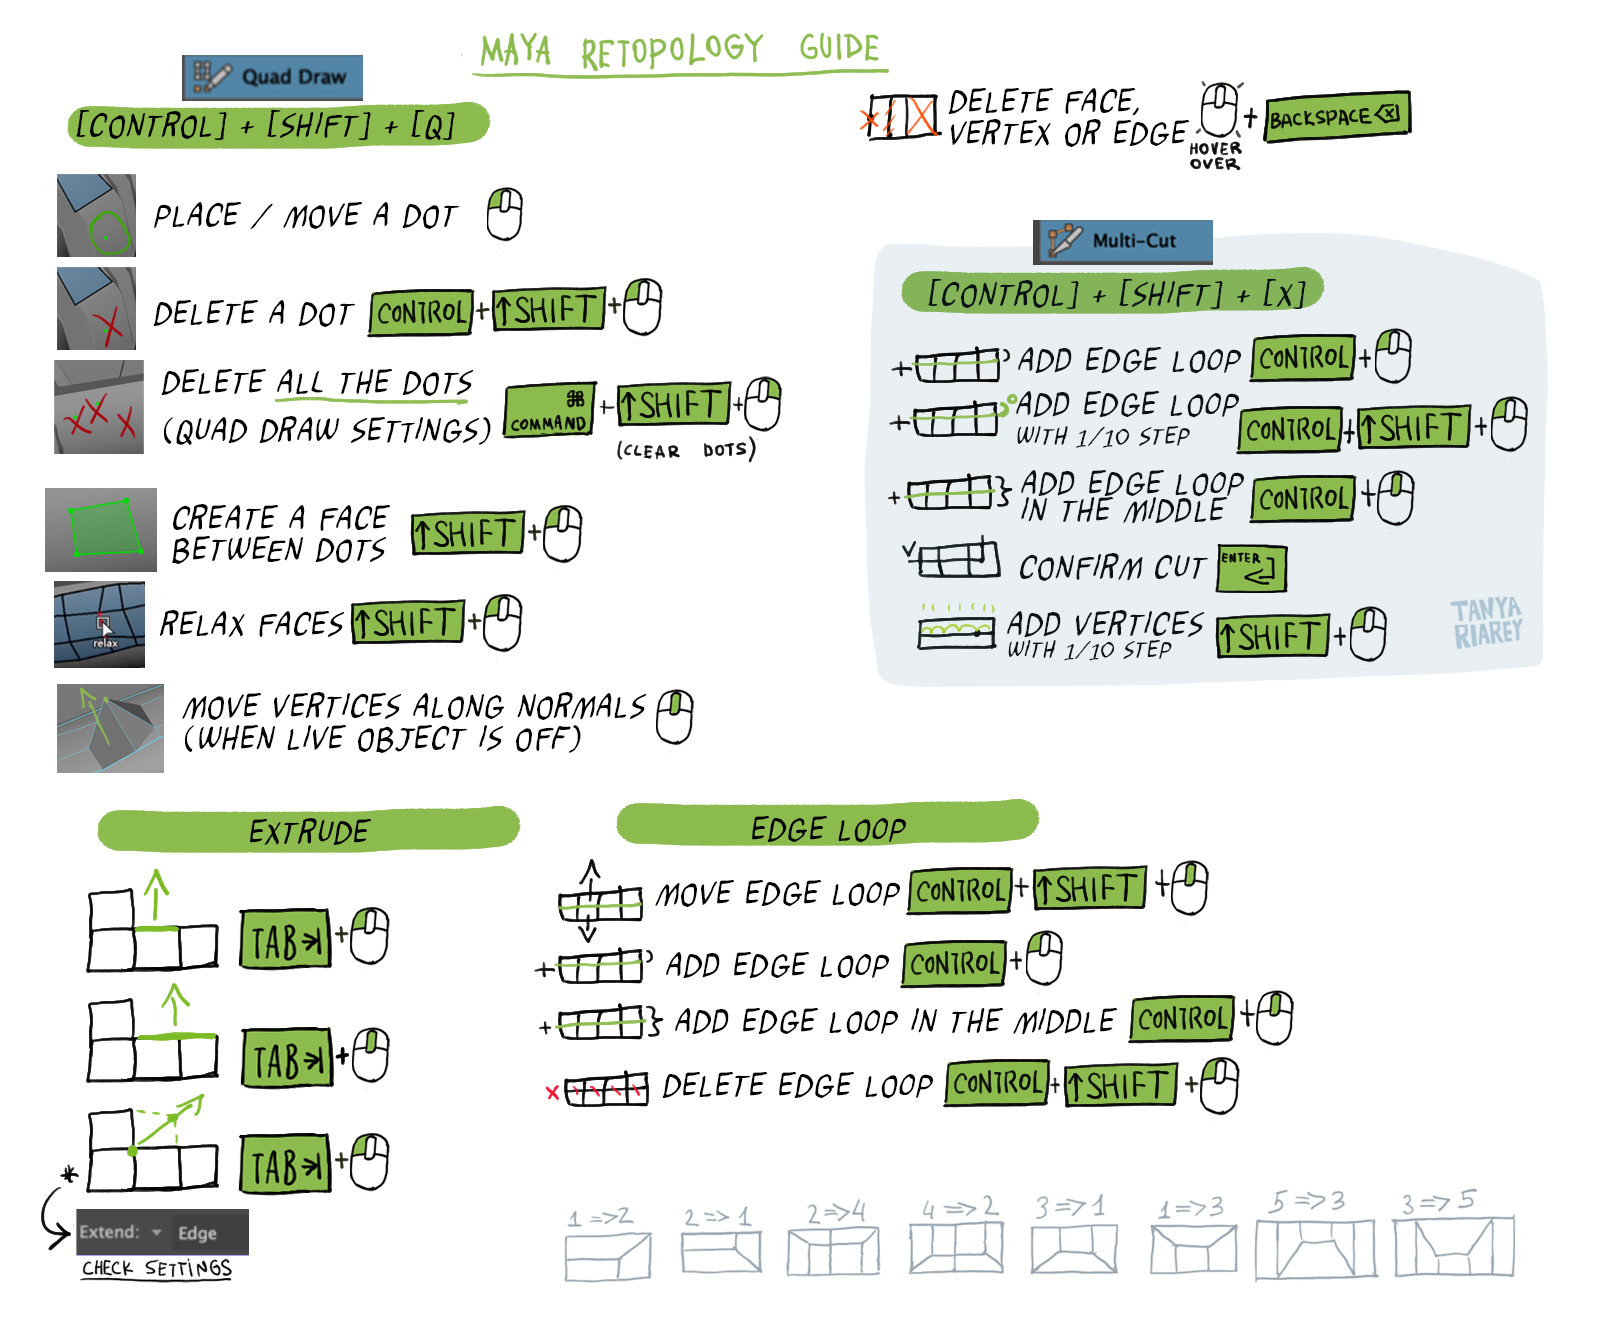
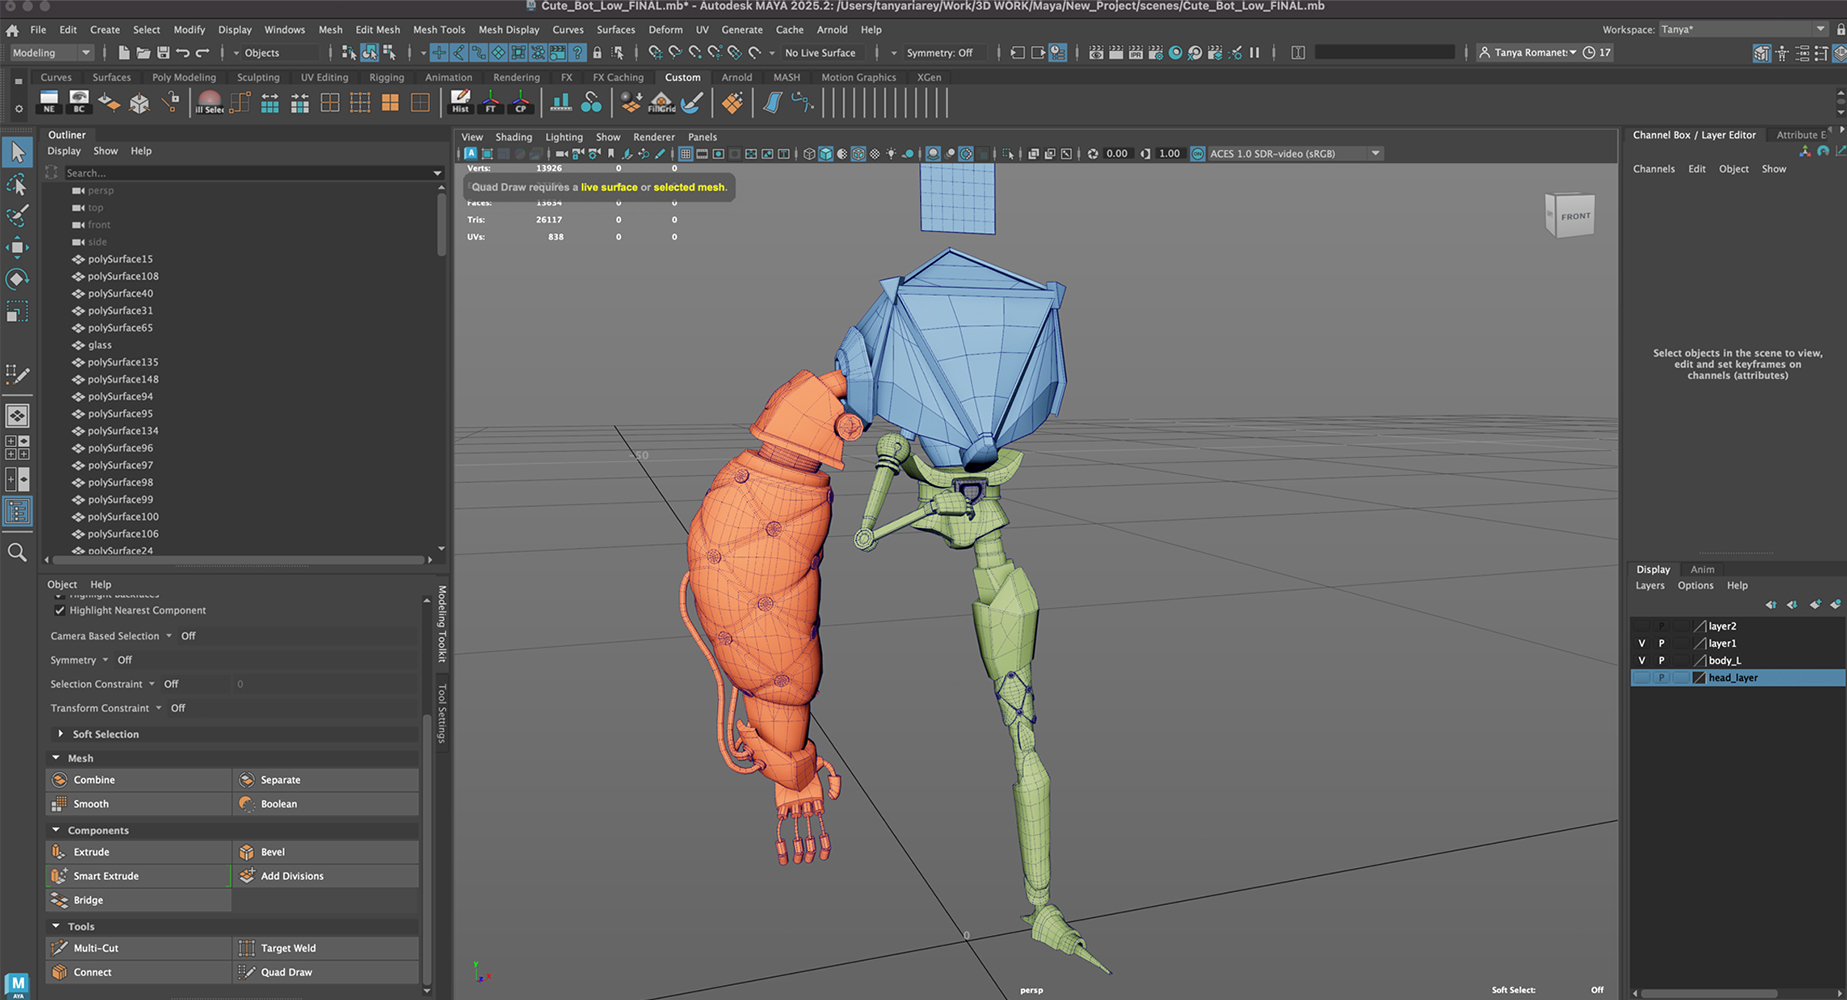
Retopology
One of my goals for this project was to practice manual retopology. I’ve tried 3DCoat and regular Blender tools in the past, but I ended up using Maya—I think it has the best and easiest retopology tools, such as Quad Draw and Multicut.
I made a small note with all the hotkeys I need for these tools, as I don’t use Maya that often. For both of these tools, there’s one hidden hotkey that isn’t listed in the Keyboard/Mouse Shortcuts: when you hover over any face, edge, or vertex and press Backspace, you will delete it.
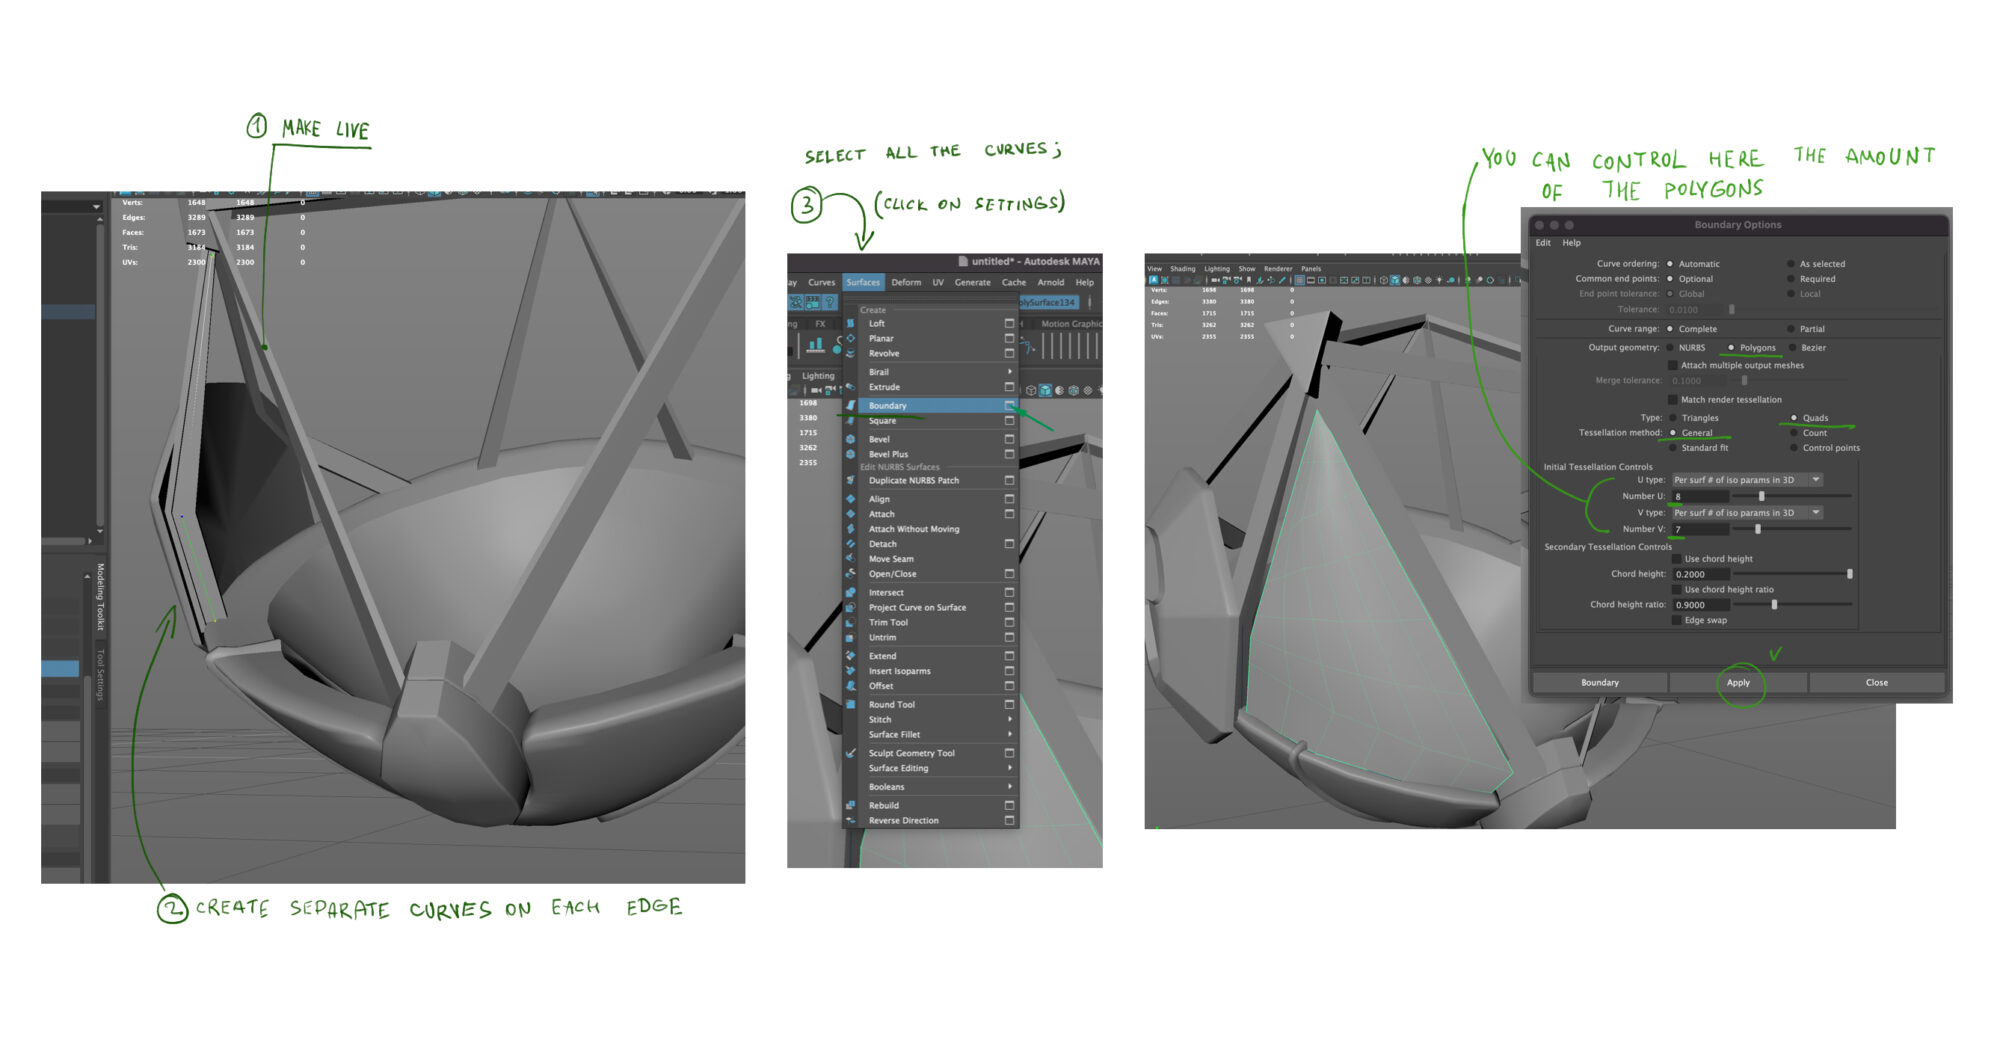
Glass Helmet
I modeled the helmet frame in Blender, which wasn’t difficult — I simply moved and rotated planks manually to match my reference. However, for the glass, I needed to ensure it fits perfectly into the gaps between the planks.
This is where NURBS in Maya proved incredibly useful.
I combined all the planks with the helmet base and made it a live object so that everything I created would snap to it.
Then, I created separate curves on each side (in the example below, I used three separate curves for that particular window), selected them, and used the Boundary tool to create a shape between these curves.
I made minor adjustments but achieved a good result almost immediately by using just the Boundary tool and curves.
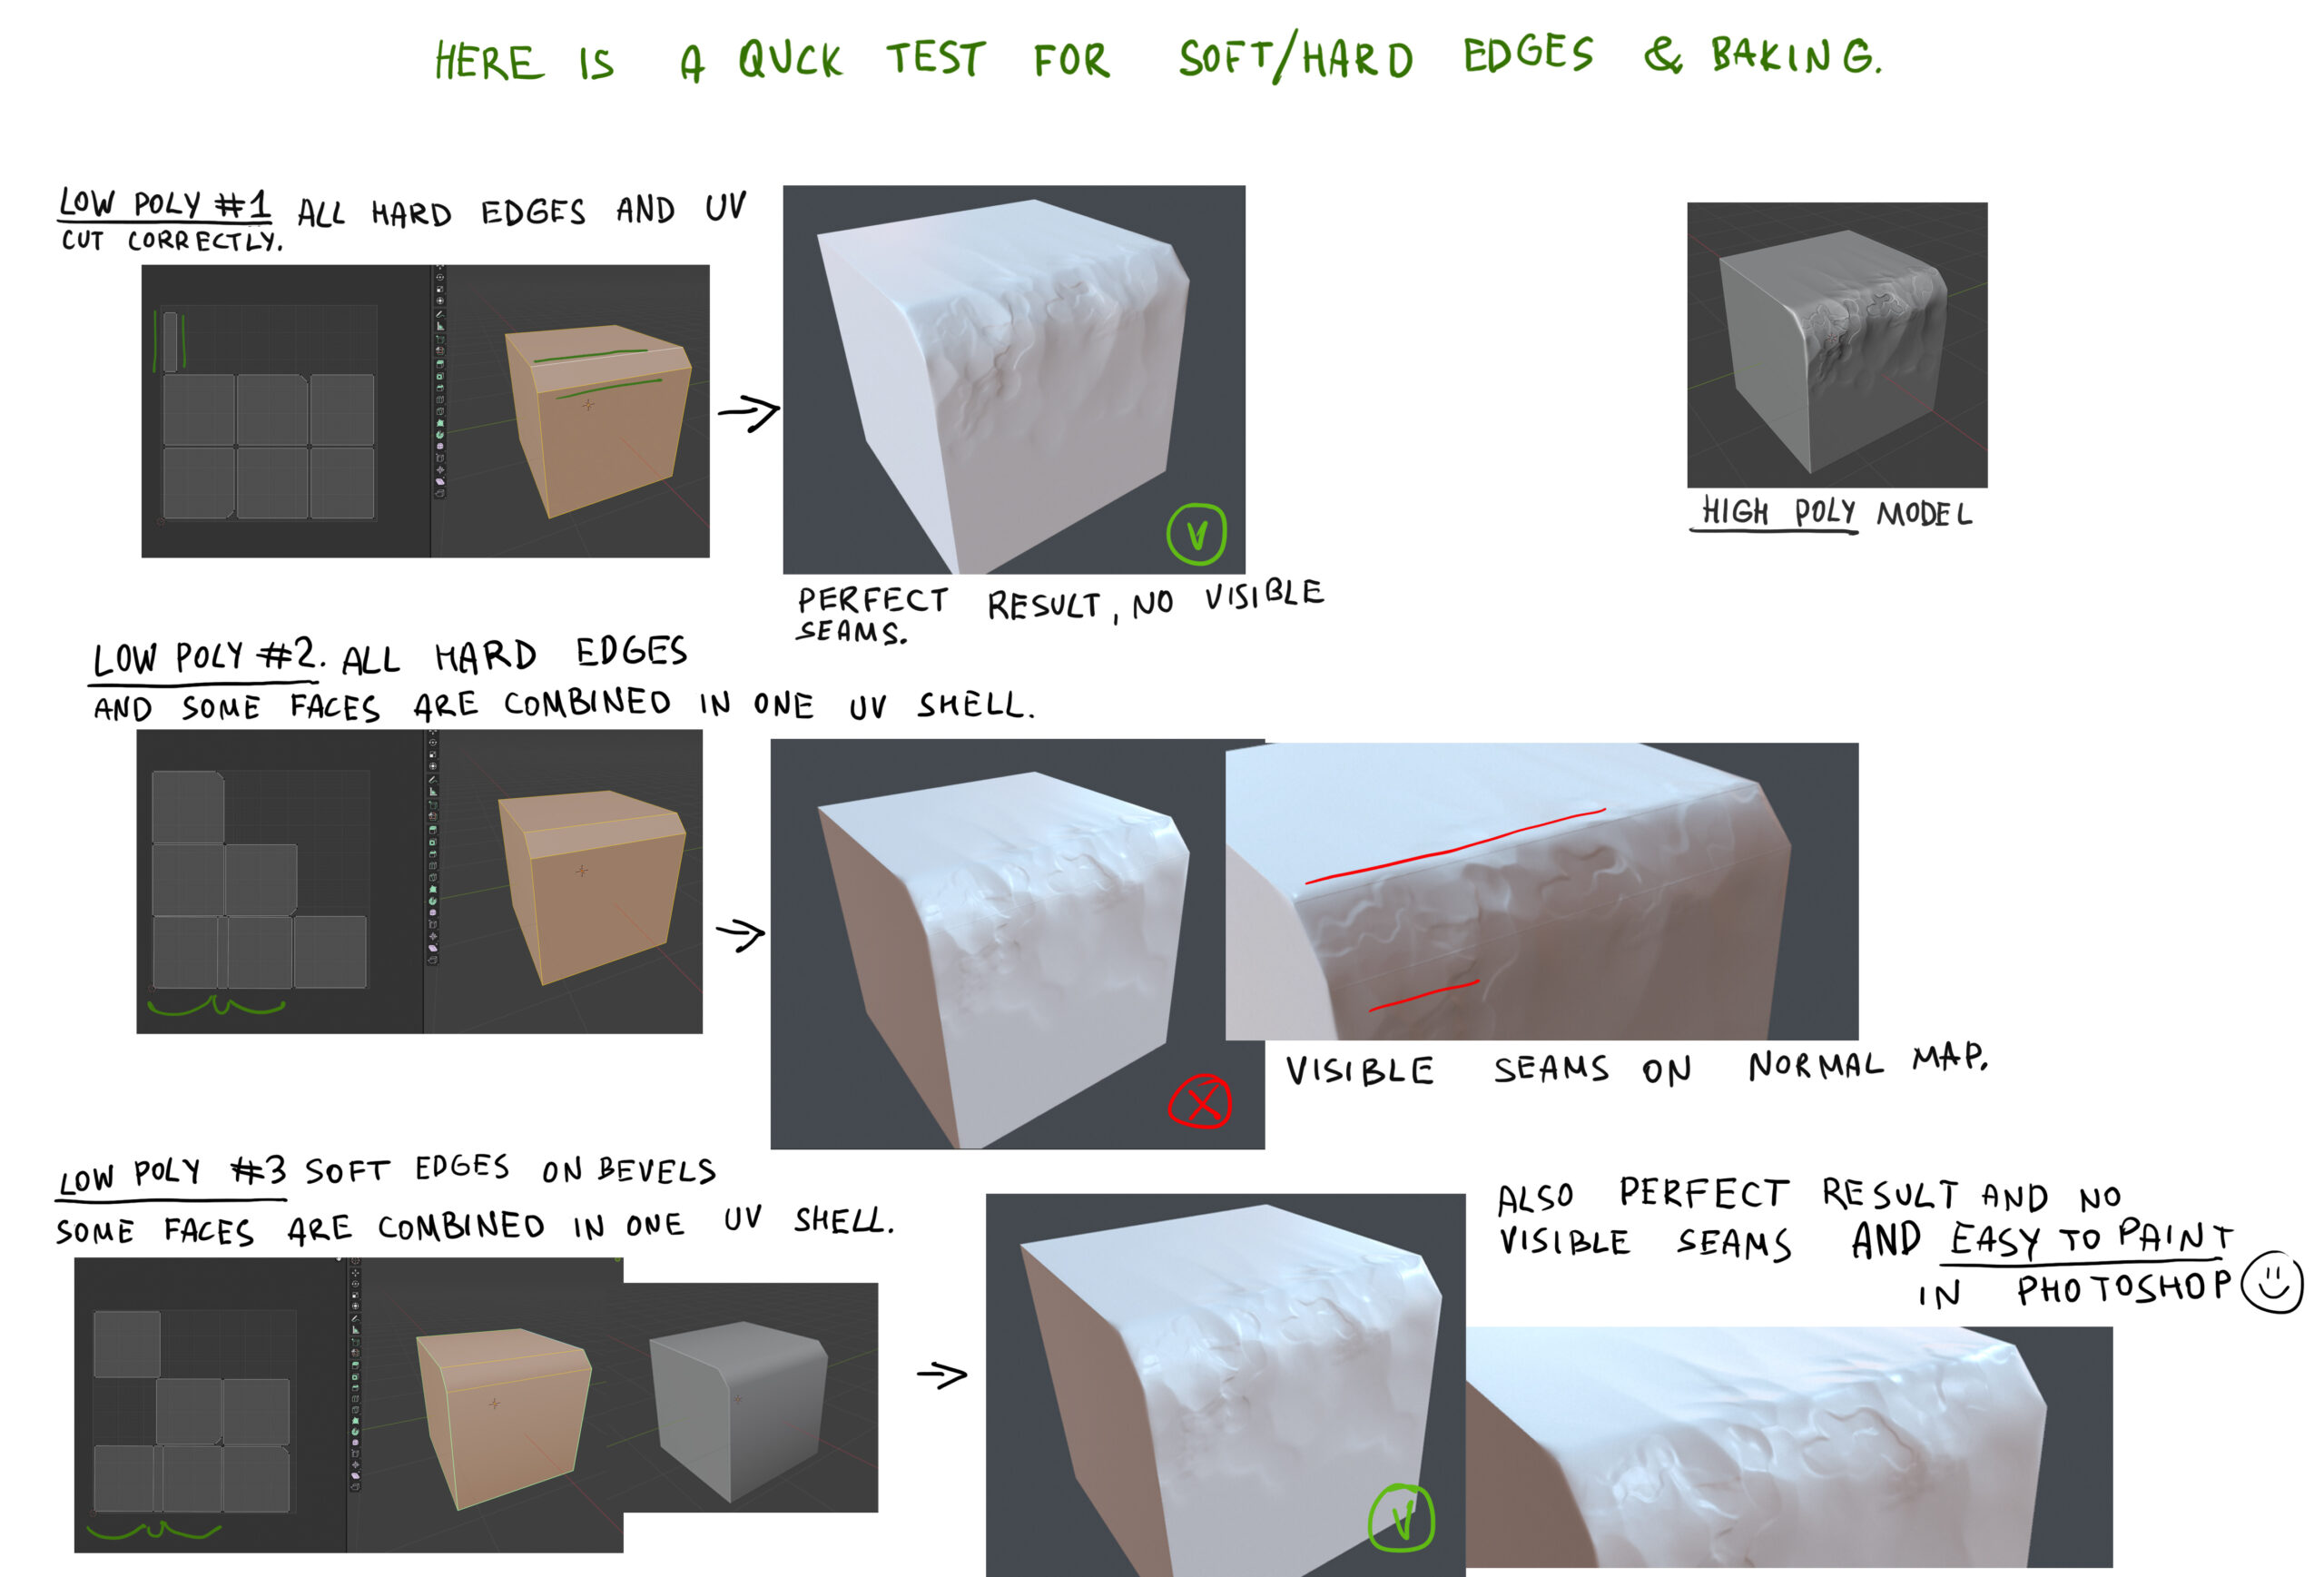
Soft & Hard Edges
One useful thing I learned is the importance of setting soft and hard edges correctly on a low-poly model. Surprisingly, many tutorials I watched never even mention this. One reason is that if you have a hard edge, you should cut your UV across it.
Otherwise, if your high-poly model has a soft bevel, you’ll likely get artifacts on your normal map after baking, such as lines.
Most tutorials I watched suggest using an auto soft/hard edges approach — it seems to work well in many cases. However, I personally prefer to manually set up hard and soft edges based on how I want to cut the UV.
For instance, when I have a bevel on a low-poly model, I make it soft edges, which means I won’t need to cut the UV. I sometimes quickly paint details in Photoshop, and having larger UV islands obviously makes it easier to paint.
You can see on that screenshot that most beveled edges look soft in my model.
UV & Baking
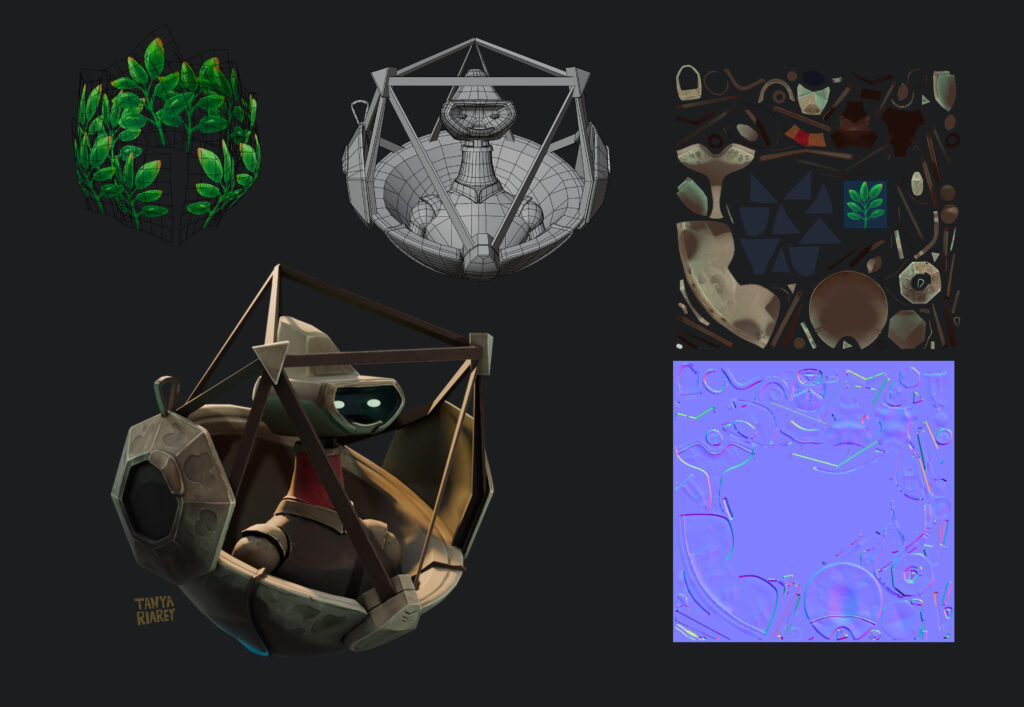
I decided to separate my model into three parts and assigned different materials for each part. I also added a plane at the top to use later for the plants inside the helmet.
I planned to use alpha cut and just paint the plant in Photoshop, then manually duplicate and place it around the helmet in Blender, where I could preview it with an alpha cut.
For creating UVs, I always use RizomUV because it’s much quicker than Blender or even Maya. It also has great tools for creating groups, packing groups, and straightening any UV shell.
There are plenty of tutorials on YouTube, so I won’t go into detail. Another software I would recommend (that I’ve used in the past) is UVLayout (from Headus 3D). Despite looking like a program from Windows 95 (they’ve never updated the design), it’s still very powerful and similar to RizomUV.
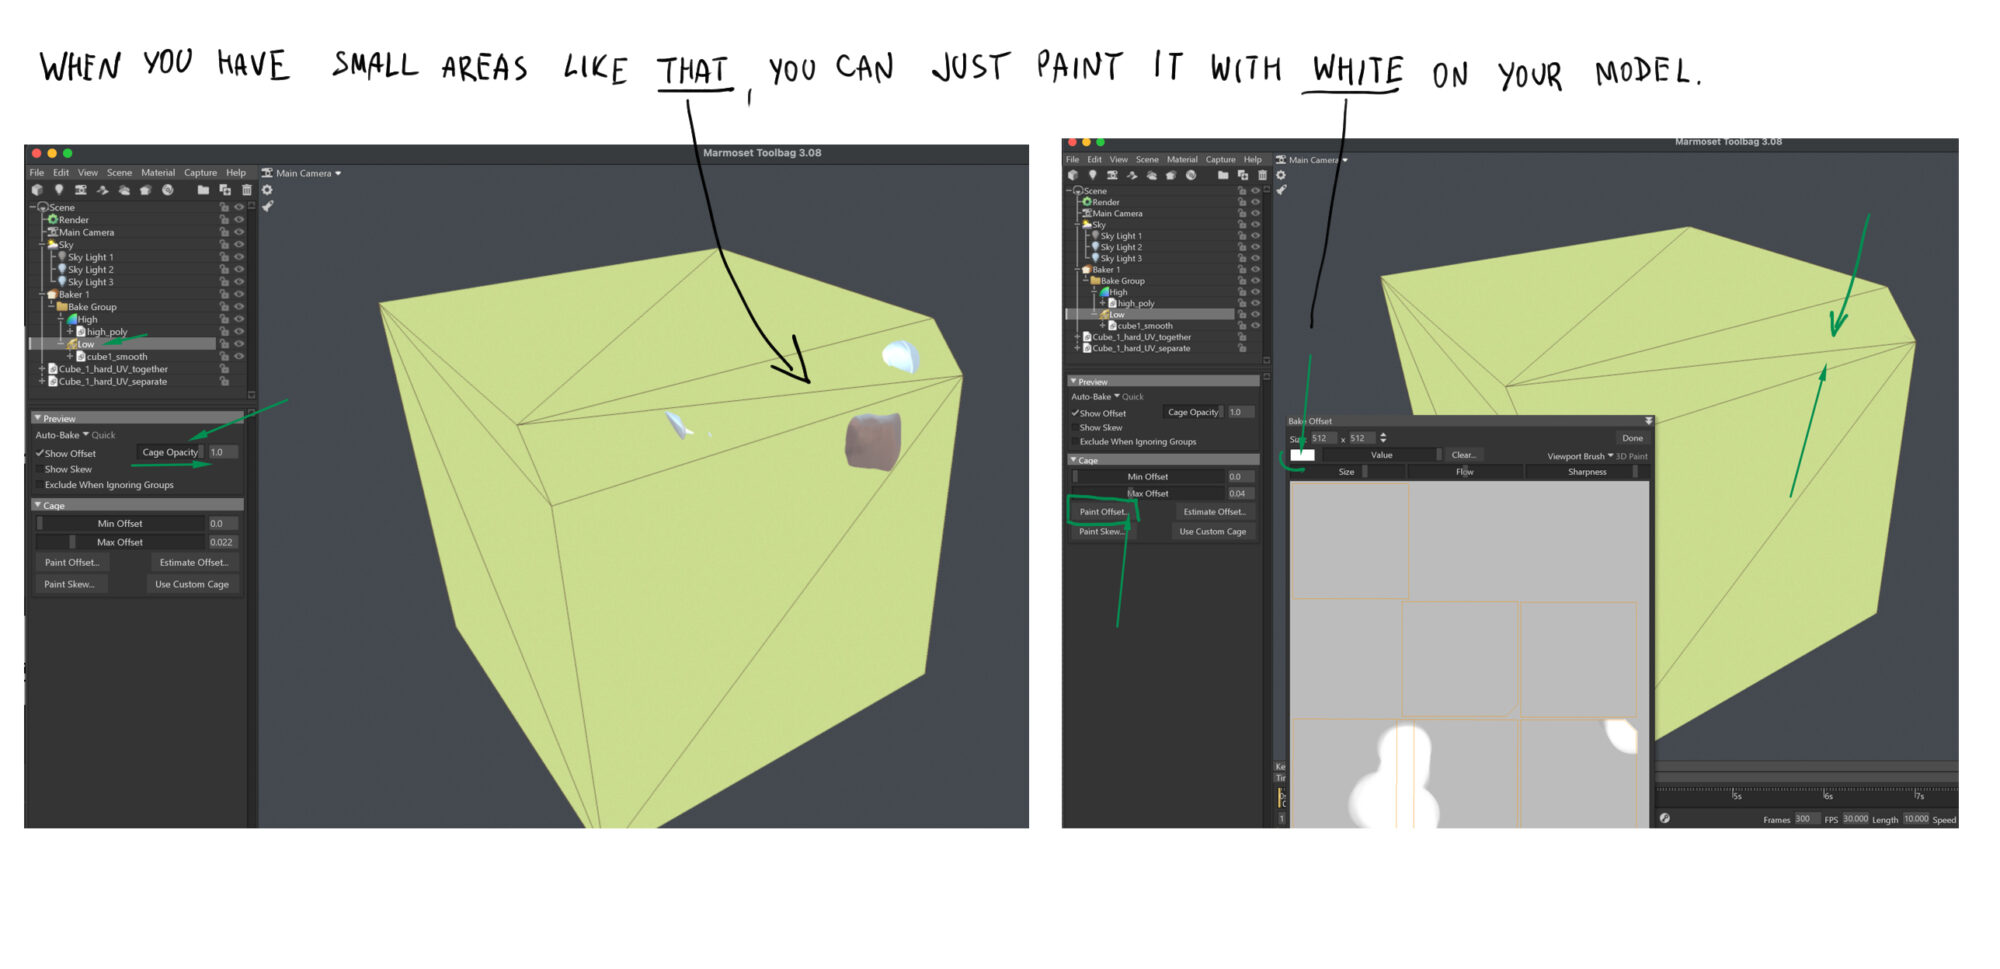
For baking, I use the Marmoset Toolbag because it always gives me better results than Substance. I love Marmoset’s option to preview every low-poly cage; if anything isn’t covered by the cage, you can see it immediately and adjust it or even paint those parts.
Another setting I always use in Marmoset when baking AO maps is “Two-Sided.”
It creates deep shadows between different parts of your model. Without this option checked, I often get inaccurate white highlights where parts of the model intersect.

Before baking, I combined some of the parts that didn’t intersect with each other into one mesh and tidied up my model, renaming every matching mesh with ‘_low’ and ‘_high’.
Then I used Quick Loader, which automatically separated all the meshes into correct groups. I achieved a result I was pleased with and baked all the maps I needed for texturing in Substance Painter.
If you don’t see the map you need in the Marmoset Toolbar, you can click the ‘Configure’ button to access a larger selection of maps to bake.
I usually bake Normals, Normals (object), Ambient Occlusion, Curvature, Thickness, and Position maps.
Texturing
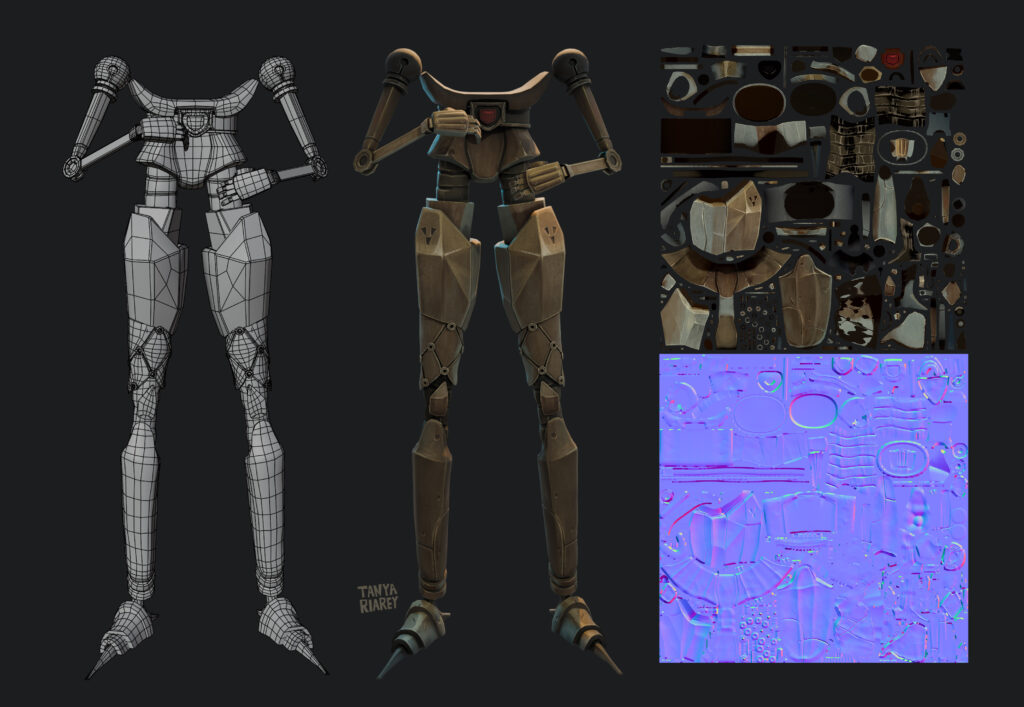
Here are my final texturing results, including the UVs and normal maps.

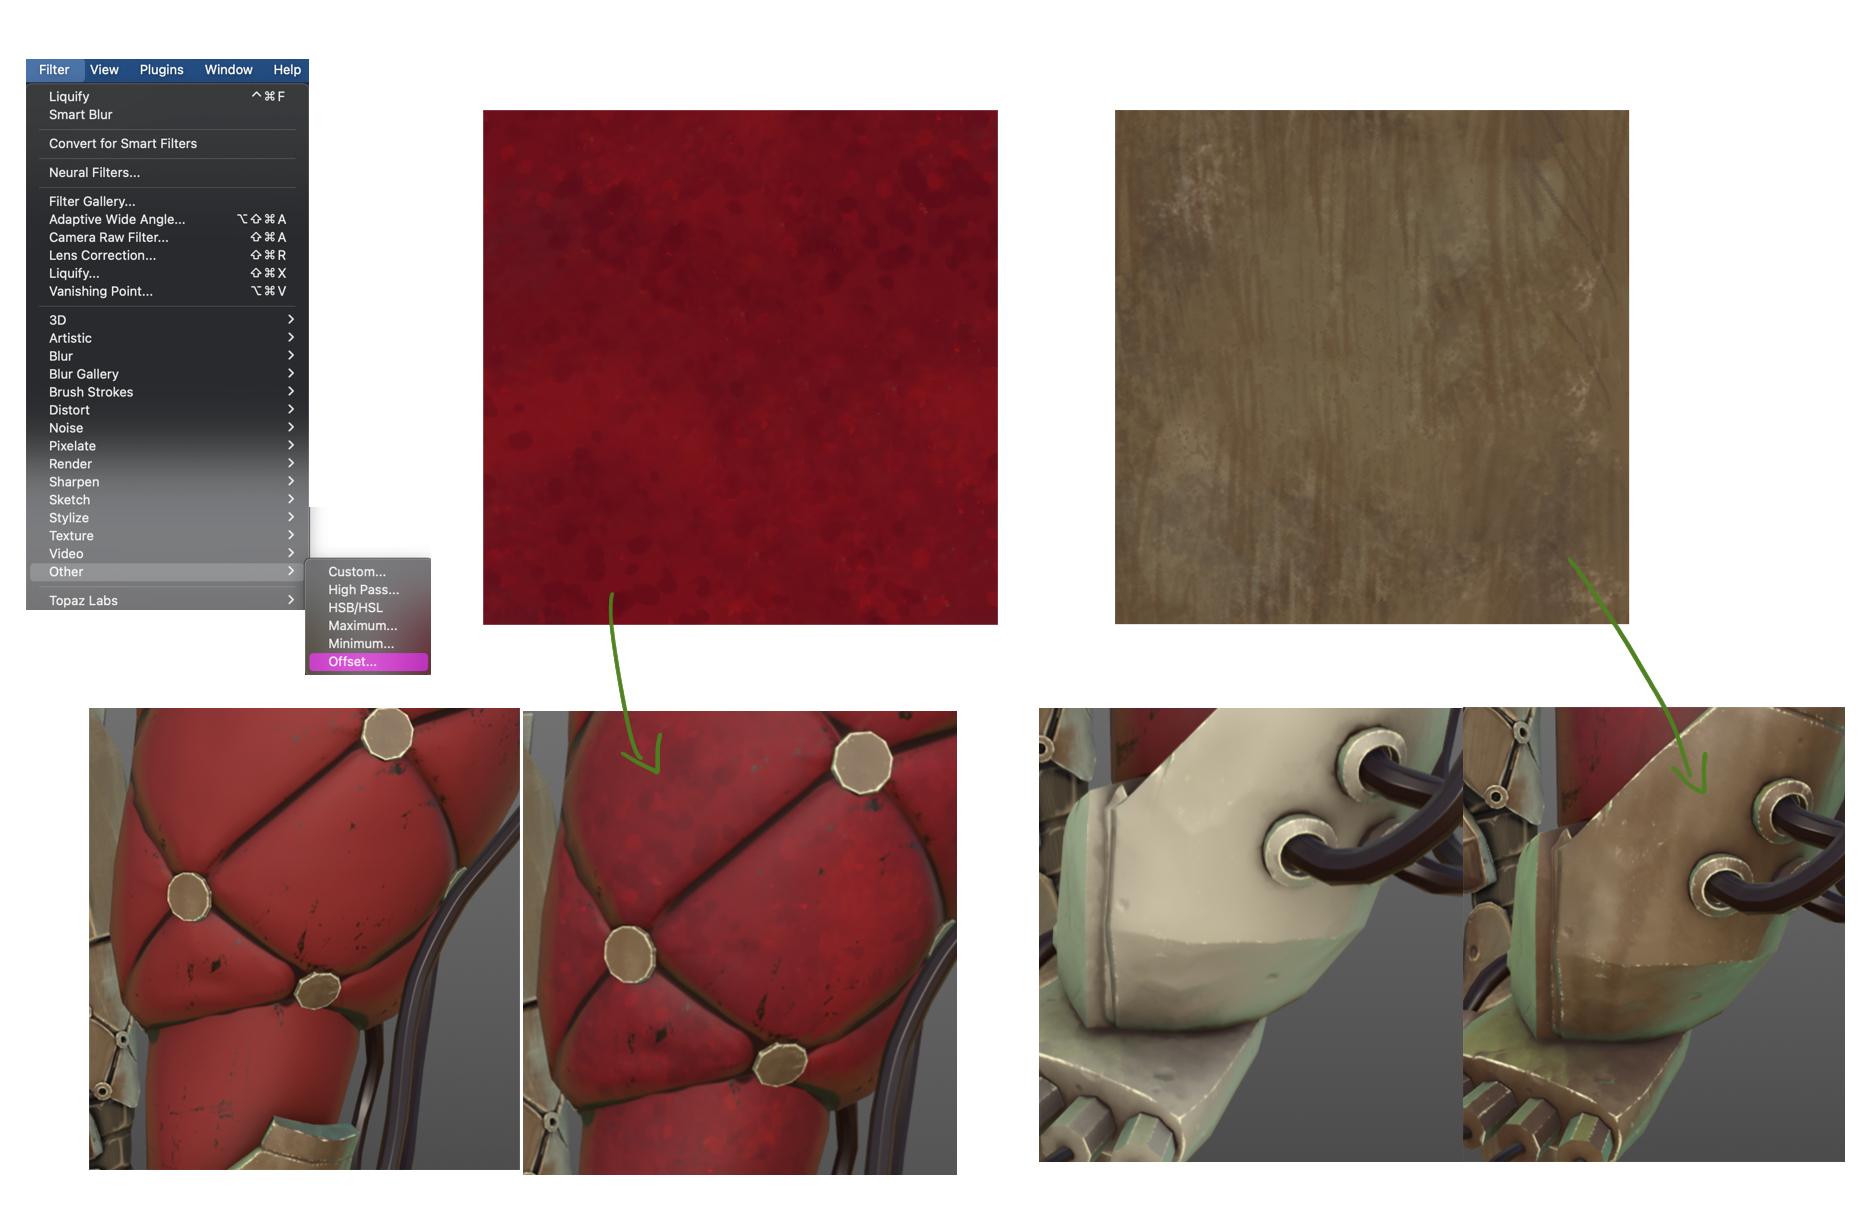
Before beginning the texturing process, I created two quick textures in Photoshop using a few textured brushes. To make a texture tileable in Photoshop, I often use the Offset filter.
This shifts the image, revealing seams in the middle that are easy to paint over.
While you can achieve similar effects with generators, I find it easier to start with a few basic hand-painted textures.
I imported all the maps into Substance Painter and began creating a foundation for later hand-painting in 3DCoat.
This is where all the smart masks, filters, and generators are really useful in Substance. Here are my favorites for hand-painting: the baked light generator and the blur slope effect.
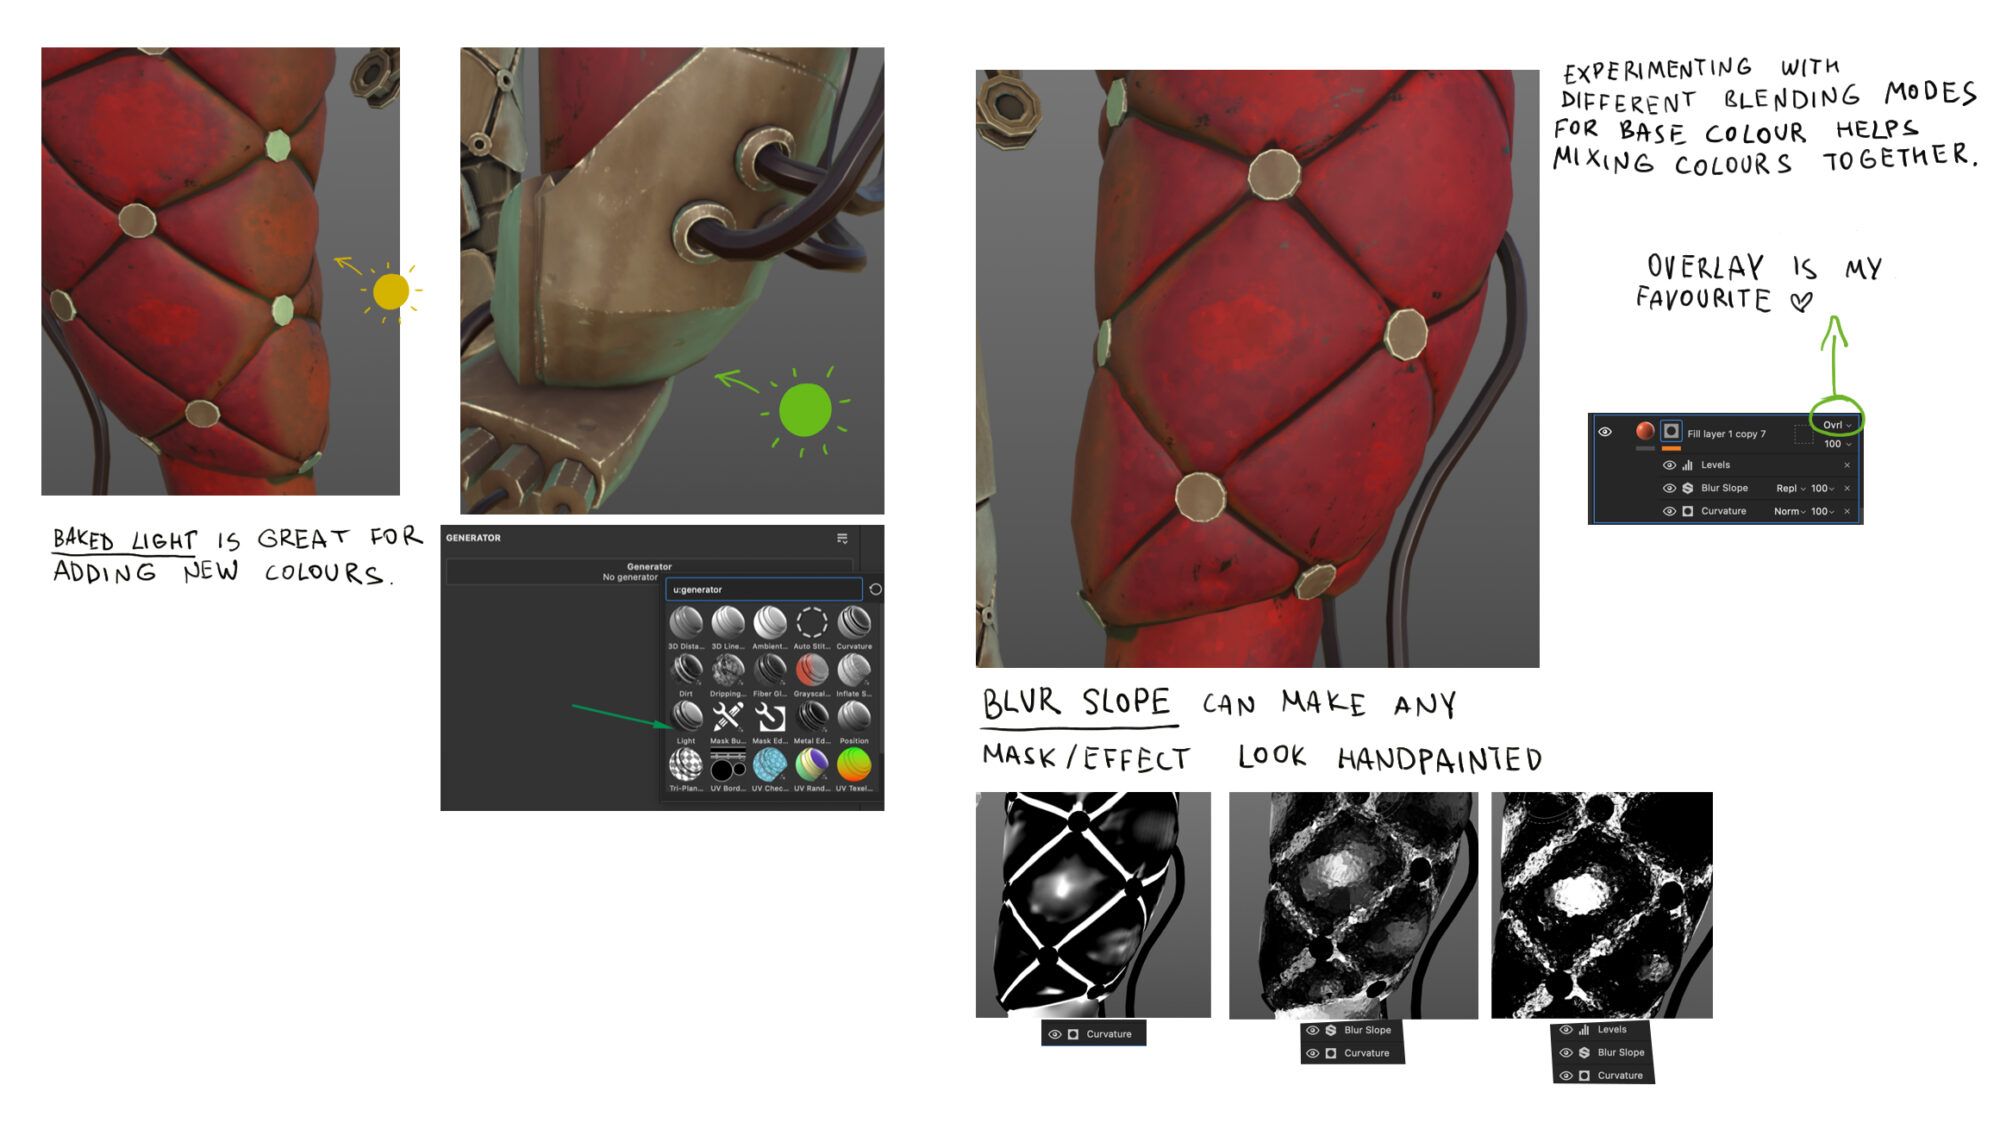
The general pipeline starts with a fill layer where you pick a color to add to certain areas of your model. Next, assign a black mask to that fill layer, and add more masks and effects to the black mask.
For example, Curvature often highlights edges, while AO creates deep shadows. You can build on this by adding smart masks, generators, or effects to get a more interesting look.
For instance, you might add levels to control the intensity, then add some grunge textures to break up smooth lines. Many smart masks are essentially presets that combine baked maps with various noise or grunge textures, allowing you to control different aspects of the settings.
It’s worth experimenting with these to discover their potential.
I found this process very intuitive, and I believe Substance Painter offers a lot for PBR and procedural texturing. However, for actual hand-painting with brushes, I don’t think Substance is ideal.
Firstly, it’s procedural and remembers every stroke (for example, if you change the resolution, it recalculates those strokes), which causes significant lag after a while.
Undoing actions also takes ages (perhaps only on Mac?).
But my biggest issue is that it doesn’t support pressure-sensitive transparency for brushes, lacks a Photoshop projection tool, and the color wheel frequently disappears when you need it.
For instance, if you switch tools (like picking the eraser), the color wheel vanishes, and when you select your brush again, you’ll need to find and reopen it.
Also, picking a color from your model is more difficult than it should be — you can only use the color picker [I] when your color wheel is active, and you need to click twice: once to activate the picker, then to pick a color.
Alternatively, you can use the material picker [P] that selects colors along with all the material settings.
This is why I prefer 3DCoat to paint small details. The coolest thing about it is its Photoshop projection feature — you can paint from different angles directly in Photoshop, and it works very well.
I used this feature for about 80% of the smaller hand-painted details.
3DCoat is great for this and is much more artist-friendly in my opinion. You have brushes with pressure-sensitive opacity and a color picker that selects colors with a single click.
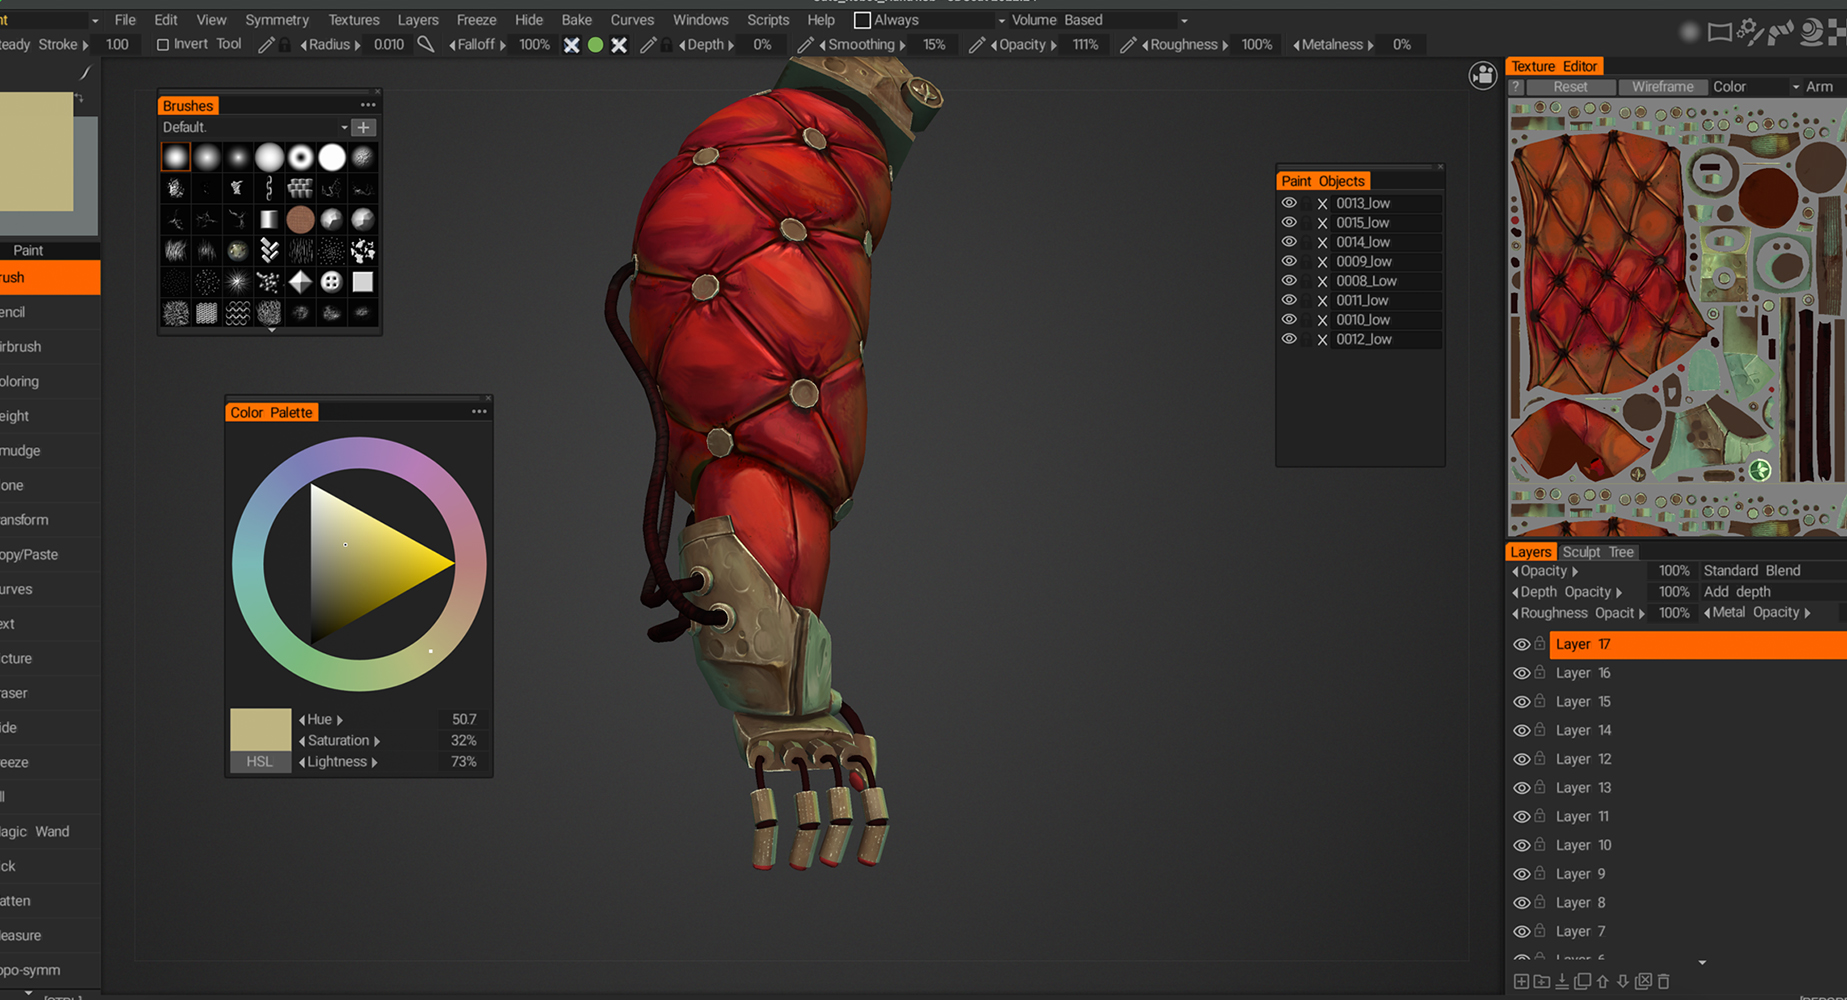
I typically use 3DCoat exclusively for hand-painting, then export all the painted textures back to Substance. I prefer keeping all my textures with layers in Substance, as it’s easier to import different sets of maps for various renders or game engines.
Using both 3DCoat and Substance Painter for texturing is the ideal approach. As mentioned earlier, I sometimes paint directly on the UV map in Photoshop for quick fixes.
If you’re using Blender for rendering, you can assign a PSD file as an Albedo map in the Shader Editor. This allows you to open it in Photoshop and make changes with an almost real-time preview in the Blender viewport.
To reload the changes in Blender, press Control + [R] in the UV Editor or Shader Editor to update both the map and the viewport preview.
Here are a few tips on achieving a hand-painted look:
- Having a base with diverse colors and textures will help you a lot — it’s much easier than painting on a flat color. Use Ambient Occlusion and Curvature maps to create this base.
- Most of the time, you can achieve a hand-painted effect by highlighting edges and painting deeper shadows around them. Try to keep one edge of your shadow sharp and blend the other side.
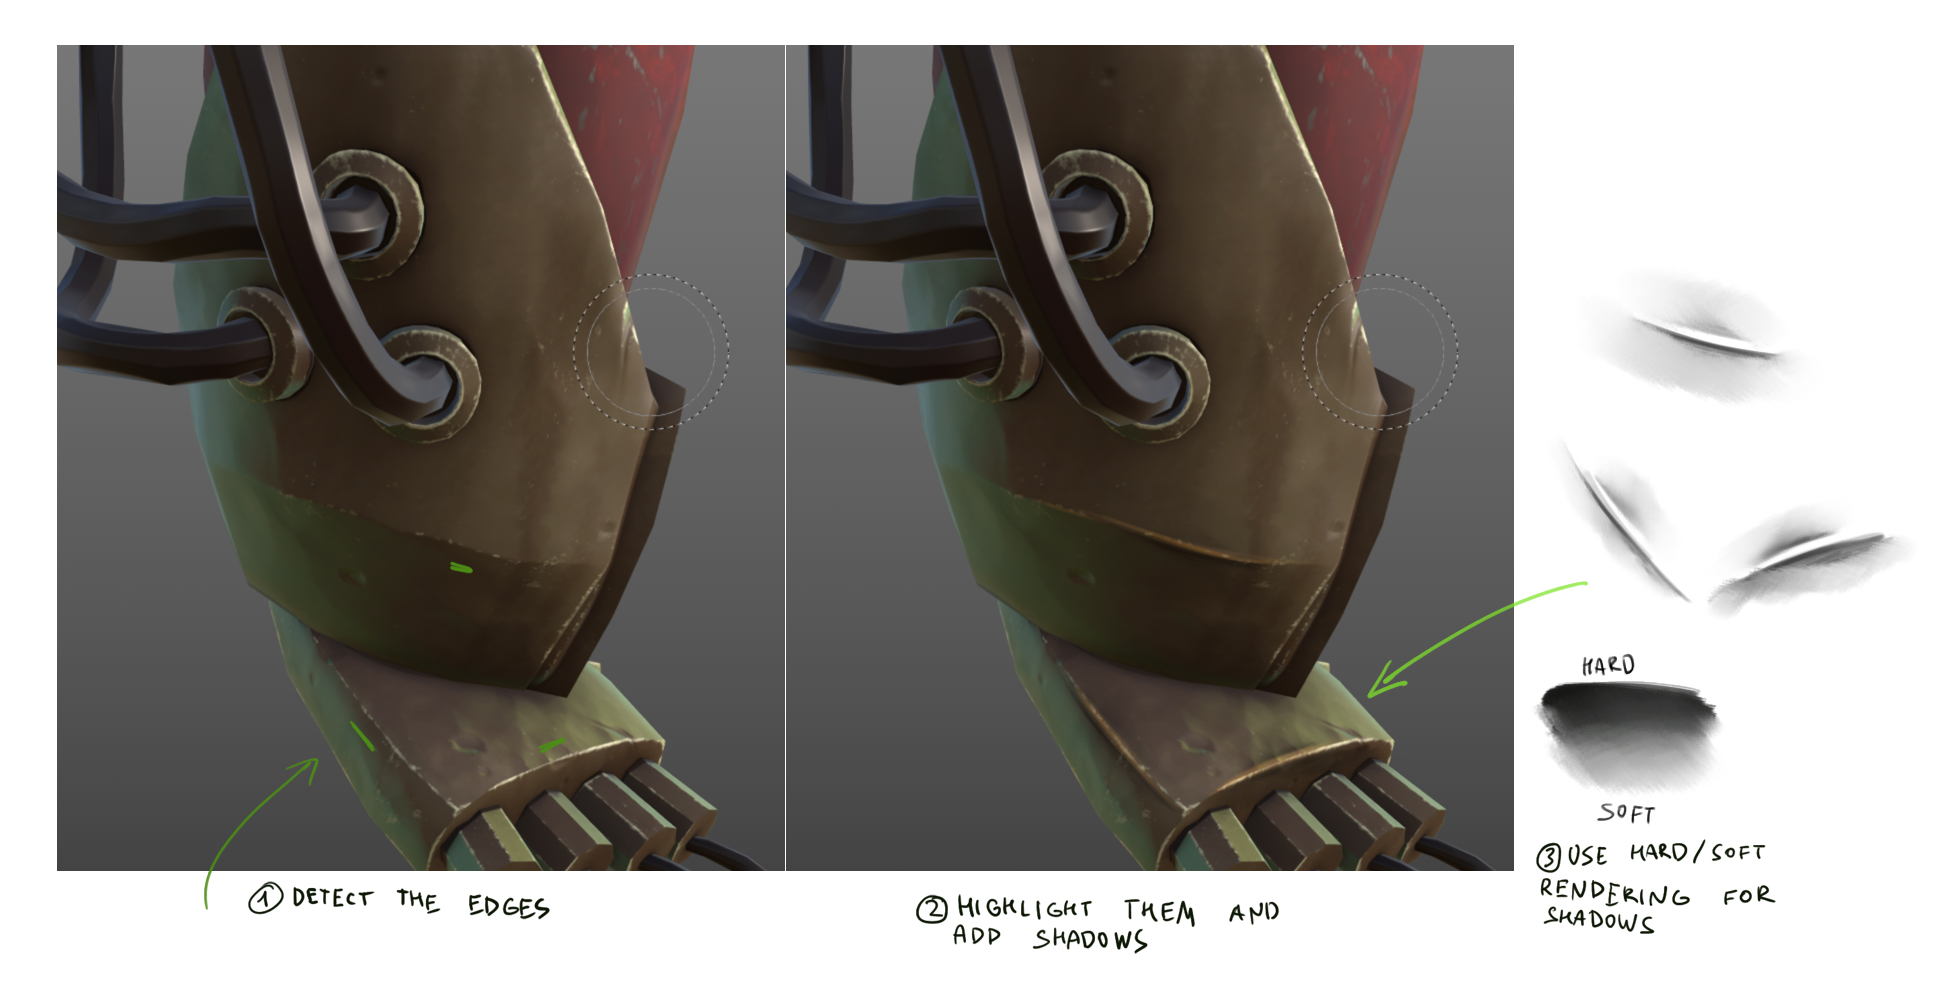
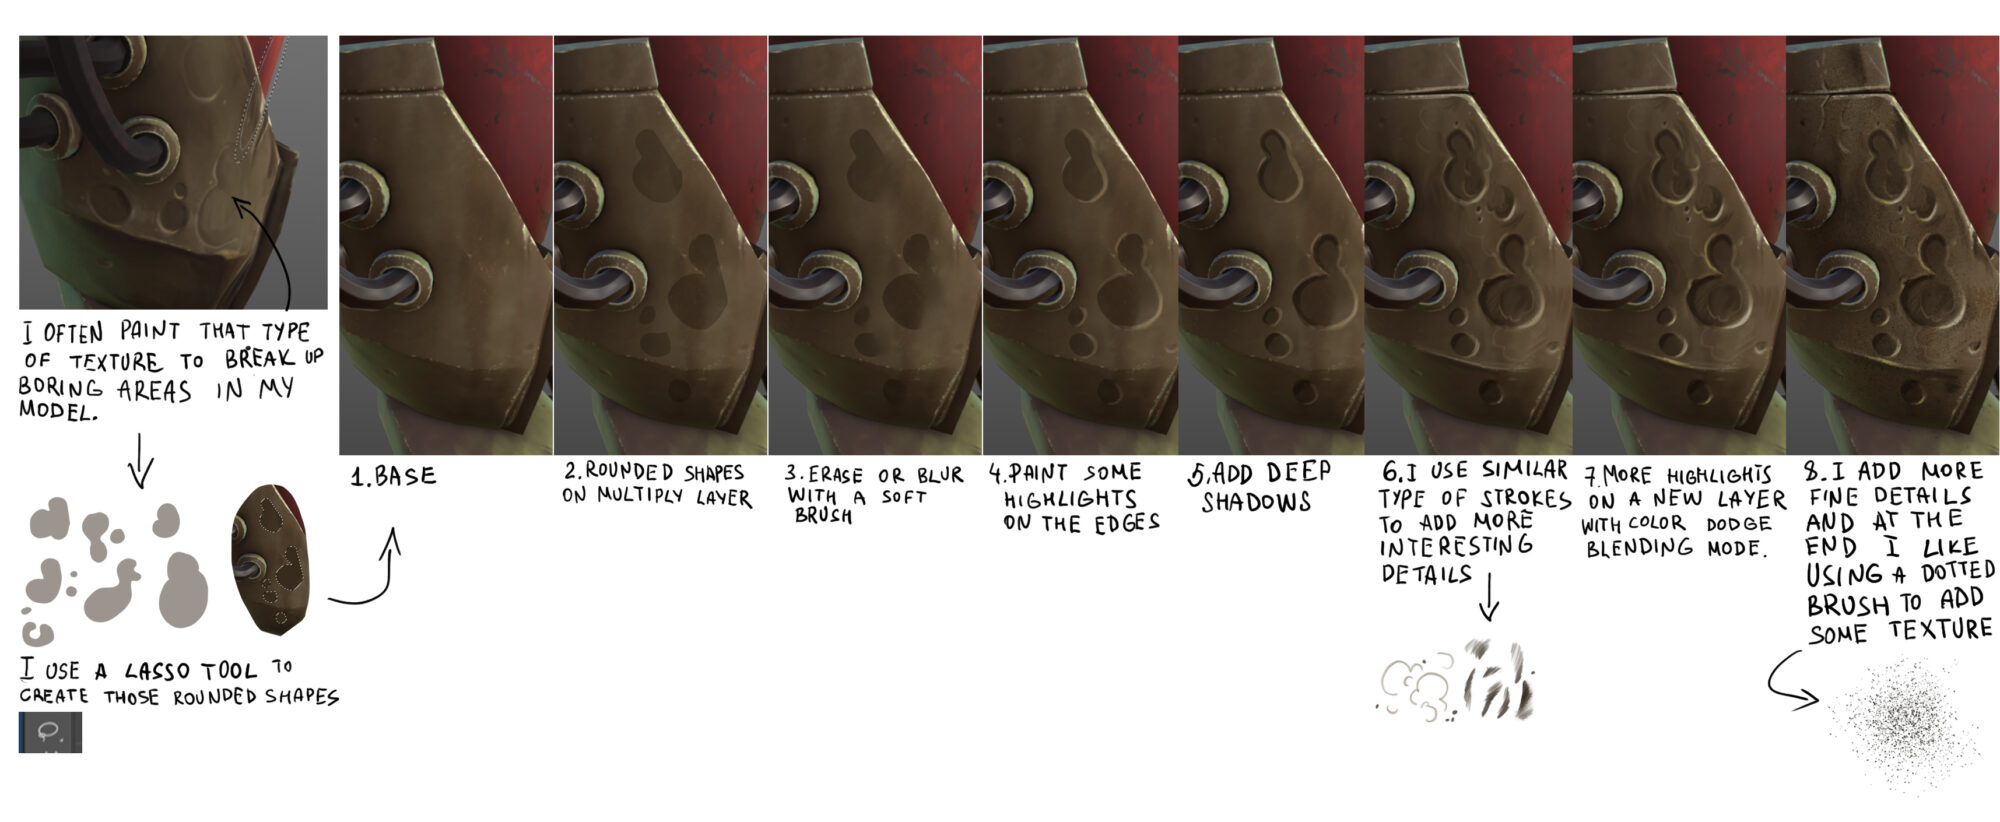
- If you look closely at my texturing, you’ll likely notice that I frequently use similar rounded shapes to fill in plain areas. These shapes are easy to paint in Photoshop or 3DCoat. Here’s a quick breakdown:
Lighting & Rendering
I used Cycles in Blender to render all the preview photos and a video. To achieve transparency for the glass, I used the Alpha Hashed blend mode in the material settings and painted the transparency in Photoshop.
I made it look like glass by making it more transparent in the middle and less so at the corners. I didn’t want any glass distortions for this hand-painted model, just a simple semi-transparent glass with a hint of blue.
For the lighting, I used an HDR with reduced brightness to create ambient light and added three extra lights — one to highlight the front of my model, and two more to highlight the edges (one warm light and one cool).
Conclusion
Overall, I’m very happy with the result I achieved working on this personal project. While most of my client work is 2D, I have been actively developing my 3D skills over the past five years.
I’m passionate about stylized 3D art and would love the opportunity to contribute to complex 3D worlds, whether it’s for games or animated films, and to refine and expand my skills to the next level.
If you want to see more of my 3D art follow me on ArtStation.
If you’re interested to check all other art I create here is my website with my client work and personal projects.
Useful resources for learning ZBrush
I’ve watched the 2020 and 2022 versions of this course, and I absolutely love it. It’s incredibly solid, well-structured, and easy to understand. The course covers both basic and advanced tools in ZBrush.
Flipped Normals course “Hard Surface ZBrush Tutorial (Modeling A UH-60 Rotor)” by Henry Chervenka covers cool hard surface techniques.
Read more articles
You might also like these articles.