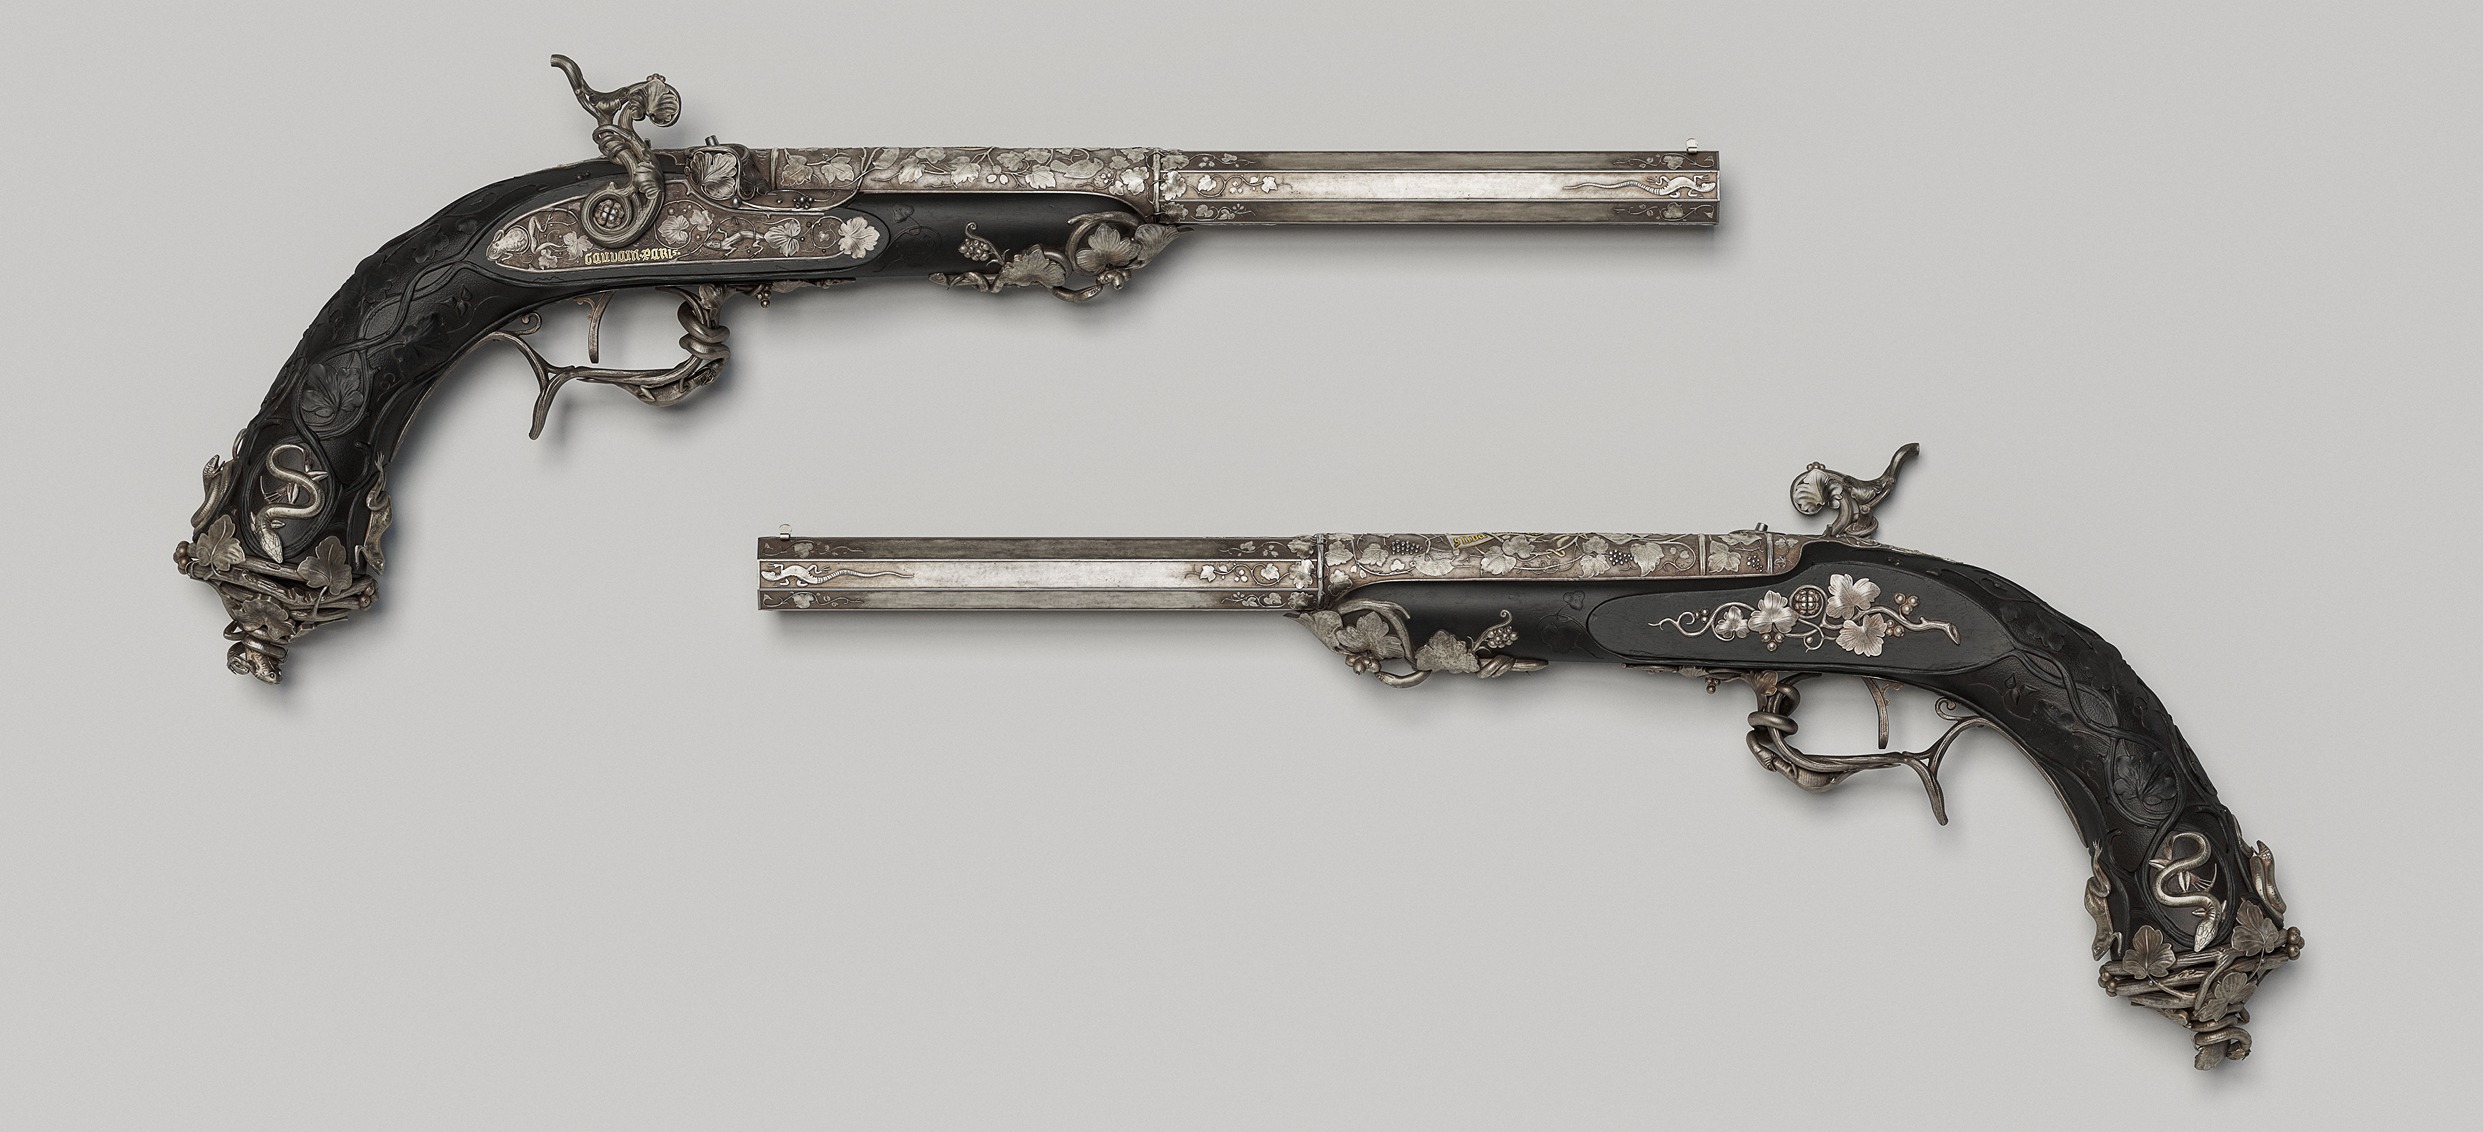
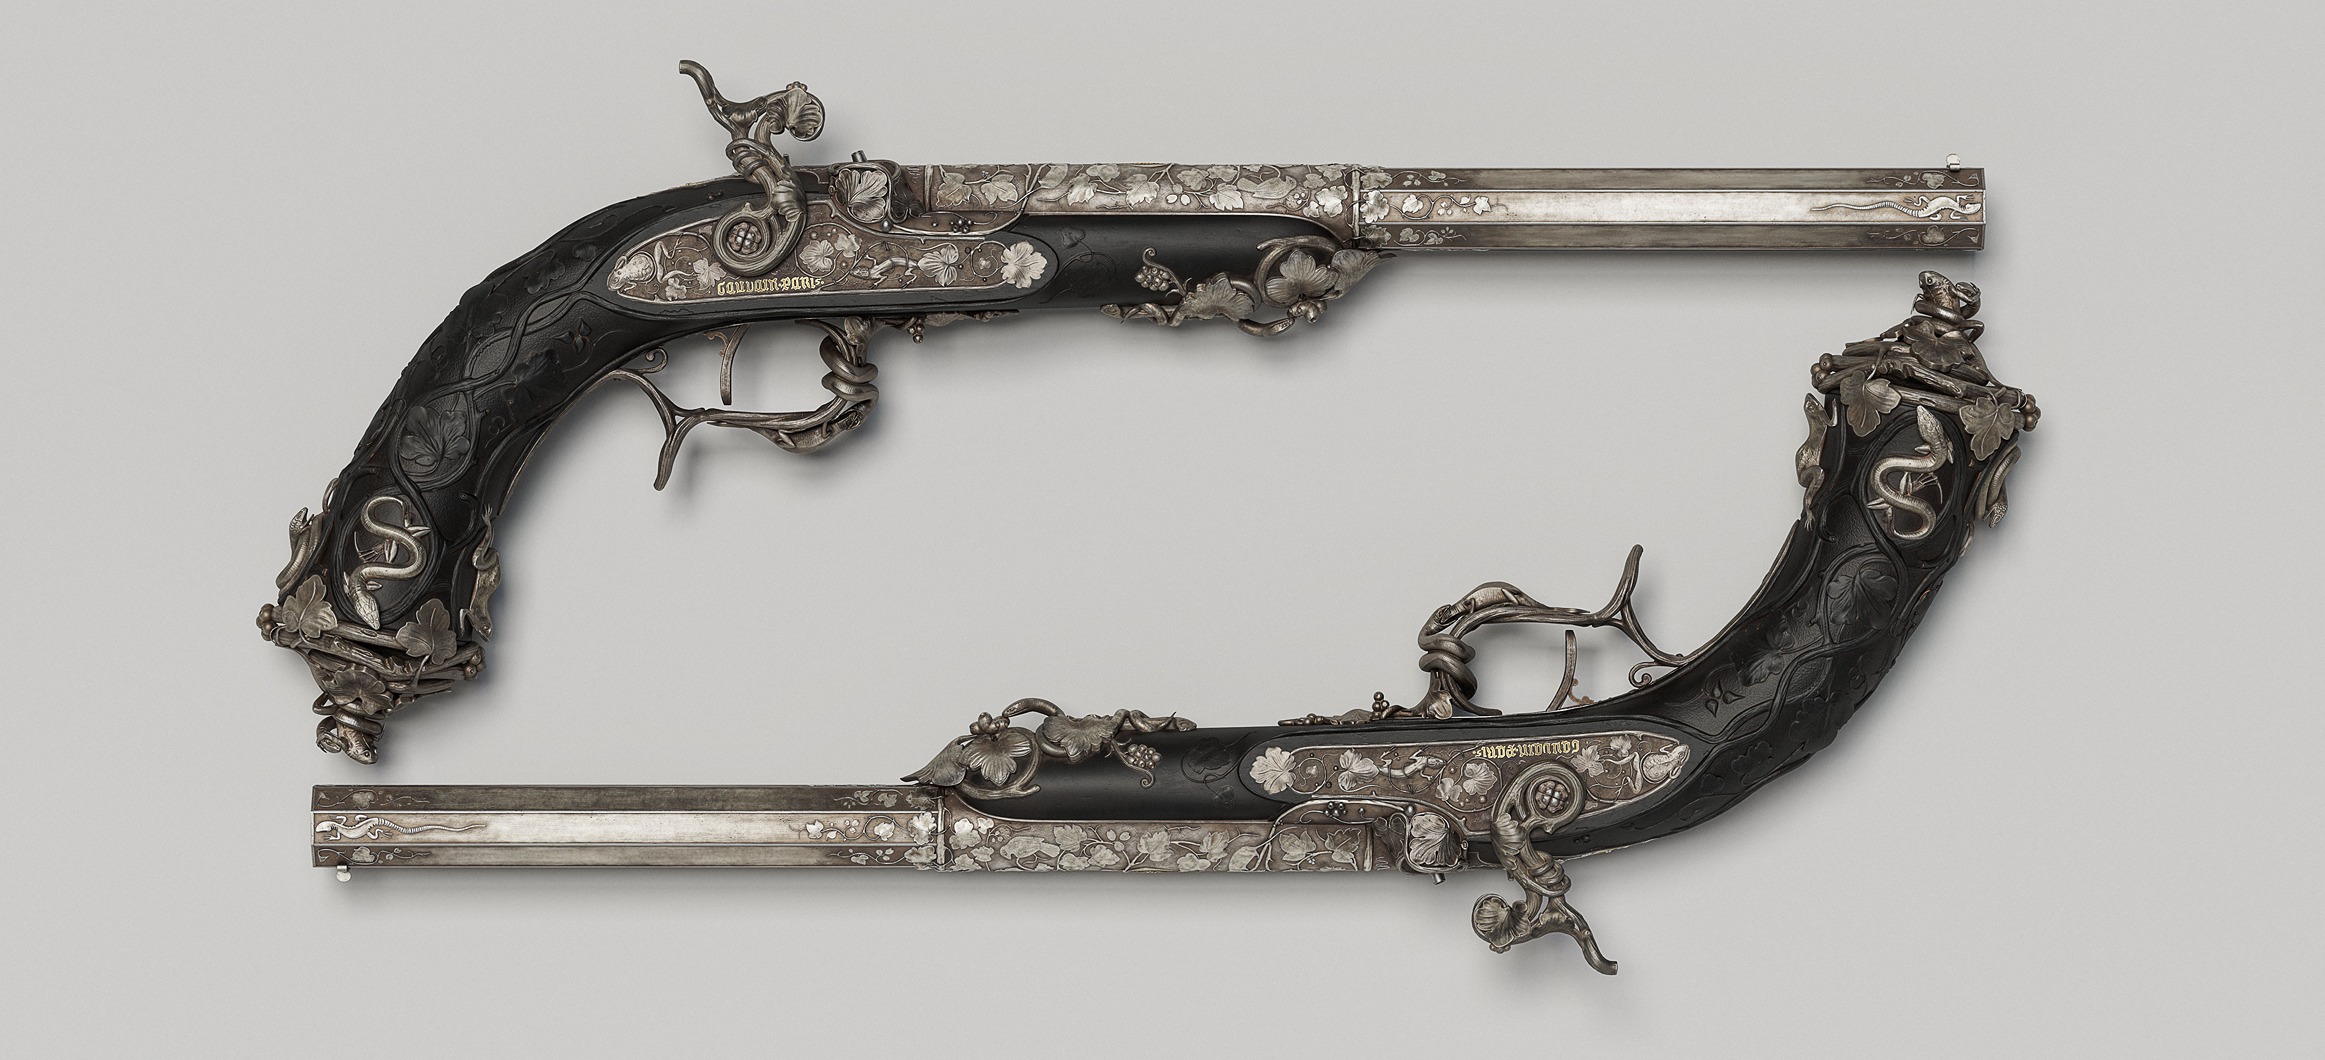
Percussion Pistol


Introduction
Hello everyone, my name is Morgan Jamain. I’m a 3D Modeler, 28 years old, and originally from France.
started learning 3D five years ago. After coming across an advertisement for an art school, I thought, “Why not give it a try?” As it turned out, I completely fell in love with the field and quickly became deeply passionate about it.
After three years studying Game Art, I joined Mimbus Studio, where I contributed to the development of serious games in virtual reality. I spent two years there, which allowed me to earn my Master’s degree alongside gaining valuable professional experience within the studio.
Currently seeking new opportunities, I dedicate 8 hours a day, 7 days a week, to building a strong portfolio that will help me join a AAA studio in the coming months. (Open to relocate)


Project goal
The goal of this project was to create a striking and original hero prop, something that stands out from what is typically seen on ArtStation.
The main objective was to recreate the original pistol as faithfully as possible, with a strong focus on achieving ultra-realistic textures and a highly polished final render.
It was also an opportunity to challenge myself with a complex and technical prop in order to assess my current skill level.
https://www.linkedin.com/in/morgan-j45/
https://x.com/MorganJobj
Inspiration
I am deeply passionate about historical culture and admire the way humans in the past had such a strong appreciation for craftsmanship and handmade art.
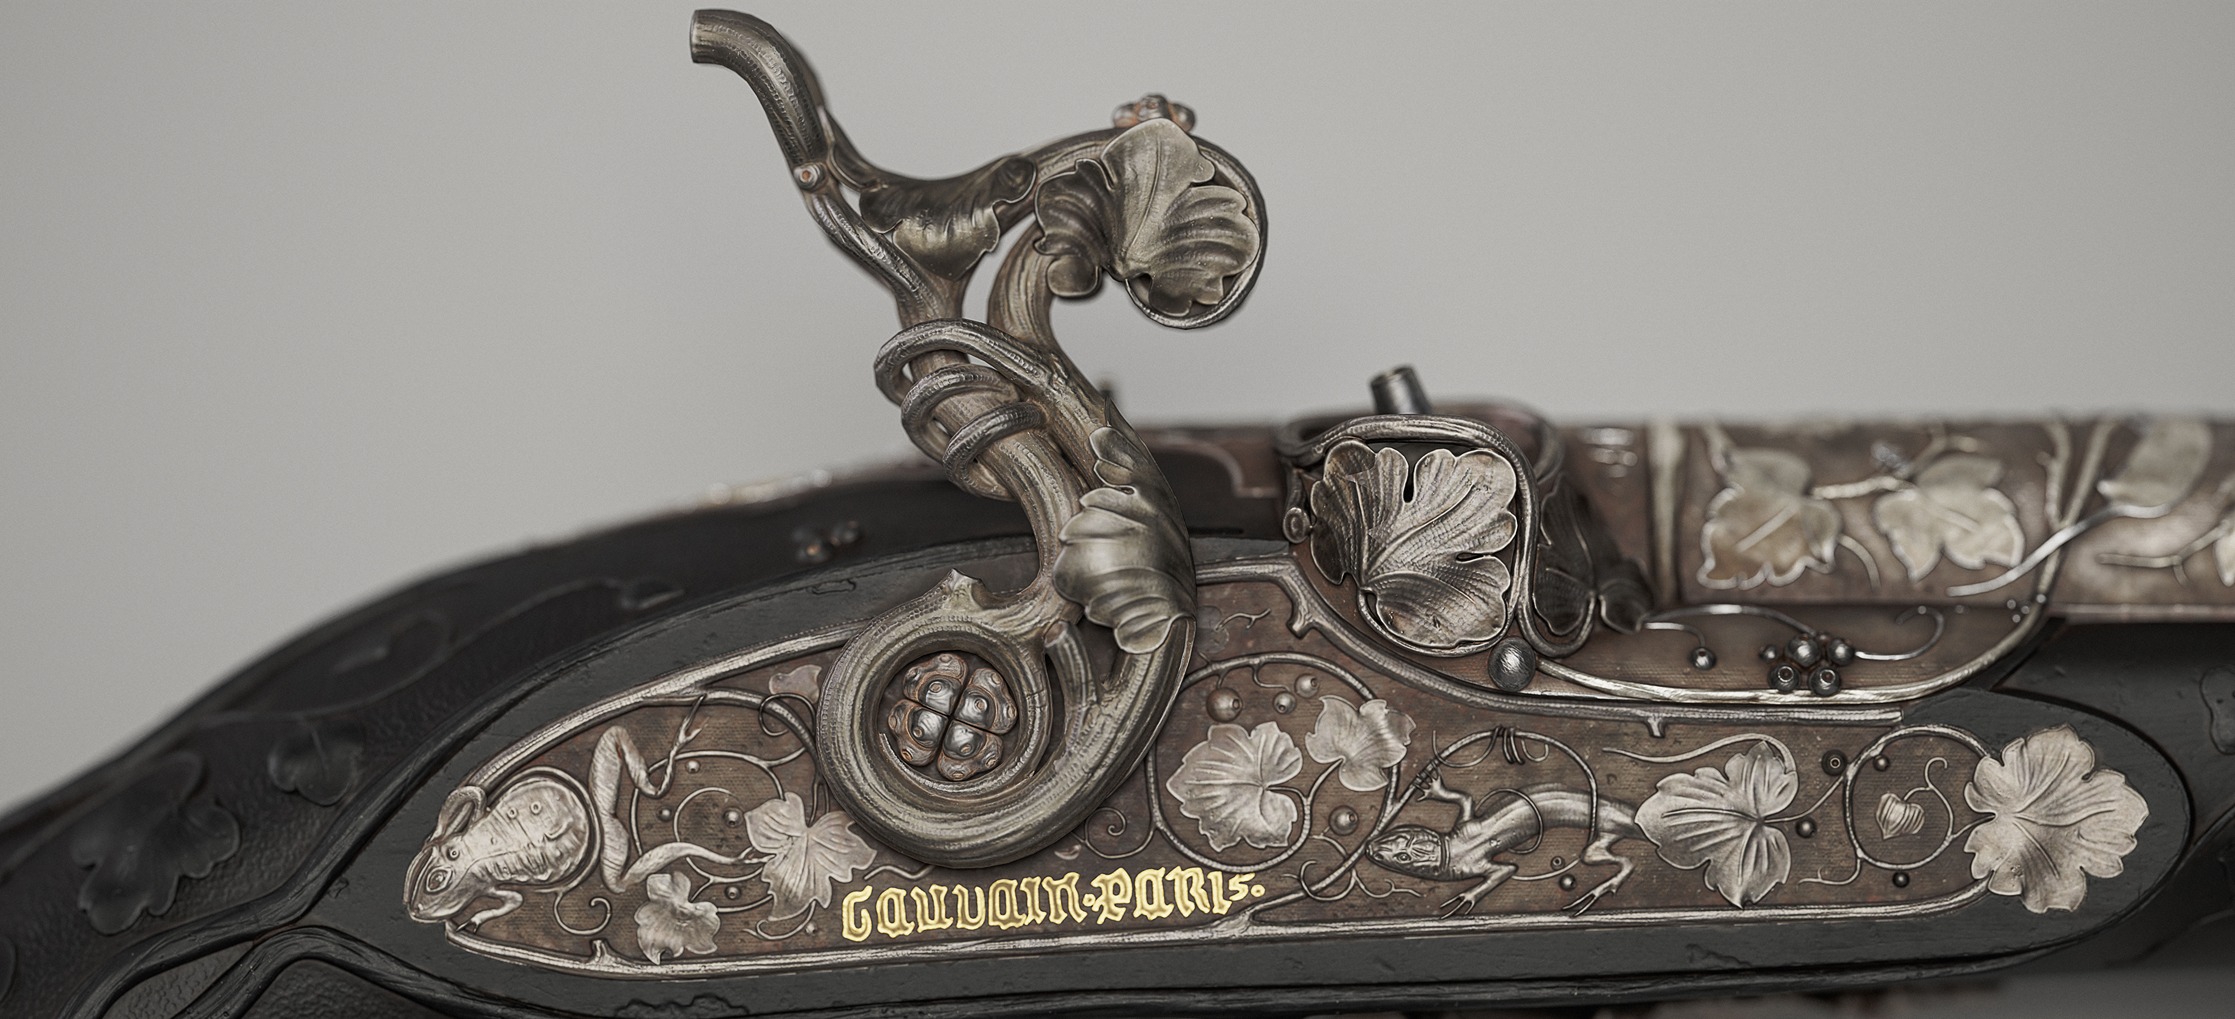
After many hours of research, I came across a percussion pistol modeled by Guillian Fombelle (who has since become a friend). I was immediately fascinated by how Alfred Gauvin crafted these masterpieces.
I then looked to see if he had designed other weapons, and that’s when I discovered this beautiful piece.


Planning
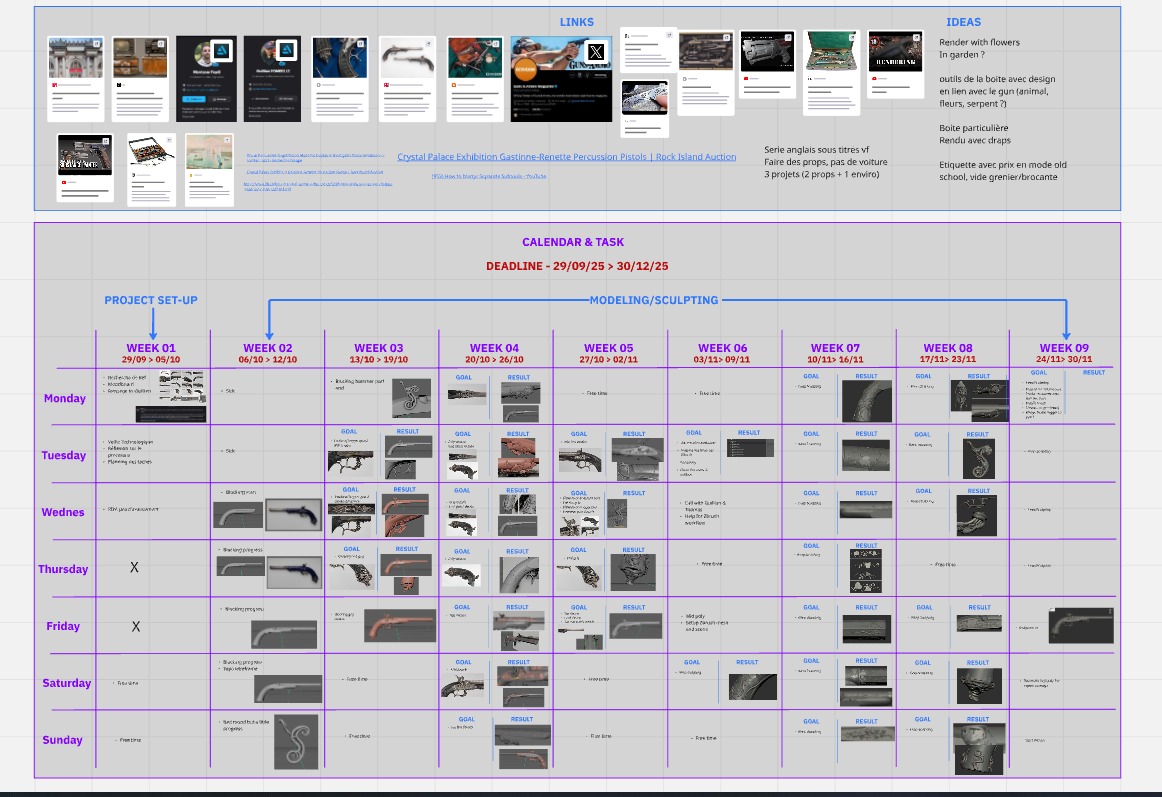
Before anything else, I always start by building a schedule; it’s essential for me. It allows me to stay on track and update each task at the right time.
I use Miro for this. I find it very practical and intuitive, and I created a detailed board to organize the entire project.
I strongly recommend doing the same: taking a screenshot of each step day after day and adding it to your Miro board. It’s always satisfying and rewarding to end the day knowing you’ve accomplished something, even if it’s just a small step forward.
This Miro board also helped me structure my workflow step by step, centralize important links, and write down ideas as they came to me throughout the project.

Software
For this project, I used Maya for modeling and UVs, ZBrush for sculpting, Blender for UV packing, Substance 3D Painter for texturing, and Marmoset Toolbag for baking and rendering.
Moodboard
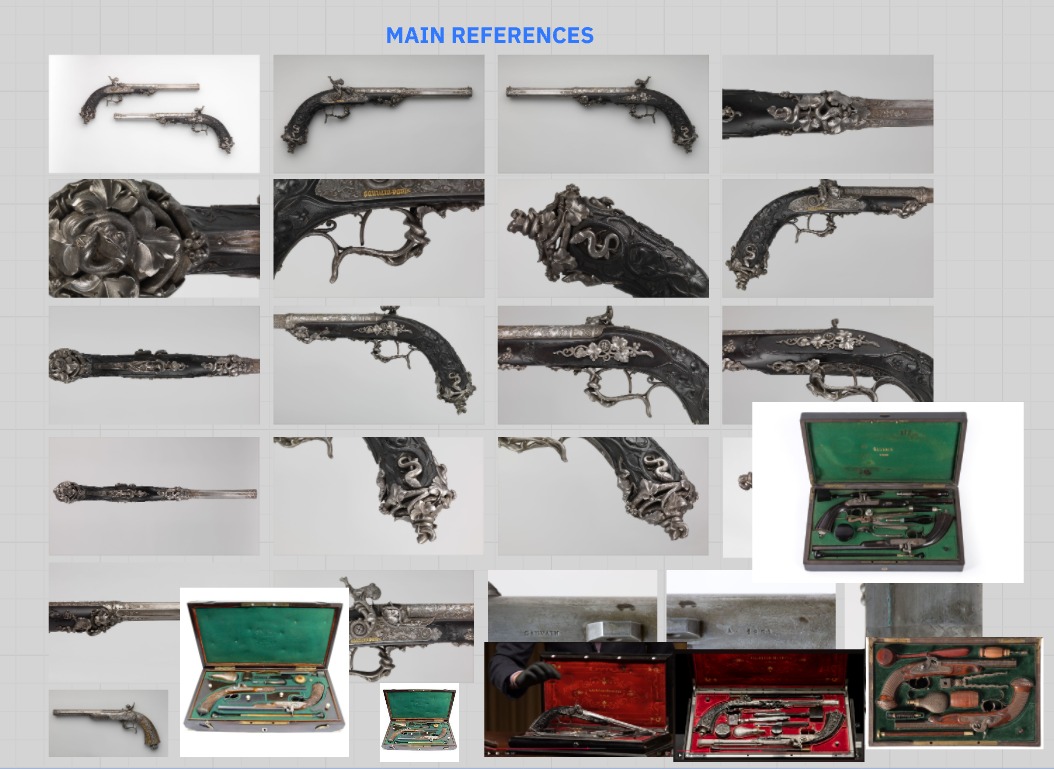
The first step, before modeling, is gathering references.
For my pistol, I was fortunate that the Metropolitan Museum of Art provided numerous high-quality photos from different angles, which made the task much easier.
I collected all these images on Miro, as well as in PureRef for convenience.
Blocking
As mentioned earlier, the MET provides numerous photos of the pistol, which greatly facilitated the blocking stage.
I simply displayed the images as a background in Maya and modeled directly on top of them.


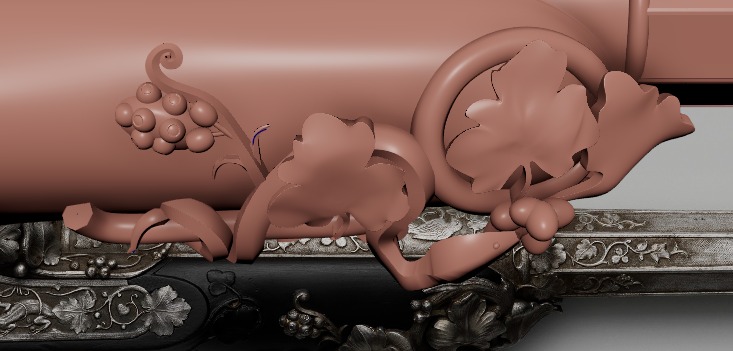
A quick aside to explain the blocking process for the ornaments, flowers, vines, and animals to make it clearer.
The pistol features a large number of decorative elements, and I spent a long time deciding whether to create them directly in ZBrush or to complete a full blocking in Maya. In hindsight, doing everything in ZBrush might have been faster, but less precise.
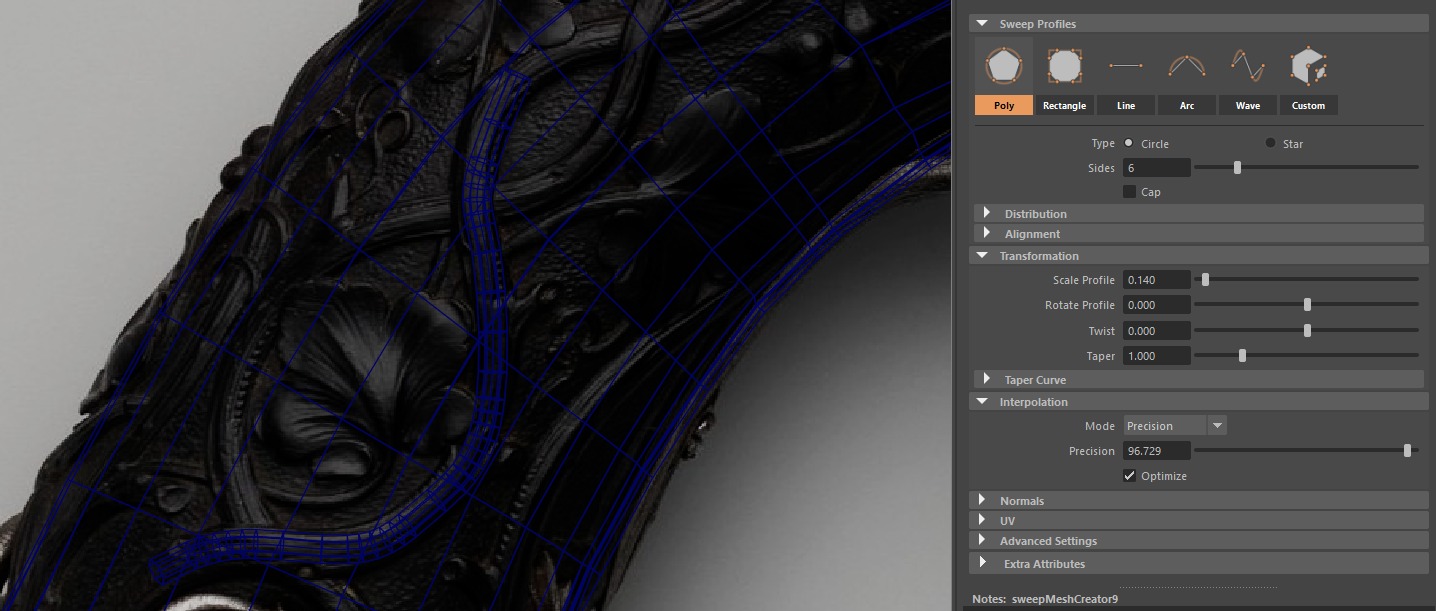
I therefore chose to do everything in Maya. For almost the entire process, I used splines and Maya’s Quad Draw tool. With a solid base of the pistol perfectly scaled to the references, I used this base as a “magnet.”
By enabling Live Surface on the base, I could easily trace splines (points snapping to the surface) for the branches, and applied the same method with Quad Draw for the leaves.
Finally, for the branches, once the splines were traced, I used Maya’s Sweep Mesh tool, which allows you to convert a spline into a mesh.


For the rest, particularly the animals where this method wasn’t feasible, I modeled everything by hand using standard extrusion techniques.


Midpoly
The mid poly stage is a crucial step for the rest of the project, and it was important for me to prepare it carefully.
I conducted numerous tests, part by part, to achieve an optimal mid poly mesh that would be fully compatible with ZBrush.
The logic is fairly simple: with an already advanced blocking in place, I just added supporting edges, bevels, and a subdivision level to all of my meshes to facilitate importing into ZBrush.

Highpoly – Sculpting
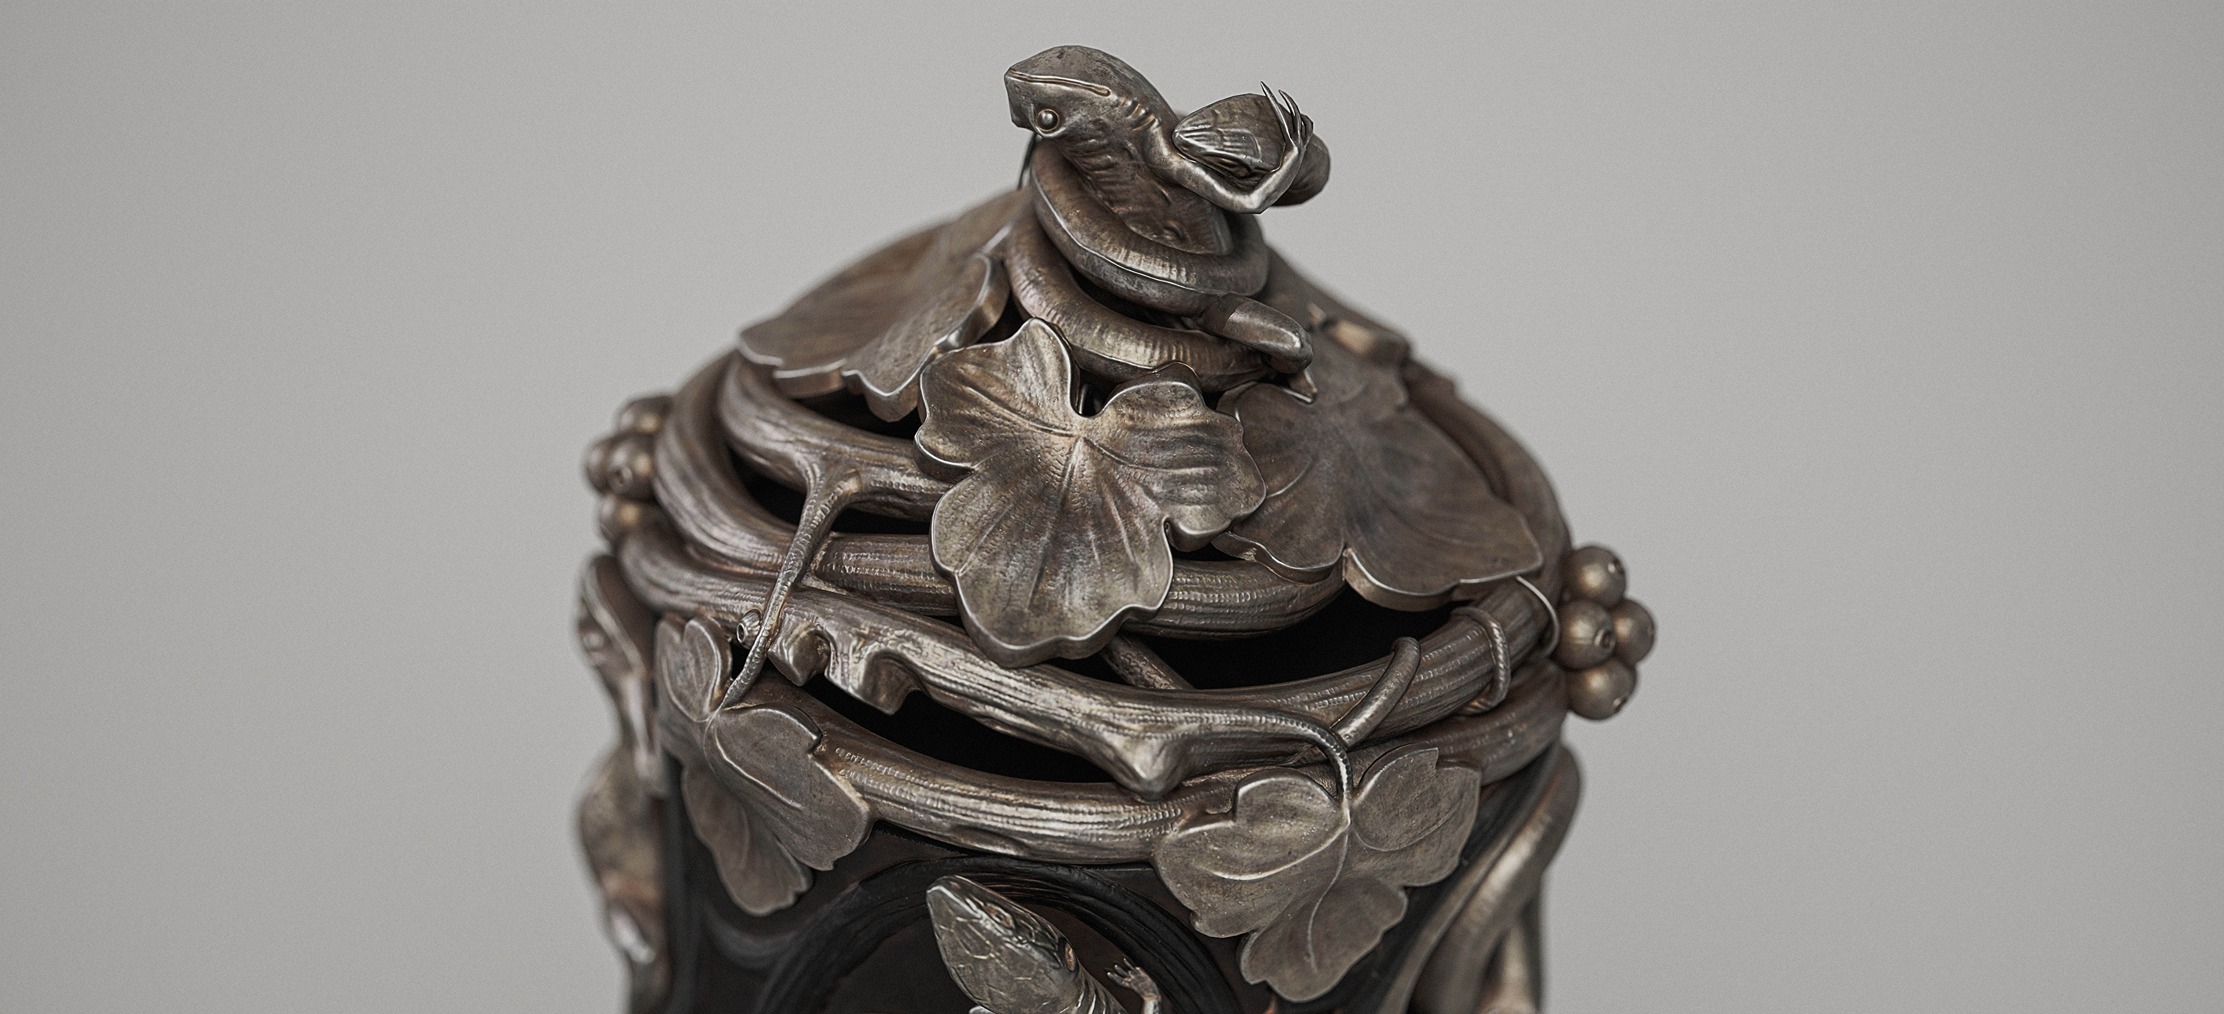
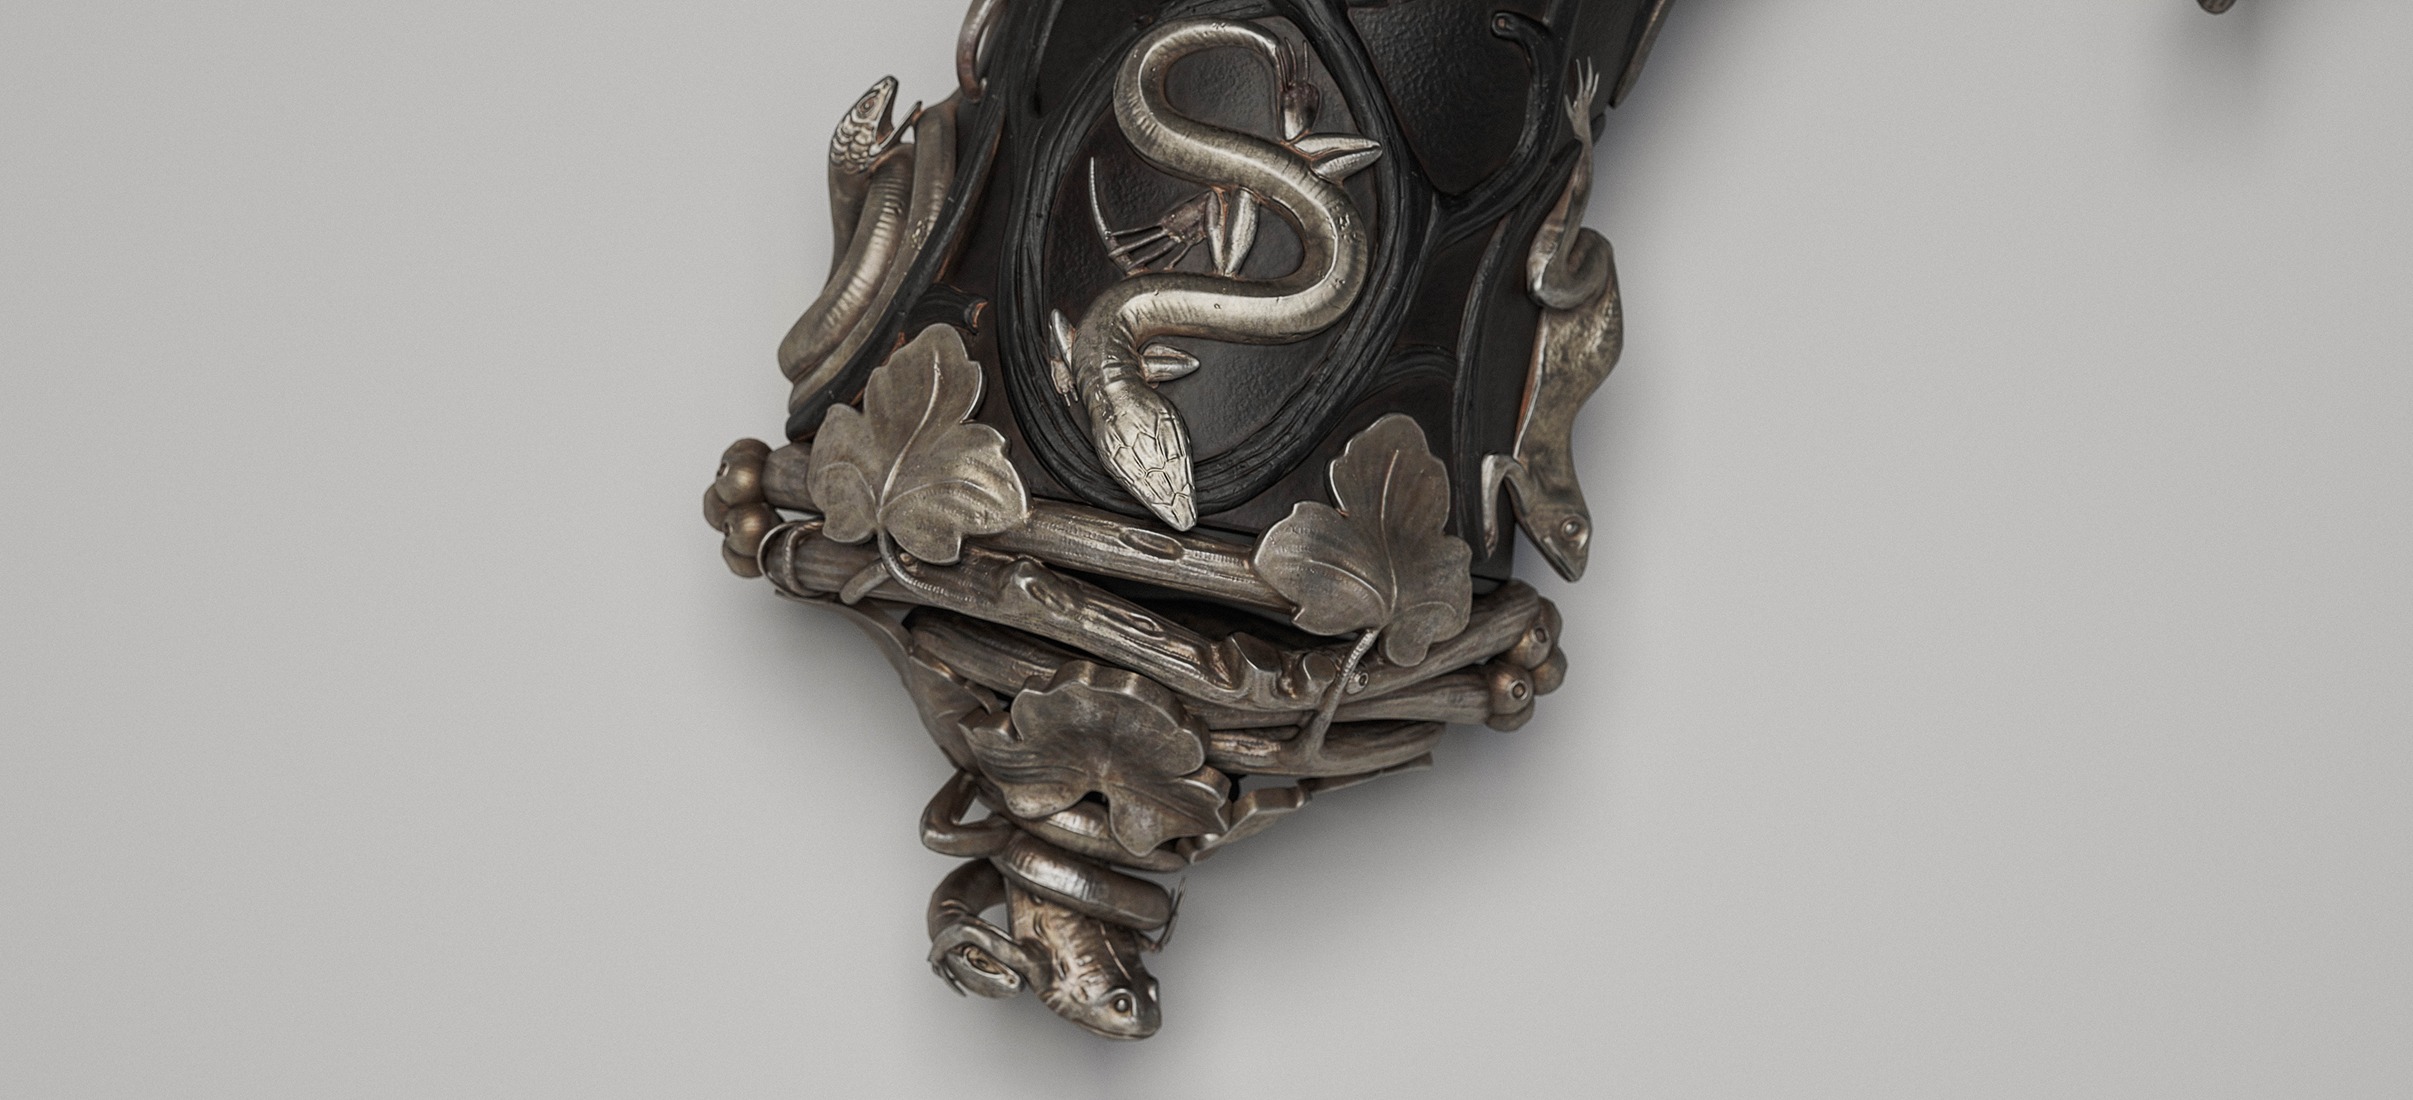
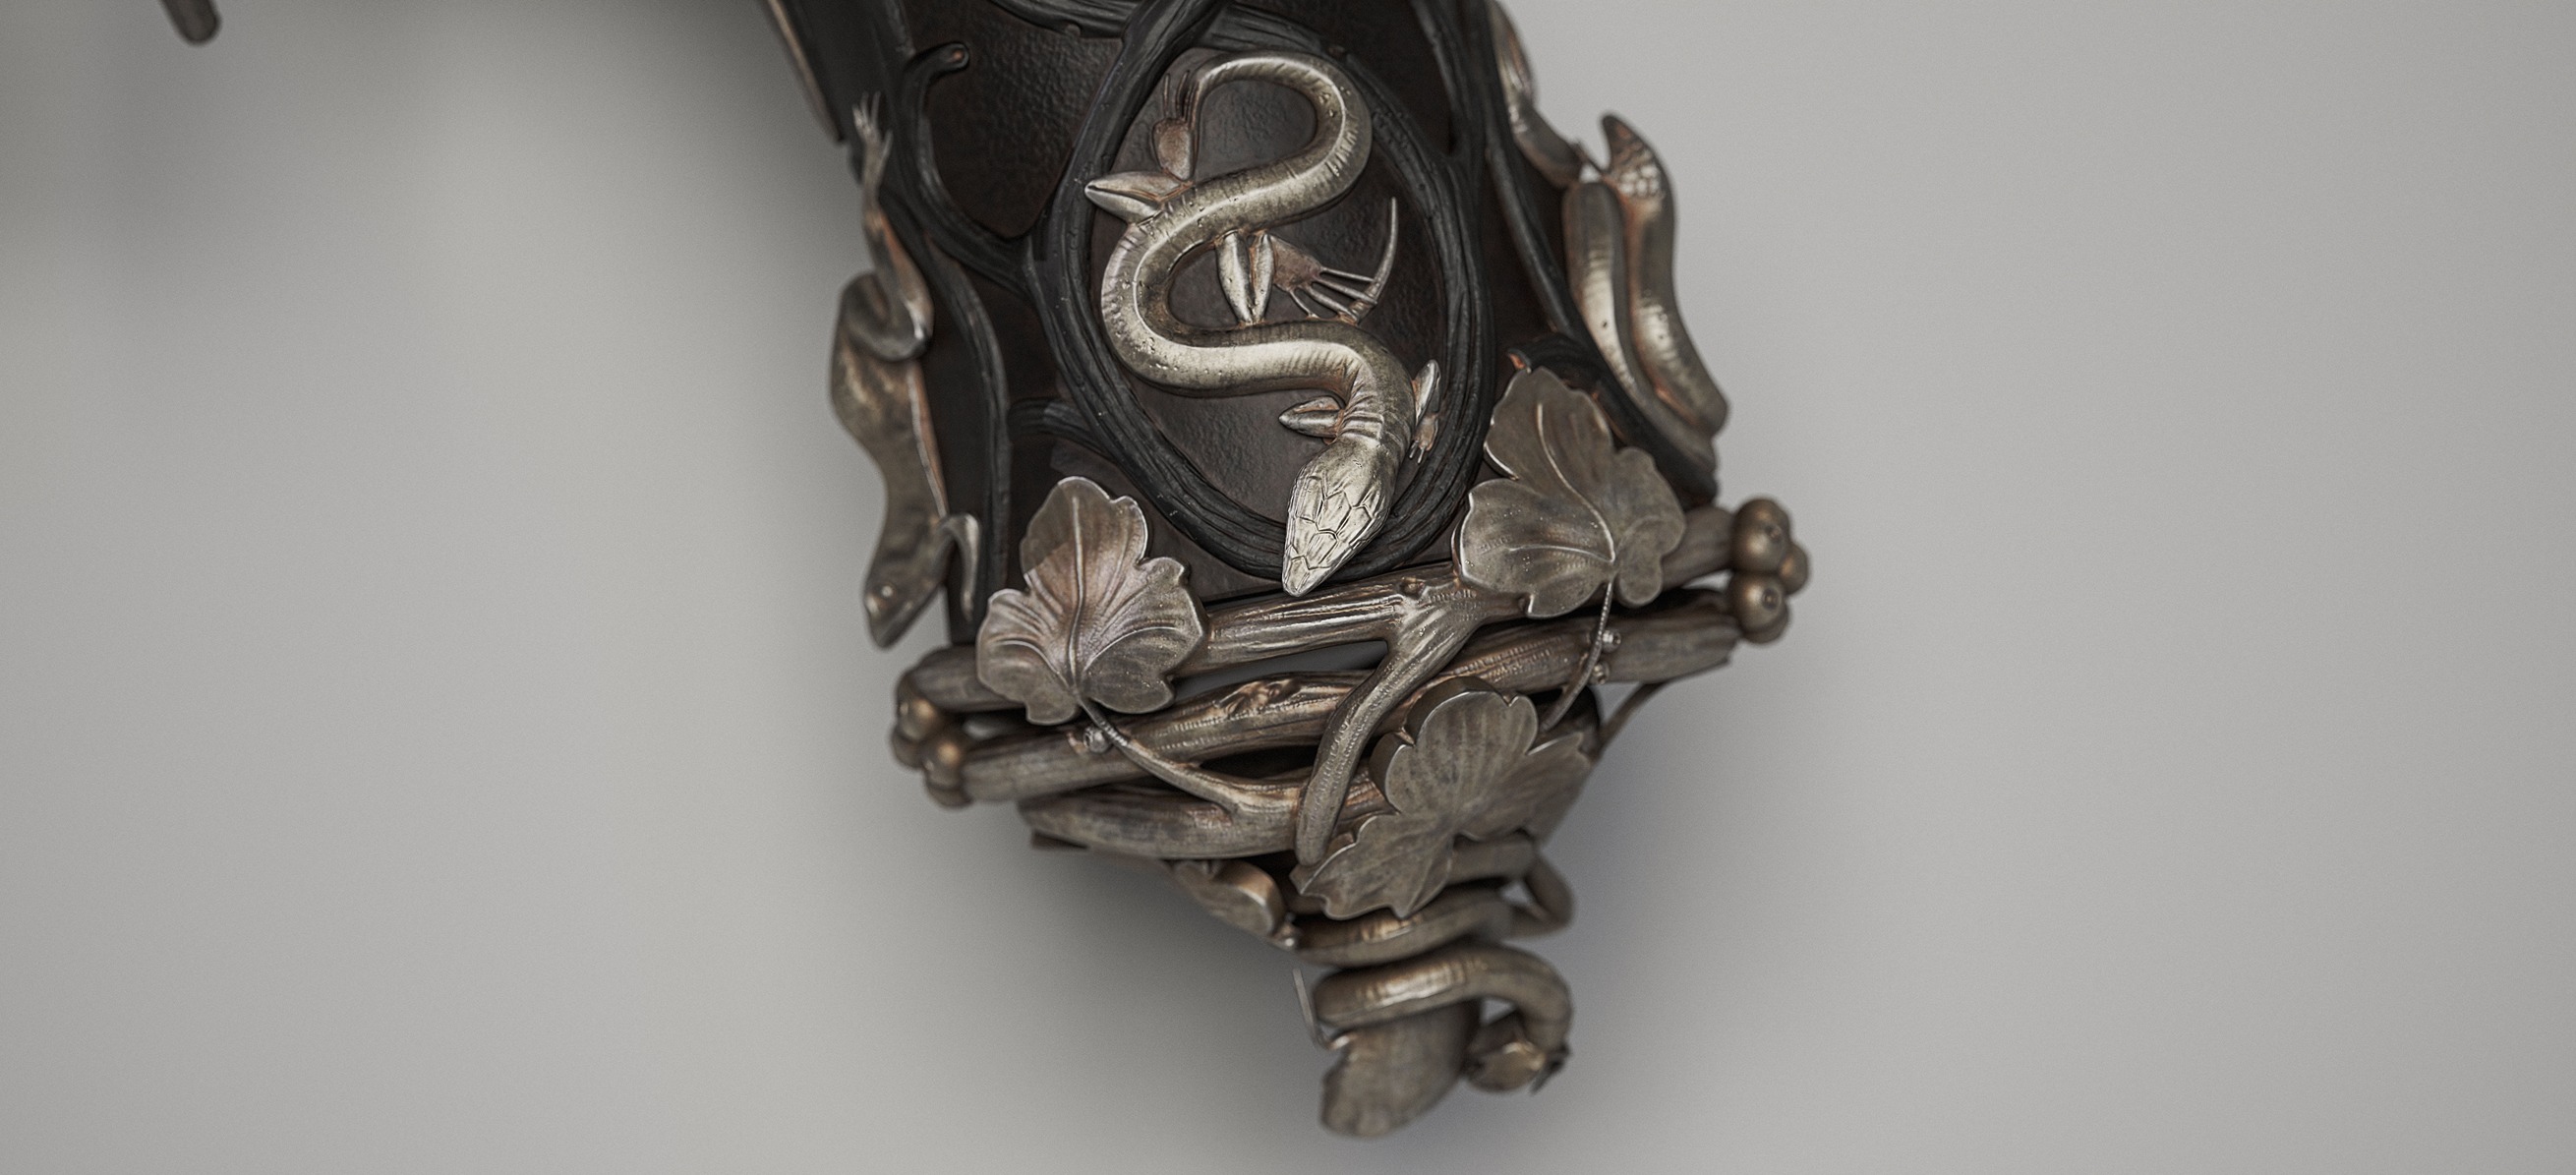
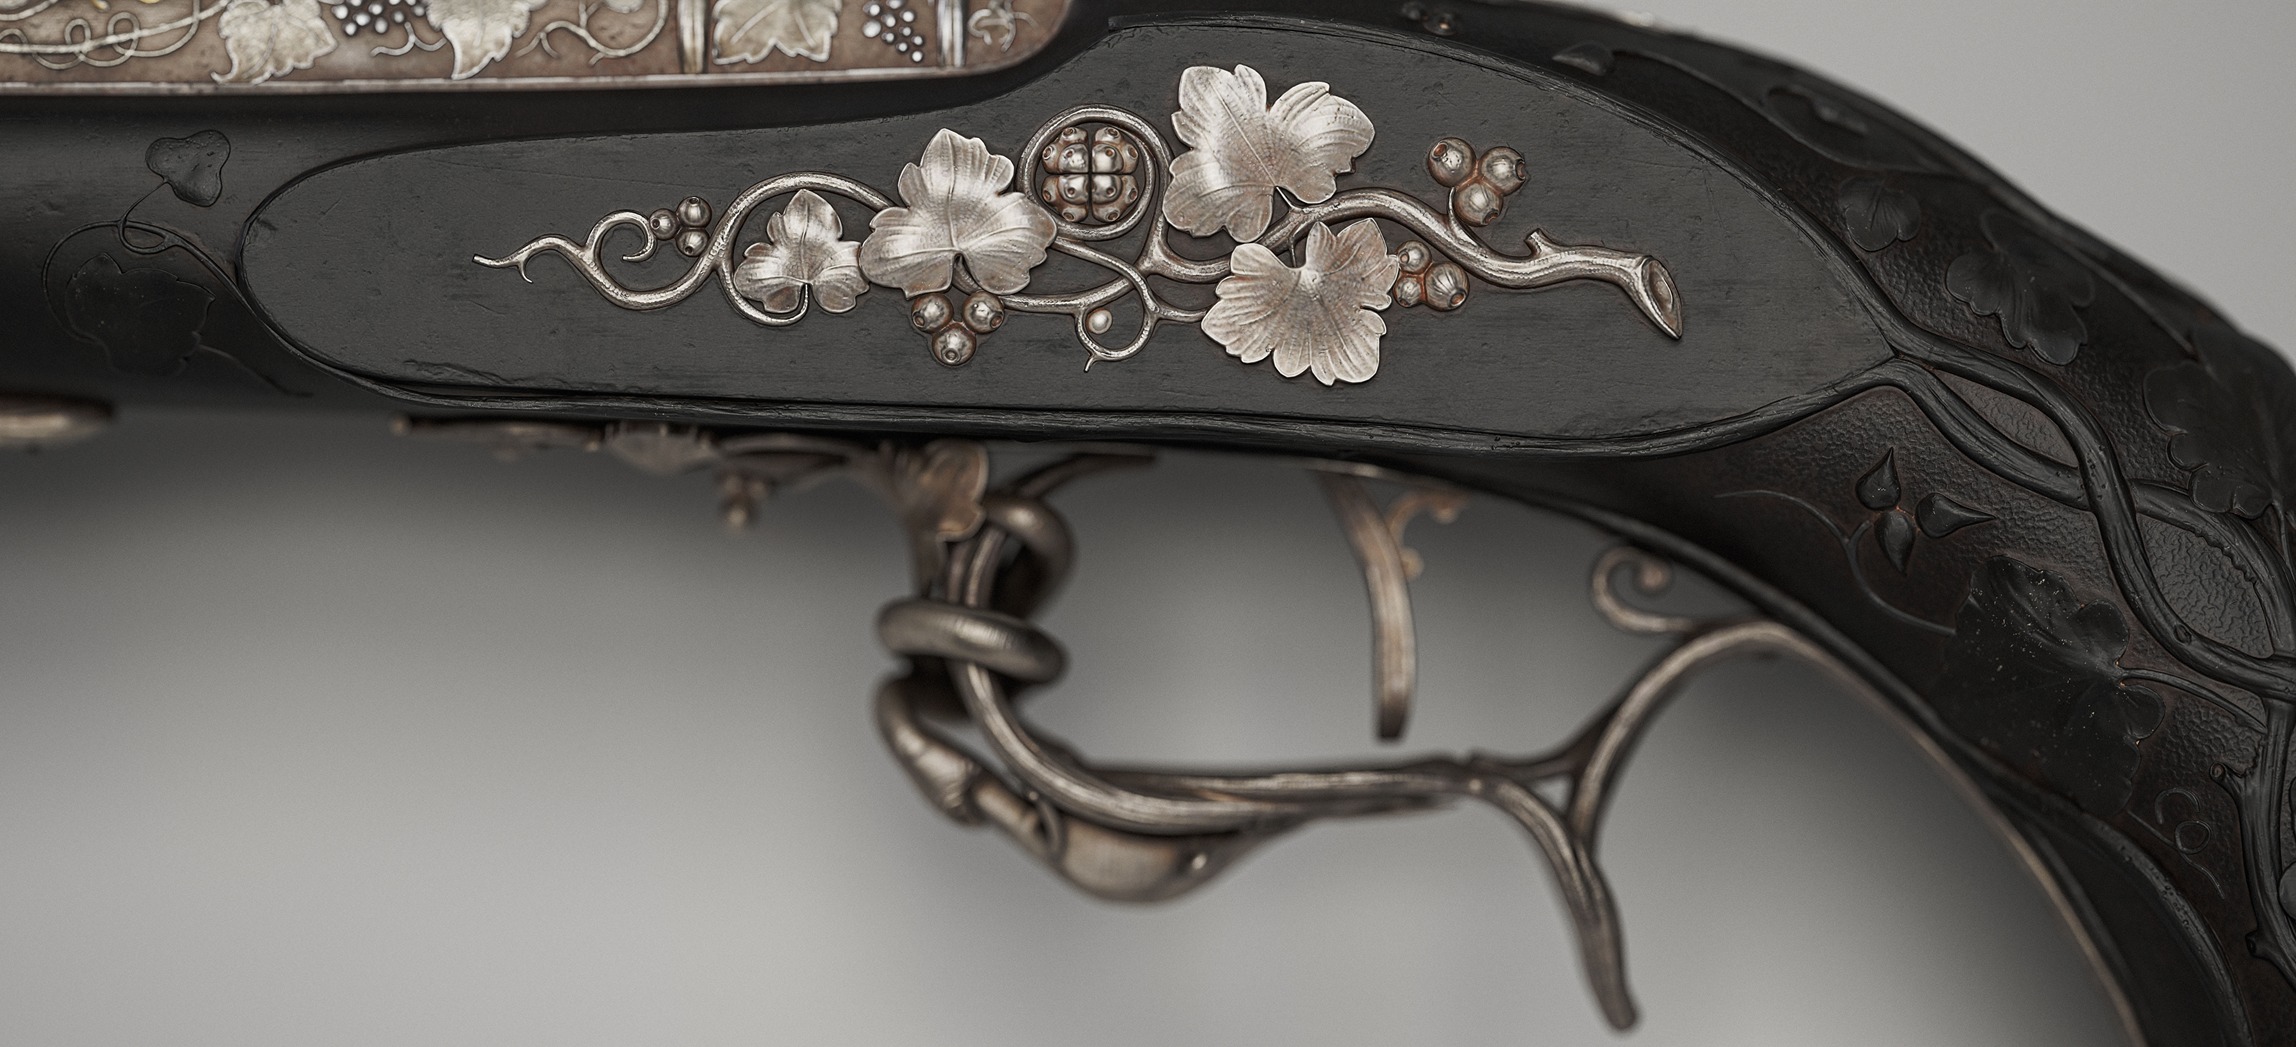
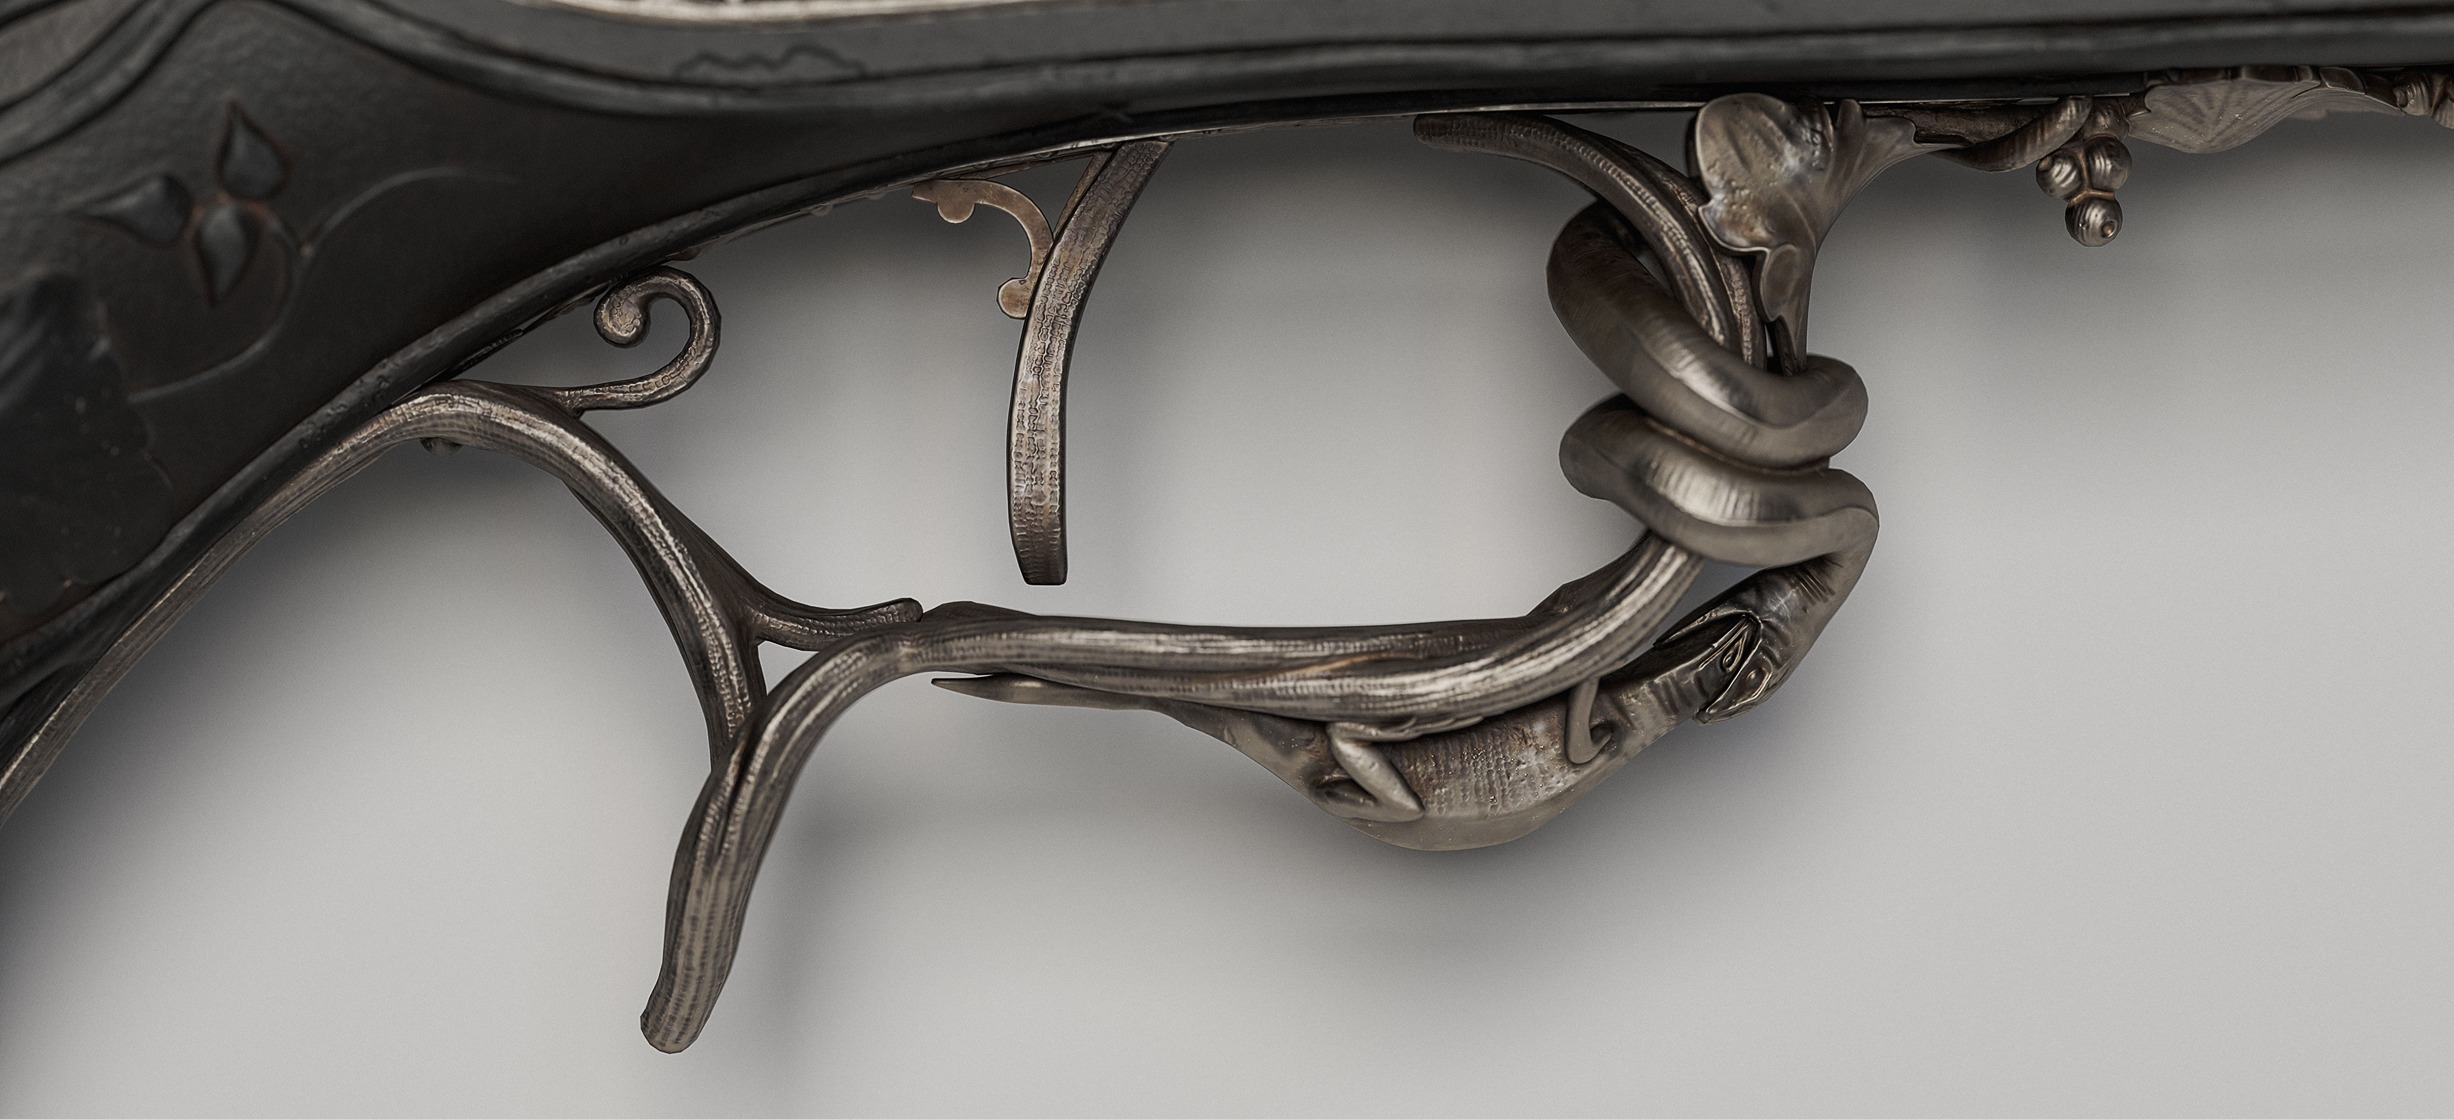
The sculpting stage was both one of the most satisfying and one of the most tedious parts of the project. The pistol contains countless small details, so I had to decide what should be sculpted in ZBrush and what could be handled in Substance via normal maps.
For optimization purposes, and I recommend everyone do the same, I properly renamed each part in Maya so I could import them one by one into ZBrush and create groups (polygroups).

Regarding the sculpt, my mid poly was already solid. I performed light dynamesh and zremesher on the necessary parts, and for the rest I mainly used brushes such as Clay Buildup, Dam Standard, and Move Topology.


Finally, I decimated my high poly mesh to achieve a reasonable polygon count for baking.
For the low poly, I used a combination of Maya’s automatic retopology, which works very well on simple surfaces (like branches and leaves), and manual retopology with the Quad Draw tool for more complex surfaces, such as the animals or certain leaves.

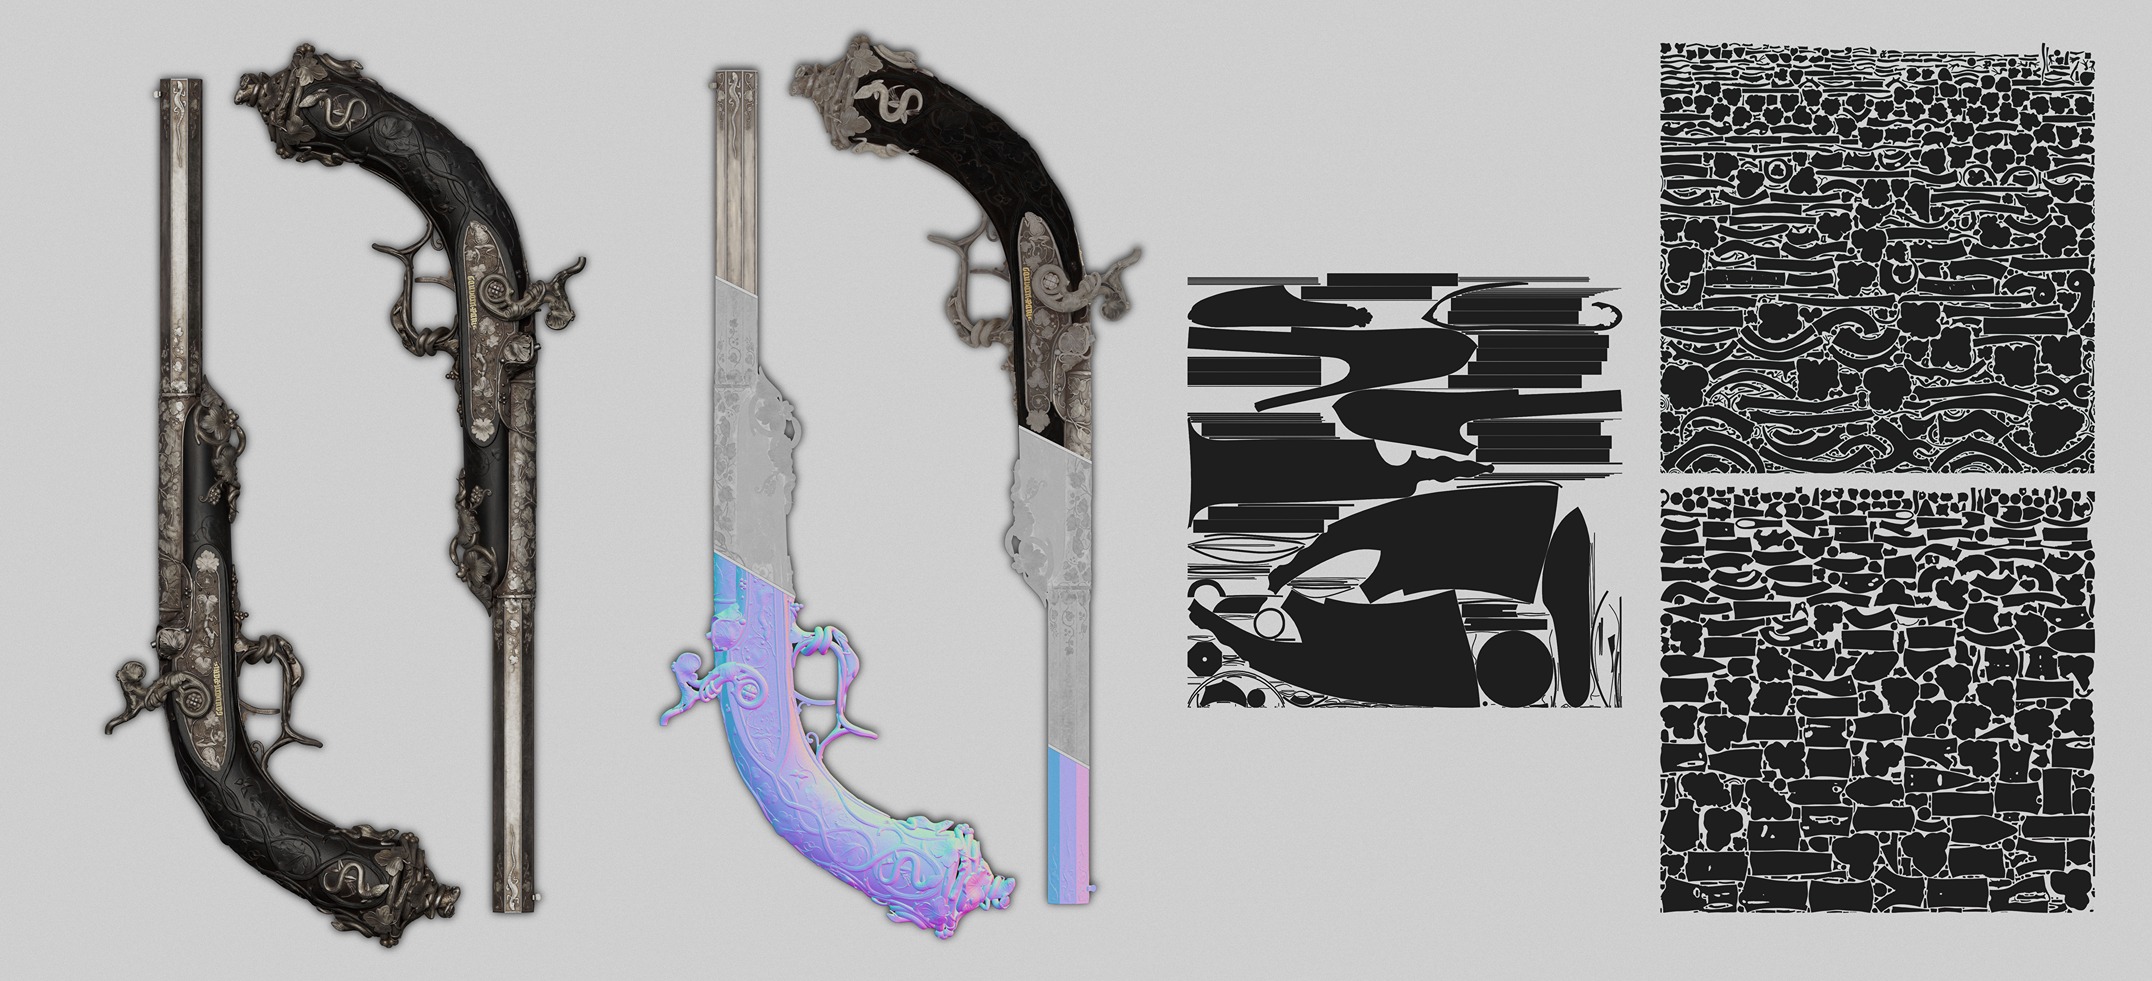
UV
For the UVs, I focused on maximizing texel density by making full use of the UV space.
I used Maya for the UVs and Blender for the packing.
I chose to divide the model into three 4K texture sets: one for the base of the pistol, and the other two distributed to maintain a consistent texel density, with a logical separation by parts of the gun.
I highly recommend using the following Blender plugins for optimal UV optimization: UVPackmaster for efficient packing. TexelDensity to ensure consistent texel density across the entire asset.

Baking
For baking, I chose to use Marmoset Toolbag 5. Marmoset’s baking tool is much more powerful and configurable than Substance Painter’s, especially for technical assets like this pistol.
For the rest, I followed a fairly simple workflow to avoid any artifacts. I used clear naming, with _low and _high for all meshes, allowing me to bake by mesh name.
I did encounter some minor artifacts, which were quickly resolved thanks to the ability to paint and adjust the cage in specific areas.

Texturing
Texturing is by far my favorite part of the process. The goal was to achieve a level of realism as close to real life as possible.
I carefully analyzed the references, breaking them down into multiple aspects in order to understand each material and the real-world techniques used in its fabrication.
For each material, I follow the same base structure: a base color (which varies depending on the material), one or more color variation layers, and two roughness variation layers.
Below are a few videos showcasing the breakdown of each layer.
In this video, I present the layer breakdown for the wood material.
In this video, I demonstrate how I achieved the hammered look on the grip.
In this video, I demonstrate how I approached the metal texturing.
In this final video, I show how I achieved this very specific hammered effect on the metal.
It was quite challenging and especially time-consuming, as I had to use the spline tool and craft everything manually.
Secondary Props & Storytelling
The vast majority of antique percussion pistols were sold with a storage case and maintenance tools. Unfortunately, that was not the case for mine.
I therefore had to design and imagine a case, of course based on real references. The challenge was to create something coherent and in harmony with the pistol.
I chose to craft an elegant wooden case with a velvet interior, along with a refined design on the lid inspired by the vines and animals featured on the pistol.
The process for the additional objects and the case was exactly the same as for the pistol, so I won’t go into further detail.

Marmoset Rendering
For the renders, I chose to use Marmoset Toolbag 5. With Ray Tracing enabled, it’s possible to achieve very high-quality renders quickly.
I then decided to structure my presentation into four categories:
- Museum-style renders to add storytelling to the props.
- Classic renders on a white background.
- Turntable renders.
- Close-up renders.
I also made several adjustments to all my cameras to achieve optimal color grading and overall visual balance.


Lighting
For almost all of the renders (except the museum-style ones), I used a single light setup: an HDRI.
I reused the “Studio Tomoco” HDR from Substance Painter, which is more than sufficient for clean renders on a white background.
For the background, I used a simple curved plane.


For the museum-style renders, I simulated lighting coming from ceiling spotlights.
I also kept the HDRI with reduced brightness to create a subtle ambient light coming from outside, without it overpowering the main lighting setup.


Post-processing
For the post-processing, I added two elements.
First, a subtle global grain across all renders to achieve a more natural result, similar to a real photograph.


Second, a light sharpening filter to enhance clarity and reinforce realism. However, it’s important not to overdo it.


Before & after.


Conclusion
Before & after.
This pistol is my first post-graduation project. When I started it, I never imagined I would be able to reach such a level of realism and detail. I am extremely satisfied with the final result and learned a great deal throughout the process.
I truly wanted to improve my ability to create realistic and complex props, and this project was incredibly valuable for my growth.
If you have any additional questions, or if there are points I didn’t cover in enough detail here, feel free to reach out to me on ArtStation, LinkedIn, or X. I’ll be happy to reply as quickly as possible!
Thank you for reading!


Read more articles
You might also like these articles.


