
Introduction
Hello, everyone. My name is Christian Almeida. I was born and raised in São Paulo, Brazil, and I am a 3D character artist for games.
I have worked on mobile games and Virtual Reality educational projects, where I had the opportunity to build characters and parts of the human body with a focus on medical studies.
I believe that working on personal projects is very important for us digital artists, which is why I always try to push my limits in these projects.
Project & Concept
The journey of this project began during the character design workshop for games with the incredible artist Pedro Varella. I am very grateful for the feedback and advice I received.
The workshop plan consisted of one online meeting per week for three and a half months, so I set a personal goal to complete the project within that time frame.

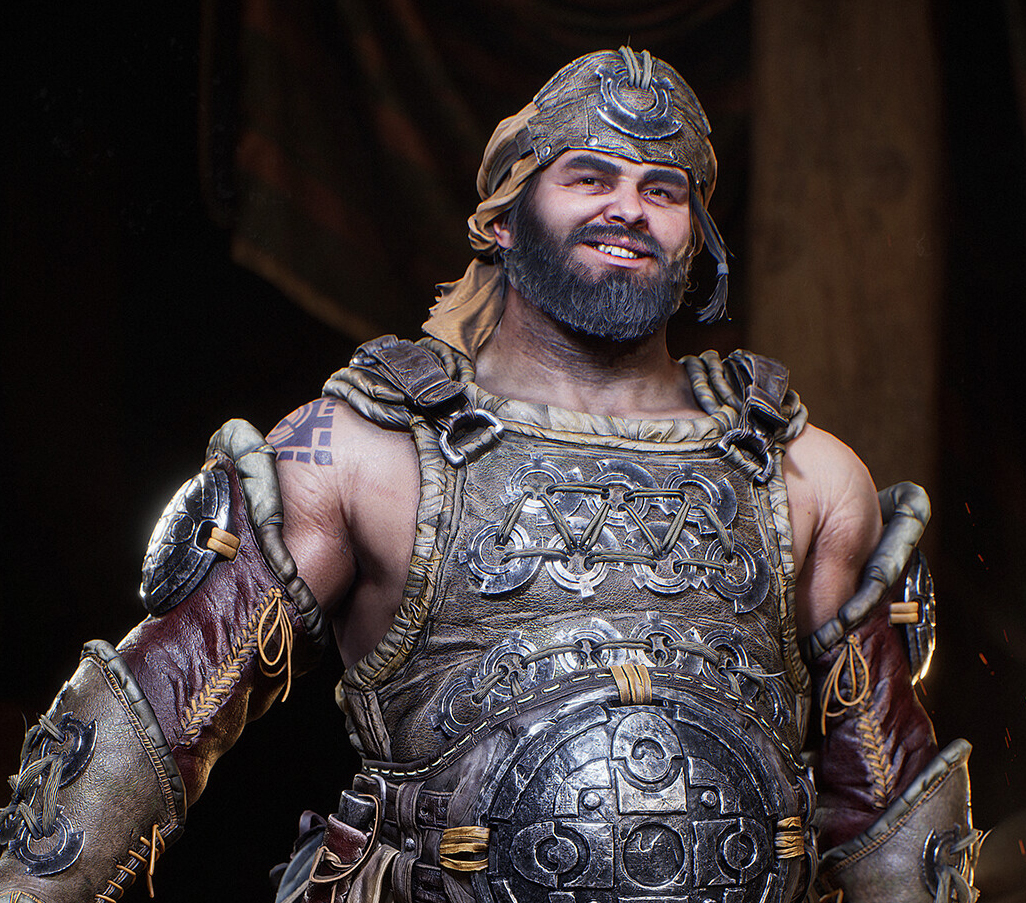
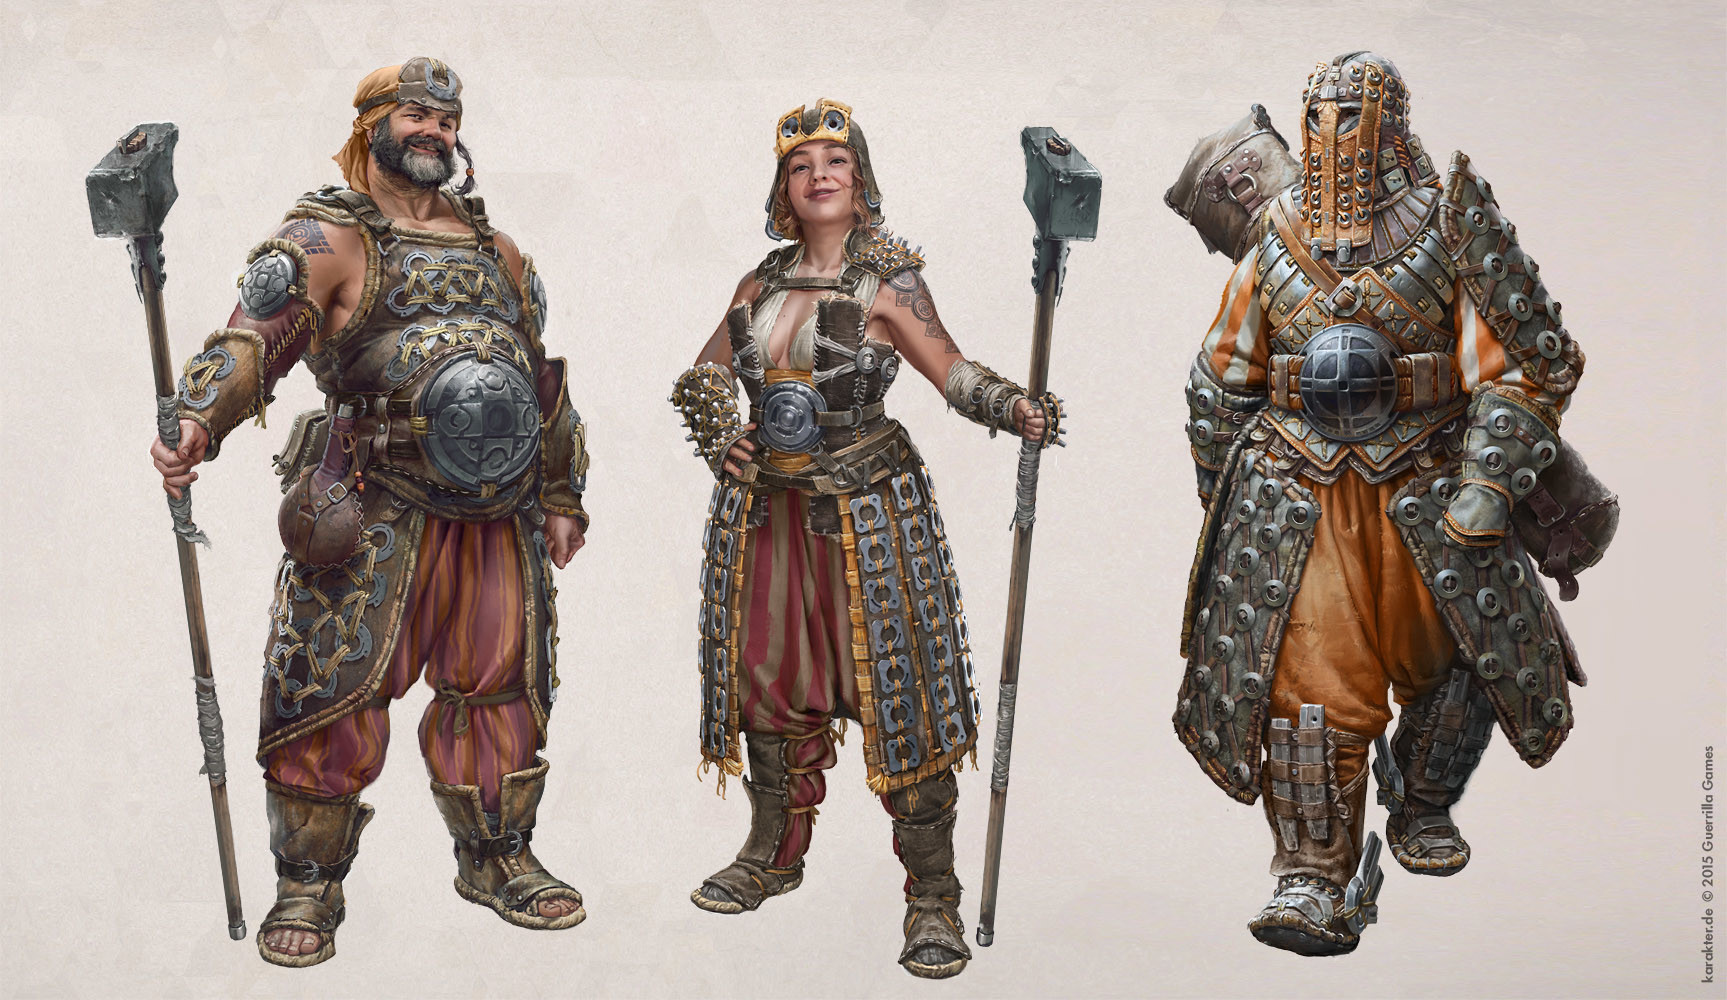
In the first week, I came across the concept art by Adrian Wilkins, which had everything I wanted to work on:
Clothes with folds, leather, armor, weapons, accessories, hair and beard.
Goals & Vision
From the beginning, my main goal was to reach a visual level that I admire in AAA games. I challenged myself to achieve the highest level of detail I could in a relatively short amount of time.
I also planned, as part of the project vision, that this character would be well-developed in areas such as topology, UVs, textures, and shaders.
Staying true to the essence of the concept and working on a good facial expression were also among my goals.
Tools & Software
ZBrush, ZWrap, Maya, Substance Painter, Photoshop, Fibershop, GS Curve tools and Unreal Engine 5.
References & Design
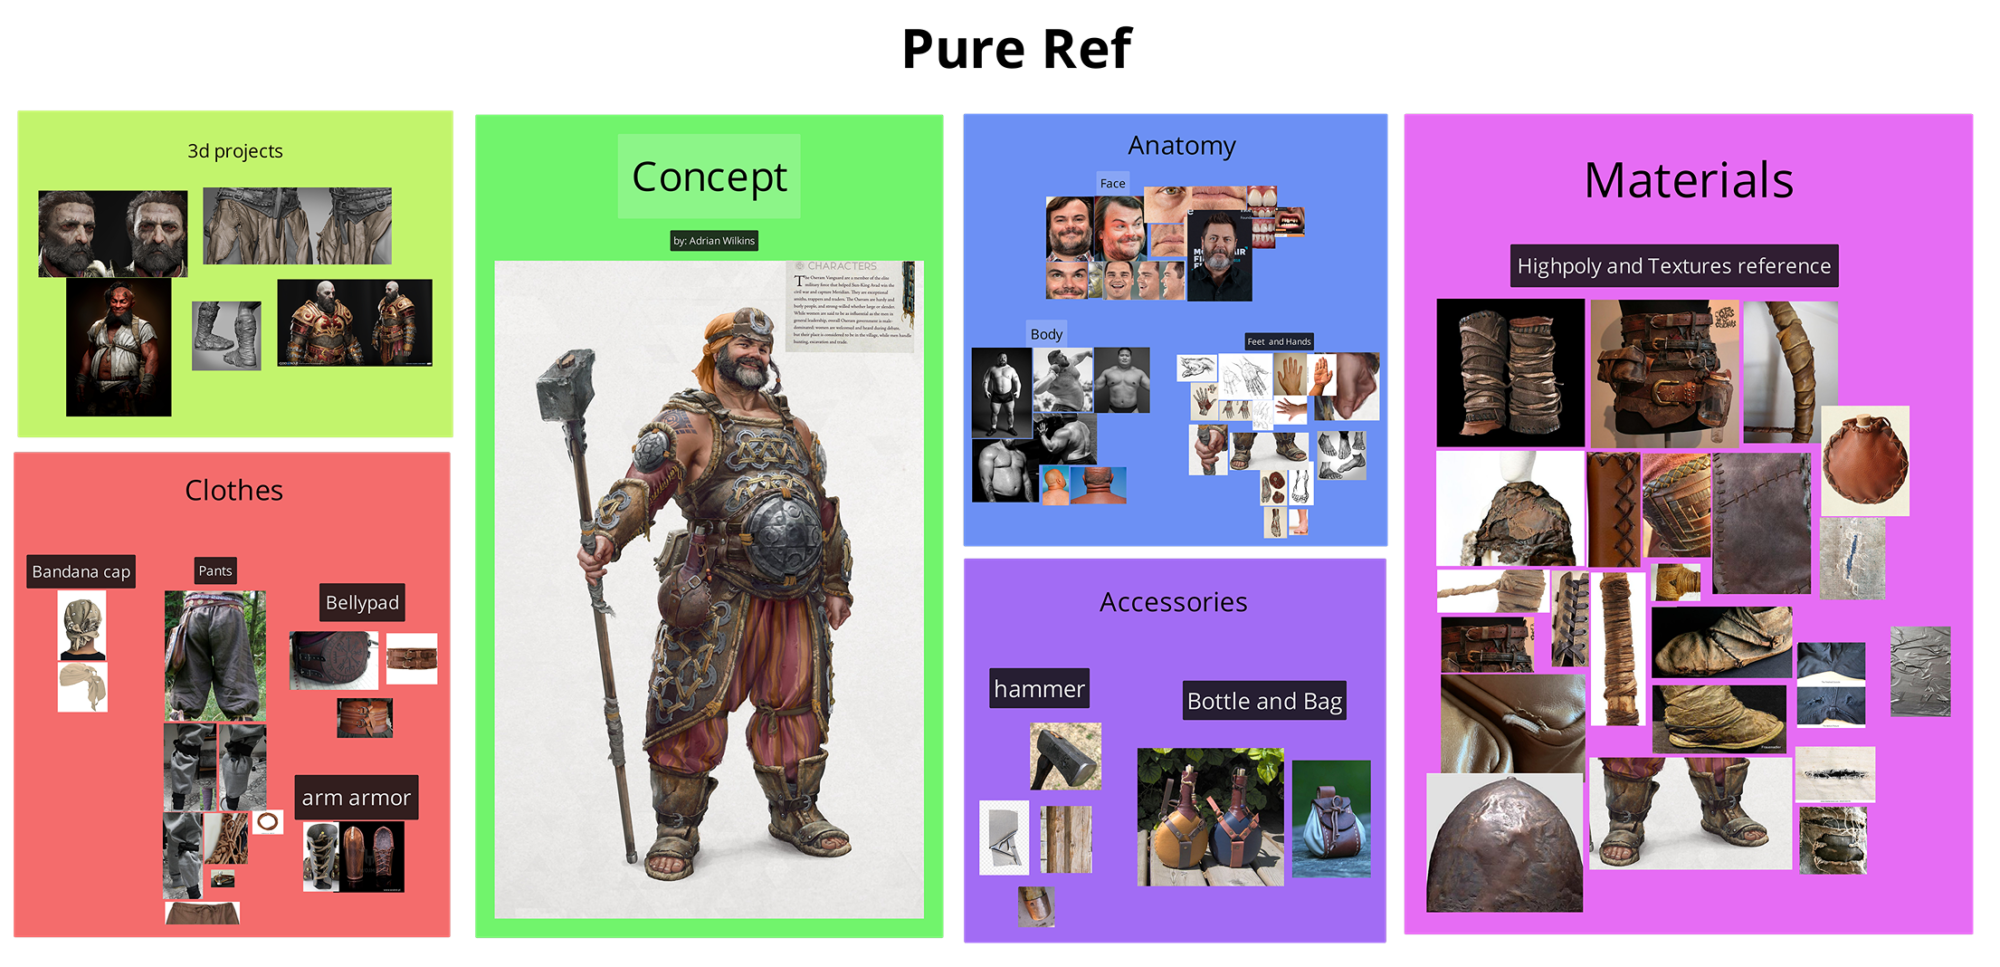
After deciding to work on Adrian’s concept art, I started collecting references that would give me answers on how to construct the character’s pieces and others that would help me set a quality target to achieve.
I organized them into categories as follows:
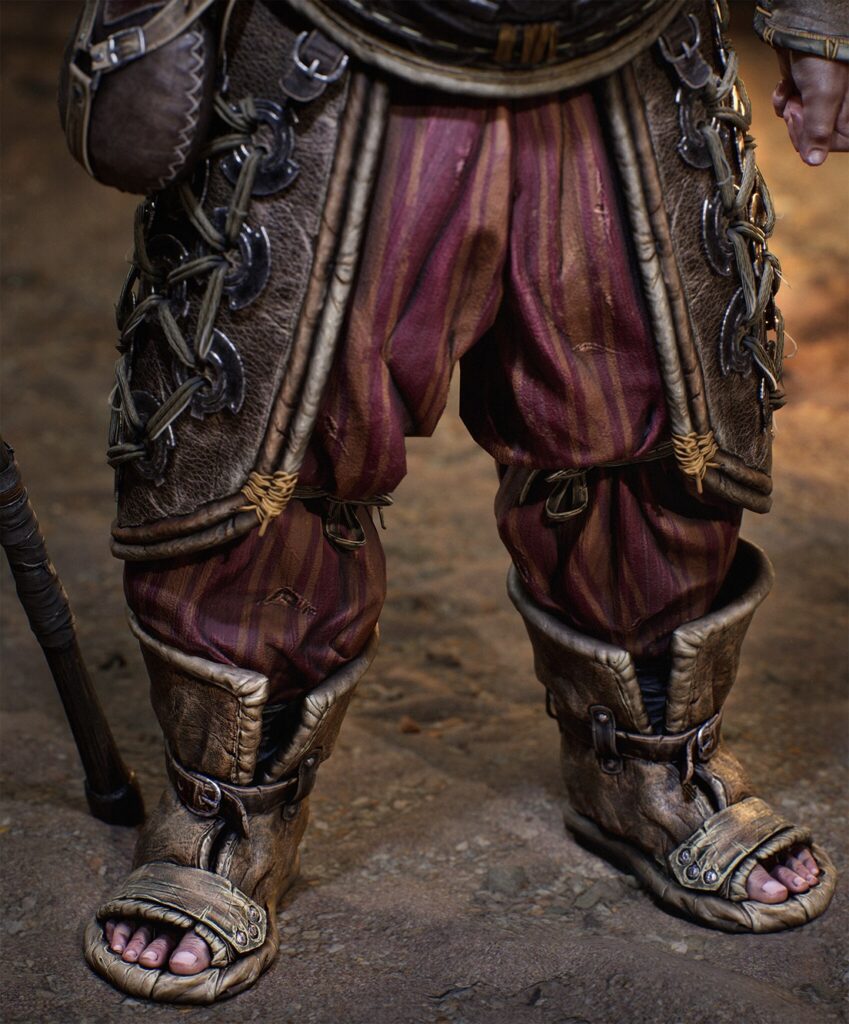
- Anatomy: Real photos of the character’s body type, facial photos of faces similar to the character’s, and details of the hands and feet.
- Clothing: Real photos of clothing and folds similar to those in the concept art. It was important to establish good references here, as I wanted to sculpt the clothes from scratch.
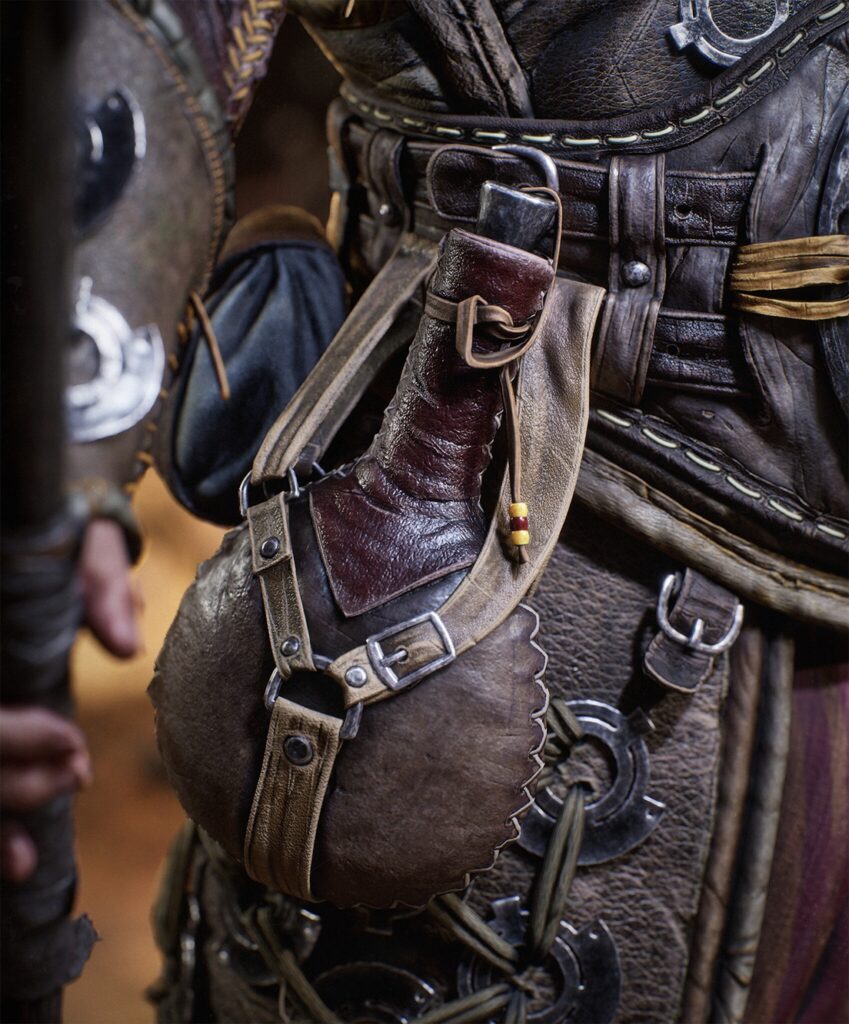
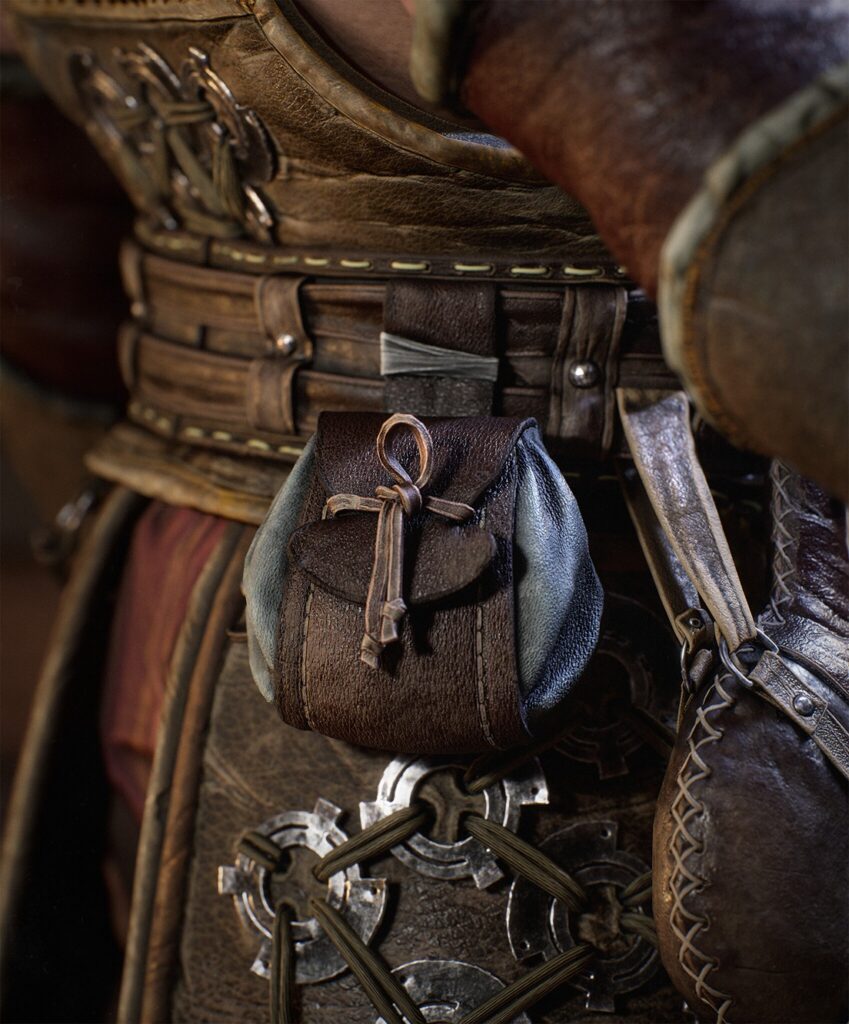
- Accessories: Photos of real objects with good definitions of divisions, knots, seams, fraying, etc.
- Materials: Photos of various materials I would use in the project, both for sculpting and texturing, such as leather, worn metal, threads, and types of fabrics.
- Other character projects: Portfolio pieces from other artists that inspire me and have a high level of quality.
Project Stages
- Blocking and Sculpting
- Skin details
- Preparation and topology
- UV mapping
- Bake and Texture
- Hair Cards
- Lights and Shaders setup
- Character Pose
- Environment
- Render
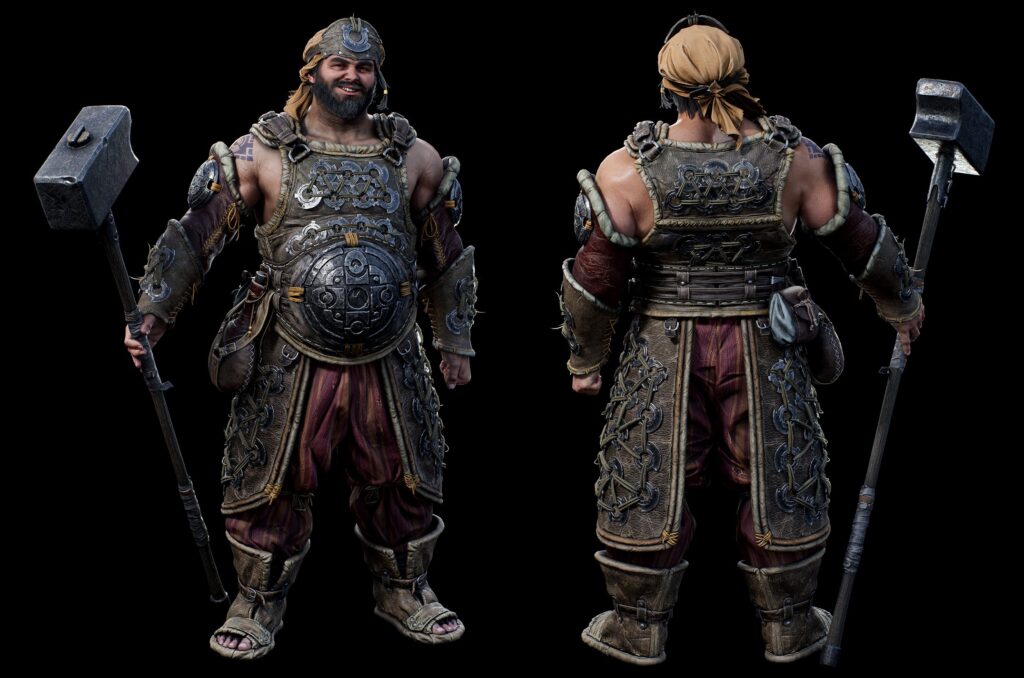
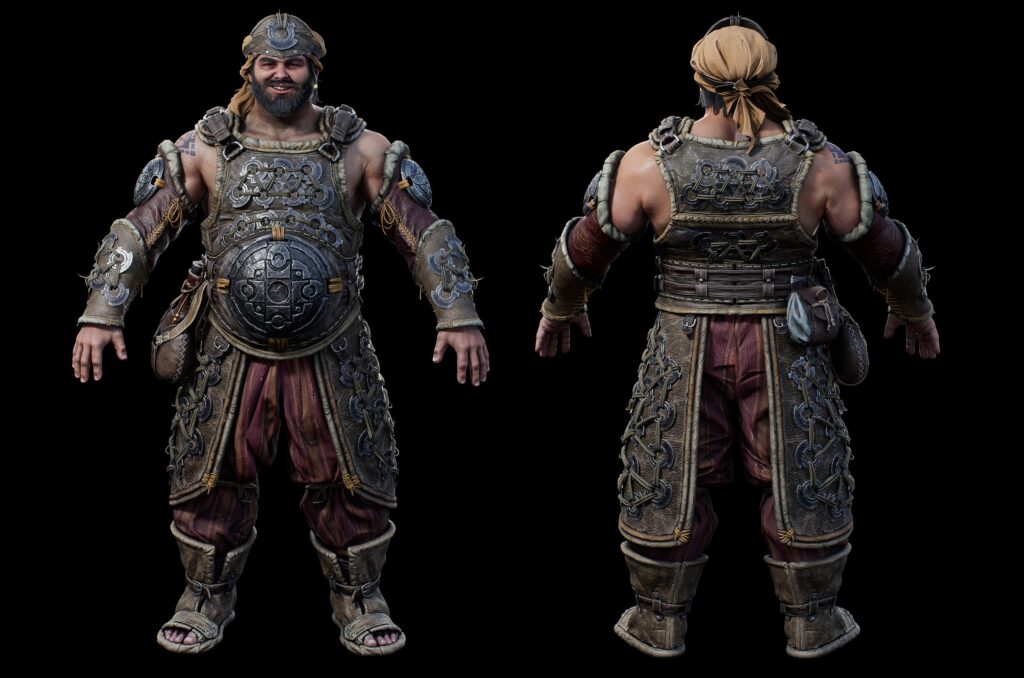
Blocking and Sculpting
I like to organize the sculpting process in a way that allows me to ensure an overall view from the beginning.
In this way, I divided much of the process into the following stages:
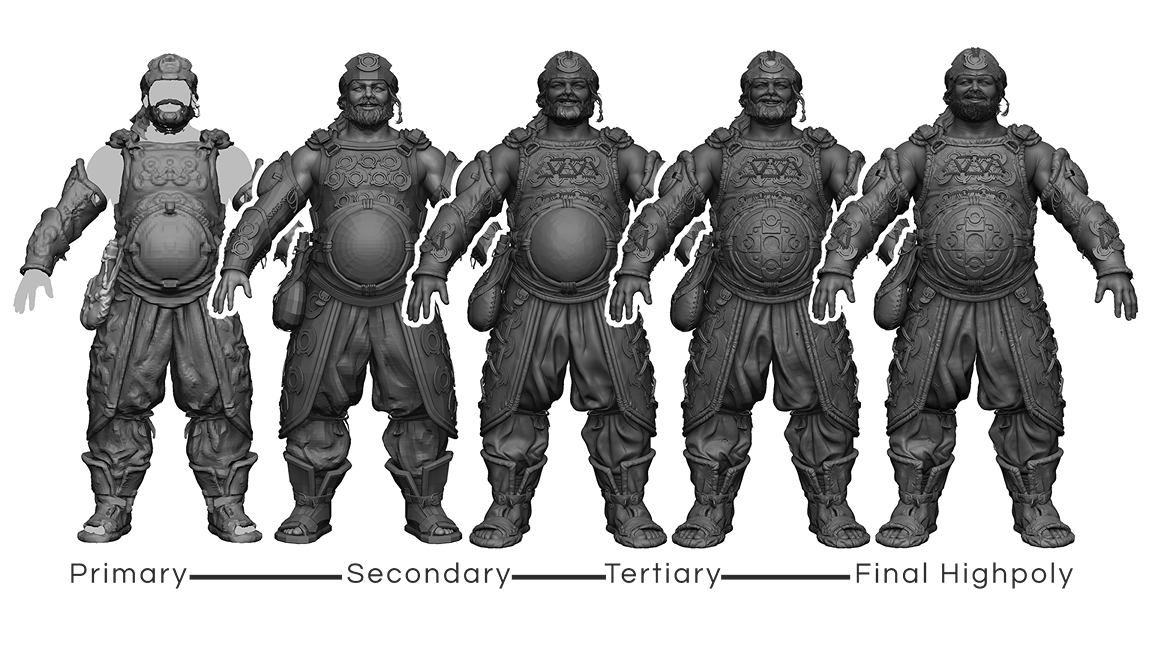
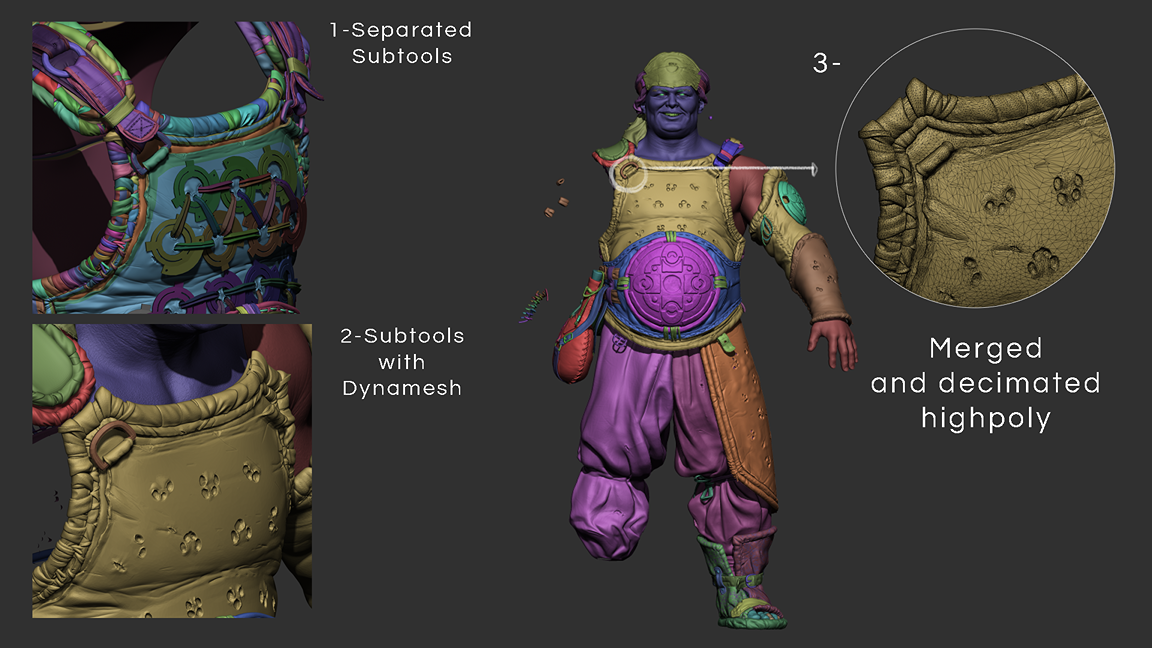
- Primary Shapes: Blocking the initial anatomy, creating clothing, armor, and accessories from body extracts and using the same Dynamesh. At this stage, I focus on establishing everything as a rough draft, just to work on proportions and silhouette.
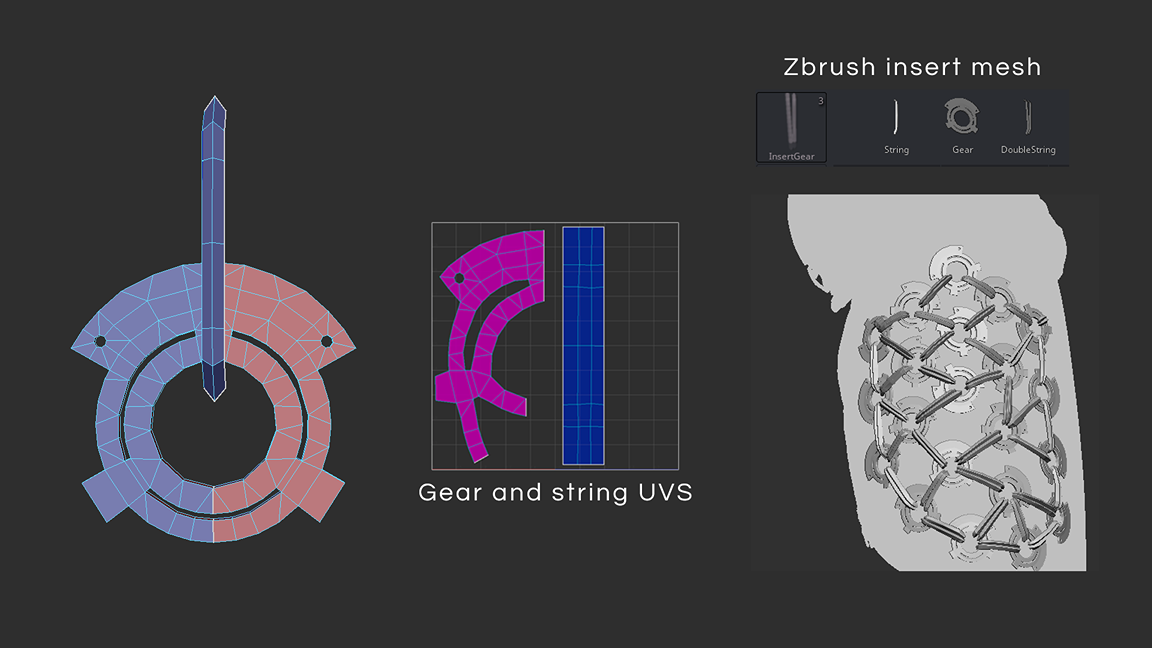
- Secondary Shapes: Moving from subtool to subtool, this is the moment when I begin separating shapes that use the same Dynamesh into separate pieces. I dedicated more time to this stage to plan what could be optimized in the construction of symmetrical objects with a lot of repetition, such as the gears tied with ropes on the armor (I will detail this stage after this section).
- Tertiary Shapes & Final Highpoly: This is the stage where I added details that reflect the character’s history in the sculpture, high-frequency details such as pores, wrinkles, wear, tears, creation of alphas, dents, and micro folds in the clothing, etc. Everything I want to carry over to the baking stage for maps is established at this point.
For the gears and ropes, I tried to get ahead of the process when I created the secondary shapes. Since these would be replicated multiple times across the armor, I built meshes with final topology and open UVs.
From there, I turned them into an insert mesh brush within ZBrush so they could share the same space during the UV stage.
Once this was done, they were already positioned and ready for baking, even before I had completed the character’s topology.
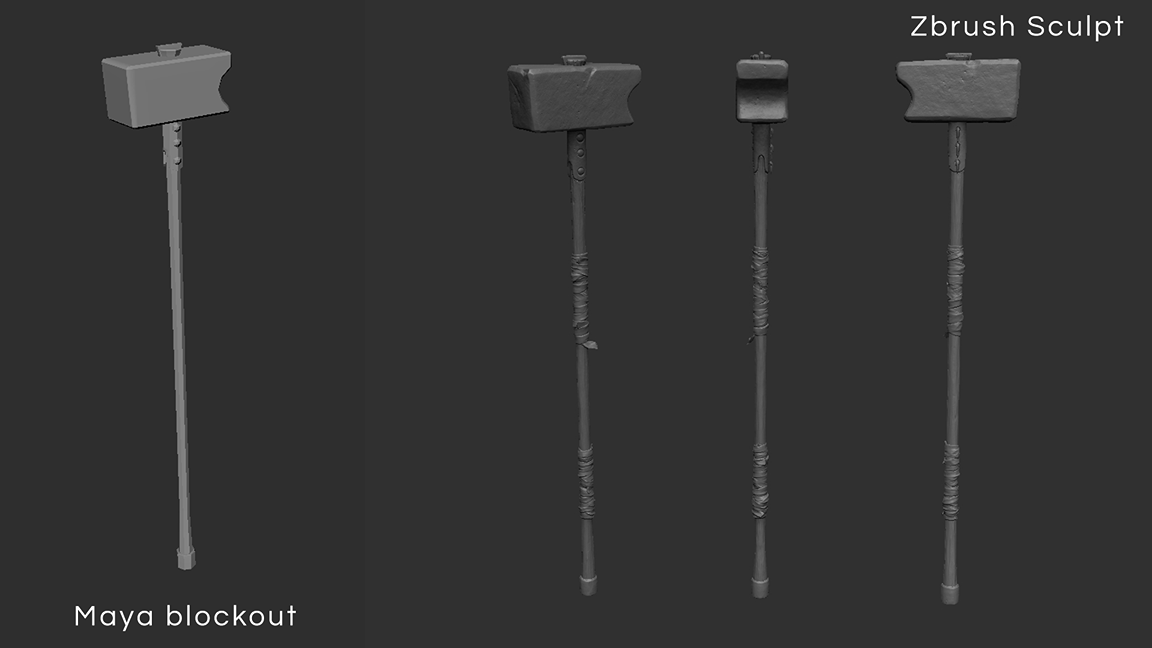
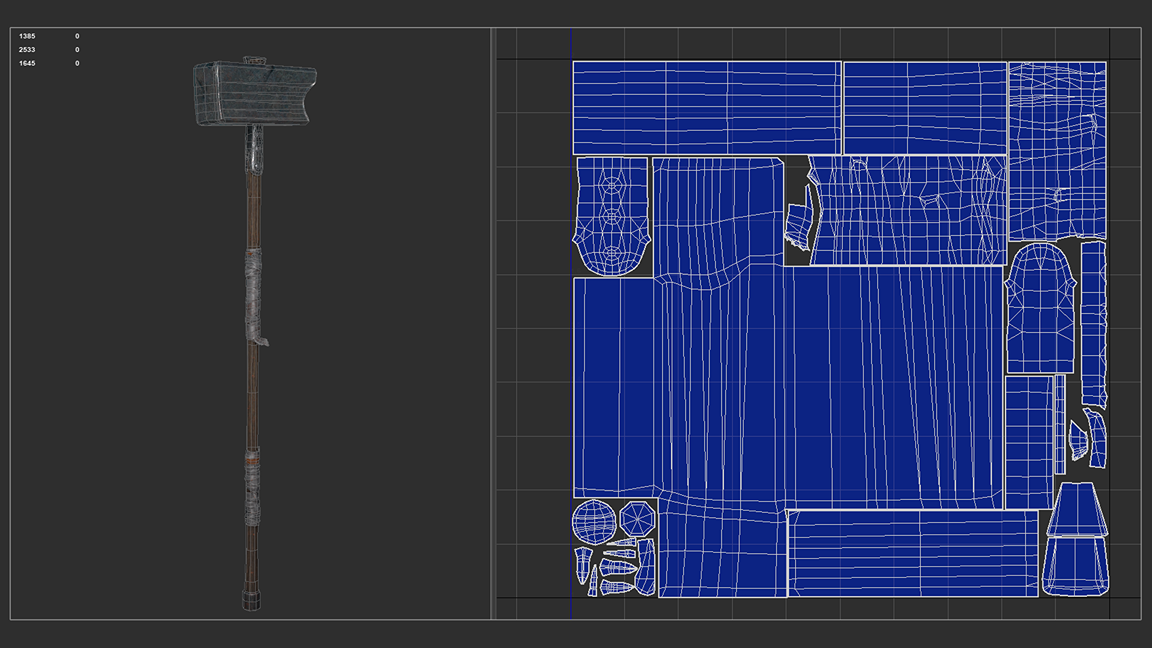
Hammer
I followed the same division of stages for building the character’s weapon. Since I didn’t work in a linear fashion, the hammer was created only after the character’s highpoly was already completed.
Here are some images of the process:
Skin
The construction of the face and body was done alongside the overall work, but to dedicate space for the process, I separated them here.
I started the process by selecting faces with characteristics and expressions similar to the concept’s face. From there, I followed the stages of primary, secondary, and tertiary shapes.
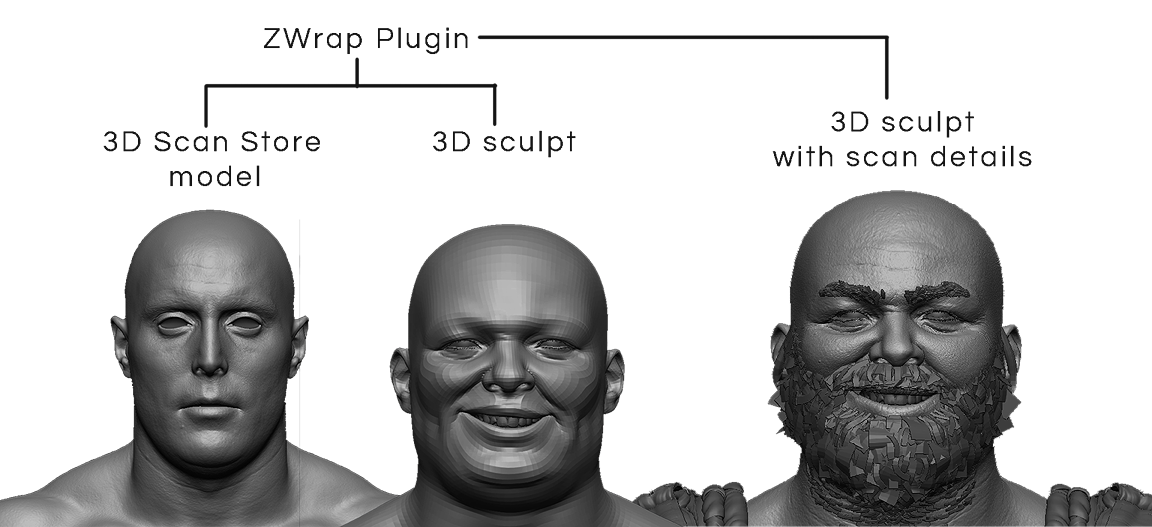
For the skin details, I used a model from the 3D Scan Store, and I applied the ZWrap plugin to transfer the shape of my sculpture onto the scan. Through this process, I was able to use the roughness and specular maps from the scan as a base in the future.
However, building the character’s face was a challenge from the start. Due to the time constraints I set for the project, I decided to sculpt it in pose right away, solely for the purpose of presenting the final project.
Preparation
At this stage, I began planning and separating subtools that would be used as Live Surface in Maya. I planned everything that would be symmetrical and left only half of the model to be mirrored later.
- Subtool Merging: I used Merge for parts that I would combine during the topology stage.
- Mesh Filling: Using the backface function in the Move Topological brush, I ensured that each subtool was gap-free between pieces for the best performance of the quad-draw (a technique that Pedro Varella demonstrated masterfully).
- Dynamesh and Decimate: After ensuring the previous steps, I used Dynamesh on each subtool to ensure they were watertight. I tried to preserve the volumes of the geometries and applied Decimate to keep the meshes lightweight for use in Maya.
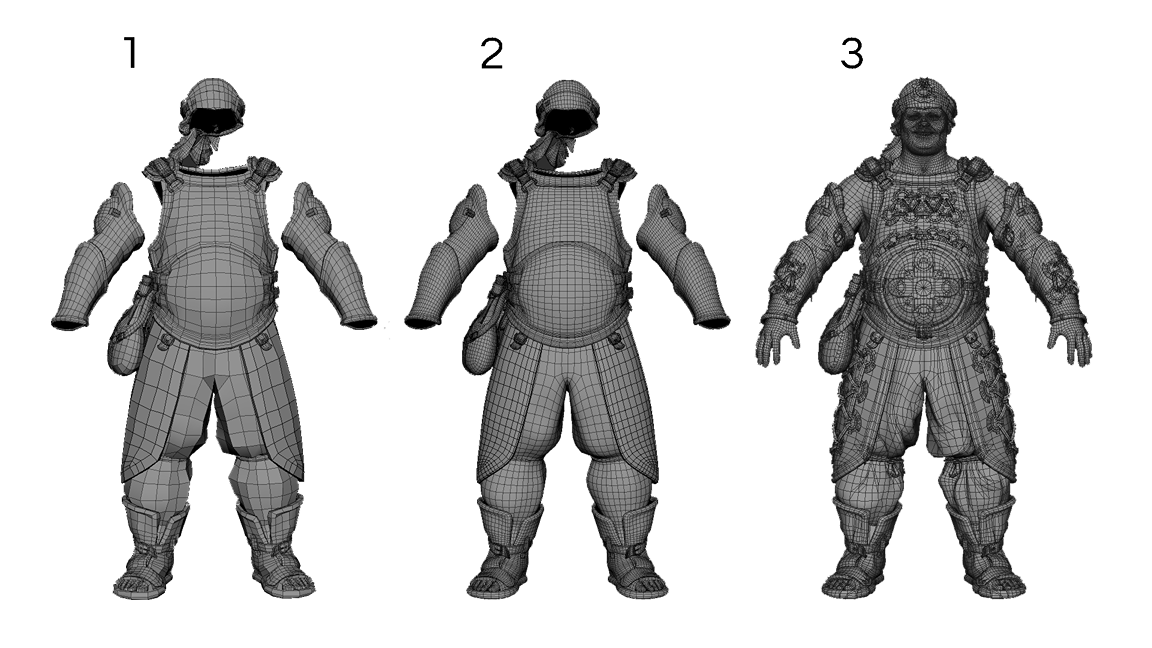
Topology
I separated the topology into stages as follows:
- Base Topology: Establishing the proper flow and loops for mesh animation, still with a very low polygon count.
- Subdivide: Applying Divide to increase the polygon count and better understand the shapes of the highpoly.
- Free-cut: Use the Multi-Cut tool to adjust the topology and better follow the details of the highpoly.

Note: It is important to keep the topology free of N-gons and ensure the flows and loops established in the earlier stages.
Finally, applying a clean-up to the model helps identify and fix any small issues.
UV Mapping
The UVs were done manually. I planned the UV set separations by parts of the character, working from the bottom up.
From that point, I focused on space optimization, making sure each UV shell was as straight as possible without distortion, which helped a bit during the Layout stage.
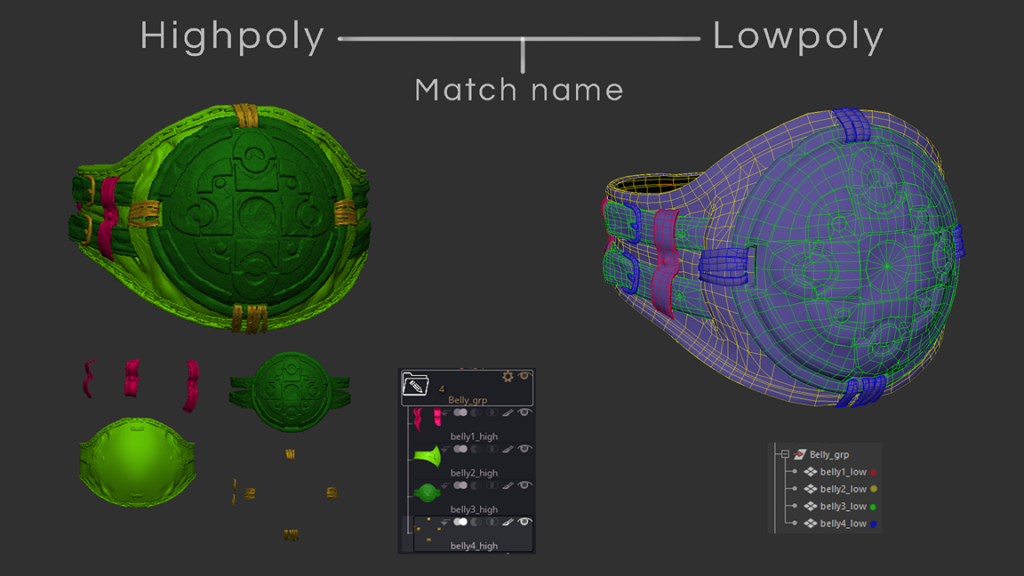
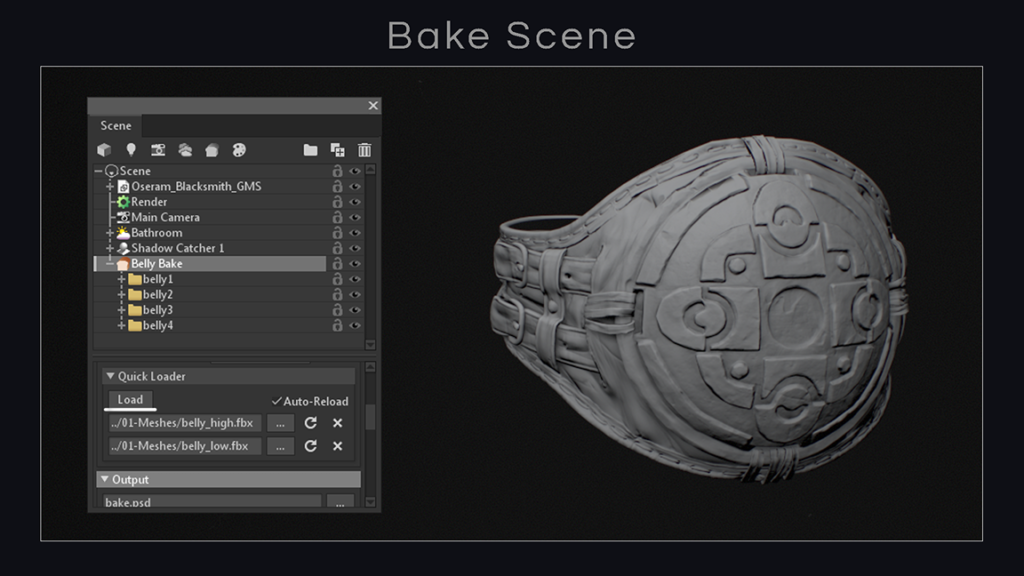
Baking
With the character’s UVs ready, at this point, I merge parts that don’t touch much in both the low-poly and high-poly. This helps prevent artifacts in the normal and occlusion maps.
Correcting the naming conventions to ensure they are the same also helps when using auto-load in baking through Marmoset (a function similar to “match by name” in Substance Painter).
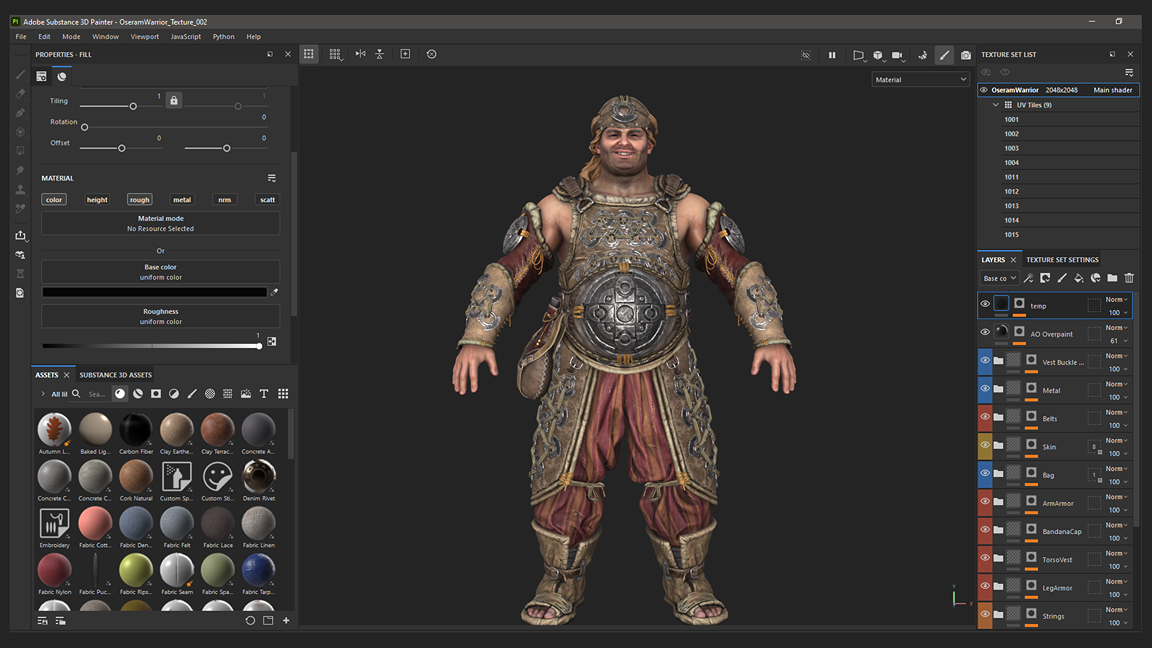
Texturing
For the skin texture, I obtained a lot of details through material baking using the scan from the 3D Scan Store.
After transferring it, I worked on adjustments and manual painting to adapt it to the character.
For the rest of the character and the weapon, the process was done from scratch. In some cases, I used tileable texture maps to acquire details for color, roughness, and height within Substance Painter 3D.
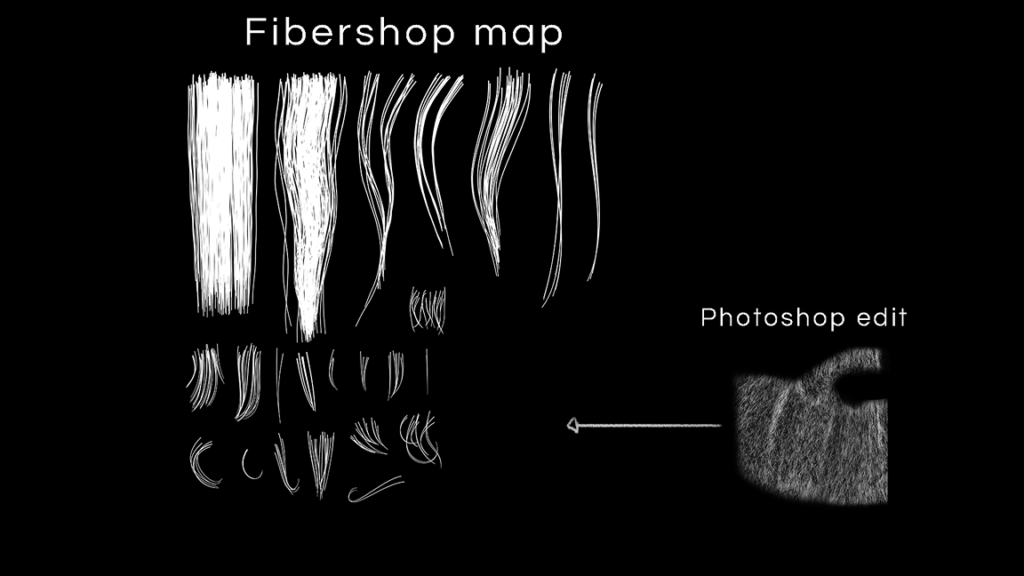
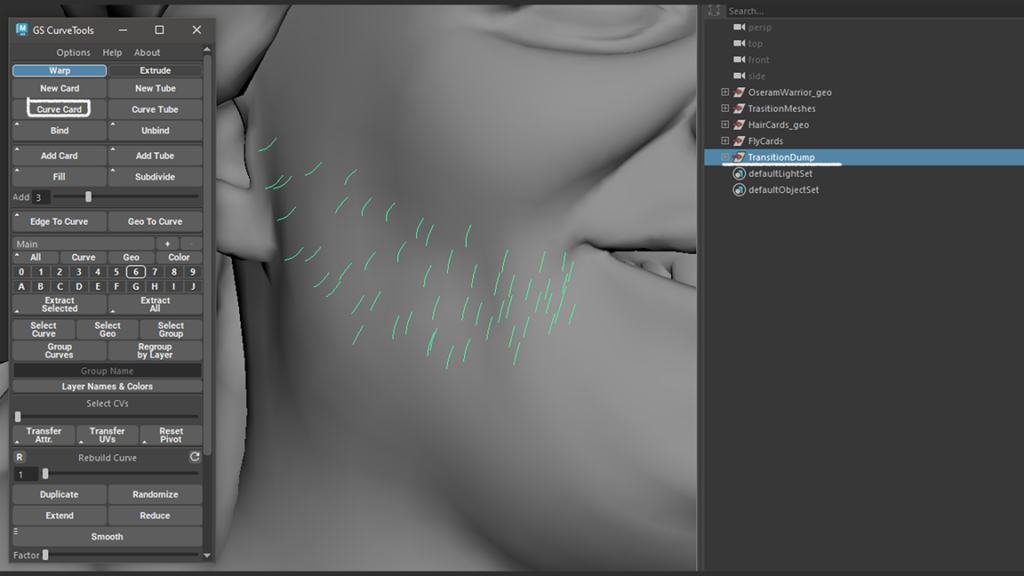
Hair cards
For the hair cards, I started by planning and sketching what needed to be generated by Fibershop. From there, I built each hair strand using the software and also created some parts in Photoshop.
The entire positioning process was done using the GS Curve Tools plugin for Maya.


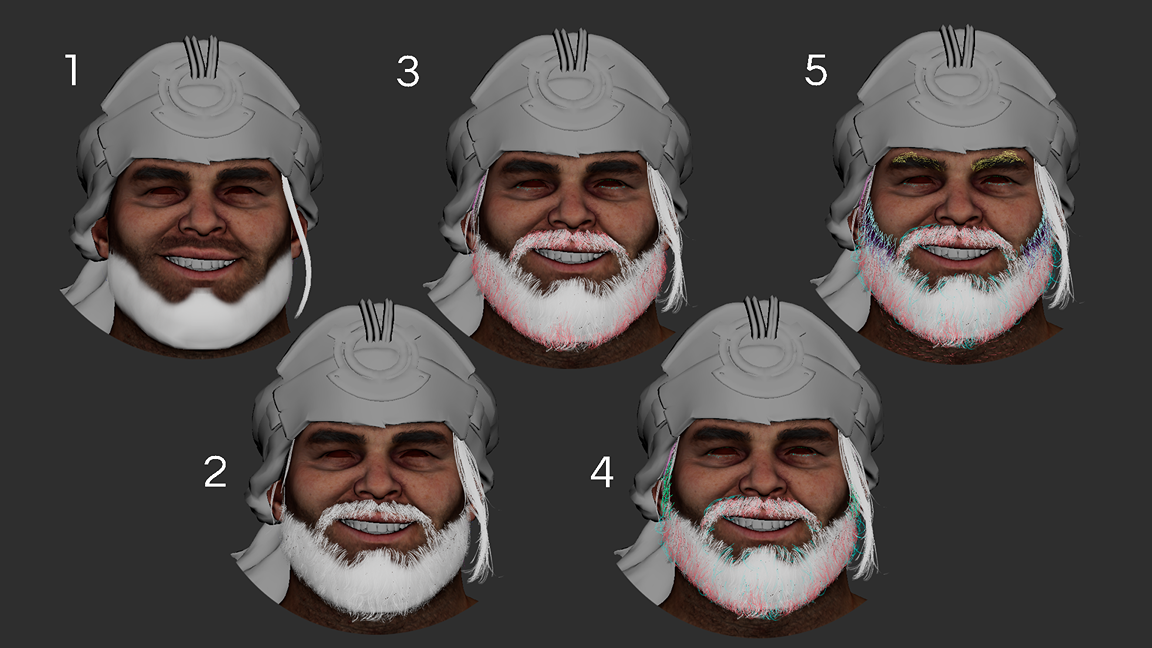
I separated the hair and beard into the following stages:
- Primary Cards: Here, I established the main shape of the hair. For the beard, I created a single, symmetrical mesh to serve as filler and save on hair cards.
- Secondary Cards: Construction of hair cards to establish the silhouette.
- Breakup and Flyaway Cards: Cards are used to break up the repetition of hair flow and add detail to the silhouette.
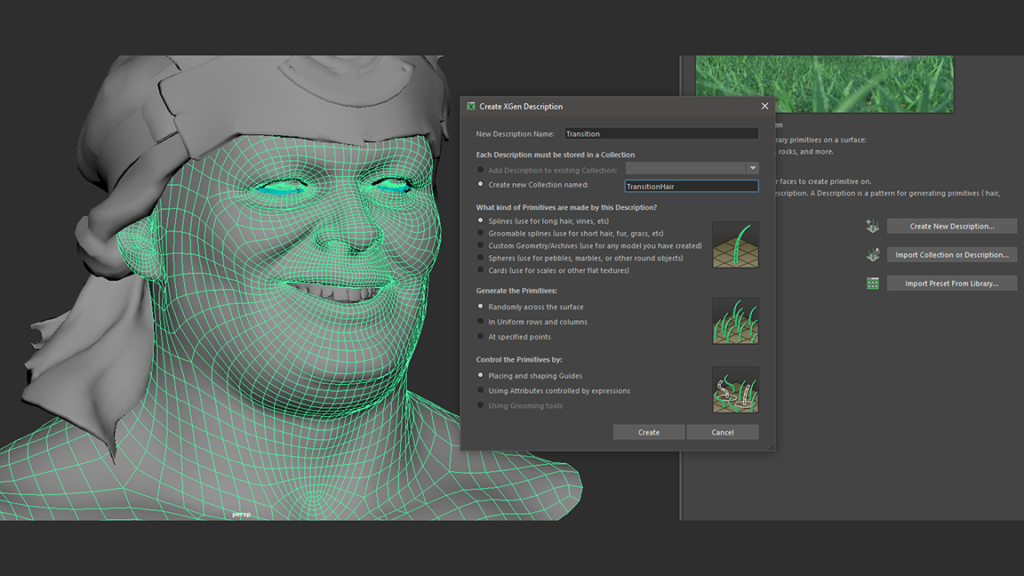
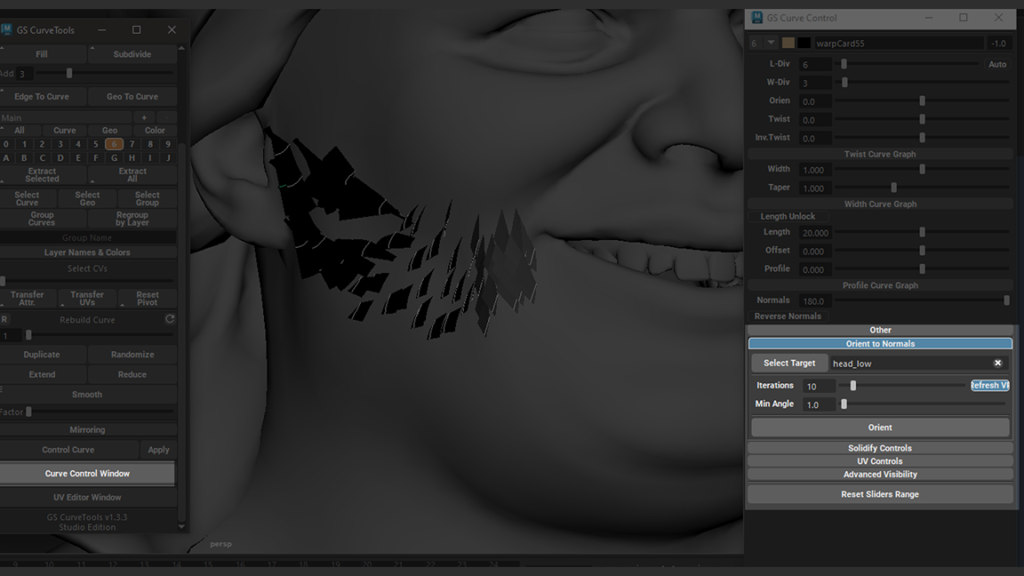
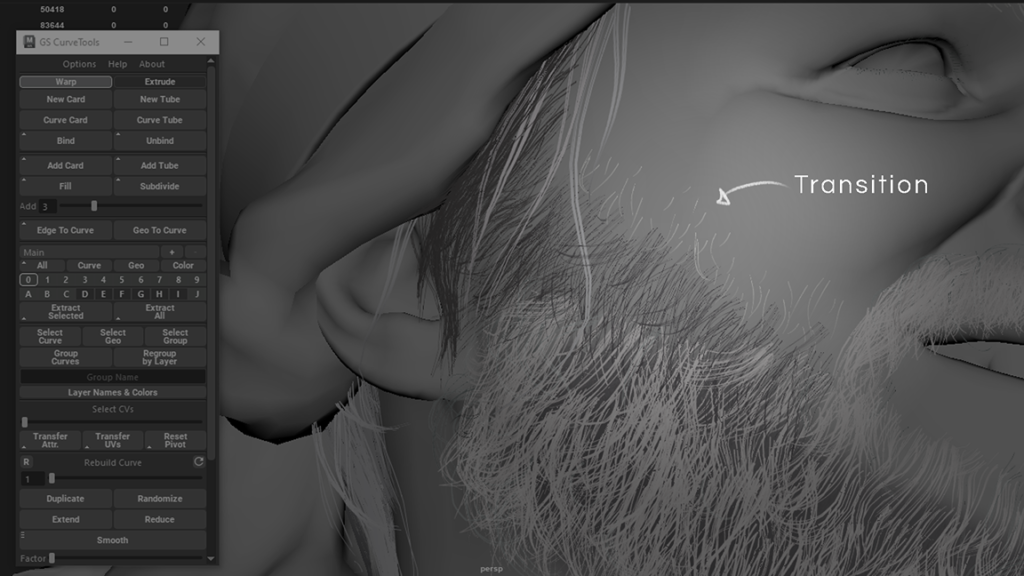
Transition cards & Xgen pipeline
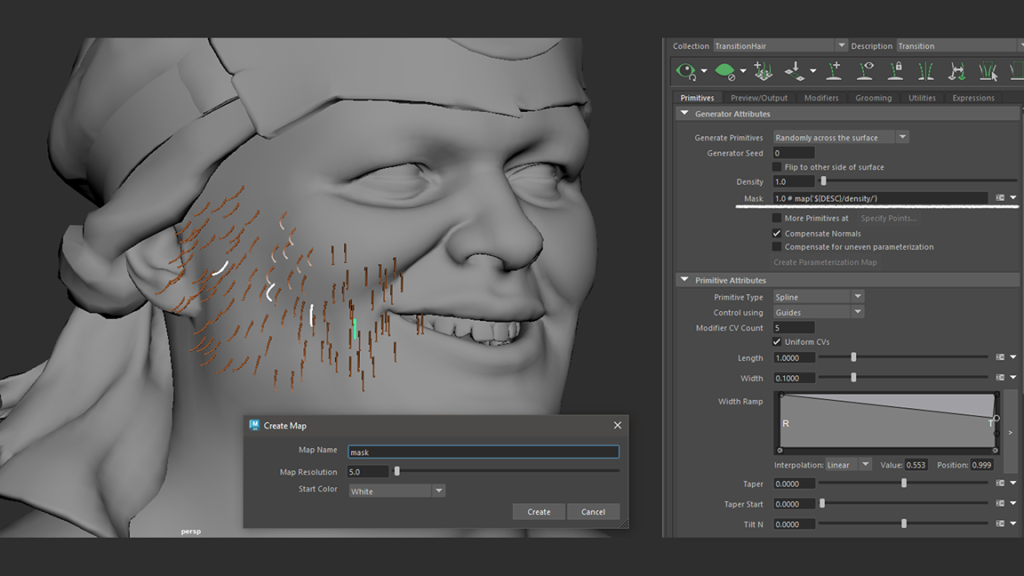
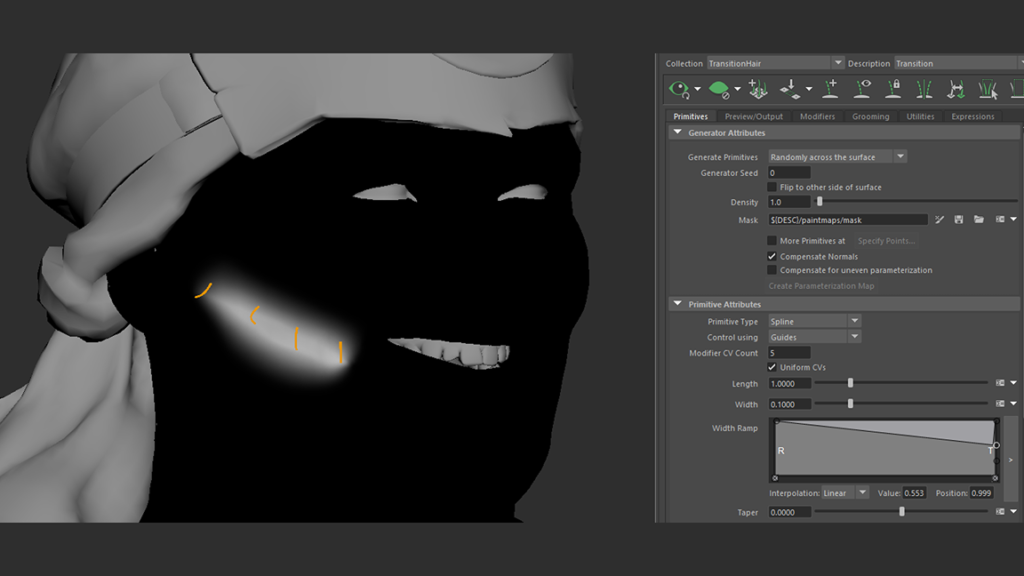
Transition Cards with X-gen – For the transition areas, I wanted to test a different pipeline, where I used X-gen guides to create transition points for the small hairs on the beard and neck.
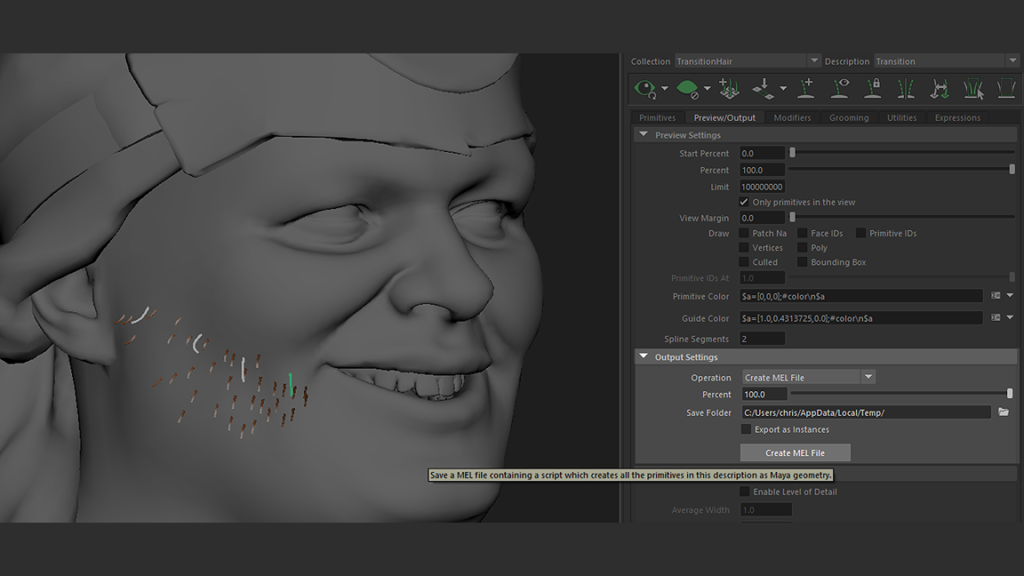
By exporting these guides as a .MEL file and importing them back into Maya, I was able to convert them into curves that served as the base for the GS Curve Tools.
From this point, it’s possible to create new cards referenced to the curves and position them on the texture map with the desired hair for the cards. I’ll leave some images of the process here:
Lights
I built a temporary scene for shader creation and texture calibration. I believe it’s important to test things while still in the construction process.
Unlike the structure of the article, I worked in a non-linear manner, so this scene I’ll describe was important while I was texturing and also building the hair, beard, and eyebrows.
Scene
The scene setup is not complex; I built a solid lighting base and a mesh created in Maya for the infinity background.
From there, I was ready to test the character’s look.
Shaders
All the shaders were built from scratch. I followed much of the foundation developed by Pedro Varella, only adapting a few points that made sense for my project.
Character Pose
After having the textures and shaders calibrated, I moved on to the pose creation.
Since rigging was not the focus of the project, I used the final low-poly model and posed it in ZBrush using masks and the gizmo.
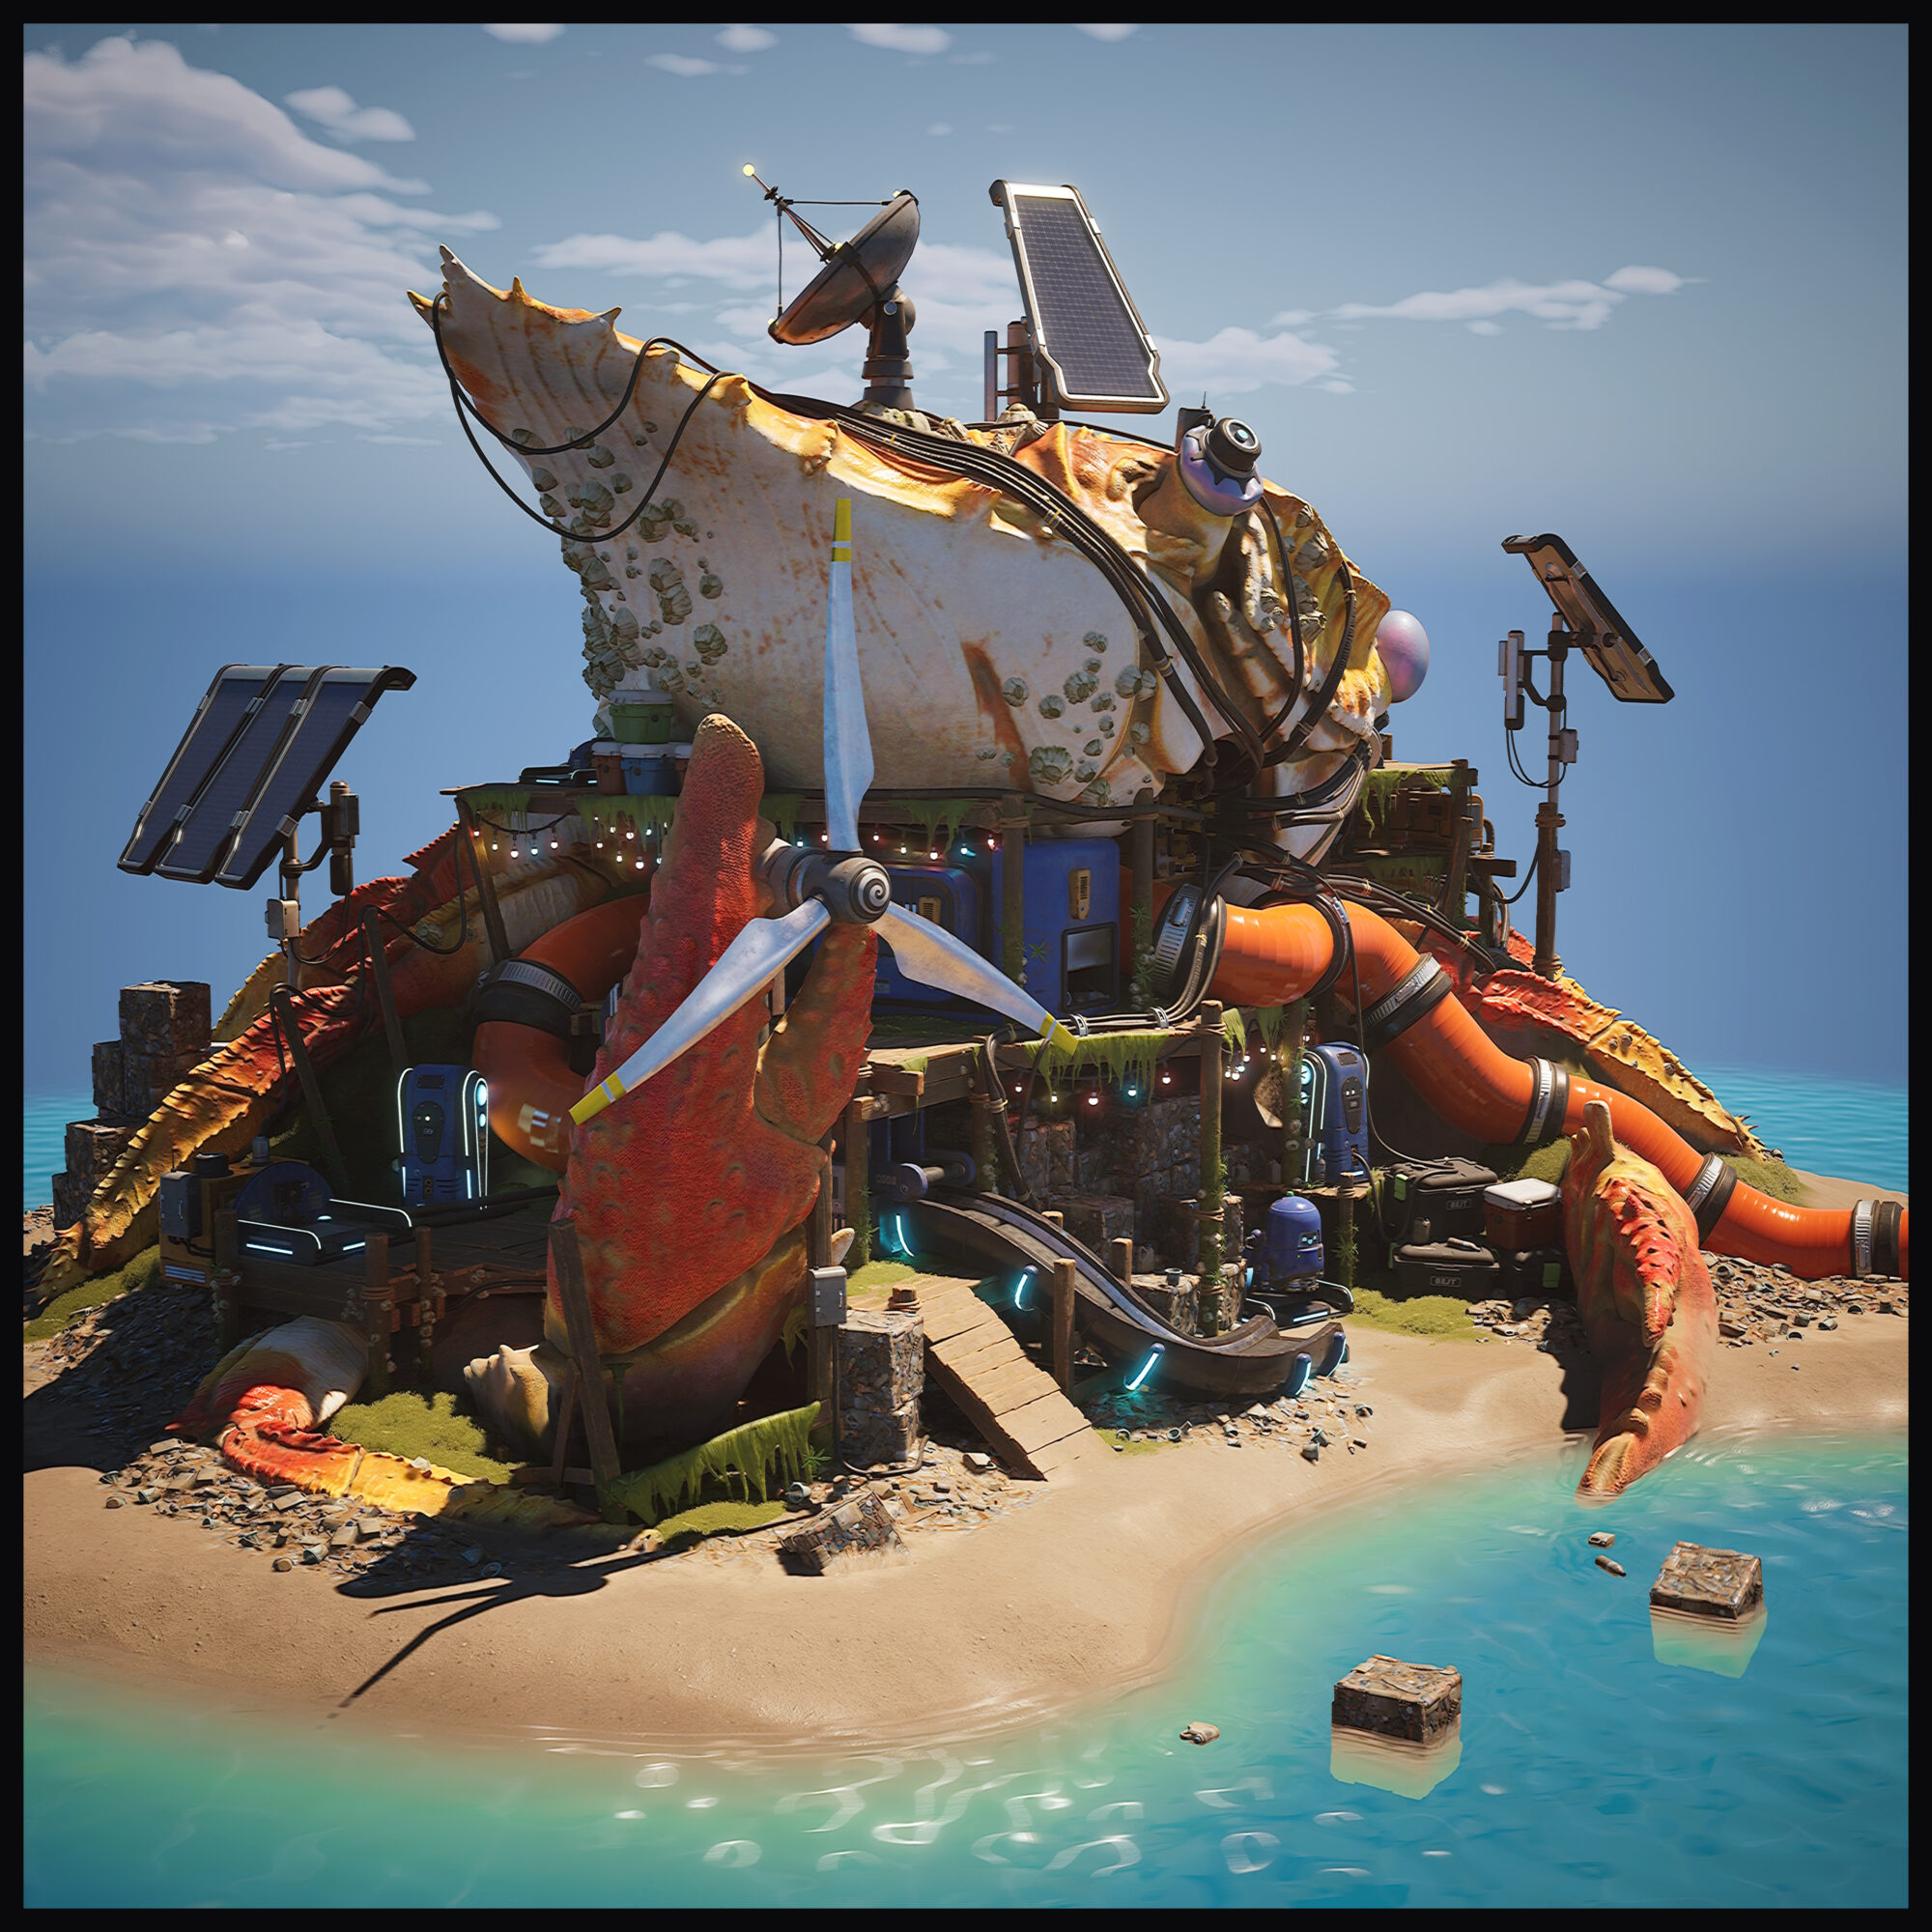
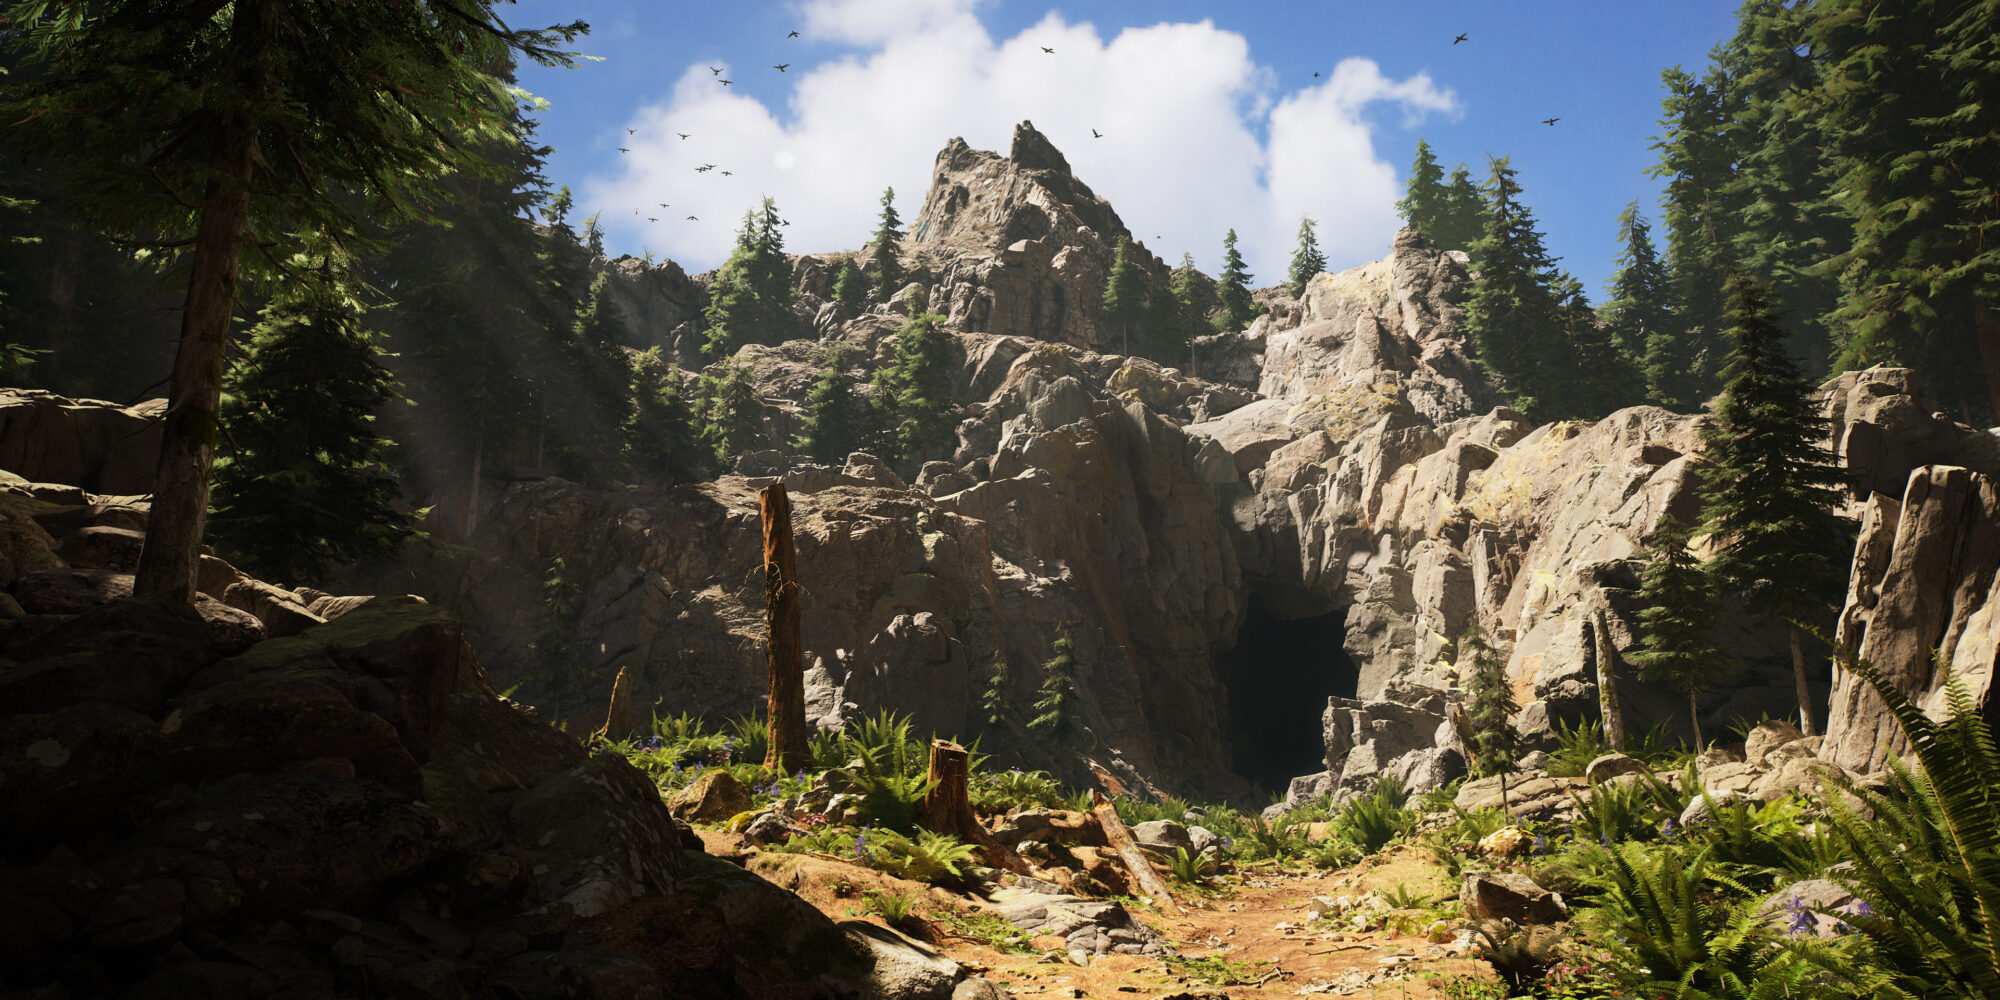
Environment Background
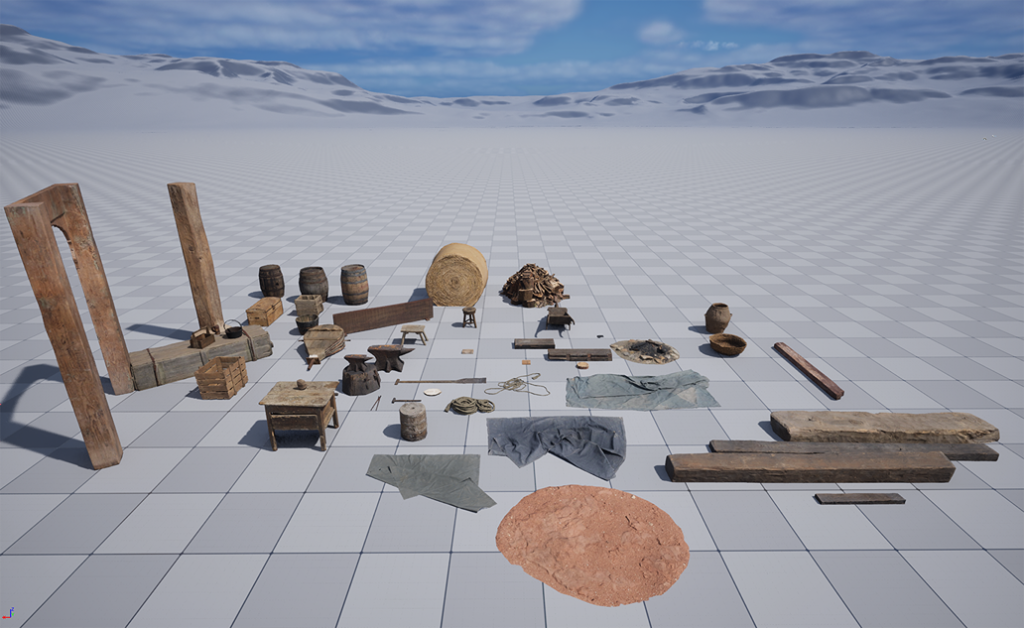
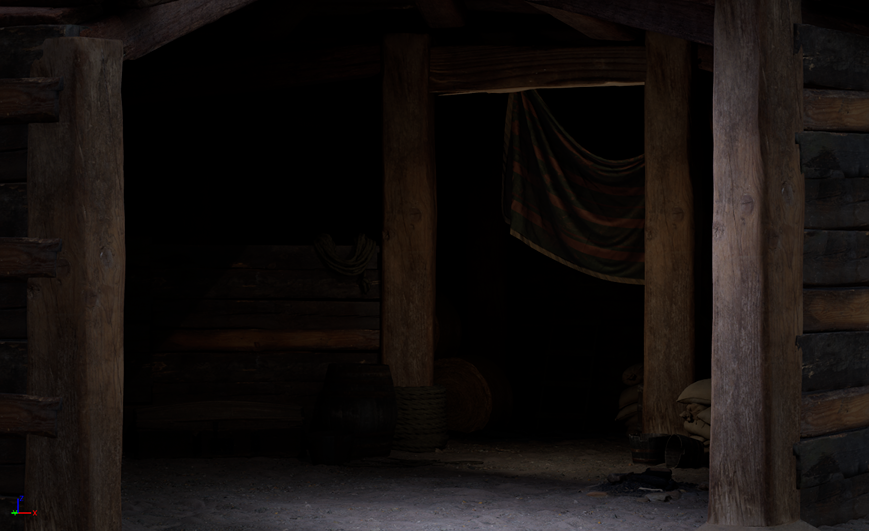
With the entire character, accessories, and weapon completed, I moved on to a personal goal. From the beginning, I set a secondary task to create a scene that would provide more context for the character.
Through research on the Oseram, I made a sketch and an image composition to align what I wanted to create. After finalizing the visual direction, I started by selecting free assets from Quixel Megascans that I could use to save time.
Once everything was gathered, I began assembling the level in UE5.
Rendering
I consider this part very important, as it’s where the entire harmony of the project is created.
I wanted to convey an implicit story through the atmosphere of the scene.
I also explored creating a campfire using the Niagara particle system to bring more life to the environment. The entire camera setup and post-process work done in Unreal resulted in the final renders.
Conclusion
I was able to reach a very satisfying level with this project.
The exploration of new processes and working with Unreal Engine were definitely key points that greatly added to my personal experience.
I am very grateful for the feedback from friends and my mentor Pedro Varella; many of his tips and advice I will keep with great appreciation.
I believe that sharing our processes greatly enriches our community, and as artists, the entire support network is crucial to keep us active in the pursuit of ever-higher quality.
Read more articles
You might also like these articles.