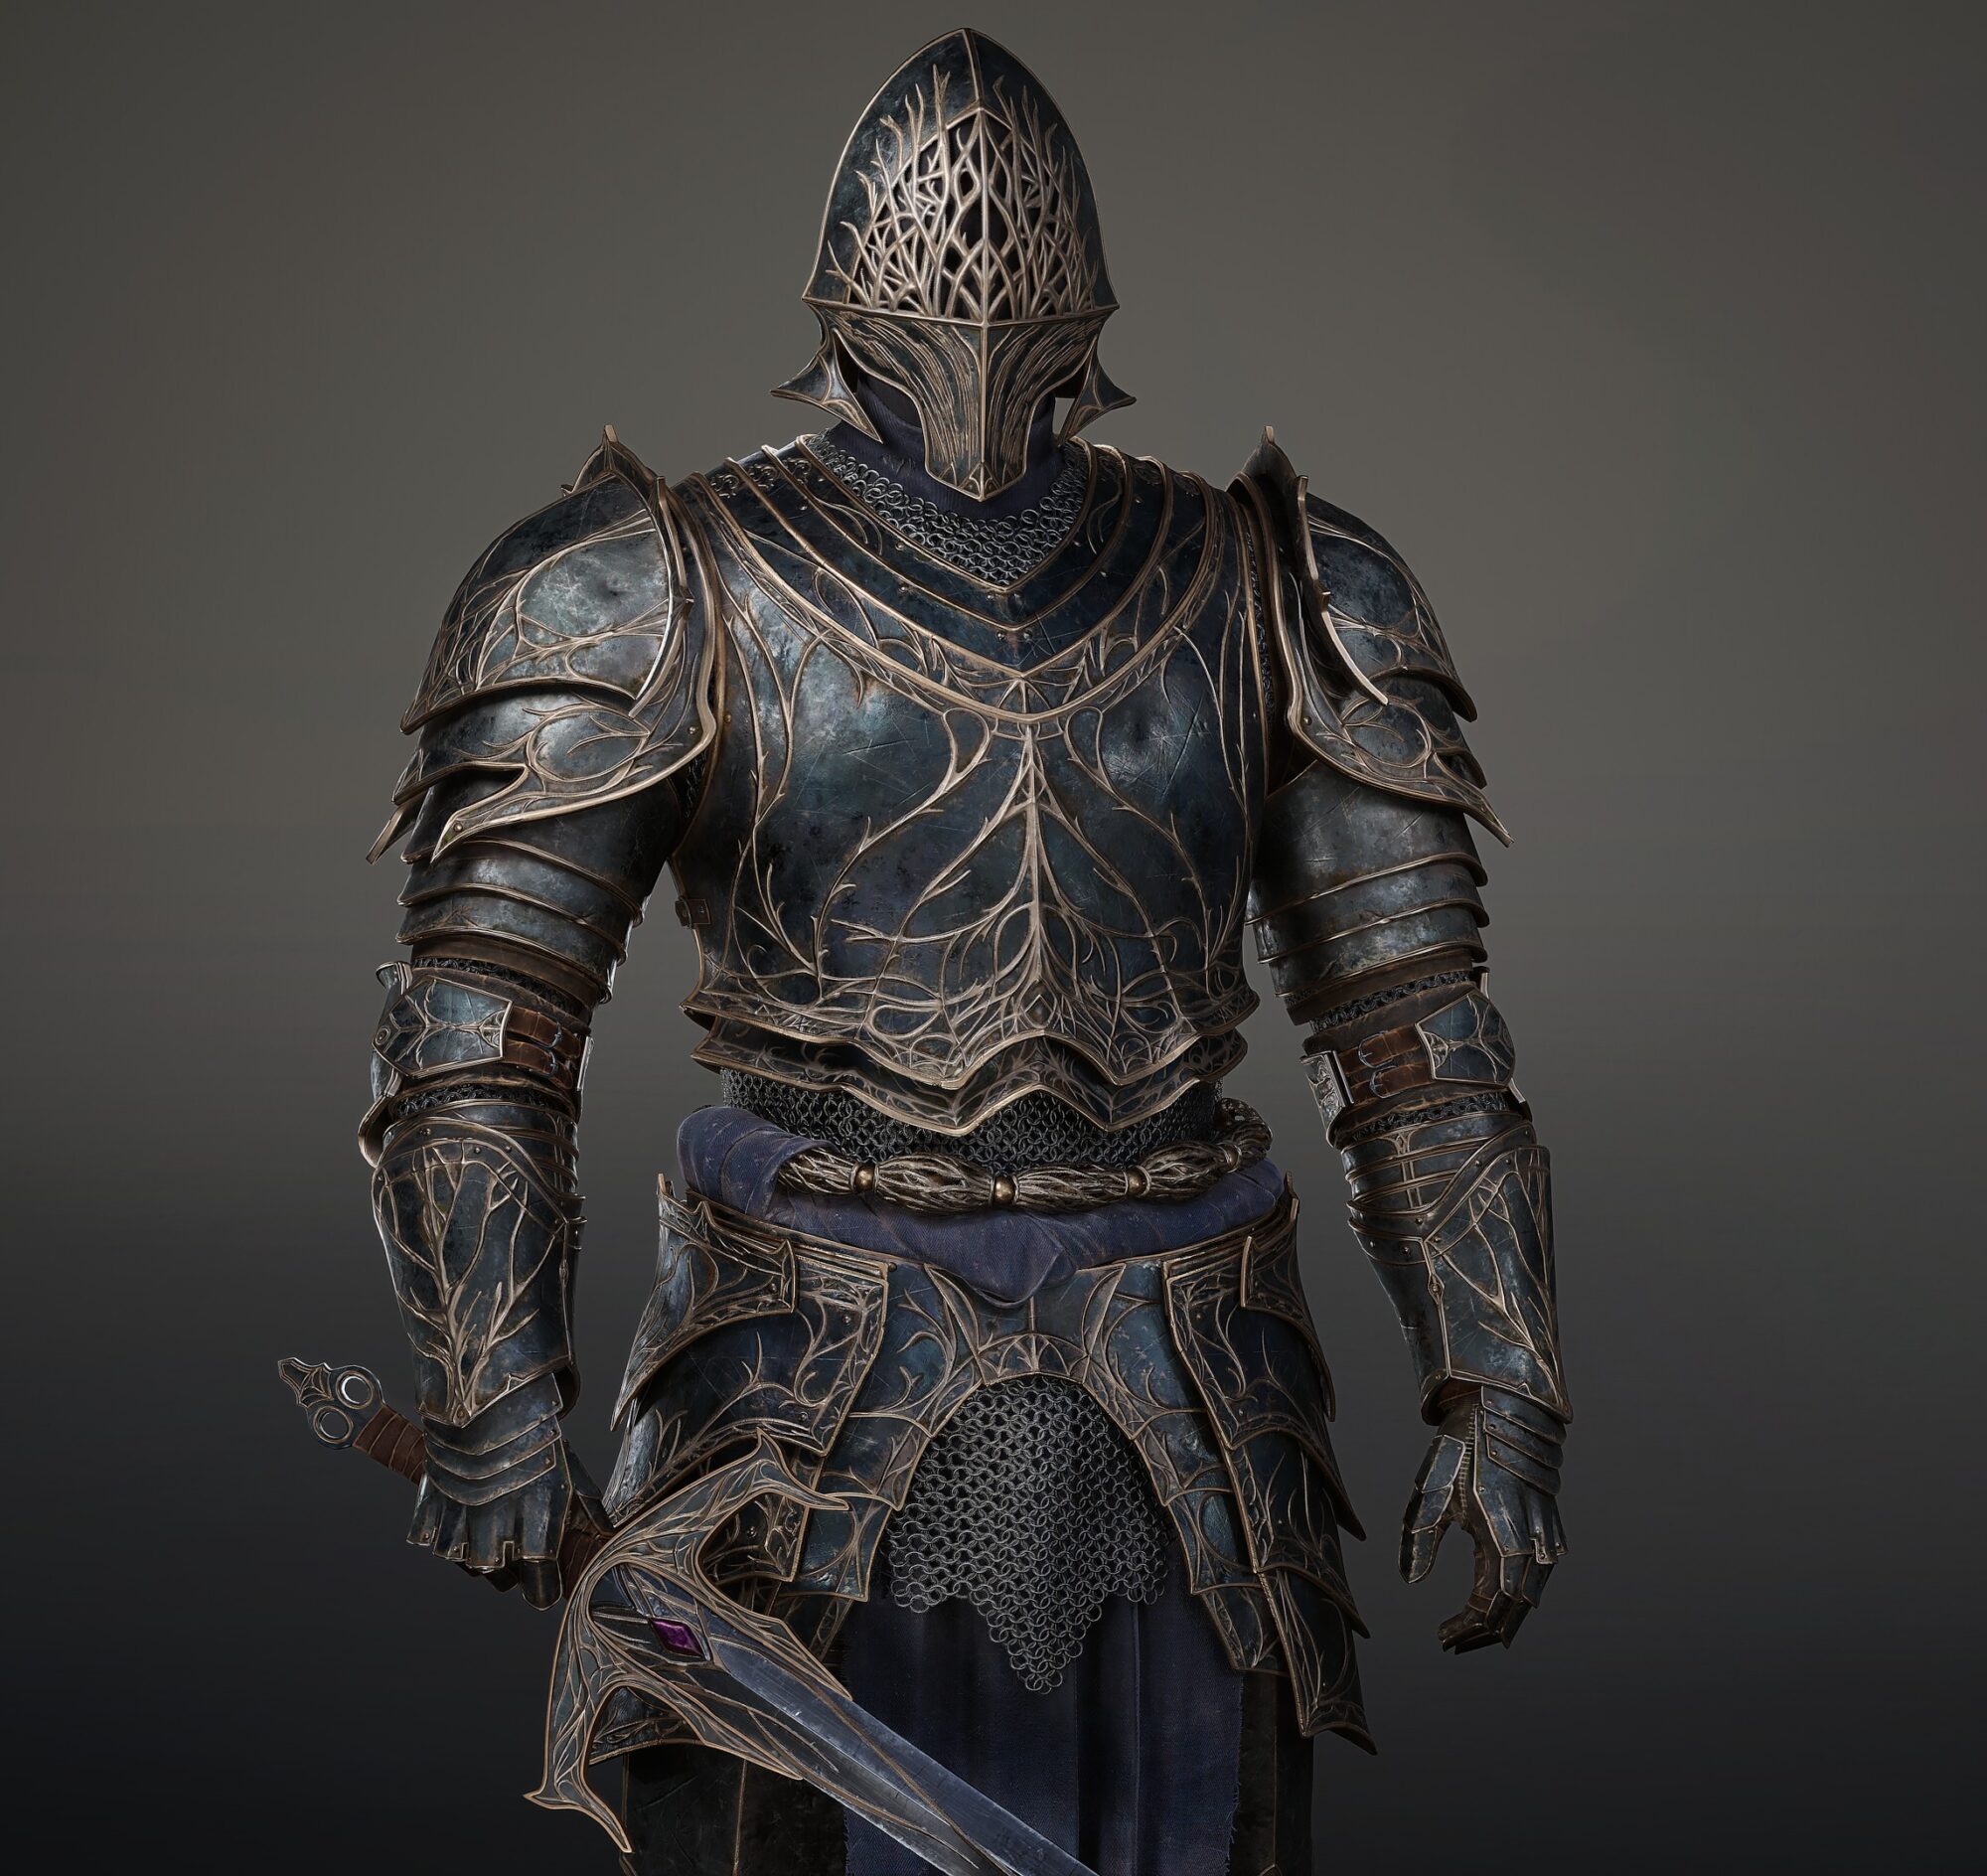
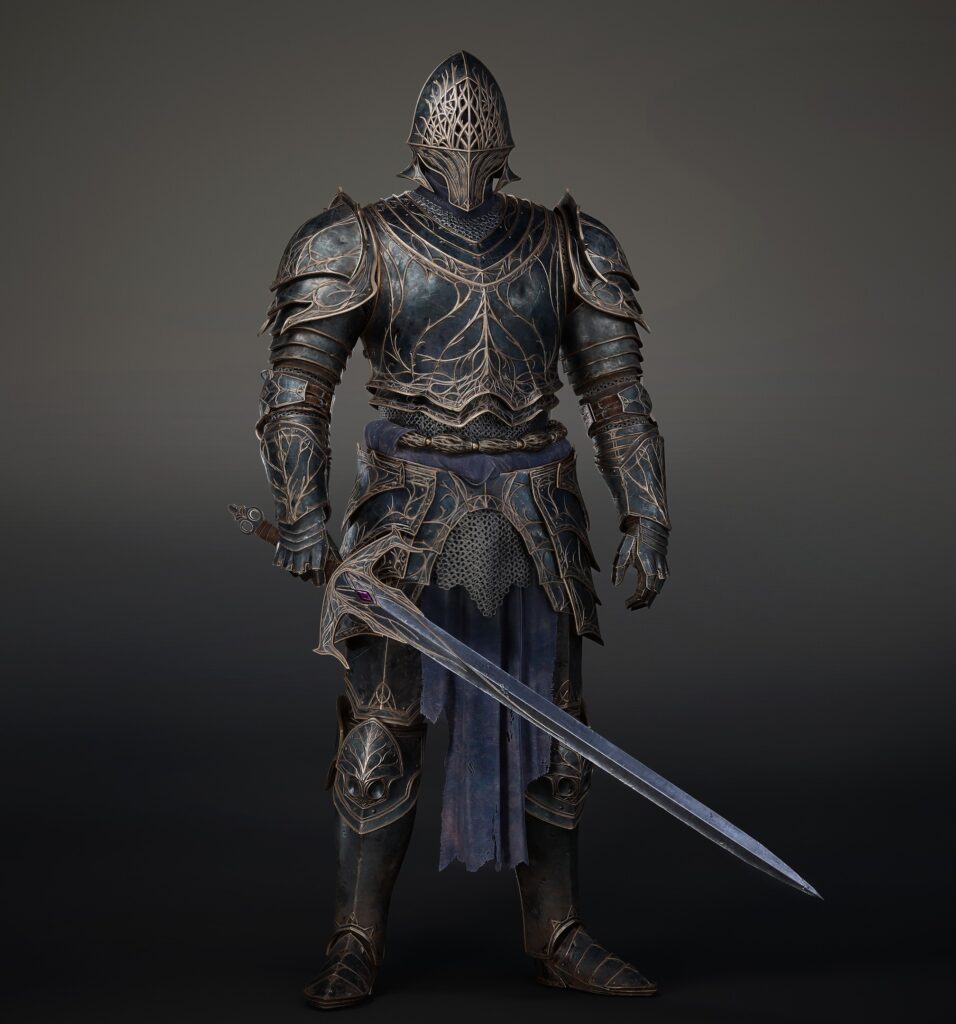
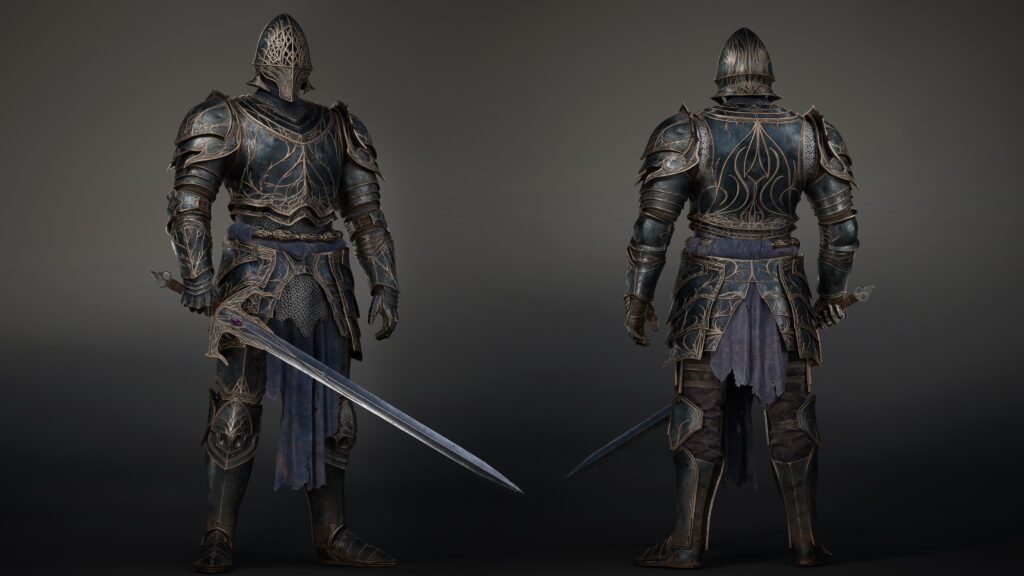
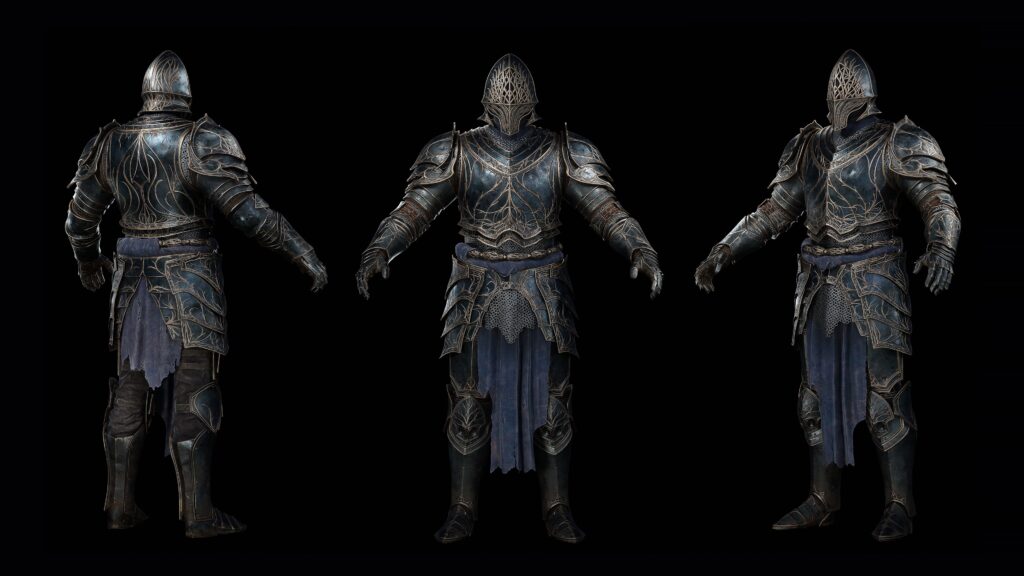
Ornate Dark Knight

Introduction
Hello everyone! My name is Jesus Olivares and I’m a Junior 3D Character Artist from Spain.
I don’t have industry experience yet, but I’m open for opportunities! I’m actively working to improve my skills. In the meantime, I’m practicing across different areas. This character with hard surface elements is one example of my ongoing development.
Project Goals & Concept
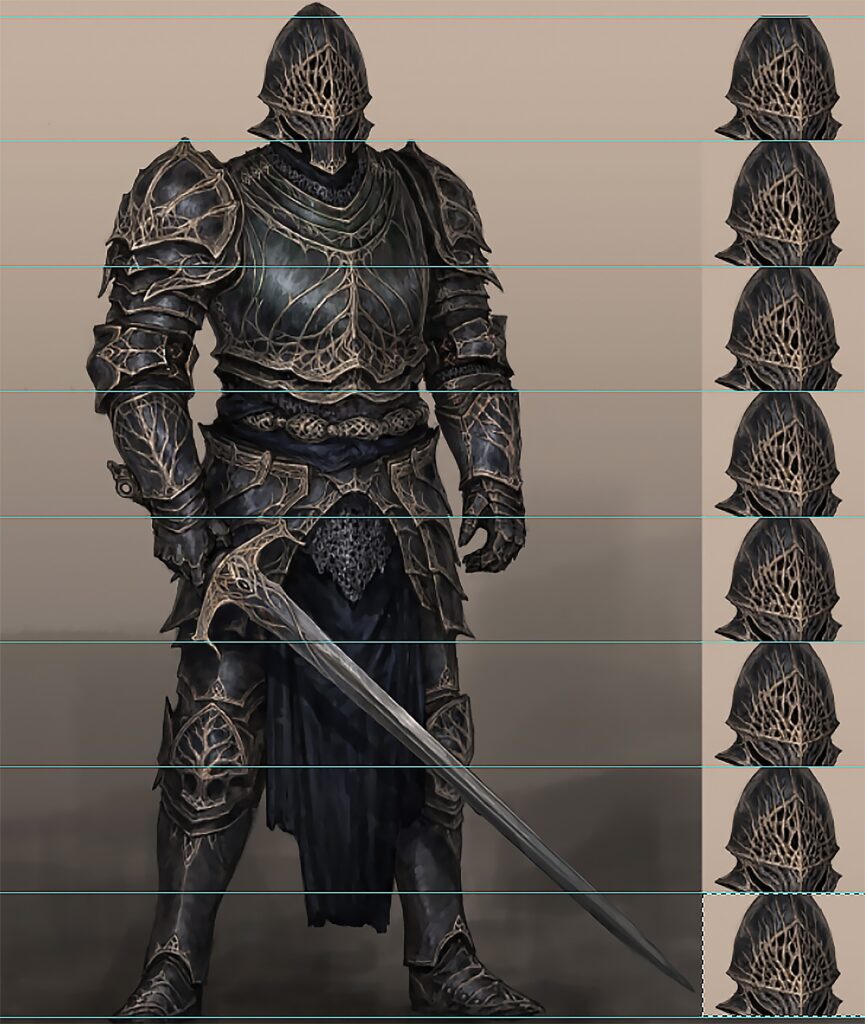
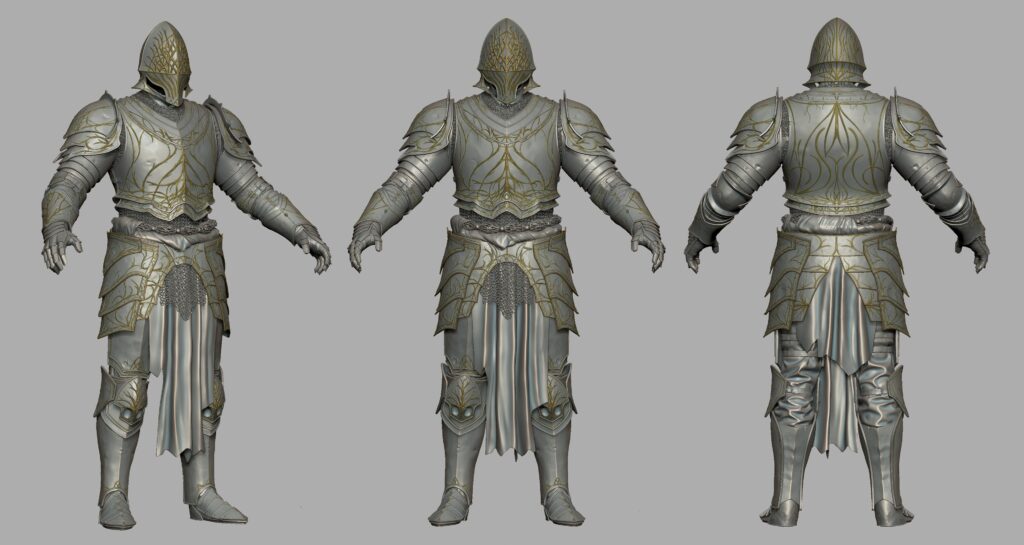
Since I’d never used hard surface art on a character before, I decided to create a knight to practice the entire process in ZBrush.
There are many spectacular knights on ArtStation, but sometimes they’re very similar, and I wanted to avoid that. For that reason, I looked for a concept that was both visually striking and enjoyable to work on.
That’s when I came across the concept by Ivan Mikhalenko.
The mysterious vibe and a touch of Souls-like style caught my attention, as well as the mix of hard surface with organic details.


Tools
- Pureref – References
- ZBrush – Modeling
- Substance Painter – Texturing
- Marvelous Designer – Cloth
- Adobe Photoshop – Corrections
- Topogun – Retopology
- RizomUV – UVs
- FiberShop – Hair textures
- 3ds Max – Hair cards placement
- Unreal Engine 5 – Rendering

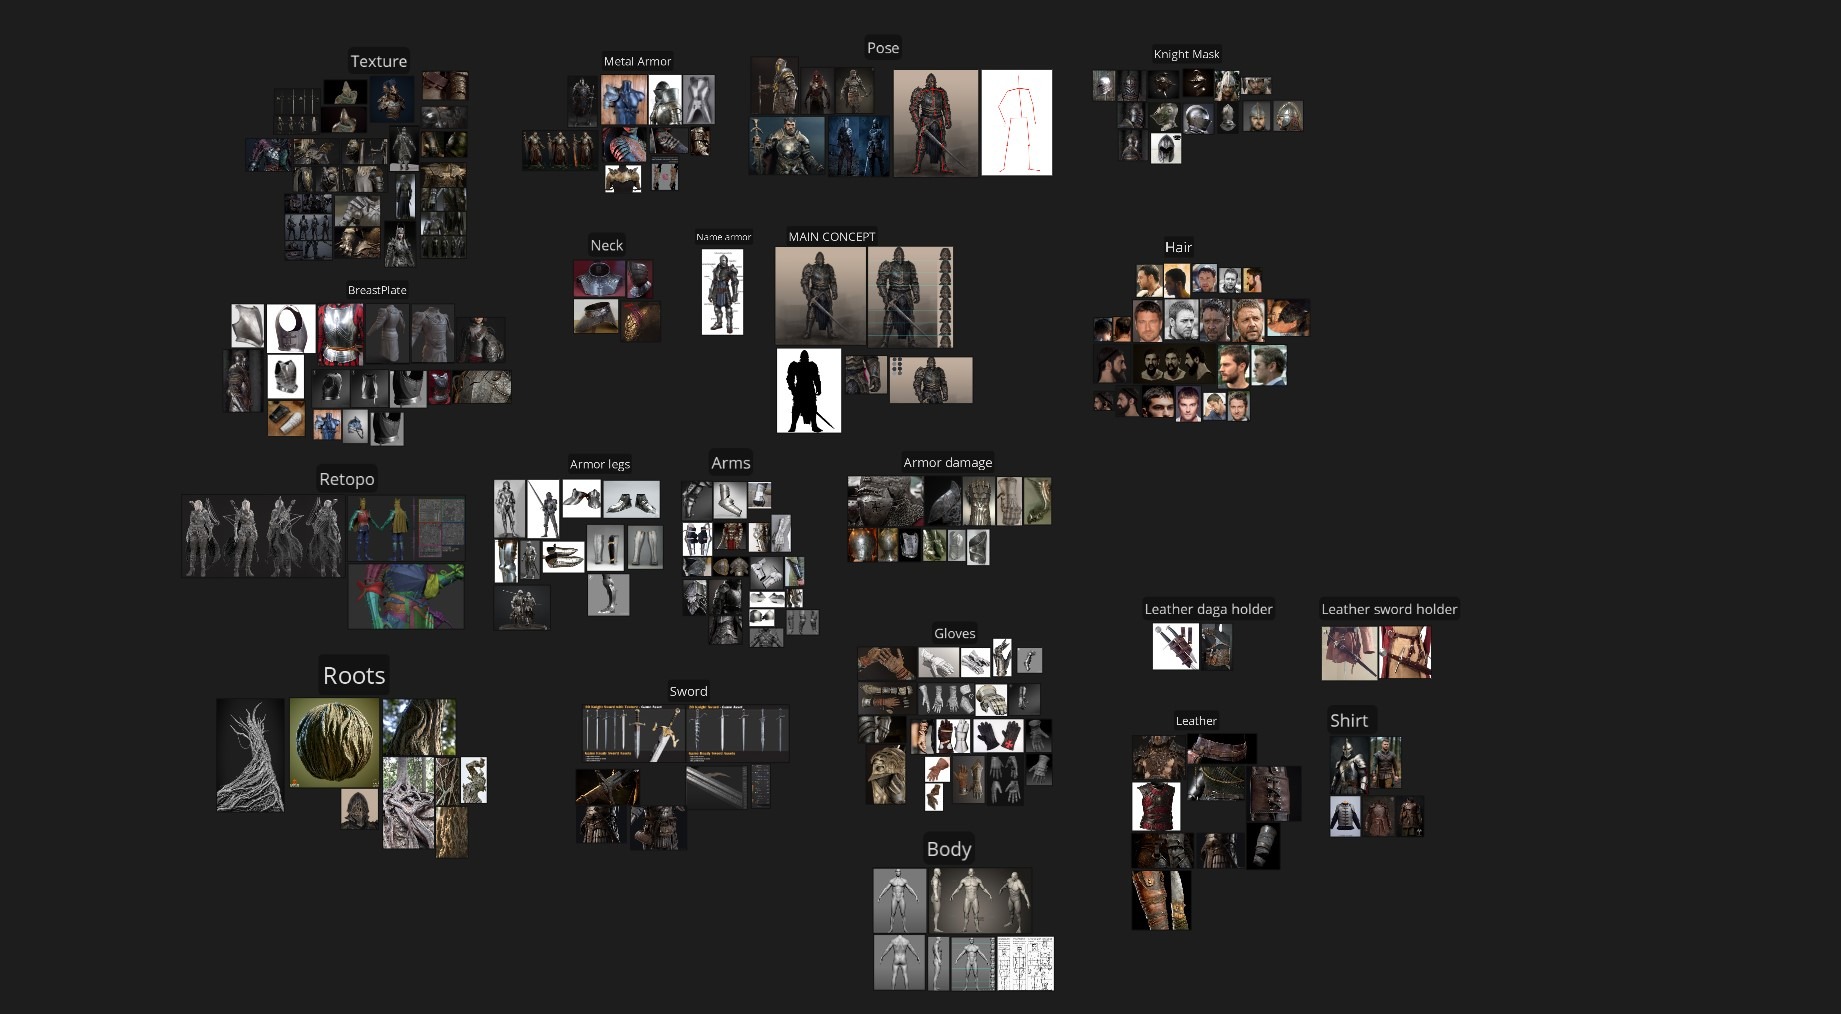
References
First of all, references. They’re a crucial part of the process and serve as a constant guide throughout character creation.
In my case, I made sure to gather a wide range of references to cover all the key aspects needed to reach my goals. This included both real-life sources and inspiring artworks from other artists on ArtStation.
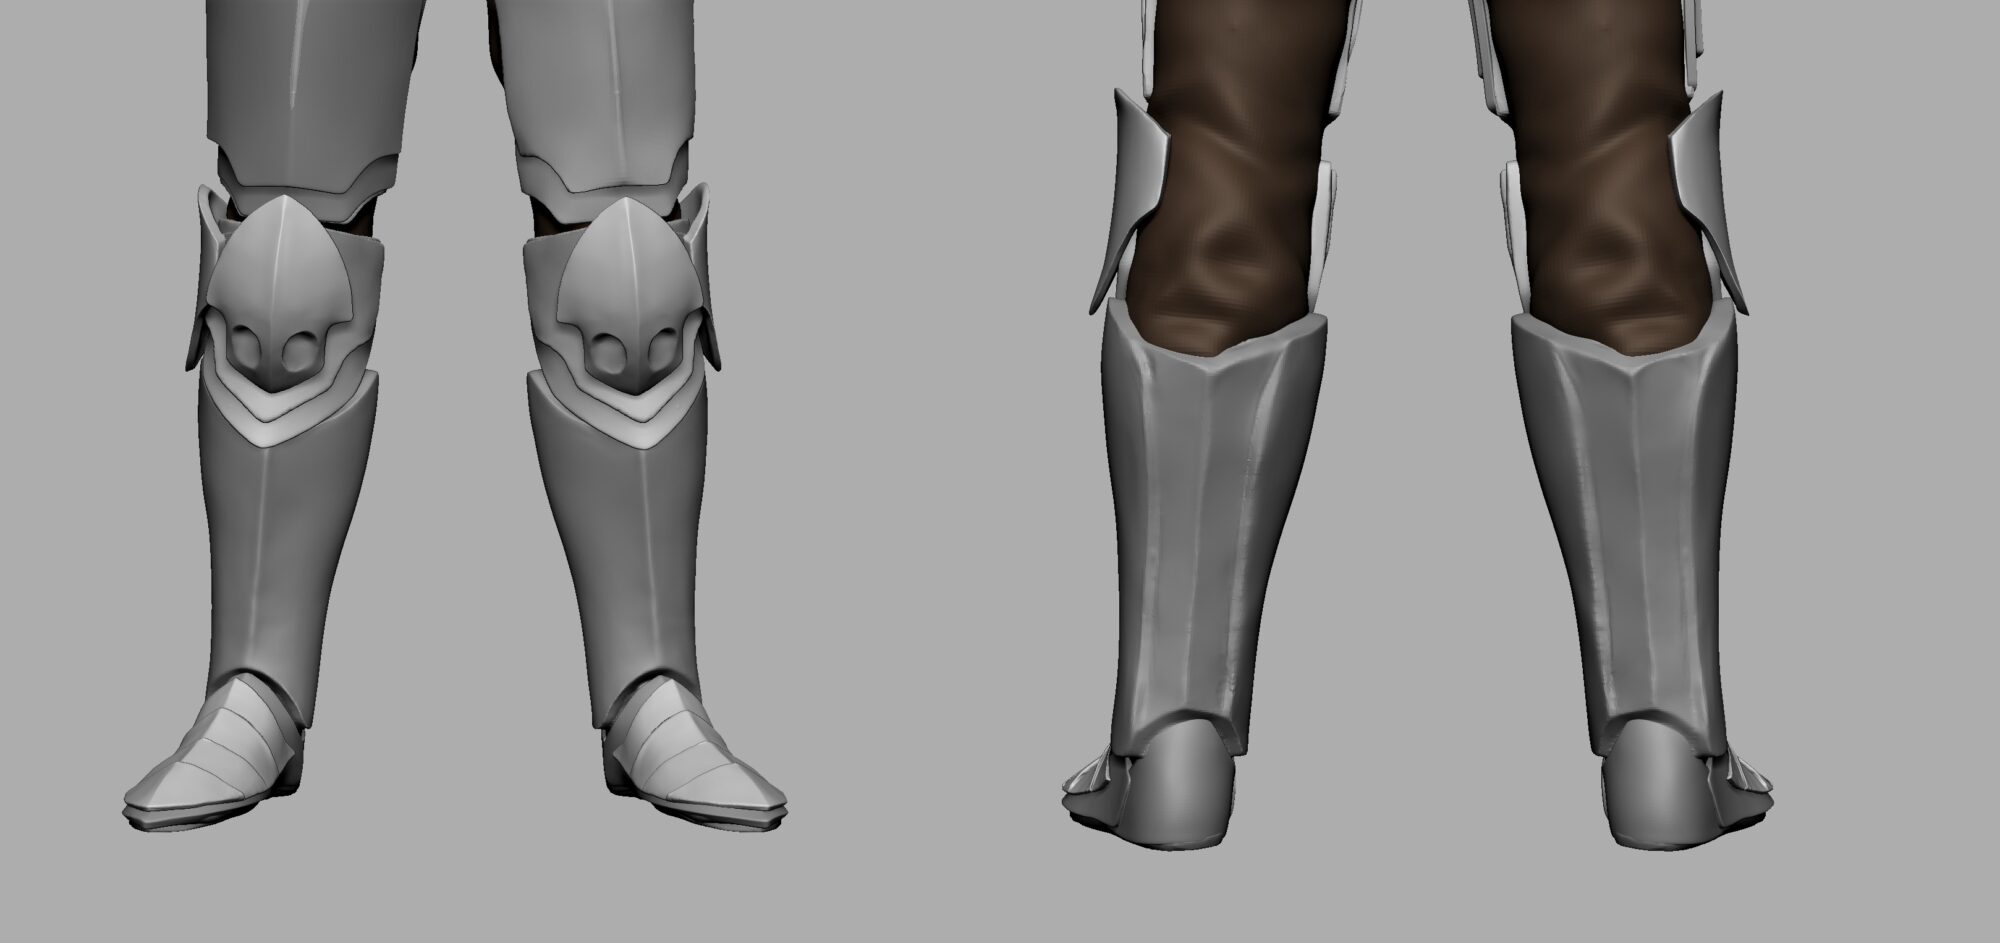
Blockout & High Poly
This is where it all begins. The blockout is an important part of the process because if there are issues with proportions, object sizes, or overall structure that don’t fit the character properly, they will become more difficult to fix later on.
That’s why I started checking proportions before sculpting.
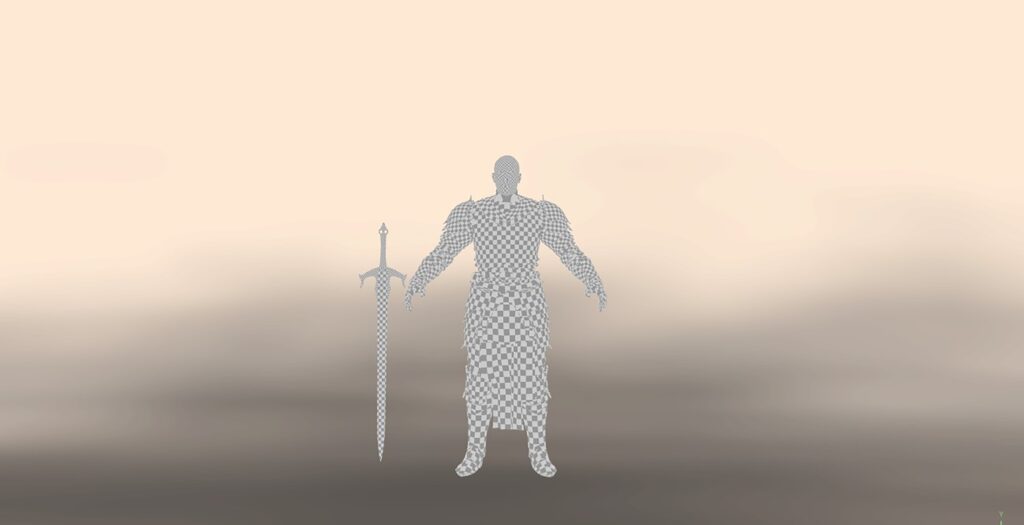
One important thing to keep in mind is that the character is symmetrical, so working on just one side and then mirroring it will help make the process faster and even more optimized for the low-poly stage.
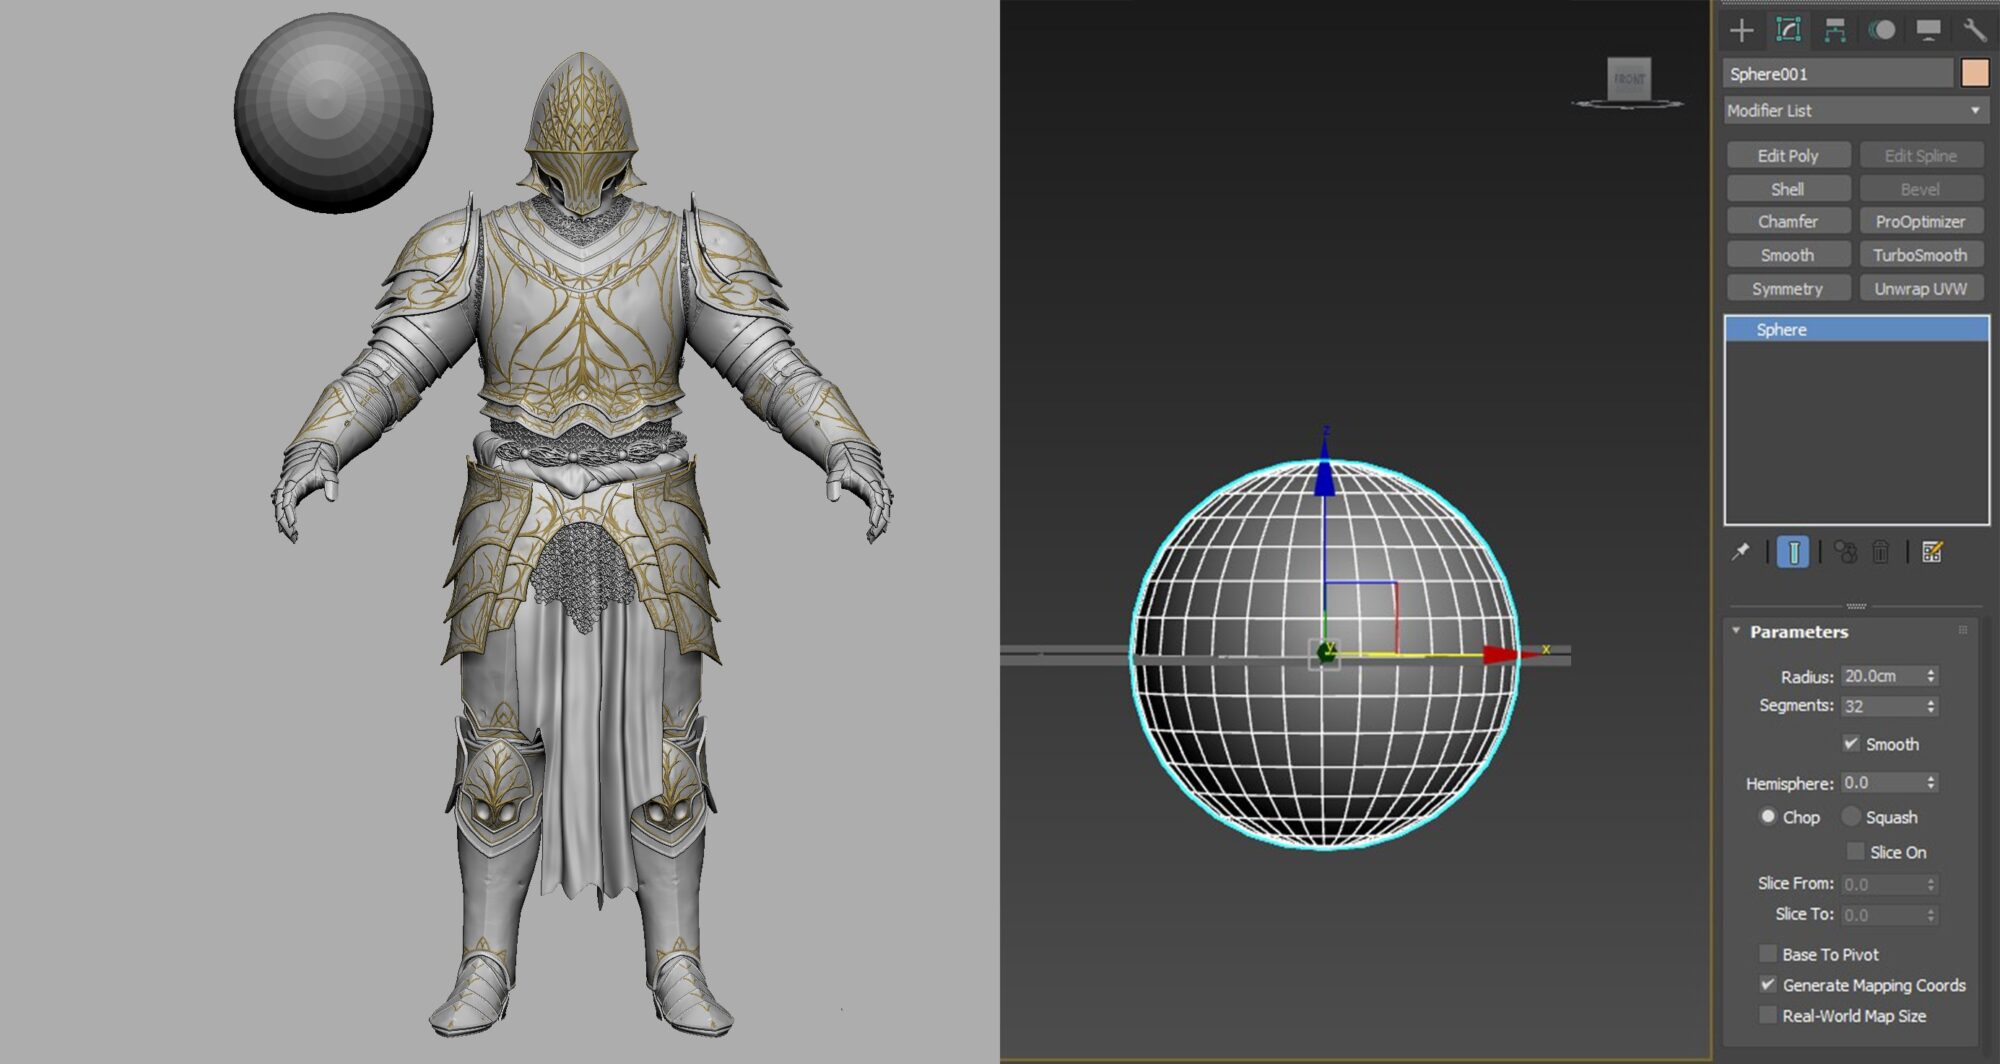
How to avoid measurement problems
If you often struggle with scale and measurements, here’s a useful tip. Before starting your project in ZBrush, import a sphere with a 20 cm radius created in 3ds Max, Maya, or Blender (any software where your scale settings are properly configured).
Bringing it into ZBrush at the beginning will help you maintain consistent proportions and avoid scale-related issues later on.
In this case, I used a base mesh for the body where I adjusted some of the proportions to match the concept, taking into account that the character would be armored.
The body needs to be slightly smaller so that once the armor is above it, the overall size would match the concept.
I began working with a Dynamesh mesh, which allowed me to freely tweak proportions and block out the different parts without any limitations.
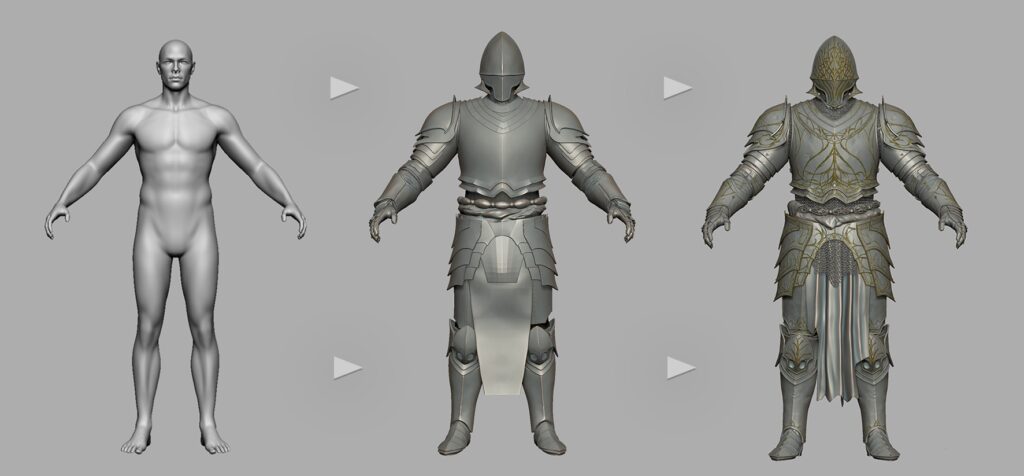

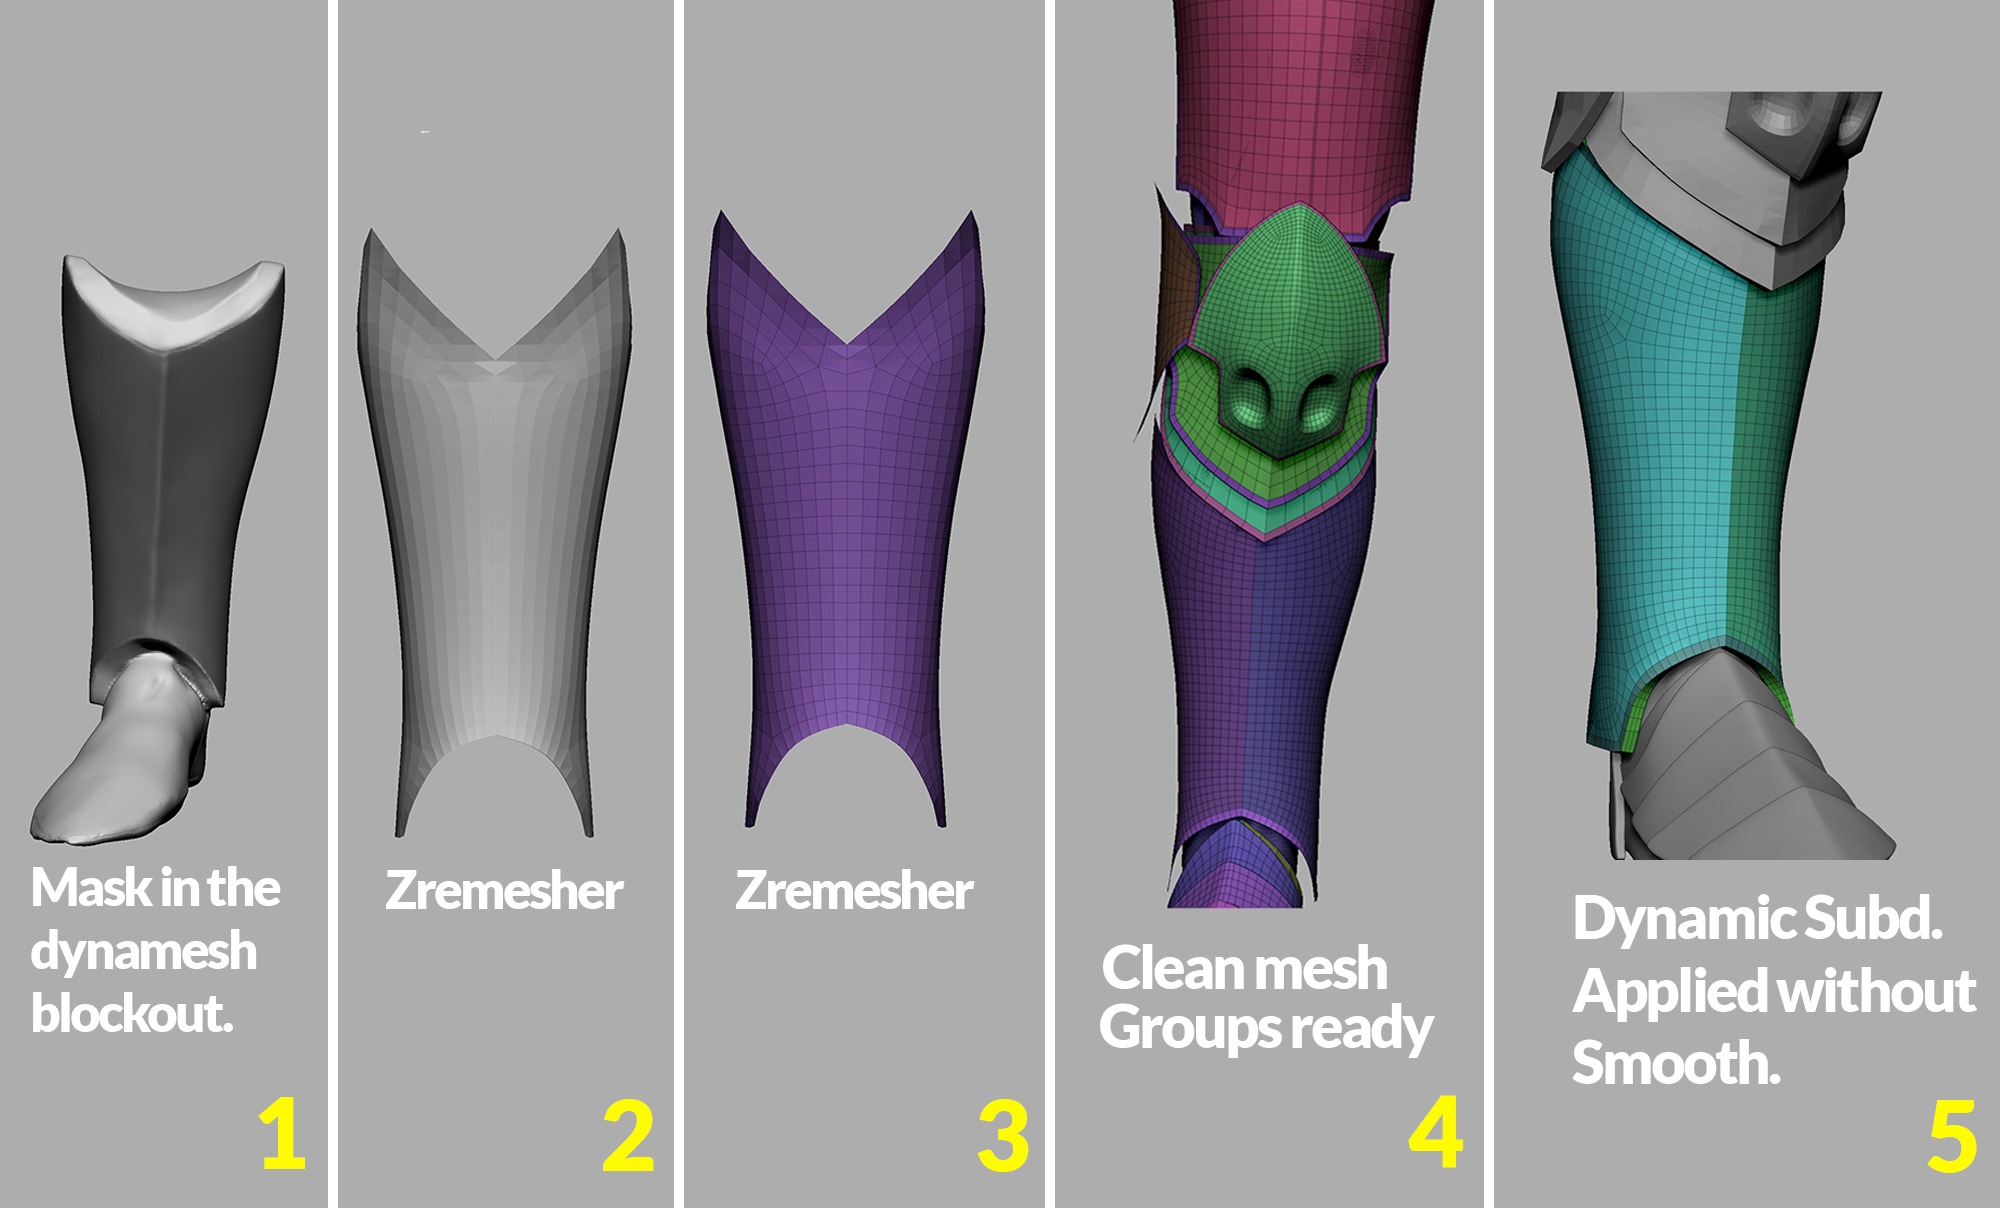
Once everything was looking the way I wanted, I moved on to defining the shapes for the high poly using the common technique of masking and extracting.
If you’ve done a solid blockout, this stage becomes much easier.
The main shapes you extract with masking will already follow the correct form, giving you a cleaner starting point and saving you time on adjustments and topology cleanup.
I used this method for each piece of the armor, but I’ll walk through an example to show how you can approach it step by step.
-
First, we make a mask. You can do it directly from the blockout mesh or take the blockout to the center (0,0,0), use ‘Mirror and Weld’ (keep in mind that we have to keep the original width and height).
-
The second method allows us to make a clean mesh with symmetry, which you can then move back to its original position for refinement.
IMPORTANT: If you want to keep symmetry active after moving the mesh, make sure the pivot stays in the same position and activate ‘Local Symmetry’.This allows you to continue working symmetrically even if the object is no longer centered. If you move the pivot, symmetry will be lost.
-
To extract the mesh, we can use the plugin called “Extract Pro+” or the normal ‘extract’ feature from ZBrush.
-
3.1 With the plugin, you’ll get a clean mesh that can be improved, if needed, by making a ZRemesh.
-
3.2 With the extract from ZBrush, you’ll have to reduce the polygons and clean the mesh as you want.
-
To get this, we will ZRemesh a few times (using low values such as 0.5 or 0.1, or the ‘half’ button) until you’re satisfied with the result.
TIP: During the polygon reduction, you can improve border quality by polishing the edges using:
“Polish”. Go to “Tool > Deformation > Polish by Features/By Groups/Crisp Edges”.
-
-
Once the mesh is ready, it’s time to add thickness. You can use ‘Panel Loops’ or, in my case, ‘Dynamic Subdivision’ with thickness. It depends on your workflow.
I prefer, in this case, dynamic subdivision because it allows me to preview how all the pieces will look with thickness before applying it.If, during the process, I want to change something in the mesh with ZModeler, it will be easier if I have a dynamic subdivision that hasn’t been applied yet.
-
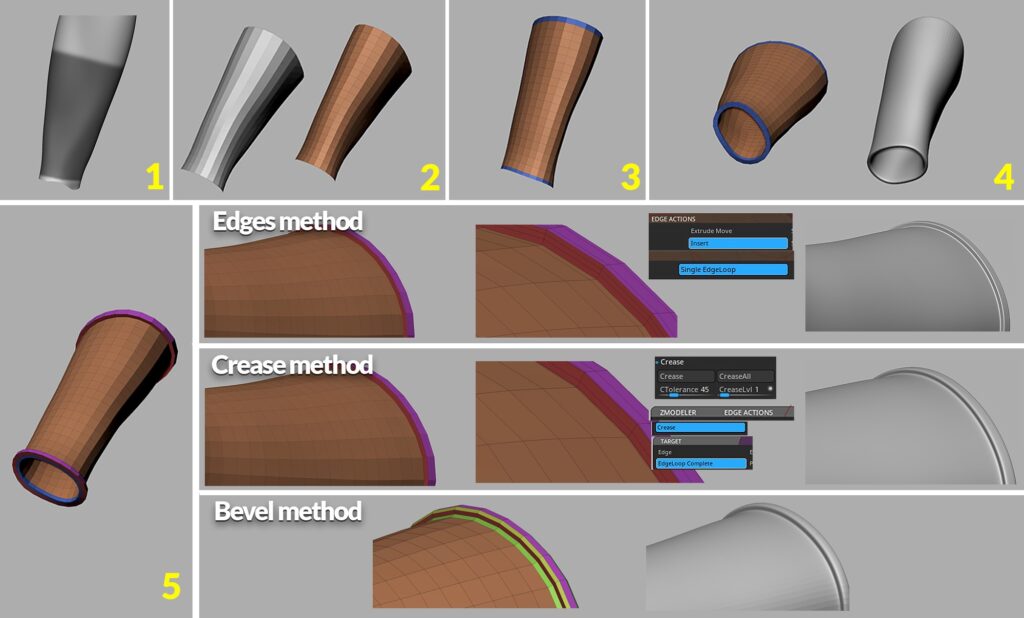
In this step, we’ll also prepare the border of the armor.
To do that, I use ‘ZModeler’ to extrude and create a clean edge loop where we will extract the border later with QMesh once the thickness is applied.
-
-
When applying the thickness, I did it without smoothing in order to retain the shape, avoiding subdivisions where the ZModeler can’t be used.
This way, I can use ‘QMesh’ to extract the border and then add ‘Edge Loops’, ‘Bevels’, or ‘Crease’ before applying any smoothing.
‘Mesh without thickness > ZModeler > Extrude edge loop > Apply thickness without smooth > Change polygroups (optional) > QMesh polygroup > Subdivisions’.
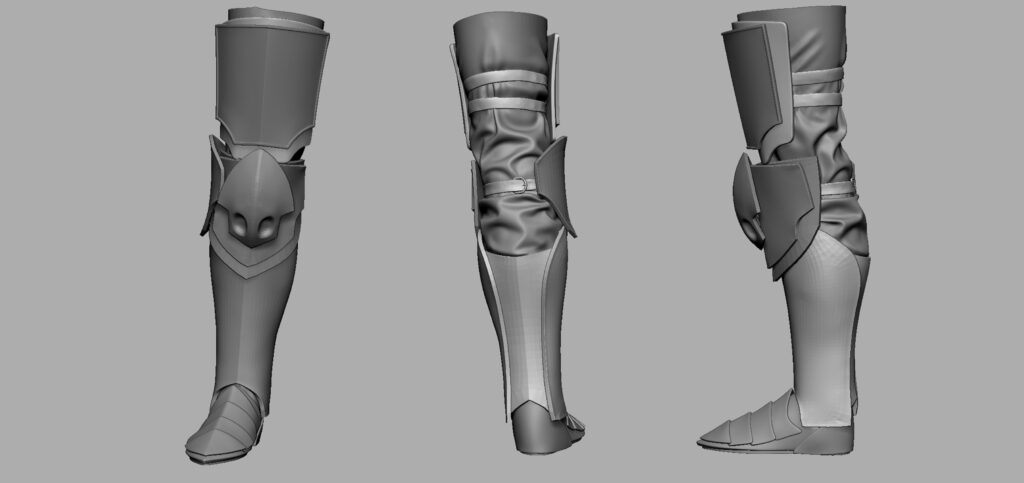
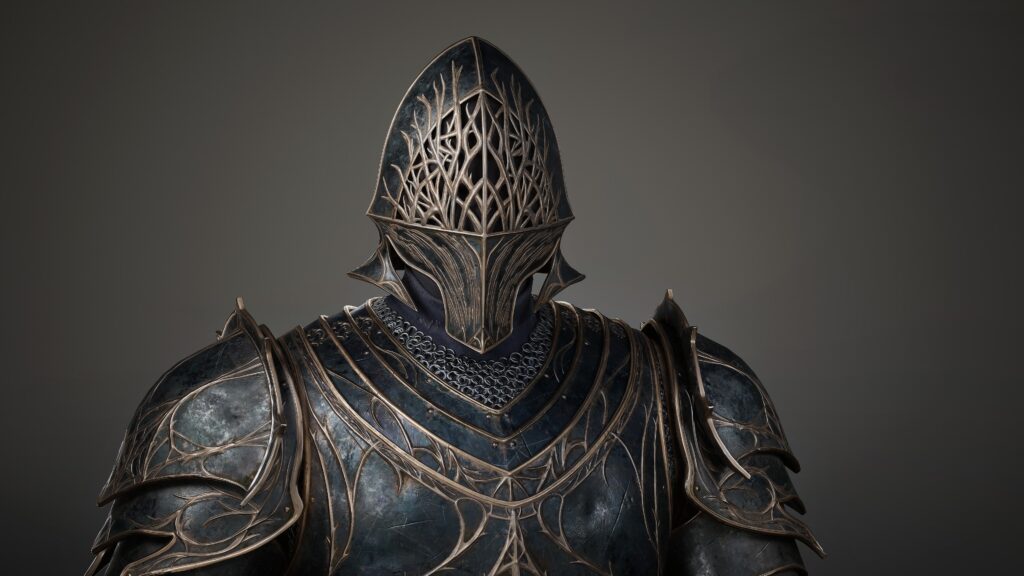
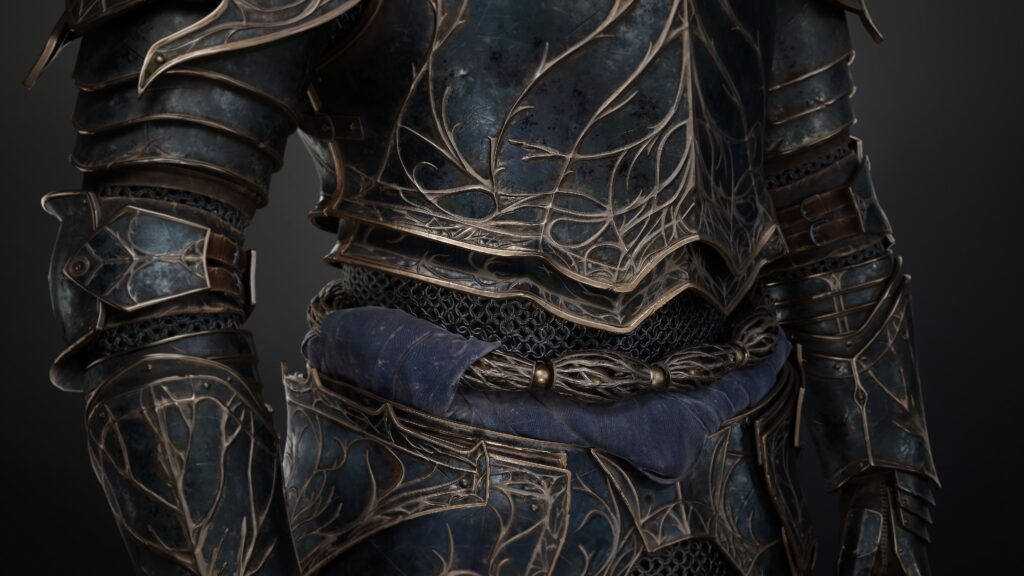
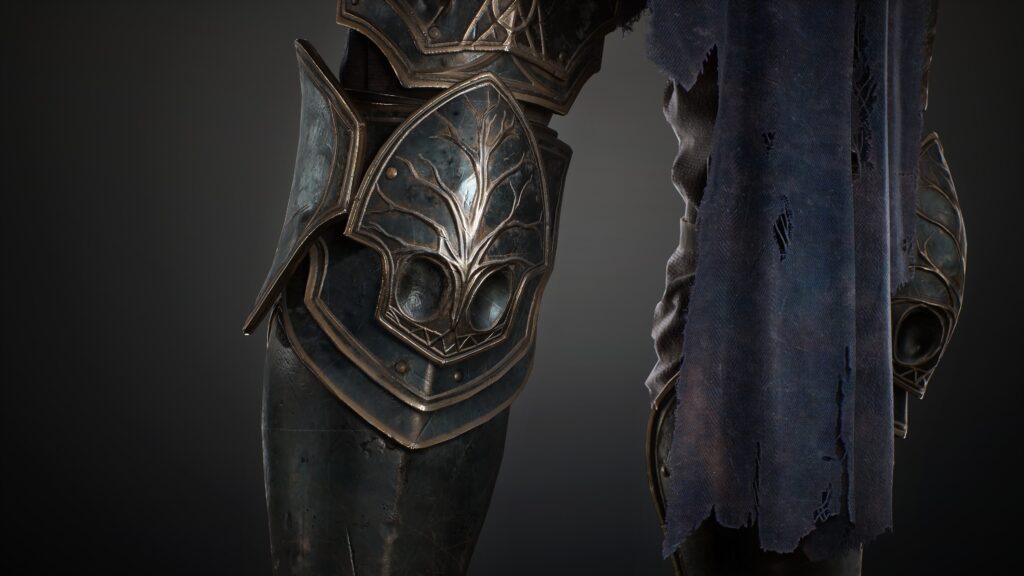
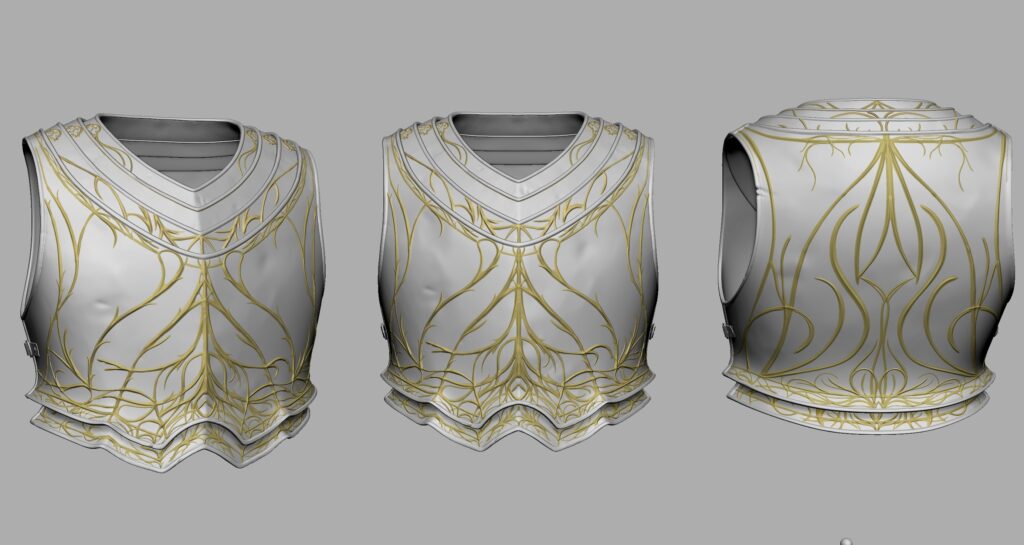
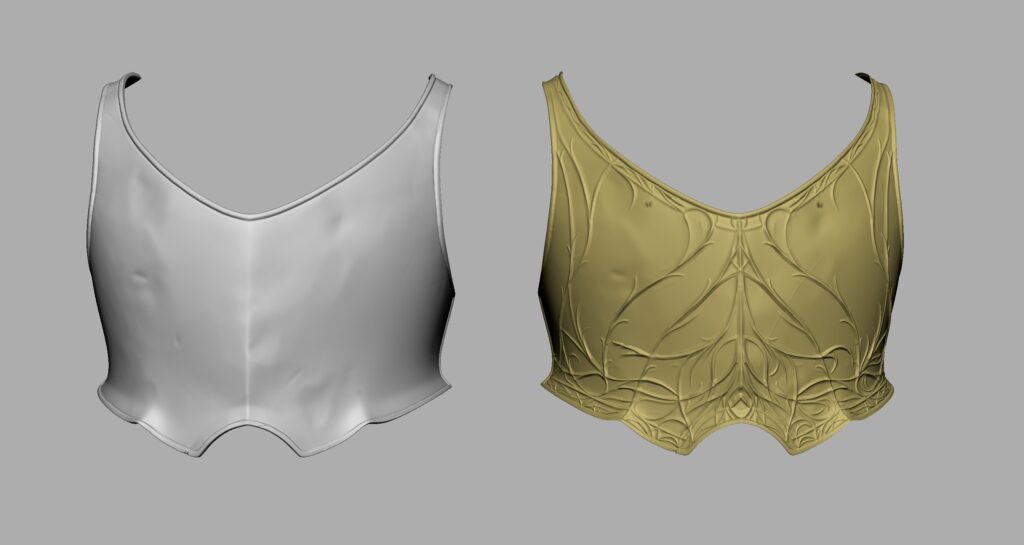
Ornaments
The ornaments were a real challenge for me, but also one of the most enjoyable parts of the process.
To create them, I duplicated the main mesh, changed its color, and applied a slight negative inflate to push it just beneath the surface.
With the duplicate in place, I began sculpting the ornaments by hand using the ‘Dam Standard’ brush along with ‘The_Gio_Soft_Forms’ brush, gradually building up the details until I achieved the look I was aiming for.
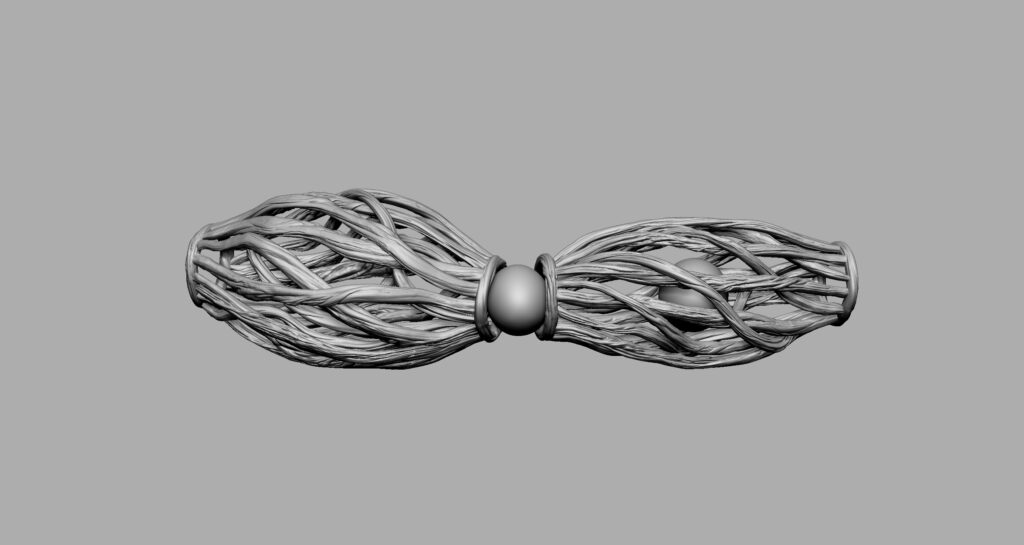
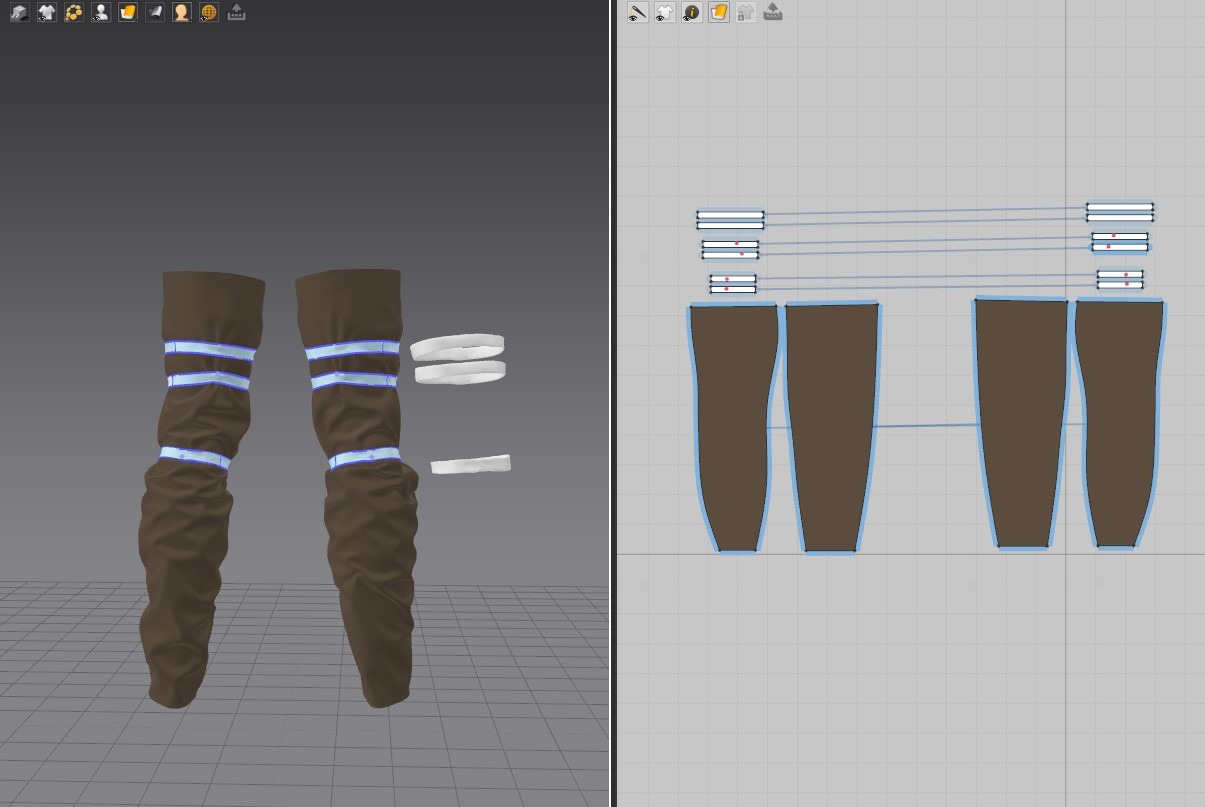
Belt & Clothing
All the clothing was created in Marvelous Designer.
For the cloth hanging from the belt, I used the base shape from the blockout and exported it to Marvelous as an avatar.
Then, I created a couple of fabric strips to simulate rolled-up cloth.
For the belt, I made two different versions, one bigger than the other, made of roots.
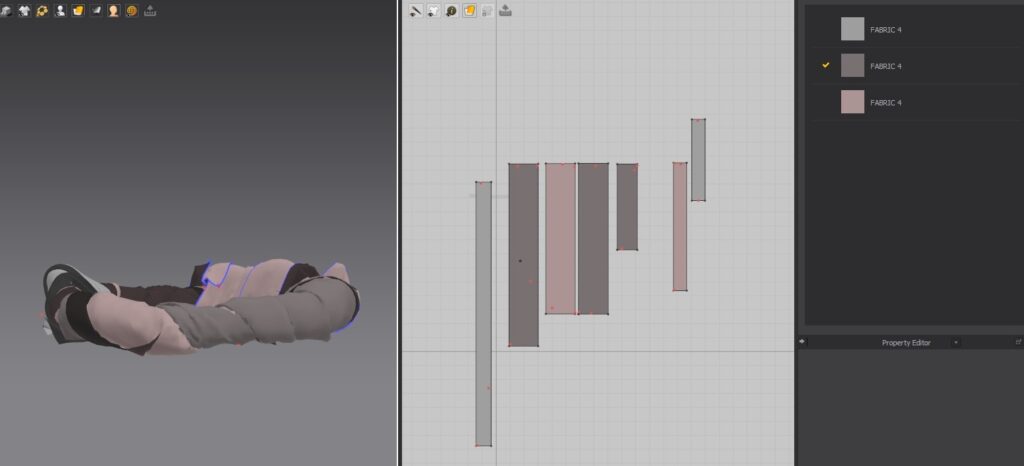
For the pants, I used a basic pattern and then modified it to match the style I was aiming for.
I also simulated a few straps to create the folds the way I wanted.
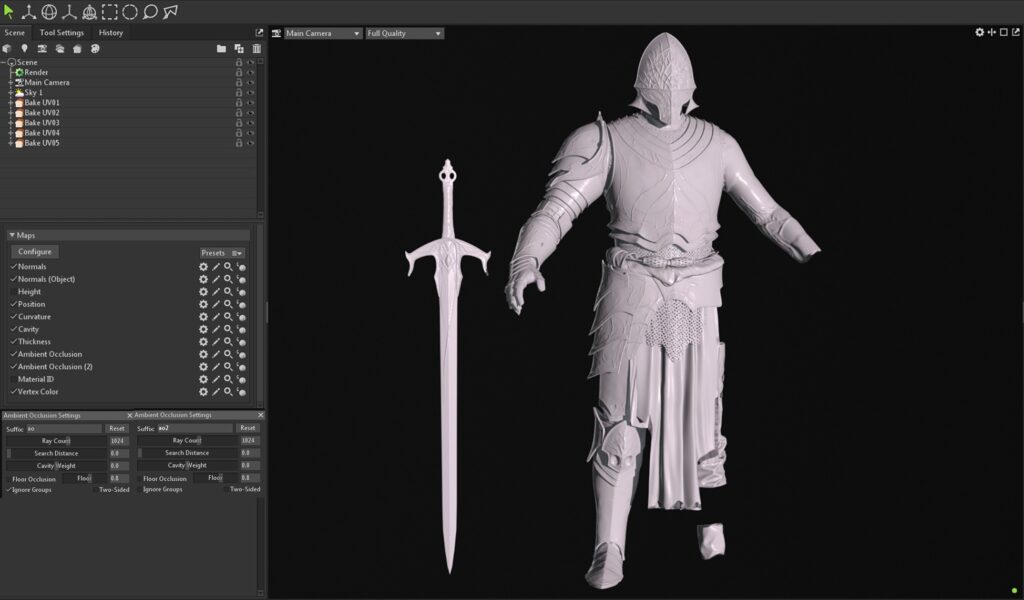
Retopology, UVs & Baking
I retopologized the mesh in TopoGun, focusing on adding polygons in areas where the shape changes significantly, and using triangles only where necessary to preserve the form while keeping the mesh optimized.
I also made sure to align the edges of neighboring meshes to ensure cleaner deformations during animation.
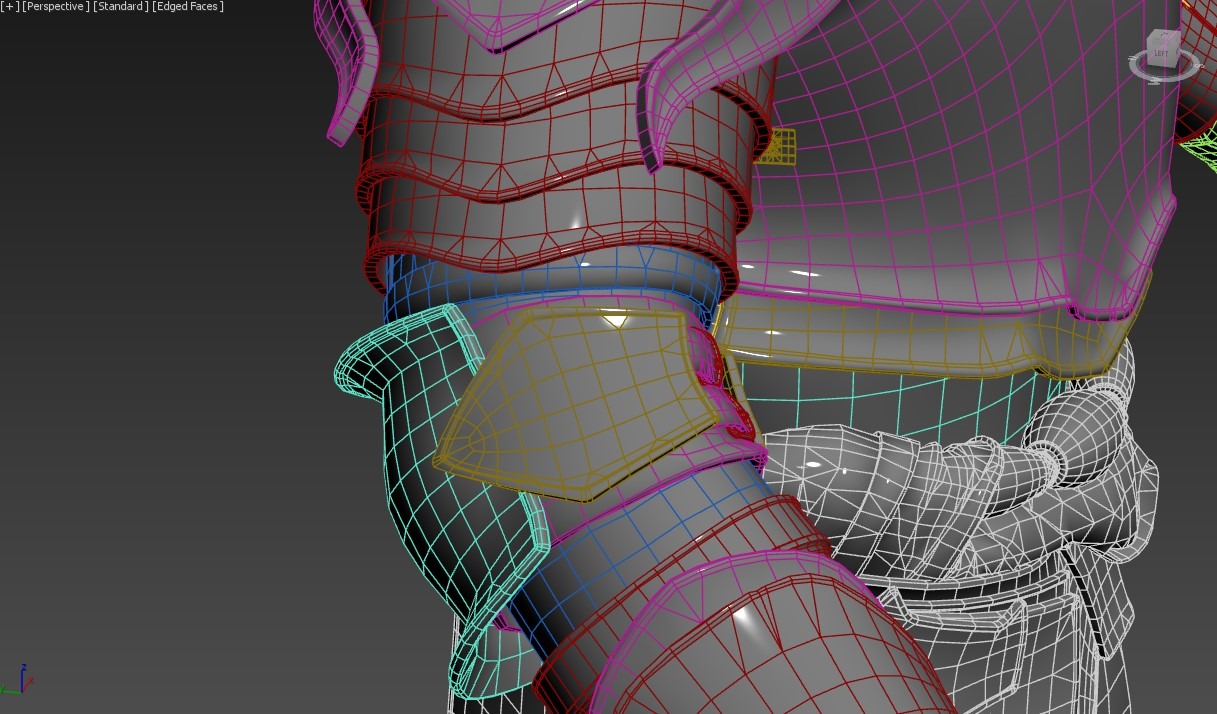
For UVs, I used RizomUV where I kept in mind the 90-degree angles when making the cuts.
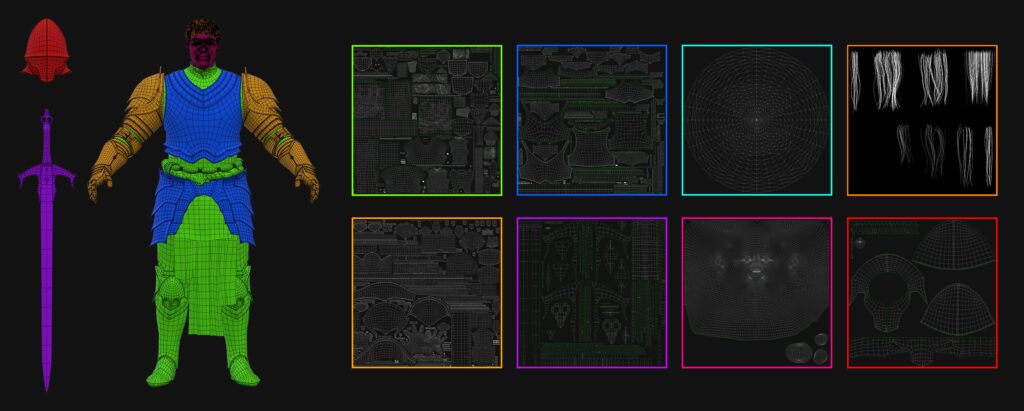

Once everything was complete, I packed the UVs and moved to Marmoset Toolbag to bake each UV set.
I also exported the ‘vertex color map’, which provides different color zones that I use in Substance Painter to create masks more quickly and easily through ‘color selection’.
This map was created by applying different colors to various parts of the model in ZBrush. Additionally, I exported the Ambient Occlusion map twice, once with ‘Ignore Groups’ enabled and once without.
This can be useful later in Substance Painter.

Texturing
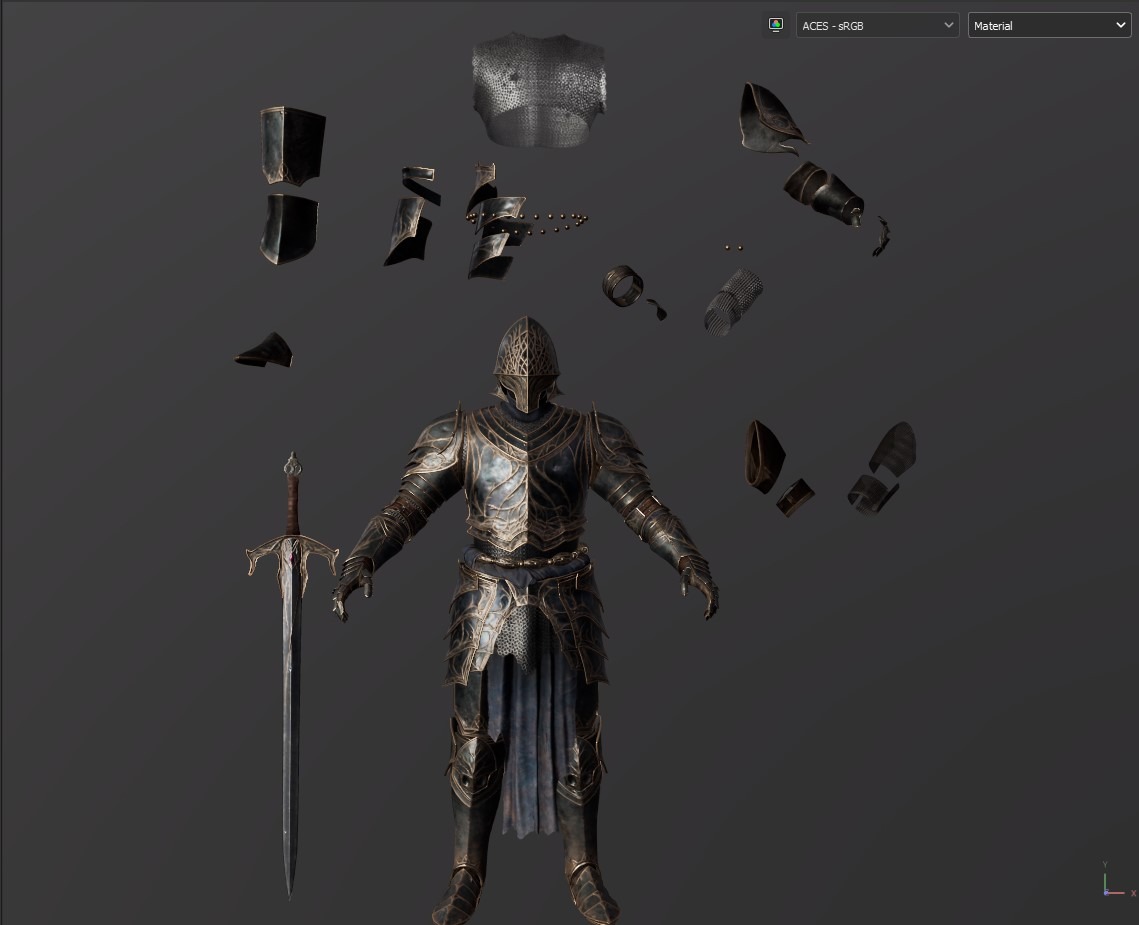
It’s a good idea to duplicate certain parts before importing them, especially those that are hard to reach or texture later on, such as elements hidden beneath others or separate cloth pieces that might complicate the texturing process.
My first step when texturing is to set up the scene with specific settings that help me accurately preview how the materials will look in the engine (UE5 in this case).
Here are the settings I typically use in Substance Painter:
-
I use ACES in Substance Painter.
-
Tomoco Studio is the environment.
-
Specular Quality: Very high (it helps to see better how the roughness interacts with the light).
-
I create a grayscale L8 channel called Fuzz for the cloth, which helps to create a mask for it.

I began by fixing some ambient occlusion issues, then applied some basic materials as a base.
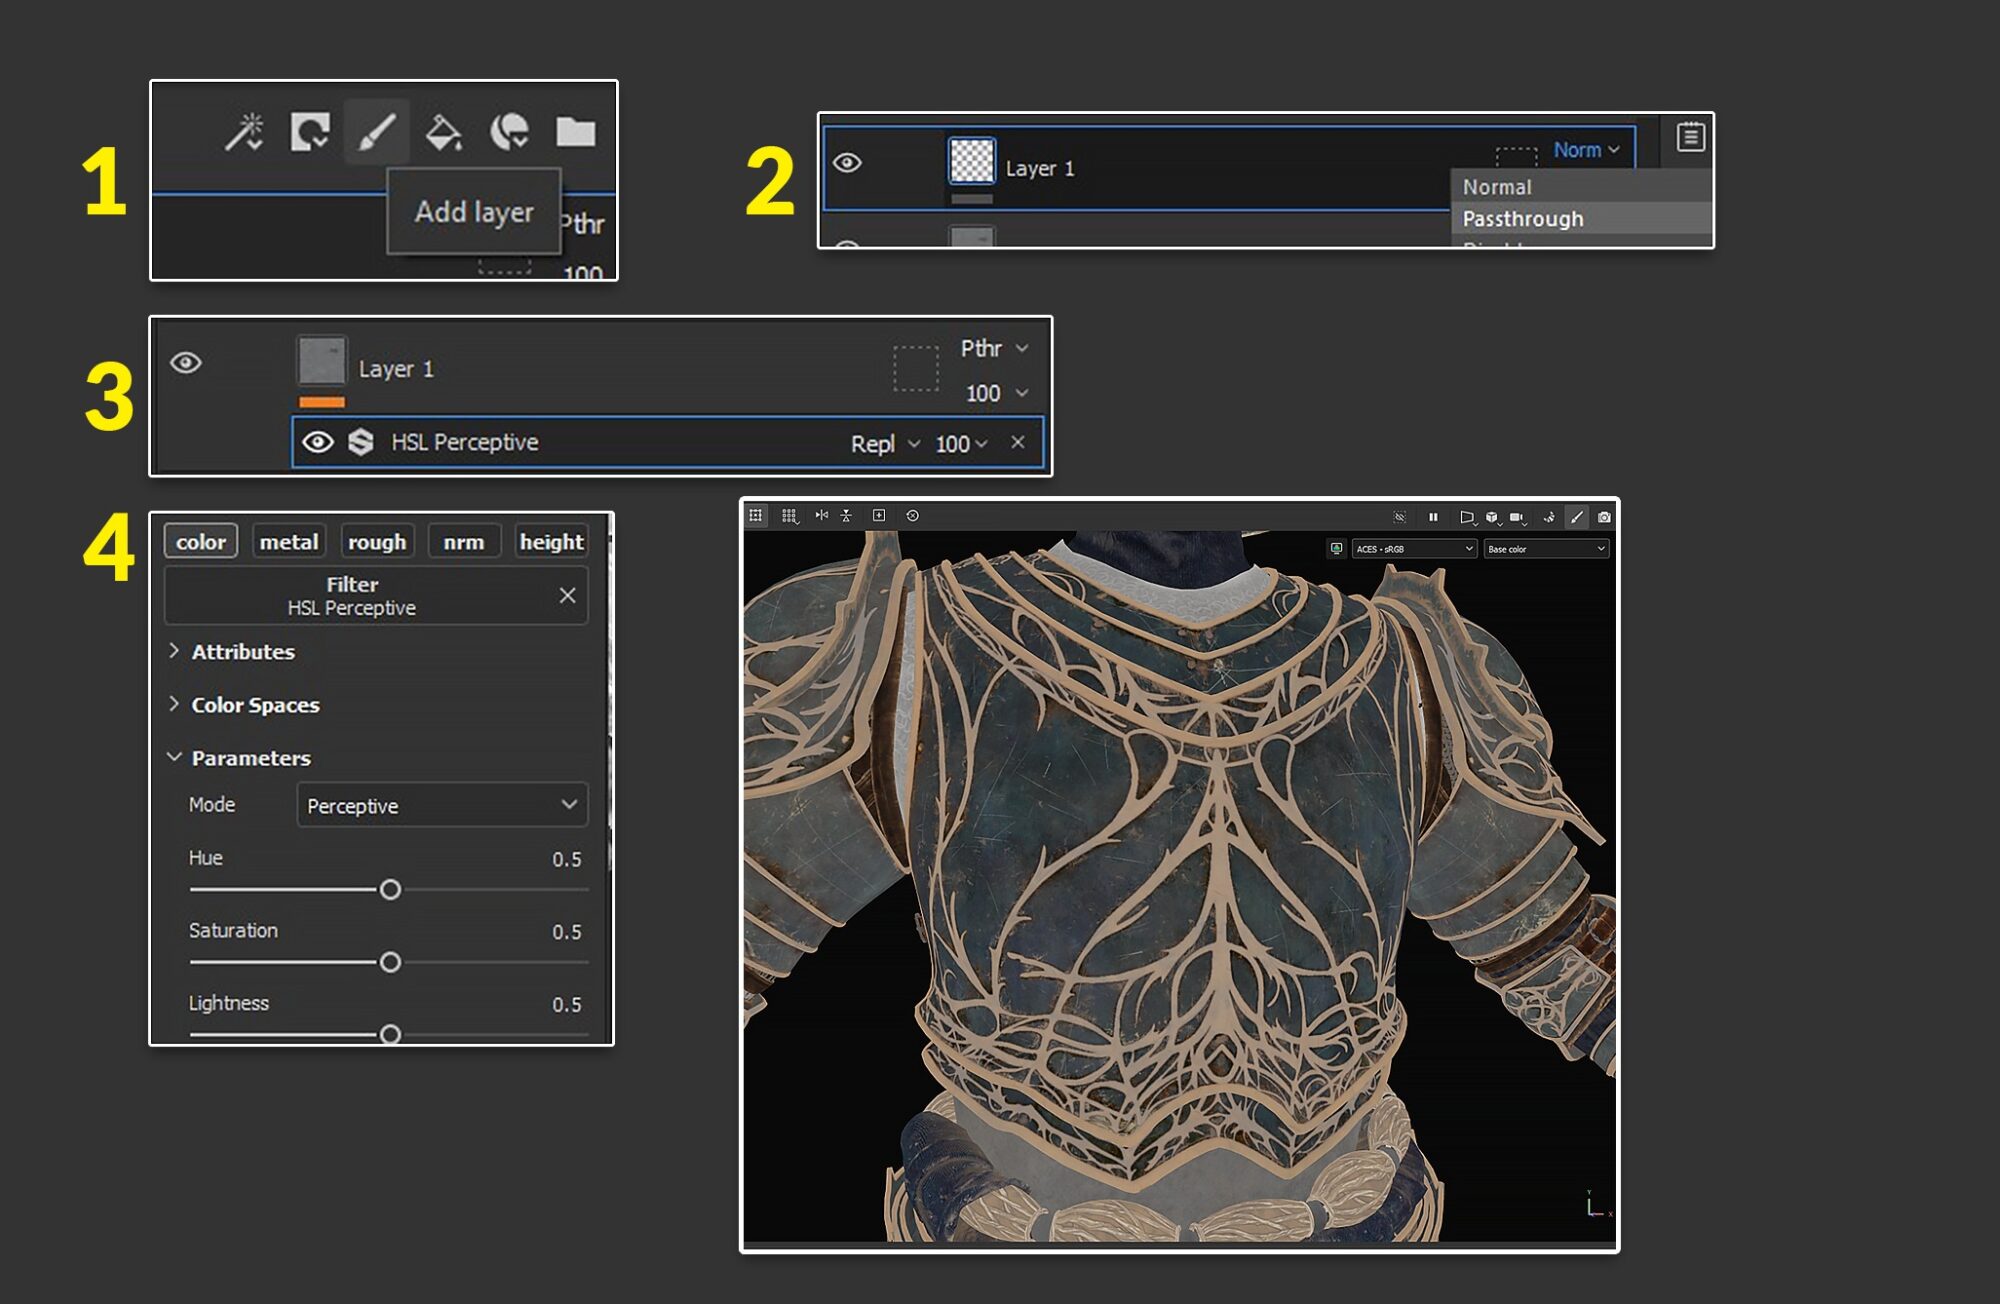
For the metal, I first created a base metal material and then made several variations in color and roughness. During the process, I used HSL with passthrough to adjust the color at each moment.
How to use HSL
-
Create a normal layer
-
Put it as passthrough
-
Add HSL as a filter
Important: if you want the HSL adjustment to affect layers inside a folder, make sure to set the folder’s blending mode to ‘Passthrough’ as well.
I also added subtle signs of wear, scratches, and dirt in places where they should be in real life. Additionally, I created opacity masks for certain elements, like the helmet.
All textures were exported as TGA and optimized for UE5.
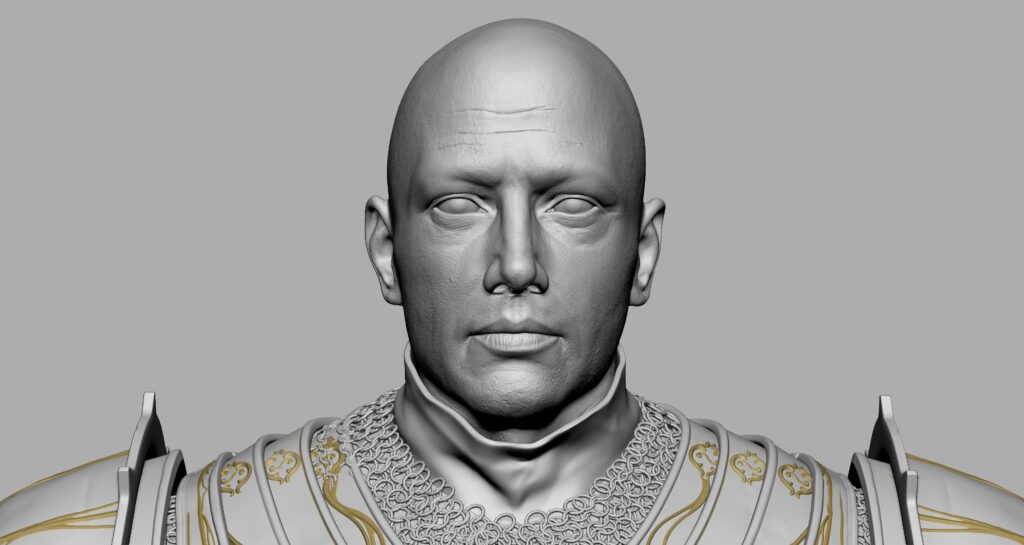
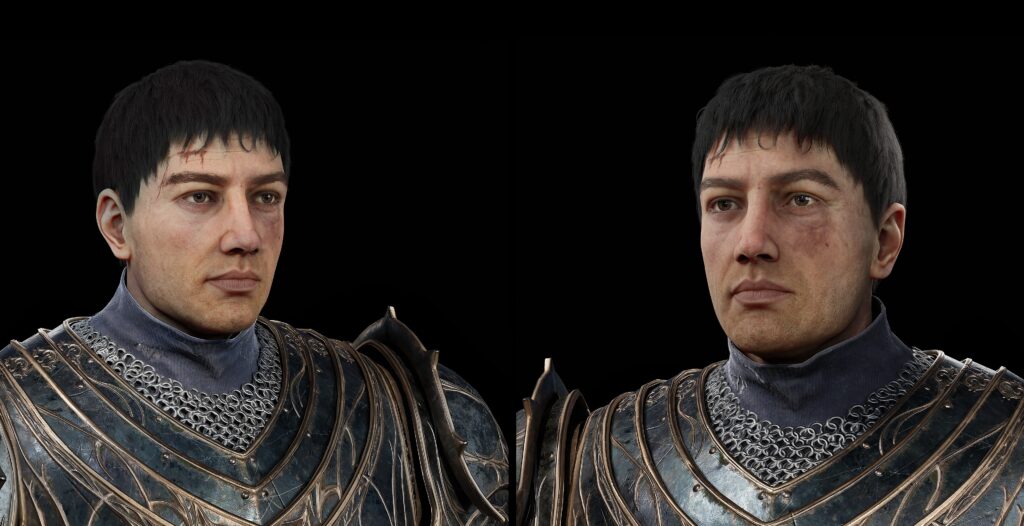
Head & Hair
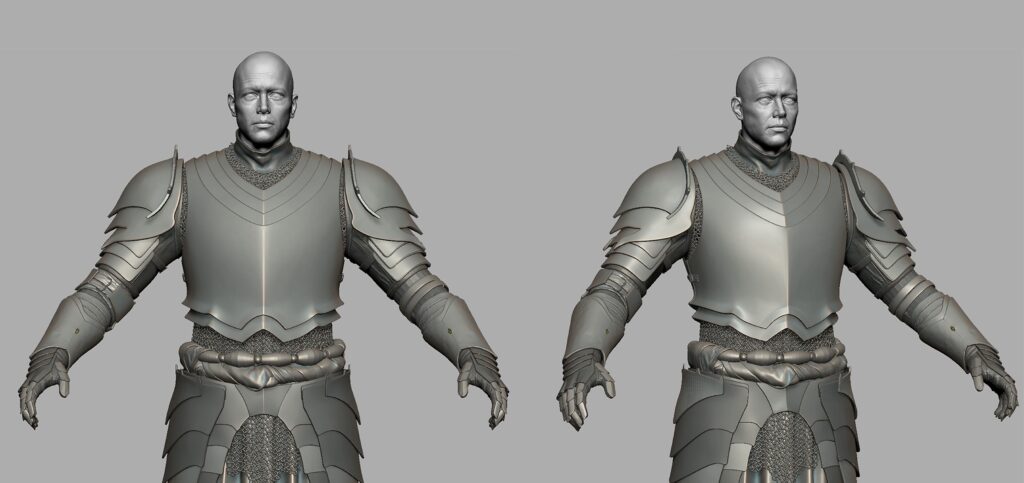
Creating a head wasn’t originally part of the plan, but I decided to include one to practice anatomy and real-time hair.
In this case, I didn’t follow a specific concept; I used an actor’s face as a loose reference to guide the overall structure and capture some realistic facial features.
The goal wasn’t likeness, but rather to make the character feel believable and human.

Since he’s a knight, I thought about making his hair like Gladiator’s, with a Caesar haircut style.
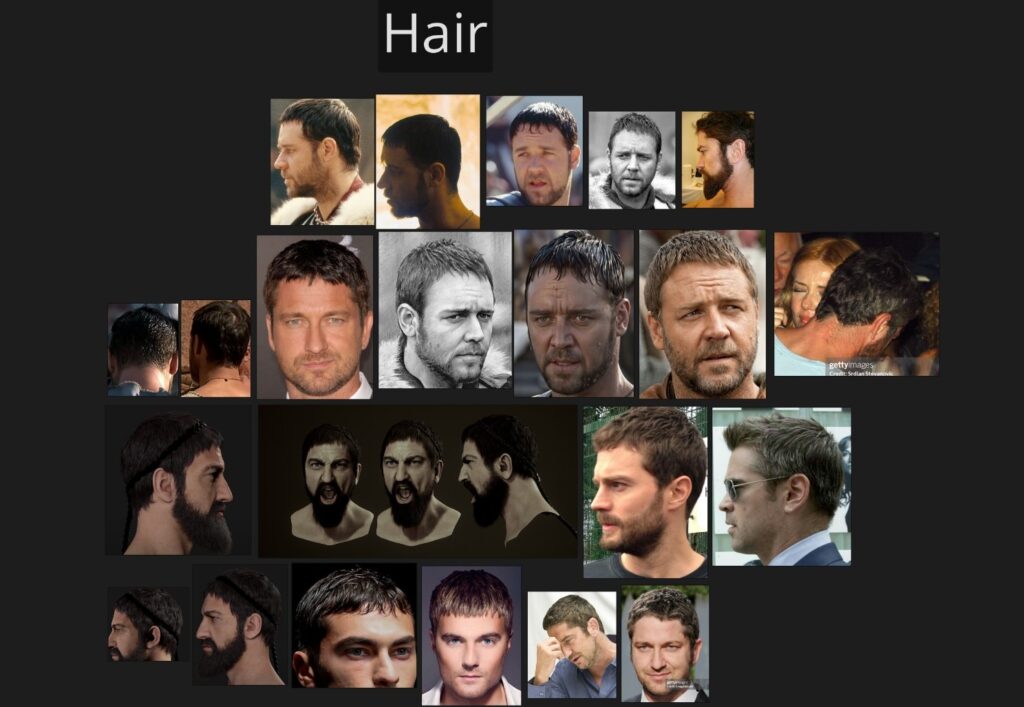
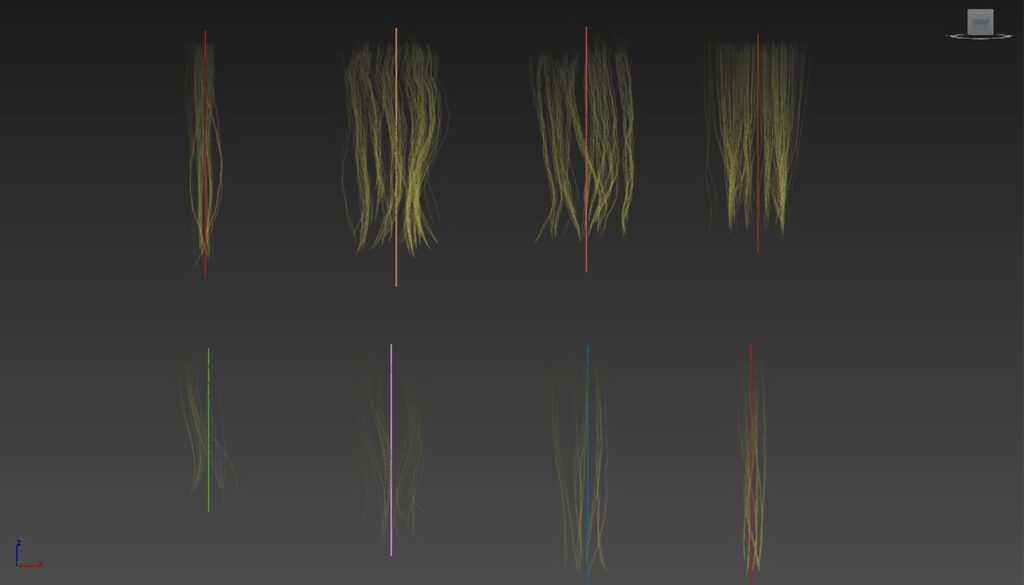
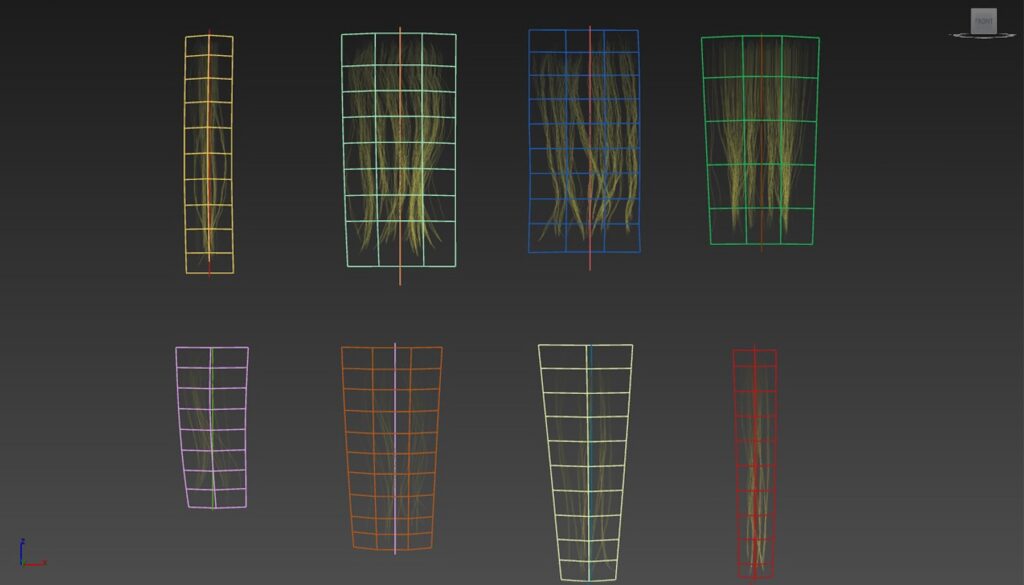
I usually create hair with Ornatrix in 3ds Max to generate the maps, but I wanted to try FiberShop.
It’s a powerful program that allows me to go back at any time and adjust the thickness, color, and other parameters quickly and easily. I followed their tutorial series.
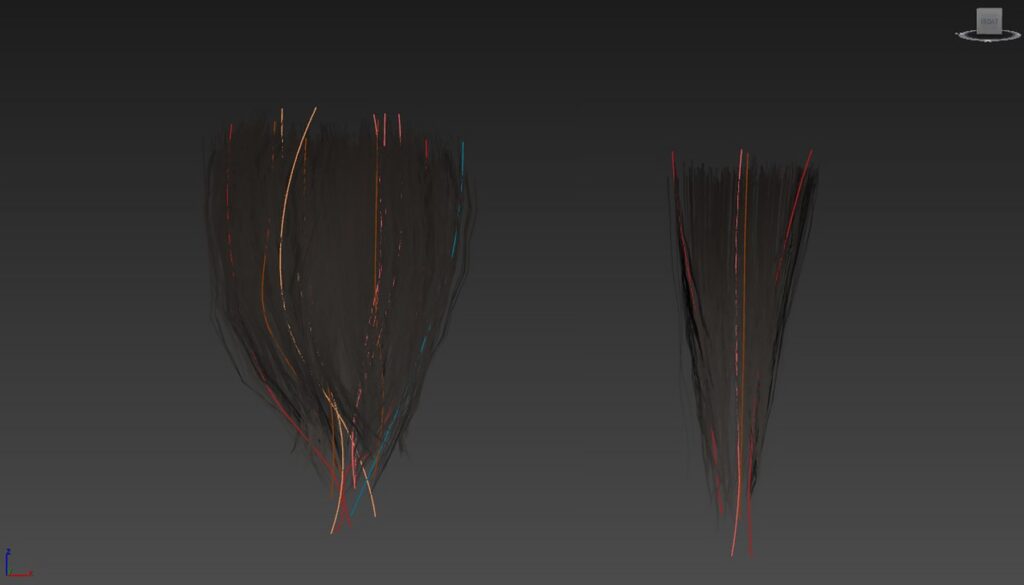
Once the hair maps were ready, I moved to 3ds Max for placement.
In this case, I created a few hair clumps and attached them to splines with a small number of smooth vertices, allowing me to easily control the flow and positioning of the hair.
Posed
Posing is a challenging step because you need to give your character personality while being careful to avoid deformation issues when moving certain parts.
There are two methods you can use to pose your character: either using control spheres or the TPoseMesh method with masking and movement.
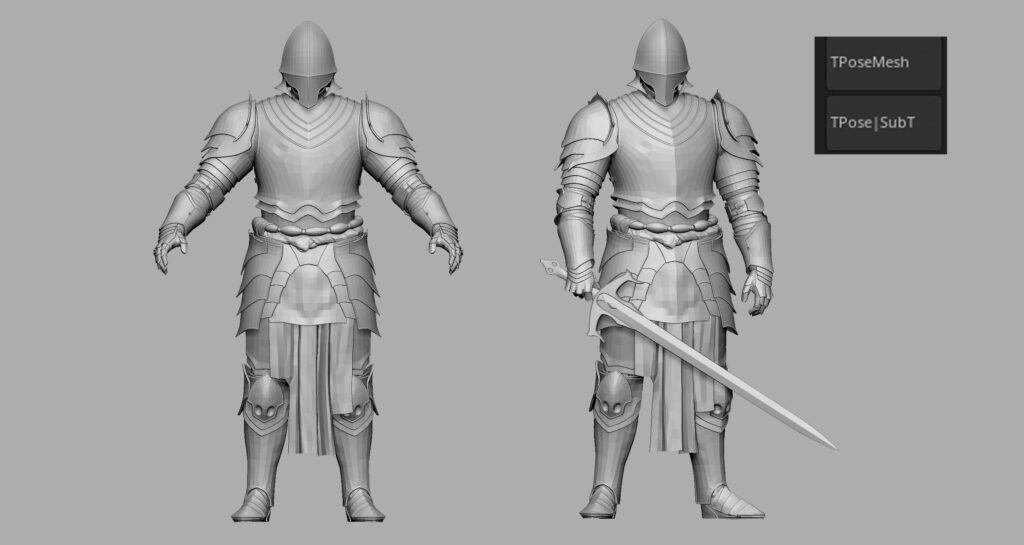
In my case, I used TPoseMesh and carefully masked and moved the character to match the pose from the concept.
Once I was satisfied with the adjustments, I used TPose|SubT to transfer the changes back to the original mesh with all the subdivisions intact.
Note: while working with TPoseMesh, you can freely modify the polygroups without any issues.
They won’t overwrite the original ones when you use TPose|SubT to go back to the original mesh.
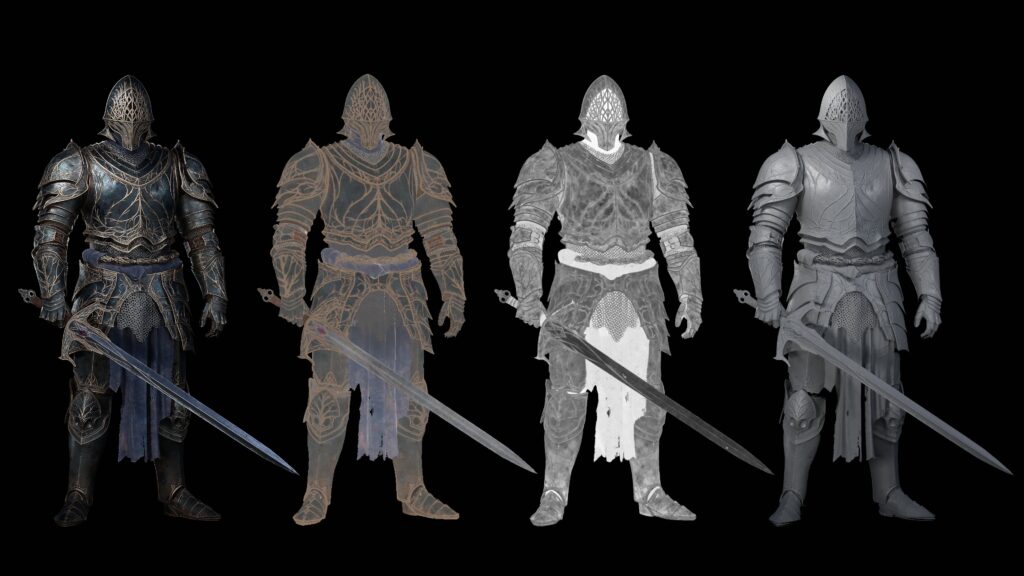
Rendering
I focused on establishing a dark and moody tone to match the concept.
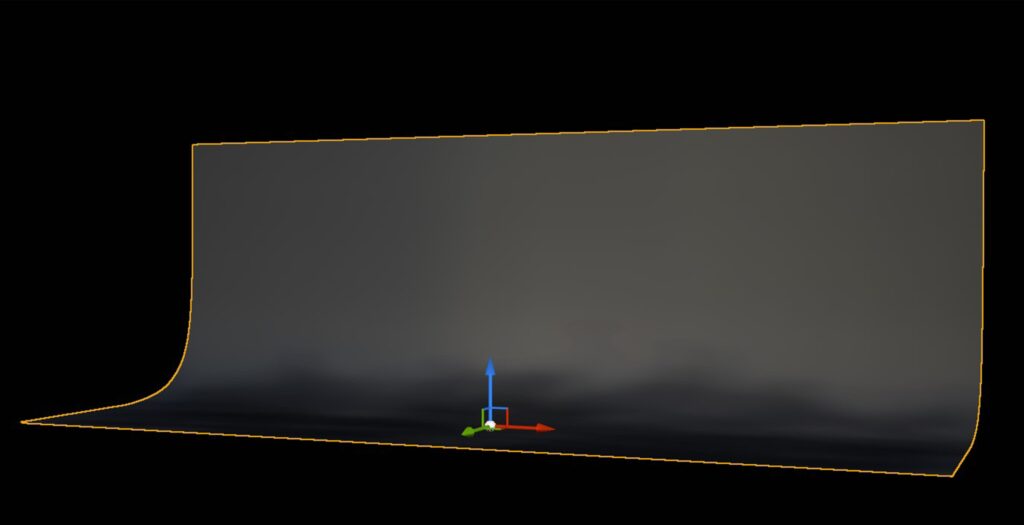
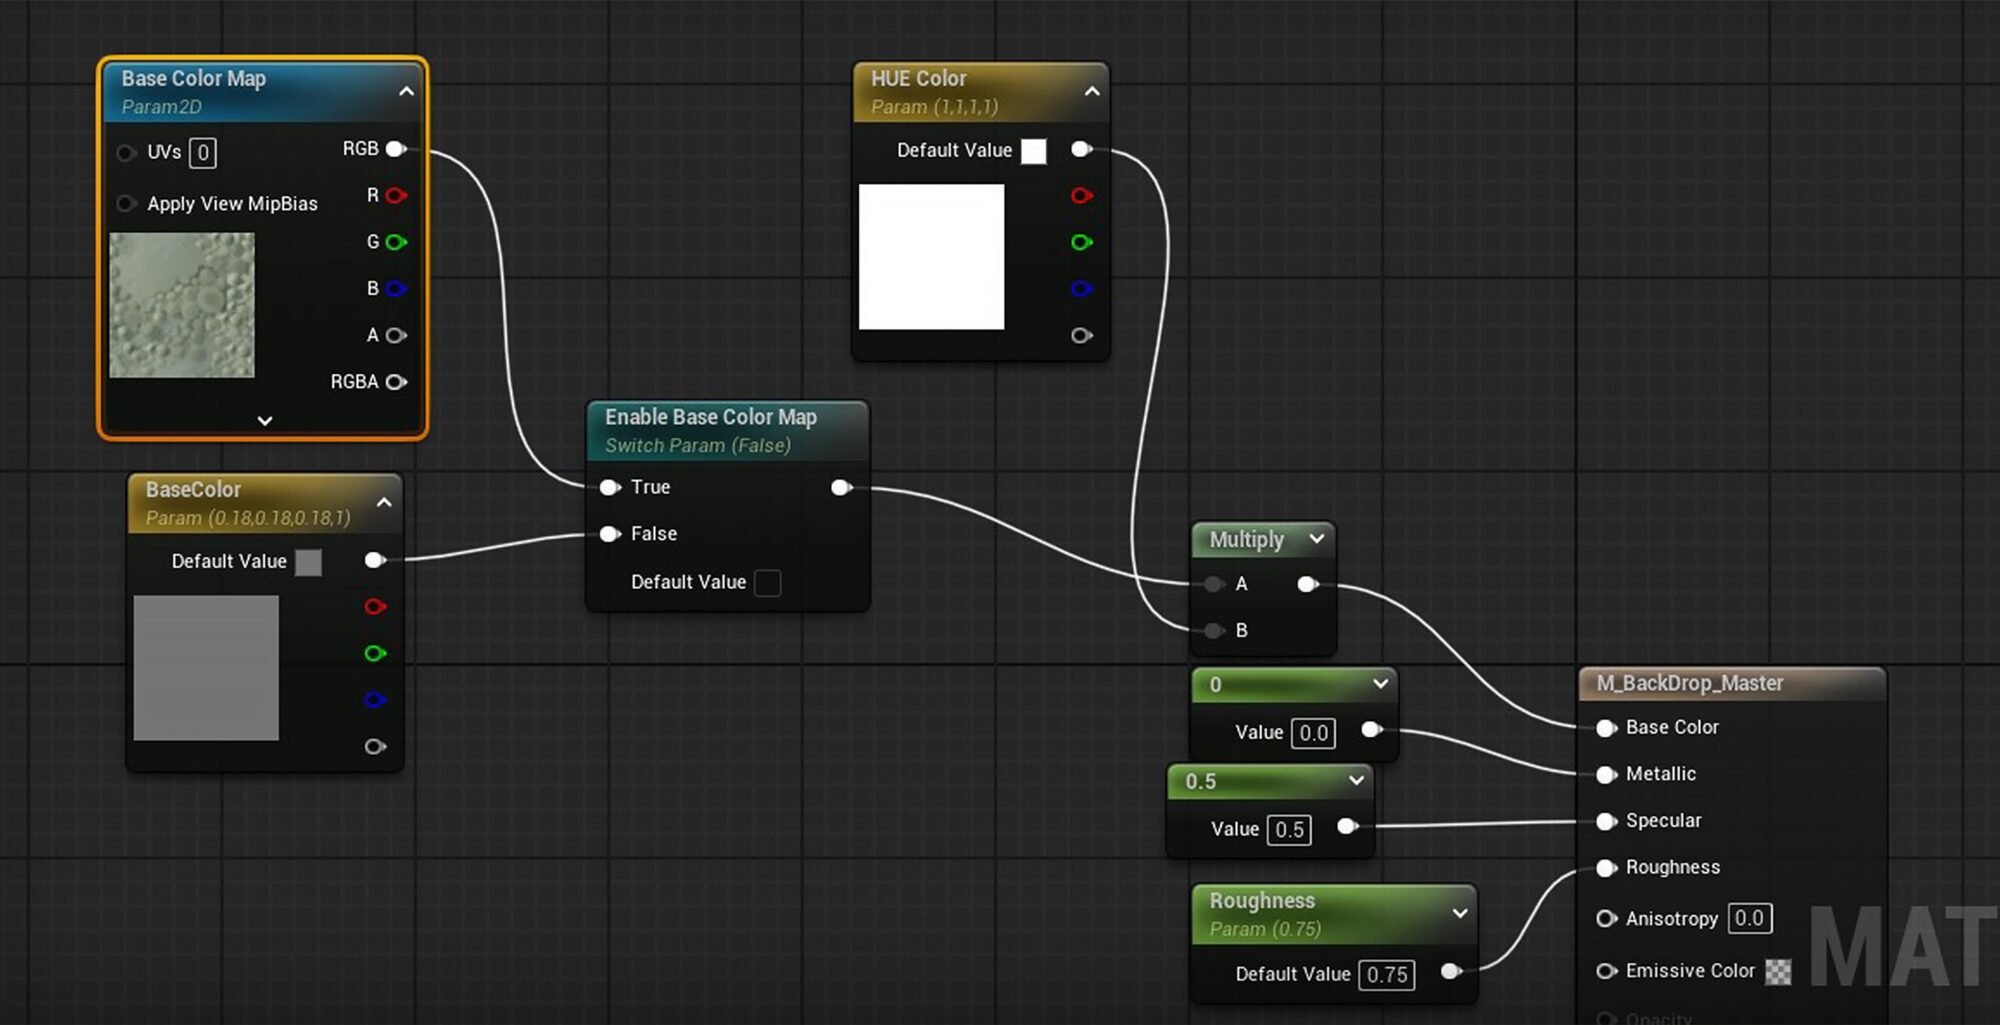
For the background, I used a simple backdrop mesh and created a basic material with a texture sample: Base Color, Roughness, and Specular channels.
The base color texture was hand-painted in Substance Painter to closely replicate the look and feel of the concept artwork.
I used an HDRI, which is essential for achieving more realistic metal surfaces. I tested several until I found the one that fit best.
The lighting setup combined a basic three-light system (key, fill, and rim lights) with additional detailed lighting to enhance some areas.
Conclusion
This project has been a challenge for me, as it was my first time doing something like this. Despite the hard work, I’ve learned a lot during this process and it has been totally worth all the effort.
Never rush any work and take your time to do things as well as possible. Taking a couple of days to rest helps you spot errors that are often missed when you’re too focused.
Thanks for reading this far, and huge thanks to Games Artist for giving me the opportunity to share my work with all of you.
Feel free to reach out on my socials.
ArtStation: https://www.artstation.com/jesusolivares
LinkedIn: https://www.linkedin.com/in/jesusolivares3d/
Read more articles
You might also like these articles.