Octopus Gas Station


Introduction
Hi everyone, I am Ben Keeling, based in the UK. Currently, I'm working at Respawn as a Principal Environment Artist.
Project
I will break down my abandoned gas station project today, a personal project I created in 2024. It was a project I was working on in my spare time alongside other projects, and I finally managed to finish it this year.
I hope this breakdown can be inspiring and helpful to others.


Goals
My main goal with this project was to find a style for my art. I wanted to combine my love of robots and sci-fi and improve my rendering and compositional skills. At the same time, creating an interesting piece of storytelling.
Initially, I wanted to improve my skills in tricky environmental topics such as vegetation and work on a tutorial series for the project.
This project was an ongoing venture, and during the same period, I worked on several other projects featuring robots.
Tools
- 3ds Max & Blender for 3d modelling .
- Zbrush for sculpting.
- Substance Painter for texturing.
- Substance Designer for tiling materials.
- Gaea for terrain creation.
- Unreal engine for the finished environment.
- Photoshop for image compositing.
References & Inspiration
My original inspiration for the project was a concept art piece by Alexandra Roslik.
I loved the mood of this piece, especially the stormy sky and suggestive brush strokes of vegetation blowing in the wind.

I took other inspirations from my favourite artists, such as Simon Stalinhag, and TV shows like Love, Death & Robots, and Stranger Things. Ed Freeman, a photographer, was also a great help.
These inspirations really drove the mood of my peace and helped me pick my compositions.
For the stylization of my scene, I didn’t want it to be completely photo-real.
My work has always leaned more into exaggerated realism as an overall style. I avoid too much visual noise in my texturing and add interesting silhouette breakups in my models.
I am also a big fan of the handcrafted feel in video games, and I try to get that across by sculpting and putting love into my art.
Whenever I get feedback that my work looks close to the feel of a looser piece of concept art, I am on the right track.

Blockout
I didn’t know what work I would create when I started this project.
The project didn’t begin life as a gas station. I initially tried different ideas for a scene featuring a story and a robot.

This came about because in 2017, I was looking at my portfolio, and I wasn’t particularly happy with a lot of the work. I had some time when I was feeling particularly down about my work.
I took a break away, discussed with family and friends, and got some advice from my partner: to try and draw inspiration from other artists that I loved to figure out where to go next.
By studying artists I admired, I could break down what I enjoyed about their work.
I wanted to find a particular niche that I could focus on and serve as the basis for what my work would be known for.
This led me to focus on the following topics.
- Improving my rendering (looking at offline rendering at the time, e.g. Vray, corona, etc.)
- Improve and work on my storytelling
- Improving my composition
- The theme of Robots in my work
I also tried other compositions; I didn’t want to just settle on my first idea as I wanted my project to succeed.

At one point, I even went down a completely different route, creating an Asian street scene.
These blockouts were a lot of fun to make, and it’s a great idea when you’re not sure about an idea to be super loose with your blockouts and not spend a long time committing to different ideas.


I found Alexandra’s concept at this stage, and the abandoned gas station idea was born. This concept appealed to me because it had all the elements I was trying to hit.
It had a lot of good opportunities for interesting compositions.
I could create superb rendering with weather and mood, and a robot exploring the scene would be a great way to hit my theme.

I even took some of my previous blockouts inspirations to this scene with the giant octopus on the gas station roof.
Initially, I found this large sign in a reference piece while working on my Asian street scene.
But I loved that aesthetic and wanted to tie that into the gas station.
Foliage
Next, I focused on studying and improving my skills, especially with foliage and vegetation.
Foliage is quite a difficult skill for an environment artist, and I wanted to be more comfortable making plants.
I took some time to work on the grass, bushes and trees for the scene, and at the same time, creating all the foliage from scratch was a good way to study the skill and improve my creation skills.


Between this and finishing the gas station, I also created several other personal projects that featured foliage, and every single time I approached them, it made that journey a lot more straightforward.
I also wrote some articles for the foliage creation at the time, so I will link them here to show that process.

Exterior
At this stage, the scene had mainly been completed foliage-wise, as I had taken a break to work on the plants for the scene and improve my skills.
I also learned to use Blender.
Taking that break for learning and improvement meant I had some time to check back in on the structure of the gas station.

This is where I reworked the shapes of the gas station and settled on the final models that make up the exterior walls.

I also tried to figure out how the octopus would interact with the forecourt.
I tried some different designs with the octopus tentacles, creating the structural supports of the gas station and even wrapping around the columns and pillars.

Ultimately, I kept it simple and left the octopus atop the forecourt section.
I also took some inspiration from a gas station in Slovakia, which tied together the organic shapes but kept the forecourt made from a circular design.

The exterior pieces were primarily modelled in Blender as unique one-off meshes.
I used tileable textures to create the base material for the walls and added dirt decals in a 2nd UV channel to create grime and wear on the walls themselves.
In the shader, I added a grunge texture overlaid in base colour and roughness to add more variety to my tileable texture.

I added trim sheets to separate the textures in certain sections where the other materials would transition.
There were also modular elements such as window frames and trims; These were either placed in Unreal or combined with wall sections on a spline inside Blender.

The floor sections were created in much the same way as the walls.
The main difference was that they had a vertex blend instead of a tilable texture.

For example, I created a big mesh for the main focal area, which I divided up. I added the curb stone on a spline inside of Blender combined with the floor. I also added mesh decals that would float just above the surface for things like the road lines.
I then added vertex painting to the mesh inside Unreal. This allowed me to paint soil and dampness and puddles into the floor.
When using Unreal 5 at this stage, there wasn’t the option for vertex painting on per instance meshes. So, I kept the floor as one mesh to allow me to paint the vertices.

As I was using Nanite, I also modelled things like the drains. The downside is that the drains needed holes in the ground to support the drain.
I could have made these cuts inside of Blender, but I decided to create an option in the shader to use the distance fields Lumen uses to mask the shader.
In these areas, I have a blueprint that creates a simple shape, such as a cylinder or cube, and I can use this to mask out the floor where I place the drain.

Octopus
I started by creating a blockout for the octopus using Z spheres in Zbrush. This helps create organic shapes, especially structures like branches.
I decided to split the head of the octopus and its tentacles into two separate pieces.
This allowed me to create the organic shape of the head and then map the tentacles to splines to position them where I wanted on the gas station’s roof.


This also gave me the added benefit of only making one tentacle mesh while being non-destructive and allowing me to move the tentacles slightly if needed.

The octopus was textured using a masked workflow inside Substance Painter. I created different RGBA masks for dirt, grime, wear and tear.
In Unreal, I used a layered shader to combine different textures. As well as a macro normal for the octopus itself.
Interior
For the diner interior, I created the walls in much the same way as I did for the exterior. The majority of the structural sections are made from the external walls.
They are a minimum of 30 centimetres thick to ensure no leaking from Lumen. I also split the walls into chunks of reasonable size, as advised by the docs.

I also created specific materials for the interior, such as the tiles on the floor and the metal panels on the wall.
To create the basis for the diner, this was mostly booth seating and the diner bar area, plus a few props that were unique to the interior, such as stools.


This was how the diner looked at this stage.

Before adding finishing touches to the interior, I made some small-scale, unique props, such as food, cutlery, napkins, drink container plates, etc.


Props
For the props for the scene, you can check out this post here for a more detailed, in-depth breakdown.

For my prop process, I also created a tutorial for experience points, available for free and can be watched here.
My typical process for the props for the scene was to create a high poly mesh.

For hard surface props that don’t require a sculpting pass, I would then unwrap the mesh and texture it using Substance Painter.
I usually wouldn’t do a high to low poly bake, and there wouldn’t be normal maps as I typically relied on Unreal 5’s nanite meshes.
So, I would use the high as the low mesh option to bake my mesh maps for texturing.
The process wouldn’t change much for more organic meshes, except it would feature a sculpting pass; I would typically reduce the polycount to a reasonable amount using processes like decimation.

All the meshes followed a 1024 per meter texel density, typically using one or two textures.
I would use tileable textures and decals or rely on a layered shader for huge assets such as the Octopus or things that exceed the texel density.
You can see more of my workflow with the props in this blog here.
Alien Virus
For the alien virus that impacts the world, I wanted to create something inspired by Stranger Things and other video game inspirations featuring these alien growth types.
I wanted to create a sort of alien red weed virus that was spreading through the world to explain why the gas station was abandoned. It helped with my story for the scene.

To create the virus, I came up with a simple logic:
The virus would grow from a single point of origin similar to the roots of a tree. The starting point would be an alien growth-boiled type-looking asset.
The vines would grow out from the center point and find their way across different areas of the environment, similar to the roots of a tree.
I also liked the idea of having some stringy webbing-type look where the growth would also attach to things in the environment.

As I knew I wanted to create this alien growth and use it almost extensively across the interior and exterior of the scene, I decided to make some tools to speed up the process.
The first was a root-type growing tool to create routes from the center point. This was done by converting the underlying geometry to voxels and then decimating it.
I used the shortest edge path operation in geometry nodes to develop roots, spawn curves, and turn those curves into geometry.
I applied UVs and a material to these to create the roots.
The second tool focused more on webbing, allowing you to colour-pick objects to grow from; by distributing points on the faces of the objects, I can attach splines between them and turn them into geometry with UVs and materials applied.
Then, to finalize the visual, I finished the assets and created a modular collection of spline-type props.
The material was baked into a simple cylinder for use in the tool and converted to meshes inside Unreal. I used a separate spline mesh blueprint to place the alien splines in the game.
The meshes were sculpted in Zbrush.

Here is how it all came together in the final scene. I used a combination of tools to place the webbing and alien roots and manually put the boils and splines.
I exported my placement of the building and assets into Blender, ran the geometry nodes tools, and then exported the output back to Unreal.


Materials
For the materials for the scene, I created a mini library using Substance Designer.
Materials generally fall into two categories: simple base materials or more complex 1-off materials. I will typically create simple base materials with good tiling and well-balanced PBR values in various base channels.

For the more unique one-off materials, such as the soil textures for the scene, creating a simple base and a damaged or more complex version of the material works well when it comes to vertex blending.
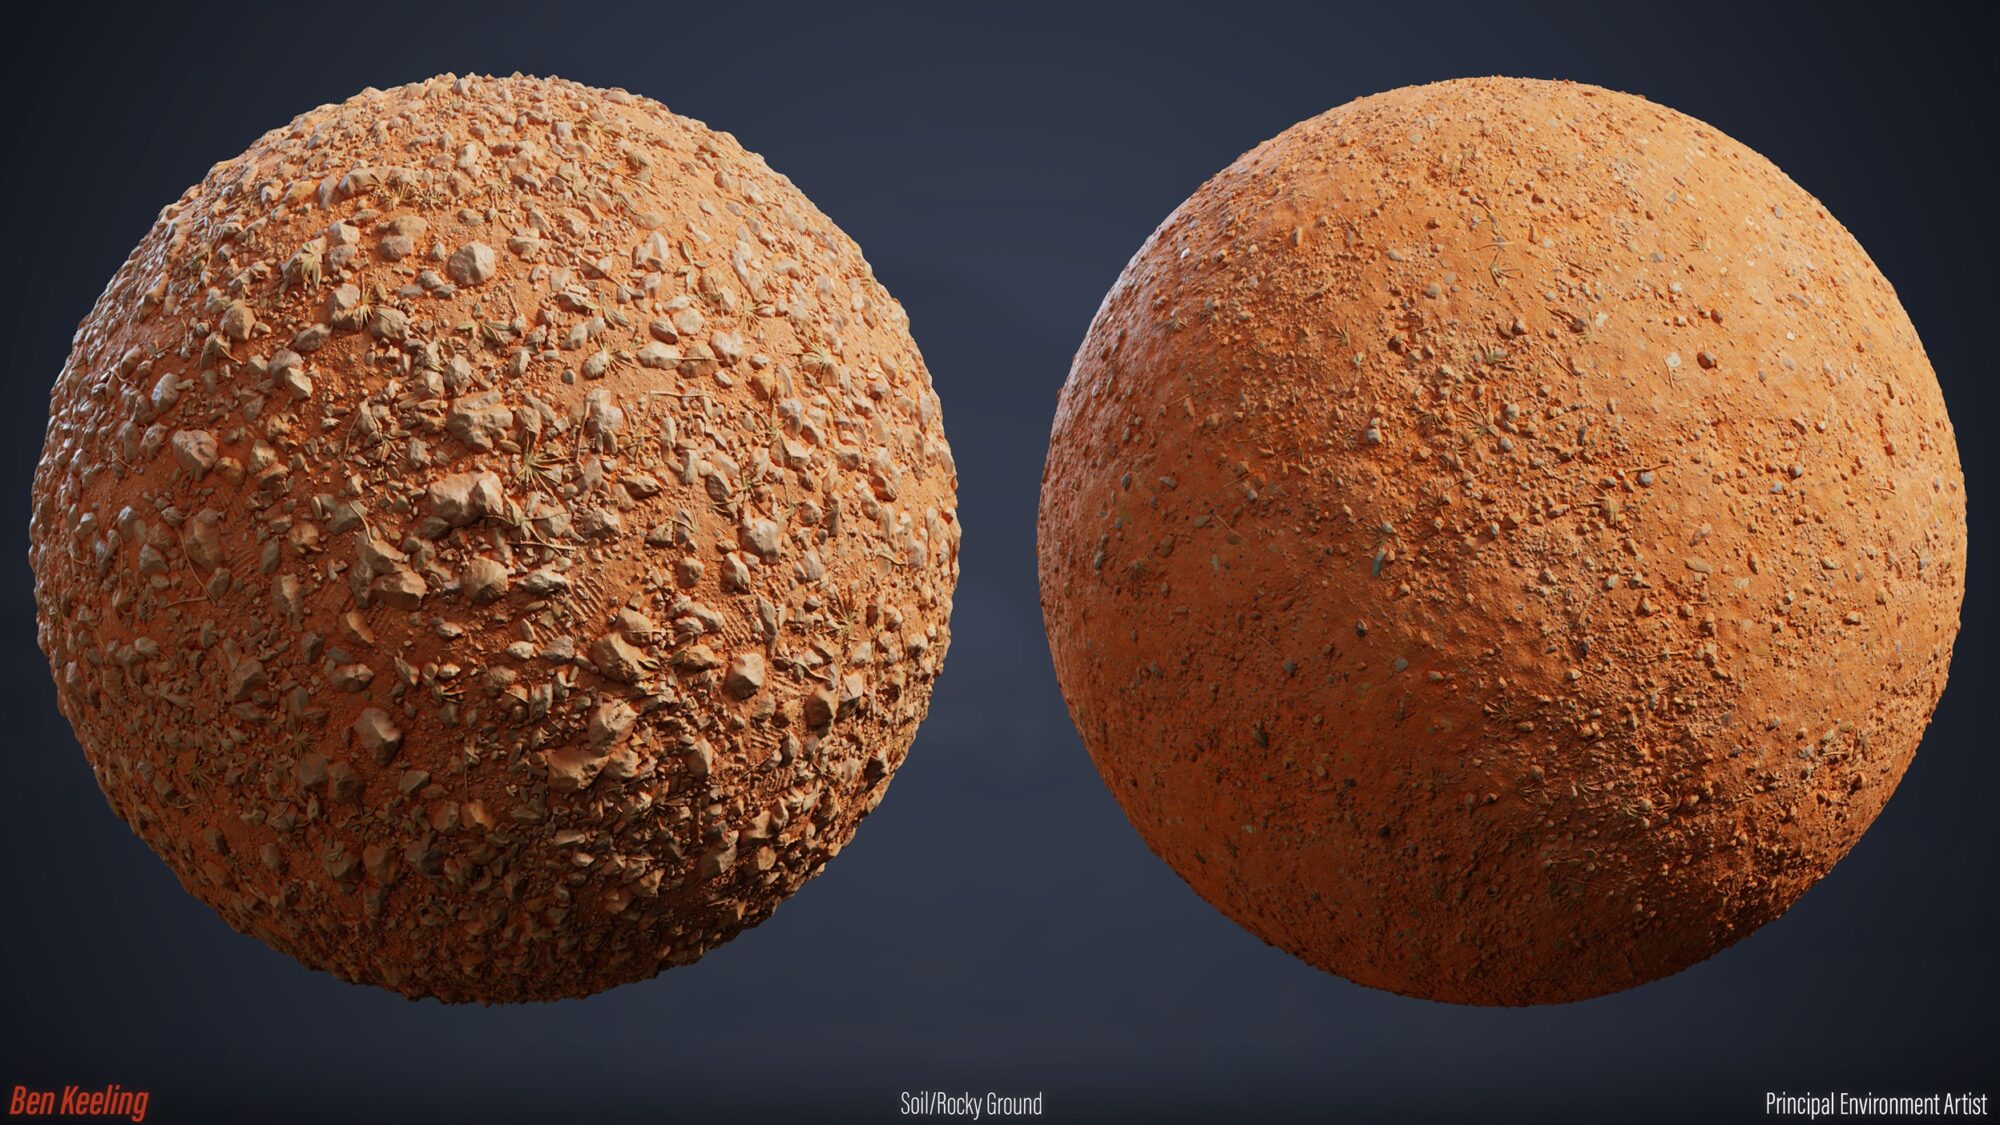
I usually blend the base texture with a more detailed one that doesn’t tile as well.
The more detailed one is used a lot less frequently in the scene. This allows me to get interesting information without worrying too much about tiling.
Something I typically do a lot for tileable textures is blend decals and grunge maps as well.
Decals can be used to get that unique detail that is harder to achieve on larger assets, and the grunge maps can be tiled at a different rate than the base tileable to add even more variety.
Lighting
So, the lighting and rendering in the scene are done using a plugin called Ultra Dynamic Sky.
This is a plugin you can find on the Epic marketplace, and I recommend it if you’re trying to use it at different times of day or in various moods.
For my scene specifically, I wanted to do four different times of the day because that would look nice as far as a presentation is concerned.
One of the reasons for doing this is because I could create the original mood, the stormy dark sky, from the concept, but I could also show my scene in a different lighting setup.
This would also allow me to show my materials and texturing skills and make all the textures PBR-friendly. As all textures are balanced correctly, I can relight the scene in any style without encountering incorrect things.
A lot of work was put into balancing the textures and the materials to ensure they look good across all the different times of the day.
For example, I did a pass on making sure the colour red across all the assets had a similar look and brightness. It isn’t always the same red, creating some variation but having a similar tone and value.

Something that the ultra-dynamic sky also does well is the weather, so I was able to create a different atmosphere with rain and stormy effects within the scene as well.

Another plug-in I also used was the easy fog by William Faucher.
This simple blueprint setup allows you to put fog cards in the distance to give even more atmosphere to the scene.

Polish
For polishing, I wrote a separate blog post about all the work I created for the scene here.
As this is mostly just a list of minimal changes and tweaks to the scene, you can read more about it here, and I won’t add that text here.
https://www.artstation.com/blogs/benkeeling/7oYEb/gas-station-props-polish-final-09
Rendering
For rendering and presentation, something I find tricky with Unreal is that its default way of taking screenshots doesn’t provide good-quality images.
You can use the high-resolution screenshot tool, but it has issues with aliasing and never looks quite as good as what you see in the viewport.
Another great video to watch is this one by William Faucher.
He goes over using the movie render queue to create high-resolution screenshots.
It’s worth the energy and effort to ensure you make the best quality renders, especially when you’ve spent a long time working on a project.
The downside of this workflow is you must run an instance of the game, which can sometimes create non-desirable results. I had issues with missing assets, differences in lighting and so on.
I solved most of this by setting assets so they do not spatially load (as I am using world partition) and deleting the other TODs from the scene while I do the render.
I also used the path tracer to render some of my scenes for my other presentations. This considers some of the stuff I mentioned earlier with doing offline renders to create the best quality you can.
I can get high-quality reflections and nice shadows in my asset shots. All of the shots of my assets in this post were rendered using the path tracer.
https://www.artstation.com/artwork/498zA2?notification_id=6769067912

Material Rendering
I rendered those using a combination of Marmoset Toolbag and the movie render queue in the game for my materials.
It was vital for me to show my work in context within the scene and to do nice presentations at the end.


Conclusion
This breakdown shows a lot of the hard work that went into the project and the scene, as well as my focus on improving the following things.
- Rendering
- Storytelling
- Composition
- Theme of Robots
I plan to round this project with an environment art-based tutorial covering more topics.
I am in a much better place with my art over the last few projects I created since my original idea in 2017. It’s nice to recap where I have been as an artist and how I have grown.
I’m looking forward to being able to create more projects in the future based on—my themes and continuing to improve as an artist in the areas that I think are important.
Read more articles
You might also like these articles.


