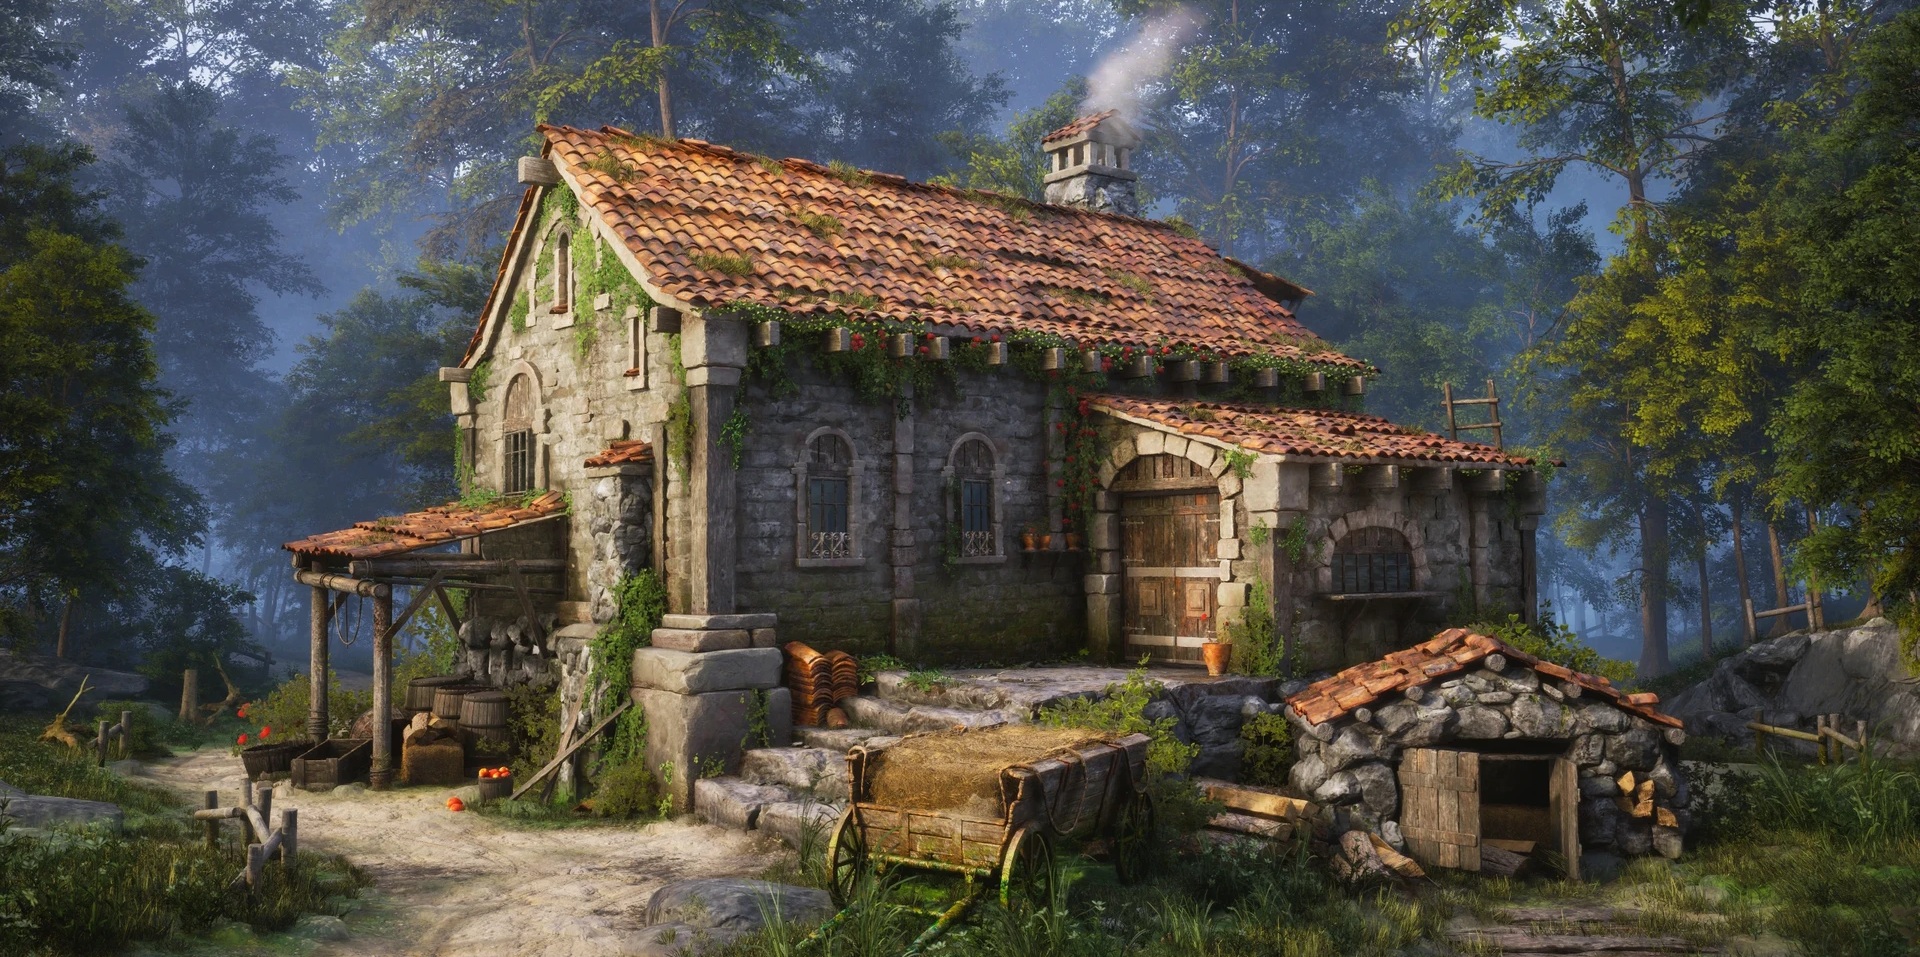
Medieval Forest House

Introduction
Hey! I'm Finn, a 20-year-old, very motivated Technical Environment Artist, currently finishing up my studies at Howest Digital Arts & Entertainment in Belgium.
Because of this, I am currently looking for an end-of-study internship. I am passionate about games and art, mostly the feeling of creating such stunning art that everyone just has to appreciate.
I am still very new to the games industry, having only about 3 years of 3D experience and only recently becoming involved with the industry. I quickly fell in love with 3D art.
Instead of treating my school like a study, it became my passion, my hobby, something I did to enjoy and to improve at, not just to add a line to my CV.
Project
This project was part of a mentorship course at Sierra Division Academy, where I took the Crafting Environments: Career Kickstarter with Alex Beddows.

Goals
My goal was to create a solid, realistic portfolio piece that showcases my texturing, sculpting, modelling, and technical skills.
I really wanted to scope down, work on something small and grounded, so I could really double down on high-quality textures.
I also had to make sure this piece would be a killer piece for my portfolio. I need to showcase all my skills; this piece should (hopefully) help me land an internship/junior position.
This piece was made in an 8-week timeframe: 3 weeks of planning, 4 weeks of production, and 1 week of presentation.
Core Focus Elements
- Procedural tiling materials in SD
- Procedural trim textures in SD
- Material blending with vertex paint and material variation
- Strong modular kit
- RGB masking for extra control with the tilers and vertex paint
- Set dressing and detailing
- Neutral lighting
Software
Blender, ZBrush, Substance 3D Designer/Painter, Unreal Engine 5, Photoshop & PureRef.
This project would enable me to improve at some programs I wanted to get better at, these being Substance Designer and ZBrush.
Now that I had a good idea what my goals were, I looked into pipelines.
What software should I use, what pipelines exist in the industry currently, what could I learn the most from?

After researching some pipelines I found out what I needed to do and know to get started on this project.
I decided I noticed Naughty Dog’s The Last of Us had some very good pipelines in place I could learn a lot from. Specifically, Matthew Trevelyan Johns’s whole ArtStation page is a GOLD MINE.
I went through every single post to analyse and understand why they make certain decisions in specific scenarios.
I think this is very important for other people too; just having a look at his portfolio could teach you a lot already.
References & Inspiration
The main inspiration for this environment came from Junhyuk Yoon’s amazing concept. When I saw this project I instantly knew this was something I wanted to make.
I had been looking for a realistic piece with material variation; this piece was EXACTLY what I wanted it to be.

After I found the concept the first step I did was break it down into references. Finding a reference for each item I could see was important, so I wouldn’t run into issues in production.

Blockout
Now that I’ve answered the most important question, WHY do I want to make this? And that I’ve collected all the reference needed, I am ready to start blocking out.
For the blockout process I’m just going to overlay my reference over my camera in Blender and start blocking out.
I start with very big shapes and slowly increase complexity till I have a correct blockout. I also used fSpy for camera matching.

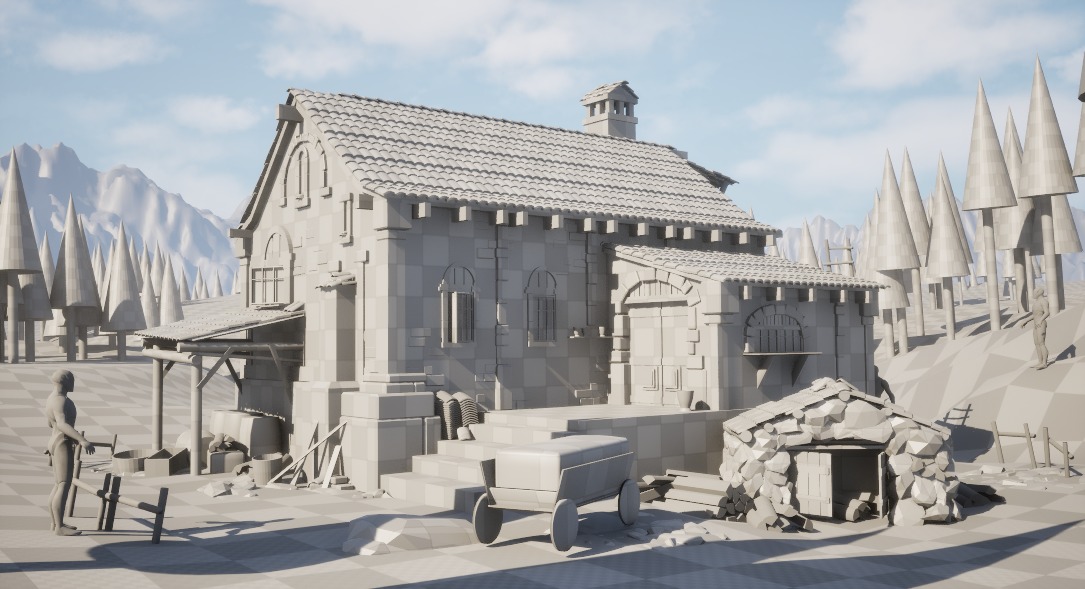
This stage went pretty smoothly.
I recommend using camera matching and keeping looking at your reference a lot. Make sure to also check in-engine for scales and a view with better lighting.
Modularity & Assets
Even in the blockout stage I made sure not to just place random models everywhere.
Since I analysed my concept before I started, I already had an idea about how I was going to break it up.
This ensured I was working with the same modular kit through the whole process, allowing for easy iteration by just a quick re-import.

By doing this I quickly realised I didn’t need many parts. Here’s a small list I made of what I needed to make:
- Wood planks (4)
- Stones (6)
- Bricks (6)
- Staircase stones (2)
- Roof tiles (few modular kits)
- Stone structural elements
- Door
Not that much at all as you can see! Sometimes breaking a project down into manageable parts can really help you visualise what you need and maybe bring down the daunting concept art that is in front of you.
Modularity & Sculpting
With all these blockout assets in place, I could get onto the sculpting. I had to get a better macro read for the environment, making sure it actually starts coming together.
I sculpted in ZBrush. Since I had little to no sculpting experience before this project it was quite a challenge, but I enjoyed it a lot!
I used mostly Trim Adaptive for the main shape read and used some flat brushes to clean up in the end.
I didn’t go into too much micro-detailing as I knew I’d have tiling textures with their normal maps.
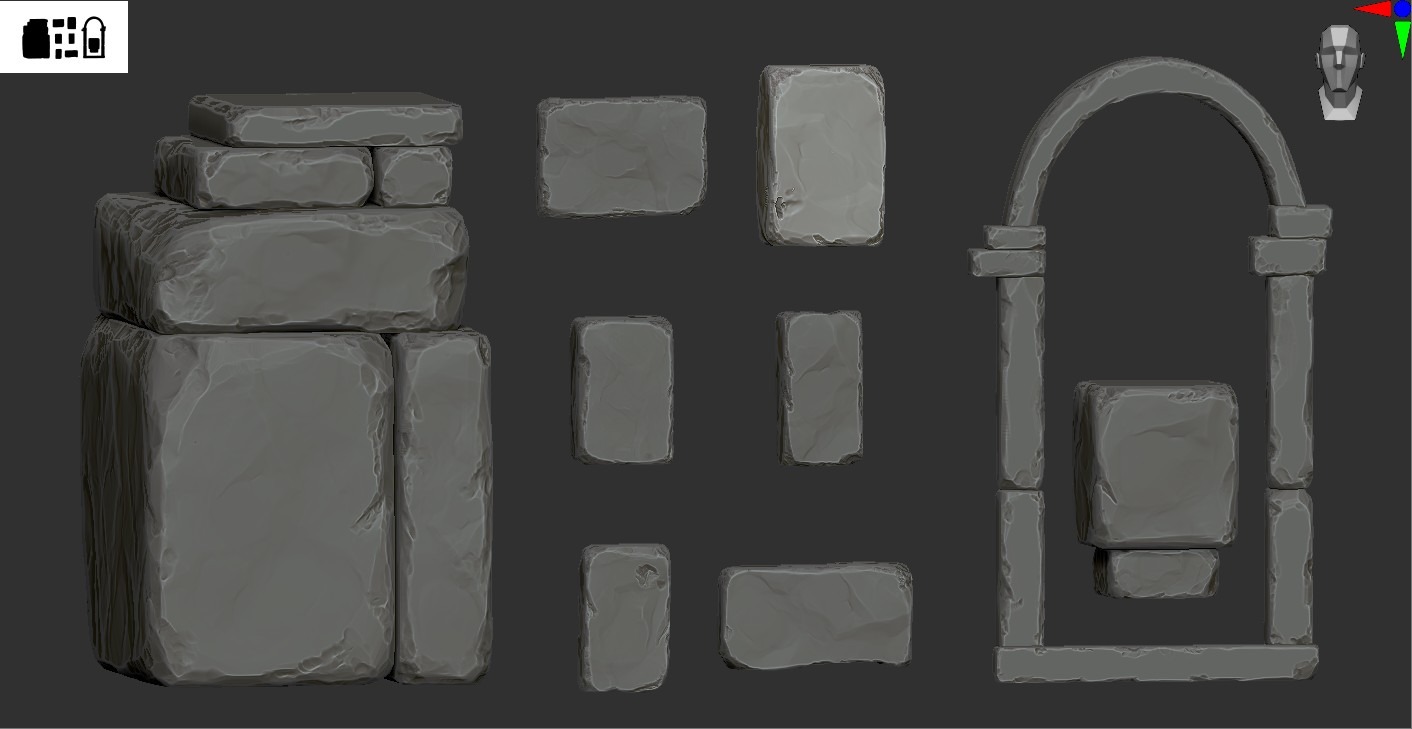


After quickly decimating these I got them straight into engine. I didn’t bake yet; the focus was really on making sure the macro read is good before wasting any time on steps I might have to redo later.
This was a big focus throughout the mentorship: making sure I define a pipeline and stick to it. While working in phases you really start to notice speed differences.
wIt’s way easier and more efficient to be in ZBrush for a week than to switch between tasks every day.

As you can see I have multiple objects that are built of these small rocks I made, but I wanted to find a way that I could assemble the full structure in Unreal and just reimport these 4 rocks to have the structure update.
Of course you can just bash together your assets and group them, but I noticed this didn’t give me the control I wanted.
So I found PLAs (Packed Level Actors). These are essentially “prefabs” or blueprints that hold all the meshes and instance the duplicated ones, which is good for performance.
Another good thing these PLAs allow for is exporting as 1 mesh. For this case it was extremely useful.
Since I had the rocks bashed together in Unreal I didn’t have a reference to sculpt my mortar.
Luckily I could export the PLA and use this in ZBrush to sculpt the mortar, then I could export only the mortar and insert it into my PLA in Unreal.

With these techniques I could get most of the scene nailed down. Here’s the final modular kit.

Props
This scene actually didn’t have too many unique props; most of the props you can see here are made by the modular kit I created.
The barrel, for example, are my wood planks, but with a bend modifier in Blender I made the barrel without having to do any extra work.
I did this because I was on a tight timeframe. If I had more time I would’ve made super high-quality assets for every prop, but here I chose a faster and still visually correct workflow.
UV’s & Bakes
With the modular kit in place, the props kitbashed from my modular pieces, the whole macro read in the scene was there.
I absolutely loved how the scene looked right now, so it was time to go into the micro details. As mentioned before I sculpted all my assets but didn’t bake/UV them yet.
I decided to go for auto UVs. I baked my high-poly mesh from ZBrush onto a decimated, auto-UV’d low-poly. I am aware that this isn’t the best method for 100% crispy close-ups, but I wanted to save time, and the results still came out nicely.
These situations are why I stressed setting up a proper pipeline; these are not things I decided on the go, and I consistently did this through the process.

Materials
Let’s go on to one of my favourite parts of the project: the materials. Everything in this scene is textured with tiling materials made in Substance Designer.
I didn’t have all too much experience in Designer, and the experience I had was mostly on the realistic side.
My goal for this project was to really understand realistic materials better and create an overall nice picture.
Here’s a preview of some of the materials (of course there’s way more :)). I wanted to refrain from using any Megascans for the main house.


I tried to use similar grunges and blending effects in the materials to keep them looking uniform and the same style.
Just popping the materials on already elevated my scene a ton. It was starting to get somewhere.

Since the whole scene was textured with tilers, I needed a way to make stuff feel unique, so I opted for the RGBA mask workflow.
I found this to be the best and fastest way to add more details while still being fairly simple.

Terrain & Foliage
This scene doesn’t have that much terrain, but for the little part you could see, it was very important that it read well and looked good.
I decided to just use the landscape painting modes to make my path.
I set up a simple RVT shader so I could add some surface variation and breakup, but I felt overall it felt very blurry.
So I set up some mesh decals to add detail and add more story to the floor.

When it comes to foliage creation I decided not to do this myself, mainly because I have no real interest in foliage creation. I had to pick my battles for this project.
I found a very nice foliage pack from Dekogon, and together with some Megascans I had some basic foliage set up. It was, however, still a lot of work to get them to fit together with my scene.
As you can see here, the foliage colours felt very, very out of place.

Polish
I’m still very far from the result, but I went through all the first steps.
Why is my scene still looking so bad?
That was a question I was asking myself a lot, since all the “bases” I had were decent, but the bigger picture was just not there. This was the full image before I started polishing.

The key to an art block like I was having here is asking for feedback. There were a few feedback points I was constantly receiving:
- Where’s the AO?
- Lighting is flat (will leave this for the last point)
- Composition?
- Material response
- Ground texture is too blurry (we changed this in the previous point)
So I took a step back and went to apply these basic points of feedback. For the AO I decided to go with distance-field-based AO since I was having a lot of issues with normal AO.
Using the distance-field-based AO means that I could control it from my master material and link this with all my objects since they use 1 master material.
Just this AO fix by itself did a TON. Here’s a preview:
This was a big step forward in my scene. I continued to apply some of the feedback and this was where I managed to reach.
It was time for the final step: lighting and rendering.

Lighting & Rendering
After polishing up the house I noticed I’m still not there. The house was finished but the scene just didn’t feel “right”.
And I honestly didn’t know of a way to overcome this. So once again I went to ask for feedback.
I want to give another special thanks to Alex Beddows, my mentor who gave me tons of valuable feedback, and my friends Miroslav Baev and Chris Pereira for the extra tips.
I can’t stress enough how important it is to have people who can give you feedback and help you grow.
From the feedback we concluded a few things: my foliage was off, and the lighting/mood just didn’t make much sense. I struggled with this a lot because every lighting scenario I tried felt weird.
I tried pushing a bit of warm light, but this just felt off; it didn’t feel in tone with the general vibe of the piece.

That’s fine though. I kept looking at reference, trying to find something that would work.
I figured after a while maybe the trees were throwing me off, so I deleted all my lights and did another full lighting pass with a new composition idea, and wow.
It took me a while to reach here, but this is what I wanted to achieve. I couldn’t stop looking at it myself; I loved it.
I used Ultra Dynamic Sky, even though I probably didn’t need it since I only used it as a base. I prefer it for the weather systems that are easily adjustable.
You will see later in the post how I use this to my advantage, but for the base scene I didn’t use it too much.

Here’s the value shot:

Another part that played a big role in getting to this result is the decals. Here’s a preview of the impact of the decals:
Winter Scene
While looking for lighting scenarios I was experimenting with some different ideas, and I came across this:

It immediately piqued my interest; this could turn into something very, very cool. As I mentioned before I used Ultra Dynamic Sky.
This was useful to quickly switch lighting scenarios. I used this to my advantage to make a snow scene.
With some work and some more lighting adjustments, I managed to create this cozy winter scene.

I created a Z-up shader for my materials. Ultra Dynamic Sky out of the box has a decent snow material setup, so I could adjust this to my wants and needs.
Of course a bit of extra set dressing and change of scenery helped immerse this environment as a whole. Very, very happy with the result.
That’s it from me. Definitely not the most complex piece technically, but man it was fun to work on.
Here’s the final transition video!
Conclusion
First of all I want to thank GamesArtists and Alfred for featuring me.
Honestly I’ve learnt so much on this platform, and still being so new to this industry it means so much to me to be able to be part of this platform.
Second, I also want to thank all my friends for always supporting me. This project was amazing fun working on, and the whole experience at Sierra Division Academy was great.
I learnt way more than I expected to, and most importantly I gained confidence in my skills and managed to overcome difficulties along the road.
Thanks for reading through my article. Hopefully there was at least some useful information in there that you guys could learn from!
Thanks a lot to GamesArtists for having me!
Feel free to connect with me or check out my socials:
Read more articles
You might also like these articles.