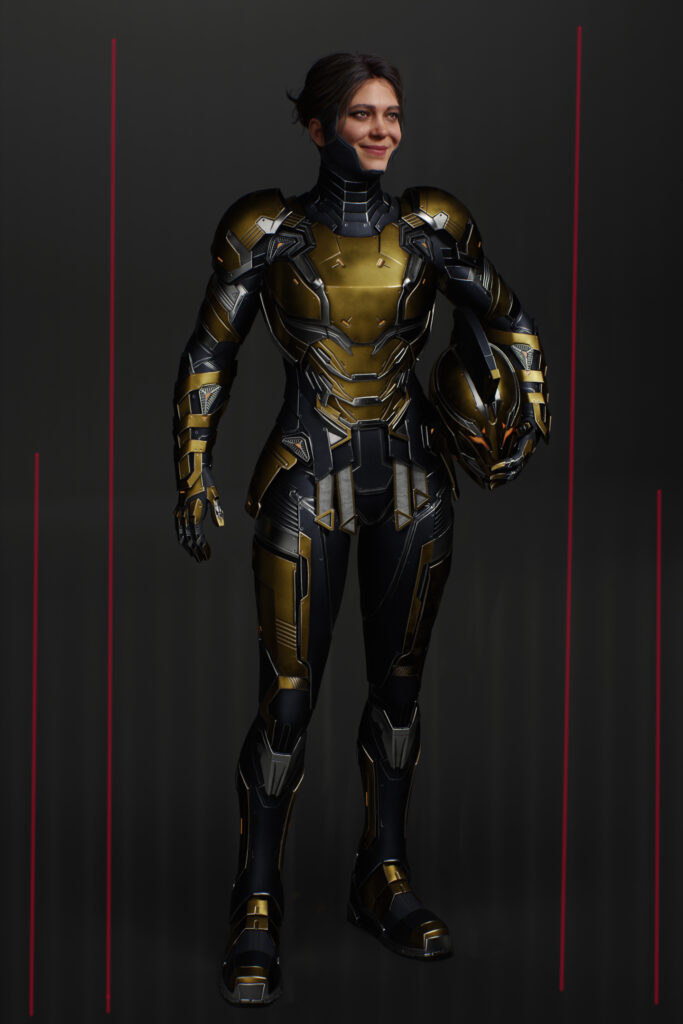
Hypolita

Introduction
Hello, my name is Mohammad Asraf. I'm a 3D Character Artist from Kathmandu, Nepal, and I'm currently working as a Freelance Character Artist for Keos Masons.
I've been freelancing for them for almost 5 years now and worked on projects like Gotham Knights and Horizon Forbidden West.
Goals
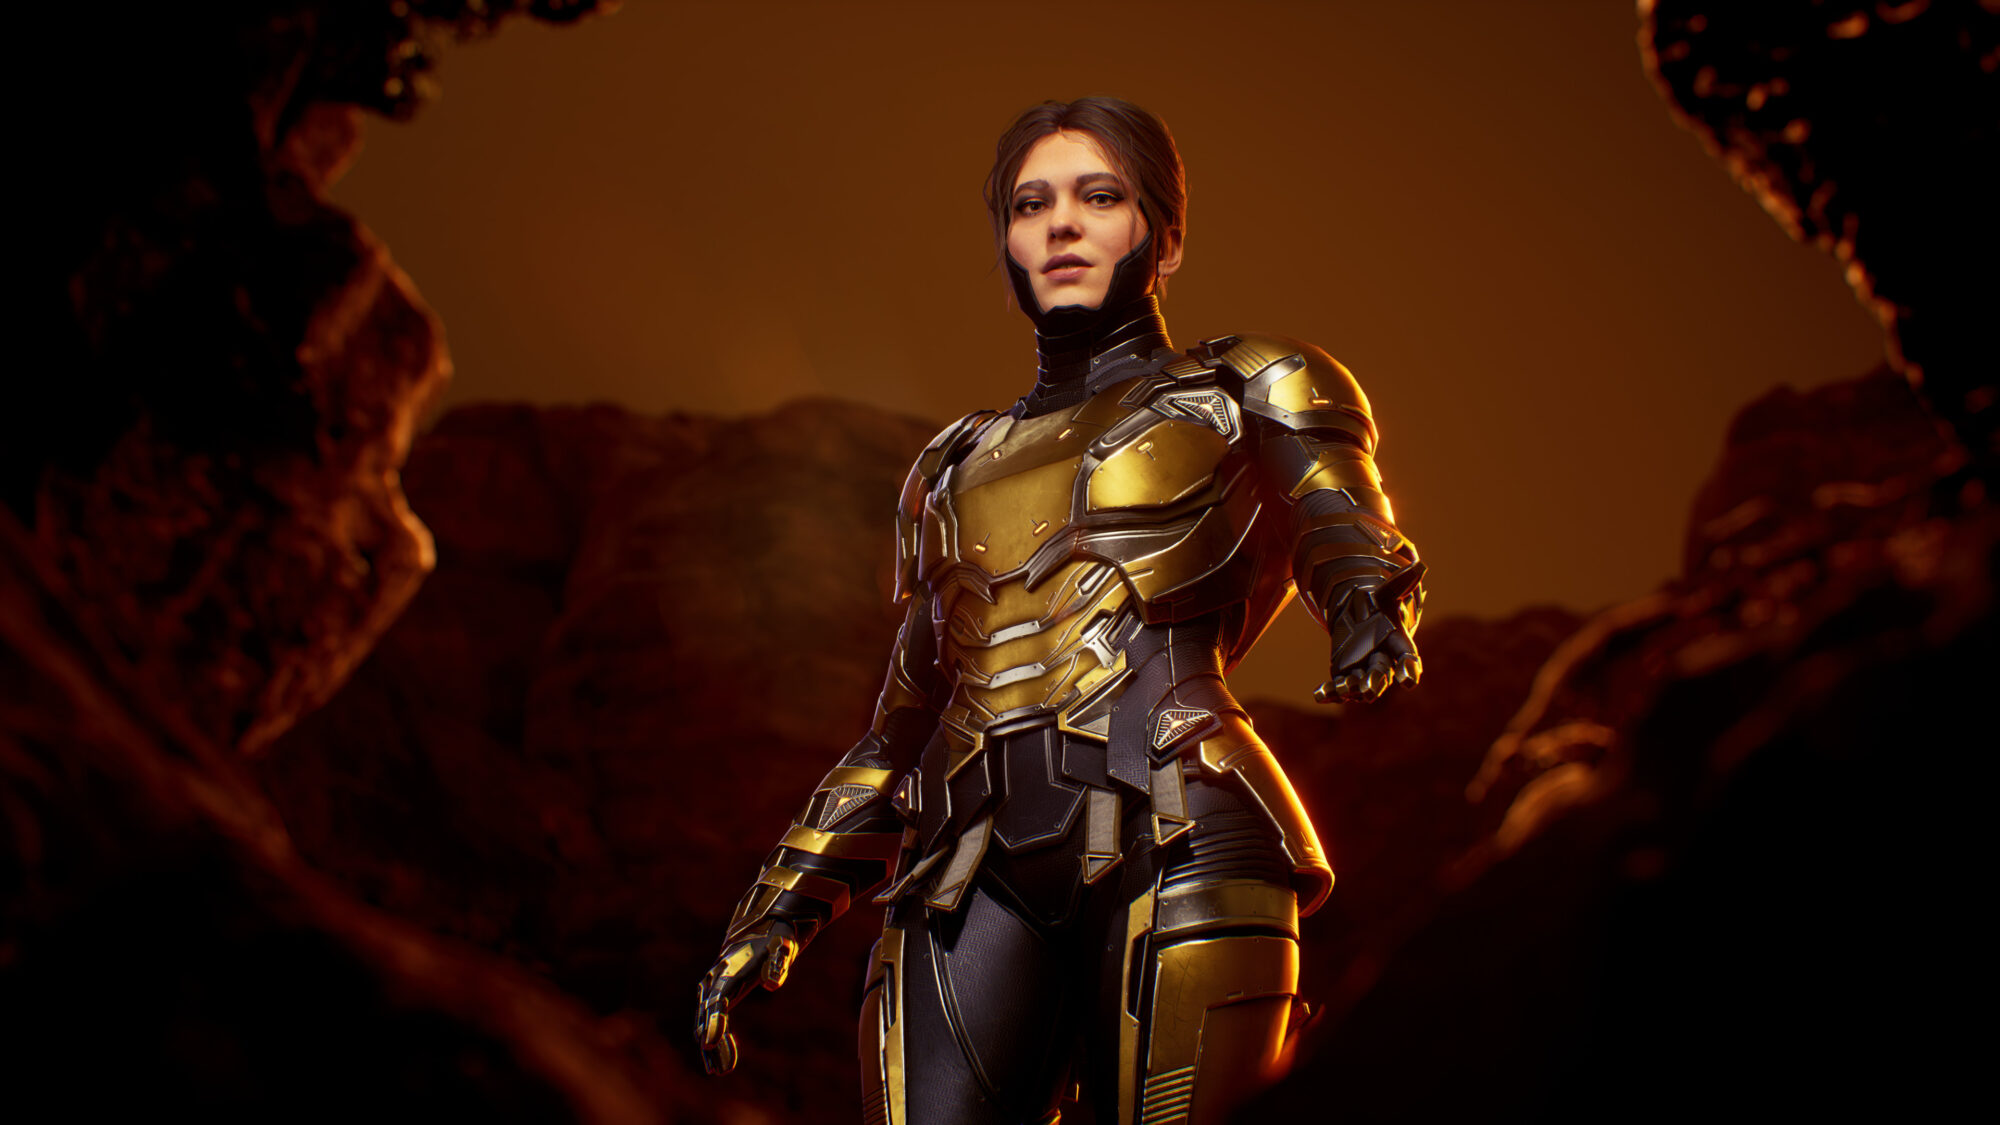
For Project Hypolita, I found this fantastic design by Rodrigo Idalino Concept Art (Rodrigo Idalino) and set two key objectives.
First and foremost, I wanted to optimize and speed up my Hardsurface workflow by using only Zbrush to create all of the Hardsurface parts.
As the second objective, I used UE to render the character.

Software
- ZBrush
- 3ds max
- Topogun,
- RizomUVs
- Maya Xgen with Coiffure plugin to make hair textures
- Marmoset Toolbag 4
- Substance Painter
- Unreal Engine
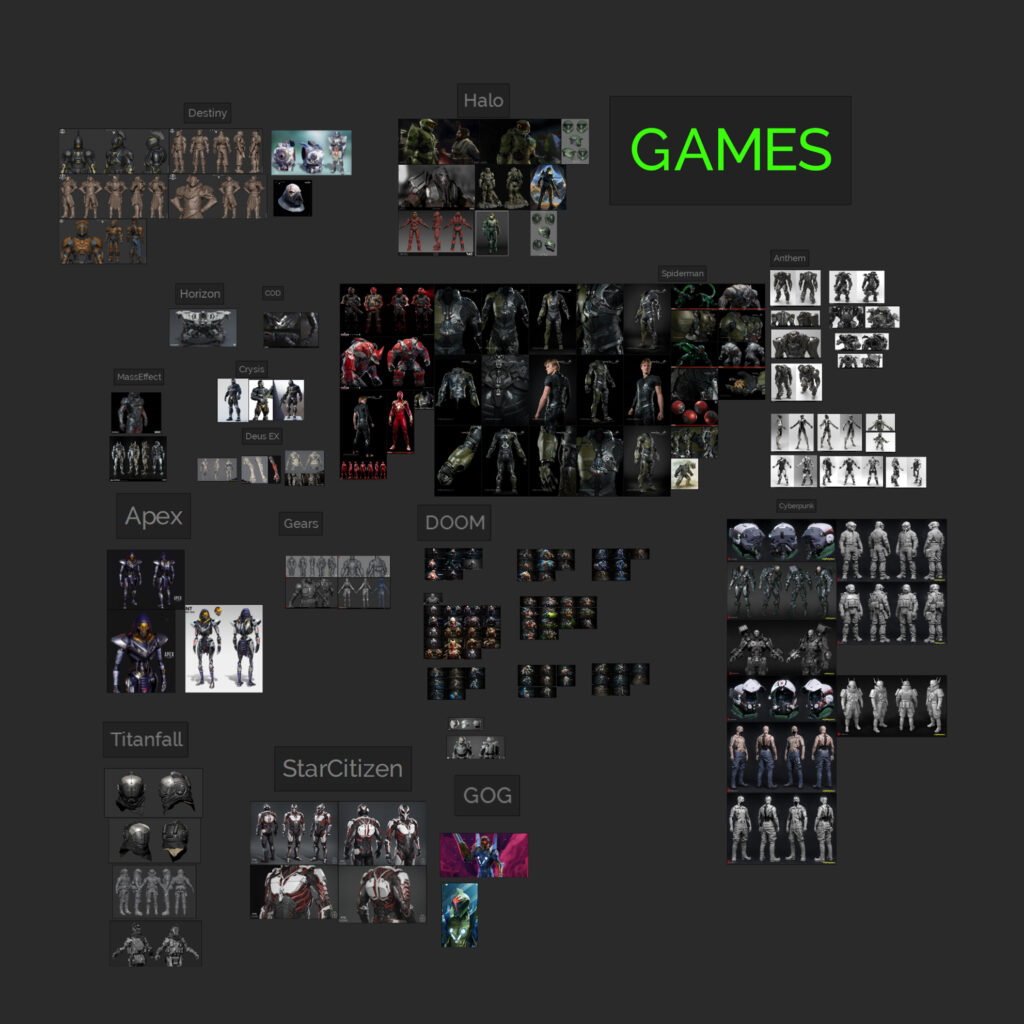
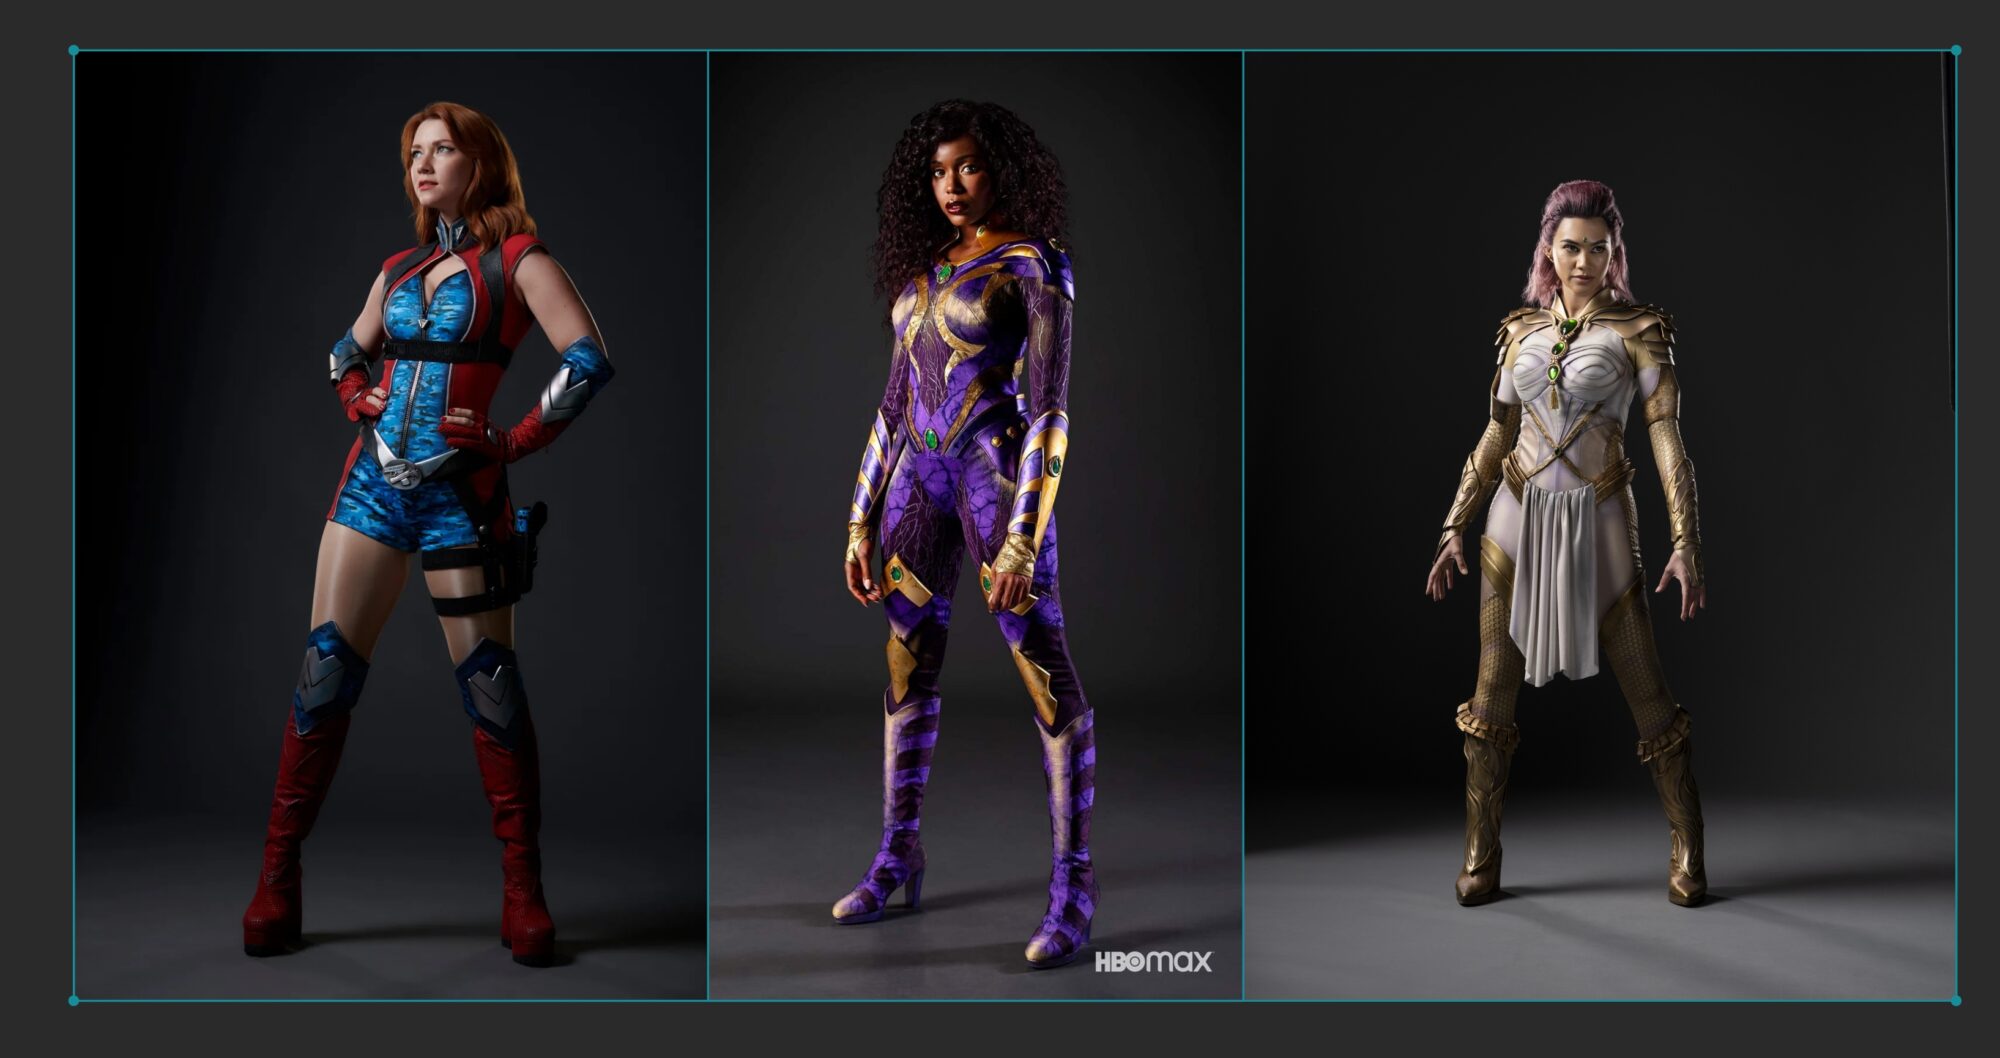
References
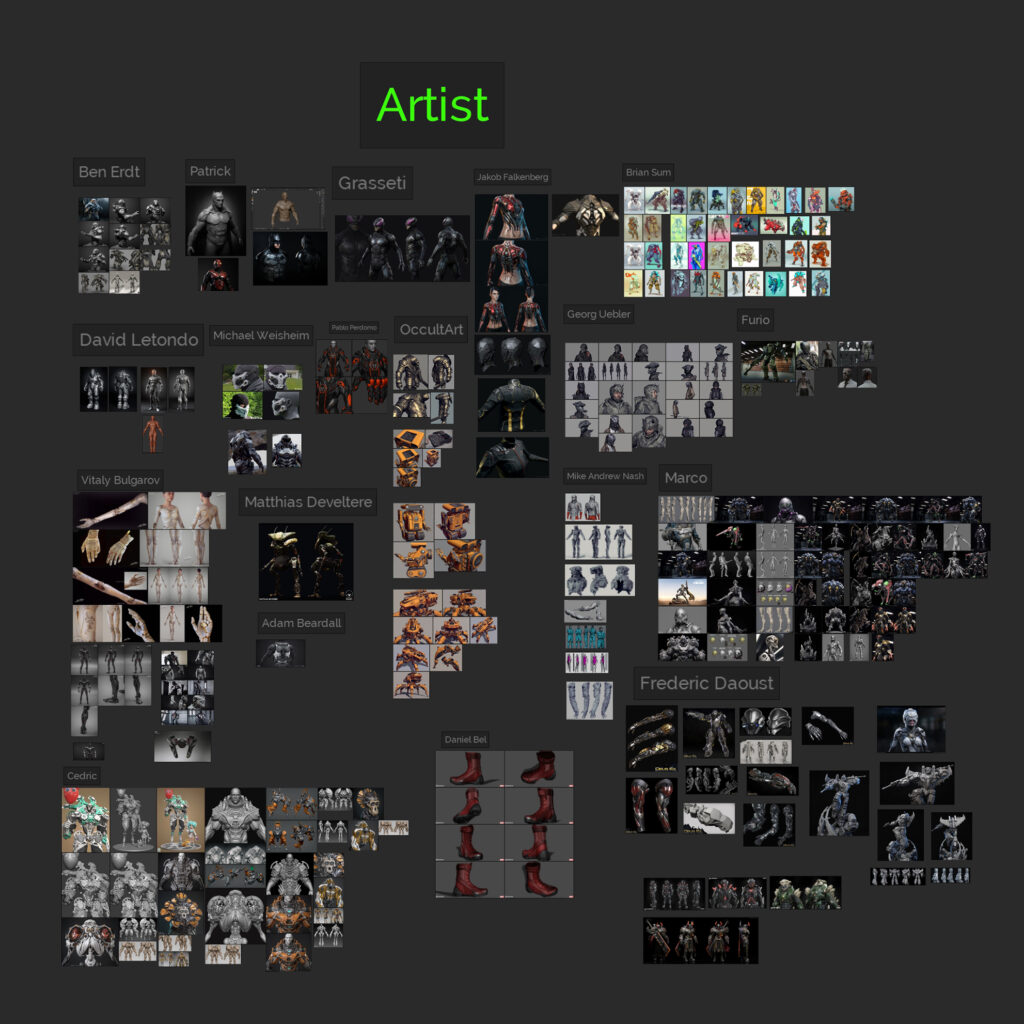
I was inspired by titles such as the Halo series, Mass Effect Andromeda, the Crysis series, Doom Eternal, Cyberpunk, the Guardians of the Galaxy game, Iron Man movies, and amazing artworks made by artists like:
Mike Andrew Nash, Marco Plouffe, Cedric Seaut, Frederic Daoust, Patrick van Rooijen, and Georg Uebler, just to name a few individuals whose work resonated with me.
Hard Surface elements & Blockout
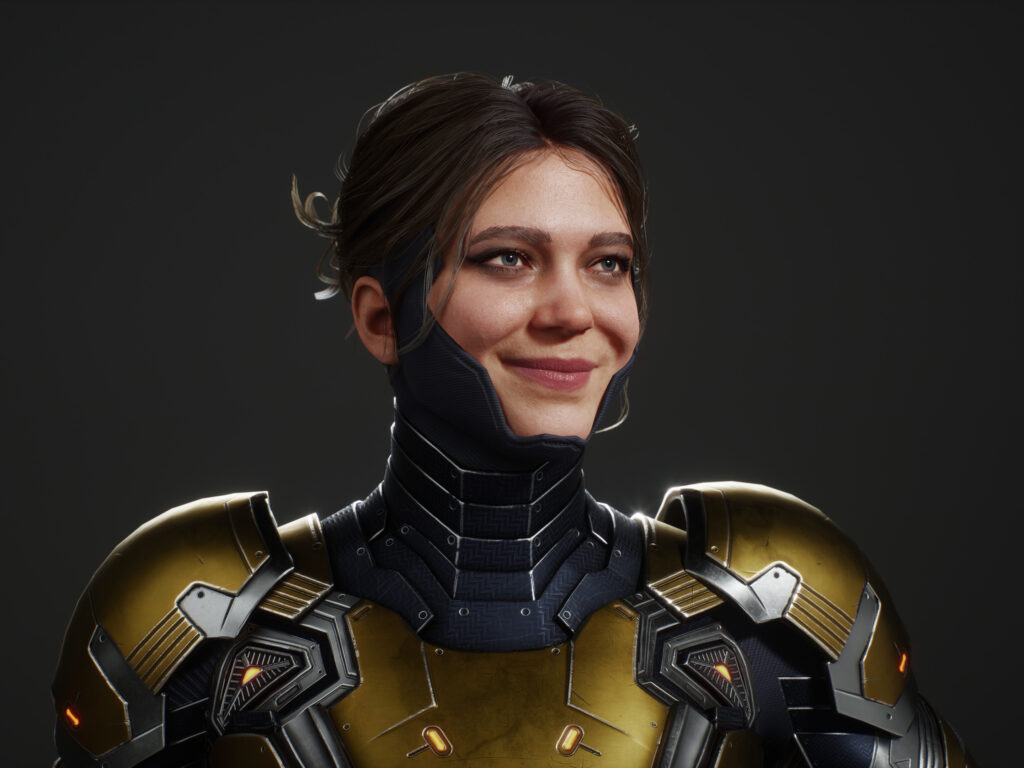
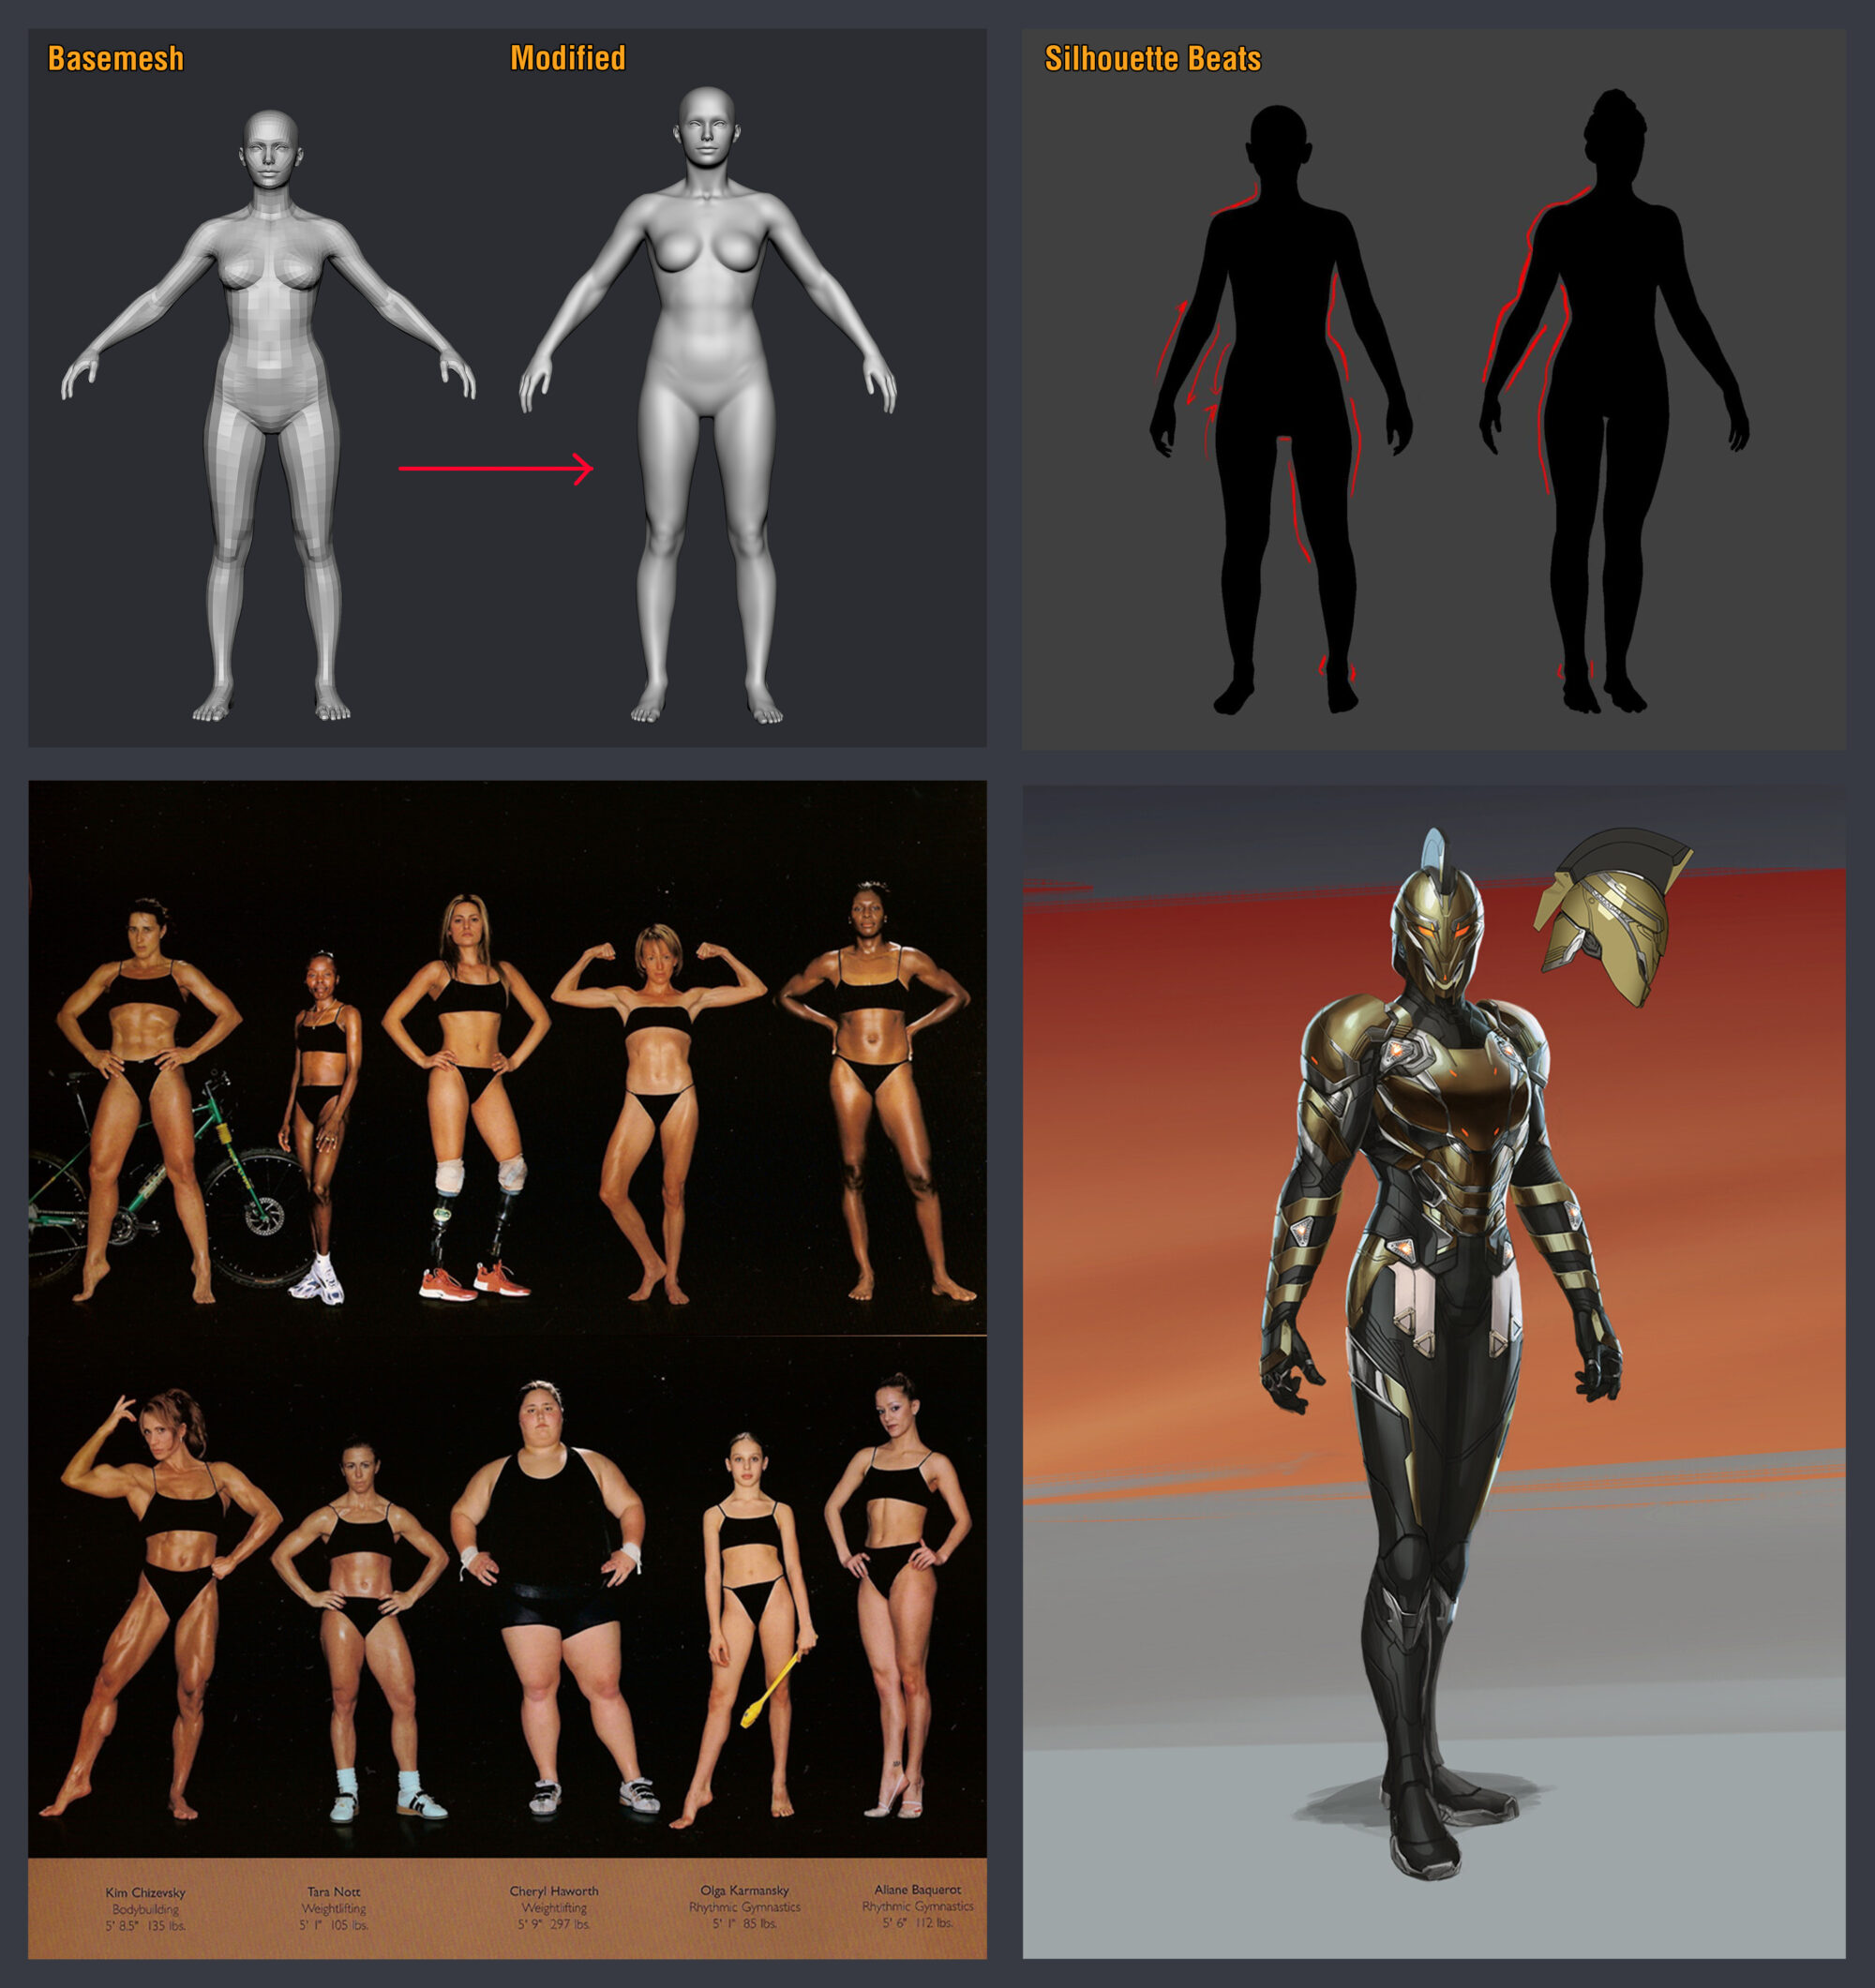
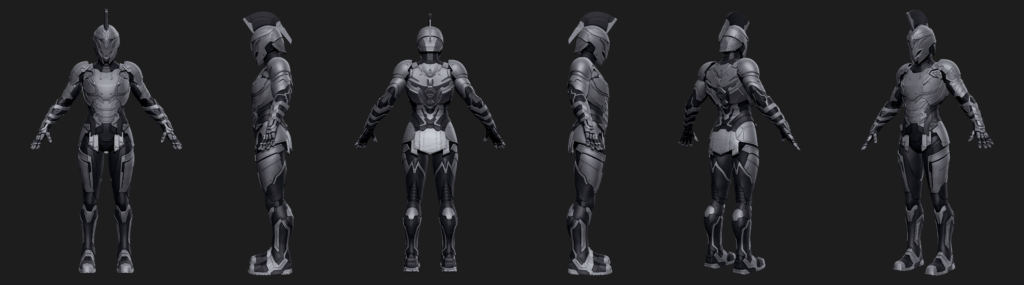
I began by blocking out Angela’s anatomy with this solid base mesh from Vincent Ménier Base Mesh Bundle and then adjusted the anatomy to be more athletic, taller, and muscular to meet the body type I wanted for Angela.
The main aim was to focus on the anatomical silhouettes of the body, forms, and shapes rather than the details because the suit would cover the entire body.
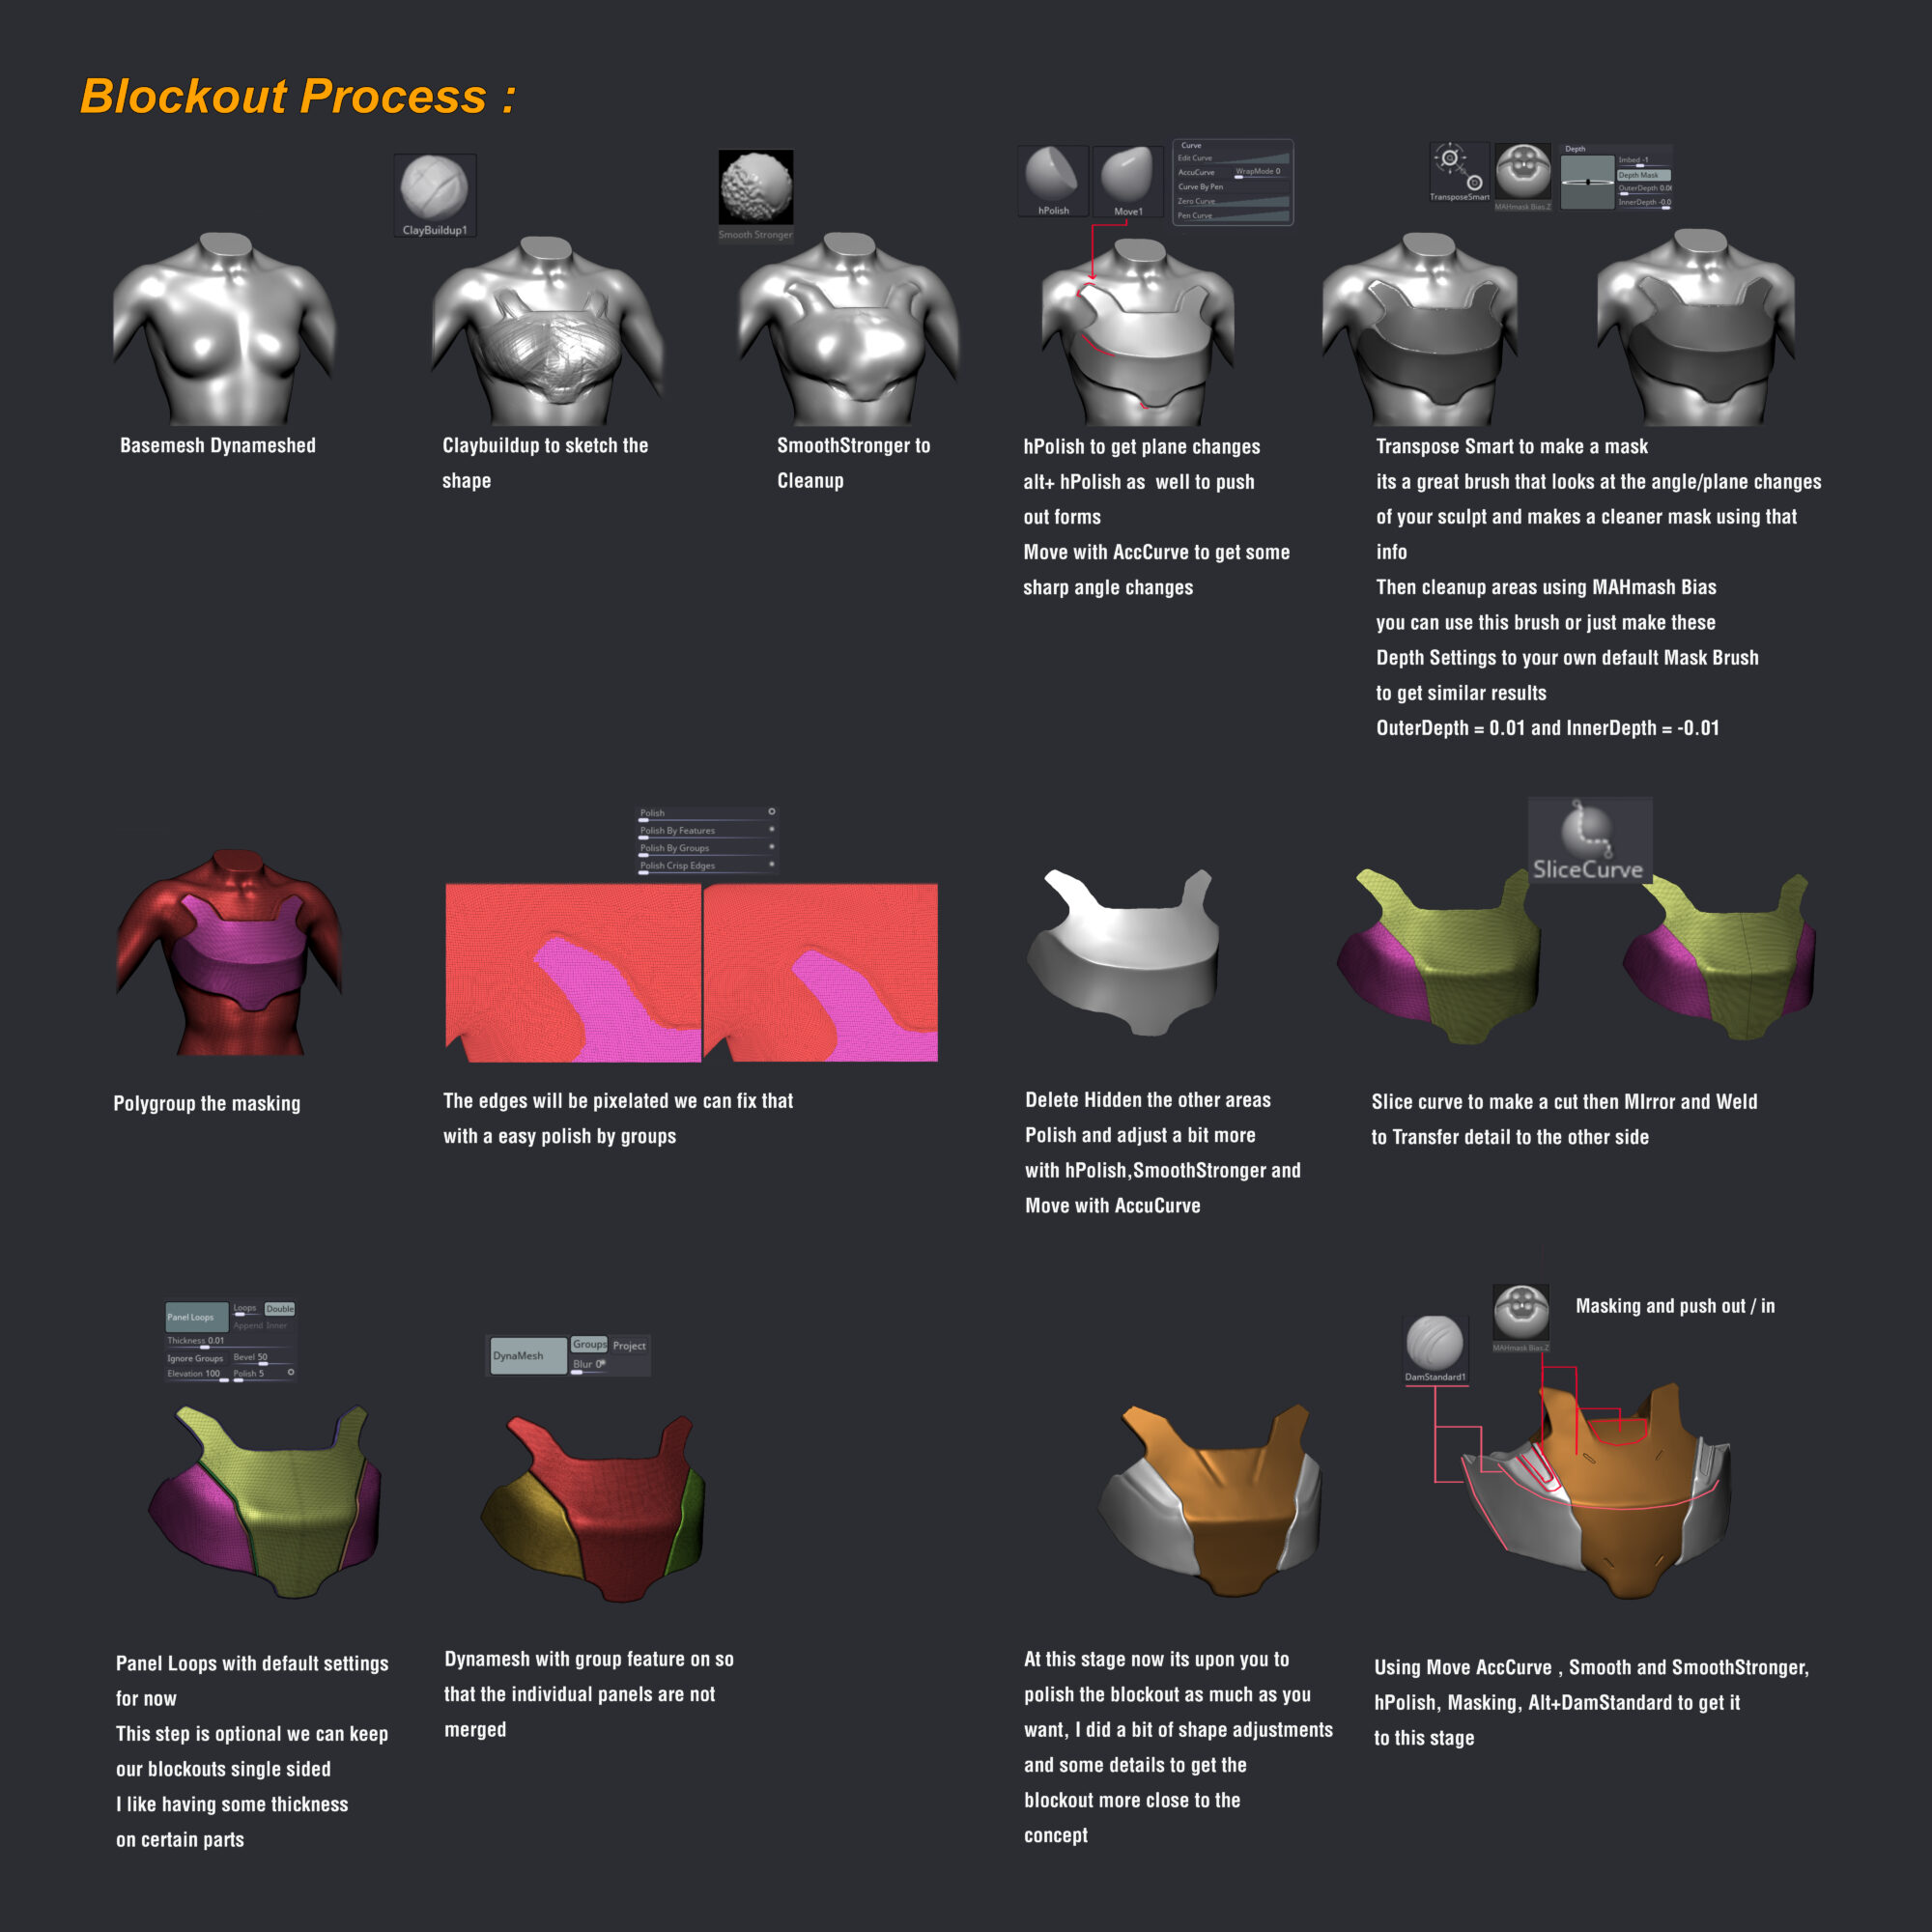
When I’m satisfied with the body, I move on to blocking out the suit.
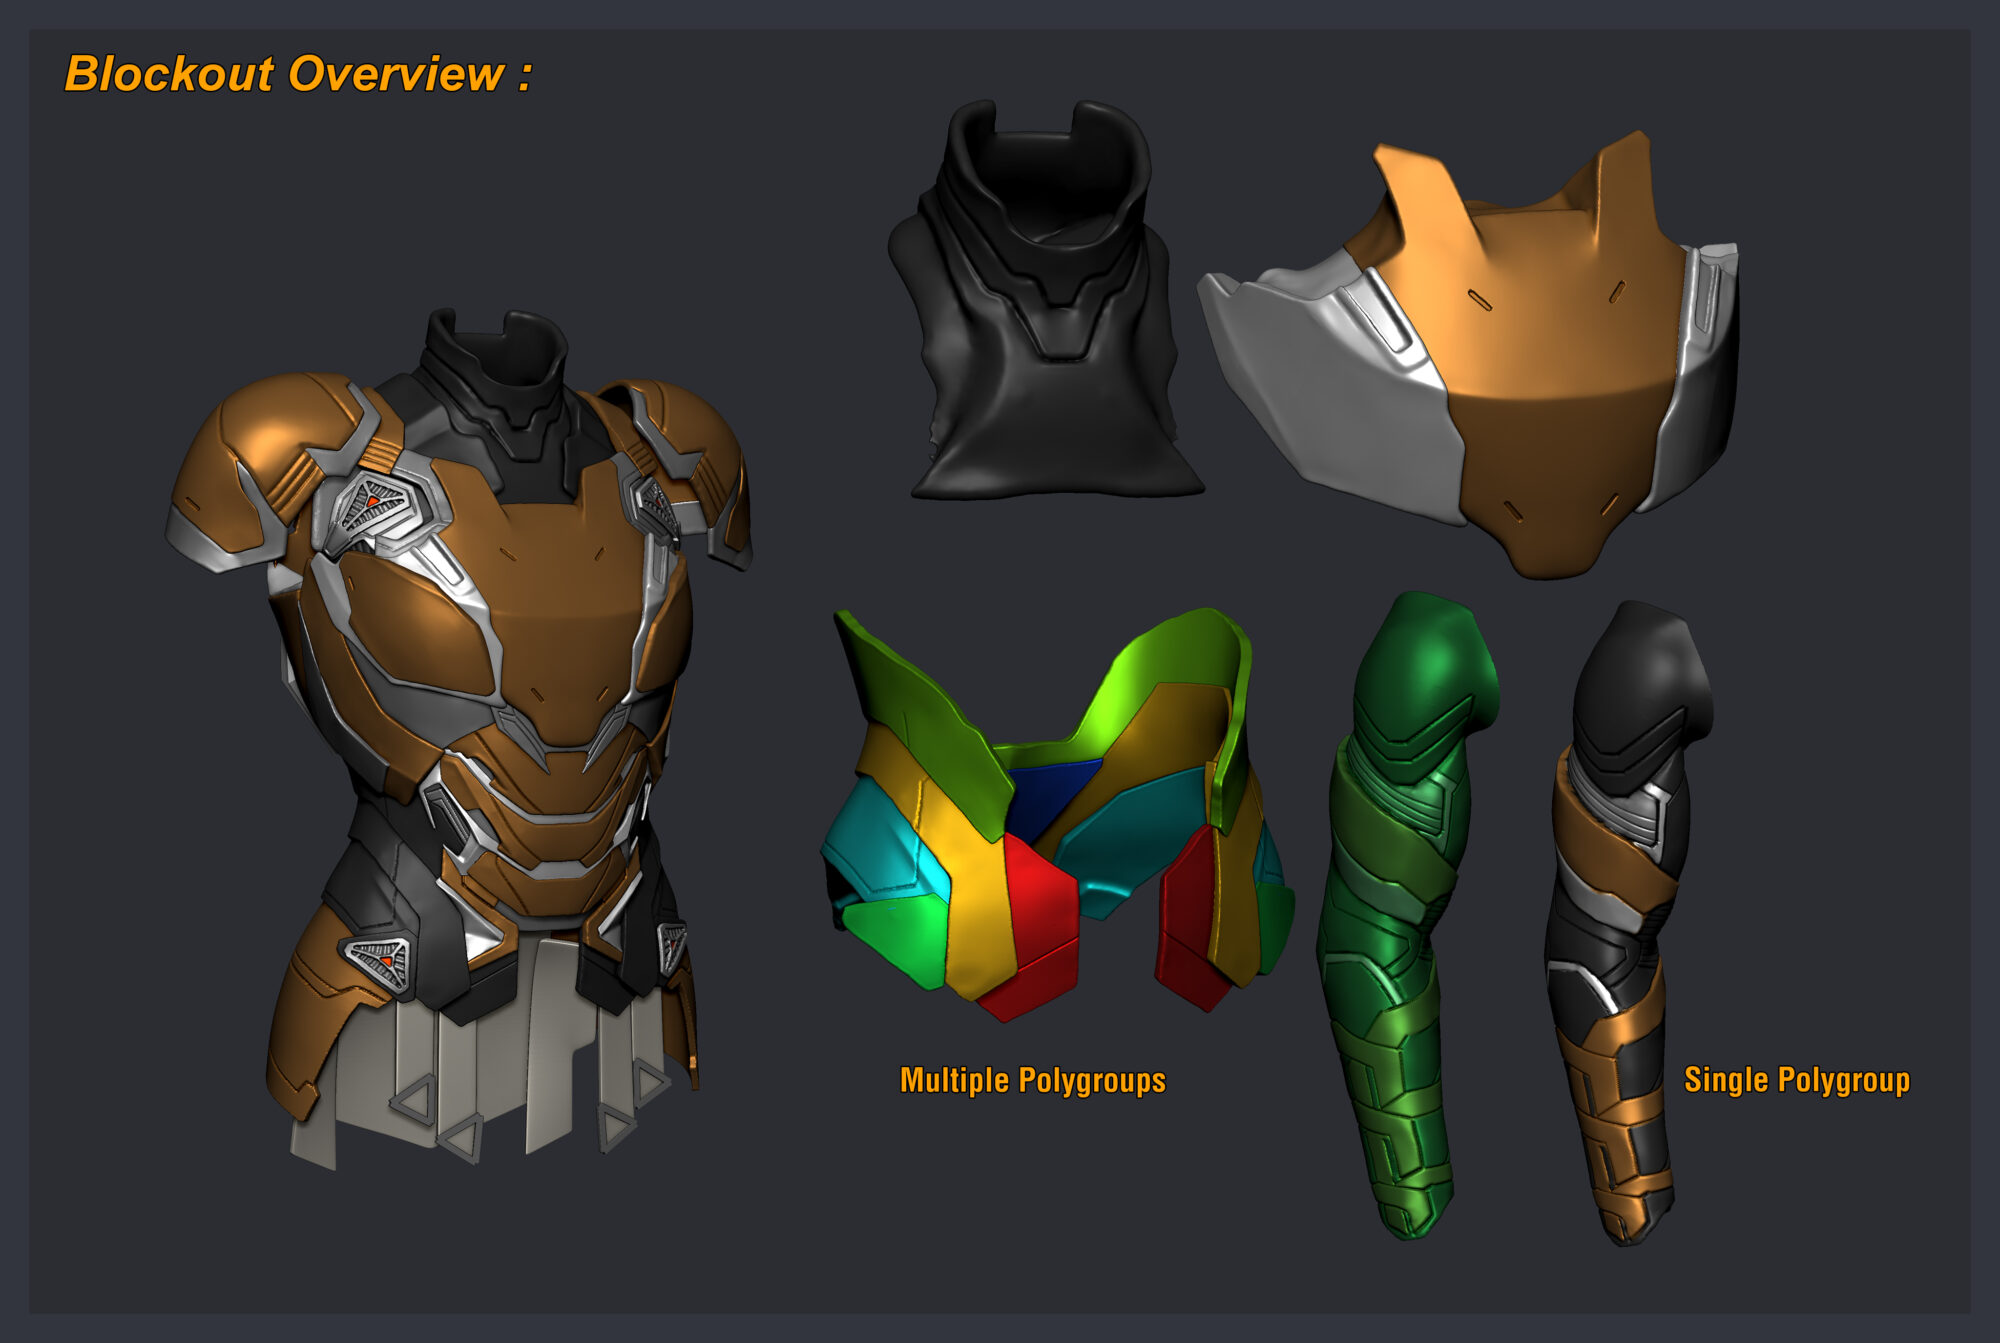
The suit’s blockout is entirely made of dynamesh, using multiple polygroups and subtools, or occasionally in a single mesh.
This is when polypaint comes in handy to visualize the design concept early on. Also, during the blockout, there is no need to be really clean with all of the pieces.
For example, the neck plate bottom is not too clean because it is hidden when everything is put together.
Here’s how I blocked out the majority of the hard surface plates and pieces.
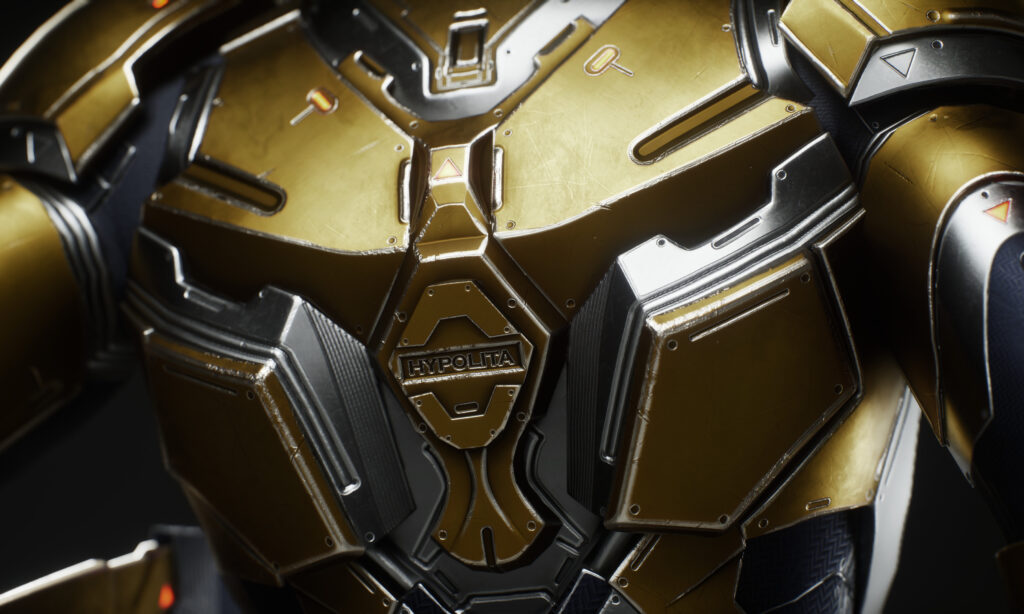
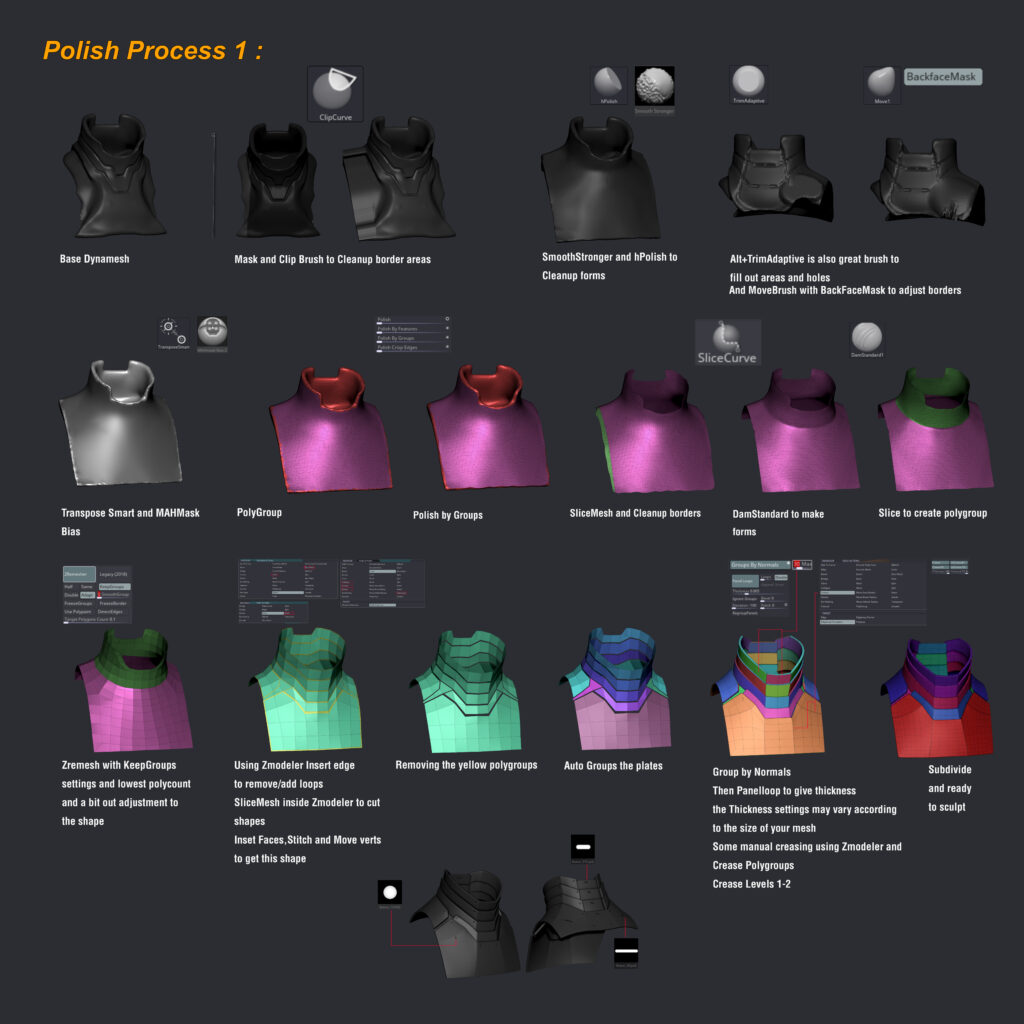
Polish
After I am satisfied with the overall blockout of the suit, I will begin polishing each plate to make it look clean with subdivisions, proper bevels, thickness, and so on. This is the most time-intensive stage, so I recommend going slowly and steadily and analyzing a lot of references.
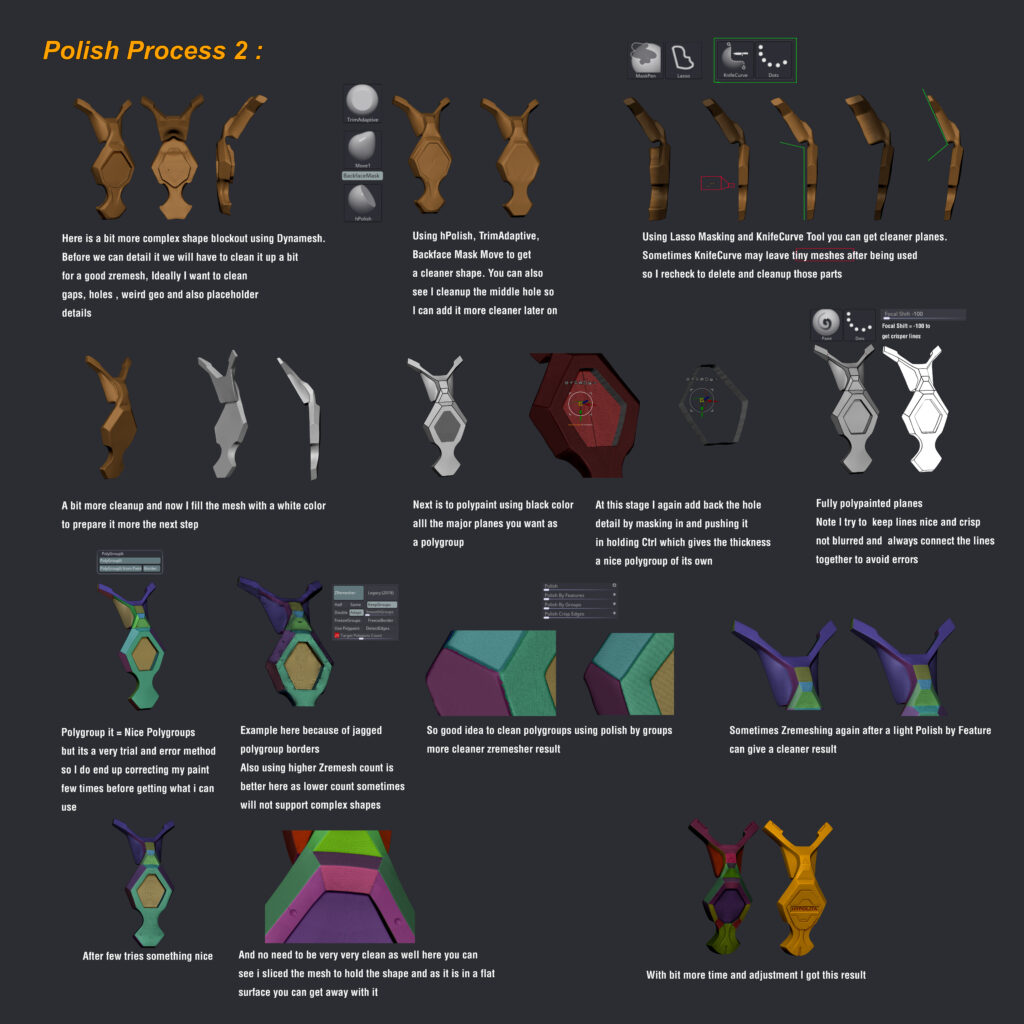
These are the two techniques I utilized.
After all of the hard surface parts have been polished, it is time to detail.
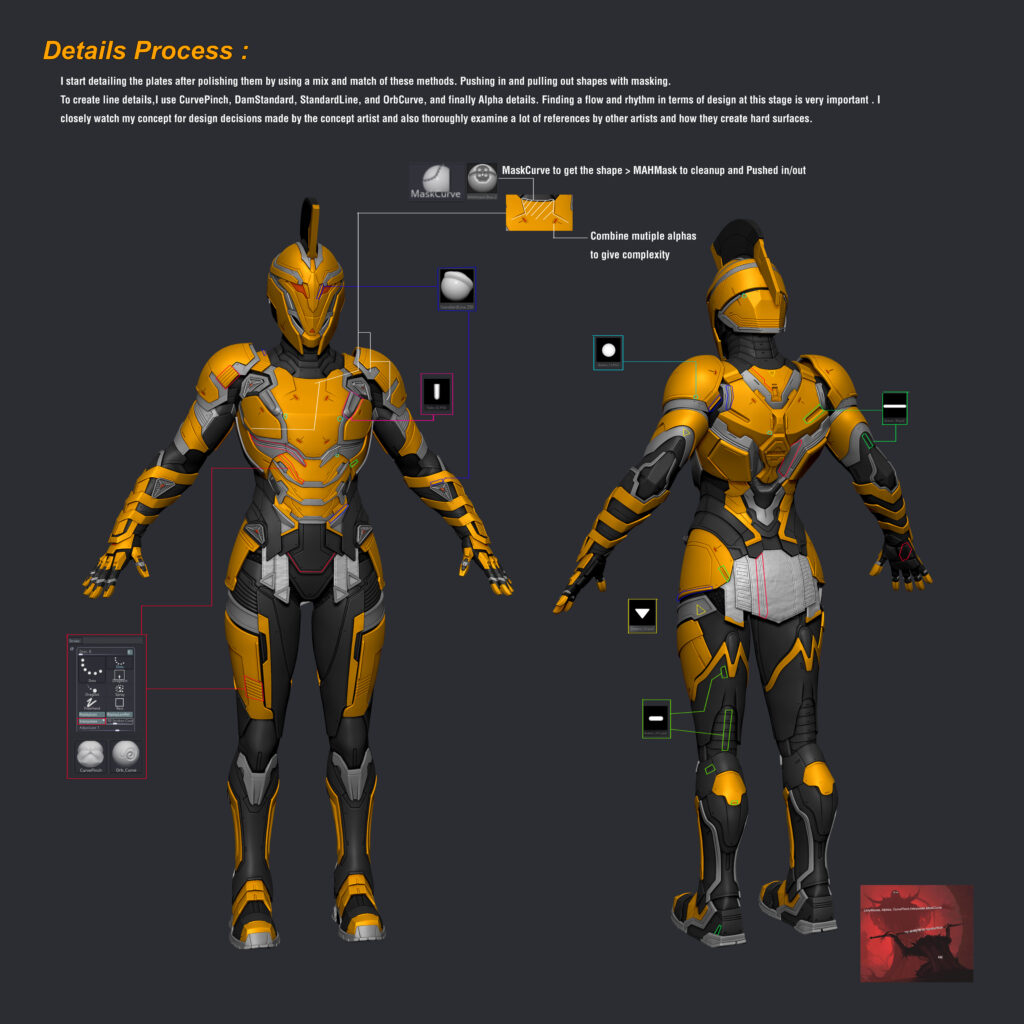
Detailing
Here’s a link to the alpha library that I used. Keos Masons Alpha.
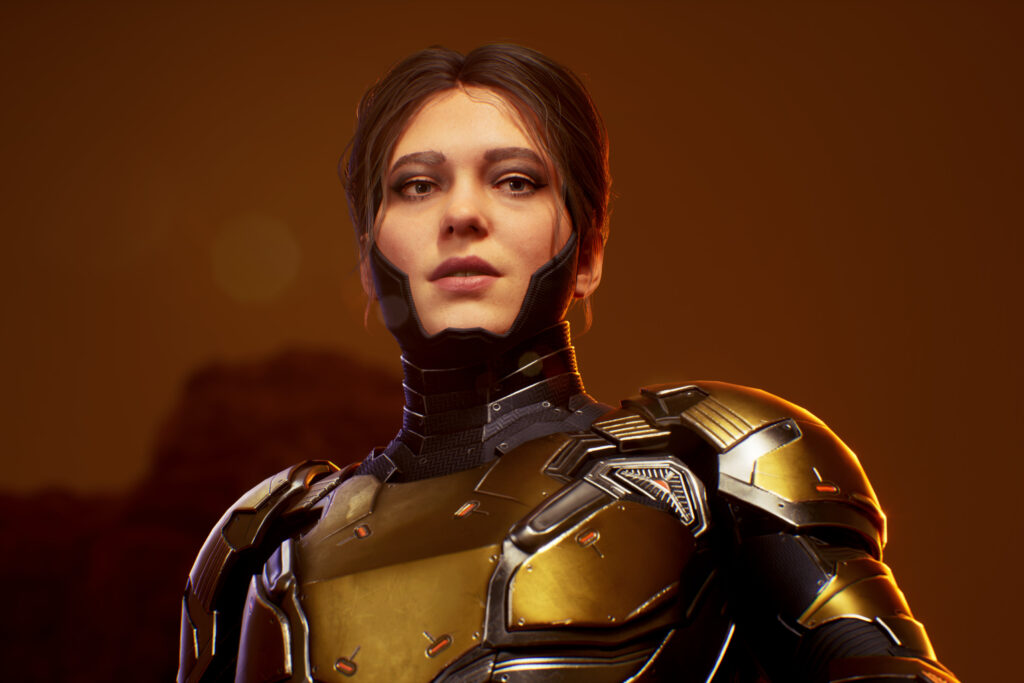
Face
The major thing I do before sculpting a face is set up my ZBrush scene so I can sculpt with proper perspective and match references better.
I took the Georgian Avasilcutei basemesh and created my scene as follows:
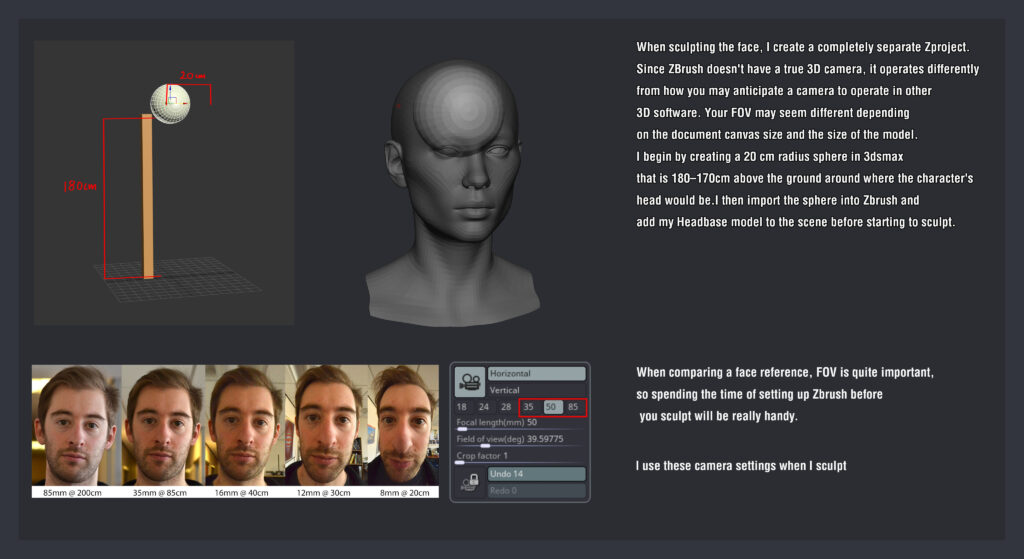
After that, there are three major steps:
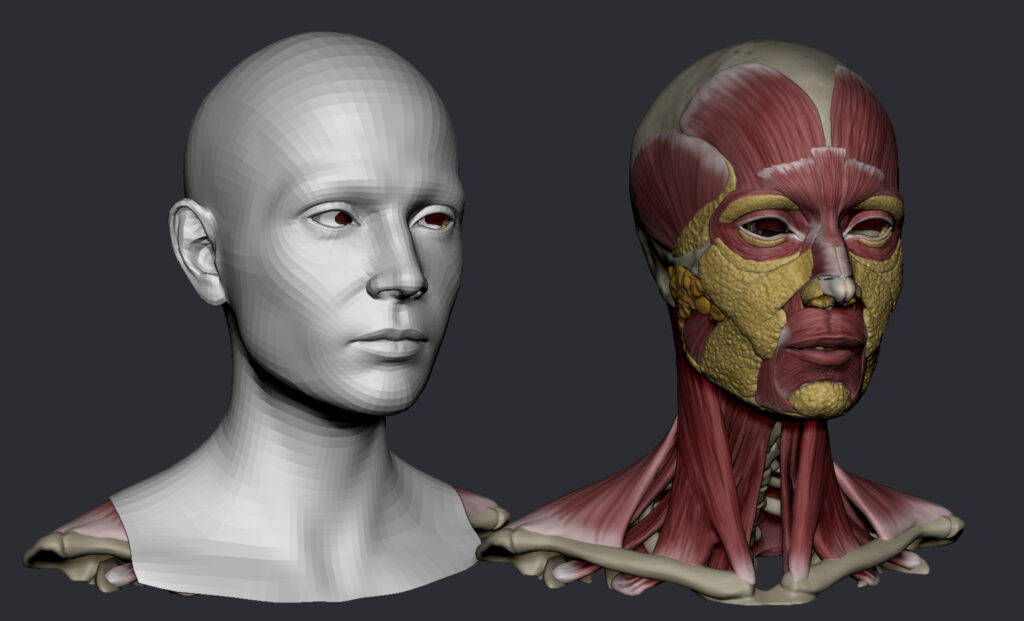
- Primary shapes: This step mainly focuses on simple forms, proportions, and larger forms, as well as defining bones and muscles.
- Secondary shapes: This step involves working on asymmetry, fat pads, and unique characteristics.
- Tertiary shapes: In this step, the focus is on pores and minute features.
Also, because you will be continually fixing big shapes and forms even when tackling pores, I consider these stages to be a loop rather than a linear path to follow. So, it’s never an absolute rule that you cannot fix large forms when making pores. Layers are also quite helpful for multiple iterations.
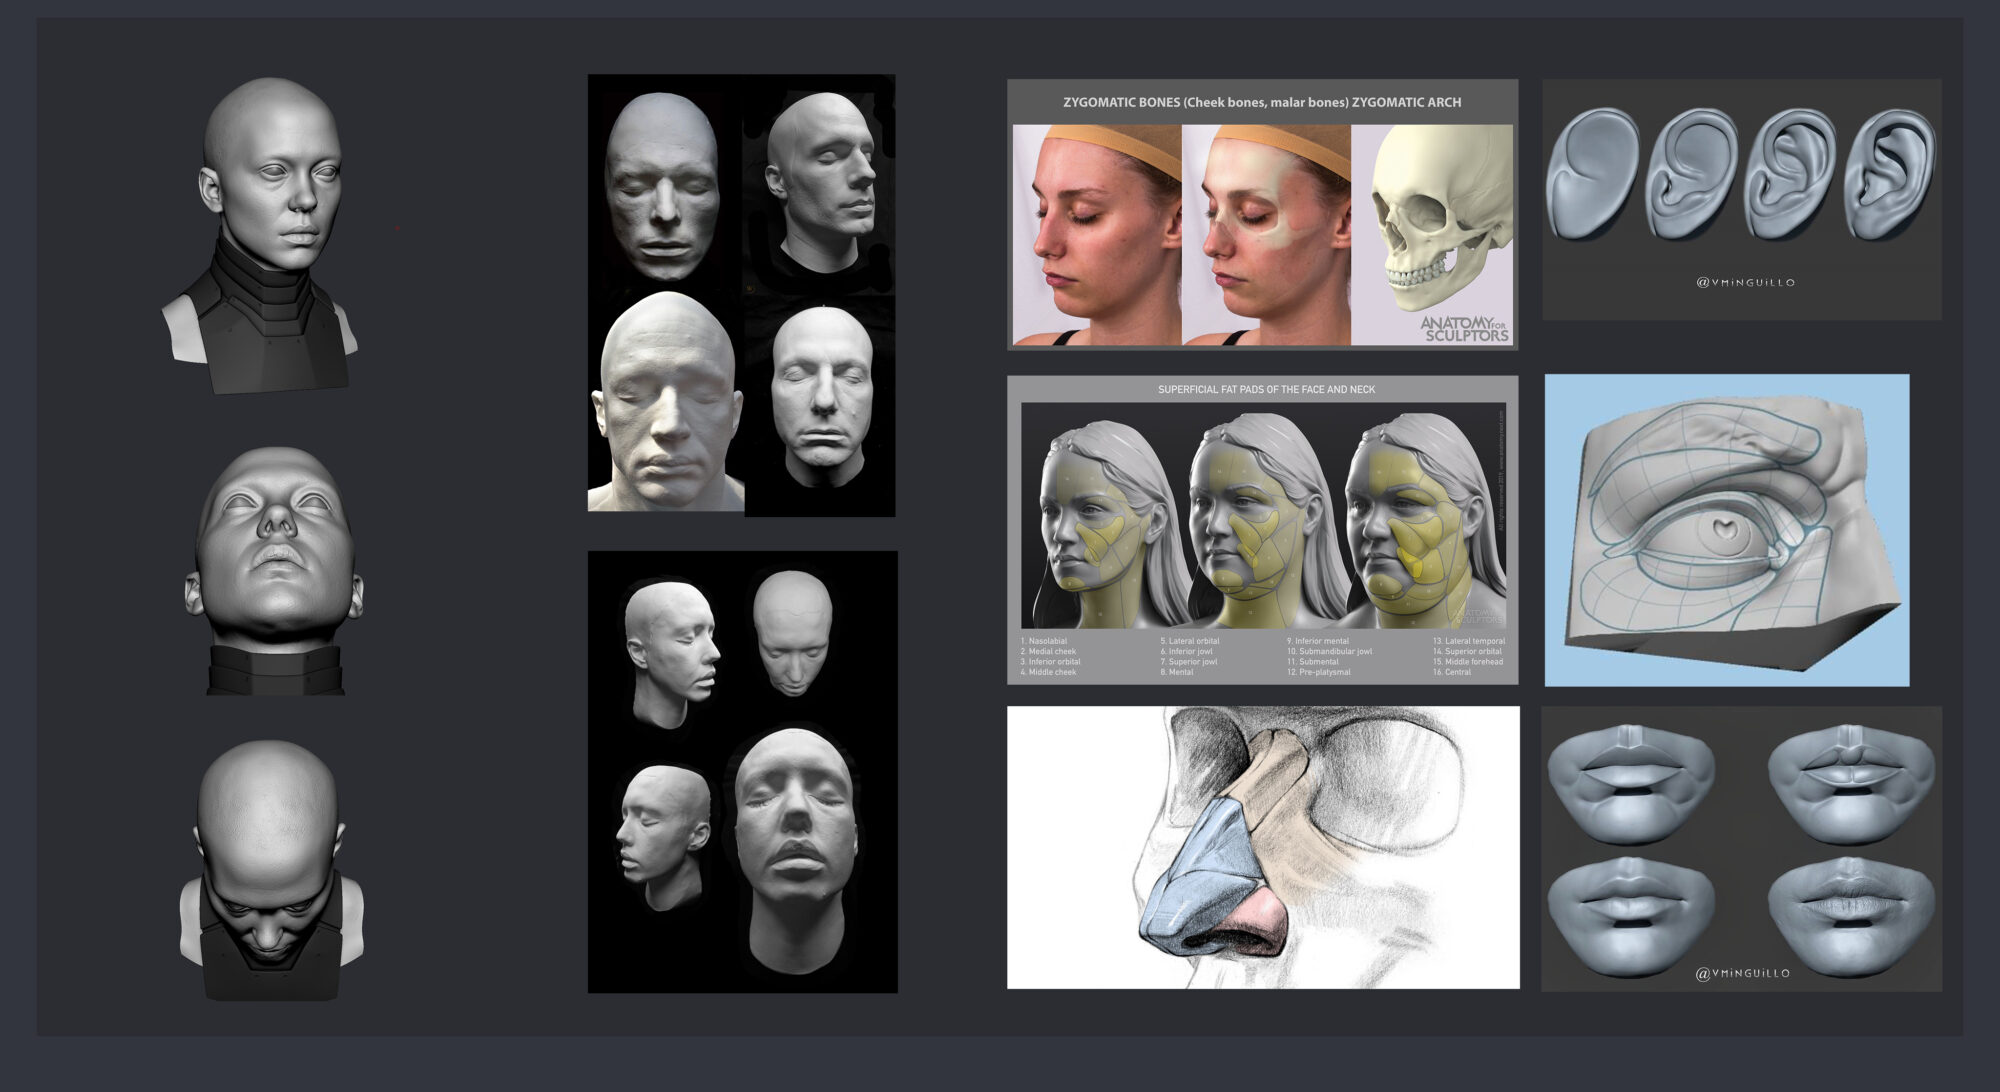
I utilized XYZ maps and Scanstore heads for the pore details. I’d also like to recommend a couple of lessons and courses that came in handy throughout the face sculpt:
Scott Eaton
Kris Costa
Ryan Kingslien
Georgian Avasilcutei
Darren Pattenden
Here’s how I went about doing the low-poly for the face with Metahuman assets.
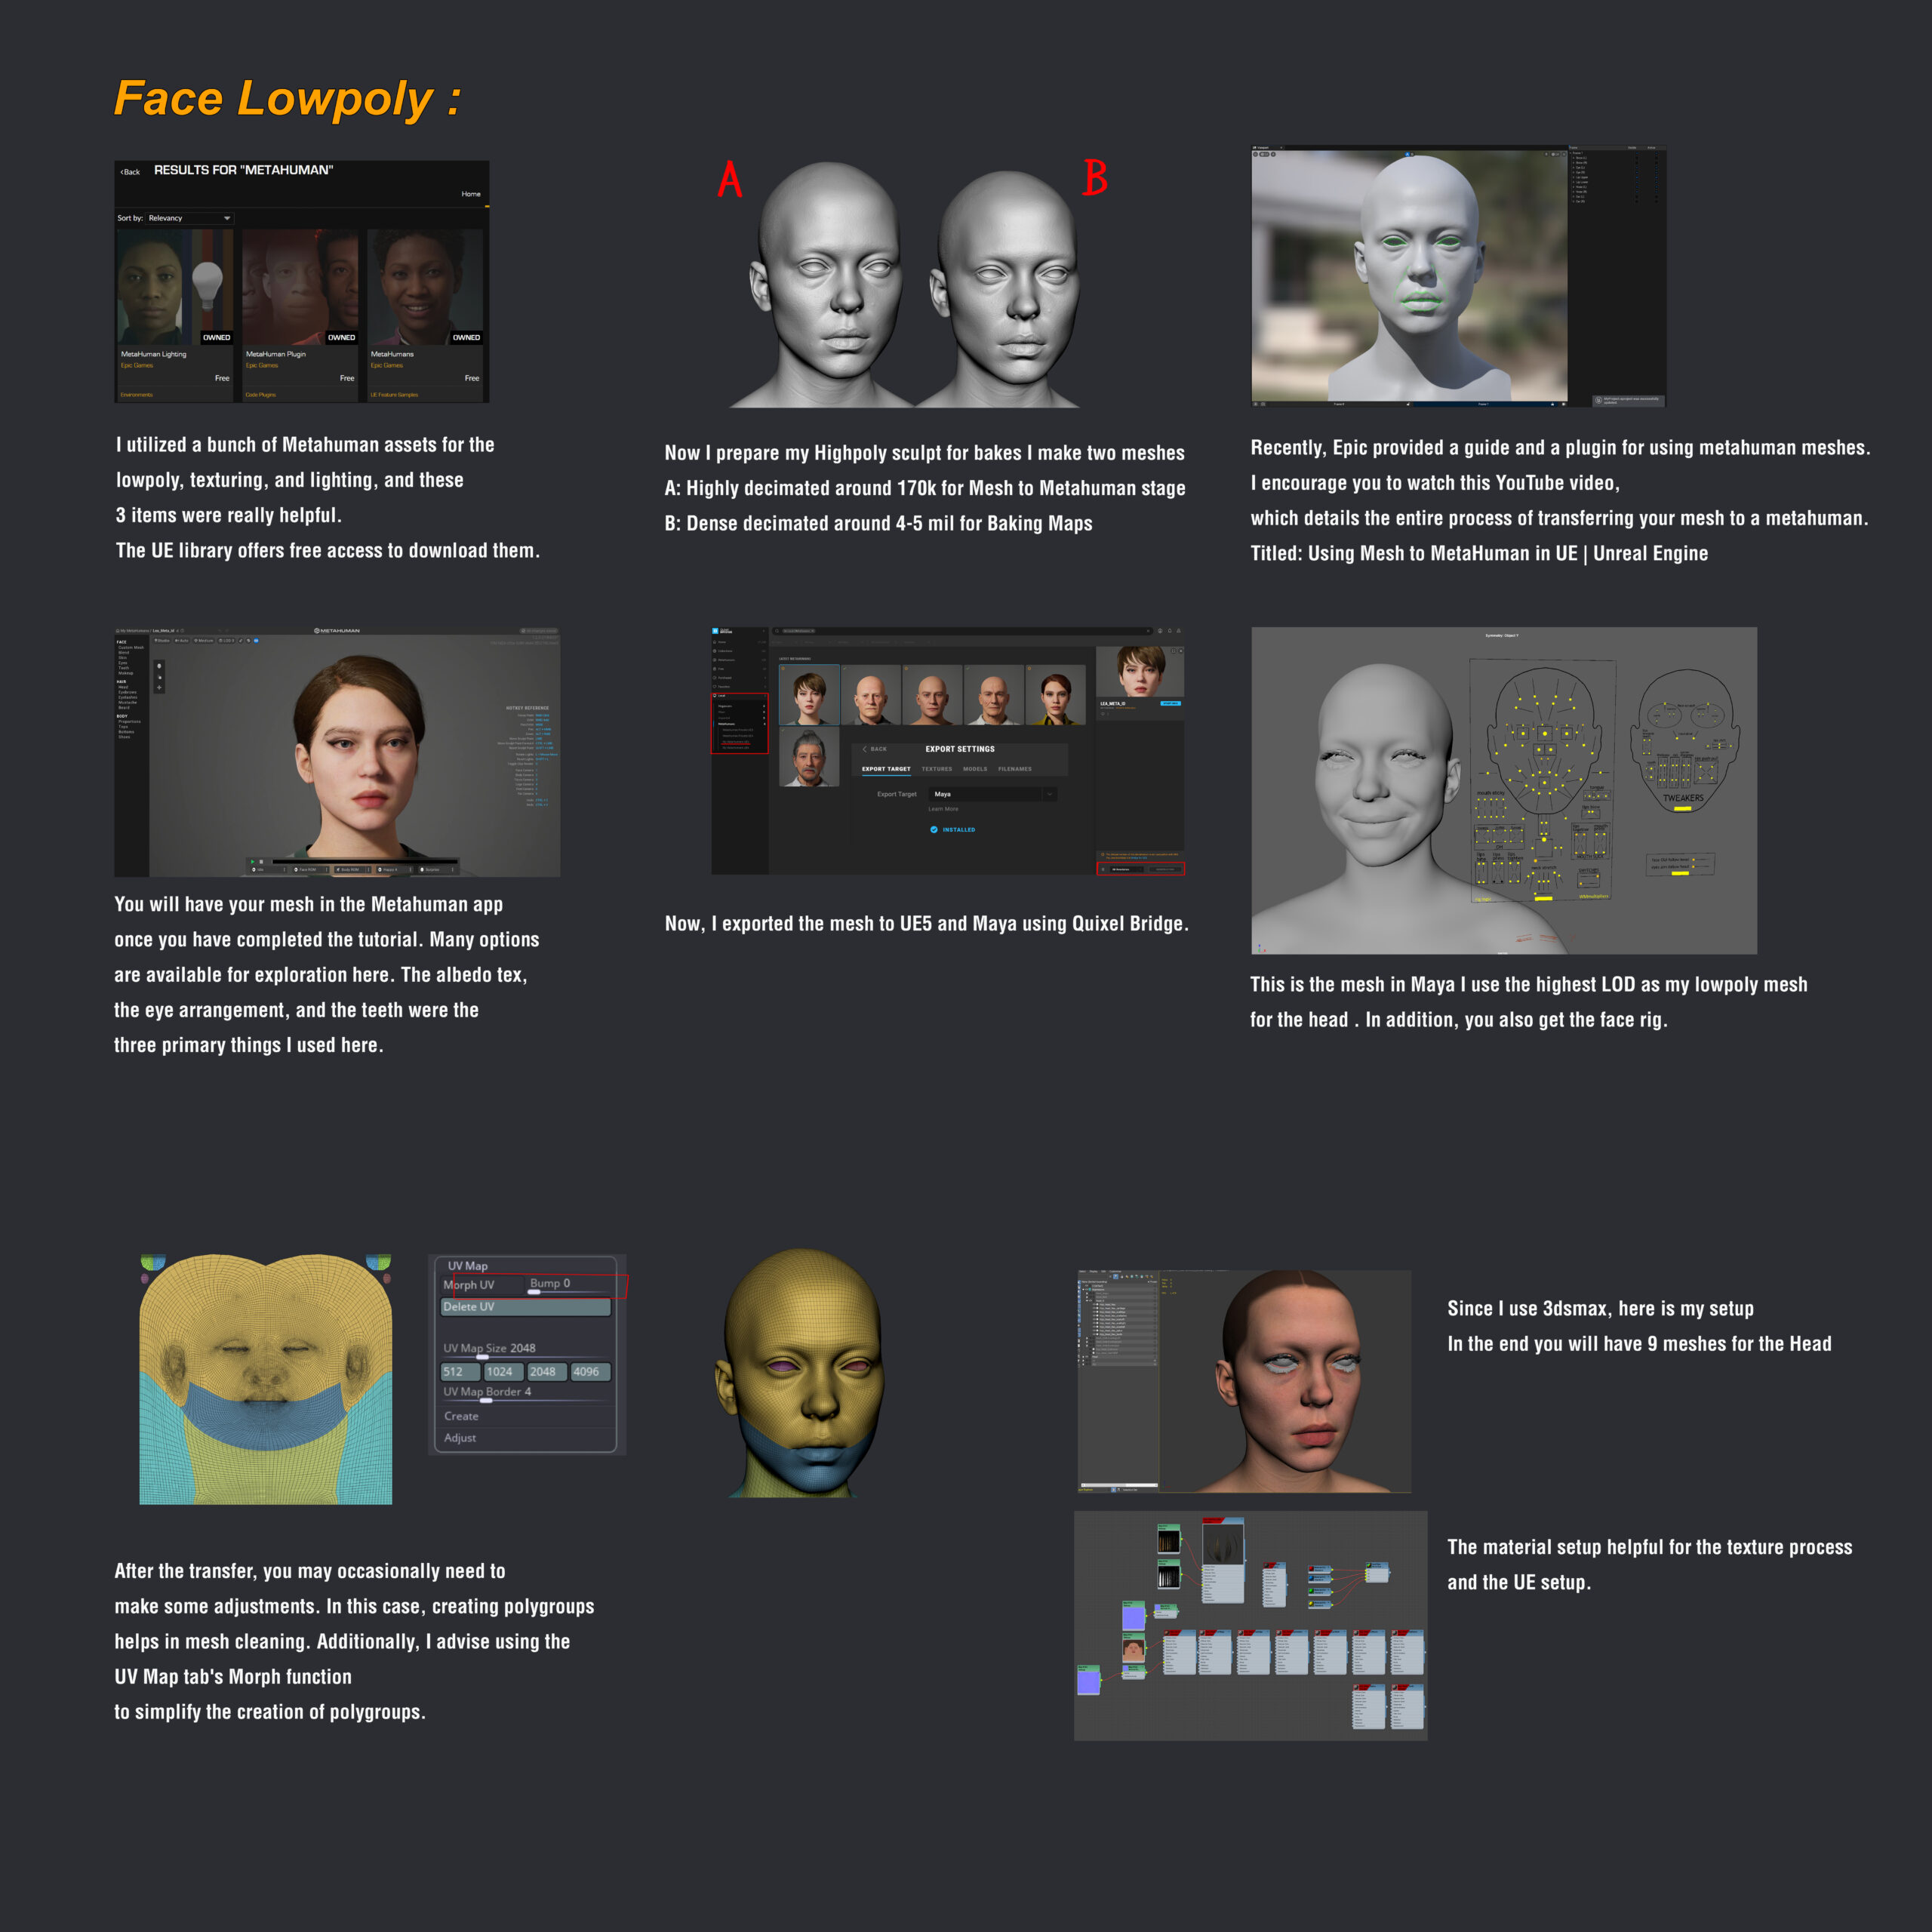
I used a method I learned while working on the Gotham Knights project for the facial textures, so all credit goes to the wonderful artist there. I just tweaked it a little to my liking.
The fundamental idea is to construct the skin’s underlying layers and then overlay a face albedo map on top, which can be any Scan albedo, XYZ, or Metahuman one.
Here’s how the layers are made up in Substance Painter for that.
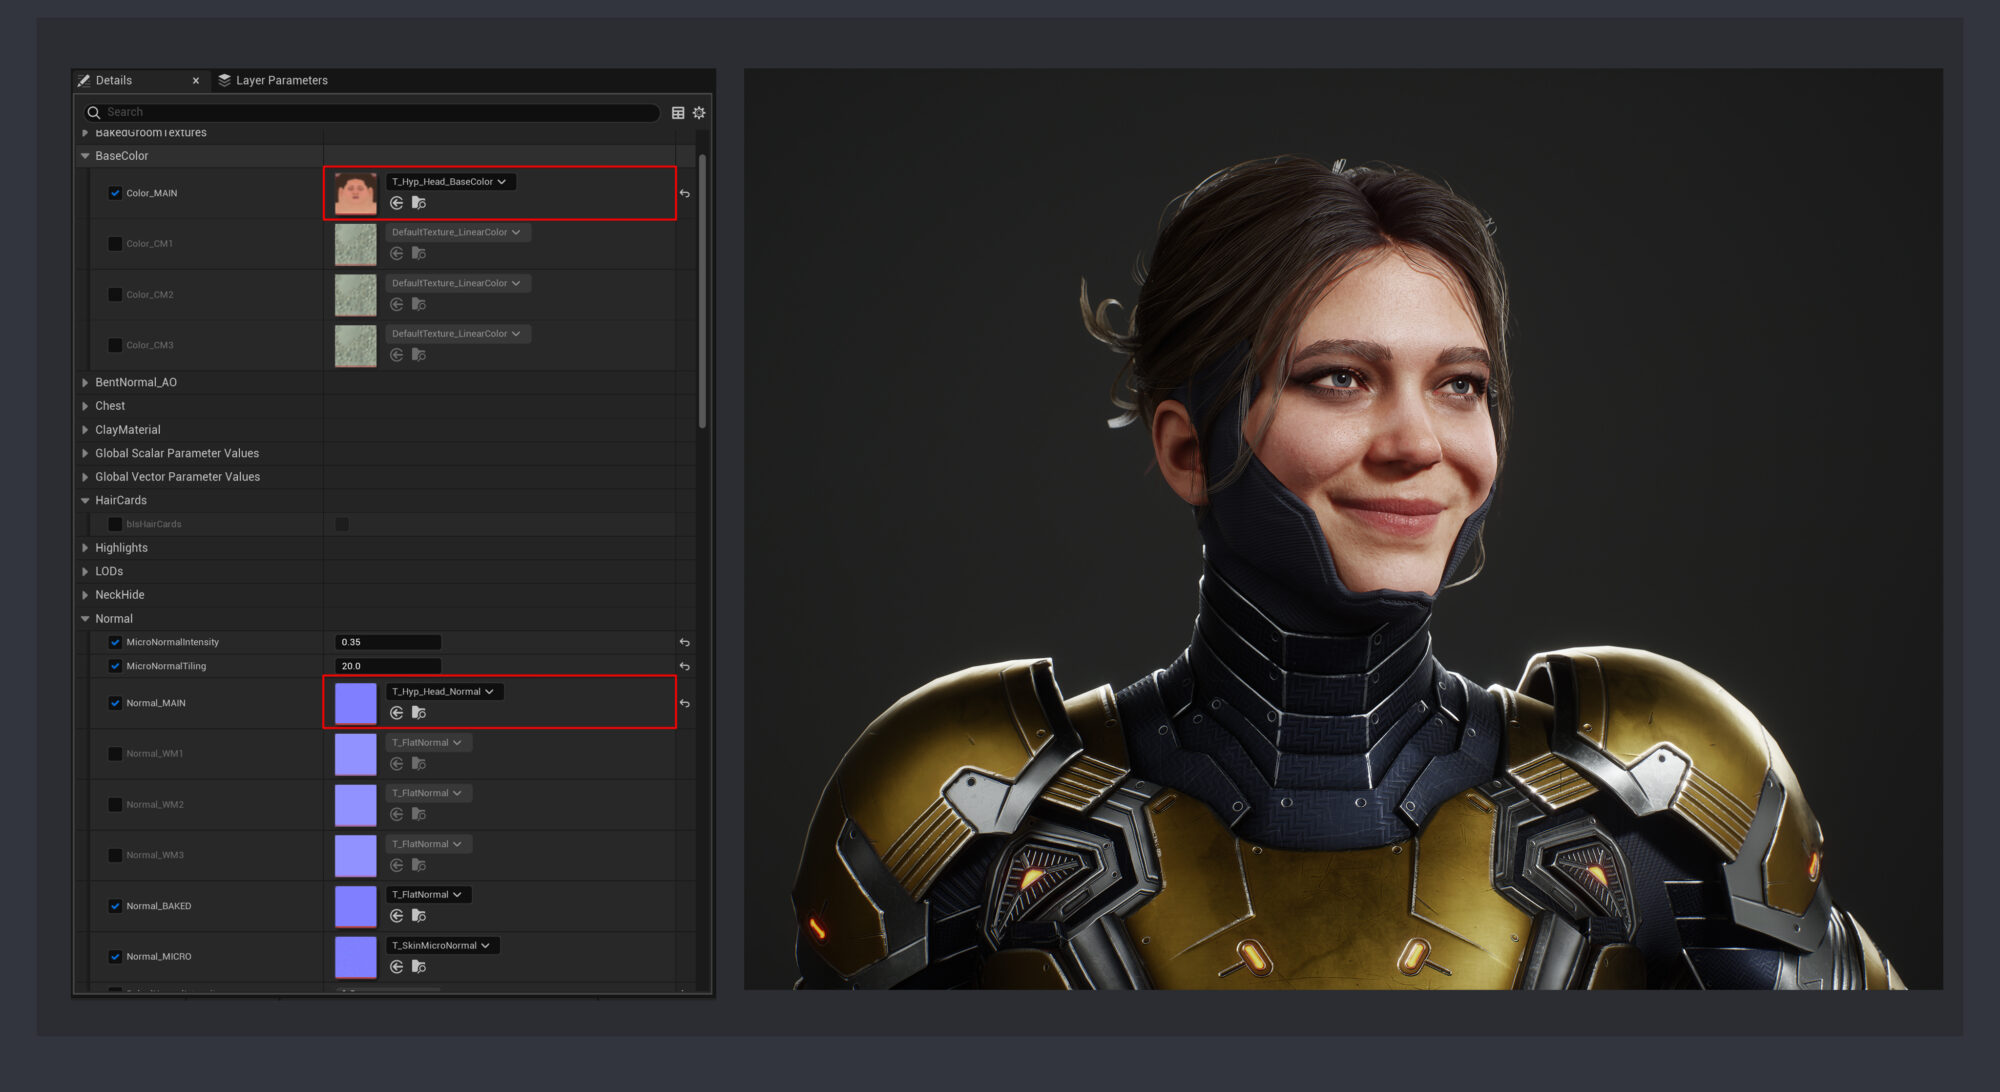
And because I wrapped the Metahuman model around my sculpt, all of the UVs and textures match. Thus, the shader is similar.
I changed two textures with my own: the albedo and the normal map.
Hair Cards
Hair cards can be a frustrating and time-consuming stage, which has frequently put me off completing them. But I tried to make my process optimal this time by doing a lot of planning and organization. Thanks to Sushan Mahandhar for all the ideas and suggestions during the process.
So, when it comes to creating hair cards, planning is essential. Here’s how I accomplished mine.
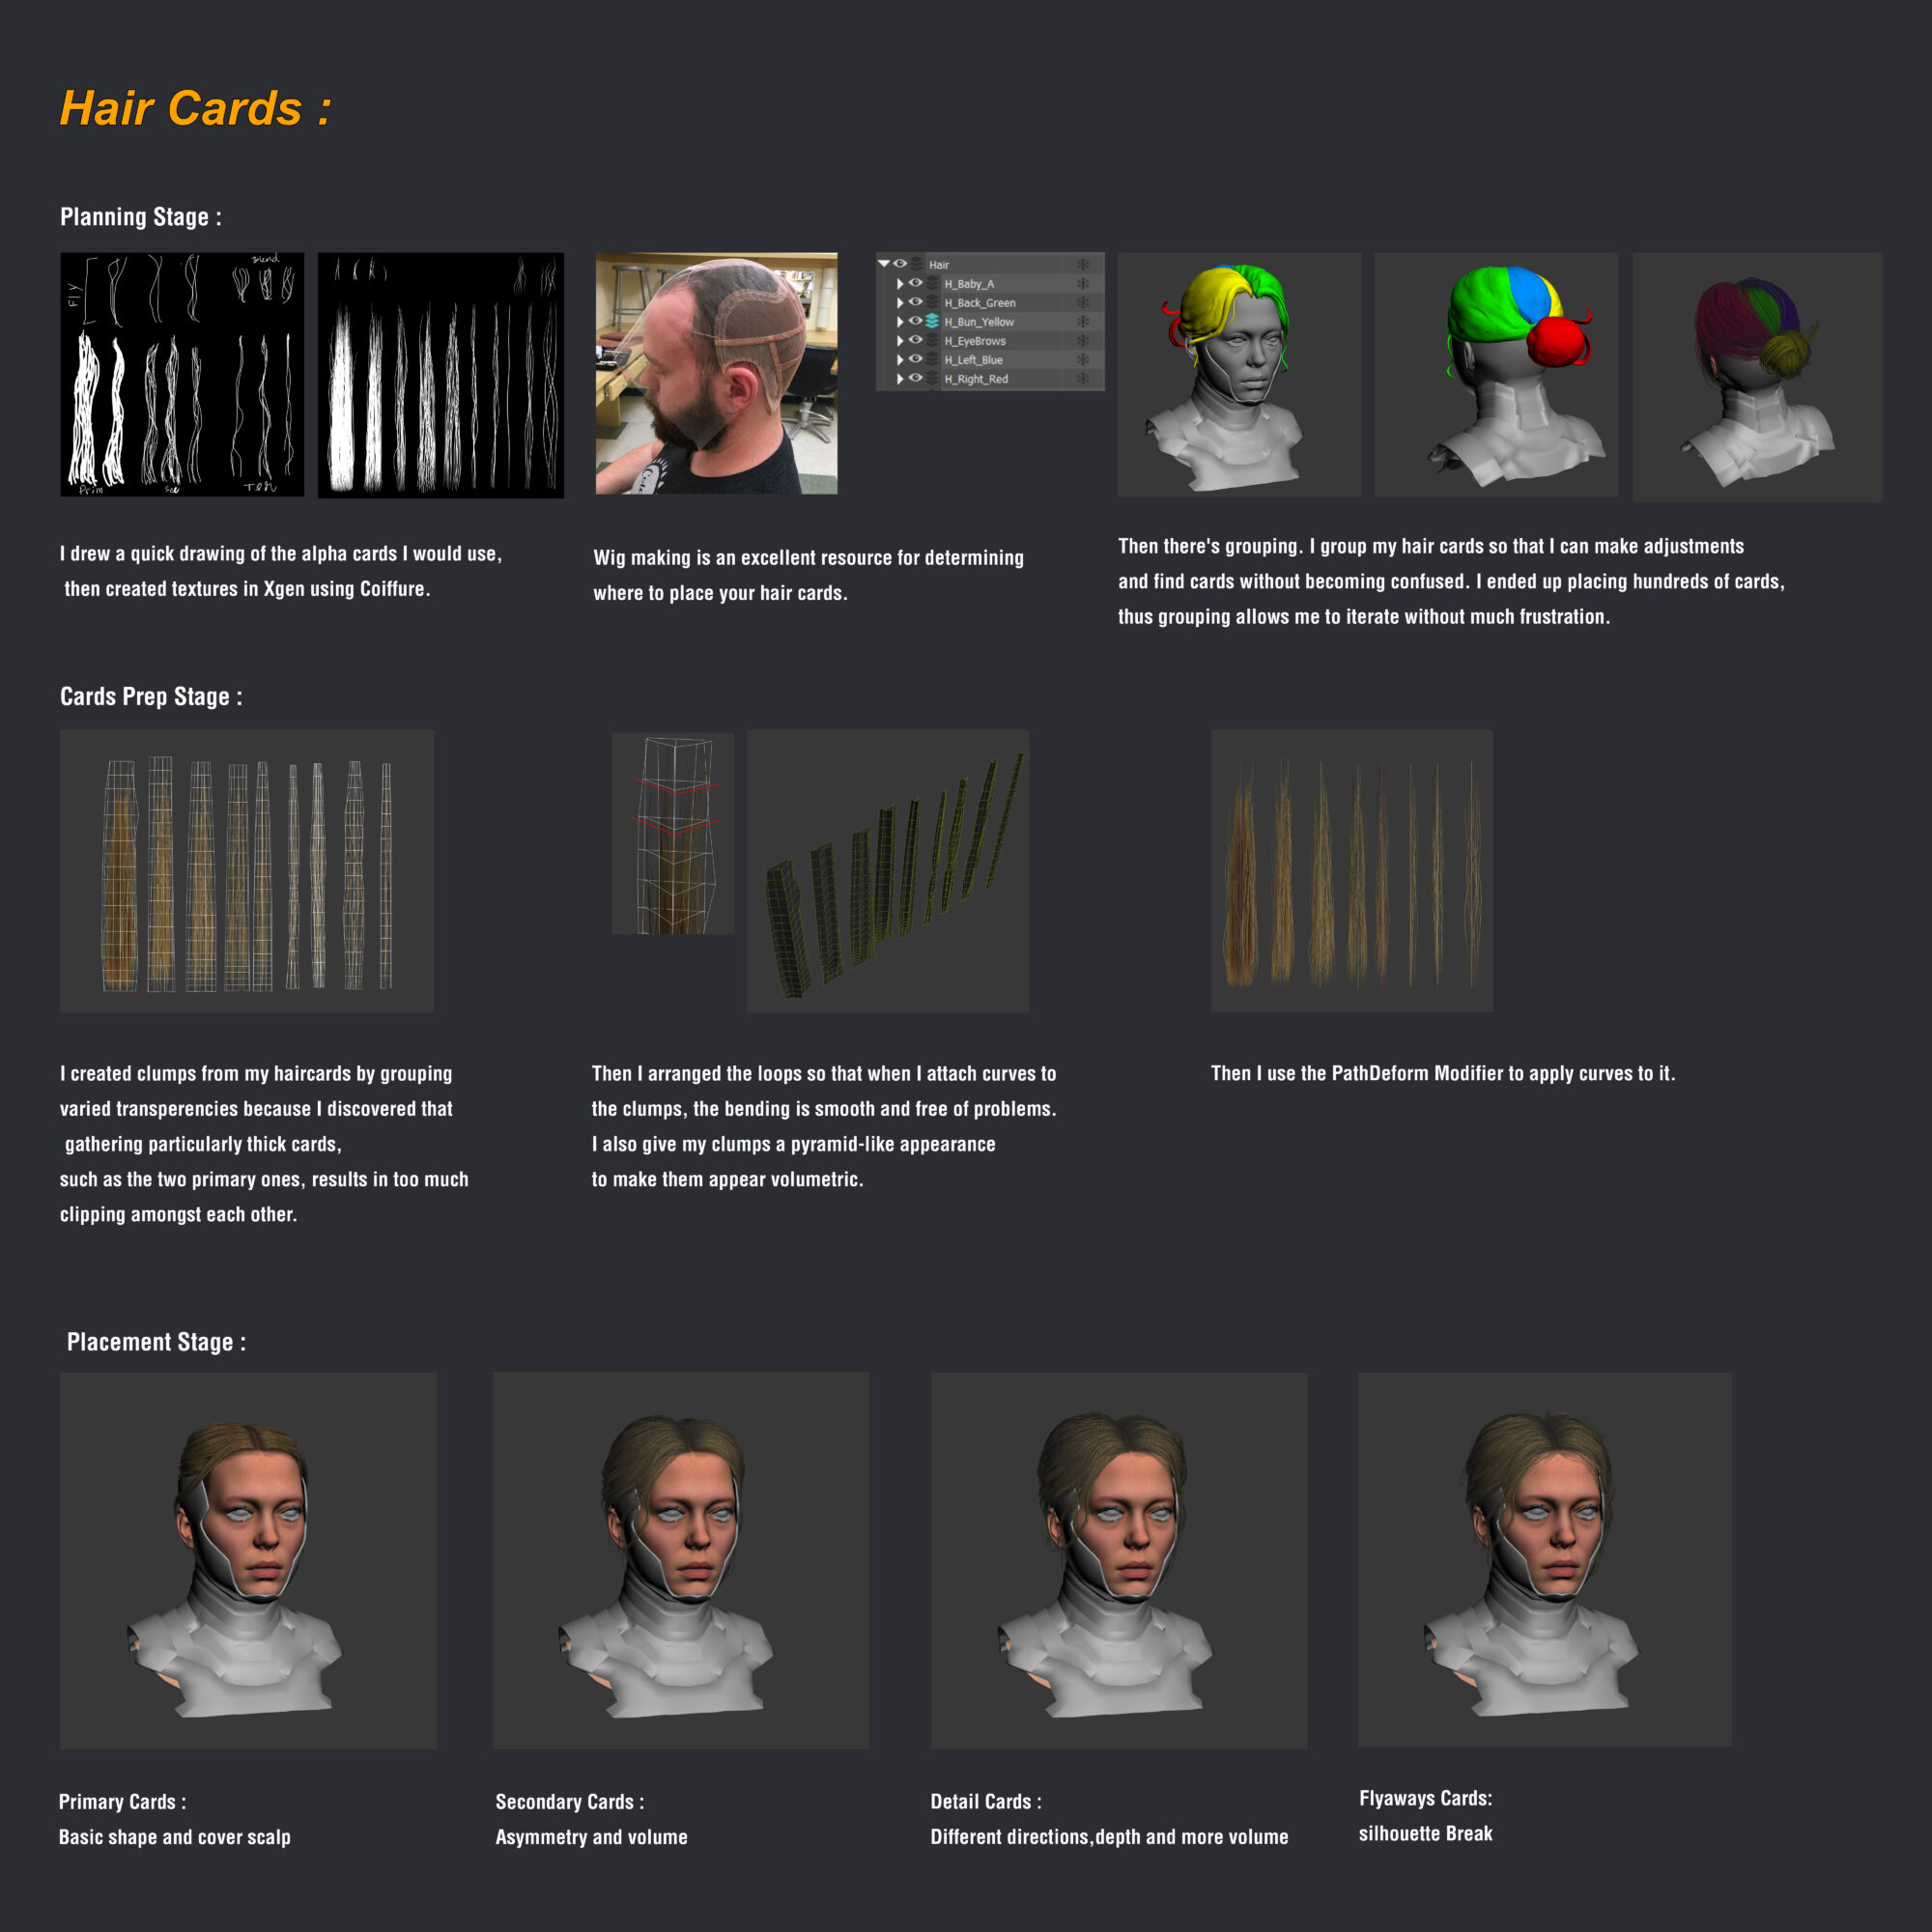
Also, because hair is an iterative process, it is always beneficial to create it in a way that allows for alterations as needed.
I did numerous iterations, continuously testing it in Unreal Engine and occasionally adjusting the volumes in ZBrush.
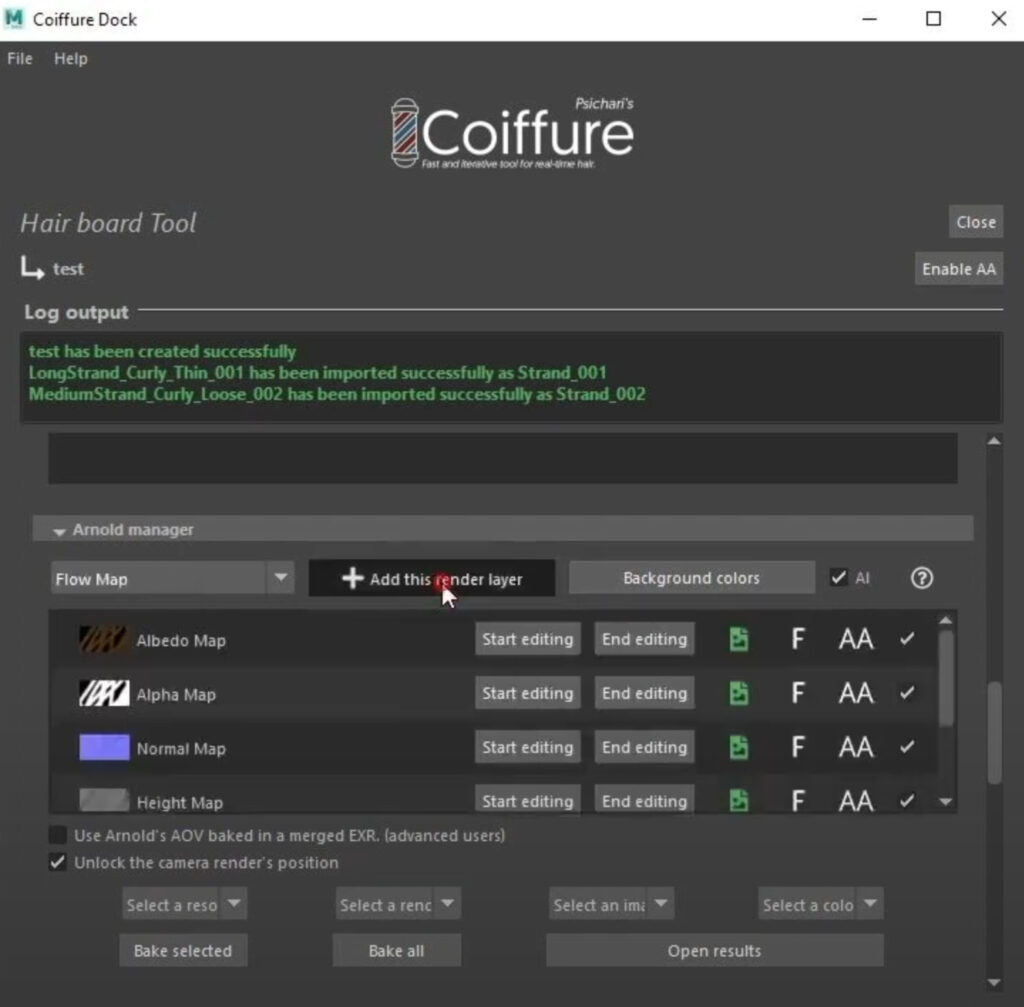
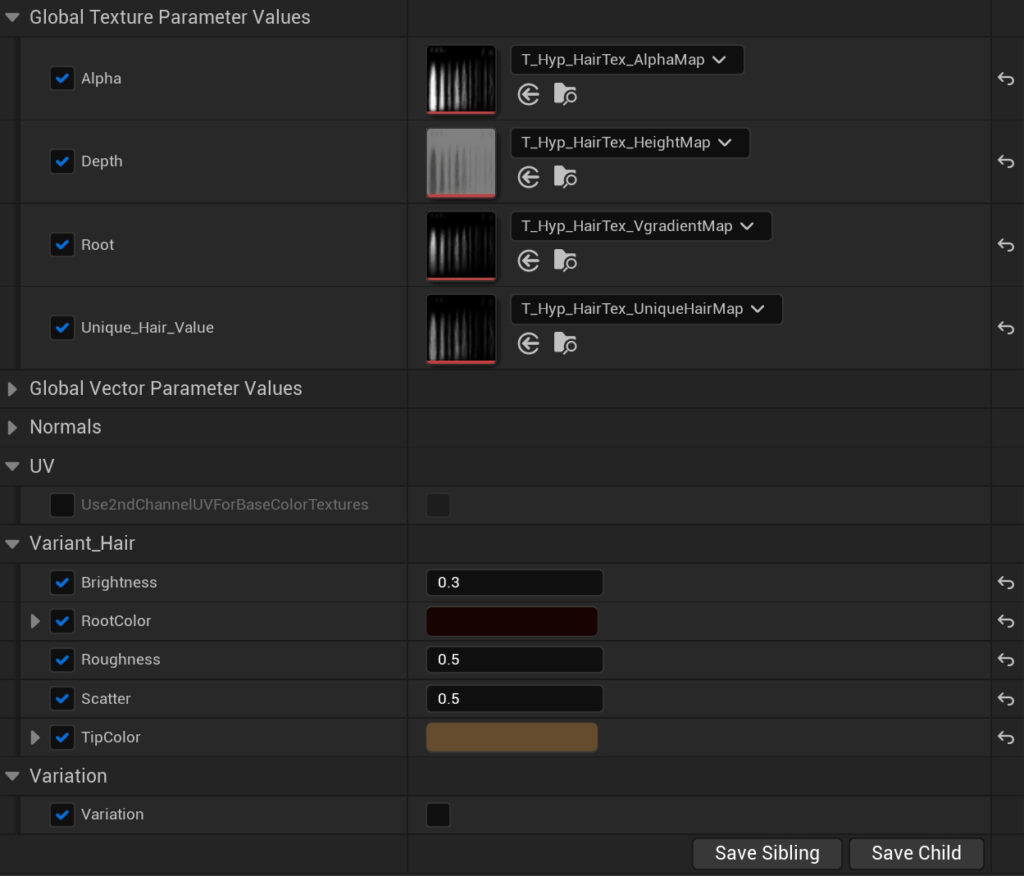
The Hair shader is then set up using the Paragon shader, which is free to download and use. I simply replaced their maps with mine, and all of the maps were easily baked inside Coiffure.
Just make sure to experiment with the PixelDepthOffset settings if you encounter any strange issues with the hair.
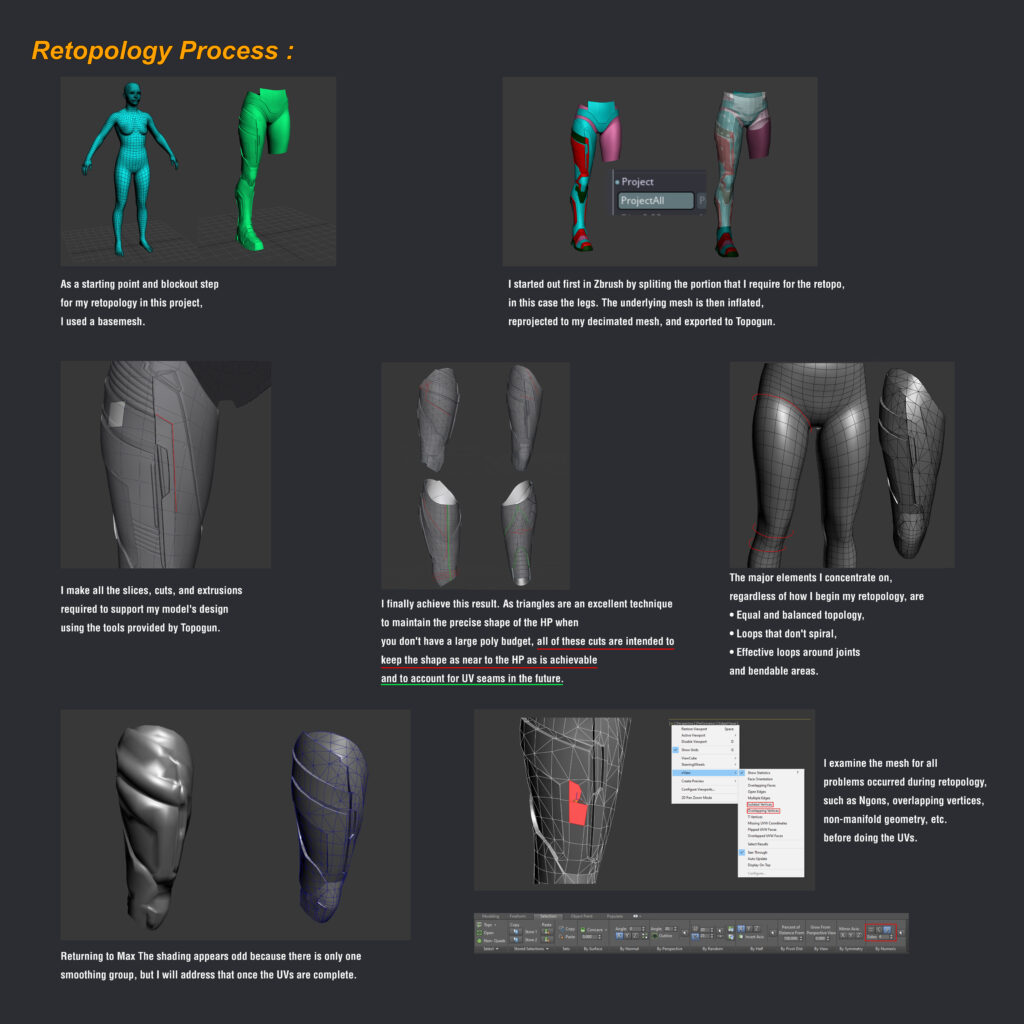
Low-Poly Suit
When it comes to low-poly modeling, one thing I would recommend is creating shortcuts for all the repeated tasks and tools used during retopology, such as cut, weld, bridge, collapse, loop, and so on, to expedite the process.
This is how I approached most of the suit’s retopology and UVs.

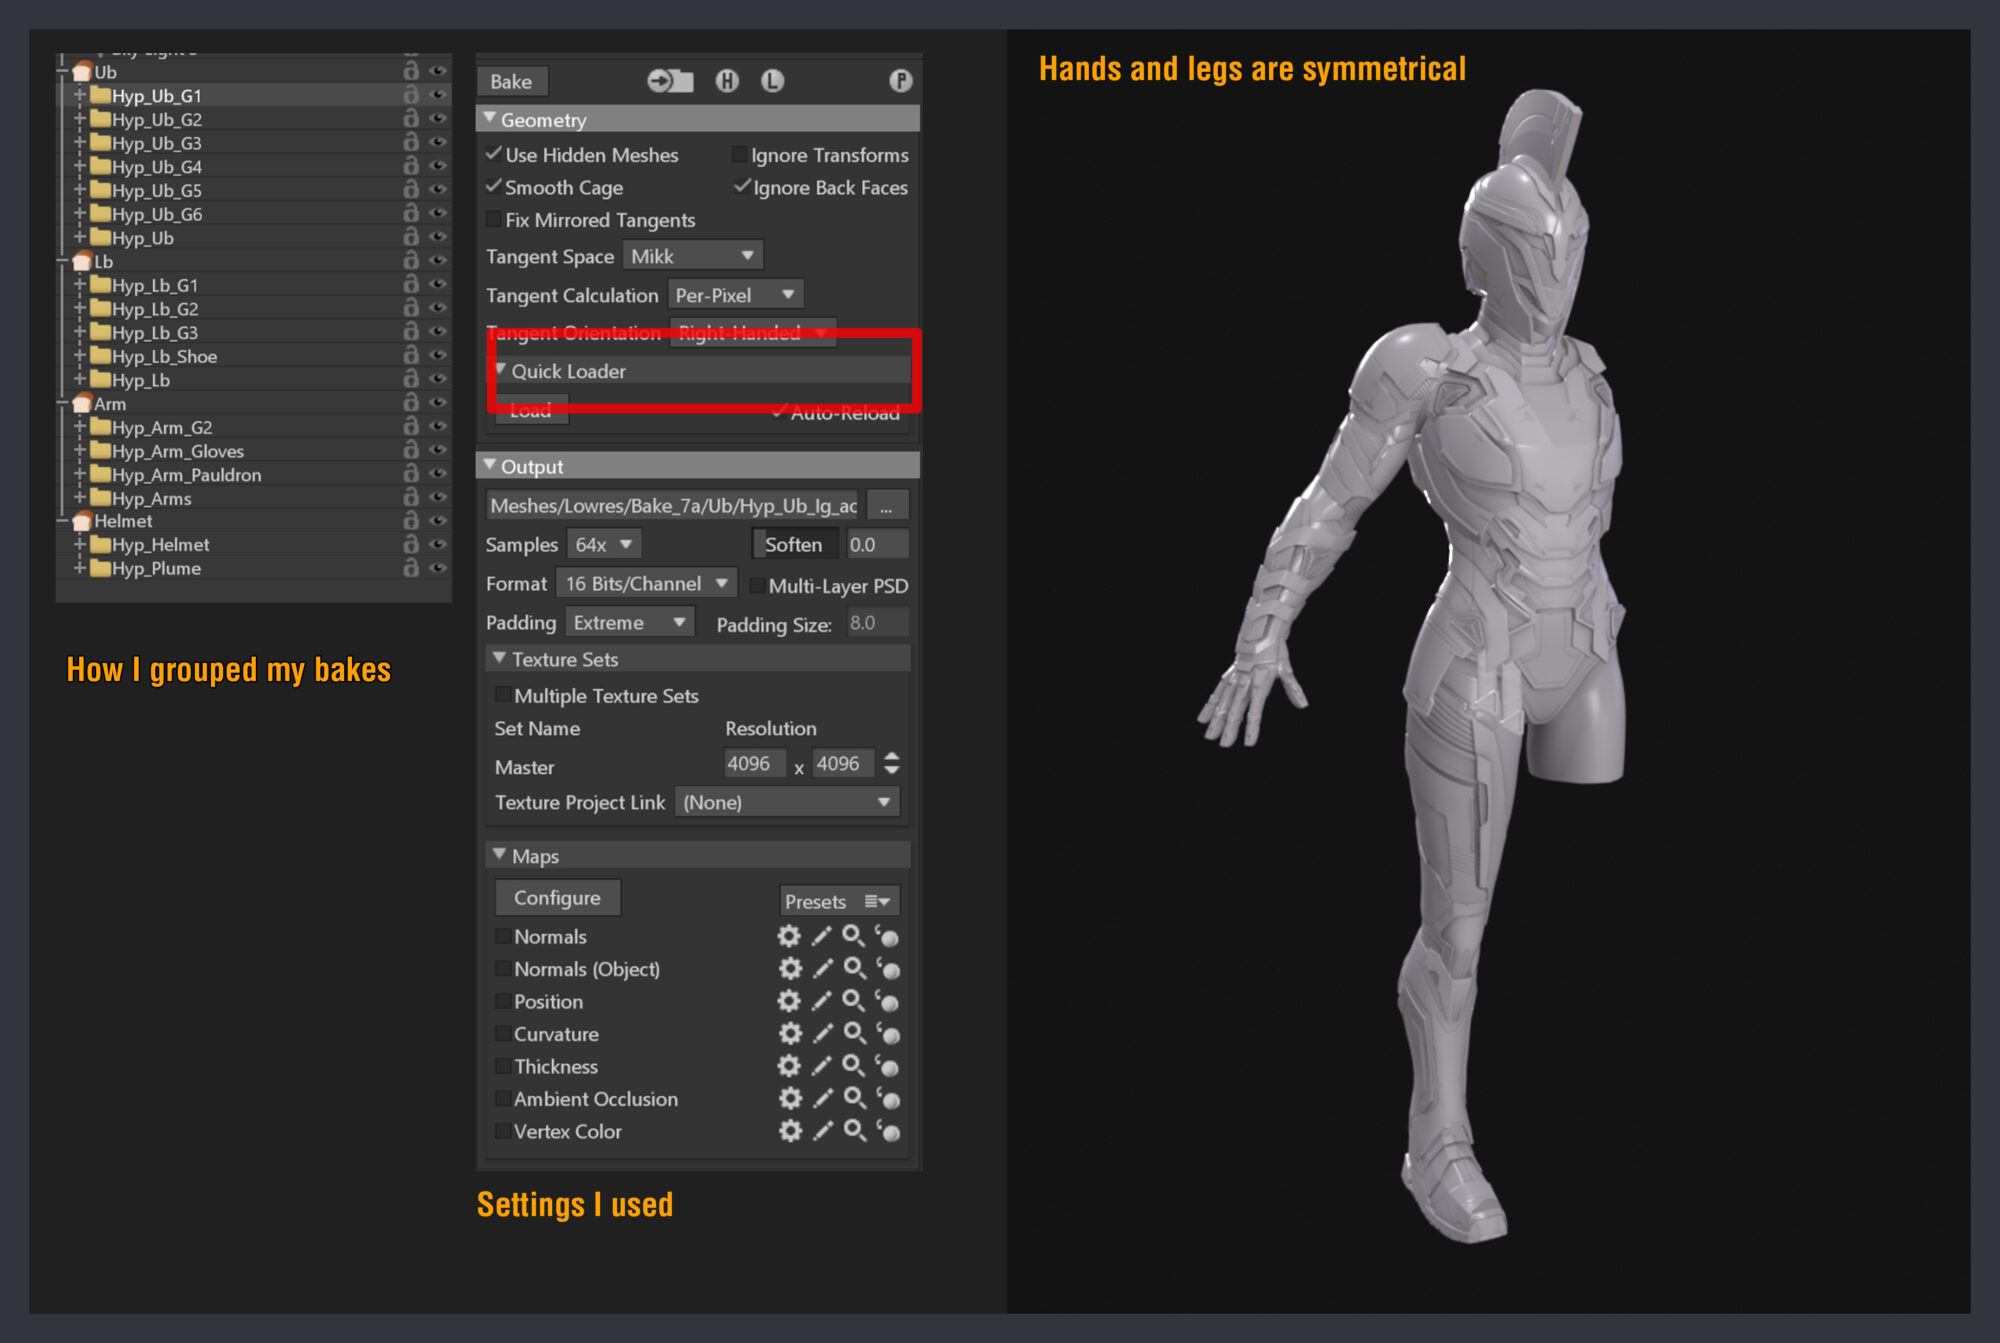
Baking
To bake all of my assets, I utilized Marmoset Toolbag 4.
If you match the naming for your high and low-poly meshes, for example: armor_high and armor_low (careful, it’s case-sensitive), and use the quickloader to load the meshes, Marmoset will automatically organize your mesh.
Texturing
For the suit’s textures, I designed all of my ID maps so that I could instance the textures throughout all of my texture sets, and only emissive and some dirt maps are unique.
I also have my Tonal map set to ACES to match my UE scene.
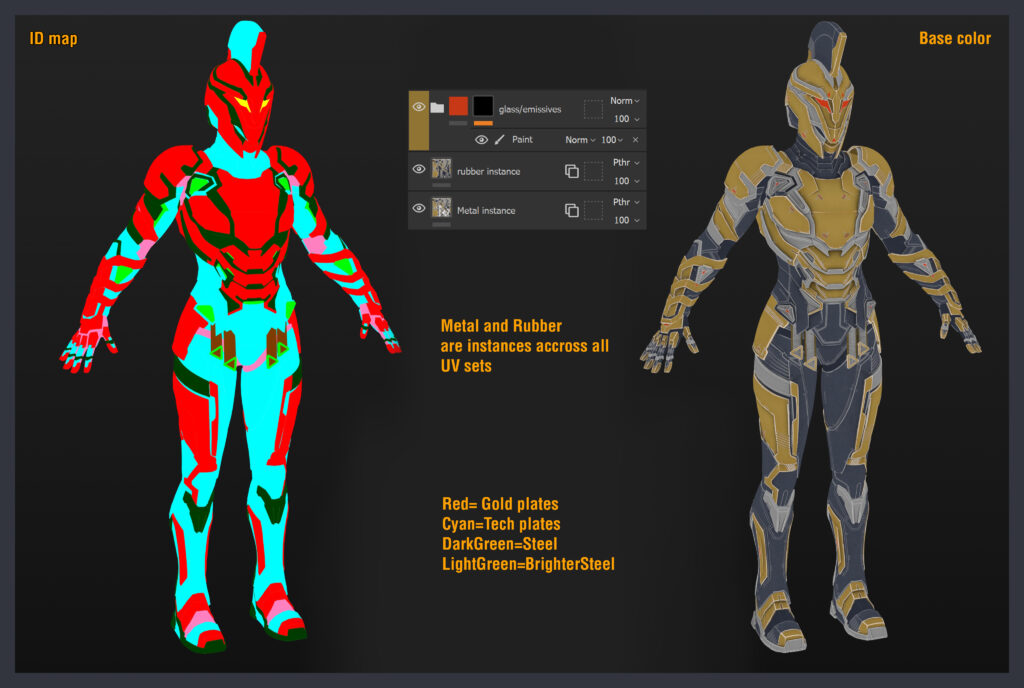
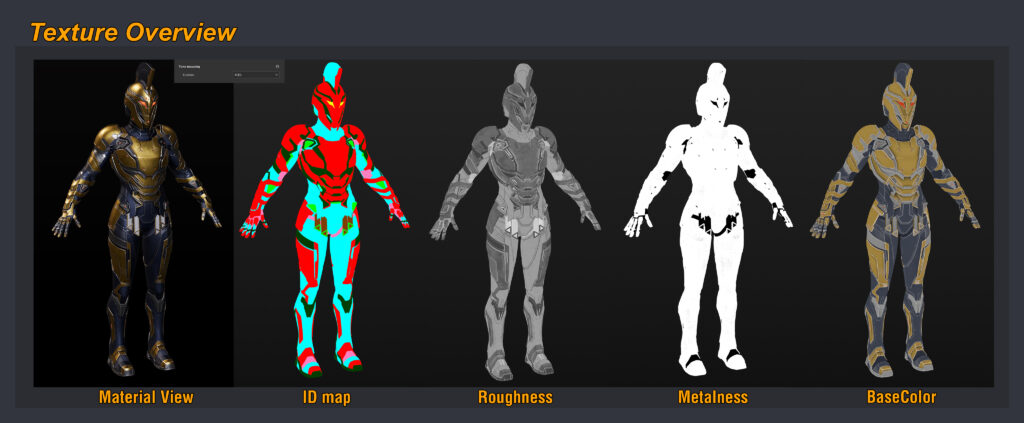
Here are the layers created using Substance Painter.
My primary goal was to have a lot of contrast in terms of color and roughness, so that each element could stand out.
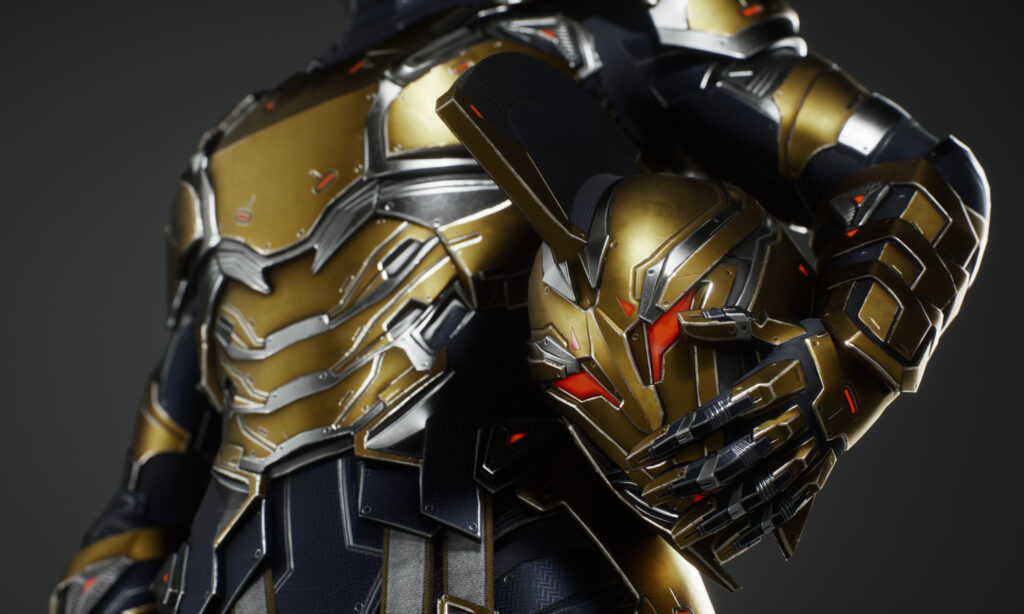
Posing
Since I don’t know much about rigging, all of the poses were created in ZBrush using Tpose Master.
For this project, I created four postures that were influenced by different things.
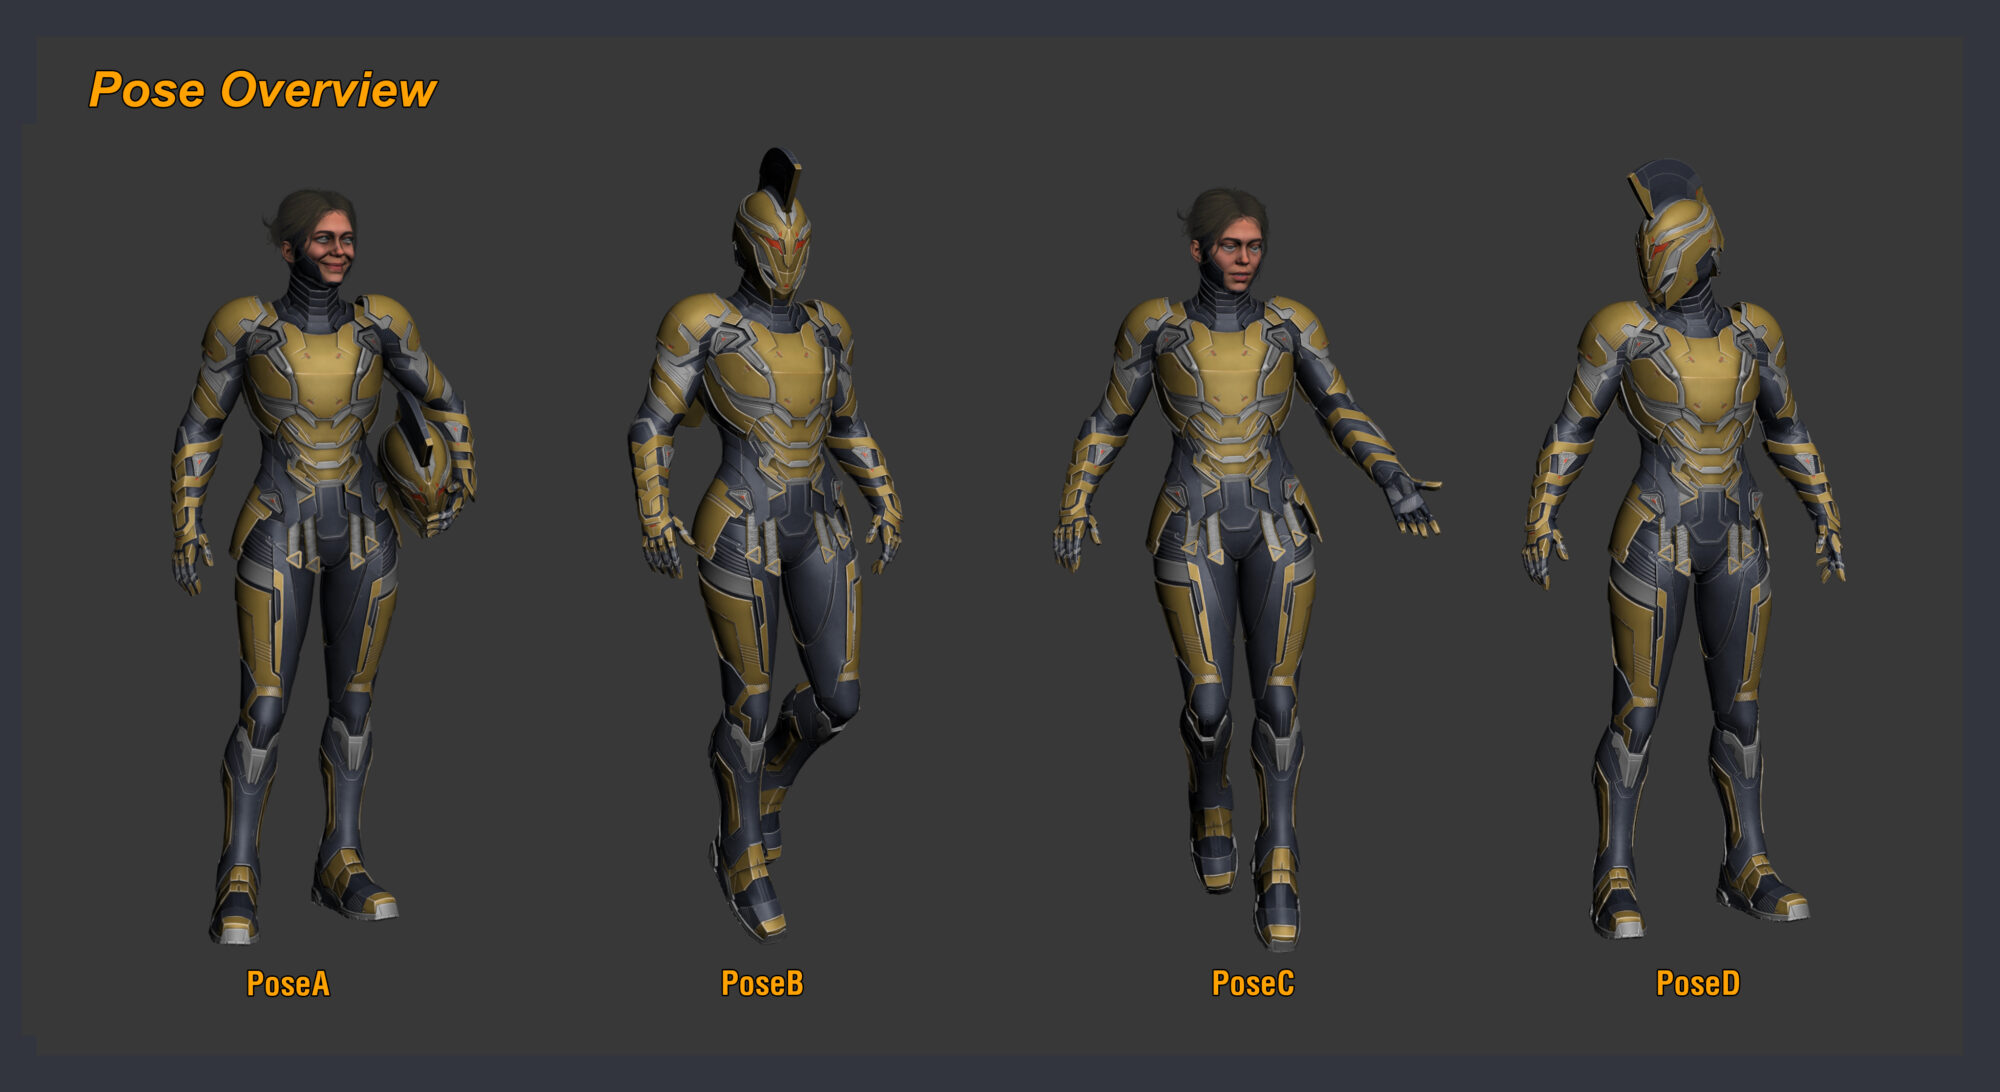
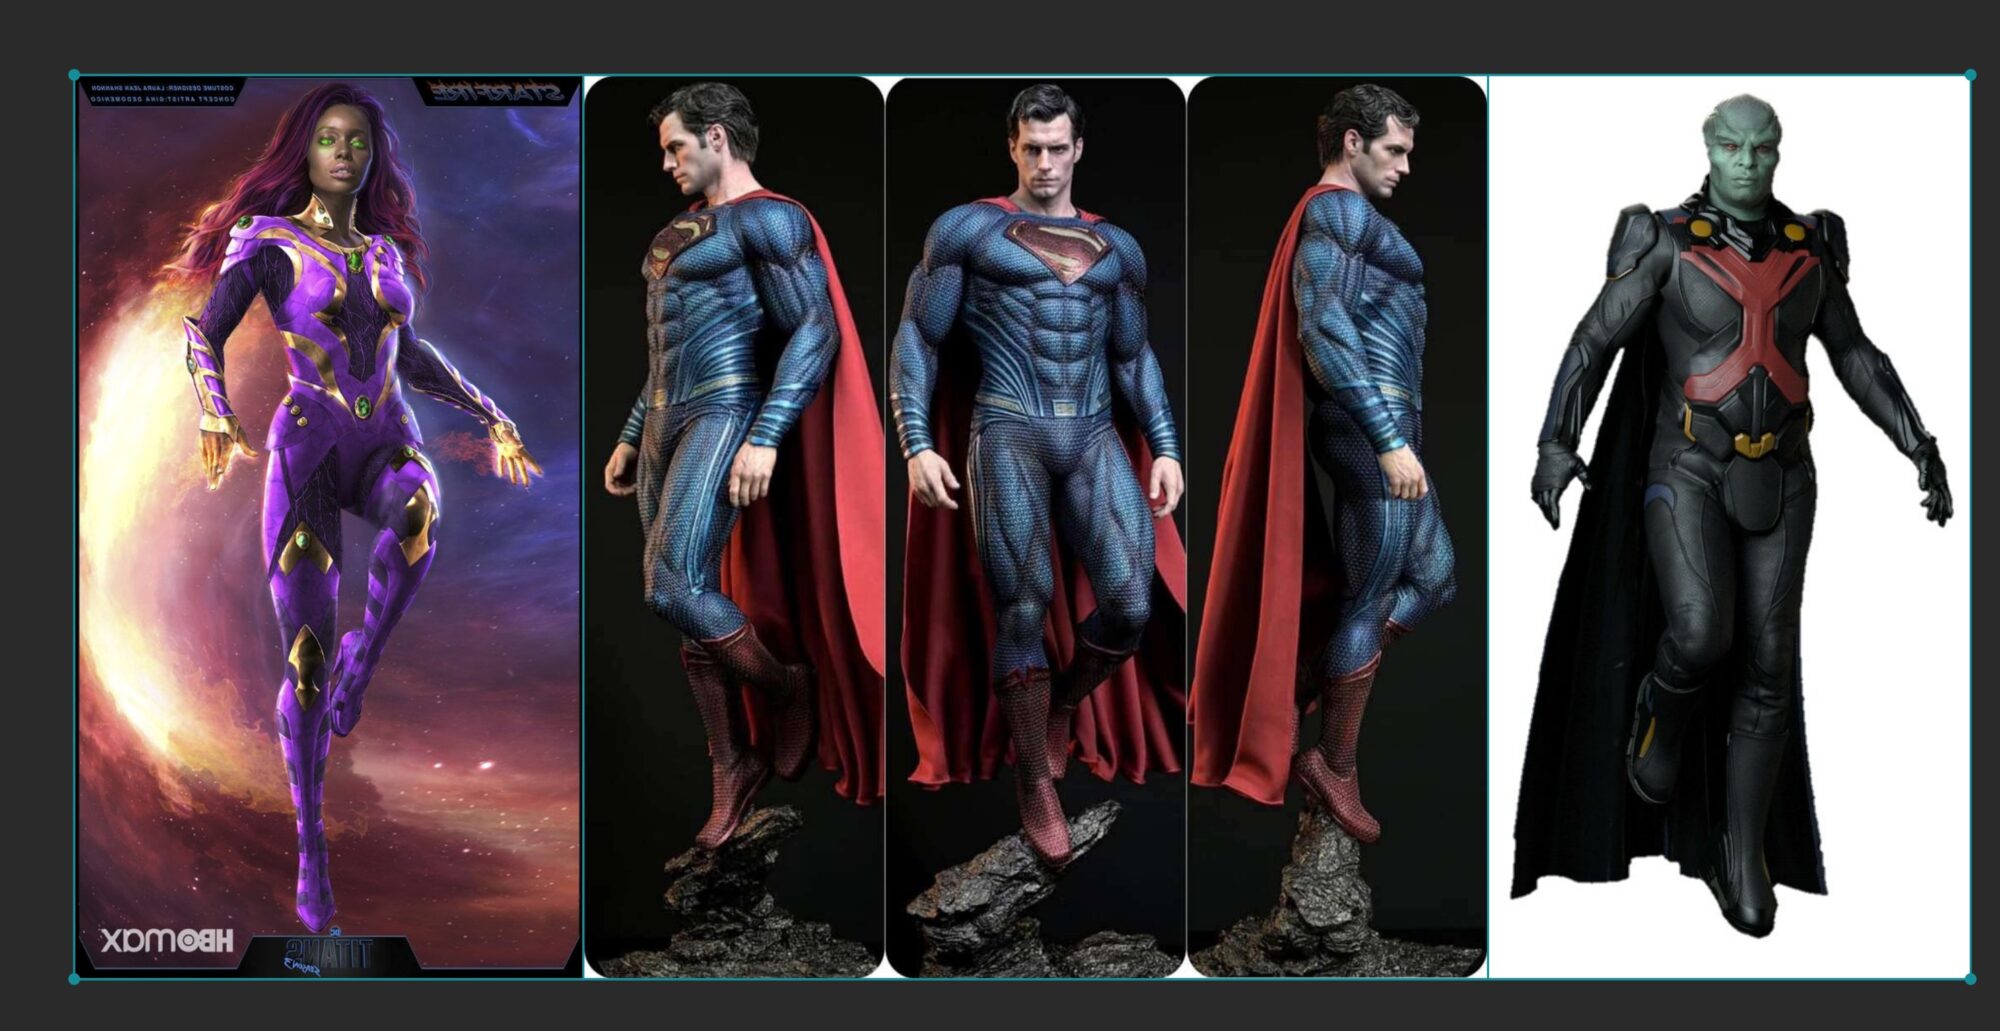
Pose A
Here I was influenced by studio photographs.
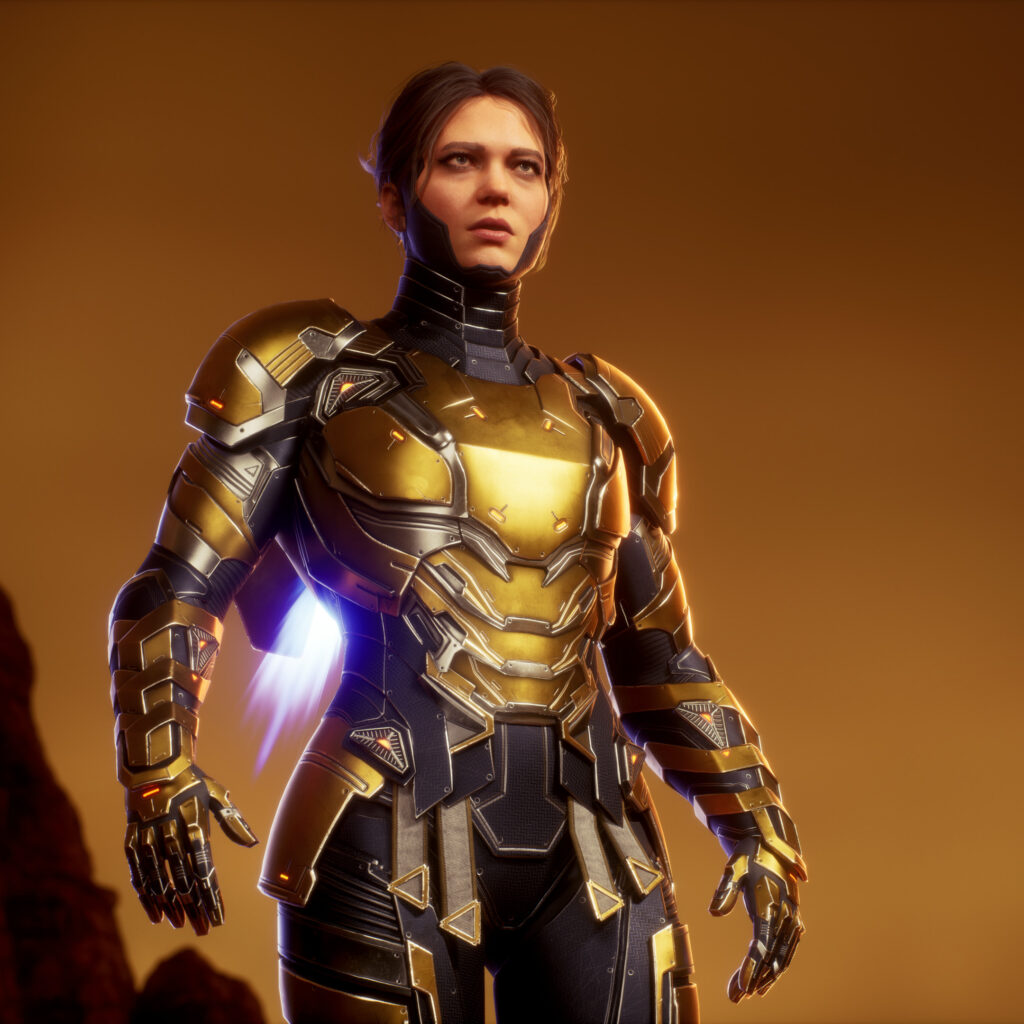
Pose B
Here I was influenced by superhero flying postures.
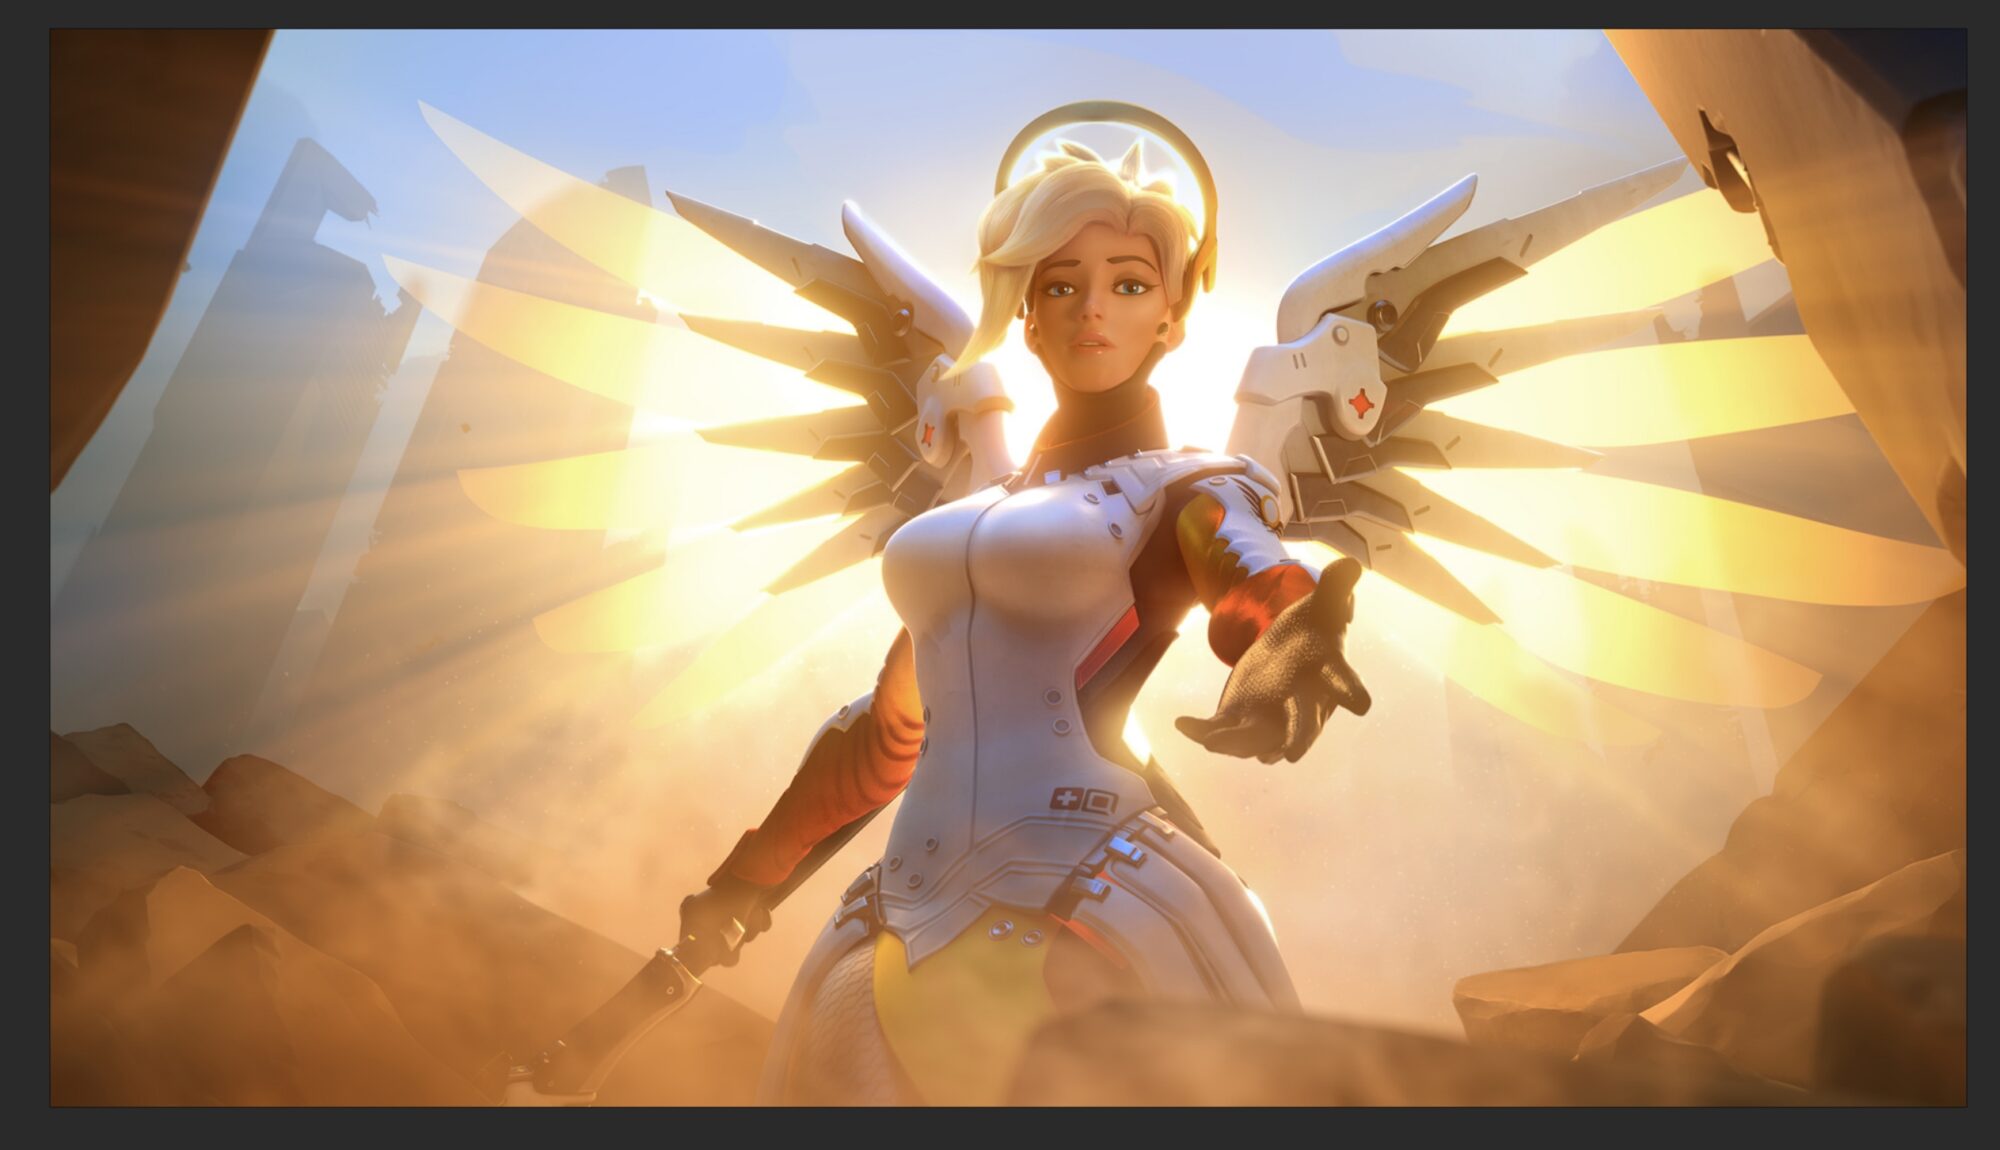
Pose C
I was particularly influenced by Mercy in Overwatch.
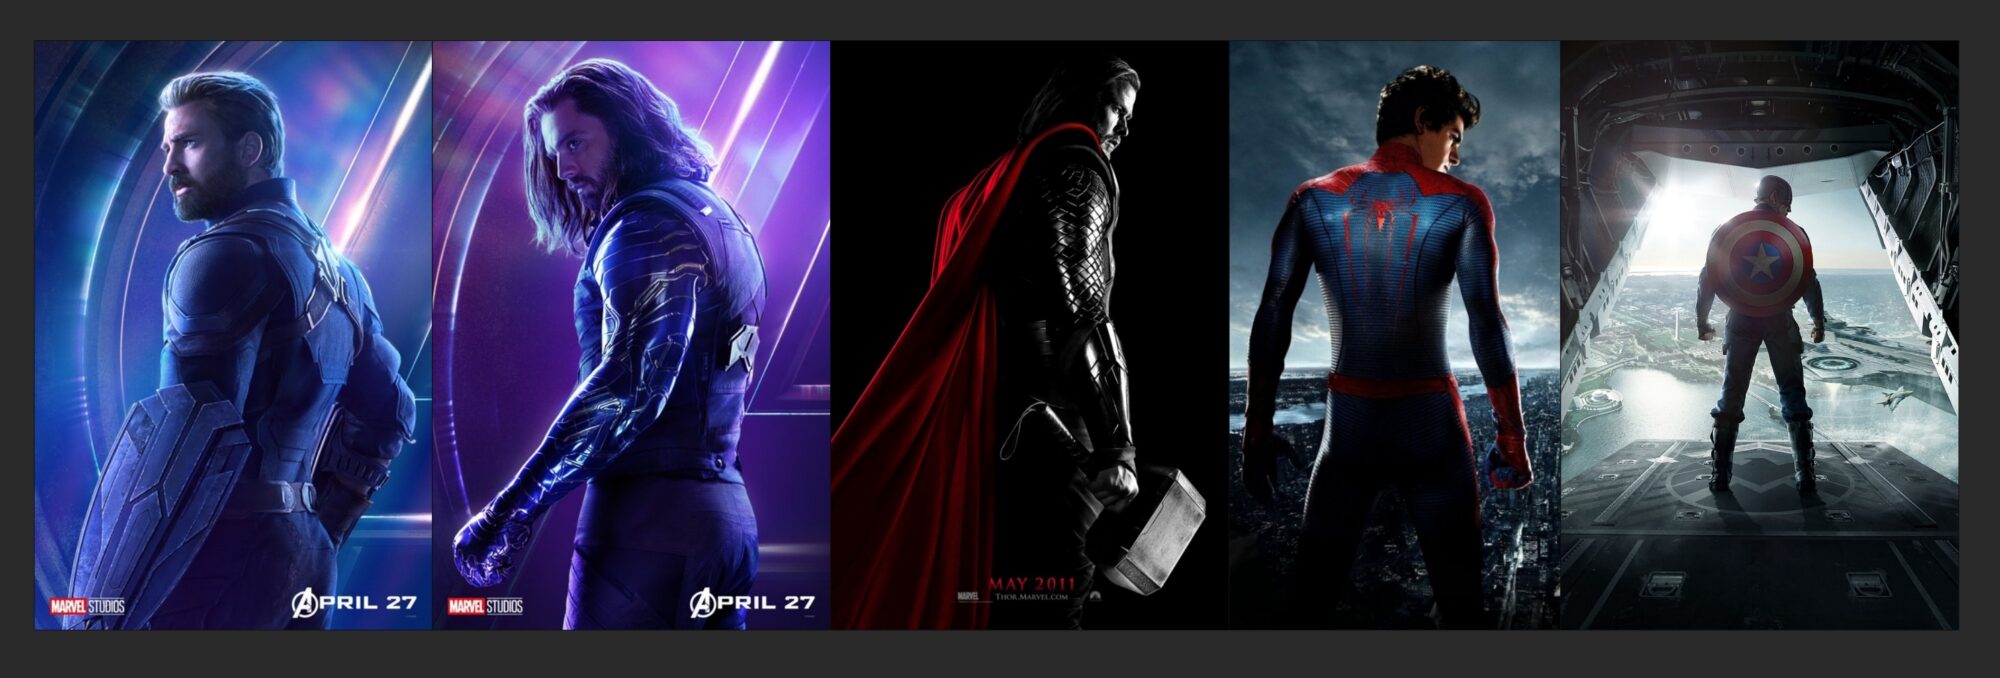
Pose D
I was influenced by a backshot image from superhero movies.
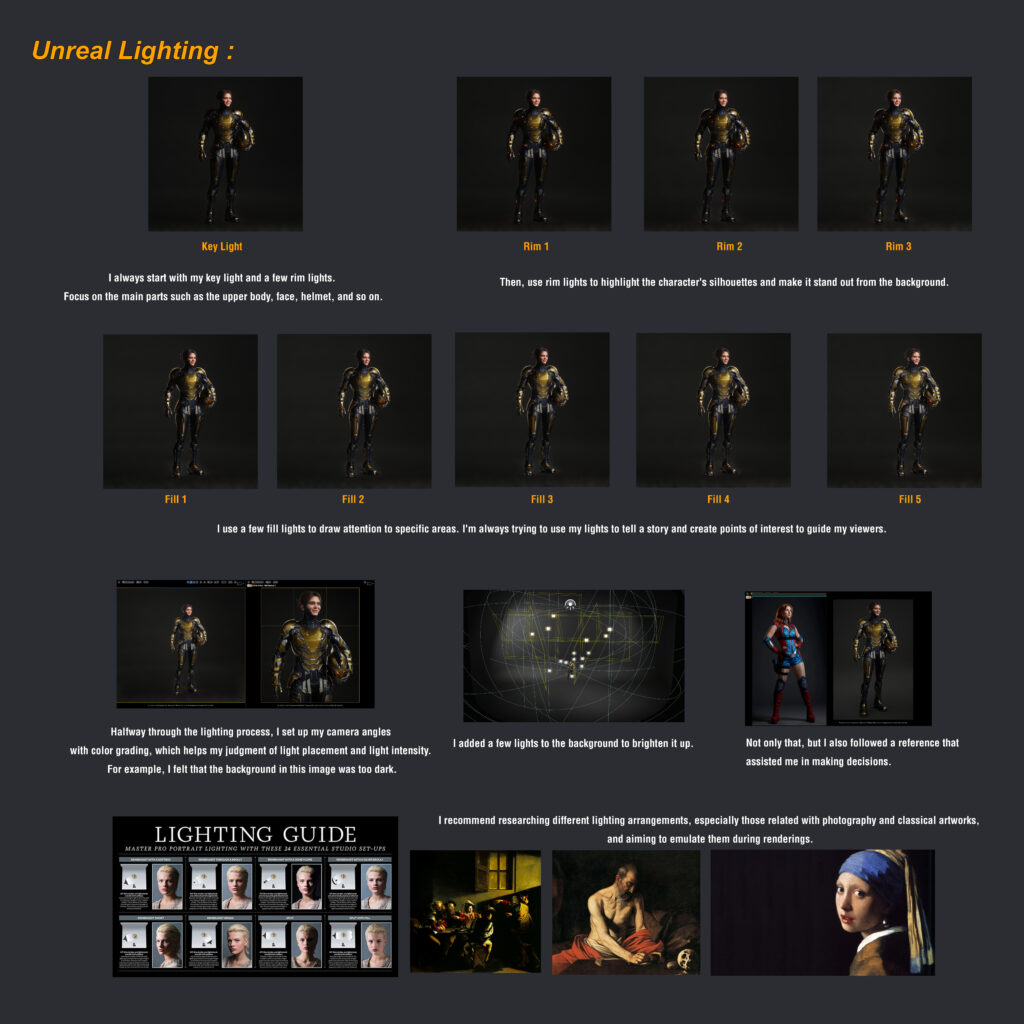
Rendering & Lighting
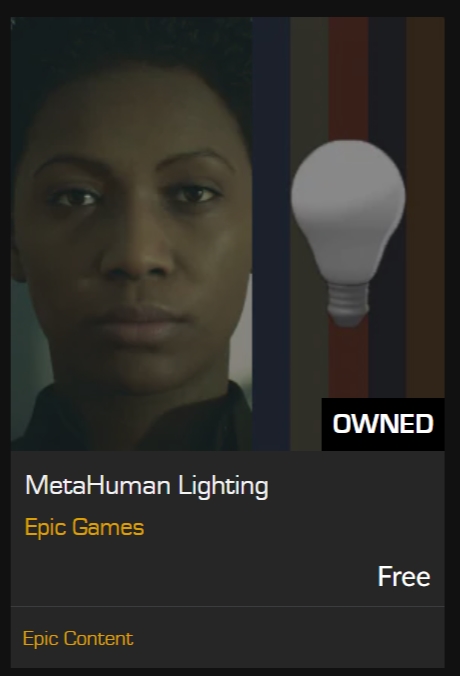
I rendered with UE 5.0. I used the Epic MetaHuman Scene as a starting point but personalized it to fit my scene.
The Epic Content shown below.
I began by importing a cylinder from 3ds Max into UE. I subdivided the cylinder 2-3 times and inverted the normals.
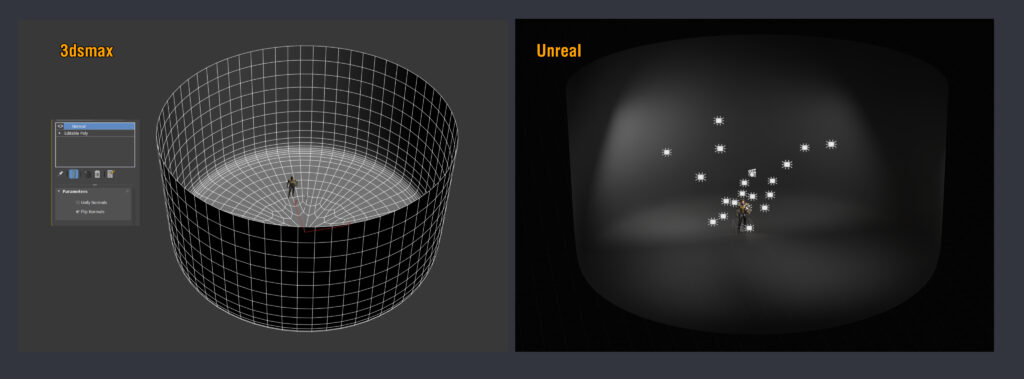
Nothing special for PostProcess, just some Bloom and Exposure changes.
Just be sure to check the Lumen GI (Global Illumination) Final Gather Quality because it might generate these lines when rendering.

I did some color grading with the camera’s LUTs because I like working with unique ones rather than global ones.
Here are the camera and LUT settings. For the LUTs, I utilized the Amplify LUT set.

Finally, I used the Movie Render Queue to render out all of the photos, and I would highly recommend watching this video from Clinton Jones and William Faucher’s YouTube and Render Video.
Here is the console variables I used:
r.ScreenPercentage (150-200)
r.AmbientOcclusion.Denoiser 0
r.AmbientOcclusion.Denoiser.TemporalAccumulation 0
r.DiffuseIndirect.Denoiser 0
r.Reflections.Denoiser 0
r.Reflection.Denoiser.TemporalAccumulation 0
r.Shadow.Denoiser 0
r.Shadow.Denoiser.TemporalAccumulation 0
r.GlobalIllumination.Denoiser.TemporalAccumulation 0
r.MotionBlurQuality 4
r.MotionBlurSeparable 1
r.DepthofFieldQuality 4
r.BloomQuality 5
r.Tonemapper.Quality 5
r.RayTracing.Reflections.Shadows 2
r.RayTracing.Reflections.SamplesPerPixel 64
r.RayTracing.Shadows.SamplesPerPixel 64
r.RayTracing.GlobalIllumination.Denoiser 0
r.RayTracing.Shadows.EnableTwoSidedGeometry 0
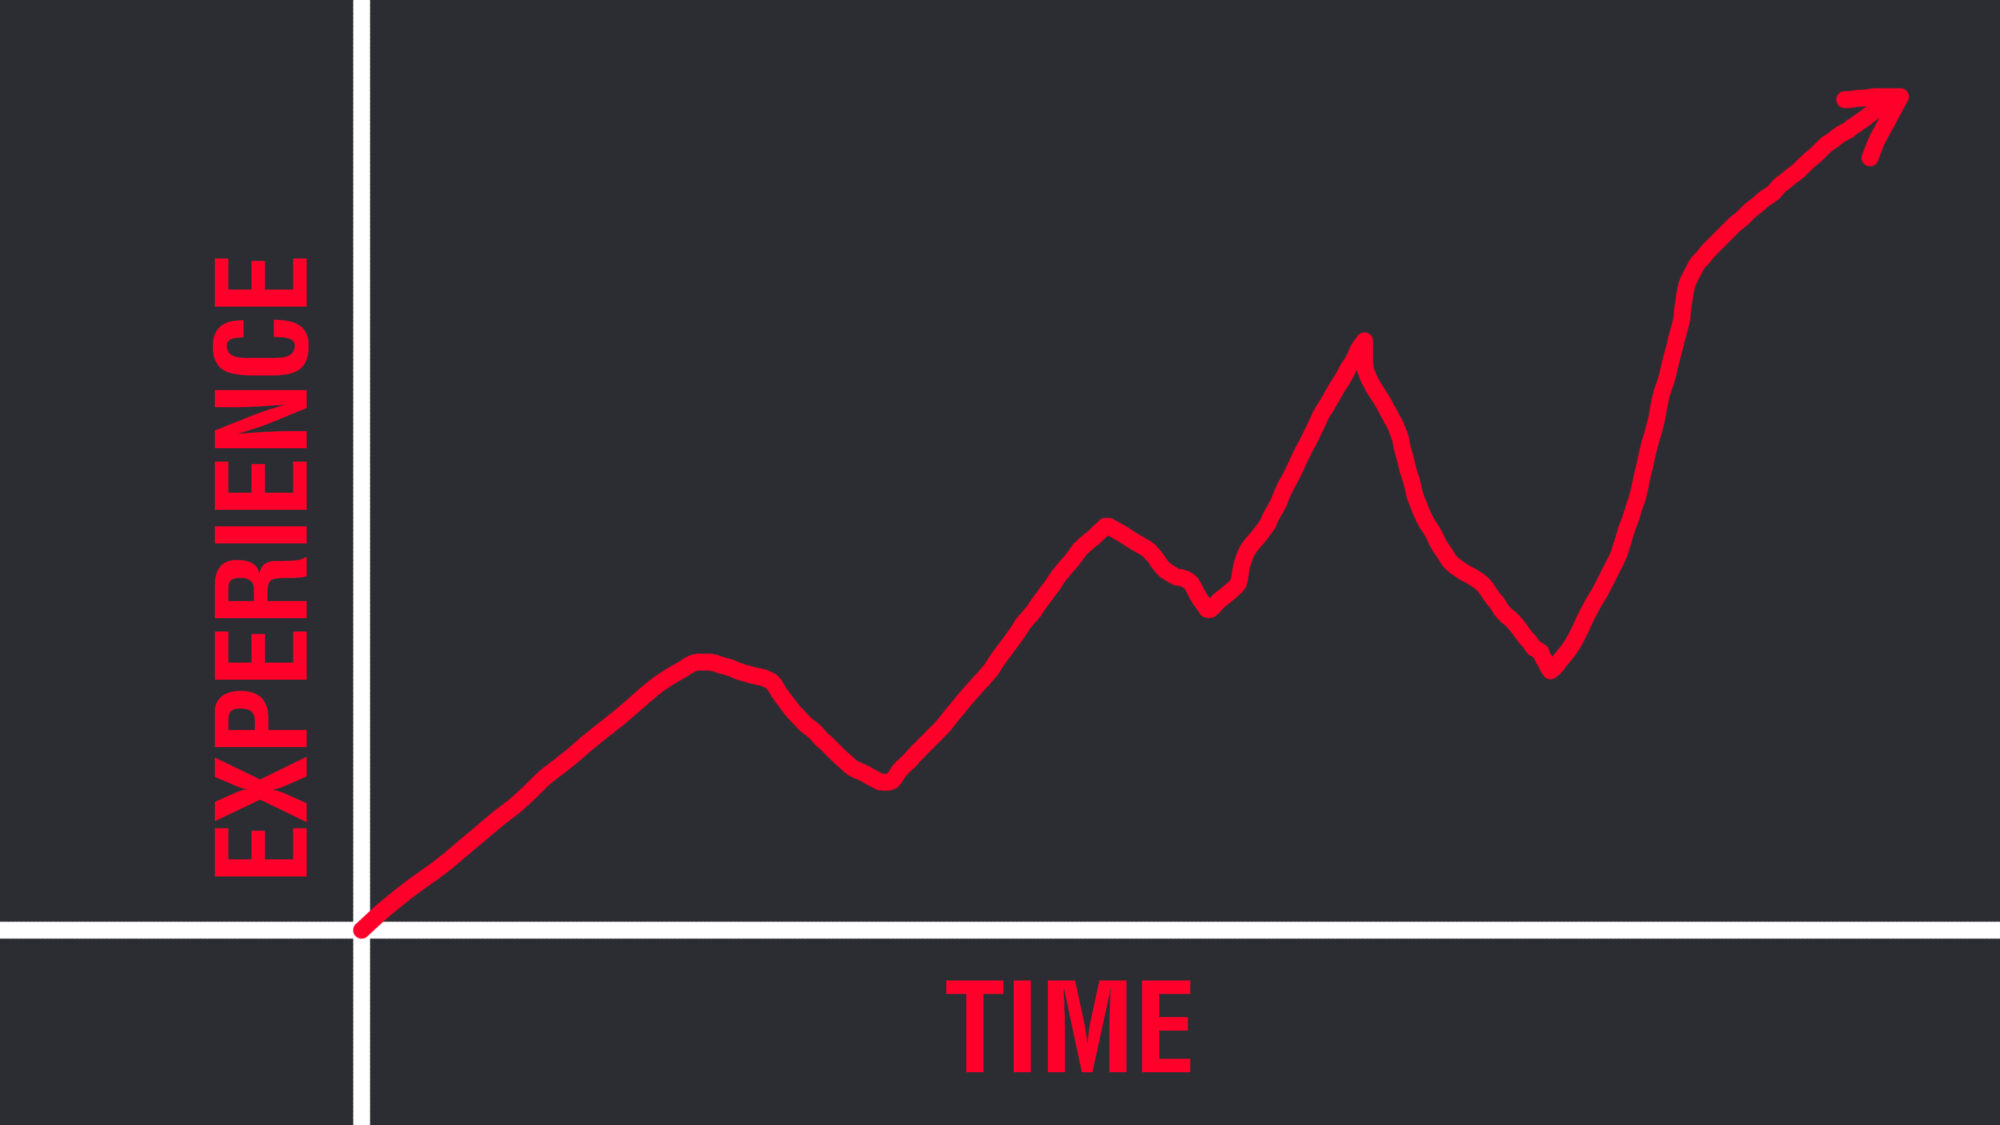
Advice
I would tell aspiring artists that this is a long marathon that will take time, that progress is not a linear growth curve, and that there will be days when they are in the valley of suck.
Persistence, patience, and hard work all contribute to your growth. Ask for feedback and learn to accept and filter that feedback, devote time to your fundamentals, lighting, anatomy and composition.
But not only those, also spending time learning good topology, efficient faster workflows for the technical stages like retopo, UVs, and bakes because character art is never 100% sculpting; it includes many other technical things, and don’t forget about your physical and mental health.
Conclusion
In the end, I worked on the project on and off for nearly a year, trying out new ideas and redoing old ones.
Because of my work and personal life, I had to go weeks without touching it, and finding the inspiration and interest to continue during the project’s valley of suck periods was the toughest personal hurdle, but it feels amazing to finally upload a personal creation after such a lengthy period of time.
No thanks to all of these fantastic people for their guidance, insight, and techniques, so I’d like to thank Marianna Liubimova, Gabriele Floris, Ventsislav Nachev, Jonathan Riley, and Michael Sydoriadis for their constructive feedback.
Patrick van Rooijen and KeosMasons on Twitch for all the hard surface workflow ideas, as well as everyone on these Discord servers: Donpolygon server, Baidukova’s class, and the CharacterArt server, to name a few.
Thank you, guys, for the interview opportunity, and thank you to the readers; I hope this breakdown is helpful.
Read more articles
You might also like these articles.