Howl’s Secret Garden


Introduction
Heya, I’m Adrian Drott from Sweden, currently working as a 3D Generalist at Axolot Games. I recently completed my personal project; Howl’s Secret Garden. It’s a colorful, vibrant and peaceful scene made in Unreal Engine 4. I’ll do my best to break down my approach to this project.
Inspiration & Goals
I started this project to learn Unreal, I briefly tried it back in 2013 when Studying at Future Games, but hadn’t touched it since. After seeing some projects posted by Jasmin Habezai-Fekri and Helde Pinto I was really inspired to learn Unreal myself.
After making a field of grass and flowers, I really wanted to take it to the next level and create something that paid homage to Howl’s Moving Castle.

References & Planning
As a beginner at Unreal, I didn’t want to bite off more than I could chew, I just wanted to learn the software.
With this in mind, I chose a basic shot from the movie. This made it easier to focus on details. I gathered screenshots from the movie itself mostly.

I didn’t plan as much as I normally would with projects, with only myself involved and such a small scope I didn’t find it necessary.
I wrote a few notes over the core reference with things I wanted to include and some ideas I had in my head.

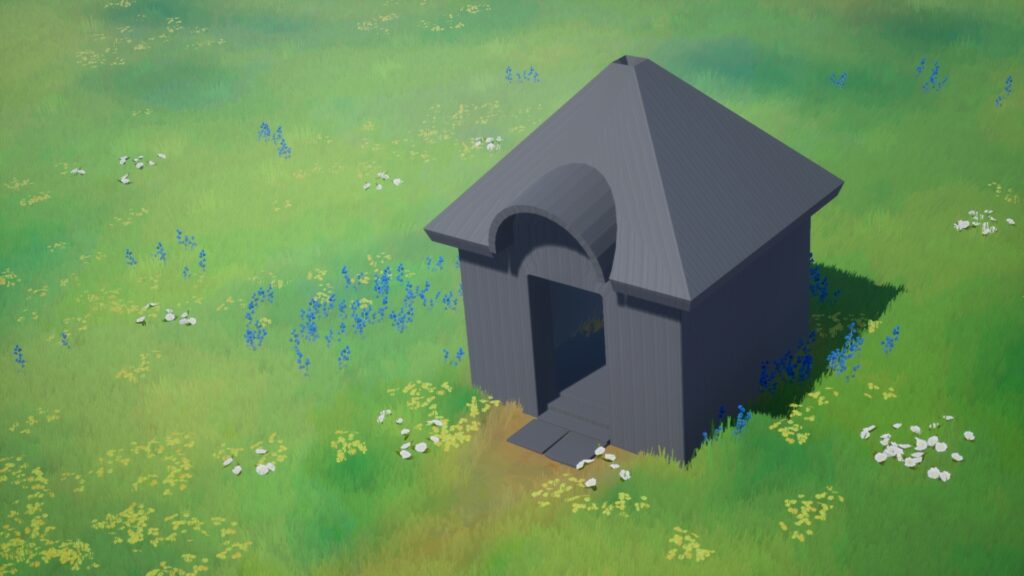
Blockout
Since I already had some flower and grass assets in place from earlier, I started scattering them and blocking out the house in Blender. I tried to follow my key reference (the top-down view of the house) as closely as possible.
I established the basic lighting as well, which in this case wasn’t hard as it was an open field with direct sunlight. However, as I progressed, I added a few spotlights to mimic bouncing light and to frame the house a bit more.


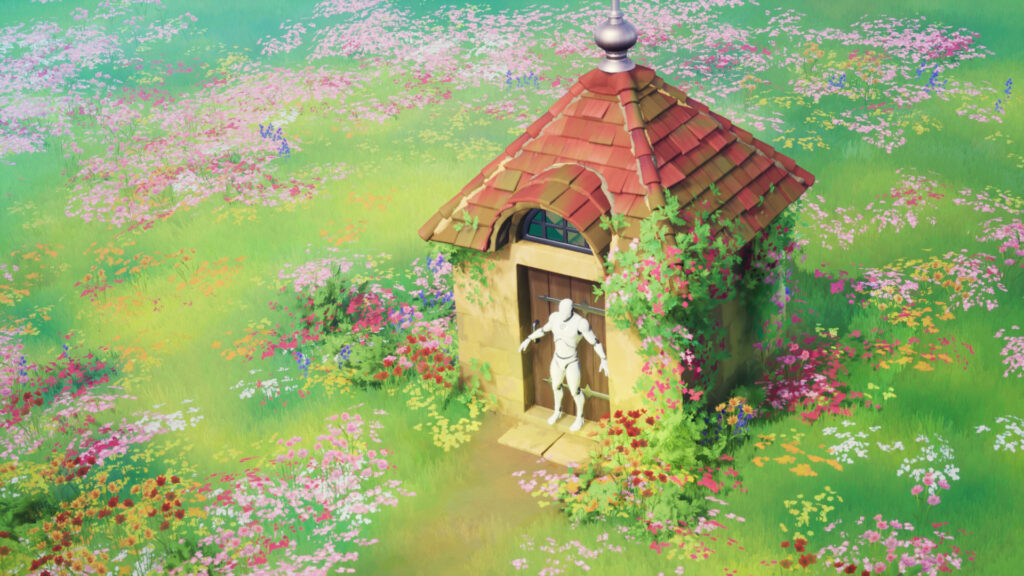


Modeling
I kept modeling very basic, it wasn’t challenging to model a cubic house. In some places, rather than using trim textures, I kept geometry bevels along with weighted normals.
I didn’t bother too much with optimizing a house this small. I also kept more geometry in places where I’d like a higher resolution for the vertex painting later on.

I created some bricks based on my brick texture. To do this I exported a rounded, tessellated cube from Substance Designer and masked out a few brick formations I liked in Blender.
This was to add a more interesting silhouette and depth to the facade of the house. Normally I’d recommend sculpting and baking proper bricks, but I find this method works for a quick and decent result.

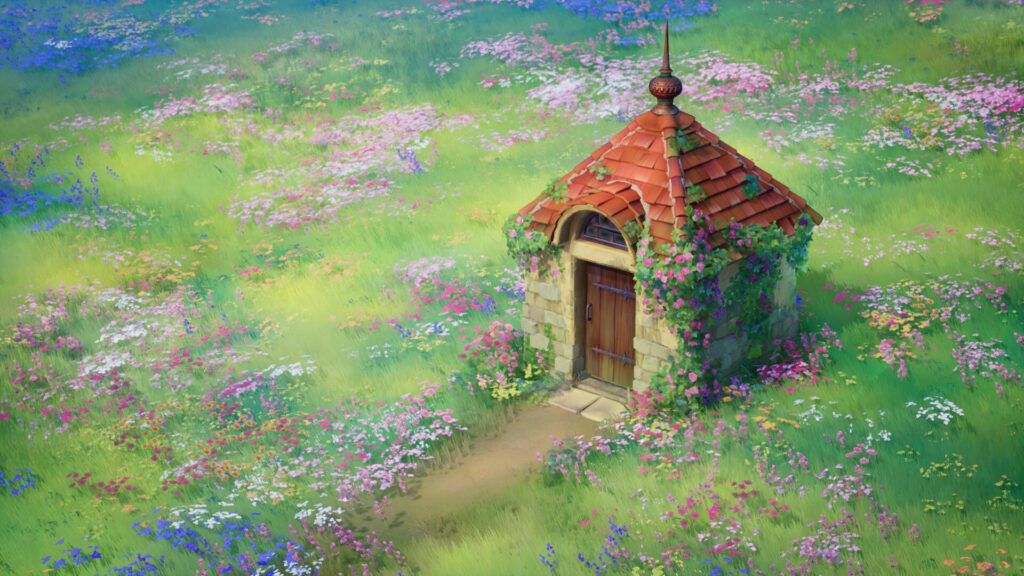
Texturing

Texturing was the most exciting bit for me. I had already checked out Jimmy Malachiers tutorial on how to achieve Ghibli-like textures in Substance Designer so I had a hunch of how to make textures in the style I desired.
I decided to develop a shader that made use of the RGBA channels of a texture to color the materials in the engine. To make this easier, I set up a custom node in Substance Designer to preview the texture while also combining the masks created for each channel.

There are pros and cons with this workflow, it limits you to a low color range and mostly works for relatively monochromatic materials. The good thing is, you can easily reuse the textures to set up interesting-looking instances of the material. From my observations, Studio Ghibli paints materials using a very limited palette, so it can be helpful to force yourself to such a limitation. It was also much easier to pick colors in Unreal rather than Designer.
I often find crossing over to another software’s viewport gives a different result and having direct control in the engine saves you from exporting over and over and jumping between the two.

I created 4 different ground textures to blend between; grass, withered grass, moss and dirt. The grass textures are quite abstract and more like patches of colors for the purpose of using Runtime Virtual Texturing (RVT).
This let me sample the ground textures I painted in other materials. For example; the grass in my scene seamlessly blends with the color of the ground, this is because the color of the grass is based on the RVT.

Materials
For most materials, I made use of the common vertex color/height blending. That way I could easily blend between various materials.
On top of that I used the RVT incase I wanted something to blend in more with the terrain, that too was masked with vertex color. Along with unique blend mask textures, I could manipulate the look of the blend as well. Here I found a tutorial by tharlevfx very useful.

I then made a version of the material utilizing a second UV map for combining a second normal map. This allows for trims which I used on both the house foundation, window and the little ventilation at the top of the roof.

Foliage & Flowers

The flowers play a key part in this scene. Originally, I tried making more complex flowers but they became too distracting to the overall scene. I ended up using floating planes for the smaller flowers, mixed with some larger ones which had a bit more geometry. All the ground foliage assets are blending with the RVT sampled from the terrain, the blend is masked using vertex colors. It really helps to mute colors of the flowers and grounds them a lot better into the environment as well. I decided to only have a few of my grass meshes cast shadows as I felt it gave more of a low contrast and stylized feel, similar to a Ghibli painting.
Wind
I built upon the wind/grass shader Christian Sparks shared in a post. Quite commonly Gaussian noises are used for panning wind textures, however, studying how grass fields blow in the wind, I realized it behaves a bit like ocean waves so I panned a displacement texture like the one below.

I created a material function for panning textures in world space.

Then used the function for various materials like grass, flowers and leaves. I also made sure to make use of global parameters which was really helpful to control the flow of the wind throughout the scene.

Clouds

The clouds are based on a tutorial by Steve’s Tutorials. They are tessellated meshes with 3D noises used as displacement in the shader. I added additional coloring options using baked vertex colors and a fresnel for the opacity. Due to the way the fresnel behaves it doesn’t look that great from every angle, but I felt I would rather keep the artifacts so it helps fade the clouds and gives them less harsh silhouettes. Hit me up if you know a better solution please!

Mountains

The mountains were mostly made in Substance Designer, focusing on creating a height map based on inverted cells of various sizes multiplied in a chain. Starting out with large cell
shapes and then smaller and smaller with less opacity throughout the chain.
Out of that height I could easily export a normal map and also create snow and grass masks for my base color. I then exported the tessellated mesh and cleaned it up in Blender.

Conclusion
Every time I finish a project I tend to feel a massive relief. It’s hard to keep up with a day job and still be productive in your spare time. If you manage that, you should be proud of yourself! I’m glad I chose such a simple scene to begin with and that I did things at my own
pace and didn’t set a deadline. It’s so easy to fall into an endless loop of “this is not good enough” only to never see the end of it. Sure I didn’t include everything I wished for like bushes, water or sculpted roof tiles, but I’m quite happy with what I managed to achieve.
So I guess my only cheesy advice is; don’t push yourself too hard and don’t forget that you’re doing this because you love it, not to be the best. I hope you found this helpful and thanks for taking the time to read what I had to say! If anything is unclear, don’t hesitate to reach out and ask anything you’d like. I’ve also created a google doc packed with resources for stylized environment art, a lot of which I used for this project.
Much love, Adrian.


Read more articles
You might also like these articles.