Horizon TA11


Introduction
Hello everyone! My name is Savvas Saroglou, I am originally from Greece and currently 21 years old. At the moment, I am a Game Graphics Production student at Howest DAE in Belgium and actively looking for an end-of-studies internship starting February 2026.
Starting my journey into 3D art and making the decision to do my Bachelor's in the field started about 5 years ago, fascinated by how these worlds were created, as I was always enjoying video games. With a total of 8 years of art classes, I was lucky enough to be introduced to 3D art as well.
Now, I am constantly trying to develop my skillset to the furthest extent by tackling new challenges with personal projects and in each new assignment at DAE, with the aid and feedback of my teachers and my fellow classmates.
Project
This project was also part of my curriculum, and a very challenging project for the final assignment of the Game Asset Pipeline course.
We were specifically assigned to concept and make a complex game-ready asset, “creating” our own pipeline by researching the industry approaches.
The world that the prop belongs to is the “Rustborn” world, which is a DAE IP that holds and is created by student work. Thus, I decided to go in that direction as well.


Tools
-
Adobe Photoshop (Photobashing – Concepting)
-
Blender (Mid poly/Low poly Modeling)
-
ZBrush (Polishing high poly)
-
Maya (UV Unwrap)
-
Marmoset Toolbag (Baking Maps)
-
Substance Painter (PBR Textures)
-
Unreal Engine 5 (Renders and Presentation)
-
Adobe Photoshop / Premiere Pro (Post Processing)


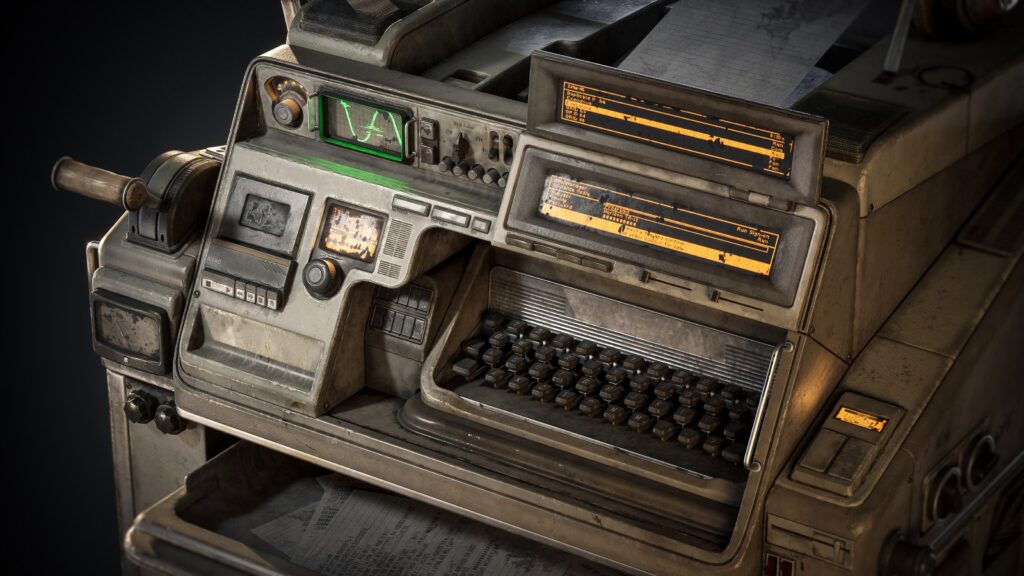
My idea for the Horizon TA-11 was for it to be a makeshift machine, and it’s used to send and receive decrypted messages across the world it belongs in.
For the concepting phase, I chose to photobash on top of an AI-generated base. The AI generation was unclear and low quality; however, what I liked about it was that it gave me a nice silhouette to start with.
Photobashing on top of that would be the fastest solution to make the design realistically detailed and functional, because all images that were used were from real-life objects.
A big inspiration for the idea and the design of the machine was the retro-futuristic aesthetic, which personally fascinates me.

A crucial step required by the assignment was to think about functionality in the design of the asset, like turn-on/off buttons, the fuse box, power levers, screens, drawer rails, and how things are attached.
What helped me a lot with this was to make some quick sketches of the design of how different parts of the machine would work and what their purpose would be.

The next step in the process was to gather specific references based on the concept and the sketches.
Since I had a machine that would send messages, I thought it would be important to have some type of keyboard somewhere in the front.
I ended up combining a typewriter keyboard with the rest of the machine, which would give that retro feeling to it.
The most difficult part of reference gathering was the metallic cylinders that the paper would pass through before it entered the machine.
After a lot of research, I ended up collecting references from old newspaper printing presses.
It was almost what I was looking for, and with a bit of freestyling in the modeling phase, I came up with something that fitted with the rest.

For the modeling part, I decided to use the midpoly modeling technique as I thought it would make the process faster based on the shapes my concept had, which were mostly boxy shapes with big bevels, in combination with subd modeling for some other parts.
This technique would also give me the freedom to rethink functionality and design while modeling, especially in my case, since my concept was only visualized as a front view.
It was effective that I could freely place and remove big, medium, and small details with Booleans, mainly focusing on the design and silhouette of the asset.
This, in turn, enabled a smooth design process for the back panels in 3D.
However, I noticed later in the project that this technique resulted in having a high-density model that could possibly slow down the software, but that wasn’t a problem since the advantages weighed more for the sake of this project.

The major advantage I found is that you don’t have to constantly keep thinking about cleaning up your topology, at least at this stage.
That’s because the correct shading in the high poly model gets achieved by polishing the mesh in ZBrush later, a process that gives a nice, rounded look, ideal for games.
Thus, it gave me the opportunity to fully focus on the design.
Having my model shaded flat at this step prevented weird shading artifacts that are caused by the overlapping vertices that might appear while using Booleans, especially when using Booleans on already existing bevels and curves.
Below is an example mesh:
The use of multiple Booleans in Blender, that are not applied until export, is effective here, especially with the BoolTool plugin that speeds up the process even more. The fact that they are not applied gives you the option later to delete some of them for the low poly model and avoid extra unnecessary topology cleanup.
Applying triangulation when exporting FBX here is important for importing into ZBrush.

Next step would be to Dynamesh the subtool and polish with the polishing sliders in ZBrush. I tend to use both Polish and Polish Crisp Edges sliders at a low level (1-5). This could also be used in cases where I would need to connect 2 parts seamlessly, without them being connected in the midpoly.

This result would then be decimated to drop the poly count, then exported for baking the maps. I tend to import this model into Blender to help me compare the low poly with the high poly.
A good balance in matching the overall shape of those two is usually the key to accurate bakes.
Here I go back to my Boolean modifiers from the previous step, and I delete the ones that are going to be fully baked (the grill hole details) and apply the ones that I want to keep as geometry details in the low poly (the panel frame).

A good trick I learned by digging in the selection menu of Blender is that you can clean up dense edgeloops (sometimes) in 4 clicks by:
Select Edge Rings > Checkered Deselecting > Select Edge Loops, and then Ctrl + X to dissolve.
This seemed to work mostly when there were clear loops to be found in the midpoly.
After making sure I have an optimized low poly model, I move towards the process of UV Unwrapping in Maya, as it provides better control over vertex selection through the UV menu it has.
Therefore, the process of straightening UV islands is more efficient.
Moving forward with the baking process, I used Marmoset Toolbag since it provides the ability to control skewing directly with painting mode.
This was especially important for the Horizon TA-11 project to tackle the distortion of the baked normals for the grilled paneling in the back of the model. The difference is visible as presented in the example image below.

With all the above techniques mentioned, and some back and forth fixing issues that appeared here and there, I ended up with a baked low poly model looking like the following:


I specifically kept the low poly a bit on the higher end, around 120k triangles, meaning that I kept some extra edges on most of the bevels because of the nature of the assignment, which was to make a hero prop with clean looks and focus on presentation.
Having imported my model and maps into Substance Painter, I started with the textures. I tend to follow a specific workflow for every base material that I learned through Jason Ord’s tutorial about texturing on ArtStation.
That workflow involves working with at least 2 scanned textures, usually from the Megascans library, to break the roughness and the color of the base material.
Continuing with the material, I add some extra layers for edge definition and some extra smaller details and AO, mainly with generators, or with scanned textures again.
I find it very useful to use a mask with a random texture set on mode “subtract” to take away from the initial texture. Of course, fixing issues manually with paint layers in the mask is a part of this process as well.
As an extra, I added anisotropic noise on the cylinders to give the rotational damage effect that could have happened over time from the use of the machine.
As an extra touch for the texture, and after using the Sticker Creator material (by Dylan Abernethy) for the project, inspired by it, I decided to make my own tape material that works in a similar way.
Using anchor points, I managed to get to the result shown in the video. It is possible to paint shapes where you want tape and then add wear to the tape material that leaves glue as if it were peeled off.
After some hours of texturing, my materials ended up looking this way:

For the decals (paper and the LCD screens), I had separate meshes that were textured with a decal map (512px). Specifically, the LCD screens were done in Photoshop.
The screen designs were inspired by old computer UIs. Making a pattern of 3 pixels, for RGB, made the process easier as I could scale the pixels up and down.

I thought it would be fun to also make an “operational rules” leaflet that would have a place on the side of the device. The design of it was inspired by VHS covers that I found online.

For the box in the back of the machine that holds the stack of paper, I used a box from Megascans that I modified for it to be open from the top.

Last but not least, I chose to make my presentation renders in Unreal Engine, as I find it the easiest to make good-quality renders, in my opinion.
Moving around the lights by piloting them while looking at your main camera angle from a second viewport really helps with placing the lights at the best angle to get the best reflections on the asset.
For rendering, I used the Movie Render Queue, as it gives high-quality images, and even console commands that you can use to enhance the output even more. Below are the results of the renders:
To conclude, this was a very fun project for me that especially gave me the opportunity to focus on acquiring new knowledge but also pushing my existing skillset to a higher level.
The idea of following “your own” pipeline from start to end, by researching what fits the case most, really helped with the above.

Lastly, I would like to thank my peers who gave me feedback during the project, and my teachers at Howest DAE.
I hope you liked the project!
If you have any further questions, feel free to reach out through my ArtStation or LinkedIn:
Read more articles
You might also like these articles.


