Etchū-Daimon Station


Introduction
I’m Lorenzo Drago, an Italian 3D artist with a university background in Communication Design.
I started as a self-taught Blender artist as a teenager and, for the past three years, I’ve been focusing on Game Art through university classes, freelance work, mod and indie development, as well as personal projects.
Project and Goals
I’m a relative newcomer to Unreal Engine. Before Etchū-Daimon Station, I used Unreal Engine 4 for the first time in my Mansion project, earlier this year. Before then, I had used Unity for a few years, familiarizing myself with its render pipelines and simple scripting.
In May, I released my newest portfolio piece, an environment based on Etchū-Daimon Station in Imizu, Japan, running in Unreal Engine 5.
Since I’ve received quite a few questions about it since I thought it would be useful to go over the process I used to create it.


To tell the truth, every other project currently on my Artstation started as a commission or an assignment. This was my first, serious, entirely personal project in some time, so I was free to aim for an aesthetic that resonates with me. I decided to aim for a certain type of photorealism; I wanted the scene to have a nuanced, mundane feeling to it, and I tried to follow that direction in everything, from the choice of subject to the video presentation.
This would also allow me to work on my use of references, proportions, and materials, areas that I thought needed improvement from my previous projects. While journeying by local trains across Japan a few years ago, I had the chance to stop at a few of these countryside or middle-of-nowhere train stations, and I find that they have a very unique, nostalgic atmosphere.
While looking for references, I stumbled upon a picture of the real Etchū-Daimon Station and thought it would make for a good subject. I started Etchū-Daimon Station on UE4, and switched to UE5 halfway through.
This was also one of the reasons I didn’t end up using Nanite for my assets. At the start of the project I was limited to working on an old PC (using a GTX 980 GPU), and found that UE5 actually performed better in some ways, especially as Lumen cut out the excessive baking times for Lightmass and allowed me to iterate on lighting faster.
Migrating the project to UE5 was seamless: I only had to enable the new rendering features in the Project Settings and switch all the lighting to real-time.
Inspiration and References

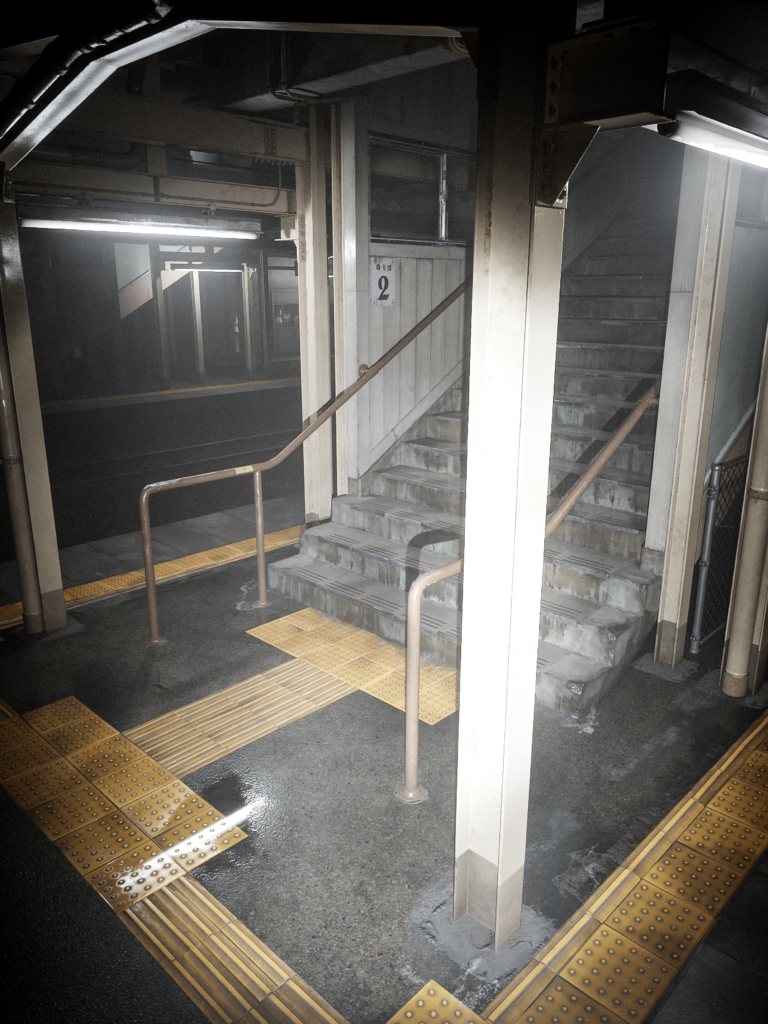
My main reference picture, sourced from Wikimedia Commons.

Most of my reference images were collected in PureRef. I was lucky to find a lot of photographs of the location across Google Maps and Wikimedia Commons. These images make up the bulk of my references. As I went on, I added more specific reference images for individual objects like windows, overhead structures, electrical boxes, and so on. I also used some smartphone footage of my own as lighting, animation and post-processing reference.
Blockout and Planning

I think that believable proportions are essential to realism. I didn’t want to run into the pitfall of making objects too large or bulky, which was a habit I picked up doing more stylized or “gamey” art.
For this reason, I used camera matching as a basis: I ran my main reference image through fSpy and imported it into Blender to create a simple blockout. I looked up the average height of a step to determine the scale of the scene.

With this, I had some fairly accurate real-world measurements, which I used as a basis to plan how the scene would be separated into modules. I adjusted the measurements to better
fit the grid and allow easier snapping.
Having also highlighted other essential objects present in the reference, I was able to come up with a flexible list of what assets I would need to make and how to tackle them, to use as a starting point.
Modeling and Texturing
From there, I was able to start working on individual assets. From the start, I had to keep in mind how the assets would be textured, in order to keep a uniform texel density and reasonable texture sizes. For this reason, the scene is a balance of custom-textured assets and assets that use tileable textures or trim sheets.

For example, the steps are custom-textured assets.
I started from a mid-poly model to create both a high-poly mesh with some simple sculpted damage and a low-poly mesh to bake normal maps to Substance 3D Painter. I created a module of three steps.
To reduce repetition, I also alternately mirror the texture and rely on vertex color blending in the material to control which areas are dirty. For this reason, I created the low-poly version so it would be easy to add edge loops where more vertex detail was necessary.

Other objects, like the painted wood planks or the yellow tactile paving, use tiling textures and trim sheets. I created most of these textures from scratch as well.
For tileable textures, Substance 3D Designer might be a more popular choice, but since these are fairly hard-surface materials, I found it easier to use the same high-poly to low-poly workflow together with Substance 3D Painter.
This way, I could generate AO and curvature maps and paint areas by hand to achieve a less procedural look. The only thing I had to keep in mind when making tileable textures in Painter is that every grunge map also needed to use whole numbers for its tiling.

When making my high-poly meshes, I made sure to introduce imperfections like subtle rotation, size differences, and warping. These get picked up in the normal map when baking and help create a more organic-looking texture.

Some objects are a combination of custom-textured parts and tileable textures.
The painted metal beams that are all over the station are built this way: using a tileable texture for the main body gives me flexibility, plus I can offset or mirror it to minimize repetition; meanwhile, the base, bolted areas and terminal parts are custom-textured, so I can still capture the bevels in the normal map.
The only area where I relied on an asset library was foliage: I’m not an experienced foliage artist, so I worried that using my own models would drag the project’s realism down. However, I also knew from my references that grass needed to be in the scene, so, since it’s not the main focus, I decided to use assets sourced from the Megascans library.
I didn’t have a lot of experience using Megascans before, so I had some trouble getting their foliage to look right. I still have more to learn in this aspect, though I believe the library can be very useful for bringing a scene to the highest level of quality without increasing the workload beyond a single artist’s capabilities. Using it allowed me to focus more on the goals I had initially set for myself.
Decals and Vertex Blending

I also created decals like stains, cracks and concrete patches.
Some of these I created from scratch; for others, I started with photographs that I derived grayscale alphas from for use in Substance 3D Painter.
I found that using Anchor Points in Painter was a good way to create layering based on a starting grayscale alpha.
As I mentioned earlier, I also did some work in Unreal Engine’s Material Editor, mostly to break up repetition using vertex color or alphas. Parallax Occlusion Mapping was essential to give a three-dimensional look to some materials like the gravel under the tracks or the tactile paving while remaining in my self-imposed low-poly constraints.
For the night scene, I created wet instances of my materials. In the simplest cases, this meant plugging the roughness map into a RemapValueRange node. For the ground materials, I also added puddles: this is achieved by blending the original material with a puddle material with a mask created by overlaying vertex color, a procedural noise and optionally a heightmap.
Lighting
Thanks in no small part to Lumen, lighting was a comparatively simple part of the project.
Especially for the daytime version, I decided to start with real-life brightness values, which can be found fairly easily on the Internet. The big numbers take a little time to get used to, but they work pretty well once exposure is properly adjusted. I used them as a starting point before applying further tweaks to get closer to my references and the look I wanted.
For the daytime scene, UE5’s default Directional Light + Sky Light setup worked quite well, as it automatically adjusts the color and intensity of the light and sky based on the angle of incidence. Although, in the case of sunset or sunrise scenes, this may be worth adjusting further as the colors get quite saturated.
I also added HDRI backgrounds sourced from Polyhaven.com, though I set them so that they wouldn’t affect lighting, since I didn’t want the captured sun to influence the scene in addition to my Directional Light. With that, I was pleased to see that Lumen took care of indirect lighting in a very natural way without intervention.
Lumen was a little harder to work within the nighttime scene, on the other hand. Compared to real-world references, my scene might appear darker, as if the light isn’t bouncing as much as it should.
When I attempted to increase exposure or light brightness, it became too hard to hide Lumen’s difficulty in solving a lot of half-shadowed areas, which would manifest itself in increased noise and instability. Still, while the nighttime scene ended up looking a little more stylized, I was still satisfied with its look, so I leaned more into a first-person horror aesthetic.
Setting up the flashlight was simple. I employed a spotlight with a simple Light Function Material using a “cookie” texture plugged into its Emission Color input. After that, I tweaked the wetness of various materials in the scene hoping to get an interesting response to the head-on light.
Animation and Rendering

The node setup for my tracked Camera and flashlight system.
Setting up the camera motion was something quite new and exciting for me. I enjoyed bringing more physicality to my exploration of the environment and making the location feel lived-in.
This was my first time working with Blueprints, let alone VR tracking, so I followed some helpful YouTube tutorials by Aiden Wilson.
My solution is hardly the most advanced, clean, performant or user-friendly, but it served me well enough for my limited needs.
With the Blueprint set up, recording the motion was as simple as hitting Play and starting the Take Recorder. The scene runs well enough in real-time that I could play it as is without tweaks.
For the nighttime scenes, I hadn’t initially set up flashlight movement. Instead of re-recording each shot with an additional tracker, I recorded the movement on top of the existing takes by editing the Blueprint slightly. I also used the Take Recorder’s function for recording an existing take.
Since the flashlight’s horizontal orientation is inherited from the camera, the result might feel a little more artificial compared to recording flashlight and camera movement separately with, say, a controller in each hand. Once I had the finished camera motions recorded, I matched those movements in real life while recording with my real-life camera to obtain the main audio tracks for the video.
I also added some extra sound effects, trying to match the low-quality audio compression and the reverb of each location. I used Adobe Premiere to combine the audio files with the rendered sequence.
I rendered the project in a fairly straightforward way from the Sequencer, as a high-resolution image sequence. Something to note, though, is that I had to disable my tracked Camera Blueprint, as VR input was still affecting it as the sequence rendered.
I didn’t change the default post-processing settings too much, except for tweaks to exposure, bloom, tone mapping curve and simple color adjustments. I also added some further color tweaks, sharpening and vignette afterward in After Effects. I’m sure it could have been done directly in-engine, but I found this way easier for me to work and experiment with.
Challenges and Lessons
It took me a little over a month to bring the project to completion. Many of the challenges came from getting used to unfamiliar functions and techniques, like Lumen, Blueprints, VR tracking, Megascans and modularity.
Online documentation, tutorials and discussions proved to be very useful, and I was glad to be able to count on DiNusty’s Discord server community for reactions and feedback; it’s a great place to get more eyes on your work and definitely worth the embarrassment of showing your unfinished creations.
Beyond the technical aspects like reference gathering and texture creation, which are fairly standardized, one broader lesson I believe I was able to learn with this project was to always keep the art direction in mind.
As I continued working on it, it became important for me to treat the project as a cohesive communication design product instead of just an environment showcase, as I had done in the past. I wanted to let the central theme drive every creative decision involved, without resorting to making choices just because other artists had made them before.
Since the core idea became that of a “mundane, everyday scene interrupted by a supernatural occurrence”, I wanted that to be reflected in the choice of subject and in the video presentation.
Shooting a showcase video with clean panning shots would have made the scene look larger than life; contrary-wise, leaning too heavily into a “found footage” look, complete with post-processing like a blur, chromatic aberration or VHS filters, would have increased the horror aspect too much.
I think that giving every choice thought and consideration can be a great way to create a more unique, eye-catching final result, and it’s something I want to keep improving upon from now on.
Conclusion
For someone who thought that this artwork wouldn’t spread past the 3D Artists’ community, I was incredibly surprised to see how much it got shared over the Internet. It was amazing to see and a little overwhelming.
A few people, whether Japanese locals or not, reached out to me to tell me how I managed to capture the atmosphere of the real or similar places and to bring those people back to different times of their lives. For me, as an environment artist, there is no greater compliment than hearing that I was able to capture the feeling of living in a place.
I was also really thankful to everyone who was inspired by my work enough to incorporate it into their own art.
And, of course, thank you to GamesArtist for letting me write about my experience.
Read more articles
You might also like these articles.


