Dragon Knight

Introduction
Hello, my name is Abel Sardido Reyes!
I'm a CG artist at Storm Studios in Oslo, Norway.


Project
This is a small breakdown of the DragonKnight piece I made under the mentorship of Siamak Roshani at his company Edgeloop.
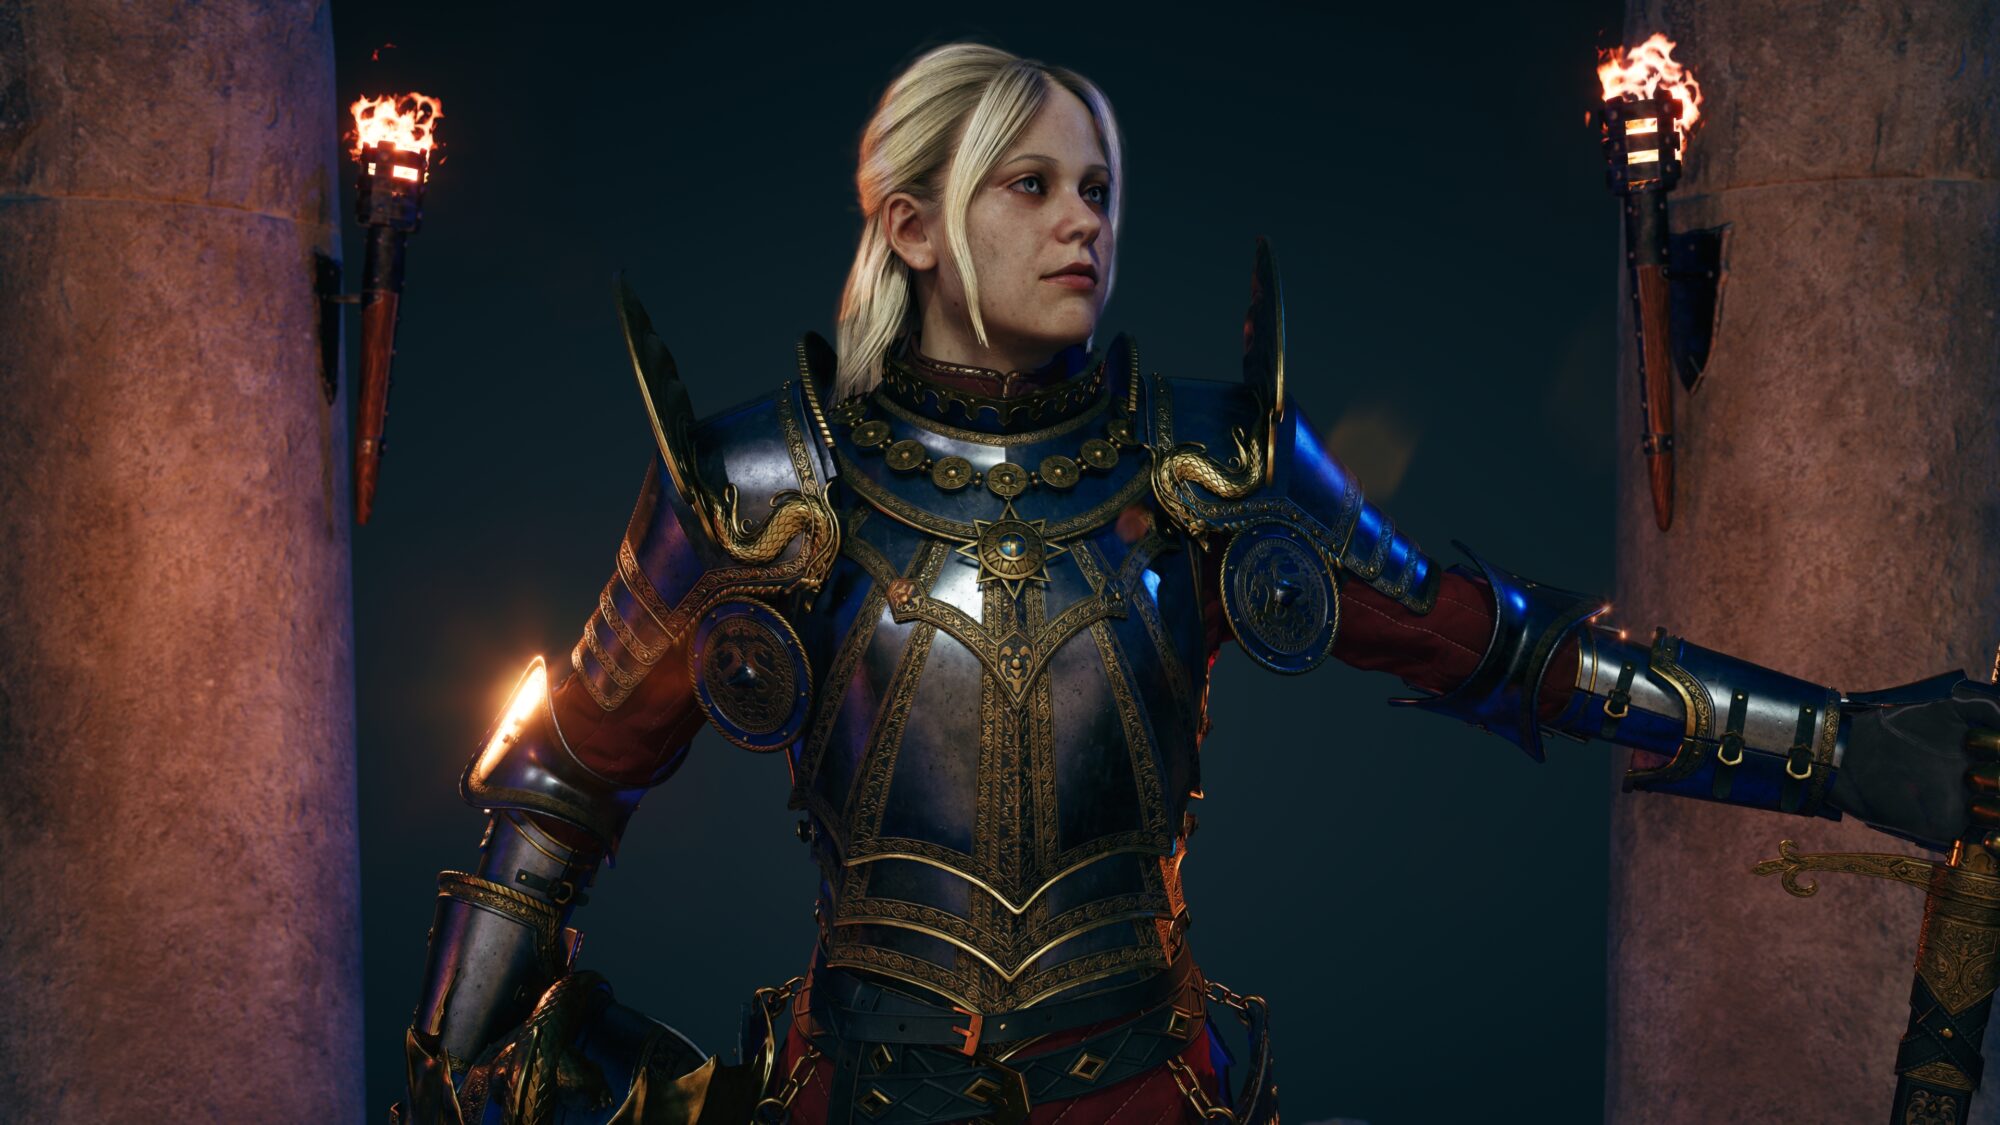
So let’s see how I went from this weird blockout to this much better-looking end result!

Software
I basically almost went through the whole 3d package gauntlet
- Zbrush (Sculpt, high rez, low rez)
- Blender
- Maya (We changed to Maya during the low rez stage)
- Topogun
- Marmoset Toolbag (Mostly for baking)
- Substance Painter
- Photoshop
- Marvelous Designer
- Unreal Engine 5
Reference
In the beginning, we decided to base the character on this beautiful concept by Jian Li.

For the references, I gathered a lot of images of different kinds of medieval armor so I could get a feel for how armor was designed to be functionally moved around and also to look at different levels of wear and tear.
I used https://armstreet.com/ a lot for finding references to various knight armor and medieval fashion which was super useful.


Blockout stage
For the blockout stage I simply extracted geometry from the female base mesh, then used the move brush to block out the armor shapes and ZRemesher it to a much lower poly count so I could easily adjust it.
The key part here was to just get the correct shapes, proportions and a good silhouette. It is still too early to think about the smaller details so it is this stage where you can explore and get a good feel of the character. To the blocked shapes do not have thickness.

Another critical factor at this stage was to find a balance between functionality and sound design. She had to look like she could fight in a battle and at the same time look royally.
So we deviated a bit from the concept by adding some extra armor plates on her shoulder and shortening the skirt part. This is a stage where you also should allow yourself a bit of time and patience because it will make the process down the line much easier.

High Poly
Armor Parts
To create the High-res model I moved from piece to piece. The main principle here was to nail down one armor piece well enough and work with that piece in isolation to avoid being overwhelmed by the whole character.
In my case, I started with the shoulder armor. By getting used to the techniques and methods used on this one piece, I could create the other armor pieces faster.
To create the high-rez armor pieces we used Zmodeler to clean up the blocked shapes and then spent some time ensuring that each piece had an even and clean topology.
If I got one dollar for each time Siamak told me “dude, this needs to be cleaner and more even” I could retire right now. I used dynamic subdiv a lot to check if the shape looked clean and nice when subdivided.
It was not uncommon for me to delete a lot of edges and almost restart the process, so patience is also key here.

To create the miniature dragon sculptures on her armor, Siamak taught me some cool tricks.
We first started by creating one scale and then using Array mesh in Zbrush to complete one circle of scales, array mesh it again to make the second row and then do one last array mesh to create a tube of scales. With this tube of scales, you can create an Insert brush and drag on the canvas to create a dragon.
Additional tweaks must be done such as the Size Falloff in the curve modifier settings and overlap (See picture). The heads of the dragons were just sculpted in ZBrush. When happy with the scaled part I just simply dynameshed it with a high enough resolution to maintain the detail


The necklace and the gold rims on the armor follow the same principle. I created a mesh that could be repeated and then turned it into an Insert Mesh brush.
To put them around the rim as close as possible I created a strip from the mesh I wanted to put it on and divided it into two polygroups and then Frame Mesh it with only polygroups on to create a curve around and then clicked on the curve with the Insert Mesh brush of the element I wanted to loop.
It should then loop around. I had to play a bit with the brush size and the Insert Mesh brush shape to get it perfectly looped, but it surprisingly did not require too much to tweak.


Face Sculpt
I already had a base mesh with UVs, and usable topology as a starting point and I based this character’s face on the actress Sorcha Groundsell. Siamak gave me a lot of videos of him sculpting heads which was super helpful.
I previously had gone through Scott Eaton’s workshop on face anatomy which made it easier to understand the structure of the face. Georgian Avasilcutei also had an excellent tutorial on likeness study that I used too.


Clothing
For the clothes, I used Marvelous Designer, and we deviated a bit here from the concept. I struggled to find a reference of how the jacket looked in the concept, so I instead used a jacket that was most likely used by knights.
It was also important to remember that most of the jacket is hidden beneath the armor, so it was more efficient to mostly focus on the exposed areas such as the arms and lower jacket parts.

To get a clean mesh out of Marvelous Designer I followed this tutorial but I did the cleanup in Marvelous since it has some decent retopology tools and it was much easier to see where each vertex was connected between the pieces.
Through this method, I could get a mesh in Zbrush with several subdivision levels, so it could easily be tweaked.


For the smaller wrinkles on the part between the upper arm and upper body, Siamak taught me to use the Standard Brush and do various Zig Zag motions to create these wrinkles.

Even though I had collision meshes in Marvelous Designer I still had to go to Zbrush to fit the clothes into the armor, where having the opportunity to go to a lower subdivision was useful.

First pass of the high poly and low poly version of the character


For the low rez, I mostly used Zbrush, Maya and Topogun. Since the high rez armor had a pretty clean topology, the low rez was then mostly about removing some extra bevel lines, and edges and merging elements if necessary.
The goal was not to over-optimize the low rez, but to have enough polys to maintain a good silhouette and topology flow. One trick I did for example was to use triangle fans to maintain the outer circular shape and have the inner part optimized as much as I could.


For the clothing it was very similar to the armor, but I used Topogun to add edges to maintain some of the folds which would then maintain the silhouette.
The key was to keep as much of the base topology that was already in the clothes, to make it easy to get good deformation when rigged and posed, and then just additional edges to maintain the fold silhouettes.

Texturing
I started with some smart materials as a quick start to get a textured base for the armor, and then added layer by layer of dirt, oily smears, grunge, bumps, etc.
I kept overthinking and adding too many grunge layers or dirt layers and had too much contrast in the roughness and color, which in turn got a bit messy so Siamak kept telling me to keep it simple and don’t overthink it.
So I stepped down and went through each layer to see what they contributed to the whole piece. Unsurprisingly I had a lot of layers barely doing anything, so I did a lot of shaving down and making sure each layer counted.

For the army ornament, we decided to do it in texture so we could be flexible with the designs and also easily change and or replace them. Siamak showed me two ways to do it and it all started with creating a trim sheet with various tileable ornaments.
I created these ornaments by mixing various elements from the 3D Ornament section at textures.com in photoshop and tiling them up in substance painter. For certain sections such as the sword, I would place some elements myself in the UV space in photoshop or sometimes just paint them myself.


To put them in the armor I mentioned earlier, Siamak showed me two ways to do it. One method was to create polygon strips where I wanted the ornaments to be, UV them into strips and place that UV strip on the ornament design I wanted on the trim sheet.
Then I used xNormal to bake the strips with the ornament design into the armor piece itself. This would generate a mask that I could throw into Substance painter and adjust color, roughness and height.


The other method was similar to the first method, but instead of baking it into the texture of the desired mesh, I would use the polygon strips and slightly move it above the mesh.
Then in Unreal Engine, I would just plug in the Albedo, roughness, metalness and normal maps. The most important part of these decals is that they need the same topology as the mesh it is above off or else it might cause issues during the rigging stage.
Both methods are valid, but method 2 gives you crisper details at the expense of a higher poly count.

For the face textures, I used the Victoria Vface scan from TexturesXYZ as a base. VFace is super convenient since all the necessary maps are in the scan geo with additional masks that mask areas such as lips, forehead, etc.
So I only had to simply wrap the scan mesh around my head mesh with Zwrap and transfer the maps over with Xnormal. Some cleanup was necessary, but with the Vface, I could skip a couple of steps, save time and get a good result swiftly.

With the various masks from Vface, I could easily tweak the hue and saturation on specific areas such as the lips, tweak melanin and hemoglobin, etc.

After tweaking the colors of her skin, I would then add the layers of dirt. To do that I would just use a dirt or grunge procedural texture and then mask them out.
Then I would add back the dirt and grunge where I believed it would make sense to have dirt, such as the cheek and forehead.

For this character, I wanted to test to do the tweaks of the skin pores in texture too.
So I would separate each layer of skin pores from Vface and use them as height maps in Substance painter and then tweak each layer of height.

Hair
For the hair I used Maya’s Interactive Xgen to create the hair that I could use to generate alembic curves which I then could import to Unreal Engine 5 and add a material to.
With Interactive Xgen I started by generating some guides and placing one guide at a time to slowly build the general shape of the hair. Sometimes I had to add a bit more guides around some areas to ensure the hair was flowing in the way I wanted it to.

To have a bit more creative control over the interpolation of the hair I used region masks to divide the hair into different regions which would interpolate the hairs independently within this region.
This made sure I could create the forehead fringe and have full control over the flow of the biggest clumps.

After setting the initial guides and creating the main shapes of the hair, I began setting up the modifiers to set up clumping, noise, strays, etc. I started with clumping, and I did 3 layers of this just to break the biggest hair clumps.
The next step was to add some noise to drag out some of the hairs away from the clumps.
I added two layers of this, and I used masks to randomly determine where the noise is going to happen. Then I added some stray hairs to add a layer of breakup in the hair itself and the silhouette. Then the last modifier was a cut modifier to thin the tips a bit.

To set up the material and hair in Unreal Engine 5 I mostly followed J Hills tutorial on creating custom hair shaders in Unreal Engine 5.
The only issue with the export and import to Unreal Engine 5 was that the hair masked out in Maya would not delete the hair but just hide it. Which would cause all the hair to unhide when imported into Unreal Engine 5.
So when exporting the alembic check the boxes (Image below) and this will cause the masked-out hair to be hidden.


Then import the alembic cache to an empty Maya scene and then drag select the visible curves and then export the alembic selected. Now only the hair that was visible should be imported to Unreal Engine 5.

I would then tweak his shader according to my needs and get this result.

UVing and Baking
The UV unwrapping was mostly done in Rizom, since it has amazing tools to make the process much simpler and easier, such as vertical and horizontal constraints.
For the Uving we had the principle that this character would be a character with customizable equipment, so we divided the UVs by pieces that could potentially be changed, so for example the greaves covered one UV tile.
Also with the UVs I made sure to straighten the UVs and use as much space as possible. The baking was done in Substance Painter and Marmoset Toolbag 4. It depended on the speed and result, so the heavy-duty maps such as Curvature and AO were done in Marmoset, while normal maps were done in Substance painter.
In some circumstances where I need a bit more control of the normal map bake, I used Marmoset Toolbag’s excellent features to tweak the normal maps.


Posing
To pose the character I used Maya’s Quick Rig, but I added some twist joints in the forearm to get a better opportunity to move the gauntlet and hands. I would also add blendshapes on the clothing to make it fit better or just outright remove penetrations.
When I was happy with the initial pose and got the approval for Siamak I would then remove all of the weight paint influence and just move the pieces to fit the character pose better. I was also lucky that I have a friend that does medieval fencing, who gave me some great tips on posing.


Rendering and Lighting
The final render was done in Unreal Engine 5. I am not a material writer so I struggled a bit on this part.
The armor material was, in general, simpler to make since it was almost just plug-and-play. The head material was taken from the Metahuman head shader, and I just plugged in my maps accordingly.
Since I used the same eye meshes from Metahuman, I just had to plug in the material and tweak the color, occlusion, etc. For the cloth material, I used the material made by Ronan Mahon, which you can buy at the Unreal Engine marketplace.

One of the cool challenges Siamak gave me was to find a way to do the stitches on separate UV channels to get some nice detailed stitches.
I started with creating a separate UV channel and creating UVs of the part I wanted to have stitches and finally make these UVs as big as possible to get as much detail as possible.

The next step was to create the stitch textures, which I simply did by first modeling the stitch and then baking out a normal and creating an ORM (Occlusion, roughness, metalness) map in Substance Painter.
Then in the cloth material in Unreal Engine 5 I added them in the shader network either with an add node or BlendAngleCorrectedNormals.
Also, I used the TexCoord node to ensure the right UV set was used.


The environment around the character went through different revisions, but as Siamak repeated a lot in our mentorship, we kept it simple. So I made this circular platform with some columns, vegetation, and rocks which I got from Quixel Megascans.
The columns could also be used as a framing element in the composition for the final renders.

The lighting was also kept simple. We had a spotlight to light the character above, an HDRI, some rectangular lights on each side as fill lights and some lights from the torches.
With some interesting HDRI we could add an extra layer of texture to the armor by having the HDRI give it a variation of reflections. To make the lighting more interesting we had the rectangular lights be colored lights.
With the addition of the torch lights the armor in the end had some good contrast and color reflection from the lights.

Another important aspect of the lighting was to play around with settings in the post-process volume, such as exposure, and also remember to put on auto exposure in the project settings.


And here are some of the final results:

Conclusion
Through this mentorship with Siamak, I learned so much about the process of creating characters, and my goal initially was to have someone guide me to take that extra step in character art that I felt I lacked and create a character I am proud of.
I felt I covered all of my goals for this character, but I feel I have so much to learn and my next character needs to be a bigger challenge.
I highly recommend Siamak as a mentor and throughout this whole process he frequently shared his knowledge and experience as an artist and as a production artist in the industry and he always challenged me to push the character further in every class.
You can easily find me on Twitch, where I regularly stream 3D Art if you have any questions or just need some company in your art grind!
Read more articles
You might also like these articles.