
Introduction
Hello everyone! My name is Nikita Vasilkov.
I currently work as a Senior 3D Character Artist at Obelisk Studio. I have been in the industry for about 4 years.
Project
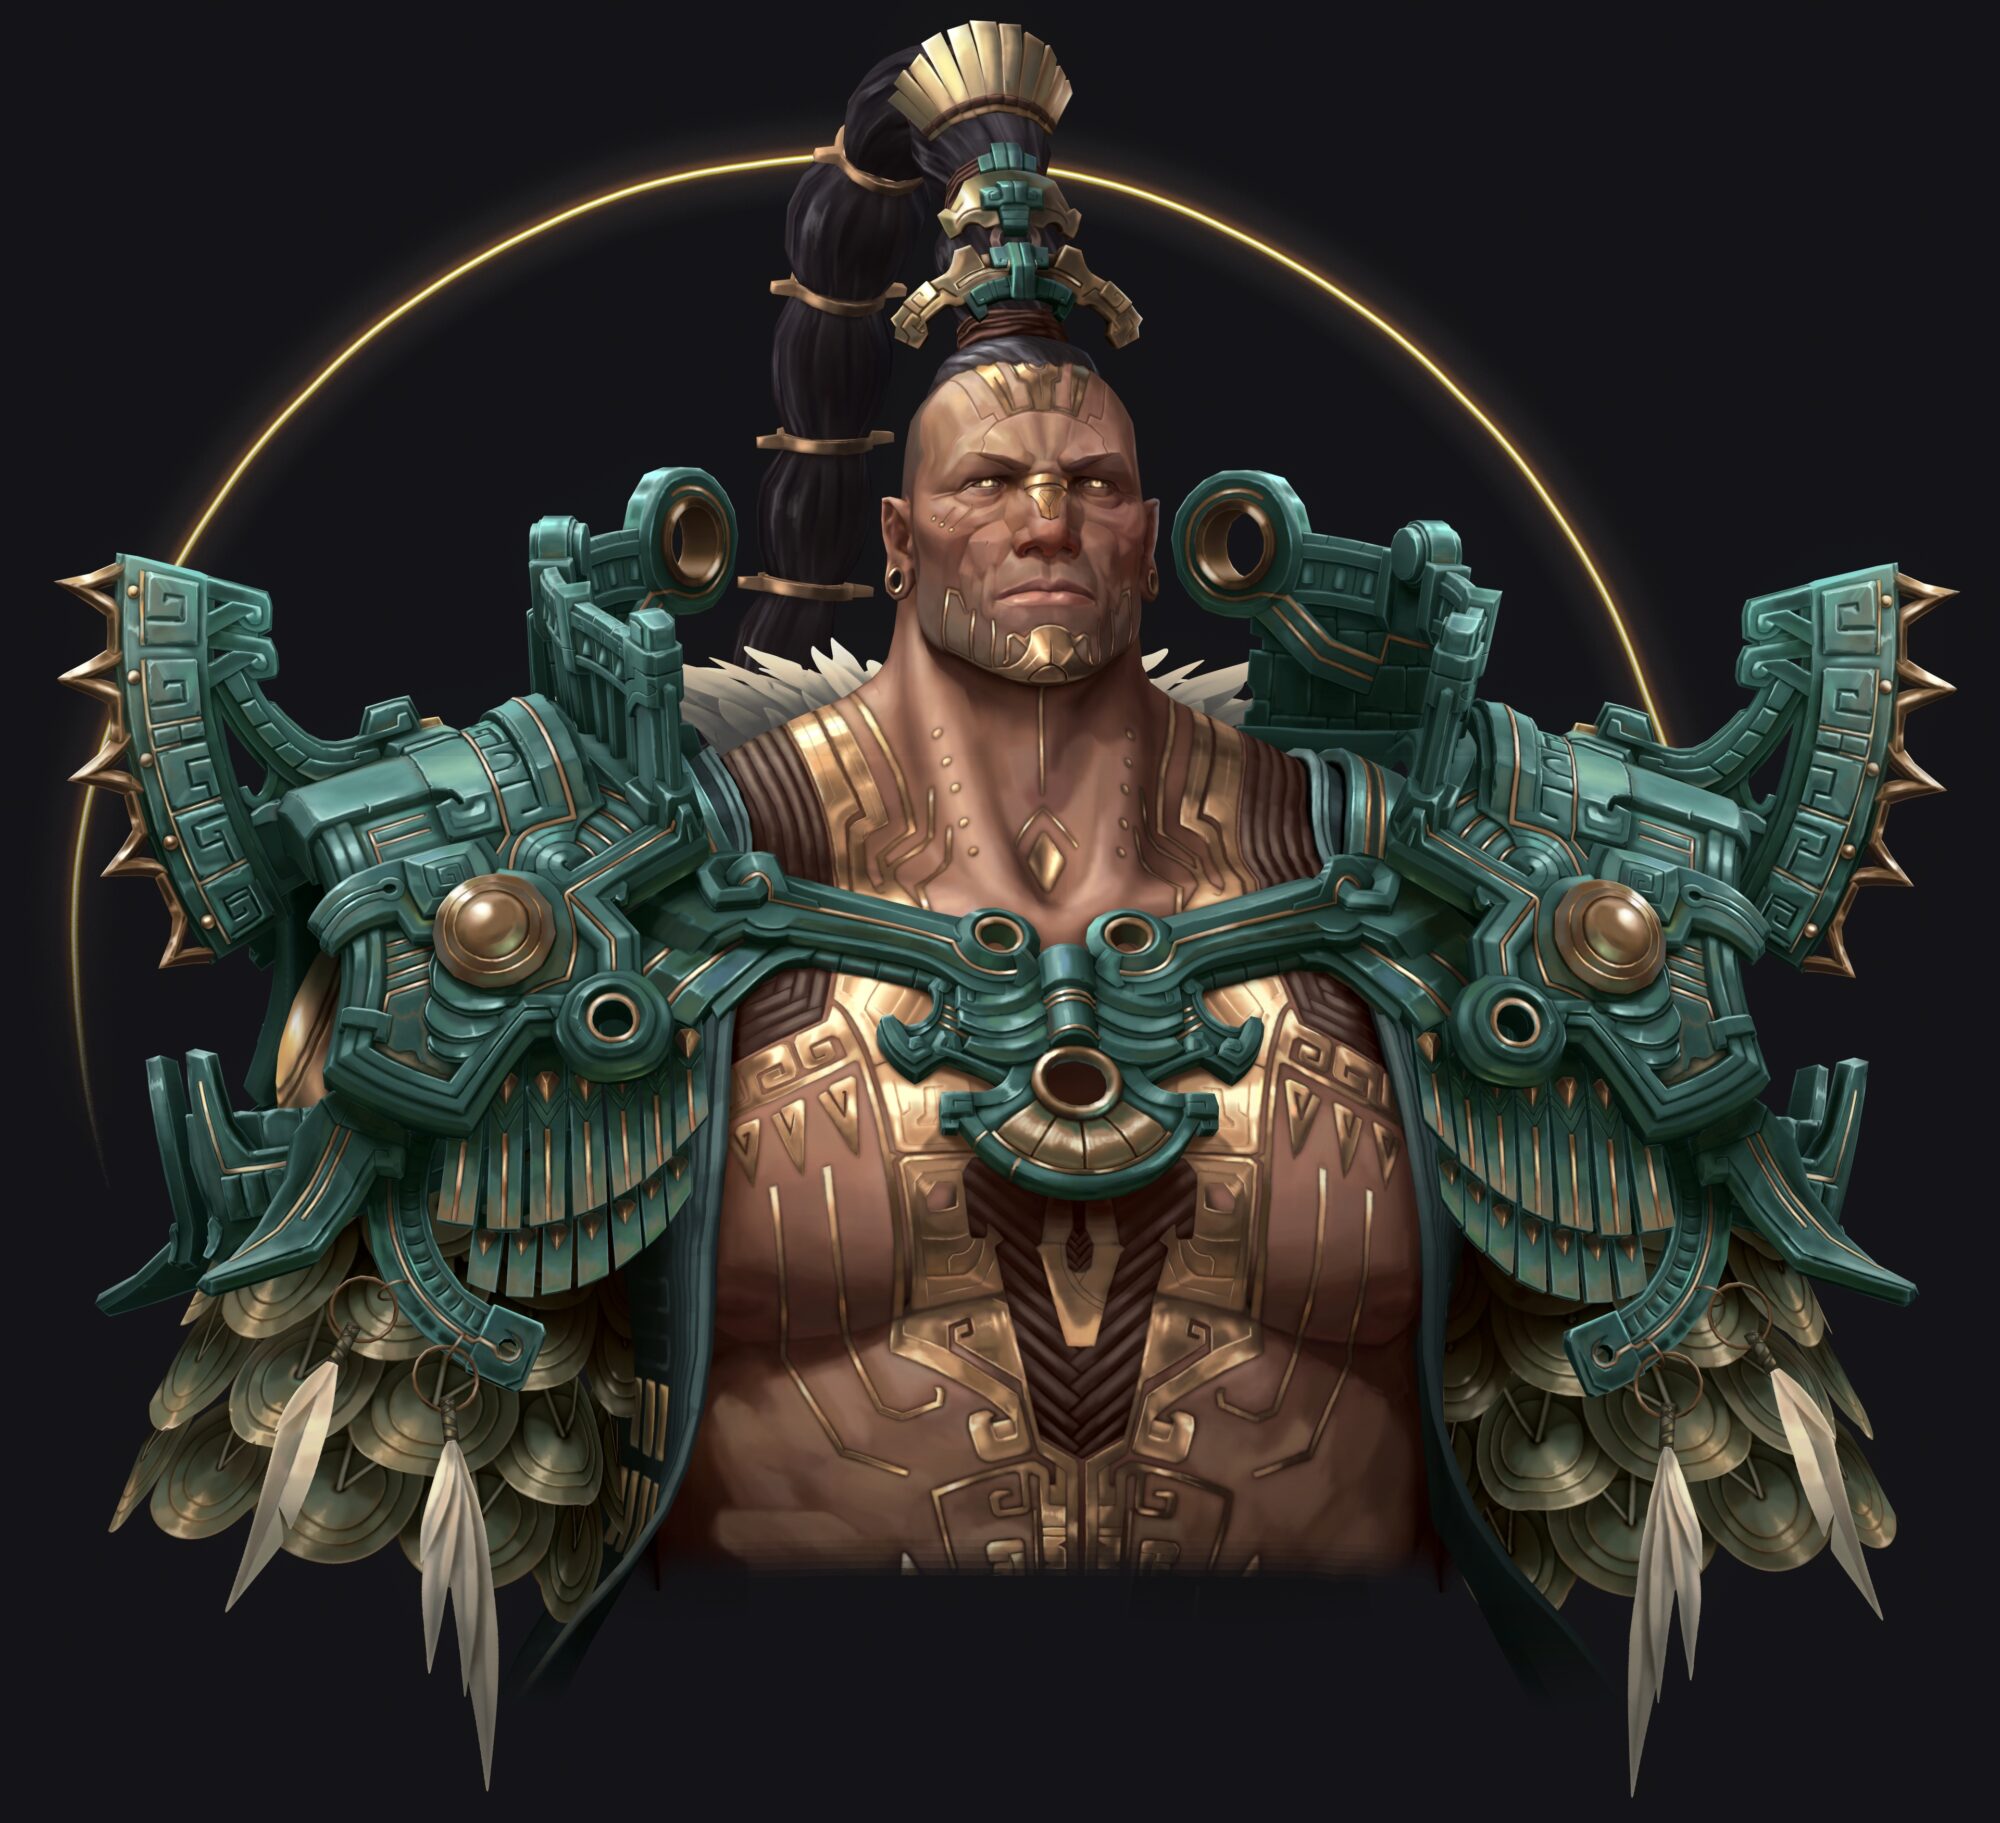
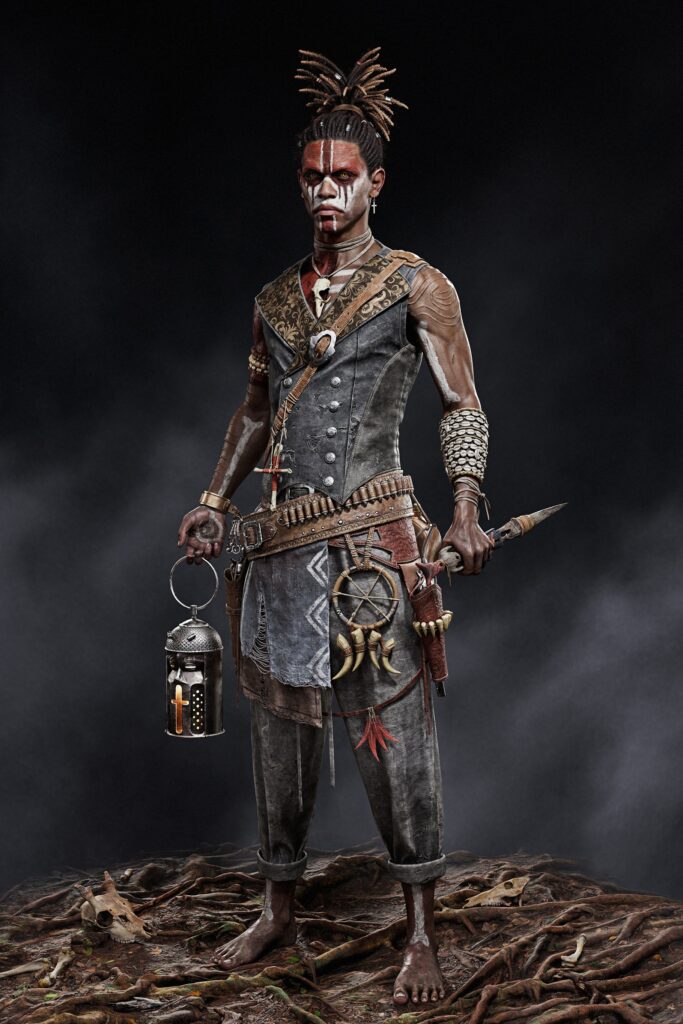
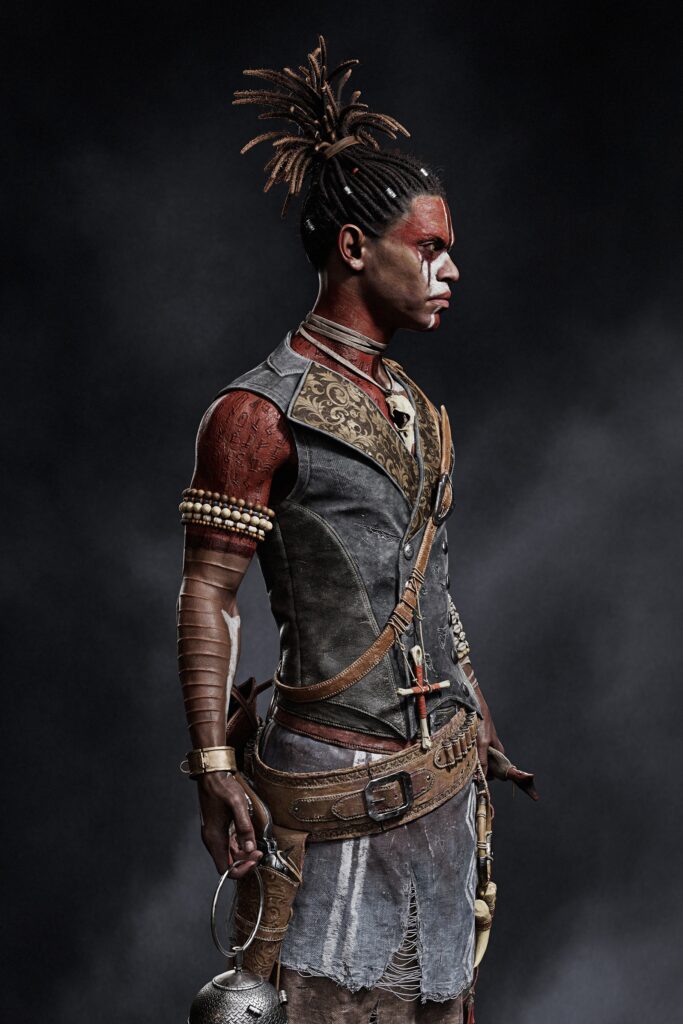
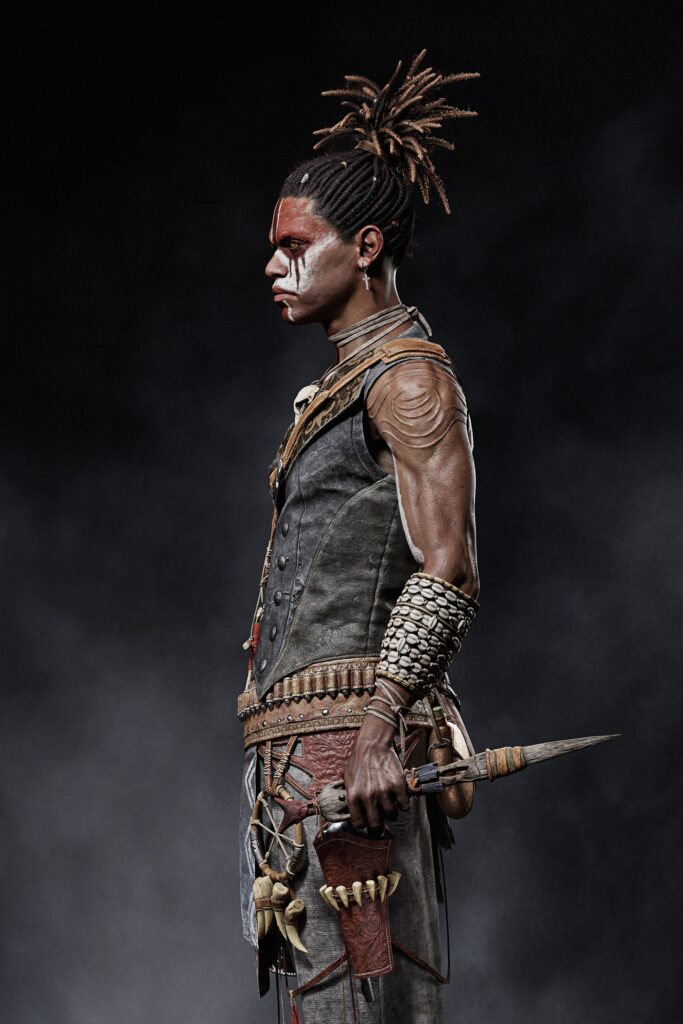
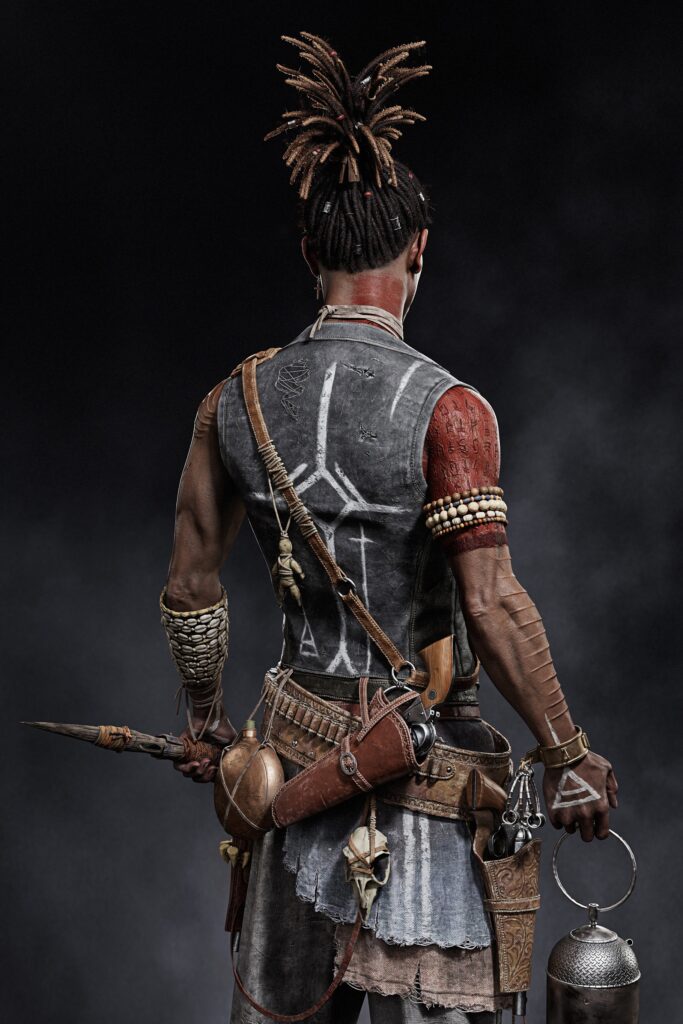
In this article, I will be happy to share with you the details of how I created my latest character — Cursed.
I would also like to thank www.gamesartist.co.uk for allowing me to share my knowledge and experience.
Inspiration
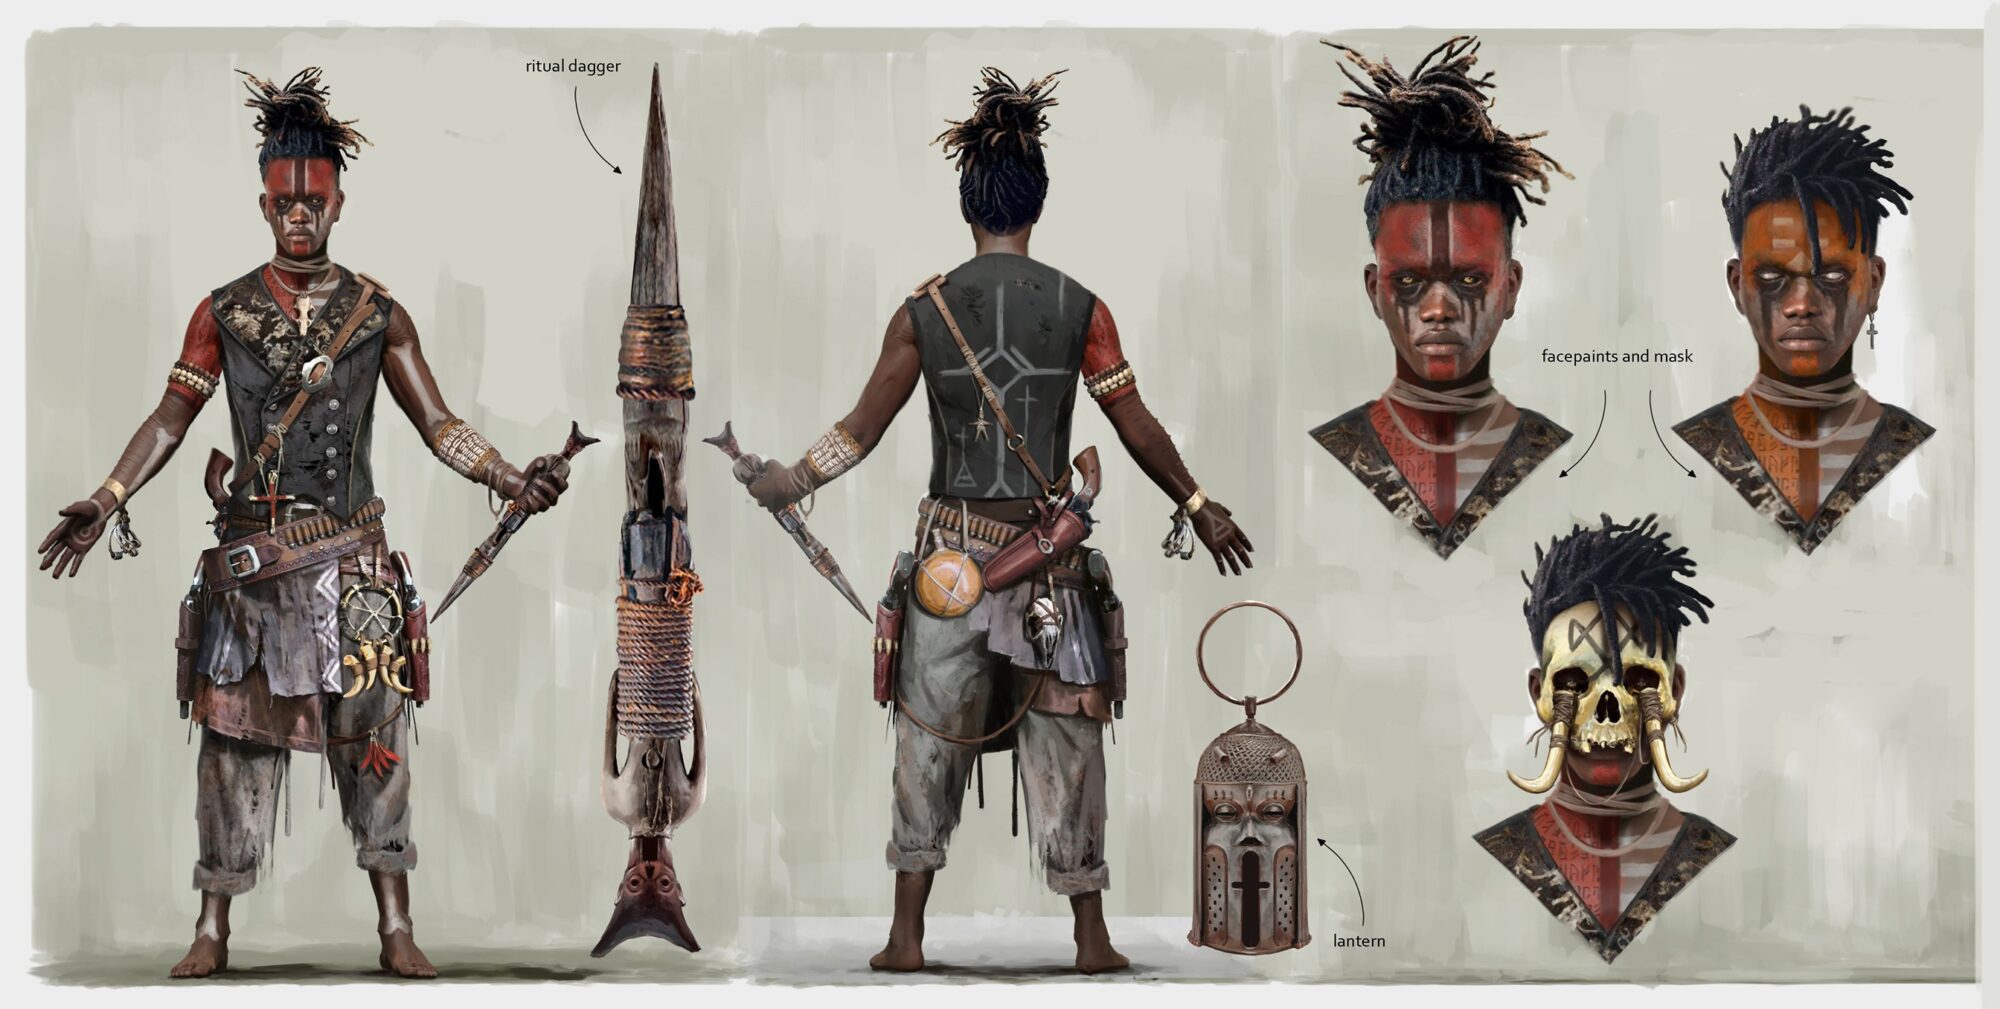
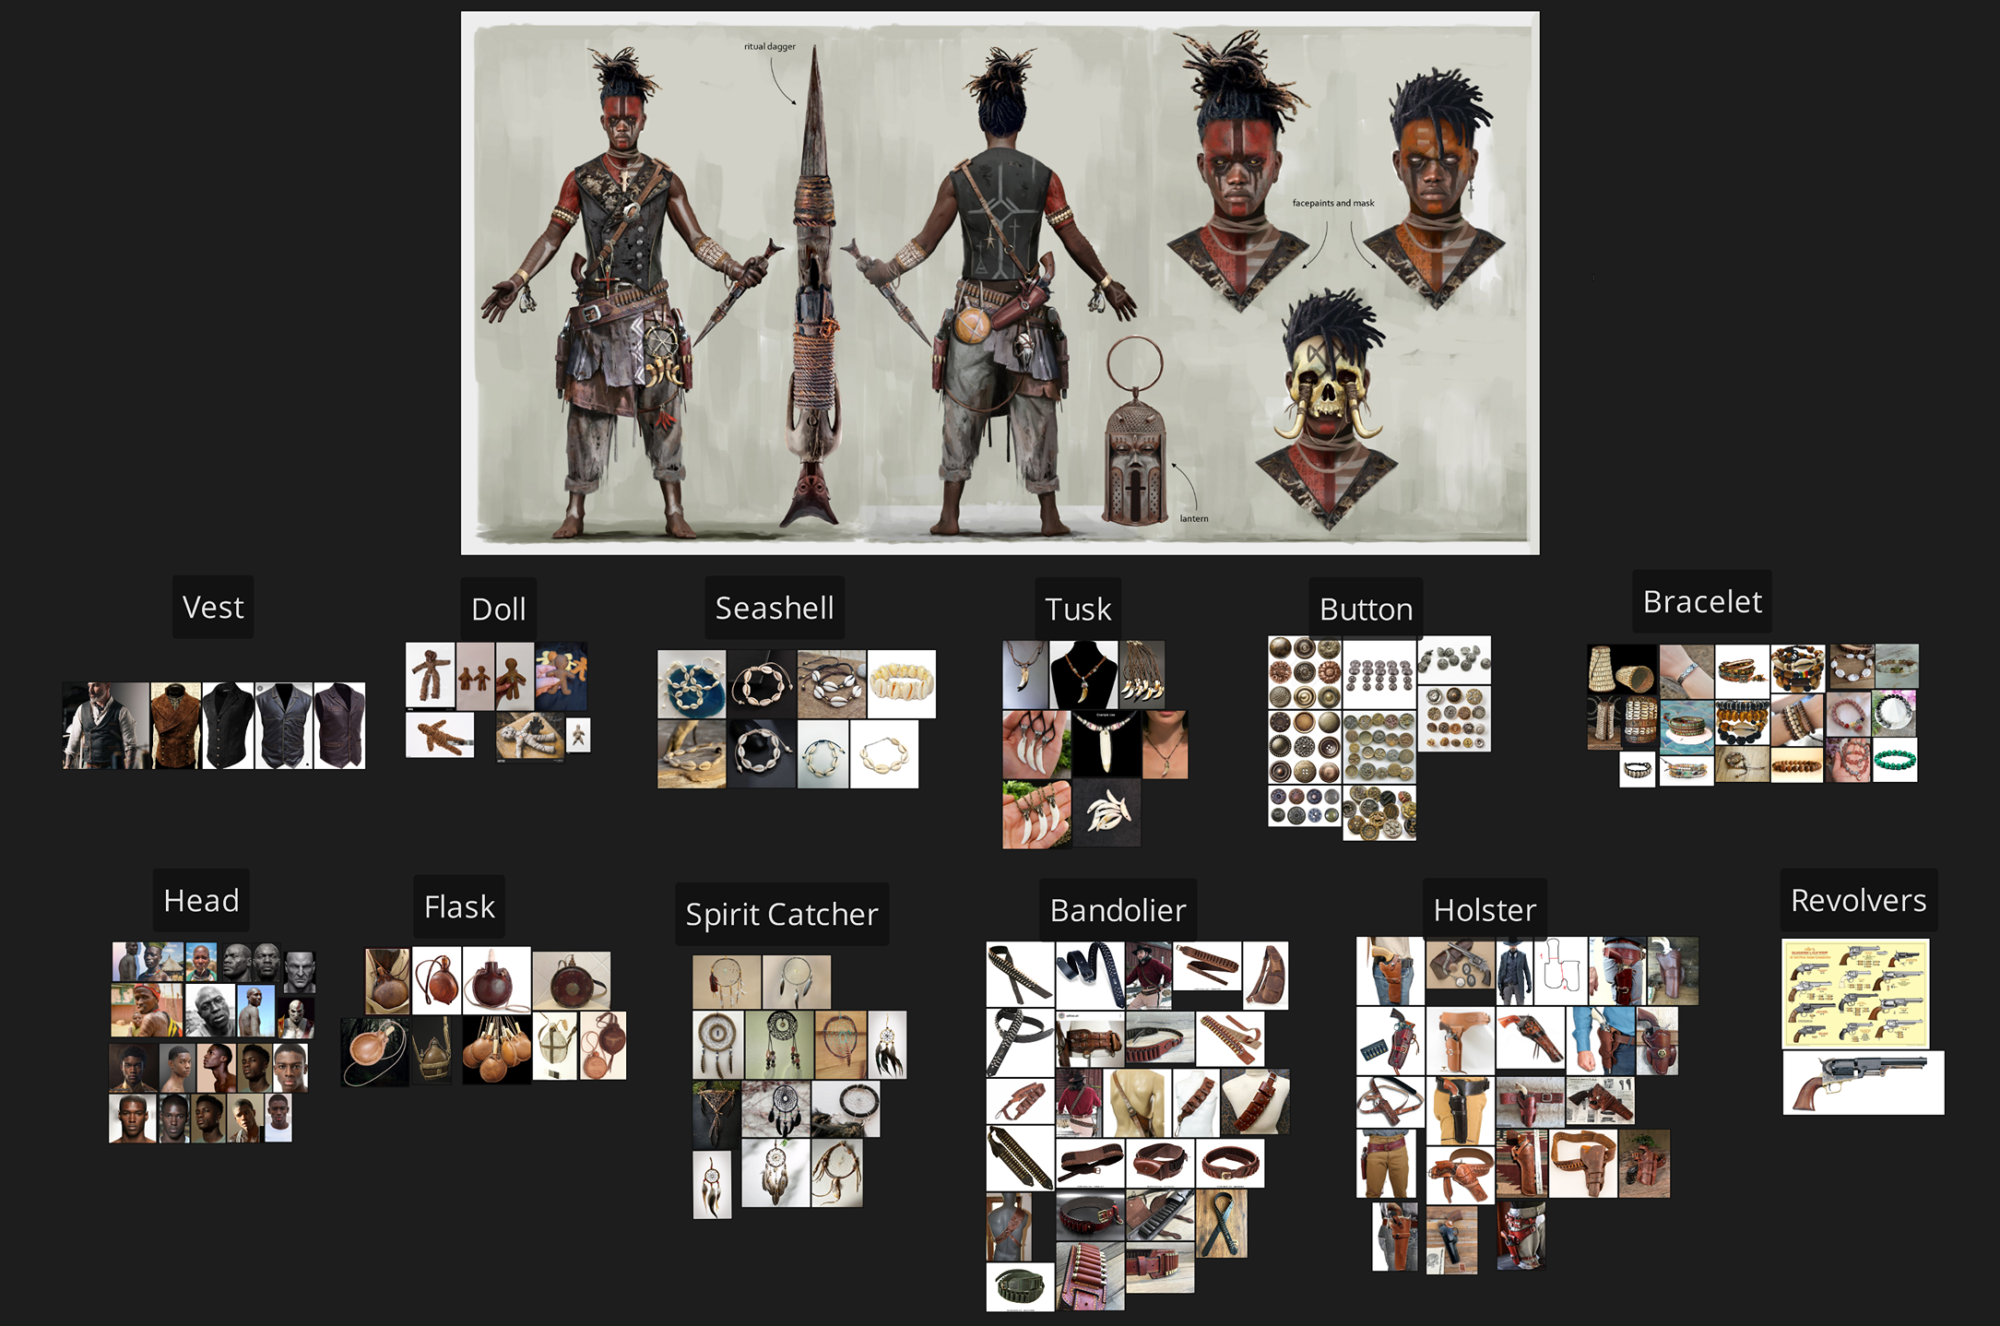
I have always wanted to create a character in a tribal style, and one day, I came across the works of artist Rostislav Zagarov.
I liked his artistic style, and when I saw one of his concepts, I immediately thought about recreating it in 3D.
In the end, during the creation process, I slightly altered the appearance of some elements of the outfit and the head, but overall, I tried to stay true to the original concept by at least 80%.
Goals
When creating this character, I wanted to improve my skills in creating and detailing clothing on high-poly models.
I also wanted to work more on human anatomy and improve the speed and quality of my work with game-ready hair, especially considering the fact that this character required dreadlocks.

Tools
- Zbrush
- Maya
- Marvelous Designer
- Rizom UV
- Marmoset Toolbag
- Substance Painter
- Photoshop
- ZWrap
- GS Curve Tools
References
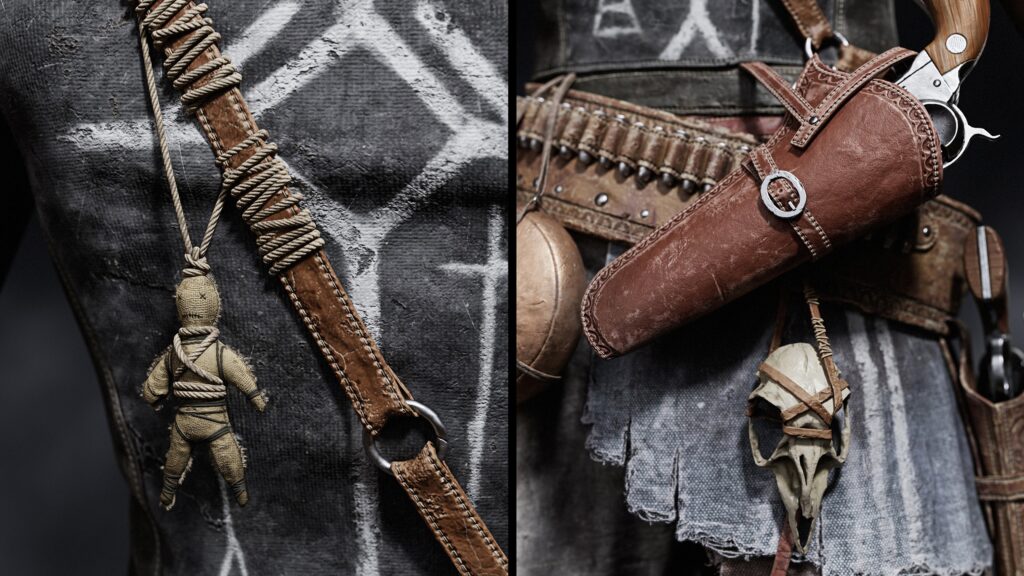
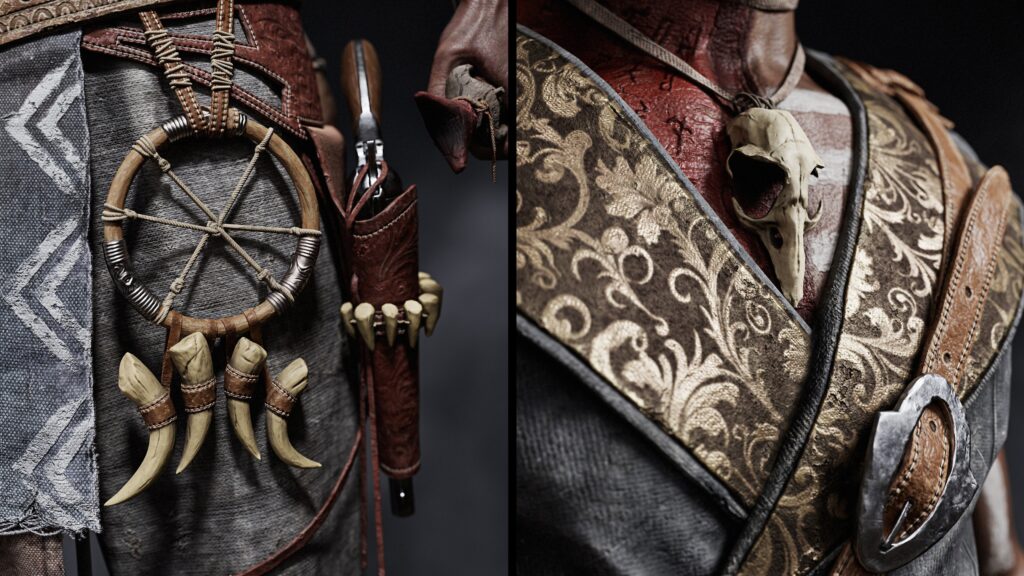
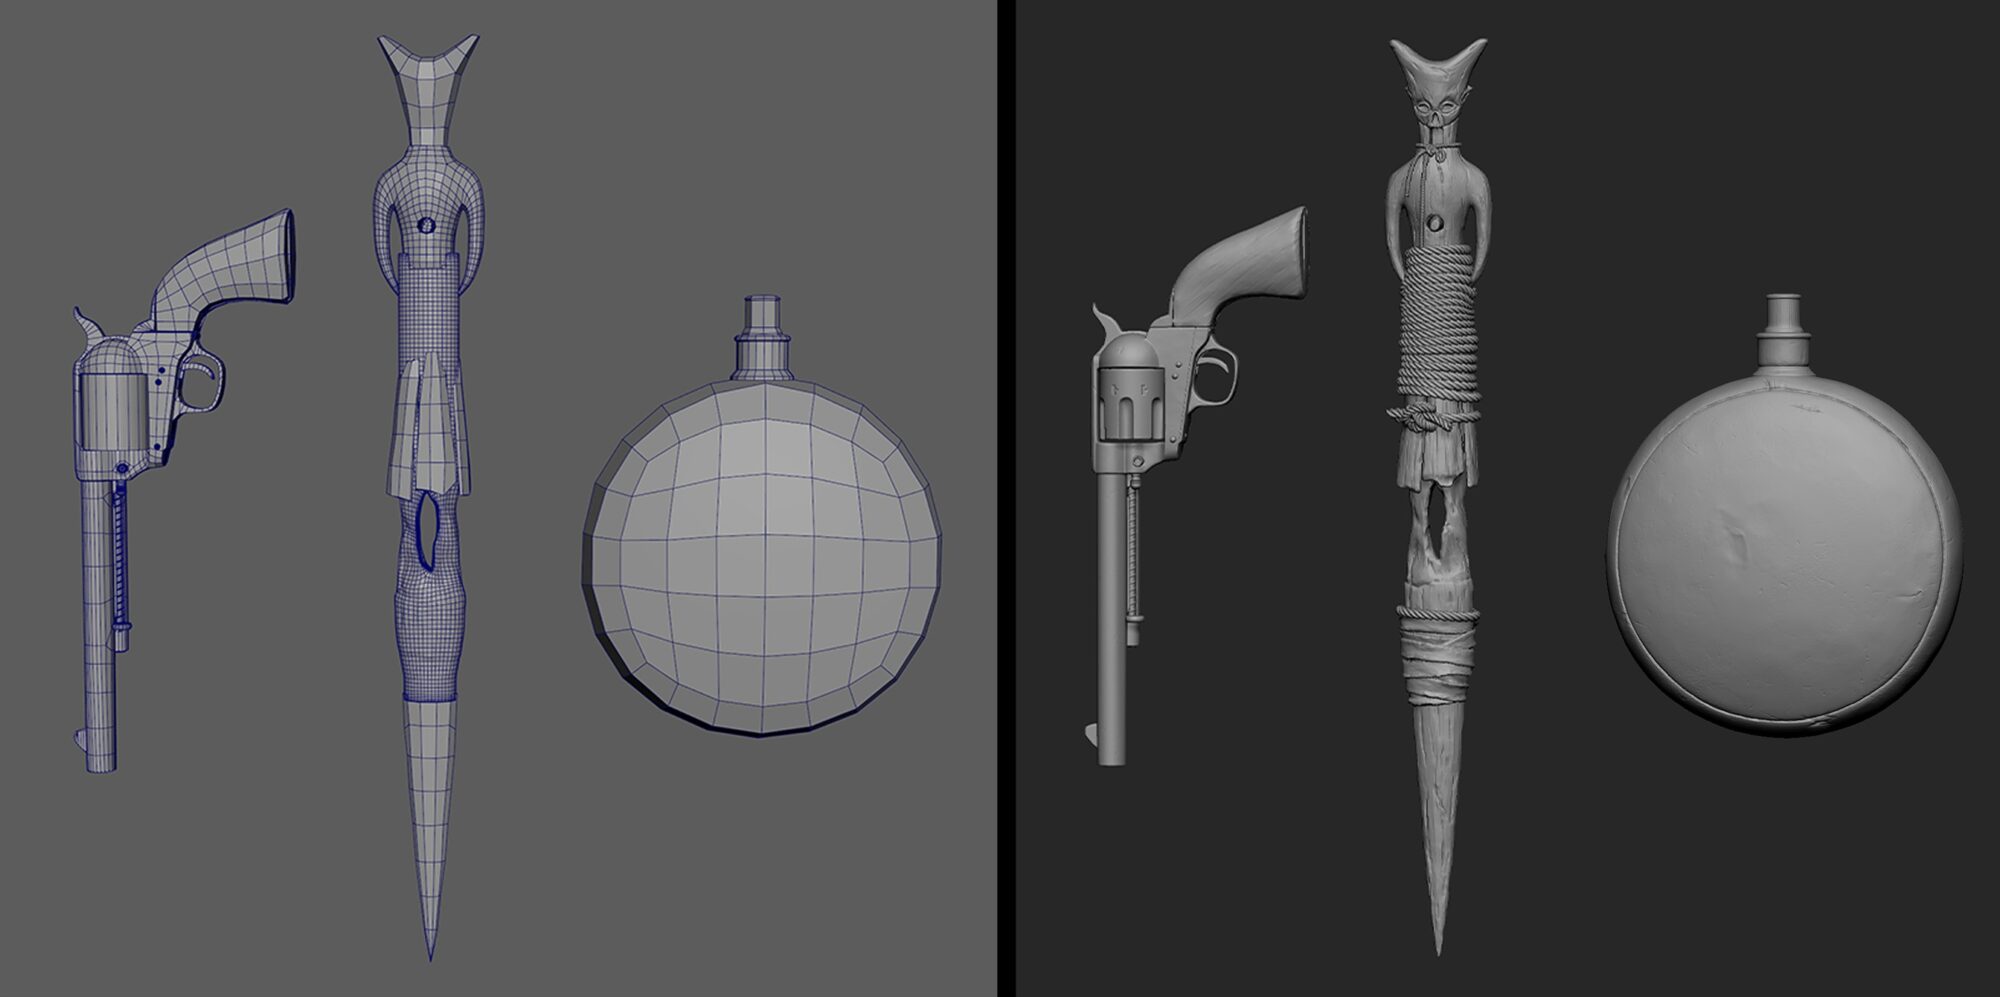
For the most part, I was inspired by the game Hunt: Showdown. I delved deeply into the topic of voodoo, as well as everything related to ritualistic attributes:
Dream catchers, bone amulets, etc. Additionally, the character had elements from the golden age of piracy, so I tried to find many references to that theme.
Blockout
Blockout is an incredibly important stage in character creation, and I try to dedicate a lot of time to it.
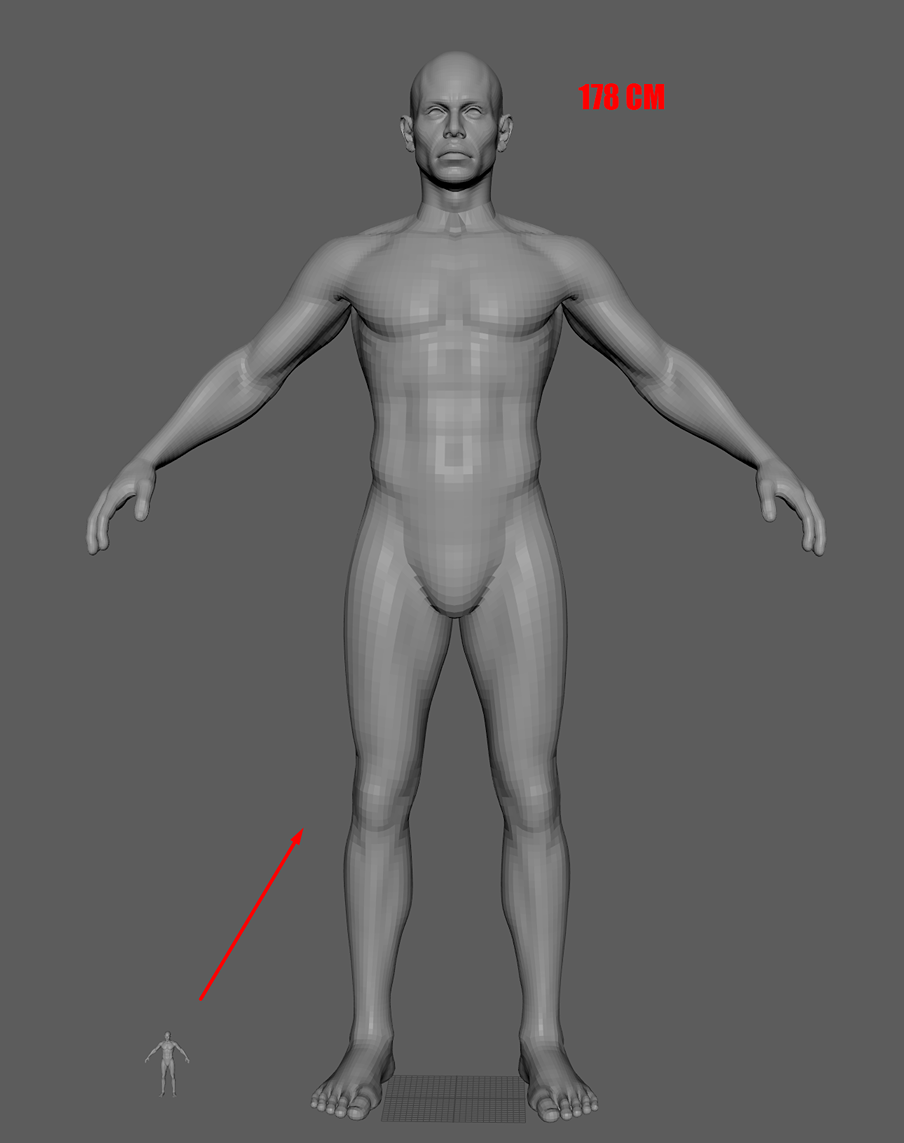
To avoid problems in further software, the character must be set to real-world size, as clothing simulation, shading and SSS directly depend on the size and scale of the character.
To achieve this, I exported the base mesh to Maya and adjusted the model to a standard height of 170-190 cm.
Then, I export the base mesh back to ZBrush, and from this point, I know that if all programs have their units set to centimeters, there will be no issues throughout the pipeline.
Next, I use simple methods to create new clothing and equipment elements. I mask areas on the character, then extrude and shape the object as needed.
At the same time, I constantly play around with the character’s silhouette until I am satisfied. This stage involves a lot of back-and-forth work.
Initially, the character will look quite rough and unrefined, but it’s important not to give in to the desire to rush into detailing too quickly.
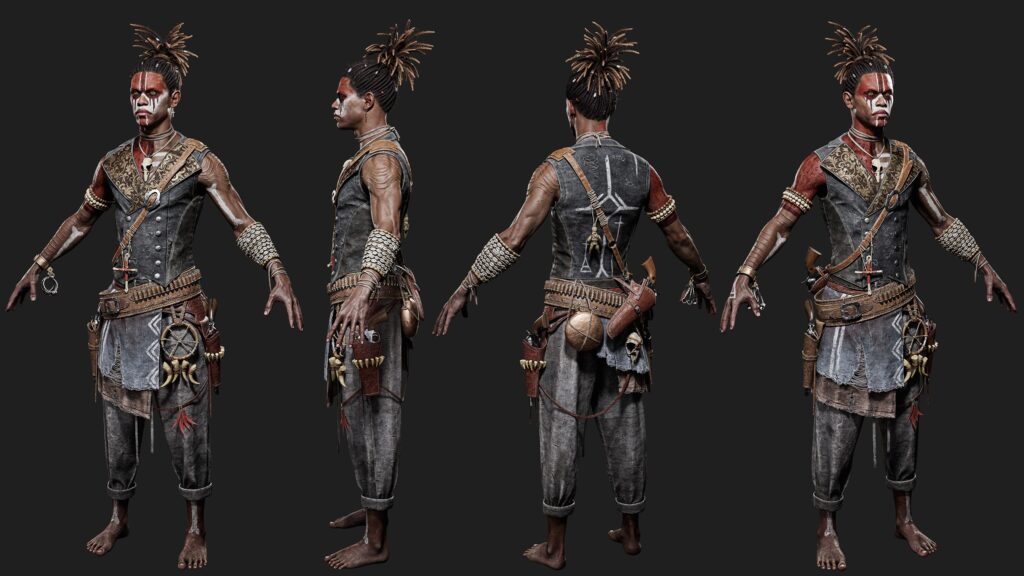
Sculpting, Modelling & Clothing Simulation
Right after I am satisfied with my blockout, I head to Marvelous Designer.
In the new version of Marvelous Designer, the developers have improved the GPU simulation algorithm, so if you have a weak PC, it will now be easier to simulate clothing at a low particle distance to get more micro-folds.
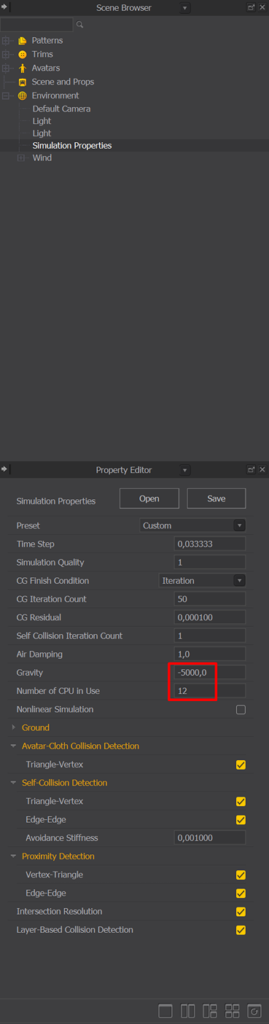
For testing, I sewed all the characters’ clothing using the GPU. I also always set the gravity between -3000 and -6000, as, in my opinion, at the standard value of -9800, the clothing is harder to control.
No matter how many cores your CPU has, do not raise the value above 12, as the simulation will start to perform worse.
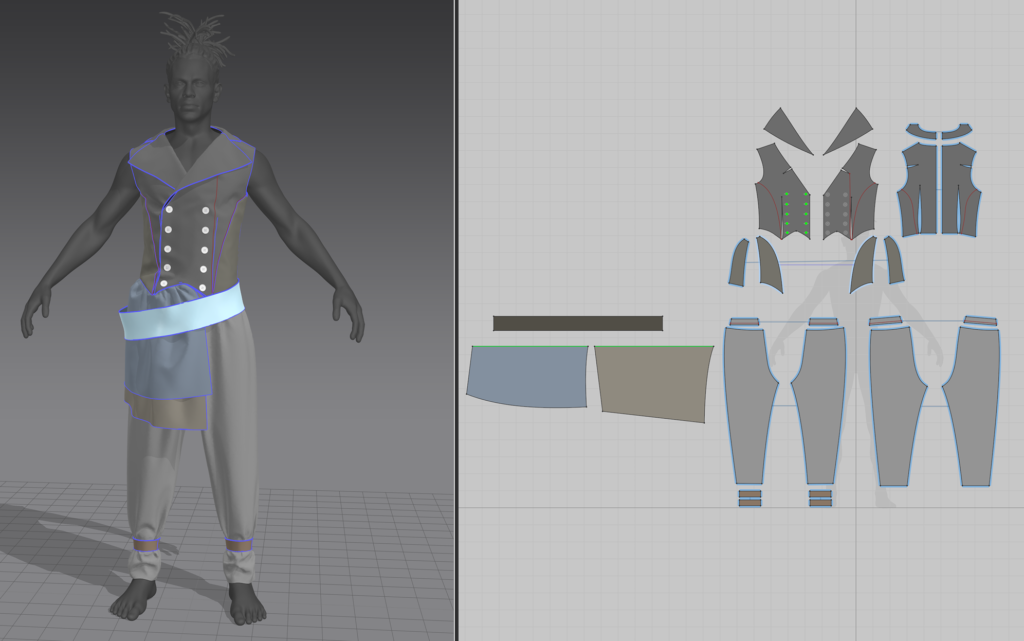
Next, I will show how to convert a simulation mesh into a mesh suitable for sculpting and detailing.
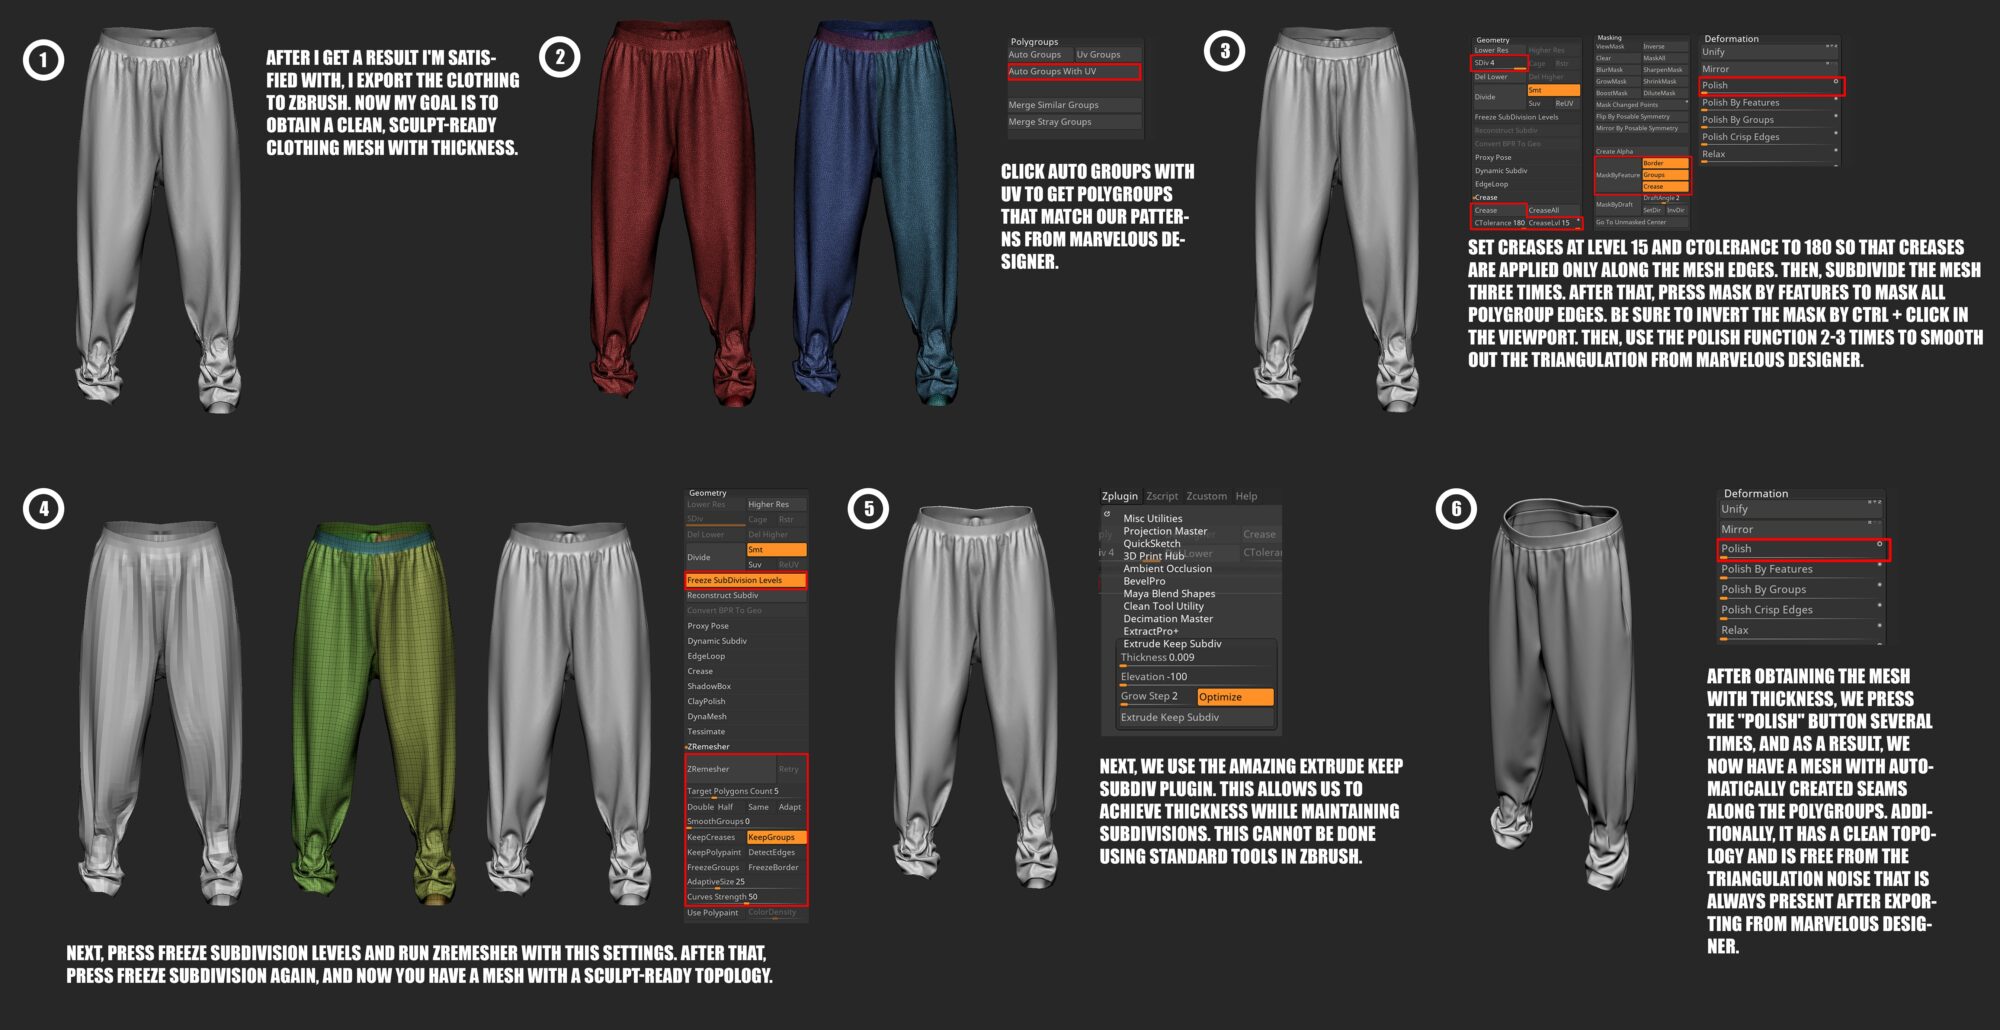
I prefer to model more hard-surface elements in Maya and then export them to ZBrush for detailing and applying creases with smoothing.
To quickly move meshes between this software, I recommend getting the excellent GN Import/Export Tool plugin. Thanks to it, I save a huge amount of time.
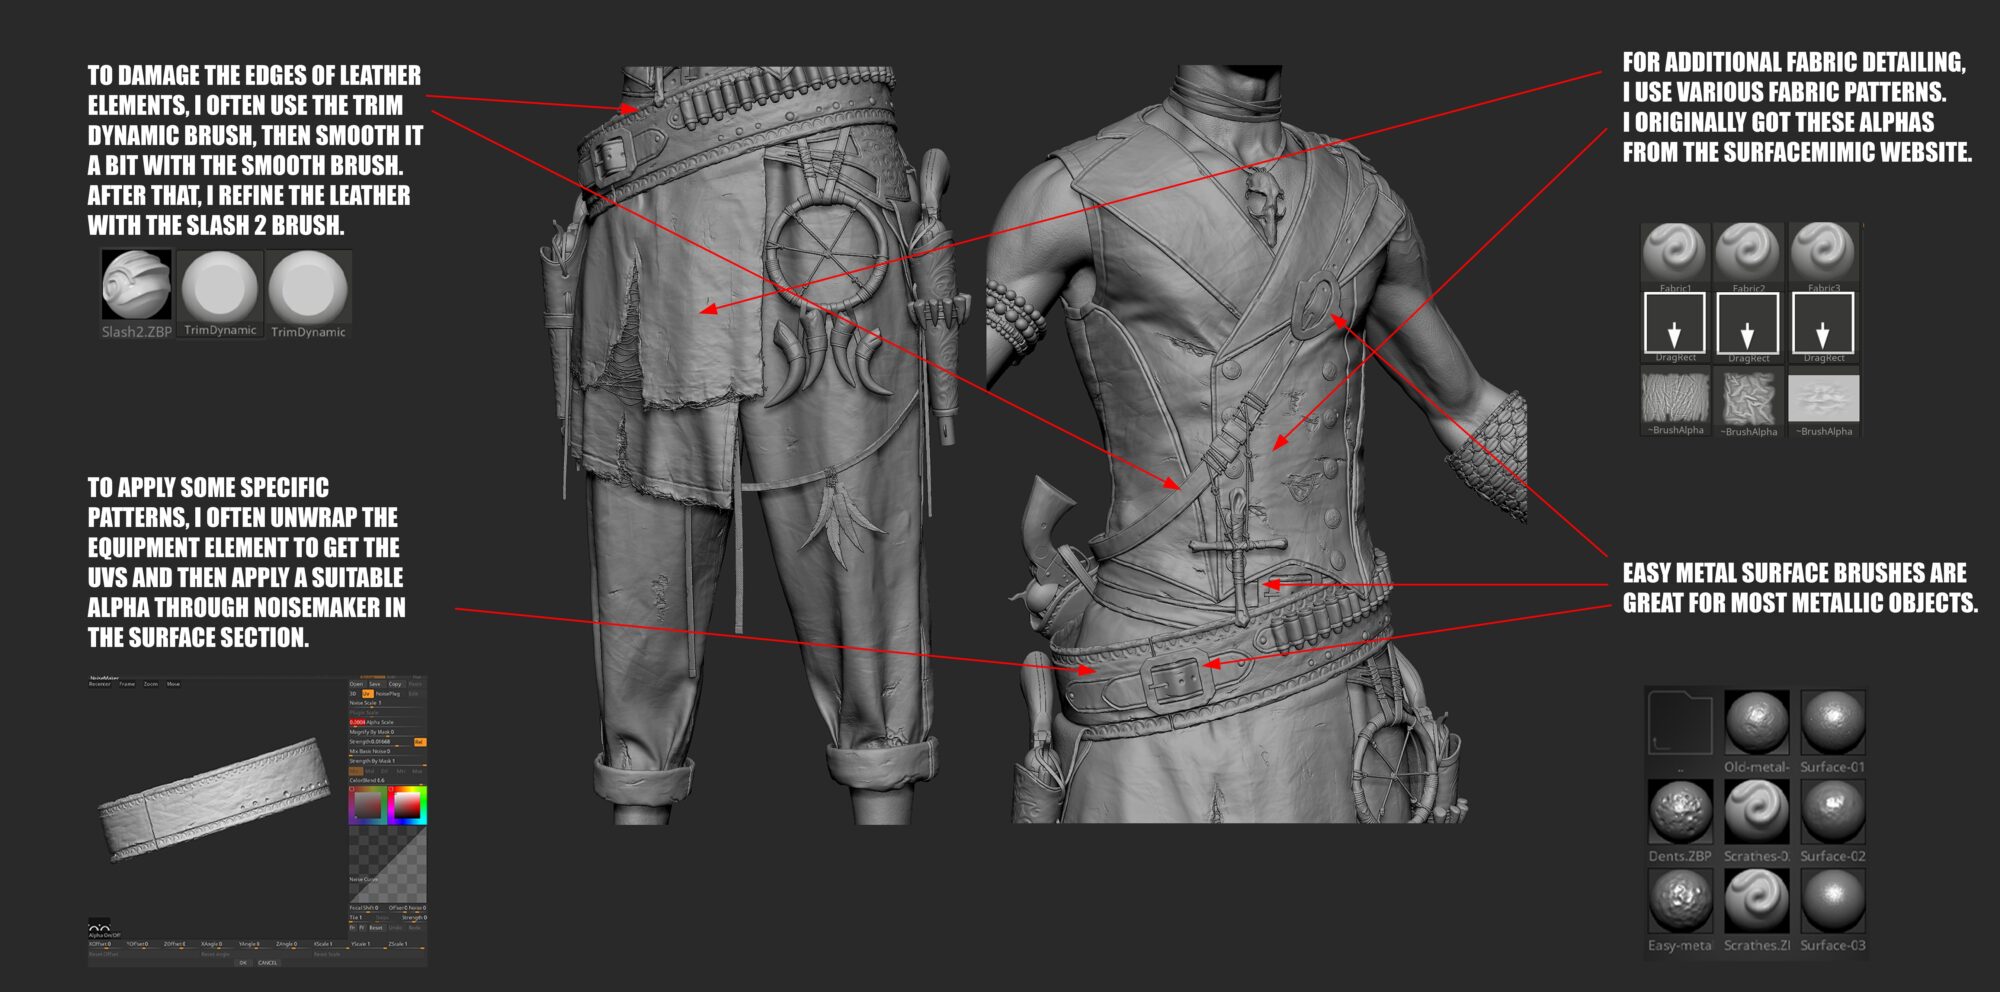
In the screenshot below, I have shown some of the methods and brushes I use for detailing.
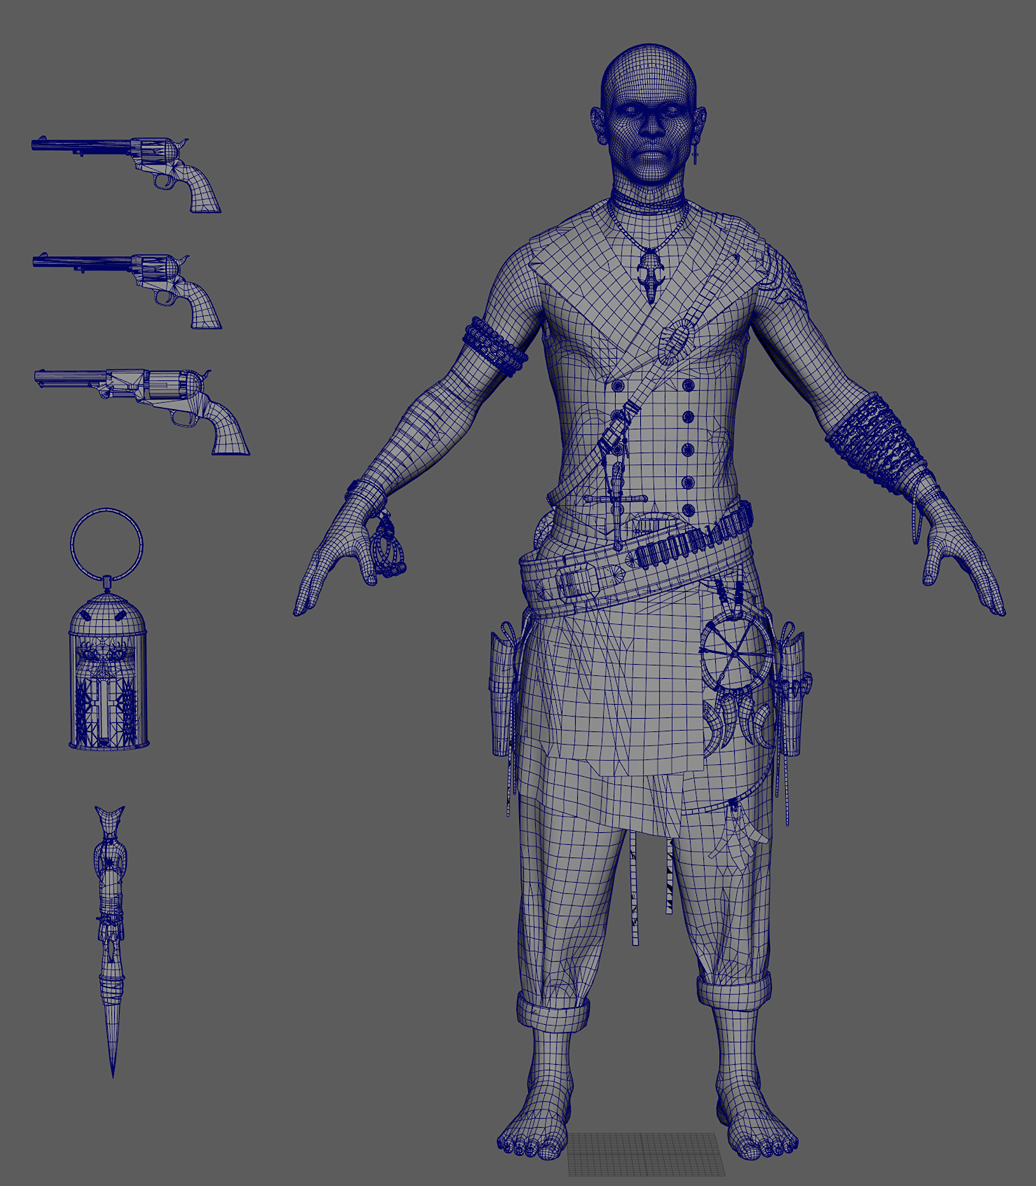
Retopology
For retopology, I decimated the high-poly model in ZBrush and sent it to Maya. 70% of the low-poly model is obtained by manually “drawing” polygons using the Quad Draw function.
The remaining 30% is obtained by exporting the first subdivision level from ZBrush with some minor adjustments.
I added additional edge loops along the direction of the folds to support the shape and silhouette.
The density of the topology should be roughly the same across the entire character, with a slight margin of error. However, a denser mesh is acceptable on the head, hands, around the bends of the limbs, and on small equipment elements.
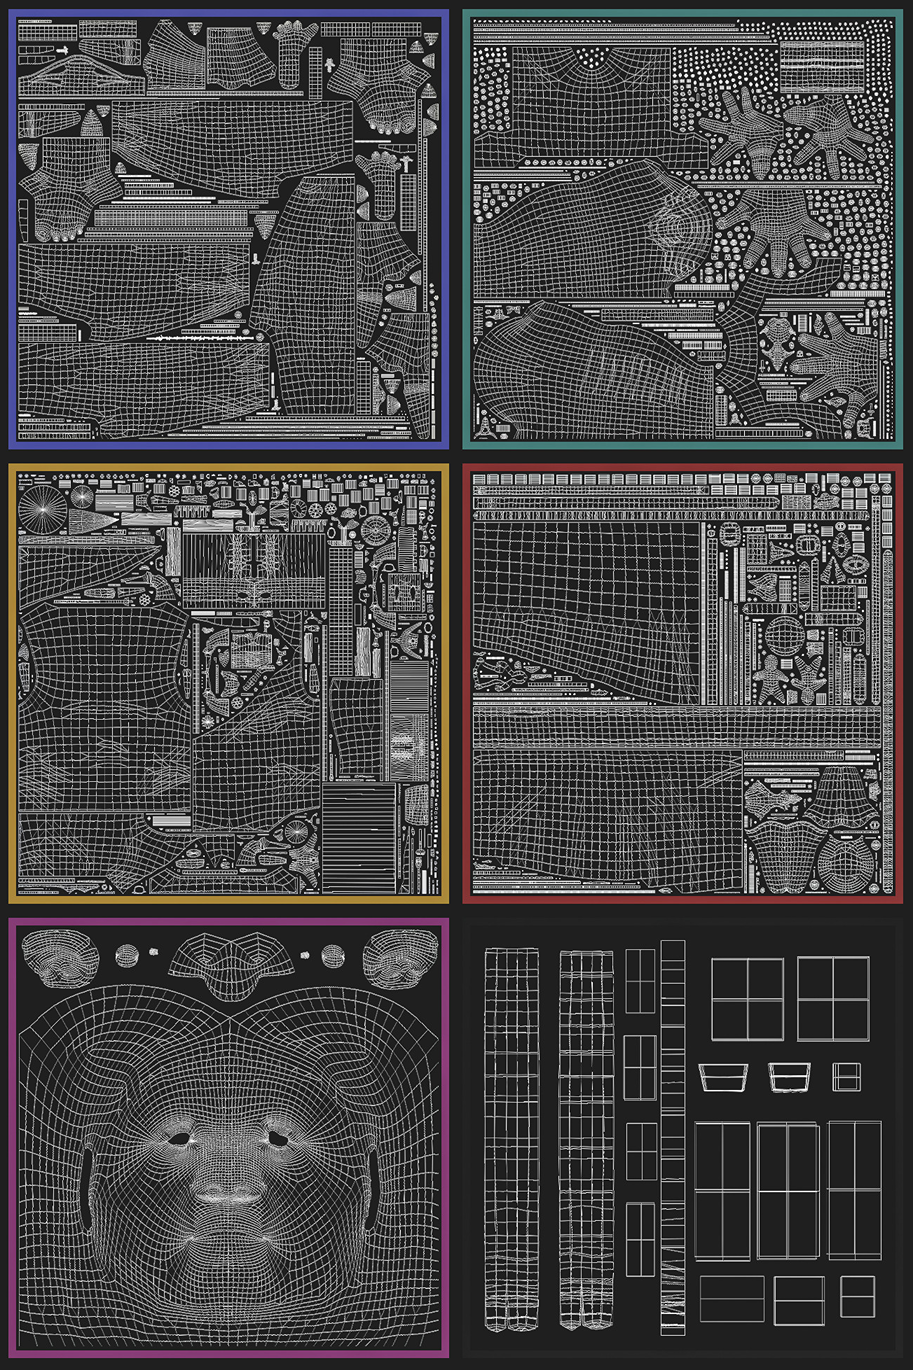
UVs
For UV cutting and packing, I use Rizom UV.
The quality of packing there is unmatched, except perhaps by the UV Pack Master plugin in Blender.
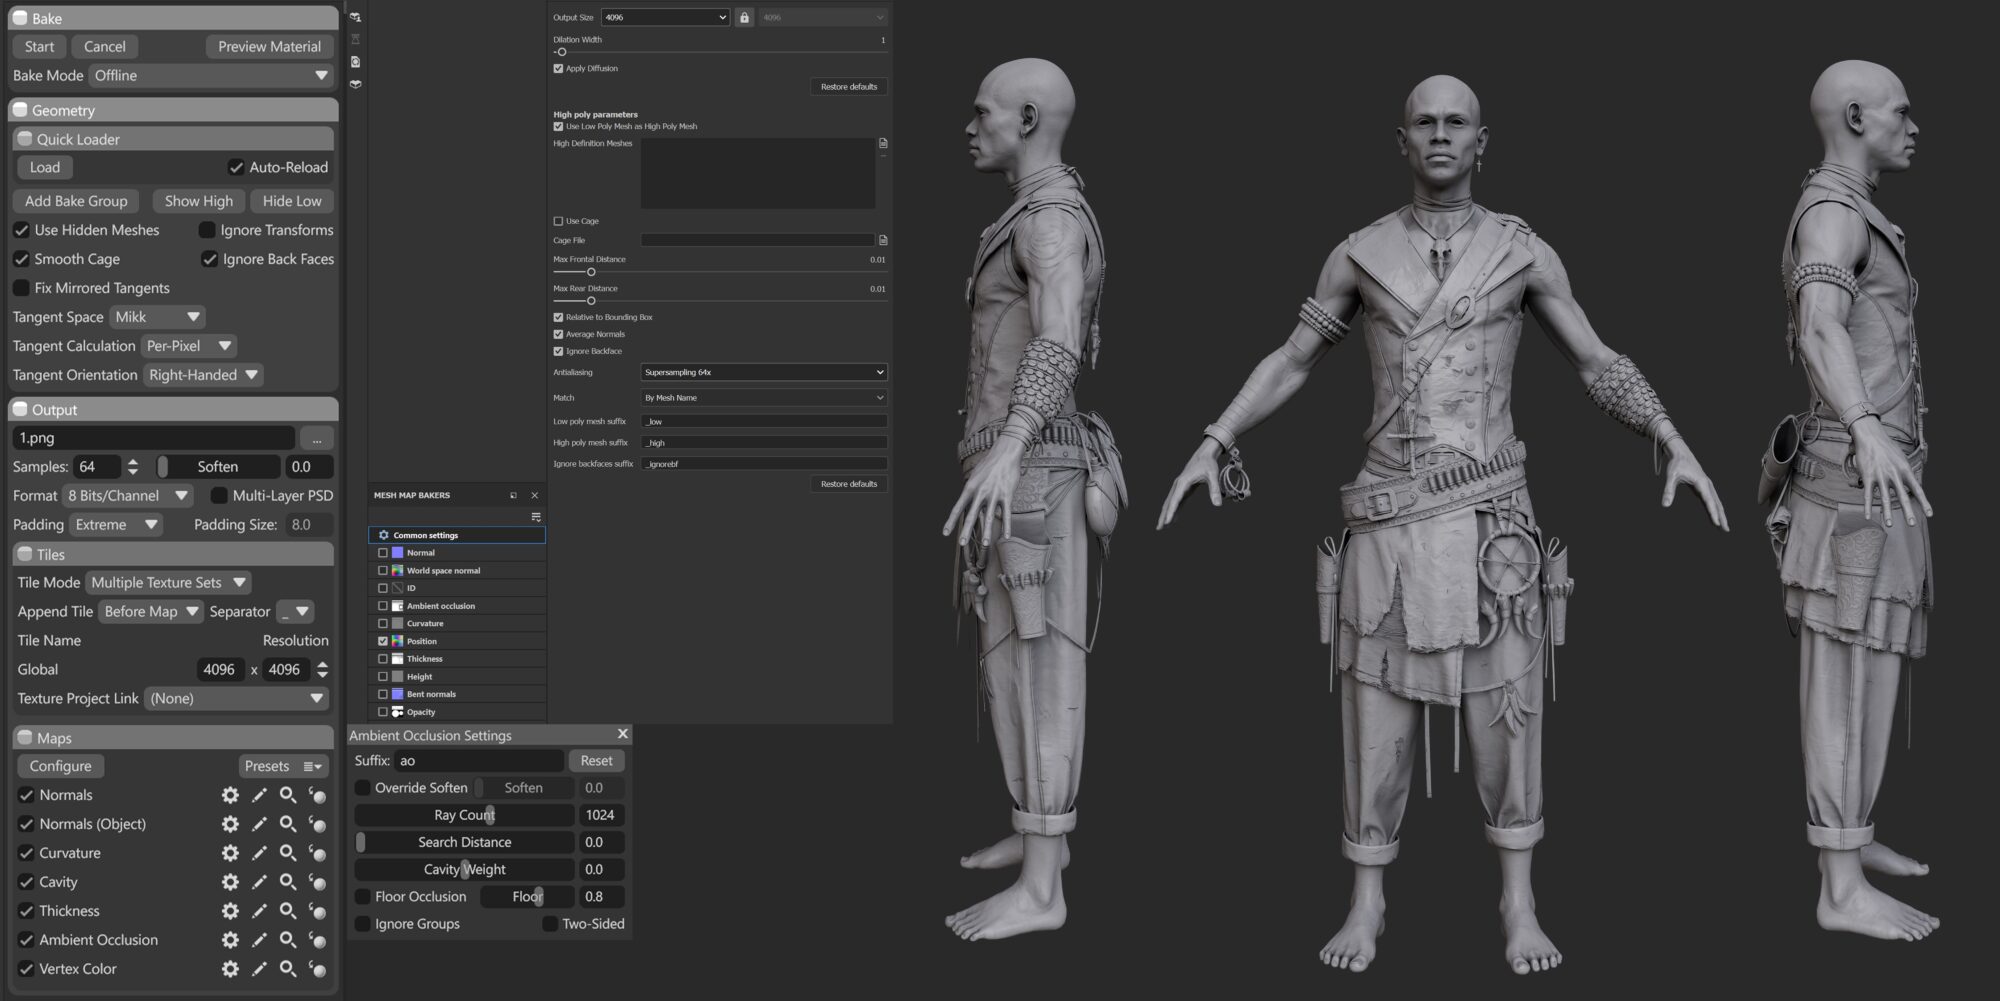
Baking
For baking, I use Marmoset because I believe that no other software can provide such flexible and precise baking.
Be sure to uncheck the Ignore Groups option in the Ambient Occlusion settings so that shared shadows from nearby objects are not baked.
For Thickness and Ambient Occlusion, it’s better to set the number of rays to at least 1024 samples. Also, bake the Position map in Substance Painter using low-poly to low-poly, as baking it in Marmoset may cause some generators in Substance Painter to work incorrectly.
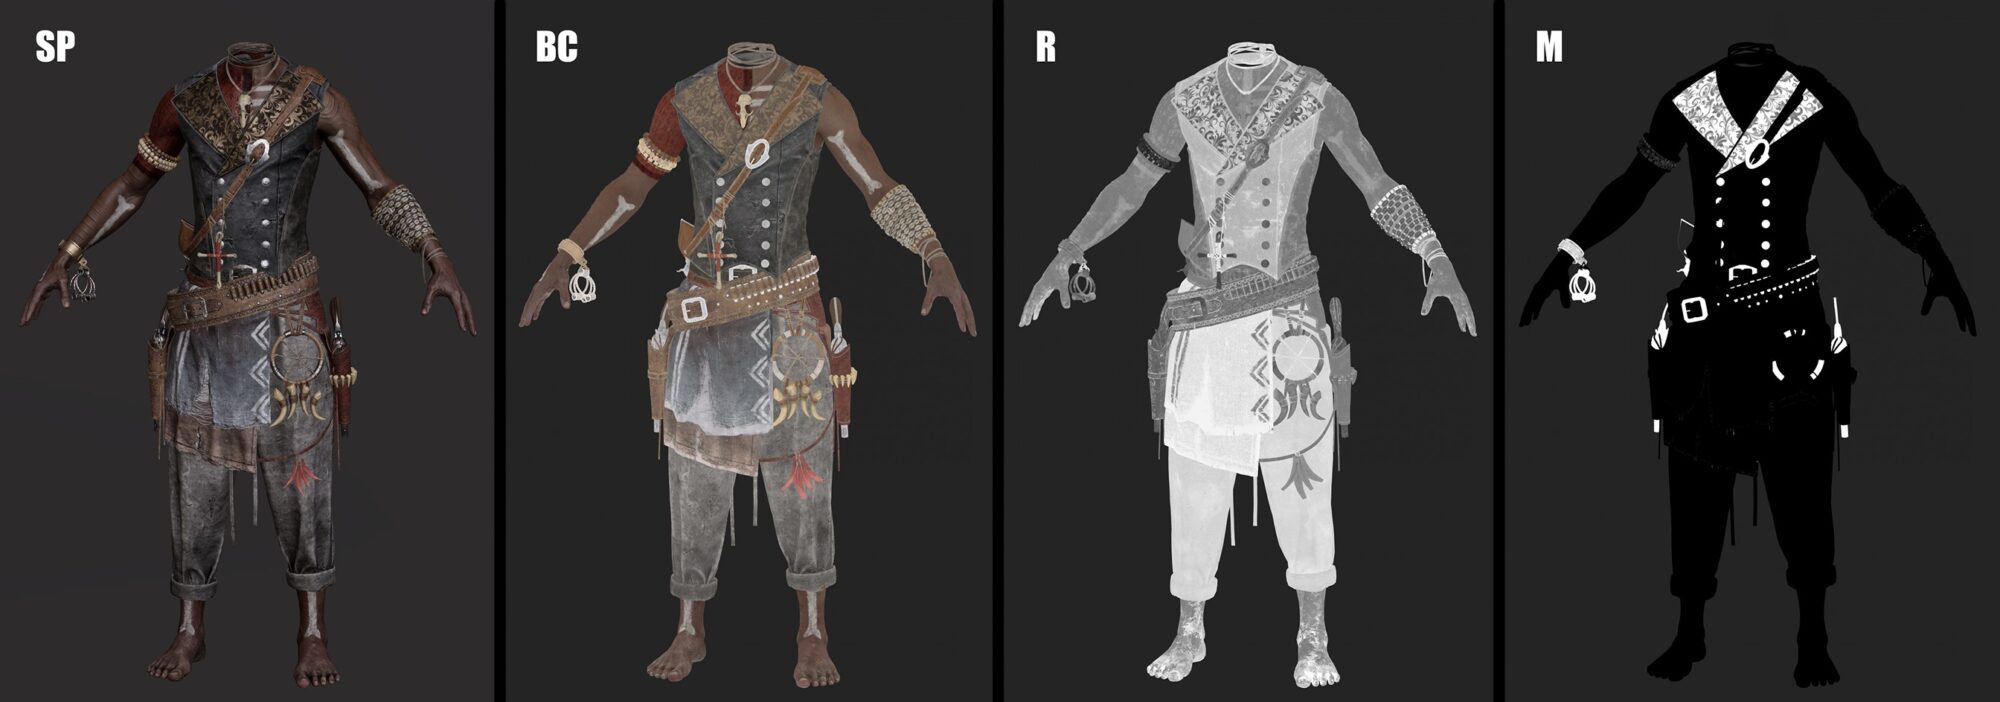
Texturing
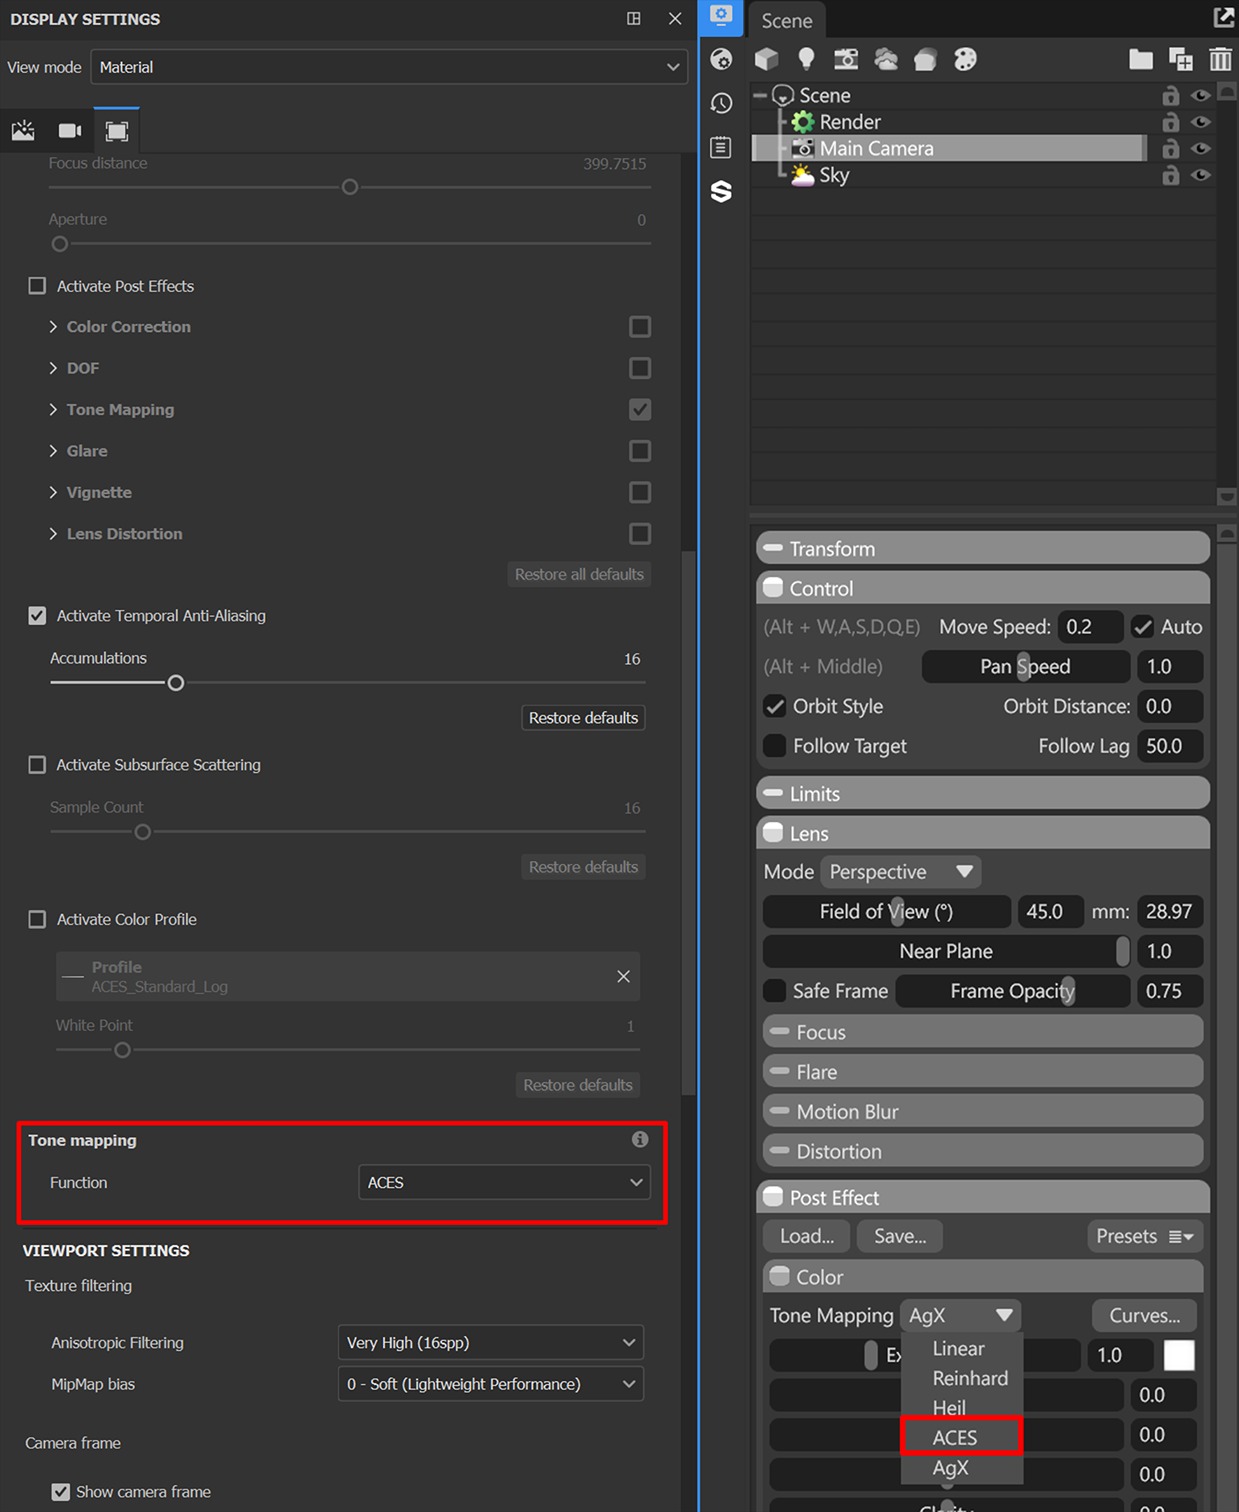
After creating the texture project, I always enable the ACES option in Substance Painter and Marmoset.
I also set the same HDRI in both software to minimize differences in lighting and color between the software, ensuring that the material representation is consistent.
When texturing, I recommend:
- Pay attention to roughness, as I notice that many artists have weak roughness maps. Good roughness will make the lighting on the character look much better.
- Always use gradients, they can be either dark or light. Apply them as often and as much as possible.
- Don’t forget to add wear and tear on the knees, elbows, buttocks, and underarms, as these areas experience the most wear. You can also add fabric fading from the sun around the shoulders.
- Try to break up any generators with additional paint layers, manually painting them. Or at least add an additional fill layer with a multiply blend mode.
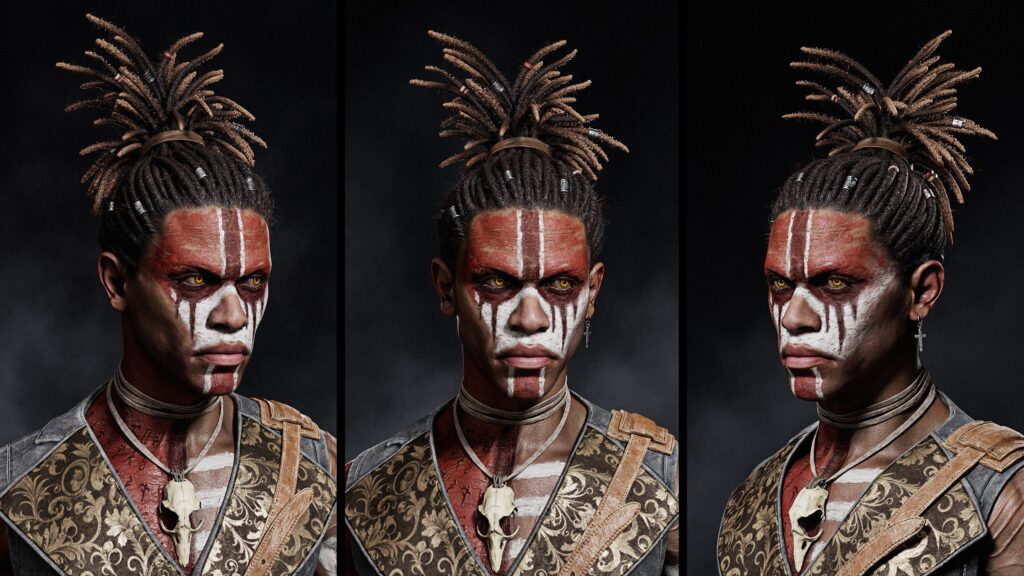
Hair
Game-ready hair often causes a bit of a panic among character artists, as most of us know that it is a complex and delicate task that, if not done well, can ruin the impression of the character.
In this case, I had to create dreadlocks, which was previously an unexplored area of game-ready hair for me.
First, I went to XGen in Maya and grew hair for baking textures. At first, it may seem very complicated, but in reality, it’s simpler than it seems.
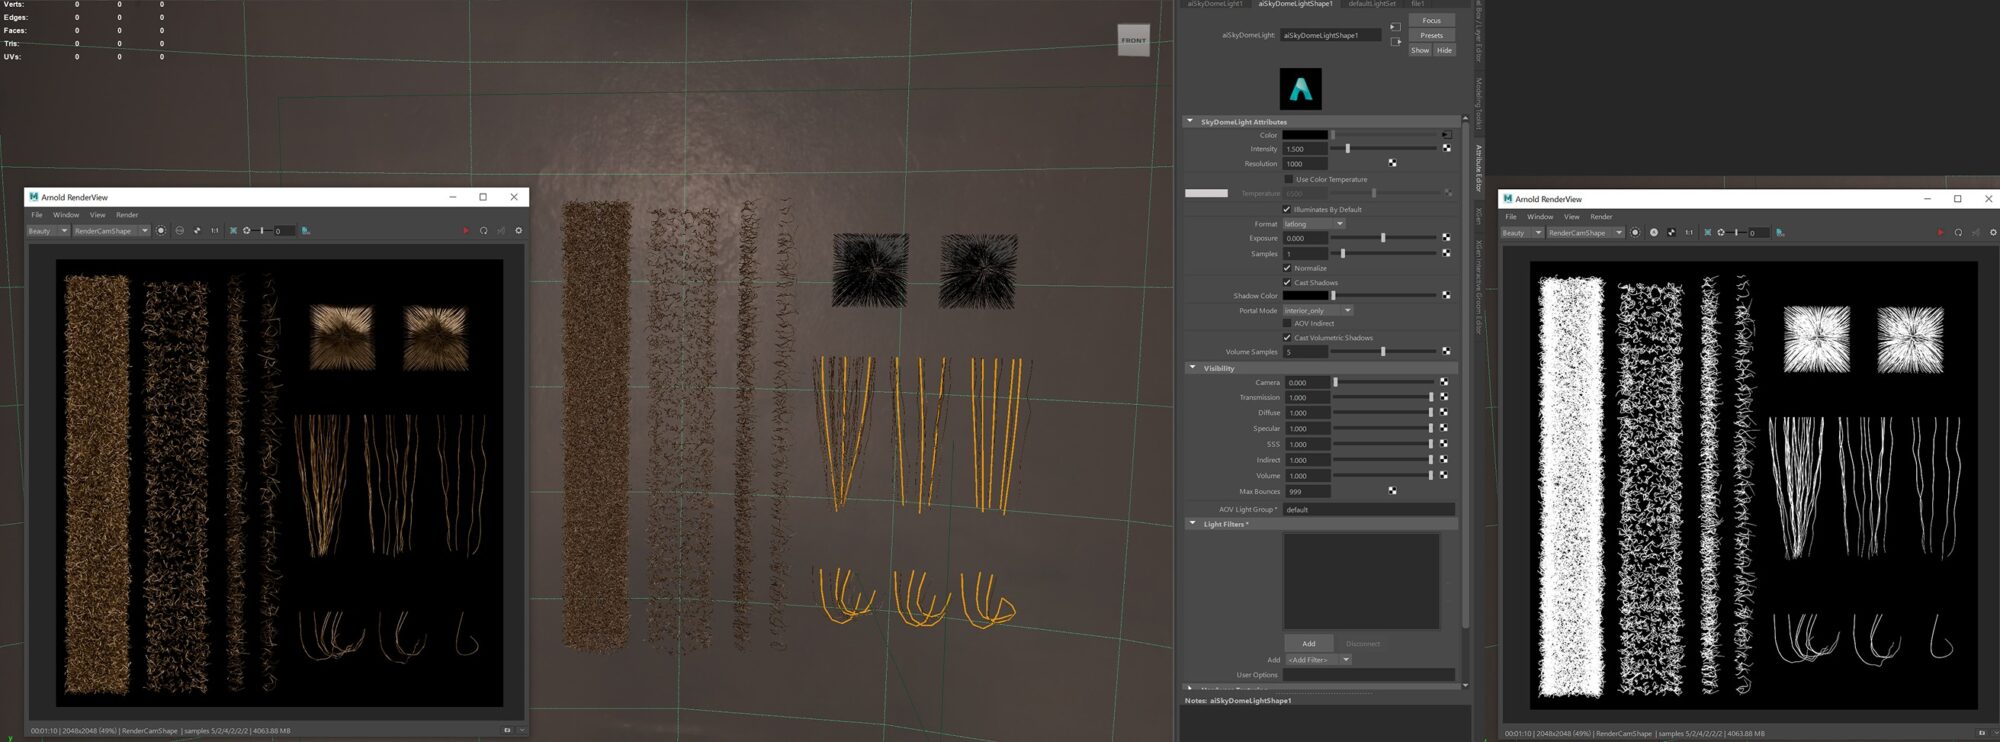
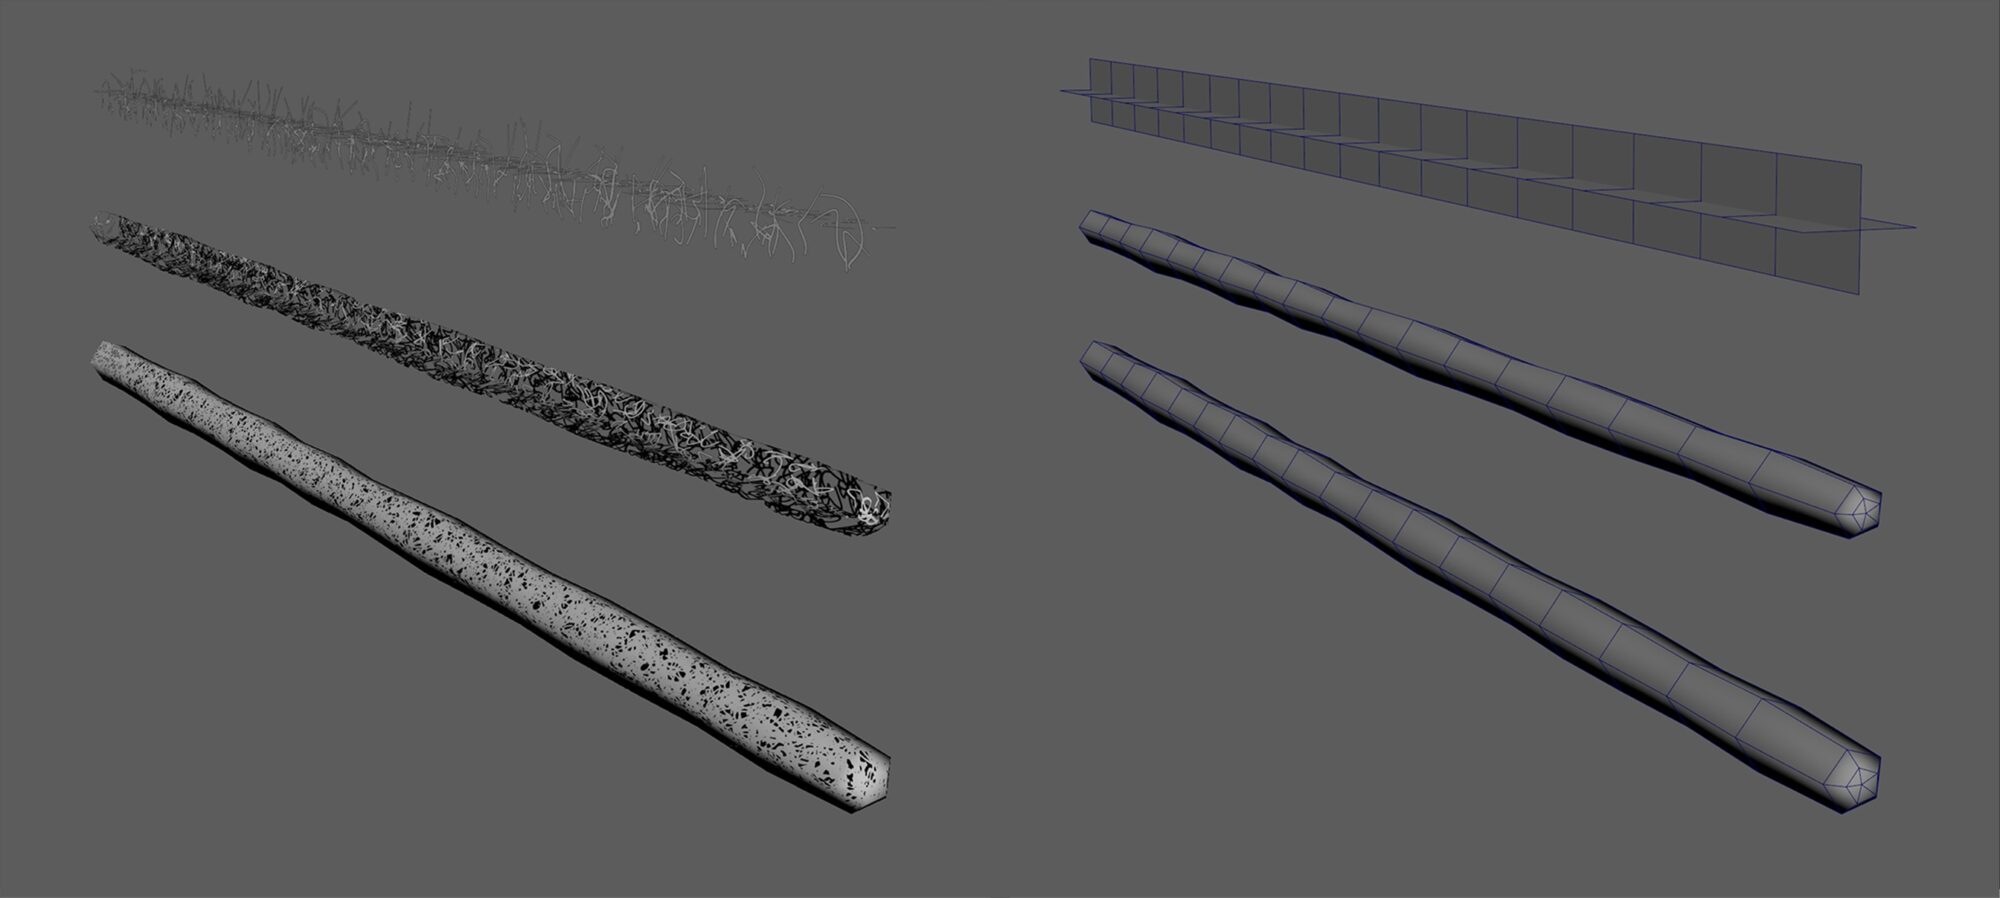
After obtaining the hair textures, I needed to figure out what kind of geometry structure I needed to create so that after applying the textures, it would resemble dreadlocks.
For this, I created 2 cylinders, where the first cylinder should be slightly larger than the other, and then I placed 2 cross-shaped hair cards inside them.
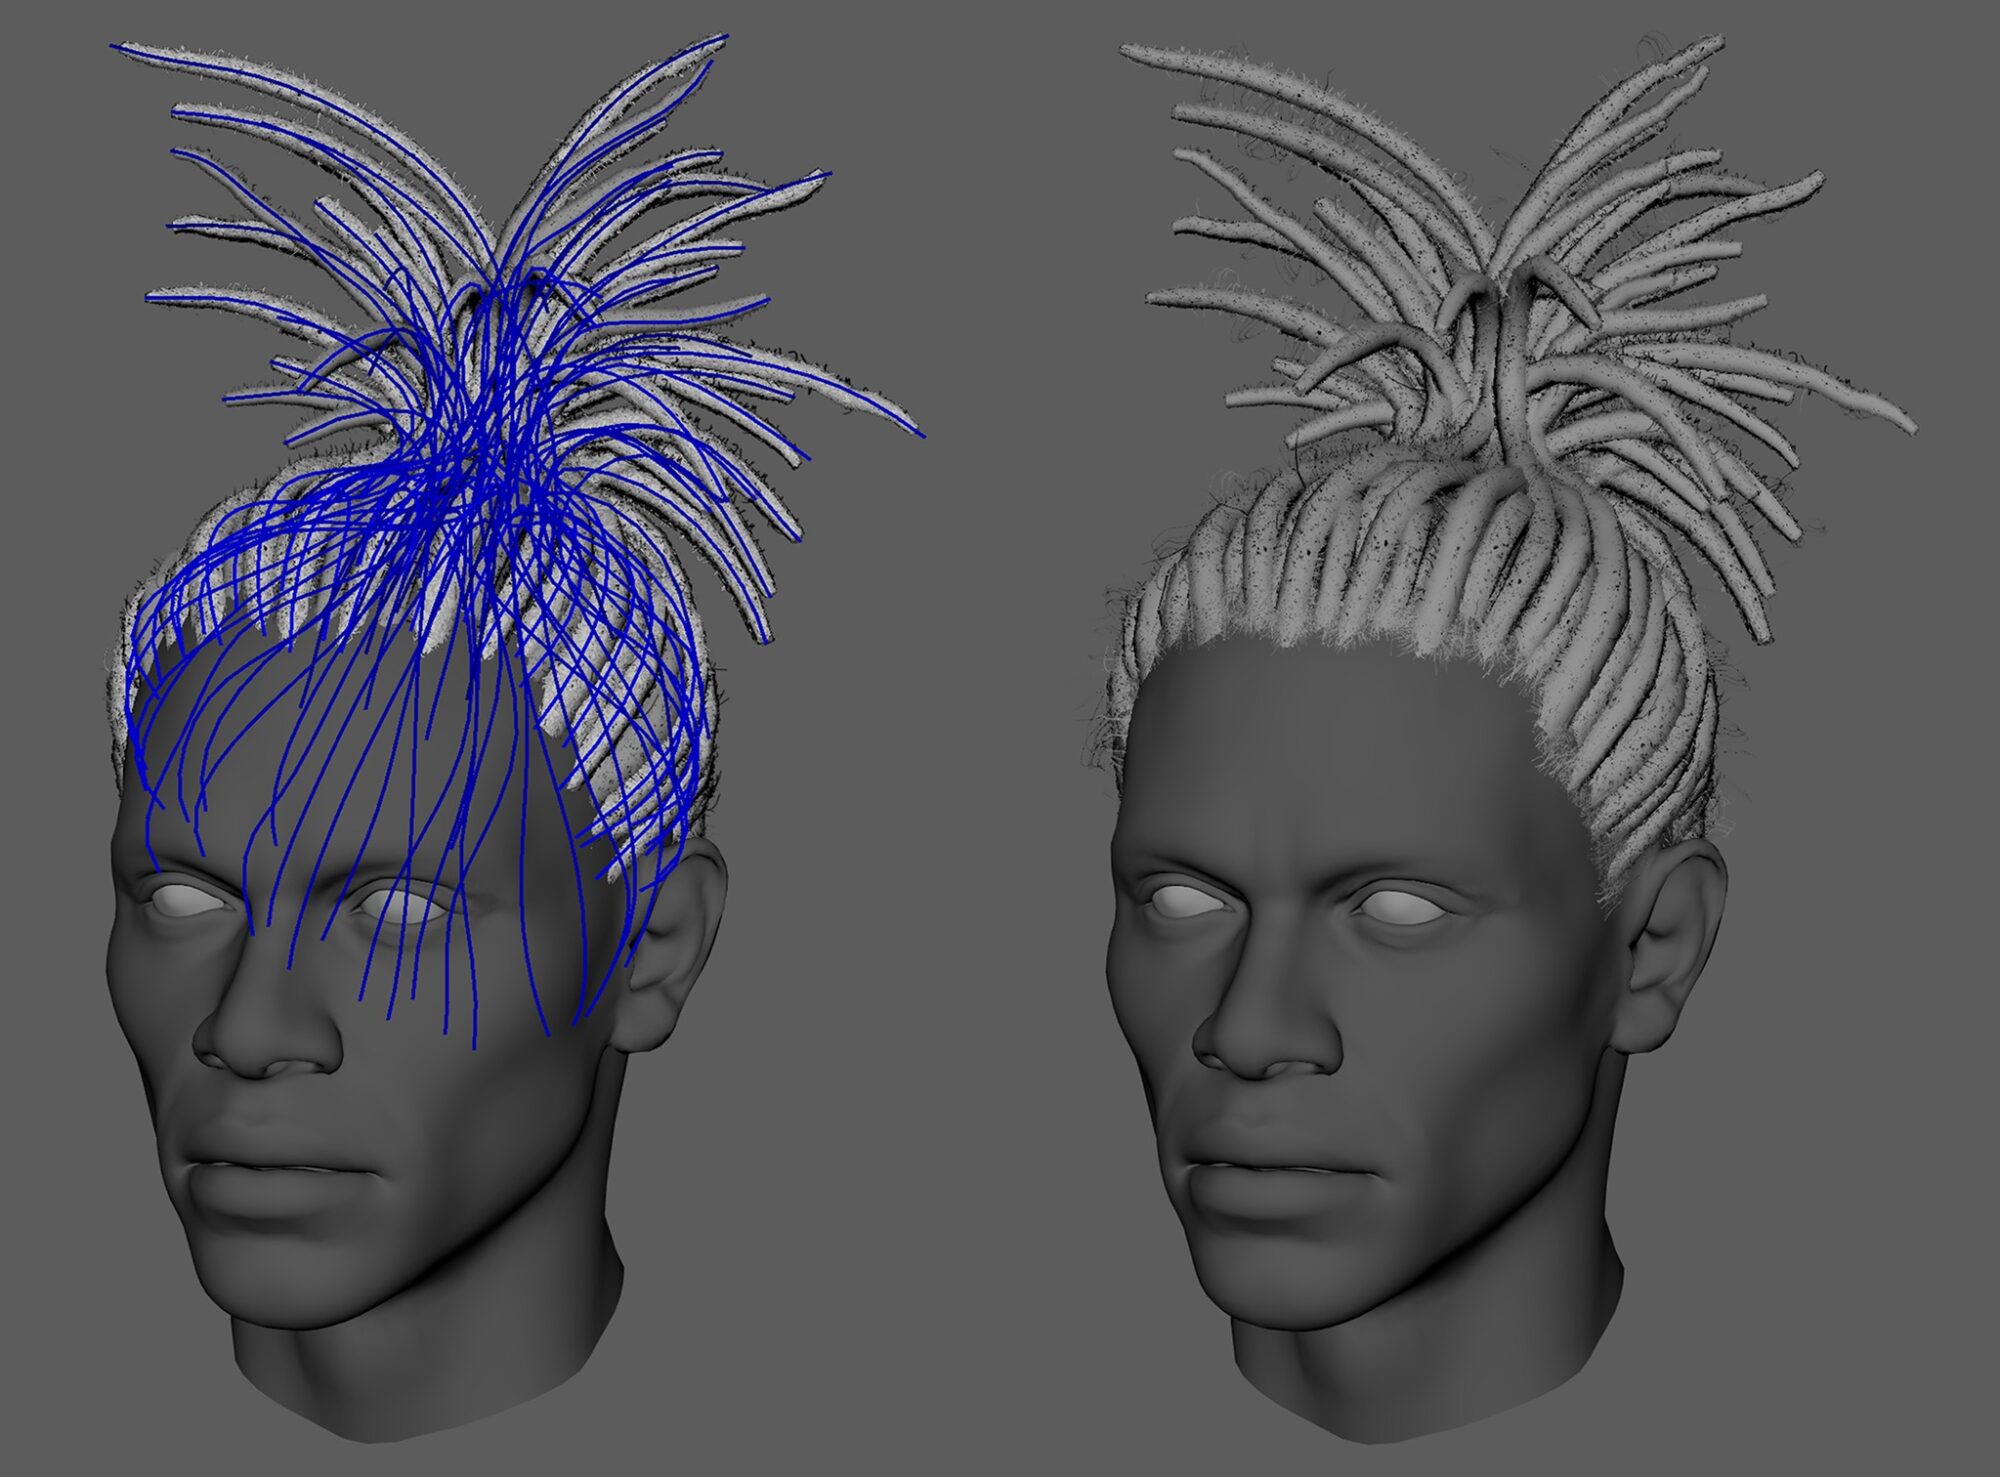
Many thanks to Hazel Brown for her amazing hair tutorials. Without her tutorials, it would have taken me much longer to create the hair.
Next, I used the GS Curve Tools plugin for Maya to arrange the dreadlock geometry along curves, and after a long and meticulous process, I ended up with a hairstyle that satisfied me.
I also placed something like hair roots under each dreadlock and added various flyaway hairs at the roots and around each dreadlock.
Lighting & Rendering
For the final render, I assembled the scene in Marmoset 5. For the ground under the character’s feet, I used an asset from Quixel Megascans.
Regarding lighting, I want to start by saying that I often see many artists who prefer to completely disable the HDRI and then set up their lighting.
I believe that the HDRI can be dimmed, but not turned off, as it helps to highlight metallic elements on the character well.
I add the key light from above to illuminate the part of the character closest to the camera and to create dramatic shadows.
Then, I added a fill light to ensure that the shadows on the darker part of the character were not completely black.
After that, I added a few rim lights to highlight the silhouette and separate the character from the background.
Conclusion.
We are nearing completion and I wanted to give a few extra tips:
- Don’t rush and take time to rest if possible. Burnout is a serious issue that can negatively impact your productivity. If even the thought of 3D makes you feel averse, it’s probably time to take a break and switch to another activity.
- Although it has been mentioned before, do not neglect references.
- Carefully analyze whether you are achieving a rich and memorable silhouette. Especially for game development, don’t shy away from slightly exaggerating features in the character’s outfit.
- At different stages of character creation, try exporting the character to the software where you will do the final render. This will allow you to see your character from a new perspective and possibly spot previously unnoticed flaws.
- Try to genuinely enjoy the process.
I hope you enjoyed this article and found it useful.
You can find more of my work on ArtStation and Instagram.
Read more articles
You might also like these articles.