Calculator Triumphator C 1927


Introduction
Hi, my name is Marina Baykova and I am a beginner 3D artist. My passion for video games spawned a huge love for the 3D world.


Goals
This project is my second independent work. The main goal for me was to consolidate all the knowledge gained from viewing a large number of lessons.
The second goal was to improve my texturing skills, so I chose a piece that has leather and wood elements because I have not come across such materials before.
Lastly, I didn’t want my props to look new, so I practiced creating various damage, wear, chips, etc.
Software
- Blender: Blockout, low-poly, unwrapping & rendering.
- ZBrush: High-poly.
- Marmoset: Baking.
- Substance Painter: Texturing.
- Photoshop: Stencils & Post-processing.
References & inspiration
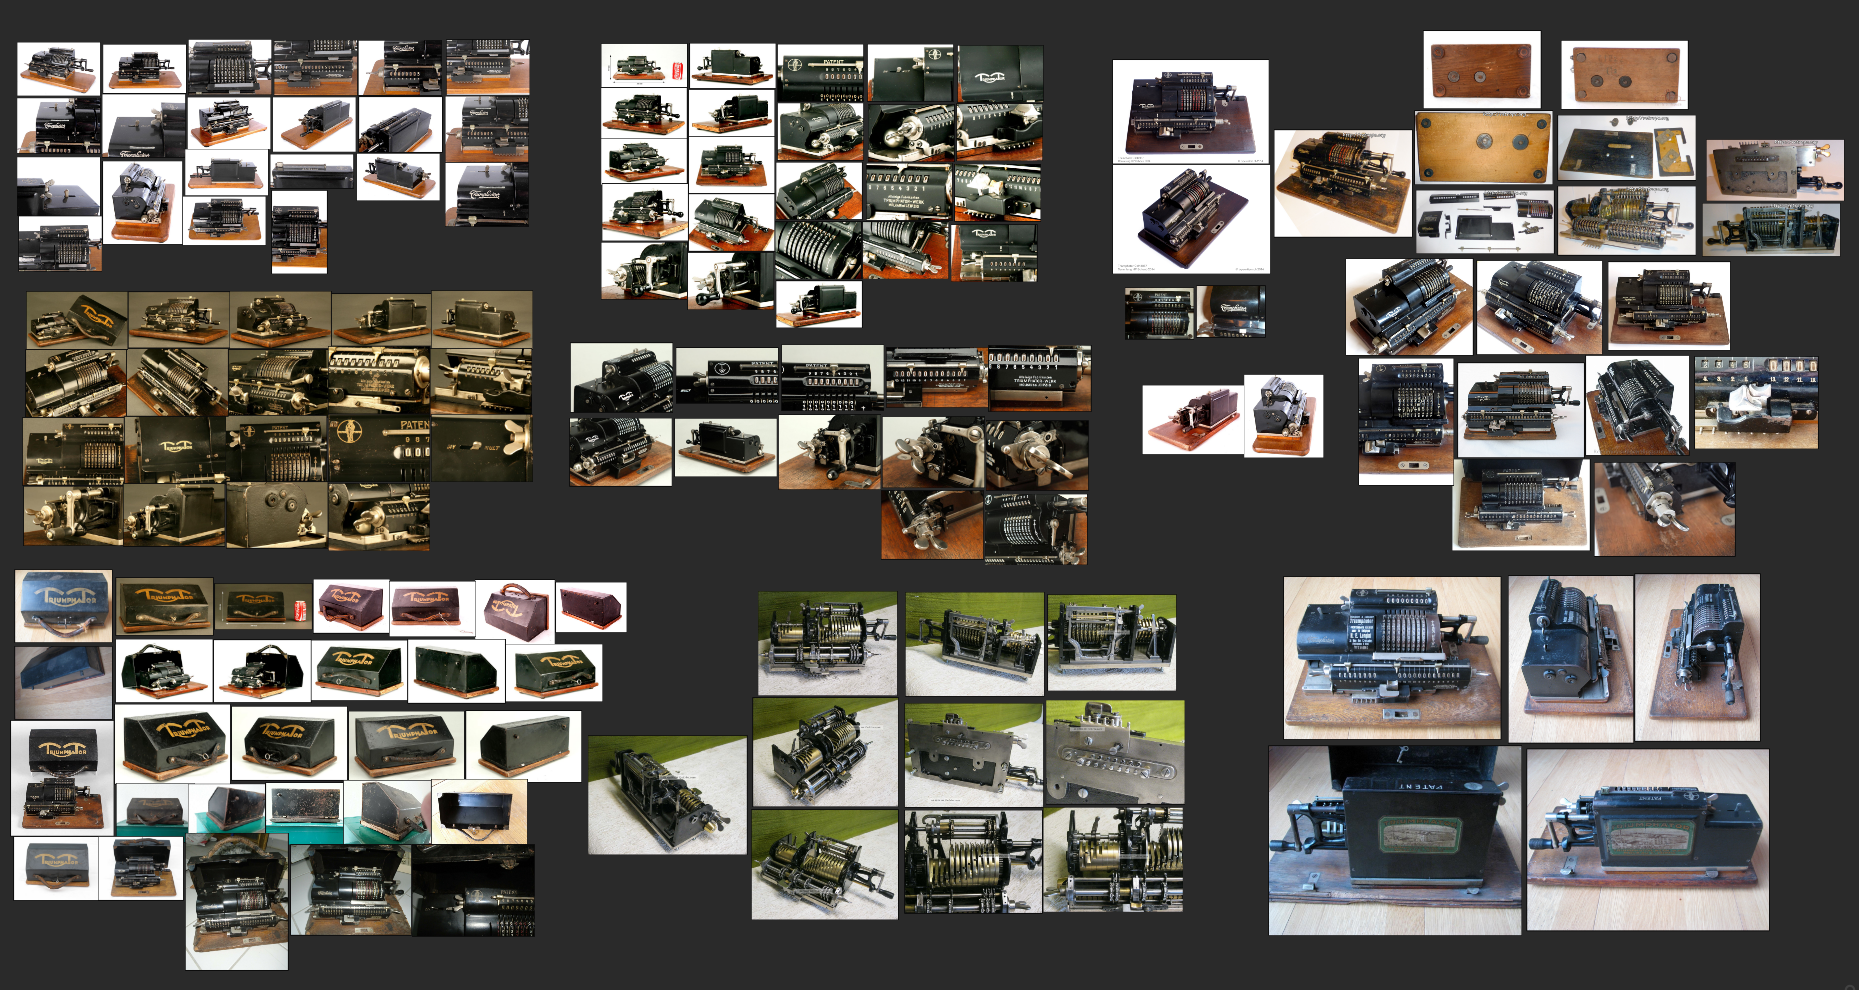
I really like different antiques and I often look for inspiration on auction sites they tend to post a lot of images from different angles and in pretty good resolution. So I collected a bunch of references for modeling the German mechanical calculator Triumphator C, 1927.
I also watched some YouTube videos to get a better understanding of how this machine works.
Blockout & modelling
Based on my references, I started to make the first sketches of future props from primitive objects: a cube and a cylinder. At this stage, it is important to set the correct proportions and build the initial forms. I always start with the largest basic shapes and gradually move on to smaller details.
On my own mistakes, I realized that at the blocking stage for round shapes, you should not be afraid to add more polygons, otherwise ZBrush will not smooth the model well in the future.

Highpoly
Moving on to the high-poly mesh, I would like to note that earlier my experience was based only on modeling under SubD. In this project, I decided to learn new techniques using ZBrush. To begin with, I made a duplicate of the base model and started adding some more detail inside Blender in the form of bolts and holes for them.
I also cut the case cover into different parts, so that later a gap would be baked in these places.

As I wrote above, I made a mistake in saving polygons on roundness, at this stage, I quickly fixed everything using the Subdivision Surface modifier, after throwing Crease over sharp corners so as not to spoil the original shape.

Then I exported every detail to ZBrush and used Dynamesh, thereby making the mesh denser. Next, I used the Polish by Features tool to smooth out elements such as spheres and various roundnesses. And lastly, I used Polish to create a bevel.
In more detail, I worked with a leather handle, it was very interesting to draw folds, for this I used special alphas for brushes. I also added a seam and drew small indentations.


After all these steps, before returning the model to Blender, we need to thin out the mesh, and Decimation does a great job with this.
ZBrush definitely speeds up and greatly simplifies the process of creating a high-poly model. Quite simple elements were completed in Blender with Bevel + Subdivision modifiers.
Below is the final result.

Lowpoly
Modeling the low poly version of my props was quick and easy. I again took my base model, the duplicate of which I also used for highpoly, and began to clean the mesh from excess polygons.
Then I selected one sharp edge and using the key combination Shift + G selected the Face Angles function, which automatically selected all the remaining sharp edges and marked them as Sharp. And lastly, I threw on Shade Smooth to smooth out round shapes.
UV
And finally, it’s the turn of the UV-unwrapping, everything here is also quite fast. The main thing to remember is one important thing: where there is Sharp, there must be Seam.
Again, using the key combination Shift + G, I selected all Sharp Edges and put Seam in their place. But in some places, like the cylinders, I added seams by hand.
After unwrapping, I started to align some of the islands, it is convenient to do this with the help of the TexTools addon. And make sure there are no stretch marks. In Blender itself, you can enable the Display Stretch function (see picture) to identify problematic islands, if everything is colored blue, then there is no distortion, and the red color indicates the opposite.

I specially reduced some parts manually, mainly internal and inconspicuous places. This method allowed me to increase the texel density for other islands. And in the end, I pack everything using the UVpackmaster addon.
Baking
I bake my textures in the Marmoset Toolbag. Before exporting, for each object, I set the suffixes _low and _high. To quickly rename all parts at once in Blender, you can use the Batch Rename function.
Also, for baking the ID map, I set a separate material for the bolts and some other details on the high-poly model, so it will be easier to create masks at the texturing stage. And some objects have been pushed aside to avoid unwanted AO baking.
Below is the result of the baked Normal and AO maps.

To be honest, this process still makes a strong impression on me. It’s like some kind of magic.
Texturing
Before I started texturing the model, I made a duplicate of it and moved some parts to the side. I just want to have control over hidden details.

From HDRI I prefer to choose something neutral, I use Studio Tomoco more often, but from time to time I went through other maps to see how the textures look under different lighting conditions.
Wood
I propose to consider my first experience of creating wood material.
First, I needed to create an imitation of the fact that my object consists of different planks. Probably I should have done this on high-poly, but I missed this moment. In Substance Painter, using the 3D Linear Gradient generator that uses the Position map, I created masks for six planks. And then, through the anchor point, I used them and set the fibers of the tree in different directions and offsets.

As a substrate, I threw on Wood American Cherry material (1). Then, in order to add more color variations, I found a picture on the Internet with a tree pattern I liked. You can use textures.com to find different textures.
Having connected my texture, I adjusted the tiling and transparency and corrected its color using the HSL filter, and the roughness with levels (2). Next, using mask_outline, the previously created anchor and height, I added small gaps (3,4).

Now is the time to add varnish and think about the wear, where it will be erased, and which places the hand will most often touch. At the beginning of the article, I said that I wanted to texture the asset as if it were second-hand, perhaps it had not been used for a long time and it was dusty.
In order to remove the varnish from some places, I made a mask, added the Mask Editor generator, and in the Paint layer, I corrected the damage that did not suit me. By the way, I use Paint very often, I like to remove/add something with brushes myself. Then I add even more variety with the help of Grunge maps, going through the blending modes and at the end, I adjust everything with levels.
Throughout the texturing journey, I constantly study my references and try to pay attention to all the nuances. I see black spots in real photos, even more scuffs & damage and add them to my model.
Everything happens in a similar way, as described above about varnish. Somewhere I add generators, somewhere I can get by with one grunge map, I draw a lot myself and I make color variations using photo textures from the Internet.

Then I wanted to add more rough details in the form of cracks and small chips.
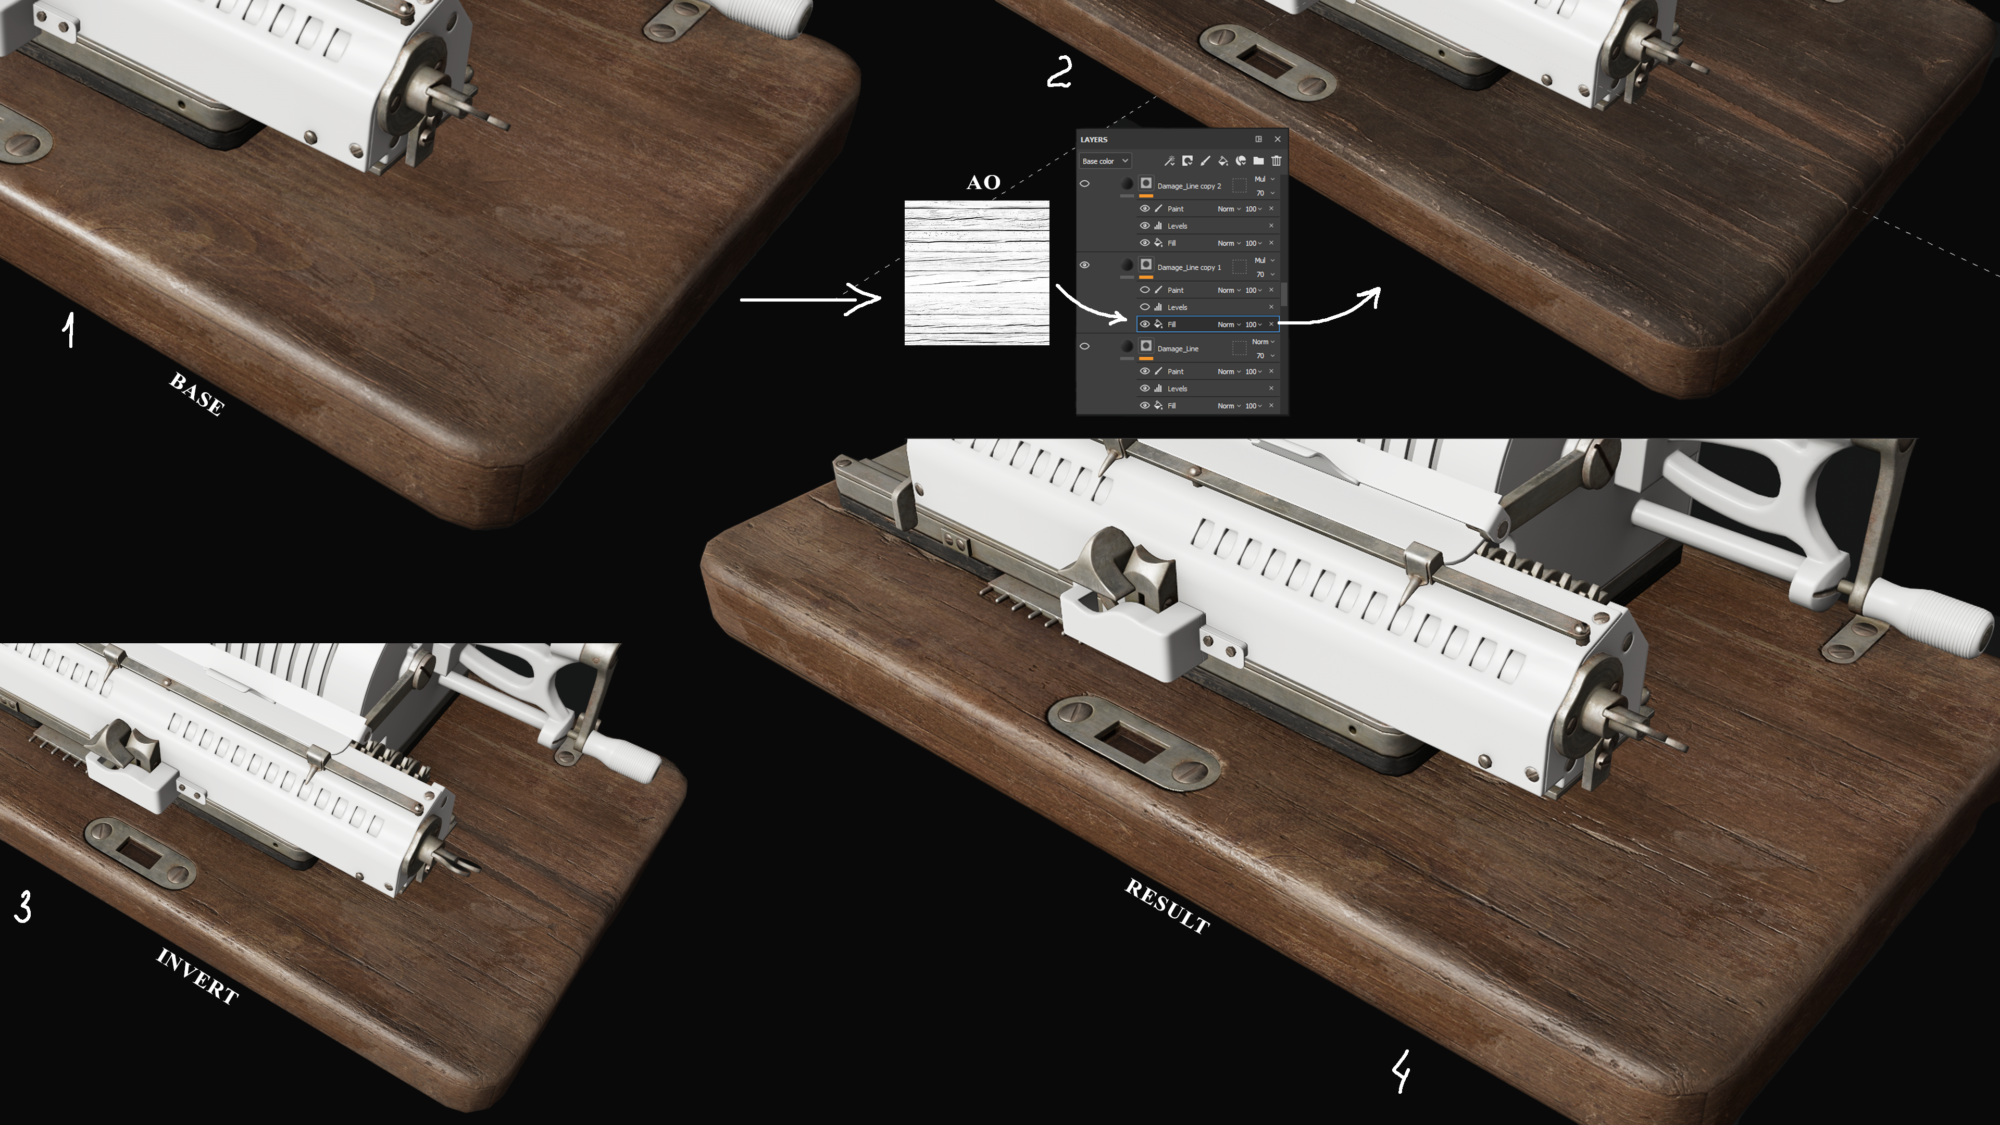
From Megascans, I downloaded the AO map of an old cracked tree. The layer was set to a negative height, an almost black color, and a high roughness. Next, I load the texture into a mask, invert it with levels and erase all unnecessary cracks, leaving only what I like.
So for the top part of my tree, I combined the three cracked layers, while changing the tiling and offset of the AO map. I also painted some damage and chips with alpha brushes.
And in the end, I added a layer of dust and a little dirt to the bottom of my board.

Once my texture is done, I put a filter Sharpen on top with a low value and HSL to tweak the color a bit.

I textured other objects of my props in a similar way, in some cases I took existing materials in SP as a basis, adjusted them for myself and added more details.
I also had to work a lot in Photoshop. On the Internet, I could not find logos and a picture of the back of the calculator in good quality. All this was painstakingly restored by hand. And elements such as inscriptions, numbers, arrows and lines were also made in it.
Lighting & Rendering
In order to make the asset look like in SP, I use the ACES sRGB color profile in Blender and start building up the three-point lighting. Gradually I add a few more lights to bring out some of the details. For example, for one of the lamps, I turned off the effect on Diffuse, thereby highlighting the roughness that I wanted to show with a small amount of power.
For the camera, I like to use a long focal length to avoid strong distortion. In this project, I set the value to about 90 mm. Rendering was done on the Cycles engine with the Transparent feature enabled.
As far as I know, there is no simple way to show Wireframe on the render in Blender. Of course, you can take a screenshot, but the quality will be poor, so I used a crutch.
We make a duplicate of the model, we don’t move it anywhere and it must remain in its place. We combine it through ctrl + j into one object, throw a Wireframe modifier and select the thickness (there is no single value here, the thickness will vary depending on the size of the model). We also set the material to the Wireframe, in my case it is black, and the roughness is set to 1. For the main model, you can leave your textures or also change the color. I turned off the base color and picked up a gray tint.
Everything can be rendered.

Finally, in Photoshop, I added a background, and also made some small adjustments to the brightness and sharpness, which I liked to do in the Camera Raw filter.
Thanks for reading, wish you success and good luck!
I sincerely thank the Games Artist team for giving me the opportunity to write this article!
Feel free to message me on Artstation or Instagram if you have any questions or suggestions.
Read more articles
You might also like these articles.