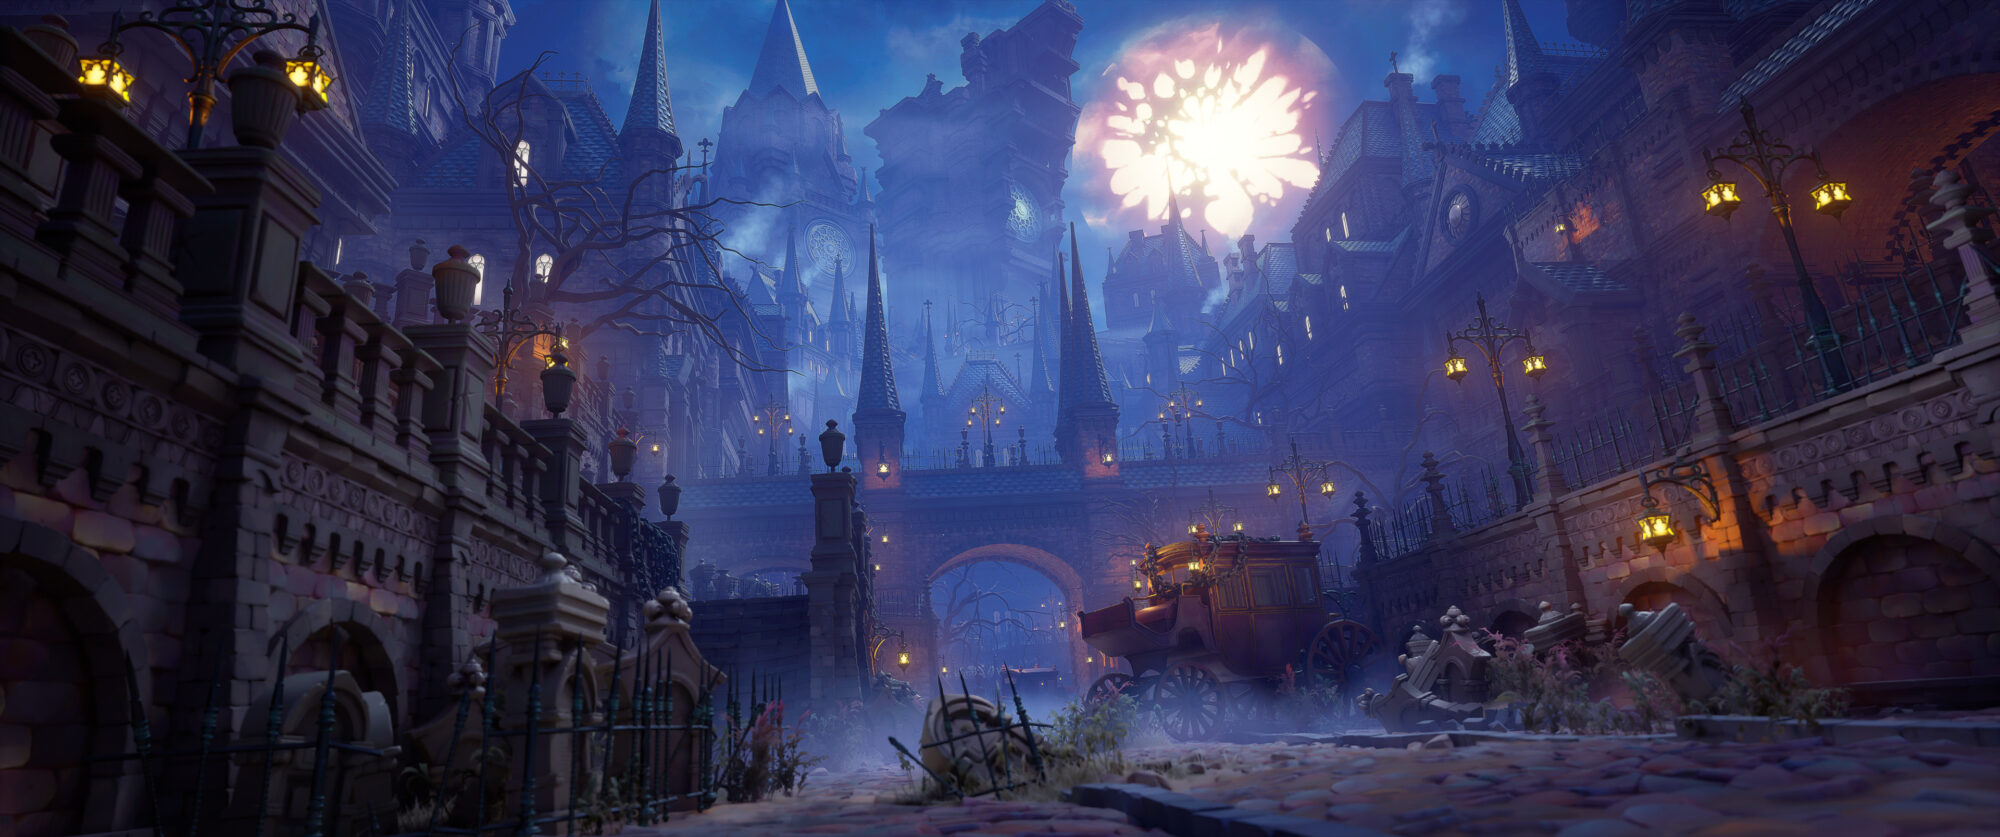
Yharnam’s Street

Introduction
Hi! my name is Florian Elie, I'm 29 years old and I work at Shiro Games as a Lead Environment Artist.
Project & Planning
Bloodborne has long been a source of inspiration for me. It’s one of my favorite games, and I’ve been wanting to make a personal tribute to it for a long time.
For some years now, I’ve been wondering what a stylized Bloodborne might look like if updated with more modern techniques and engines.
It was with this question in mind that I embarked on this project in January 2024 in my spare time!


The Bloodborne universe is teeming with details, so it was essential for me to plan well in advance and break this project down correctly so that it could be carried out in my spare time alongside my work at Shiro.
When I start a project, I always create a quick to-do list of what I need to create so that I don’t forget anything and can manage my free time more efficiently.
The aim of this project was also to learn, so I decided to integrate Houdini into the workflow and save as much time as possible using procedural tools like Designer, SpeedTree, etc.

Tools
- 3DS Max, Maya (Modelling, UVs, retopology, etc).
- Houdini (Helpful generators for buildings, chains, roofs, etc).
- Designer (Material generator).
- Painter (Props texturing).
- Photoshop (Some hand-painted stuff).
- Marmoset (Baking).
- Unreal.
- SpeedTree (Foliage).
- ZBrush (High poly & sculpts).
References & Inspiration
My main references were, of course, the game itself and the official game art book. I also drew a lot of inspiration from the paintings of Johann Christian Dahl, as well as some Flemish and Dutch painters.
I compiled a PureRef board with many screenshots and references for the project, which I updated as I progressed.
From that, I made a very quick Photoshop montage to give me a vague idea of the main shot.
Then, I did a blockout in Unreal, first with boxes, then with a few buildings and modules.


Blockout & Modelling
For the buildings, which make up most of the scene, I wanted to be able to iterate very easily with a non-destructive workflow. So, I used my material generator to generate trimsheets quickly and used them in Houdini, thanks to a building generator that works with Boolean blocks.
The goal was to have a highly iterative workflow, which took some time to set up, but the speed of iteration was well worth it. With just a few clicks and exports, I was able to produce a large number of buildings.
I designed modules based on the game’s concepts. I sculpted some parts in ZBrush and did the rest with trimsheets.


These modules were then used in Houdini, thanks to the LAB Building Generator, allowing the structuring of various modules as desired.
Once the system was set up, I could input any blockout and choose how to distribute the different parts.


I recommend this tutorial from Project Titan, which explains very well how to set it up: Project Titan Tutorial.
Props
For the props, I used a fairly standard workflow:
- Blockout in 3DS Max & Maya.
- Sculpt in ZBrush.
- Retopo in Maya.
- Baking in Marmoset.
- Texturing with Designer, Painter & Photoshop.


For the lamp posts, I used a handy trick from Illustrator. I drew the lamp-post patterns and imported them as vector files into 3DS Max.
It then converts them into lines, so all you have to do is transform them into edit poly and you’re done.


To obtain a stylized rendering, I generated black and white brush effect maps in Designer, which I used in Painter with filters such as slope blur and light to create smart materials and tint them with gradients.
By combining this system several times with masks to create AO or highlights, it’s easy to create a stylized base that’s both simple and iterative since all you have to do is choose the colors in the gradient.


Since I was doing this project on my own time, I had to have a visual target that was relatively easy to sculpt, so as not to waste too much time and to keep it achievable.
Foliage
As Bloodborne’s vegetation is quite sparse in the Yharnam phases—apart from the dead trees—I took the liberty of “redesigning” the city’s tall grasses and potential flowers to add a touch of color while maintaining the city’s “tortured” feel.
I quickly made an atlas in Photoshop and Designer, which I imported directly into SpeedTree. In just a few nodes, I had the flowers for this project.


Thanks to a custom shader in Unreal, I could adjust their hue using a custom position gradient. With a simple RVT, I injected the ground tint at the base to facilitate color matching.
Here’s a useful tutorial on using this shader with Unreal’s foliage editing system.

Materials & Tileables
For the trees, I added a few nodes with forces and noise to give them the twisted, eerie feel of the city.
By using the trunk as the main force of attraction and letting other secondary branches grow on it, it was easy to create a creepy effect.


Tileables were a central element of this project.
Since most of the assets are made of trimsheets (floors, walls, roofs, etc), I needed a way to iterate quickly on them and be able to make lots of variations very quickly.
I made myself a material generator with lots of customizable parameters to create entire PBR handpaint-style materials from a bitmap.

I created brush effect maps to compose the different shades and add the stylised touch I wanted. It’s the same principle used in Painter for smart materials.
The aim is to compose the general shape from the bitmap, then reuse the height and normal information to extract only the desired axes using nodes such as “light”, rework them with nodes like slope blur or directionnal warp, for example and texture them as desired.


Once all the parameters are exposed and set, I just create a sbsar of my material, which I then use as I wish.
It’s these generated materials that I then use on the buildings and modules created in Houdini.


I export several versions of the same material for vertex painting in Unreal to bring variation and avoid tiling repetition.
Finally, I use Unreal’s latest nanite displacement features to achieve a very high level of detail.
Here’s a tutorial on how to set up nanite displacement material.

Technical Aspects
The technical side was one of the most important parts of the project.
Since this was a scratch-built project, I had to get the basics right. I started with the fundamentals (master terrain material, RVT, etc.), following available tutorials on setting up a scene in Unreal.
- Smoke FX
- Fog cards
- Foliage shaders
- Material Nanite tessellation
- Vertex painting for variation
- Local volumetric fog
- FX particles
- Skybox
For local volumetric fog, I followed this great tutorial by Andy Lung: Local Volumetric Fog Tutorial.
In this scene, it was a very important compositional element, highlighting the elements on the ground and creating a darker atmosphere.


For smoke fx, this is a very simple system in Niagara, starting from the “fountain” template and using a custom alpha made in Designer.


Fog cards are very useful for sculpting a scene and adding perspective.
I followed this tutorial to make them and used another map made in Designer, as shown in the screen above.


The skybox was a big topic. I wanted a hand-painted skybox that would showcase Bloodborne’s emblematic moon.
My reference was Christian Dahl’s View of Dresden by Moonlight.

So, I didn’t use Unreal’s default skybox and made a custom one.
I started with a reference cloud photo, which I then retouched in Designer and handpaint. I also hand-painted it and created an emissive mask to make it shine. And… It’s done!


Lighting Rendering
Before attacking the lighting, I first calibrated the camera and focal length for the look I wanted to achieve.
A short angle for a very wide shot of the environment. It’s essential to get the compo and the work right before tackling the scene in too much detail.
Otherwise, it’s the best way to realize that the whole set-up isn’t right and that certain crucial comp elements need to be tweaked!
Alec Tucker did a really good post on this subject.
Lighting is one of the most crucial stages. It’s what’s going to enhance the scene and tell a story.
There’s a lot of literature on environmental storytelling and lighting. It’s essential to know where to put the emphasis. For this scene, I used the moon as a guide. I knew that it would be opposite, next to the cathedral, which implies night lighting against the light. I used slightly overcast lighting, the aim being to create a mysterious, cryptic effect, but not to occlude the elements in too dense a fog.
It’s a subtle balance to strike. For the overcast lighting, I played with the atmosphere to mute the hard shadows.


The scene is therefore made up of a directional light (the moon) and a few spot lights and point lights to enhance important areas.
In Bloodborne’s lore, street lamps are oil lamps, so I couldn’t rely too much on them to light up this scene. They serve more as decoration than as real light sources.


Of course, final adjustments!

Another compositing example is in my second scene.

Conclusion
In conclusion, I’m quite satisfied with this project. It’s pretty much what I wanted it to be.
I’m happy to have been able to carry out what I had in mind on such a big stage. I wish I’d had more time to work on the sculpts and texturing, but that’s for another time (on a shorter project, I think)!
I’ve learned a lot, especially about lighting and procedural workflow, thanks to Houdini, and that was also the aim of this project!
There’s a lot more to say, but I hope this overview will be useful and bring new workflow approaches for some!
Don’t hesitate to ask me questions on ArtStation if you want to dig deeper! Thank you for reading!
Read more articles
You might also like these articles.


