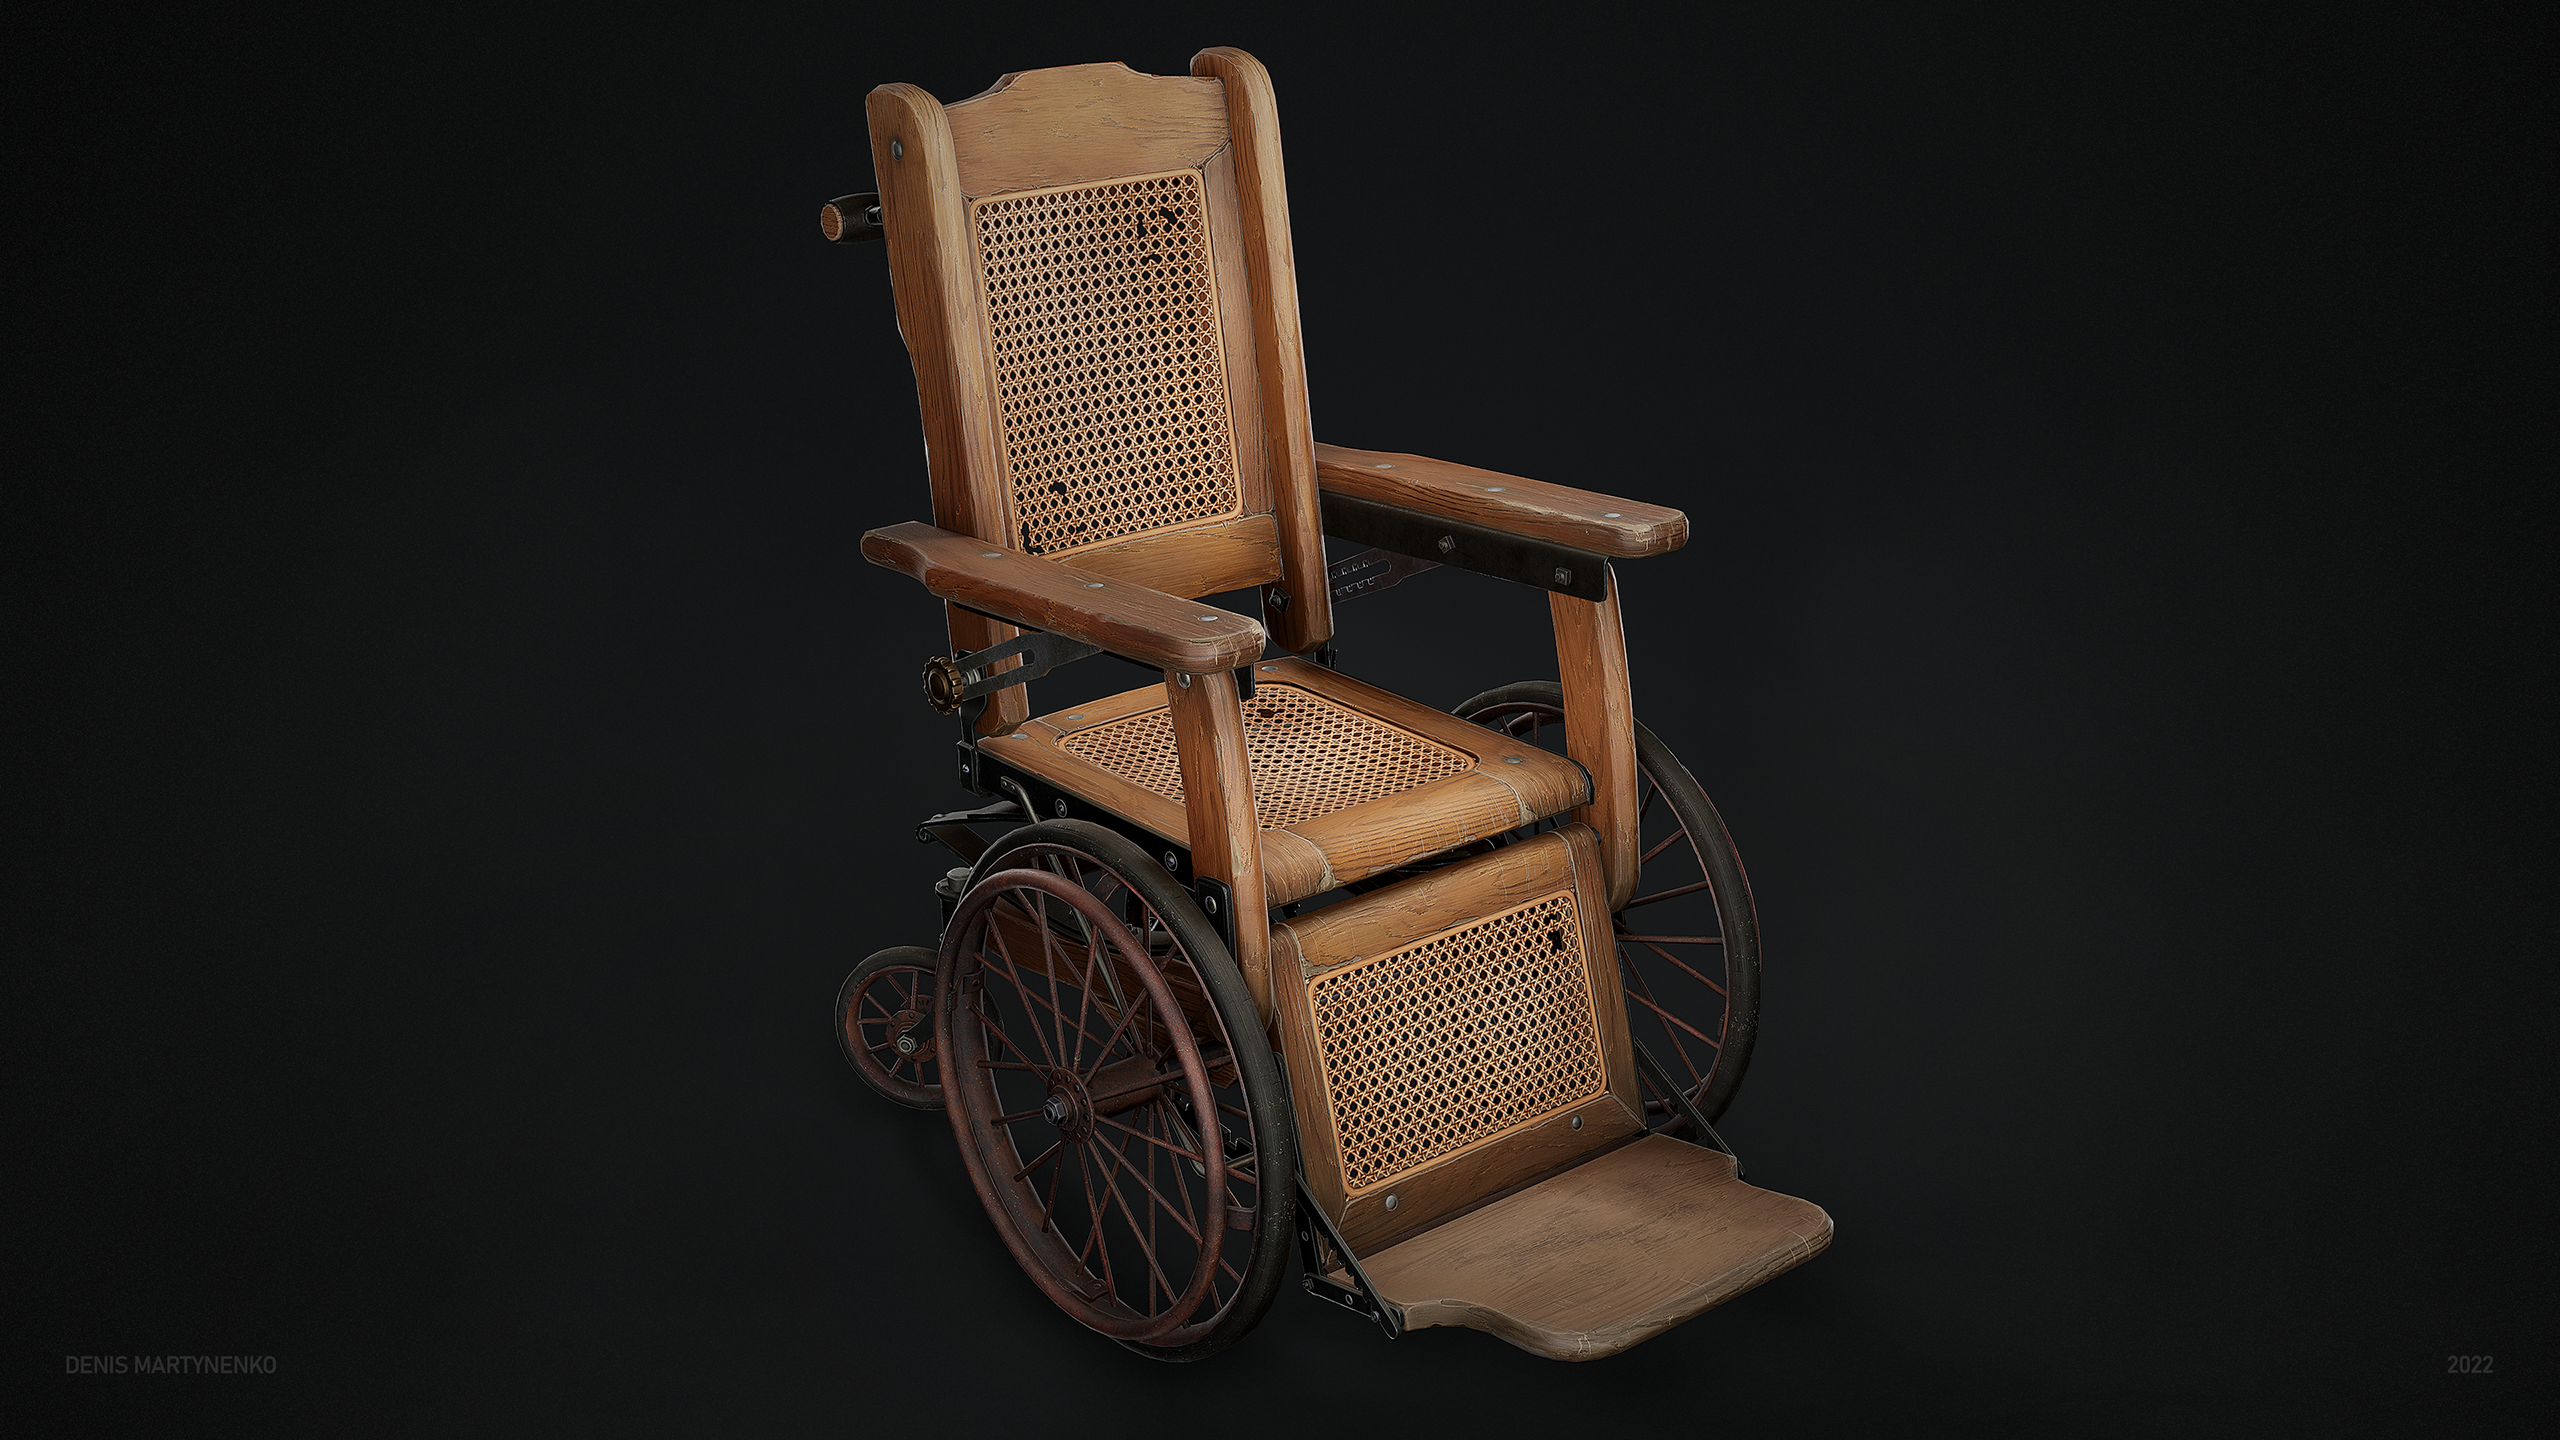
Vintage Wheelchair

Introduction
Hi everyone! My name is Denis Martynenko, I’m a 24-year-old self-taught 3D artist. My journey begins almost two years ago when I realised that Game Art was my passion and that I wanted to do it for the rest of my life. For a long time, I worked every day to study and improve my skills, in this project, I can show you what I've learned. So my main goal of this work besides starting to fill up my portfolio is improving my texturing skills by implementing Substance Designer for base materials and generator creation to become more flexible and efficient.
Reference Gathering
For reference gathering, I just browse Pinterest for something interesting to create and then I noticed a cool-looking antique wheelchair that I had never seen before. I started digging into Google and Picclick to collect some closeup references which will show me interesting details which I should make sure to implement in my work. It’s a goldmine all these auctions sites where people sell their vintage items, everyone should definitely look into them to find good high-quality refs. When I collect all the images I need, I store them into PureRef for my reference board. It’s absolutely obvious your board will fill up more and more while working, but it’s critical to collect as many images as possible before going into the modeling phase to prevent you from making mistakes.

Blockout
This is where it all begins. I started by creating the base shapes to maintain real-life proportions, scale & logic. Often you can find the dimensions of an object already mentioned on auctions websites, this time I used my eye but I always have a 178 cm Unreal mannequin in my scene by default to rely on. So, no joke here about deleting the default cube from the Blender startup file, mannequin did all the job for me already.
Usually, I don’t waste too much time on the blockout, I’m just getting the right scale. I then begin to create the object parts for further export to Zbrush. Firstly, I create a basic shape then I mark the hard edges and UV seams at the same time using Zen UV addon. After that, I select all the seams and apply creases on them, then add Subdivision Surface modifier to have a closer representation of what I will get at the end.

Side note: Whilst doing all this process again for breakdown purposes, I made some custom actions using the Pie Menu Editor, this is always a good idea to speed up and optimize your repetitive actions:


Highpoly
As mentioned, I did all my highpolying in Zbrush. I just sent it directly from Blender using the GoB addon. By doing it this way I could kill two birds with one stone – add desired edge bevels and sculpt some damage if needed. As I’ve already marked all hard edges, UV seams and creases before, the only thing I need to do in Zbrush is to click “Auto Groups with UV” and “Crease PG”, Subdivide it a couple of times and then Dynamesh it to an appropriate resolution. Then it’s time for the polish workflow which is quite popular these days. You just need to be careful with sliders and not overdo it to maintain the main shape of the object, try not to leave bevels too tight at the same time and let baker software do its job. It needs to be balanced. Also, don’t be shy using Booleans in Zbrush to cope with some forms and don’t waste too much time on it. And of course, this is a good idea to use standard Subdiv on simple parts which did not have a sculpt pass.

Speaking about sculpt – this time I don’t find much sense to hit the details, there is only generic work with the edges to add some damage using Trim Dynamic and Trim Adaptive brushes, nothing too fancy.

After, I decimate my sculpt and bring it back to Blender using the same GoB tool to apply a smooth shade, fix some issues caused by the decimation process if needed, assign different materials for the future ID map, give proper names for the meshes and mirroring all parts, to get the full information baked onto an AO map.

Lowpoly
Now it’s time for the low poly. Fortunately, I already have a good base from my blockout stage for it. Usually, I just append mesh from the highpoly document, assign red color to it for visibility, take the blockout mesh, assign a green color and turn it into the low poly piece by adding and editing some geo here and there. Nothing too complicated here. I repeat this process piece by piece appending and deleting highpoly parts, after I’m done I check for anything that could cause performance issues. Don’t forget to change the low poly mesh name based on the highpoly name by just changing the suffix from _high to _low, it will be helpful for future baking.

UV
As my low poly is based on the blockout mesh which was already UV’ed, it’s almost done, I just need to mark additional seams and unfold it. Blender is not the best package to work with UV, but there are plenty of different addons to help you. Zen UV, which I mentioned earlier is very good for marking hard edges and seams by angle, Machin3tools provide a huge number of useful features like manual UV edge alignment using a handy interface for straightening it, TexTools is another good tool expanding Blenders UV’ing experience, Texel Density Checker is a must-have if you want to easily manage your texel density through the asset and lastly, UVPackmaster is a huge time saver when you need to pack all your islands nice and tightly. I’m always trying to straighten my UVs as best as possible so I can achieve better packing and baking, it’s a good idea to keep UV direction consistent so you get less pain at the texturing phase.

Baking
I’m using Marmoset Toolbag for baking purposes. It’s easy to use and tweak cage and skews in real-time. This process just needs some attentiveness and time given to it, take care of every mesh, you have to get a clean bake without any distortions at the end. And that’s it.
Materials
Of course, before doing any work with color, you should set up your scene in Substance painter. I always use Tomoco Studio as my environment map, setting up Tone Mapping Function to Log in terms, I use ACES LUT to achieve better colour consistency between different programs and make sure to activate Temporal Anti-Aliasing. In the shader settings, you can also tune up the quality to higher values.
So, when the scene is ready and I have imported all my meshes and baked maps, I determine my color scheme for the asset. It’s just simple fill layers with some color and roughness information.

The reason for this is to create a basic image of what I want to achieve and give myself some variants to choose from. It can be changed during the texturing process, but for now, I have a starting point.
For this asset creation, I decided to implement Substance Designer into my process. I started to learn it a few weeks ago, so I’m not very good at it but my basic knowledge was provided by Daniel Thiger tutorials which I highly recommend. At first, I started to create a generator for the wicker pattern which will be placed at the back, seat and leg support area. It’s a very simple graph and contains some tweaking abilities like choosing a desired pattern, one of five I did, setting up tiling, thickness, rotation for additional variation, I also added some bends and folds to give it a more natural look. It was very fun to create this generator and I think that it was faster and easier than modeling it manually. And in the end, you have some variants to choose from, which is awesome!

After that I began to create base materials for main mesh. There is no goal to do all texturing inside Designer, just to create base I can rely on in Painter. So, I start building materials from height variation using my Material ID map for masking areas I need. That was my mistake to combine textures in Designer because further I had to fight with visible seams which probably take some additional time to cope with. Then I did some colors and roughness. Again, this materials is far from perfect but I believe this give me very good base and main benefit I have from it is normal data, curvature and AO maps for further texturing in Painter.


Then I import all these Designer maps back into my Painter scene, assign them and this is where all the fun begins. First of all, to improve my base mats and add more variation to them I layer some photo textures from textures.com and fill the layers with grunge masks at low opacity and different color modes to get the desired look.
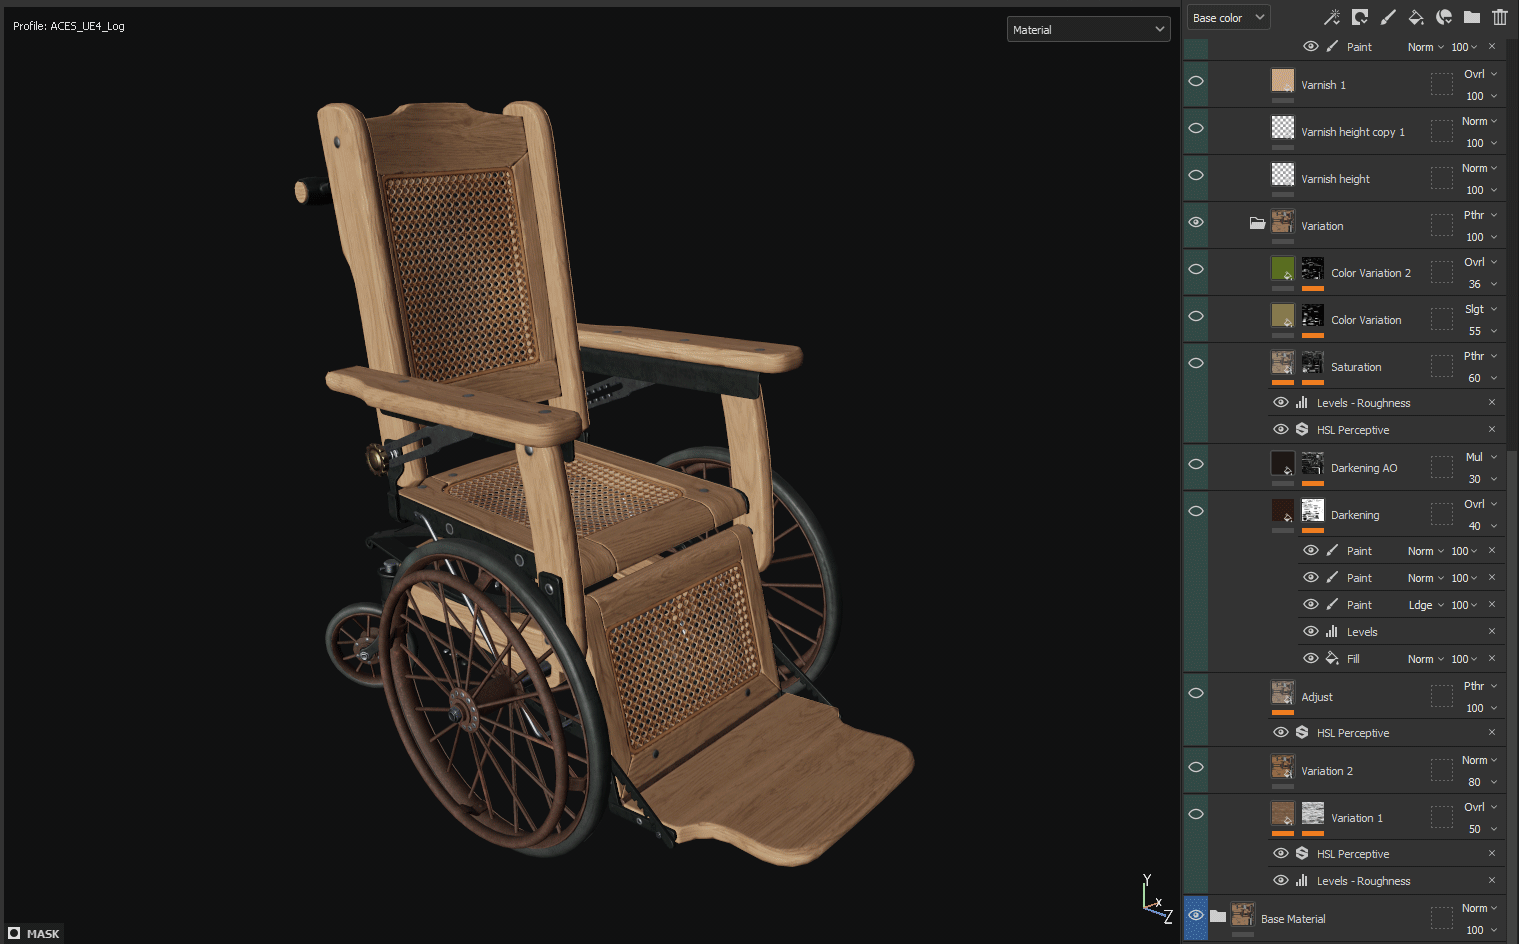
At this stage, you need to be very patient and accept the fact that your result is quite ugly for now and this is completely normal! It was very hard for me to cope with before but now I know you since you have all these materials it’s only half the task, they are live and separate from each other and your second half of texturing work is to blend them together in beautiful harmony. You just need to stop yourself tweaking base textures, because you could end up doing it forever and never get the desired result you want and in the end, drop it unfinished.
Firstly, I just take my tablet and begin to hand paint color variations and with every new layer my asset comes to life closer and closer. I’m highly relying on my references in the process. I started to add wood variation, varnish and create some edge damage on it, correct some stuff and implement alphas to create believable scratches and wear and tear. Adding slight dirt and dust, then some final tweaking I add Sharpen filter, AO multiply and Curvature overlay on top of everything.

Rendering
I render this asset in Marmoset Toolbag 3. It’s really intuitive and relatively easy to get nice-looking renders by using it. The render scene was already created for checking results while in the texturing process, so all I need is to add some main and rim lights to express some volume in my asset. I created a few cameras to set up desired angles, FOV, I then choose ACES Tone Mapping and add a barely noticeable Sharp. I then add some post-processing like Levels and a cloudy texture on top in photoshop and it’s done!


Conclusion
In the end, I need to say – Never give up! I think it’s important to implement new programs and techniques into your workflow and learn something new to create your standard pipeline process more enjoyable and challenging, it’s very motivating!
Also, I need to express my special thanks to GamesArtist.co.uk for this opportunity, I really appreciate it.
Huge thanks to all the people at Potato Family Hangouts, Leoluch – Development Game Content and MentorCampus, if you are a Russian speaker you can easily find there like-minded people who are always ready to help each other, remember, you are not alone in this journey!
Read more articles
You might also like these articles.