Vintage TV/VCR set

Introduction
Hello, my name is Handy Chevrin and I am a self-taught Hard Surface Prop and Weapon artist from New York, USA.
When I first laid eyes on the photos of the TV, I knew I had to model it; It was the most boring-looking thing I have ever seen.
It was my duty to make it look as interesting and realistic as possible, so I had to find more references to be able to achieve that goal. I also decided to model a VCR to make a whole set because I thought the TV only would look too empty by itself.
References
I know this goes without saying, REFERENCES, find them, use them, even when making stylized work. A good reference catalog can really push your work to the next level. I know it can be hard to find references for certain objects, so for that, here is a list of websites that you can use to find some high-quality references.
Ebay
Pinterest
Worthpoint
123rf
Etsy
Youtube
CGworkflows
Bonus – To find some really good and ACTUAL PNGs check out pngfind
Since my main references are not good enough for me to create the look that I was going for, I looked through the websites mentioned for different TVs, VCRs and objects with similar materials with more interesting texture details to work off of.


Modeling and UVs
For the modeling, I used the standard Blockout → High → Low poly workflow. I used Maya for the blockout and low poly and ZBrush for the high poly to cut out and unionize different parts of the TV as needed. I then run everything through a Dynamesh and a “Polish Crisp Edges”. I have yet to find a better workflow than the ZBrush boolean workflow. It’s just so intuitive, fast and easy to get really high-quality results.

After all my smoothing is done, I decimate my model and export it into Maya to create the low poly and the UVs.
I made 3 Different texture sets;
TV (4k)
VCR and Cables (2k)
Screen (1k)
All at different resolutions in order to keep a good texture quality to maintain a fairly even texel density across the different sets.
It is important to have an even texel density in order to have the texture resolution be coherent on all models. It will become really obvious that something is wrong, should you have texture sets or UV shells that are vastly different in texel density.

I did however scale down the UVs of the bottom of the TV and VCR tremendously because they would never be seen which allowed me to give more texture resolutions to the part of the models that would be seen.

Baking
Marmoset baker, inarguably the best baker there is. The speed and the available features like the live cage (gif 1) and the skew paintings (to fix distorted normals) (gif 2) are just unmatched, compared to baking in software like Painter.
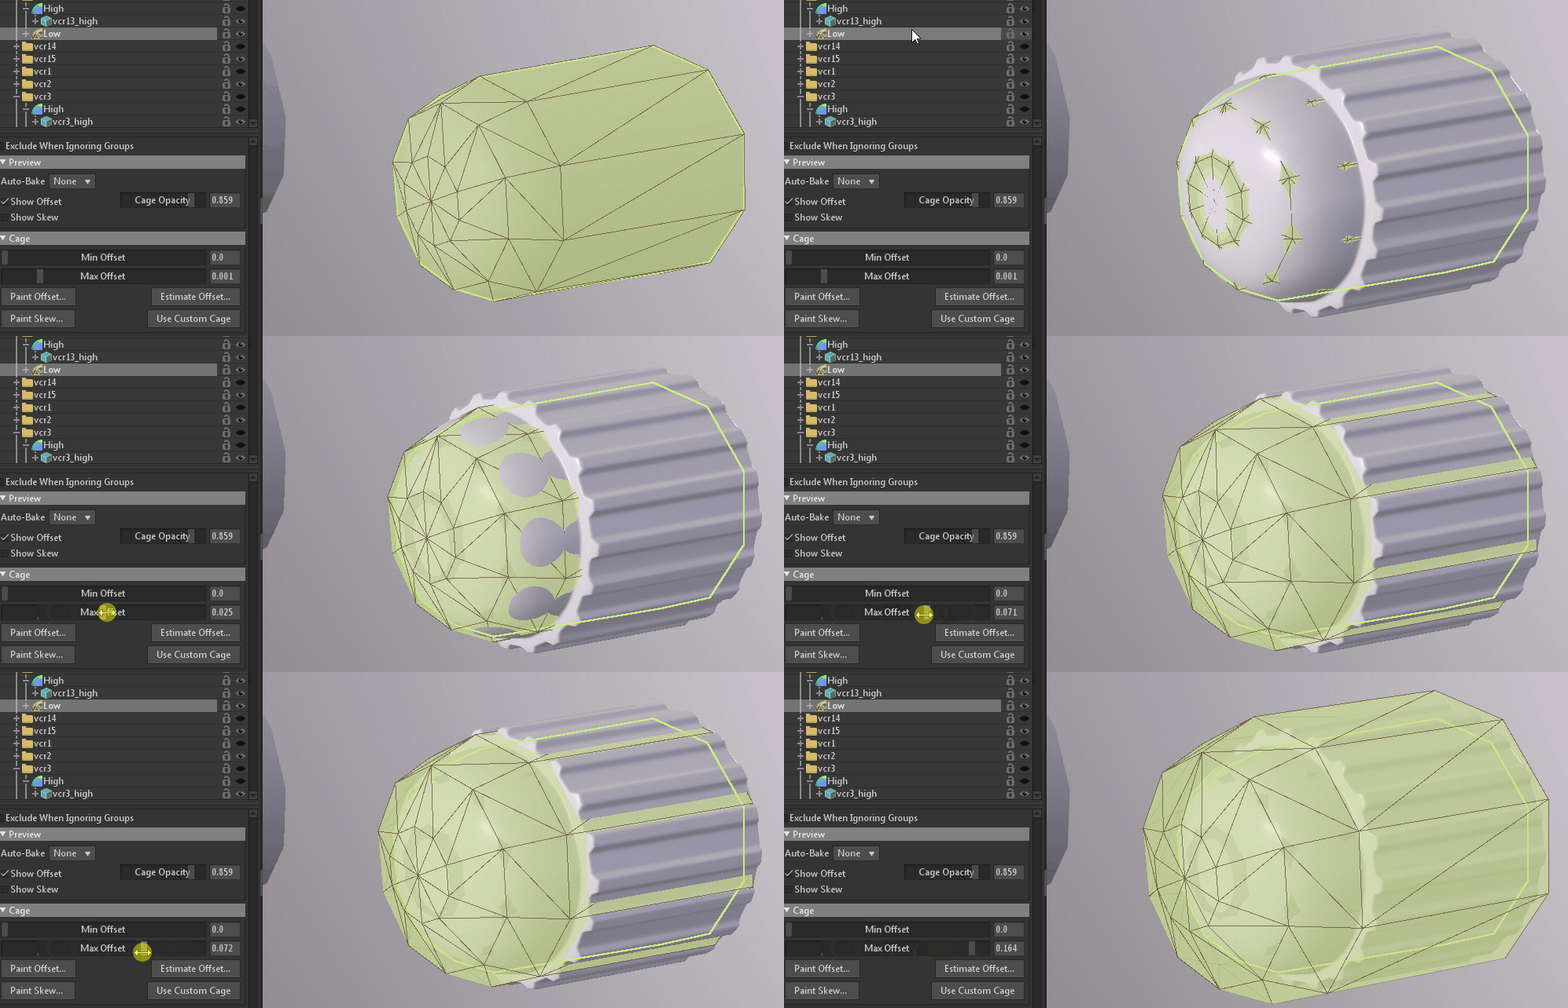
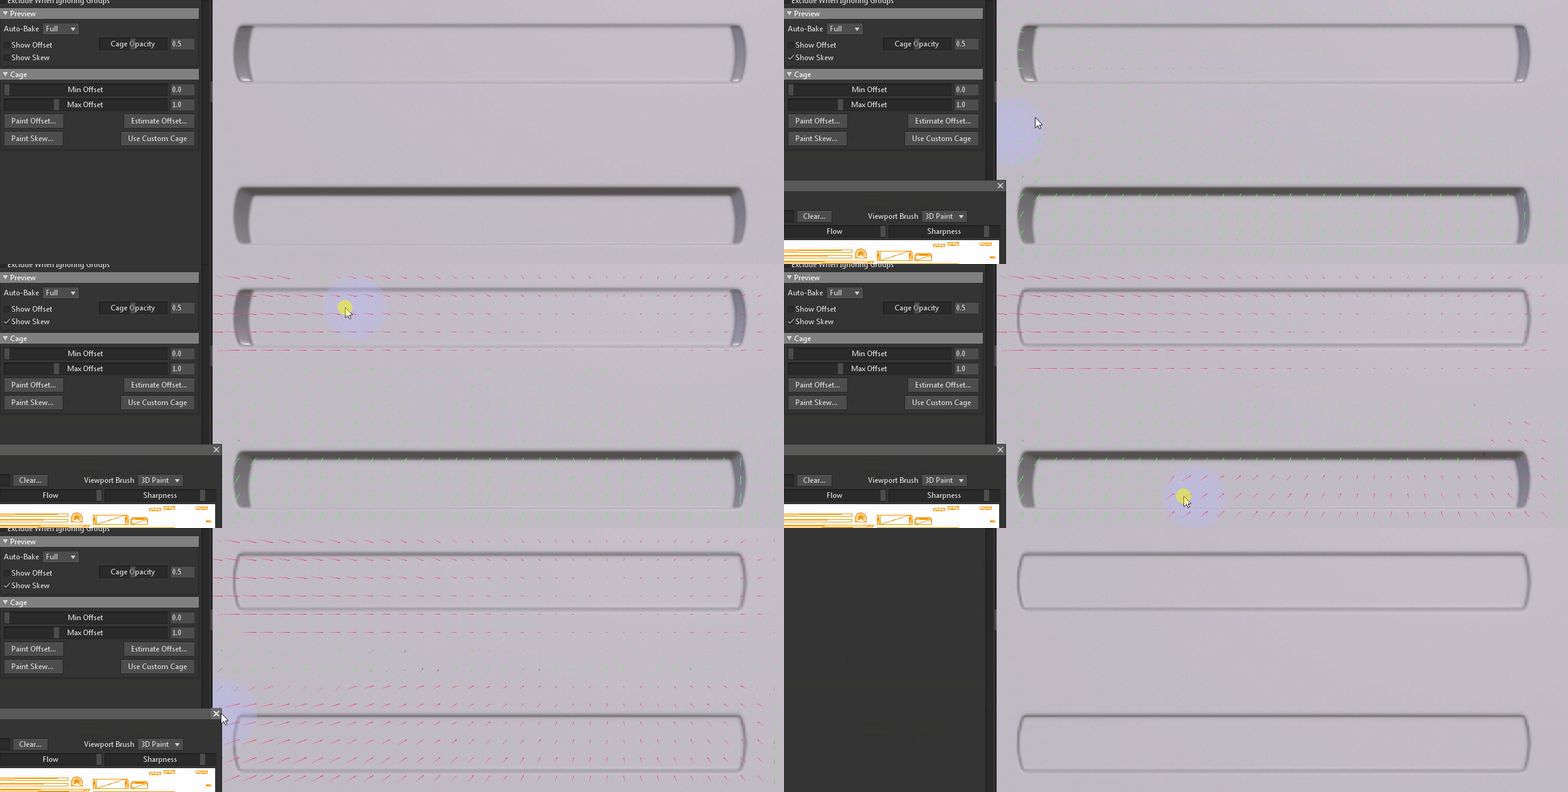
Although you can bake just about any map in Marmoset, I only really just like to bake my Normal, AO and Color ID in there. Other maps like (Curvature, Position) I bake in Painter as I find that to give me the best results when I use generators and or triplanar mapping.
(Side Note: If you are working with DirectX and baking in marmoset you should check the “Flip Y” option in the bake setting. Leave as default if working with OpenGL).

Texturing
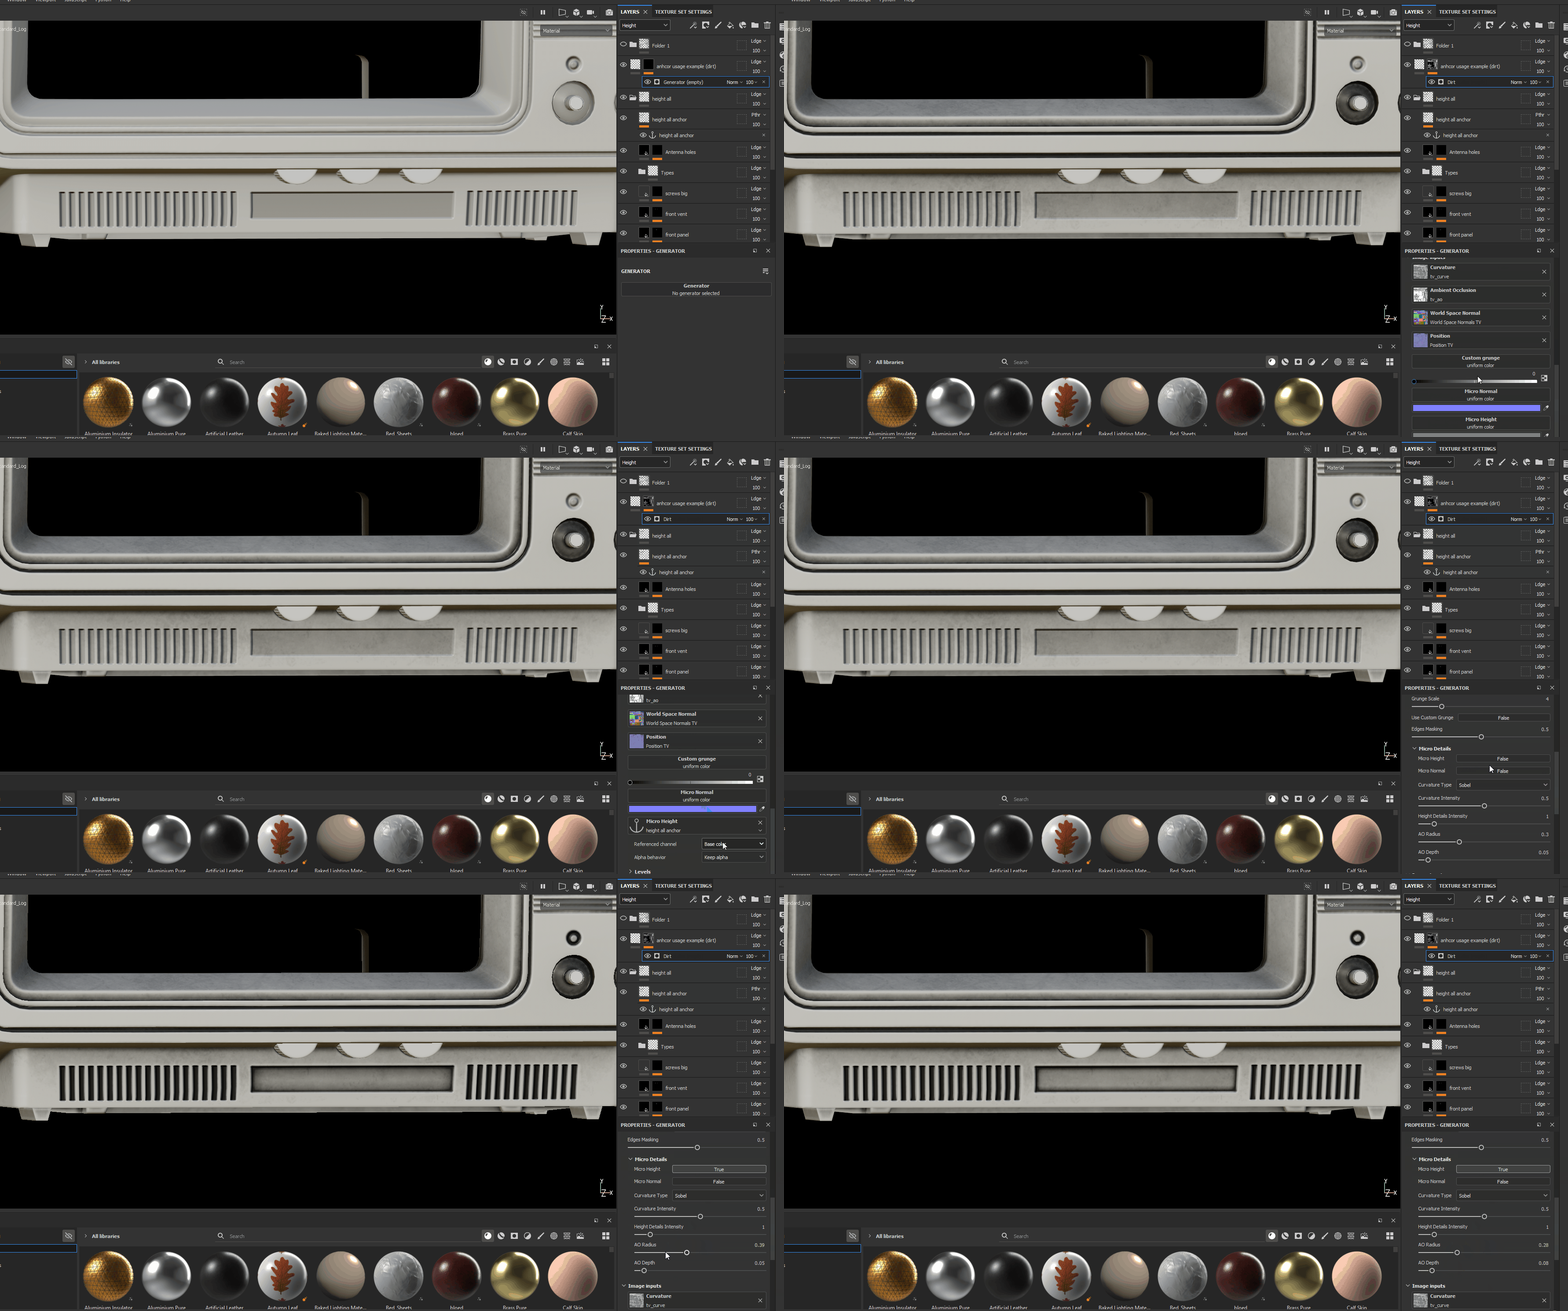
Before I start setting up my base materials. I make sure to paint all my custom heights (ie. screws, vents, holes), I then add an empty fill layer (called: Height All) above all the custom height layers, set the height blending mode to “Passthrough” in order to inherit all the height information below as its own. I then anchor that layer in order to reference its height information to any layers above.

Now whenever I want to include my painted heights in a generator or a fill, I can just reference the “height all” anchor onto the generator and “voilà” you now have dirt or edge wear on all your custom height. (click here for more anchor point examples)
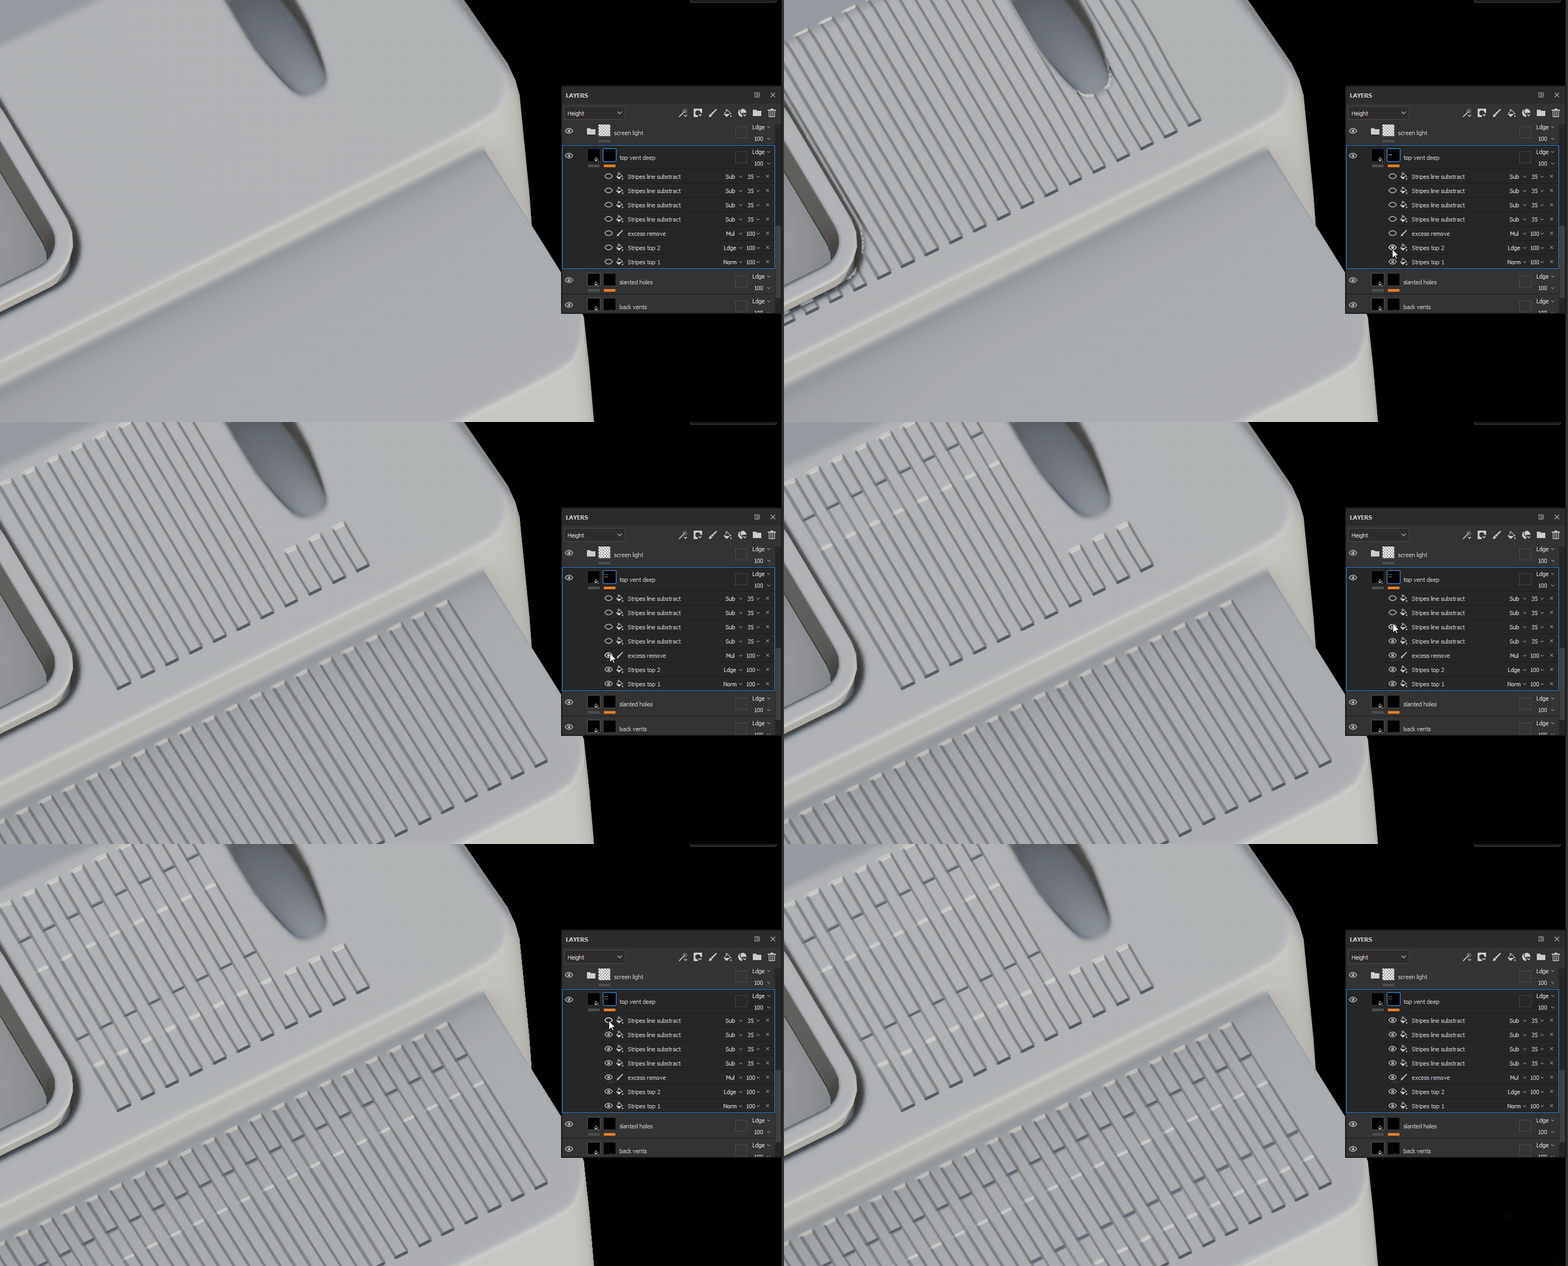
One question I get asked is how I made the vents on top of the TV. It’s really nothing special, I just use the “Stripes” procedural and played with some blending modes and opacity.
As for the actual texturing, I gathered my references and started by setting up my base colors/materials and basic roughness variations for the different parts of the TV, Screen and VCR. Add some subtle color variations with overlay and multiply blending modes and some light edge highlights to make the edges pop a little bit more.
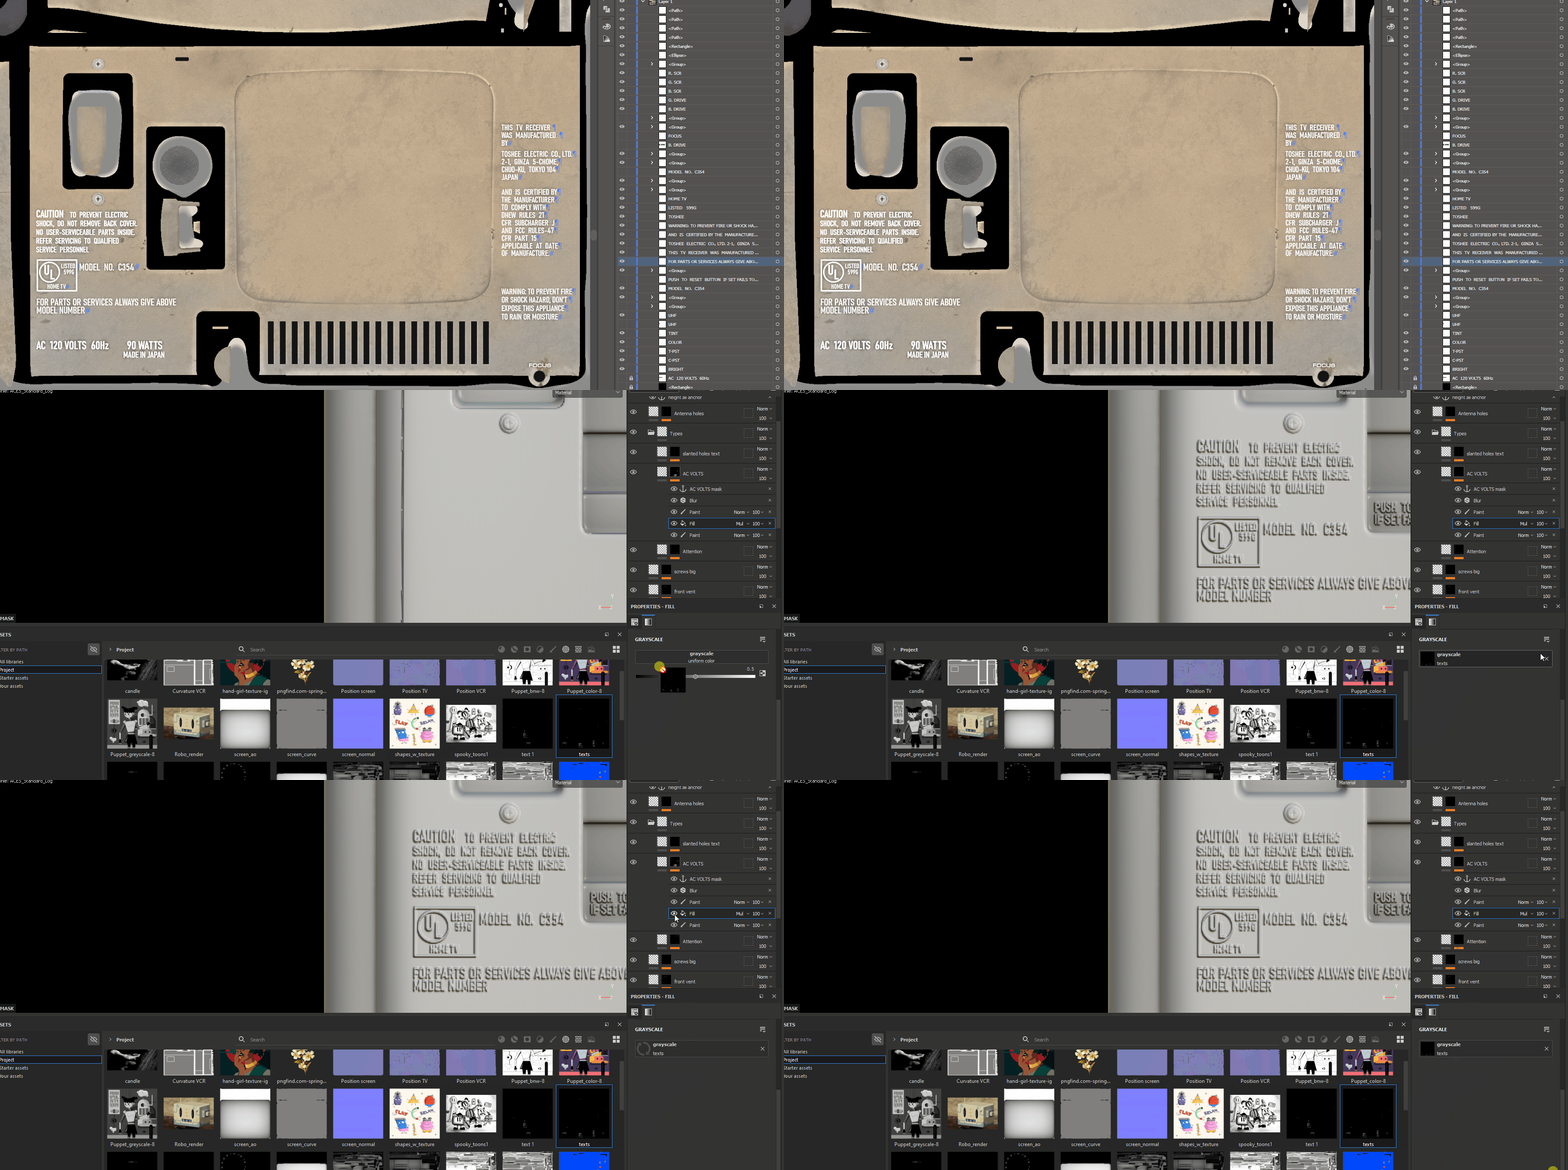
I haven’t talked about the texts on the models yet. That’s because I did not start writing them until I had my base colors set up in Painter. To make my alphas, I exported my base colors (with no edge padding) to Illustrator. I used the base colors as a UV indicator in order to know where to put my texts and shapes. I then add a black background to export them as alphas in Painter.

Since they are already placed in the correct UV location, I didn’t have to paint them on my models, I just dragged them onto a fill mask, and played with my height.
I am a big fan of details and storytelling, I knew I wanted to have a lot of creative freedom on both the TV and the VCR. I thought about where things would be touched, maybe there is someone who doesn’t know how to really operate the VCR so family members highlight the main keys for them, maybe they have a baby who just draws everywhere… That way of thinking can really help out with the texturing process.
For the stains, spots and roughness/color details, I use a combination of stencils and procedurals from Painter. Nothing beats having some nice hand-painted details in your texture, especially when you use good stencils for them. To see how to make good stencils and how to use them see “Rick Greeve’s video” on Artstation.
I love having some random spots of blemish or stains on my models. Some white spots and black spots with low opacity are always a nice touch.
The main way I texture is by trial and error, never be scared to delete and rework ten layers if you have to, if it means you will get a better result. Especially after feedback.
An example of me starting over is when I was working on the top sticker of the VCR. I really wanted to capture my reference, but I couldn’t get it quite right; it was looking really bad. While looking for feedback, a fellow artist provided me with a better reference photo that I could try to work off of. I decided to start over in order to get a better-looking sticker.

(Tip: In this video, you can find a good smart material to get you started with making your stickers. The way I made mine is just a modified version of that).
Screen
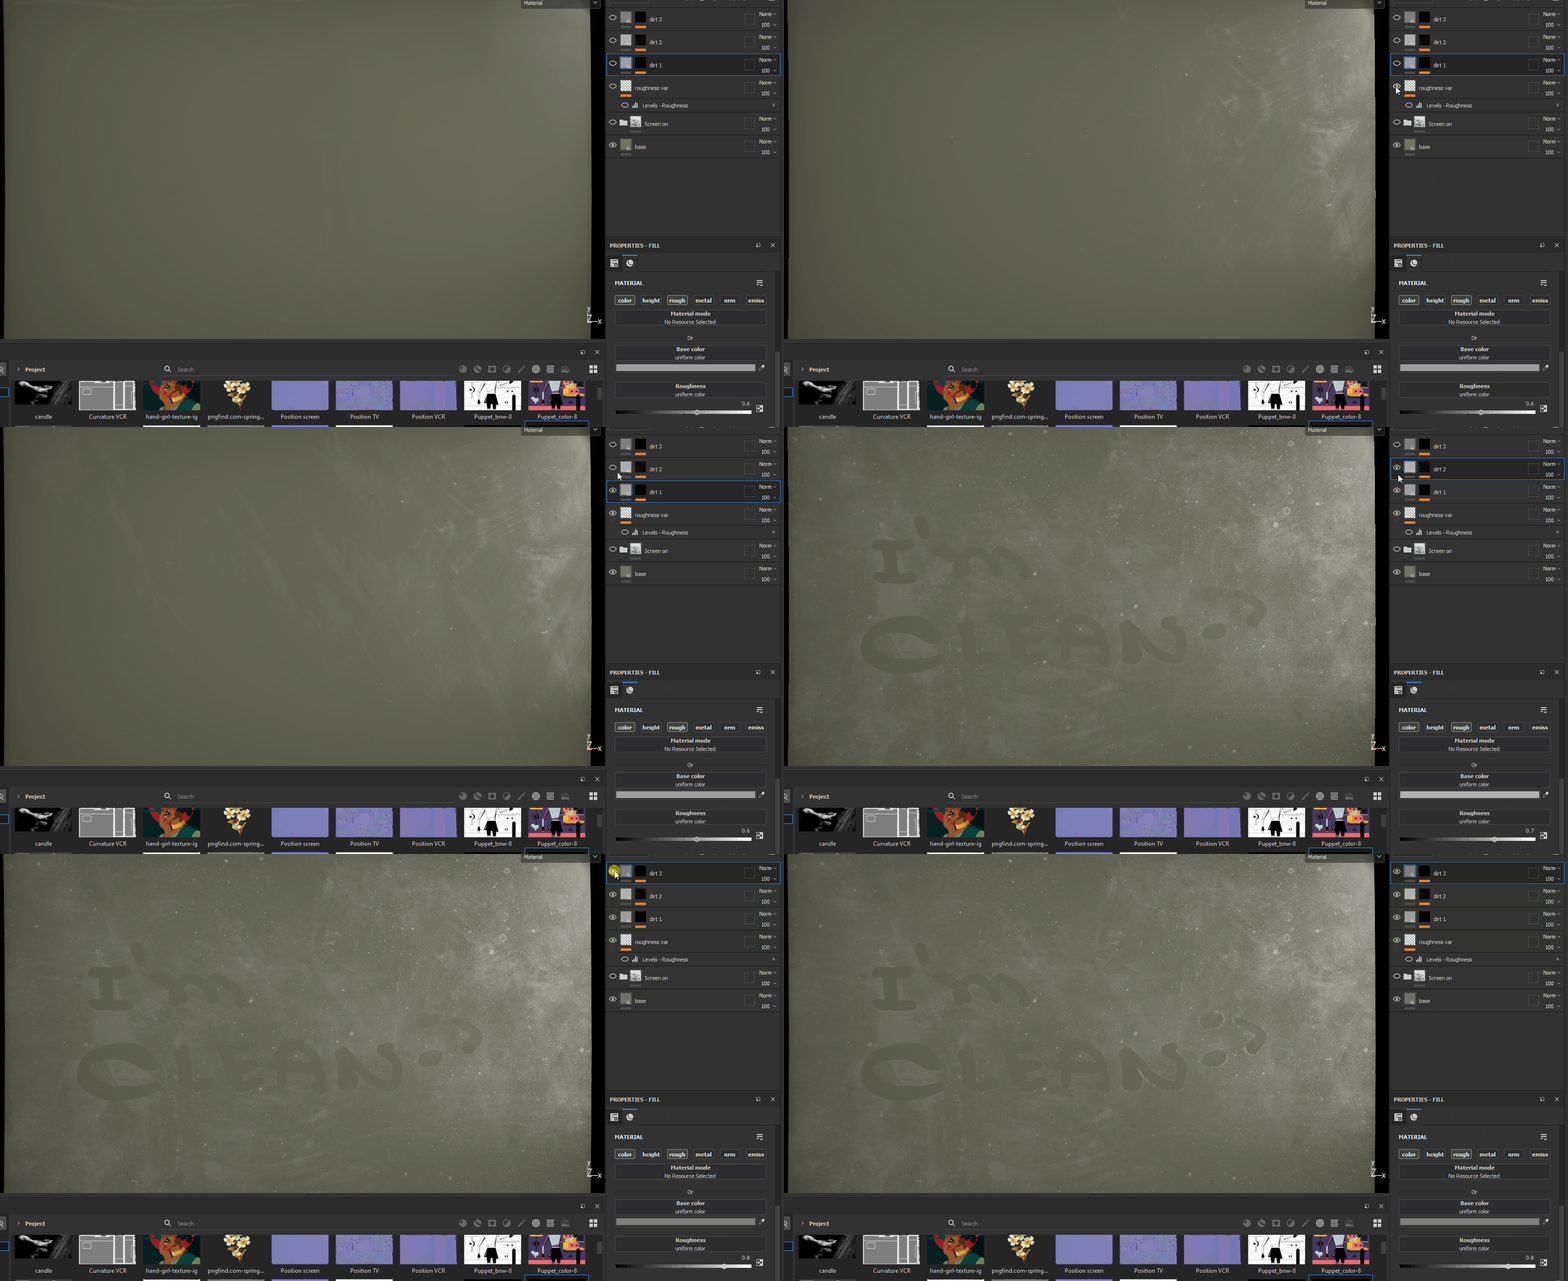
I’ve always struggled to get good base values for my screens that will look good in marmoset. If this is also you, feel free to use these values as your base and modify them at will.

Every layer past the base mainly utilized my roughness channels with some light gray dust color.
Rendering/Presentation
Once all my texturing is done, I exported my textures into Marmoset Toolbag. I am not really that good at lighting so with some tips and tricks from “François Larrieu” and “Mattias H”, the process seems to have become a lot simpler and a lot less stressful than it had started to become before I reached out to them. The main things to look out for are your camera angles and your roughness variations. What good is it to work so hard on your beautiful roughness variations if you don’t show it off in your renders. A bad render can kill your beautiful model, so take your time on it just like every other stage of your model.
Conclusion
Thank you for reading my article. I really hope I have taught you a thing or two. Thank you to Games Artist for giving me the chance and opportunity to write it. I hope I get to share more of my knowledge with you in the future.
Things to remember/keep in mind:
-Be patient
-Learn to analyze your references
-Give your props character via storytelling
-Take your time, don’t rush the process. Strive for quality
-Don’t be scared to ask for feedback/questions
-Take breaks. (Trust me XD)
If there is something I didn’t cover and you would like to know about, feel free to shoot me a message on my Artstation and I’ll get back to you as soon as possible.
Special Thanks to:
Mattias H for always giving me awesome feedback
Laura Catalina for letting me use her drawing as my screen display
François Larrieu for the dope lighting tips and tricks.


