

Introduction
Hi, my name is Maksym Pitielin.
I’m a Senior Character Artist, I've been working in the video game industry for many years now and video game art has been my passion for as long as I can remember.
Project
I rarely publish my personal projects, most of the time things I’m working on in my spare time end up never being finished since most of my time is dedicated to professional work, and when I come back to the personal project, the desire to get it done has already faded, but this guy was relatively fast.
I think it was less than 3 weeks since I started, to final publication, working a few hours in the evening for most of those 3 weeks, but there definitely was a lot of corner-cutting.

Here is the original picture that was sent to me for a laugh.
I thought it was the funniest thing ever and I just had to try and recreate it in 3D, with a few design tweaks and, of course, since the picture was AI-generated, there are many areas that will have to be reworked.
References
Let’s start with gathering references.
To my surprise, it was quite challenging to find good references for obese people’s bodies, especially to this degree. And even more so for obese faces, so many of my references are artworks from other artists.

High Poly
I started with a base body from one of my previous projects. Unless you are practicing anatomy, I would always recommend starting with base body mesh and building on top of it.
In my case, it was heavily edited to the point where only some facial features, arms and feet remained any resemblance to what I’d started with.

After I got to this point, I felt it was good enough to start working on the suit. Since his nude will not be seen in the final, there was no point in trying to get perfect anatomy and details.
I just had to make sure the overall shapes and proportions are good enough.

When creating blockout, I find the dynamic subdivision feature with dynamic thickness in ZBrush incredibly useful.
It allows you to keep working on a relatively low res model in a non-destructive way but having a high-quality preview. For most of the outfits, I try to stick with it as long as possible, and only after you feel like you are ready for the final polish pass, you can convert them into real subdivision levels.

After some tweaking, I felt I was in a good spot to start sculpting folds on the cape and cowl. For this project, I decided that I want to hand sculpt all the folds without using Marvellous Designer, mainly because there is a particular result I was looking for and it would take way longer to achieve it with marvelous.
The brushes I was using were mostly Standard brush, Inflate, and Smooth Directional. It’s hard to give any tips to improve your fold sculpting, but the main thing to think about is the logic behind your folds.
What is the material you are working on, is it tense or relaxed, is it compressed or stretched? There are never just “random” wrinkles, everything should be thought out.


Same with the suit, It’s important to understand what areas are relaxed/compressed, and what areas are under tension and stretched out. A step to note here is to take time and assign different polygroups to mark seams on the fabric.
It comes incredibly handy when modeling fabric seams and polishing since you can mask one side and really sell the idea of the overlapping fabric.


Now it’s time to finalize the head. After a few more tweaks to the blockout, I exported the mesh into Substance Painter, projected pore details from XYZ and then added more details/imperfections and features in ZBrush manually.
It’s important to keep every one of those steps in layers for future tweaking.

Adding some props, finalising the design for gloves/boots and High Res is done!

Low Res
Right from the start I knew I wanted to render it in Marmoset Toolbag and didn’t care much about polycount to a reasonable degree. It was not a game-ready character. Every subtool on High Res had all of the subdivision levels preserved, so I exported everything with the lowest or second lowest subdivision lever into Maya.
The result was very high, 367k tris to be exact, and that’s before adding all of the facial hair, but I knew marmoset would be able to handle it.

Here comes the unwrapping stage.
The most important here is to make sure all the seams on the Low Res match the seams on the High Res, and since I was using the lowest subdiv for Low Res and all my seams are based on polygroups that I’ve created, it was very easy.

Baking and Texturing
After a quick bake in Marmoset Toolbag, I started texturing in Substance Painter. For my approach to skipping the manual retopology step, I also bake a Height map. It will become important at the rendering stage since I’ll be able to use it for tessellation and bright back all the details that are not modeled.
For the texturing, there wasn’t anything really special here, my intent was to keep all materials very clean, with no baked lighting, the final renderer will do most of the work for me.


Render
And here is how it looks in Marmoset with the default camera:
To get back to the Height map that I baked before, here is an example of how it used to bring back some of the finer details from the high res.

And for a close-up of the face, some fuzz was generated with XGen:

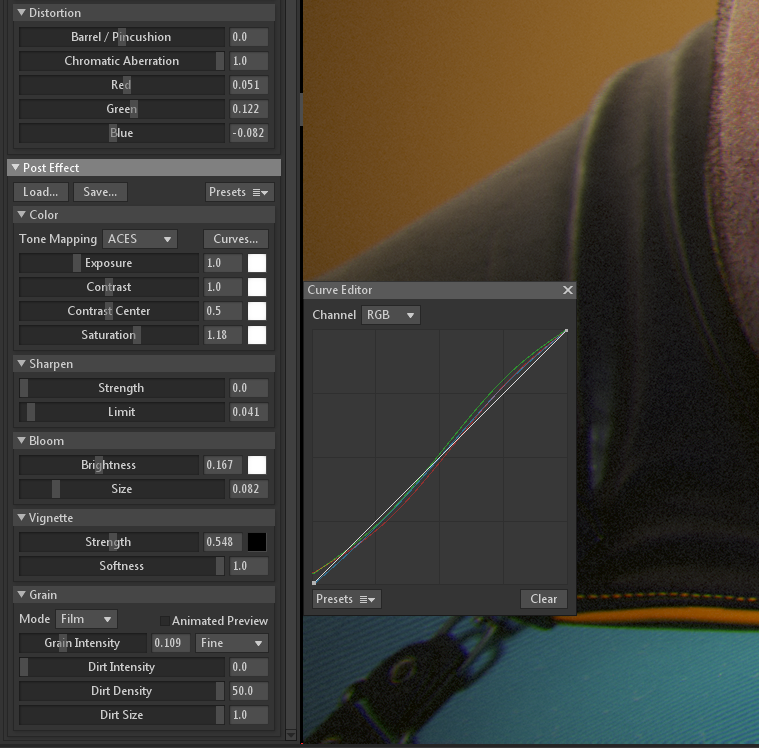
Now for the final touches, I do try to play around with the camera setting in the marmoset toolbag. Usually, I add some subtle chromatic aberration and edit curves to get a more cinematic and interesting look.
Here are the settings that I used for this project.
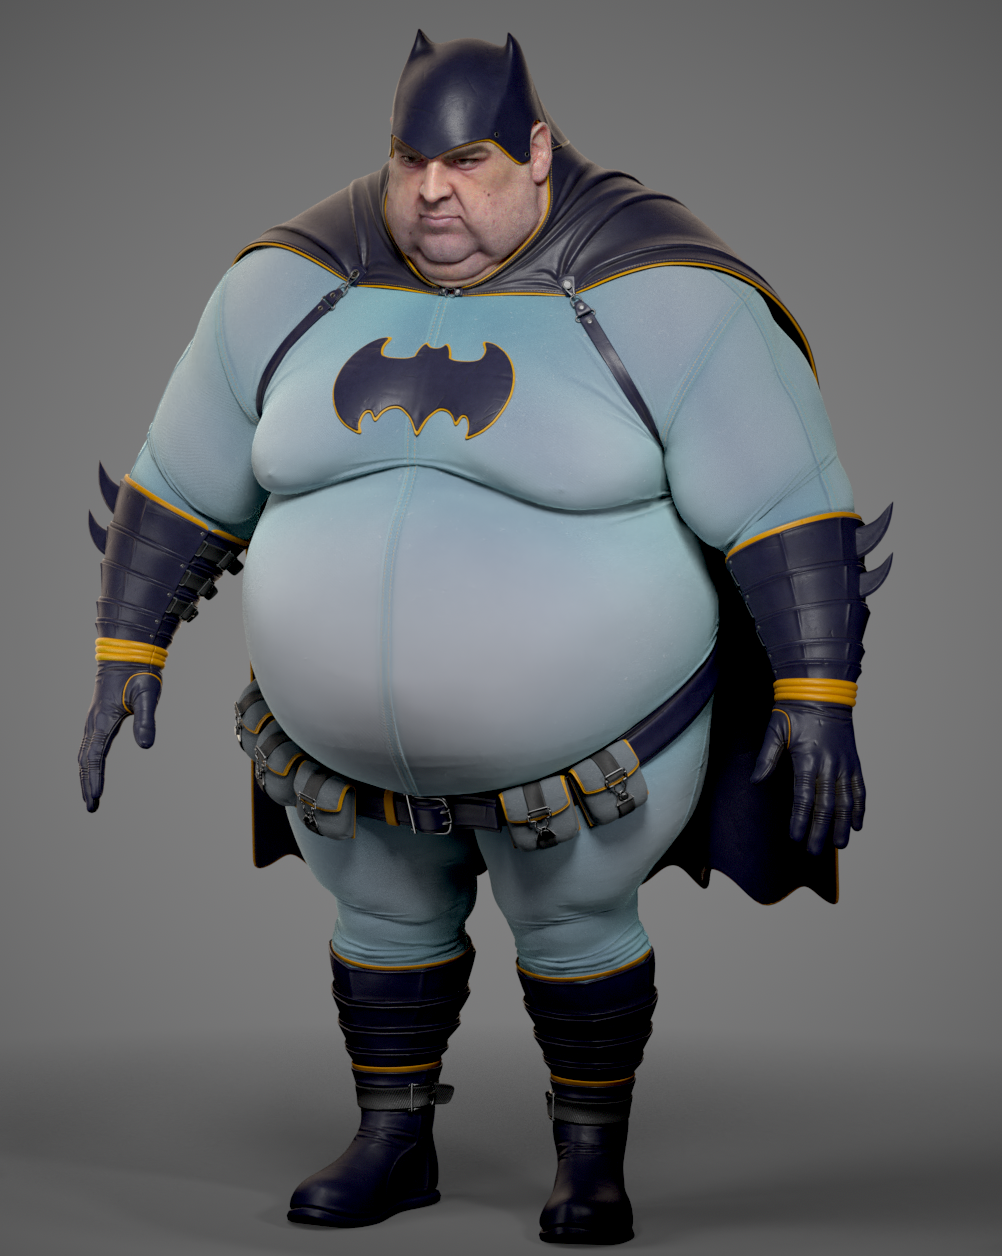
And here is the final render:


Hope this breakdown was at least a little bit useful and thanks for getting to the end.
Good luck!
Read more articles
You might also like these articles.


