The Heretic Sword


Introduction
Hi, I’m Alexander Tang, a junior artist at Free Radical Design. I’ve loved designing and drawing weapons from a young age and decided to pursue my passion for games by attending Escape Studios to learn 3D and get a job within the Games Industry.
I have a great interest in weaponry, especially swords and medieval arms, often visiting museums such as the Wallace Collection to gather references and learn, as well as conceptualizing weapons for my game design, “Labyrinthe.”


Project
“The Heretic” was created by Ilya Alekseyev for Blade Show 2021, where he won the award for Best Blade. You can find a link to his work below:
[Making the Heretic – The Sword of the Year]
I’ve always been a fan of ‘That Works,’ even when they had the original show ‘Man at Arms.’ After seeing The Heretic, I knew that I wanted to recreate it. It was the perfect sword to sink my teeth into, as I love detail, and it was a great chance to really put my skills to the test.
References
The first important thing was finding references. This is a sample of some of the references I was looking at, mainly breaking it into separate parts and focusing on close shots, as well as different angles/lighting to see its colors and how it reacts with light. I cannot stress how important this stage is. To get a result that is as close to the real thing as possible, you must spend time really understanding it.
I watched the forging video many times, not only to see the blade but to understand its forging process, how it is made, what materials are used, as well as Ilya’s inspiration, design philosophy, and ideas behind his work, which helped me understand the art behind The Heretic.
Throughout my process, I also rewatched it over and over, looking for things that I missed and to remind me of what I was doing and my goal.
From his video, as well as other sources, I documented a board of references throughout his process, even initial sketches and sculpting. Seeing these stages made me decide what brushes to use as well as what detail to add (I’ll go over this later in another section).

Blockout
After gathering my references, I then proceeded to break them down into smaller components. Breaking it into smaller pieces meant I could work and focus on each component one by one, working my way down the blade until it was finished.

Sculpting
Now that I had the Heretic separated into its base components and my references gathered, it was time to start sculpting. I decided to start at the pommel (which was the easiest) and work my way down the blade. I’ll breeze over the first few sections as they aren’t too special in terms of technique and focus a bit more on the more detailed sections.
For the Heretic, there weren’t too many brushes I used but I’ll go over which ones and how I used them (Majority of these used with square alphas):
Clay Build Up – BCB – The standard brush to add geometry.
Planar – BPL – A very harsh brush to level/flatten an area (or used in inverse to lift it up). This was used in conjunction with the next brush for harder, metallic pieces.
HPolish – BHP – Similar to Planar but a bit more flexible and a bit softer. This was to “hammer down” softer areas to make them look more metallic.
TrimDynamic – BTD – Again similar to HPolish, used to chip away and dent corners. I also used this inversely to build up geometry and then chip away at it.
DamageStandard – BDS – I rarely used this to actually create damage, this brush was mostly used inversely on tight corners to “sharpen” up the edges and make them more defined.
Mallet Fast – First you’ll have to go to Lightbox> brushes > mallet > mallet fast but the shortcuts after will be BMJ, which is a very nice brush when you really want to gouge. I used this essentially as my “chisel” to dig into areas for the silver work.
There are other brushes that I used on occasion but these are the main ones I used. Experiment with these brushes and try others. Maybe they’ll work for you, maybe they won’t.
It’s what I have gotten comfortable with and learned to use over the past few years of ZBrush.
Sculpting Process
I won’t go over every single piece but I’ll go over the basics of how I sculpt my detail. I usually start off by creating my details with ClayBuildup (CBD).
Then I’ll use brushes like HPolish (BHP), Planar (BPL) or TrimDynamic (BTD) to polish off the mesh and clean it up. I’ll then add a few extra details like carvings/edges using DamStandard (BDS) before finally polishing and detailing flat areas/edges to add interest and wear.

For most of the pieces of the Heretic, I started off with a base mesh. This was either a primitive shape, a mesh quickly made in Maya, or an alpha which I converted using ZBrush Spotlight.
Below is a gif showing the process of one of the sides.

I start off using the base mesh created in ZBrush/Maya, using my tools to layer on the base shape, before moving in with the Hpolish/Planar to clean it up and add the flatter areas and then going in with DamStandard and other brushes for the detail.
Don’t be afraid to go back over old work. There were areas that I had to revisit as they did not hold up to newer parts, so I went back over to redo them. This is where it is vital to keep looking over your references and comparing it to your work to make sure your work is as close as it can get.

Detailing
The final part of each piece was the detailing. Going back through my references, I took screenshots not only of the final piece, but of the process as well. Watching where and how Ilya strikes with his chisels to carve and engrave detail. This helped inform me of what brushes or alphas to use as well as where to carve and what direction to sculpt.

For the damage I would mainly use MalletFast (BMJ) as my chisel to gouge out areas, using my references and intuition about where and what direction to dig in. I’d then use a mix of other brushes like HPolish (BHP), Planar (BPL) and Trim Dynamic (BTD) to flatten the areas to make it smoother and more like metal.
While making the Heretic, there were several design choices that I had to make. Not all detail translates well from a real-life object to game art or digital. Throughout the process, there were areas that I needed to change or adjust.
One main part that was changed was the chain wrap that goes over the grip. The original was too difficult to read from a distance if I were to go for the same size as the reference.
I decided to increase the size so that you could see the pattern from afar, whilst still keeping the rough shape of chains.

For the damage I would mainly use MalletFast (BMJ) as my chisel to gouge out areas, using my references and intuition about where and what direction to dig in.
I’d then use a mix of other brushes like HPolish (BHP), Planar (BPL) and Trim Dynamic (BTD) to flatten the areas to make it smoother and more like metal.

The handpainted pass allows me to control where I want dark pitting and oxidation to be, allowing me to frame areas more and soften the blend as well as stopping the piece from feeling “flat”.
For the hammer marks, I wanted to mimic the damage and scuffing that might appear through the process. Multiple dimples to show wear and tear and added detail.

These were to mimic little bits of chisel/hammer marks adding some surface variation and breakup to the flatter metallic surfaces. The setup also made use of anchor points to generate the mask for the dimples and edge colour.
Damascus Steel
The Damascus steel was a very fun (and excruciating) material to recreate. It is one of my favourite smart materials that I’ve made so far. For this material, I made use of Anchor points which I passed up the chain as masks to create the multiple layers of the Damascus.
To understand the material better, we need to understand what Damascus steel is. It is a steel that is made using two different types of steel that are then welded and folded together to create a pattern. This is what creates a striking colourful pattern.
So in our material, each layer represents a different steel, using the anchor points as our “layers”.
The initial layer is our base steel material. We then create a mask that acts as our first layer of darker Damascus. Using that layer as an anchor point and inverting that mask, blurring it a little so that the metal “blends”, we create our second layer of lighter Damascus.
Then using the primary anchor, using levels, and bringing it in, we create our third and final layer of bright Damascus.

The Damascus smart material uses the base steel smart material I made with some adjustments.
These were usually subtle adjustments made to the base colour, roughness and metallics to add some variation to the material and bring out the pattern.

It was important to balance these values as at the very beginning, the contrast in values was far too strong, causing the effect to be too powerful and almost stylized.
Below is a gif showing the progression of the Damascus smart material on the pommel.

The three-layer Damascus material is easily seen in the first version, but it was too punchy and contrasted too much.
It was a lot of dialing down with the base colour and roughness to eventually find a subtle enough balance between all the values, whilst still maintaining the pattern.
It was very much worth taking a week to create this material alone, as it was used in multiple areas across the sword.
Blade Damascus
The blade Damascus was a trickier affair. It was another part of the sword that had to be adjusted to be more in line for games. I created the original alpha that was as close to a 1:1 copy of the original Damascus pattern.
Whilst it did create a very nice Damascus effect using my smart material, from afar, it was just a muddled mess of a pattern. I had to choose the points that I thought were the most important and prominent in the pattern (the diamonds) and honed in on that.

By reducing the strength of the unimportant areas and keeping the diamonds at a higher value, I brought out that pattern so that it was more readable. I went through quite a lot of different iterations until I had found a point that I was happy with.
Final Touches
Usually, at the end of creating props, I add a large scuffing pass and contextual wear.
However, this is very much a ceremonial sword. Paraphrasing what Ilya said, this sword was made for war, but on a much larger scale.
This was a sword not used on the battlefield, but in the court, to be offered to another King to wage war on another.
Therefore, I did not want to damage the sword too much. I did a very light grunge pass to add a bit of dirt and slight scratch marks where it might have had some sharpening and such, along with a few more dents and hammer marks but overall, I left it as pristine as possible.
Whilst smart materials and generators can do a lot of the heavy lifting, hand painting is always a great way to finish it. I use the masks and generators to get the rough areas and then use a paint layer to adjust them personally, using my references to see where I can change.
Rendering and Lighting
Posing a long and thin prop is tricky, especially for one with so much detail that goes across a large space. It was difficult finding positions and shots that showed off as much of the detail, as well as close-ups to show off all the finer detail.
I decided to go with two rendering scenarios, one that was a clean studio shot, and one that was more of a cinematic shot. Both required different setups and lighting.
For the studio shots, I wanted a cleaner shot, using a blank white background, rect lights as well as a few point lights to get some interesting highlights. I must thank Jonjo Hemmens here for helping me through this process.

The rect light acted as my main fill light, mimicking a studio lighting scenario, with the skylight lifting the values slightly.
The point lights were mainly to add a little lighting to some areas of interest I wanted to highlight.
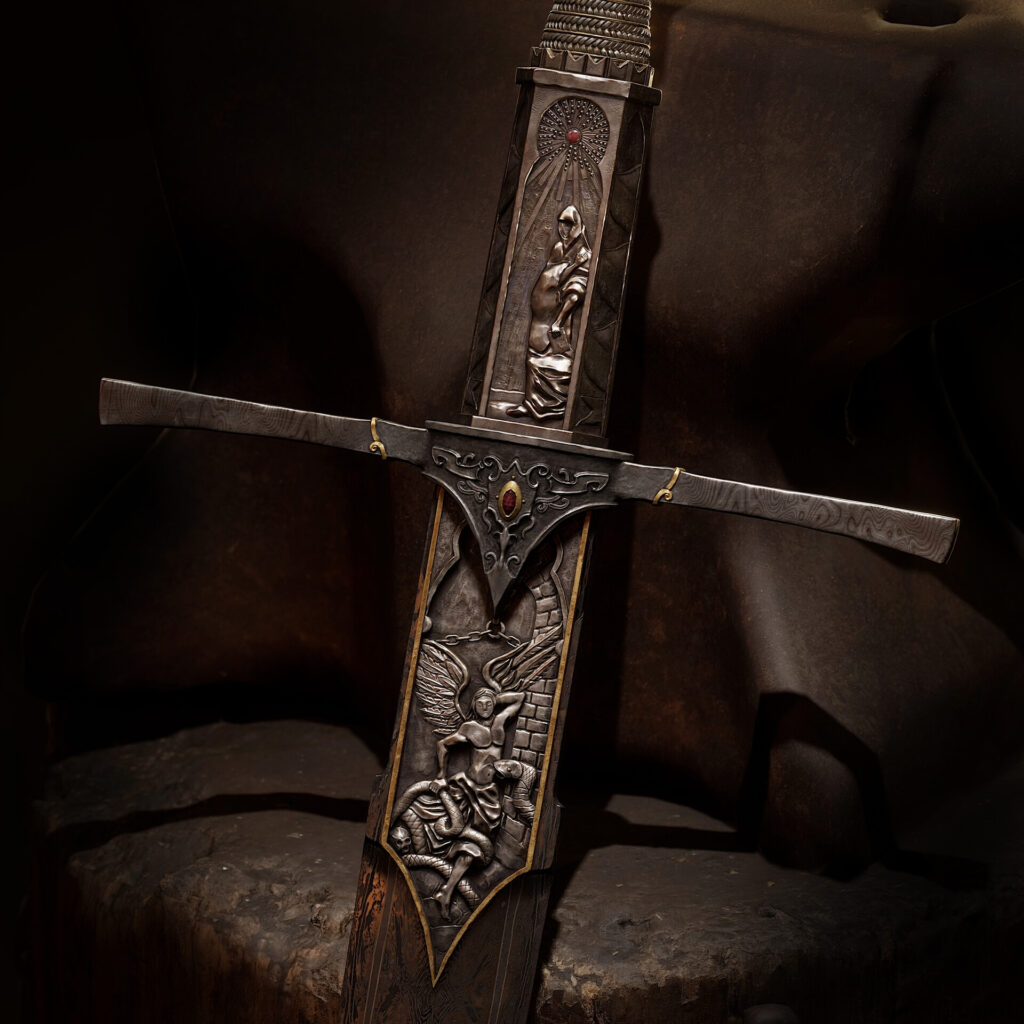
For the cinematic shot, I wanted to pay homage to the old forging videos I watched, mimicking the setup of the sword on the anvil. With this, I went for a warmer lighting setup to bring out some of the details and show it reacting to different light color values.

The setup was similar enough with the rect light this time acting as a rim light from the back and one of the point lights acting as a main fill light, and the top point light to add some lighting to the pommel.

Final Words
And that was the process of making The Heretic. I hope I covered my process well enough. The main important points I want to highlight are referencing and preparation.
References are extremely important for any work. Make sure to spend the adequate time gathering images and researching what you are creating, making sure you understand the process of how it’s made and what materials are used.
Preparation is also key. Smart materials may take a time to prep, but once you have them ready, it’s smooth sailing as well as planning what you are doing in advance, especially with a project as detailed as this.
Special Thanks to
Jonjo Hemmens – https://www.artstation.com/jonjo – your help has been invaluable throughout this process for the texturing and lighting process
Abbas Ishtiaq – https://www.artstation.com/abbas_ishtiaq -for being the best right hand man, encouraging and helping me throughout as well as creating the cinematic
And all the members of Experience Points – https://discord.com/invite/exp-points – for all their advice and feedback as well as their encouragement to carry on and do better.


Read more articles
You might also like these articles.


