Roman Baths

Introduction
Hi! I’m Daniel, an environment artist from Sydney Australia with a primary focus on real-time environment creation for games.


Software Used
- Maya
- Blender
- Substance Designer
- Substance Painter
- Photoshop
- ZBrush
- Marmoset Toolbag 4
- Davinci Resolve
Why I chose the project
Ancient Rome has always been a constant source of inspiration and fascination for me. The level of grandiosity in the architectural works they created is hard to comprehend and it’s easy to see the influence of their architectural legacy in modern buildings around us. I chose to design a somewhat quintessential roman bath house as it would be a great way to practice my trim creation, shader work and ZBrush sculpts.
I decided not to work from a concept to practice my composition skills and got to work trying to understand what makes roman architecture look so good, by studying classical proportions and motifs. I realized quickly how important it is to get these proportions right, as anything that strays from them quickly becomes very strange looking and “architecturally illiterate” as the architecture nerds call it.
I also gathered reference from famous paintings as well as games that have portrayed antiquity in amazing detail such as Assassins Creed Origins and Odyssey.


Initial Planning and Reference:
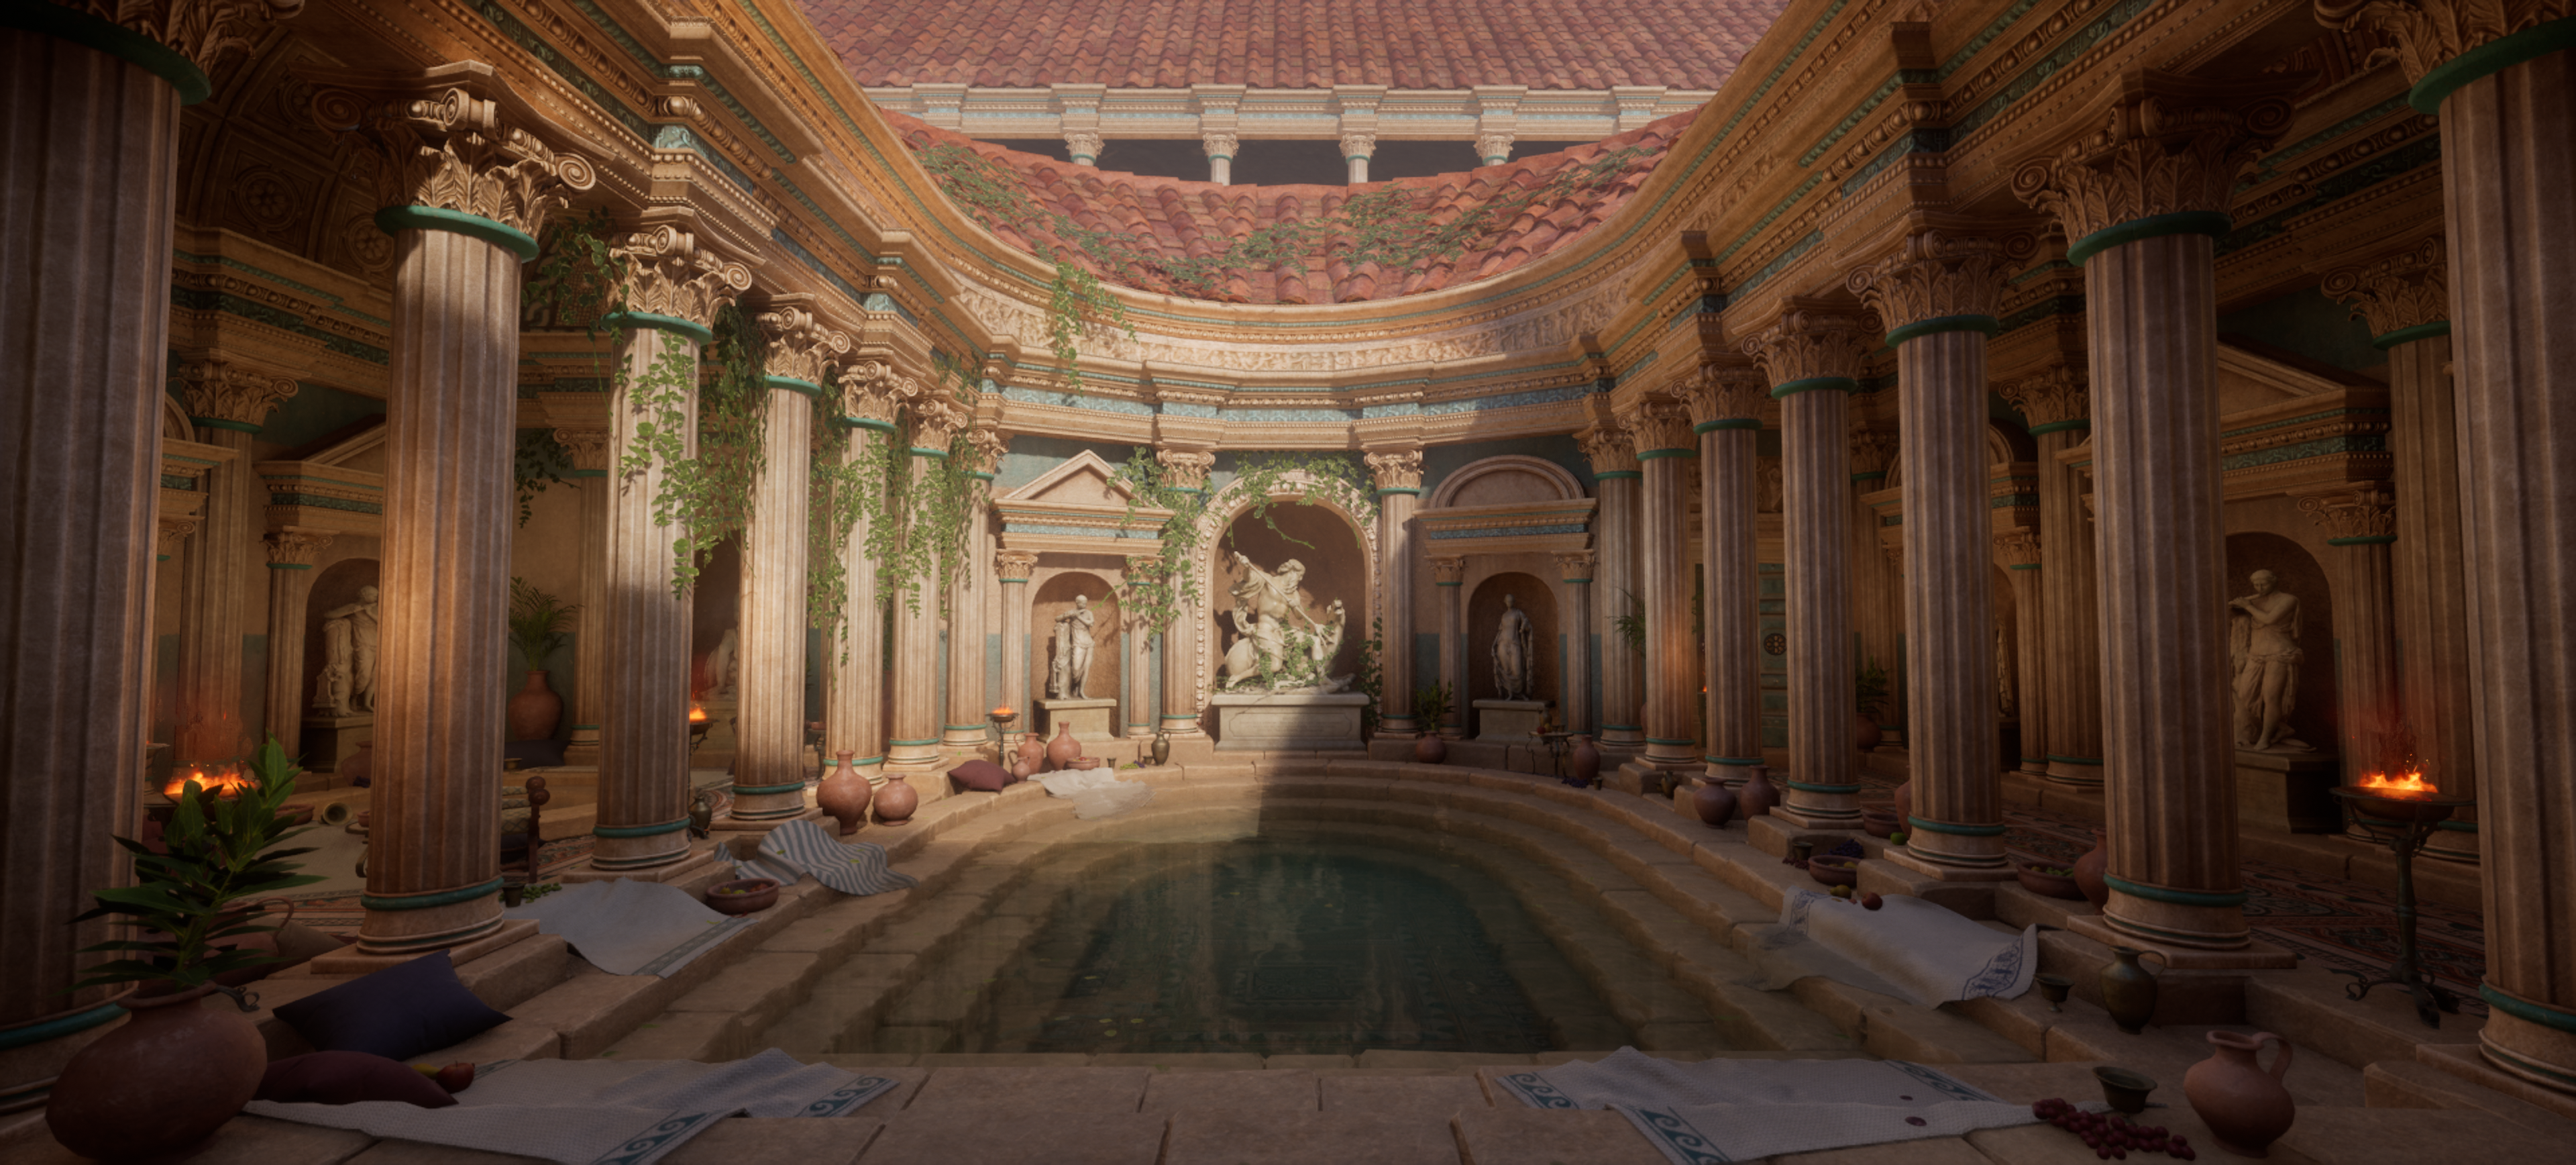
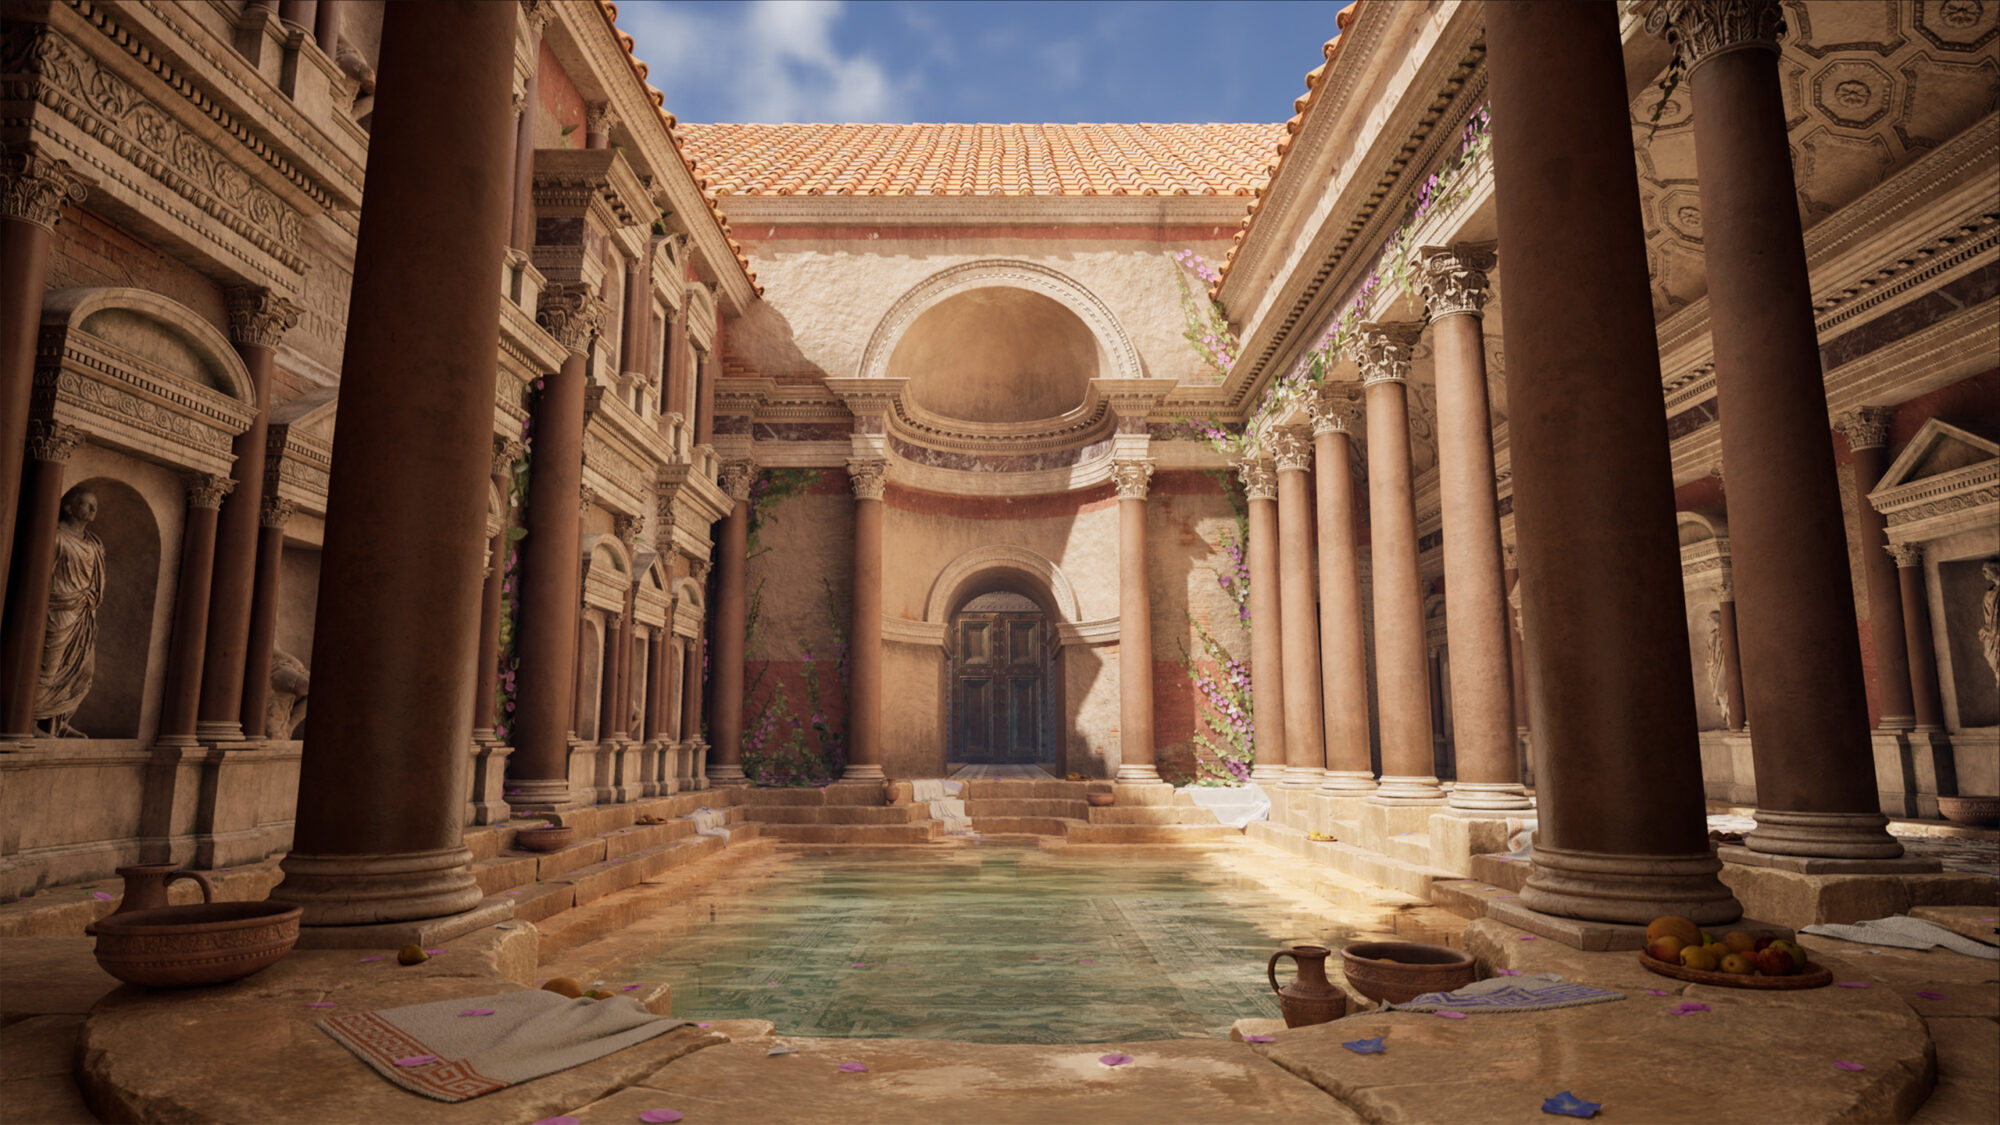
The baths are an amalgamation of architectural motifs from many real roman buildings. The lavish statue wall and many of the ornate marble trim motifs I created were inspired by reconstructions of the famous baths of Caracalla by Andrea palladio.

The central quarter dome and curved entablature that sits front and center in the composition comes from many roman temple designs, with my main reference being the interior of the pantheon.

The bath enclosure and steps are more akin to the famous roman bath house in Bath, England. I chose this rugged, slightly worn-down aesthetic as opposed to the clean marble slabs that would have adorned the much larger bath houses in Rome, as I wanted to breath some interest and texture into the environment as well as create an opportunity to practice my sculpts. A Key reference for the sculpt of these steps was the boss arena for the mimic tear in Elden Ring as I thought these looked amazing.

Blockout
I then started my blackout in Maya, by creating rudimentary shapes that approximate the final meshes and bashing them together until I was happy with the proportions of the architectural elements and the overall composition. In this stage I also put an emphasis on working out the correct scale for my meshes and modular pieces. Using a mannequin with the correct human scale is instrumental in achieving this and I would advise doing this very early on.

Ornate Trim
I then got to work on creating a trim sheet that would contain all the ornate detailing I would need to texture the architectural meshes and the statue wall. I started by modeling rudimentary base shapes that would then be sculpted in zbrush to refine the shapes and add breakup and variation, I tried not to add much high frequency detail during this stage as these would be very small on the final meshes and too much noise could hurt the readability of the trims.
In hindsight, I could have made them even less noisy to get a better result and I ended up not using some parts of the trim because they were too noisy.
I also used displacement maps from megascans assets to displace sections of the trim to be used as the high poly, don’t feel like its cheating by using other people’s assets in your scene! Rogelio Olguin’s section on the Artstation Learning course on environment production was instrumental in understanding the workflow for this trim sheet and id highly recommend it if you can afford it!

They were then ready to be brought into designer for baking the height map and then into painter for texturing. I added some simple color variation using various noise textures as well as some edge highlights and dirt in the crevice’s using the dirt occlusion smart mask.


I then created my modular entablature meshes, making sure to create necessary geometry for applying my trim texture when UVing. I went with a Mid-poly approach to modelling most assets in the scene as UE5’s Nanite polygon streaming system basically negates the need to be conservative with polycount. It meant I could slap on beveled edges and be much more liberal with my poly count which helped as I didn’t need to uniquely unwrap and bake from a high poly.


I got a whole lot of reusability out of this trim, and I ended up using the heightmap to displace areas in the high poly of the Corinthian column capital in blender. I also ended up using the normal from this material as a detail normal using a 2nd UV map on the pottery which was a timesaver.

Mosaic Trim:
The Romans loved decorating bath complexes with mosaics, so I followed Vincent Derozier’s genius workflow for creating mosaic trims in Substance Designer through his paid course. The workflow involves simply creating a template in photoshop which contains your designs or reference and then tracing over that template using SVGs.
This gives you a nice base to build your height map and a color id map to build your base color. I would generally urge you to make the mosaic tiles considerably bigger than they would be in real life as it drastically helps with the readability of the material and avoids unnecessary noise. This is something that I picked up while studying Vincent’s work on the Assassins Creed games.

Vertex painted materials:
I also created 2 simple plaster materials that could be vertex painted onto the walls. I knew that roman construction usually consisted of a brick wall that was then plastered over and painted which meant creating 2 plaster materials that are designed to work together would probably give the best result.
The base material is basically various grunge textures with slight colour variations blended ontop of each other. I then adjusted the height slider of each grunge map until I was happy with the resulting normal map. the process was repeated for the red plaster, with a simple paint chip grunge map masking out areas that have chipped off revealing the original material underneath.

For my vertex blend material, I used the megascans master material as a base, but added extra controls to add noise to the falloff of the mask created by the vertex colour. Usually, the default falloff with the megascans blend material doesn’t feel organic enough and you’ll need to alter it somewhat.

Stone Sculpts:
Stone blocks were the classic zbrush trimdynamic and trimsmoothborder brush extravaganza with some rock and crack alphas mixed in! nothing special here, but I think they turned out decent. A simple zremesh for the low poly and they were ready to be textured in painter.


I fit these 3 stone blocks onto one 2k texture and I could orient the stones in many different ways to avoid obvious repetition.
The Curved steps were those same blocks bent into shape using the curve modifier in blender. If you look closely, you can see some stretching and compression of the texture, but with organic objects like this you can usually get away with it!

I then placed these blocks making sure to leave some level of randomization of rotation and position, too much uniformity can sometimes ruin the character of your environments!
Water Shader
I wanted the water to look really inviting and a perfect reference for this is Stef Velzeboer’s water shader section of the art station learning environment production course. I used his method of creating a depth gradient mask, which can be used to lerp between two colors. I lerped between black in the shallower areas (which effectively makes it transparent) and a bluish turquoise in the deeper areas. I like the way these colors are somewhat stylized but still fit well in the environment
three water normal maps are being panned across the surface in different directions and with different tiling values which creates some nice movement.
I found that reducing the refraction value significantly created a better result, rather than making the refraction value something scientifically correct (1.33 for water).

Lumen unfortunately doesn’t support translucent reflections thus far, so I had to enable screen space reflections in the material to get some better reflections. Because screenspace draws from what is visible in your viewport to render its reflections, I needed a simple box reflection capture in the scene to stop the reflections from blowing out when the camera is pointed down towards the water.
The final step in anchoring the water shader in the scene was slightly saturating, darkening and lowering the roughness value of any surface below water level. A simple material function that masks below the y level of your water mesh can be used in the master material to lerp between the original material and your wetness adjustments.

Foliage Pass
For foliage, I used exclusively Megascans assets and atlases. I made a collection of petals from the bougainvillea plant atlas, assembled them into clumps and scattered them in amongst the ivy meshes, sometimes foliage doesn’t have to be so complicated!

Props Pass
Your props pass is important because it can start telling the story of your scene. I wanted the scene to feel like people had not too long ago, been taking advantage of the luxuries of Roman life.
I scattered Megascans fruit assets and roman olive oil pots around the scene to try and achieve this.
I also exported all the stone blocks in the scene to blender, joined them together and gave them collisions. I could use this mesh as a collision object for my cloth simulations to place used towels in the scene. To get my simulations to look more like towels as opposed to the default bouncy rubber sheets, I made sure to turn down the internal spring value, object collision distance and self-collision distance.
This means that the cloth can scrunch up much closer to itself and approximate the way towels bunch up. It also helps turn up friction on the collision object to simulate the friction a towel’s material has in real life.

I used some custom stencils created in photoshop to stamp these nice Greco-Roman patterns in substance painter.

Polish Pass
At this stage, everything is looking too clean. Because I was using tiling trim materials to texture many of the architectural elements, I used RGB masks using a unique unwrap on a second UV slot to add unique dirt crevices, leaks and splashes. The Blue channel adds dirt, the red channel adds leaks and the red channel adds extra grunge.
Make sure you turn sRGB off on your masks when using this technique! I’m not blending any new textures in with these masks, rather tinting the albedo and controlling where the tint gets applied. I also added controls to adjust the roughness of each mask as usually dirt will increase the roughness value. This really made the meshes with tiling materials pop and sit believably in the environment.


The walls were also looking too clean, so I scattered some Megascans leak decals in areas where moisture would run down or collect. You can see the subtle difference it makes here.

I really wanted water puddles on the steps and mosaic floor, so I added the water puddle material function that comes with the Megascans blend material to my master material with a global switch parameter to turn it on or off. This meant I could vertex paint puddles on any surface if need be. I think these puddles helped to tie the scene together.
Finally, using the foliage painting tools, I scattered some petals in and around the pool.

I found that placing the petals in the water didn’t look great as the movement of the water contrasted with the stillness of the petals. I solved this by using the simple grass wind node that ships with unreal to create some subtle up and down movement as if they are floating in the water.
Lighting
Lighting in UE5 is such a breeze because of lumens real-time global illumination and 90 percent of the lighting comes from a skylight and directional light working with the sky atmosphere system. It’s as easy as dropping them into your scene, adjusting the intensity and maybe cranking your indirect lighting intensity and you’re basically there.
You will usually need to place individual “fake” lights that help to accentuate certain surfaces or lift their specular reflections. For the main shot, you can see I’ve placed an area light behind the camera facing the pool to brighten the columns, and another facing the ground in front of the camera to lift the specular reflections on the water puddles and catch the edges of the columns.

By placing lights that don’t have a real source on screen, you can really push your scene to the next level and really art directs the overall composition. Don’t light your scenes with the mentality of replicating real-life light sources, because I think more often than not it won’t be enough.
Embrace the creative control you have by placing additional lights, be mindful however that shadow casting lights have a significant cost to the GPU and turning them to non-shadowcasting if you can be more desirable in the context of game environments.

I’m also using an exponential height fog set to a very low density, and the default BP Skysphere doesn’t influence the skylight to get slightly better clouds than what I was getting with the default volumetric clouds.
Rendering
Because I couldn’t seem to get my translucent reflections to render in the movie render queue, I had to resort to using the high-resolution screenshot tool to render my stills, and the regular sequencer to render my cinematics. This meant a slight reduction in quality but I still think they turned out ok!
I then used DaVinci Resolve to do a slight color grade, mostly just removing some red tones to get to my final shot.

Outro
This project took me around 4-5 months to complete working around 2 days on it per week. This was mostly because learning the tools and best workflows takes up a decent chunk of time. I learned so much during this process and had so much fun working on it. Onto the next one!
Thanks for having me GamesArtist!
Read more articles
You might also like these articles.