Introduction
Currently working as a Character Artist at Myrkur Games.
Software
For this project, I used ZBrush for sculpting, Maya for some blockout meshes (the gun and buckles e.t.c), hair and UVs, Marvelous Designer for clothes, TopoGun for retopology, Marmoset Toolbag for baking, Substance Painter for texturing and finally Unreal Engine for rendering.


Inspiration And Reference
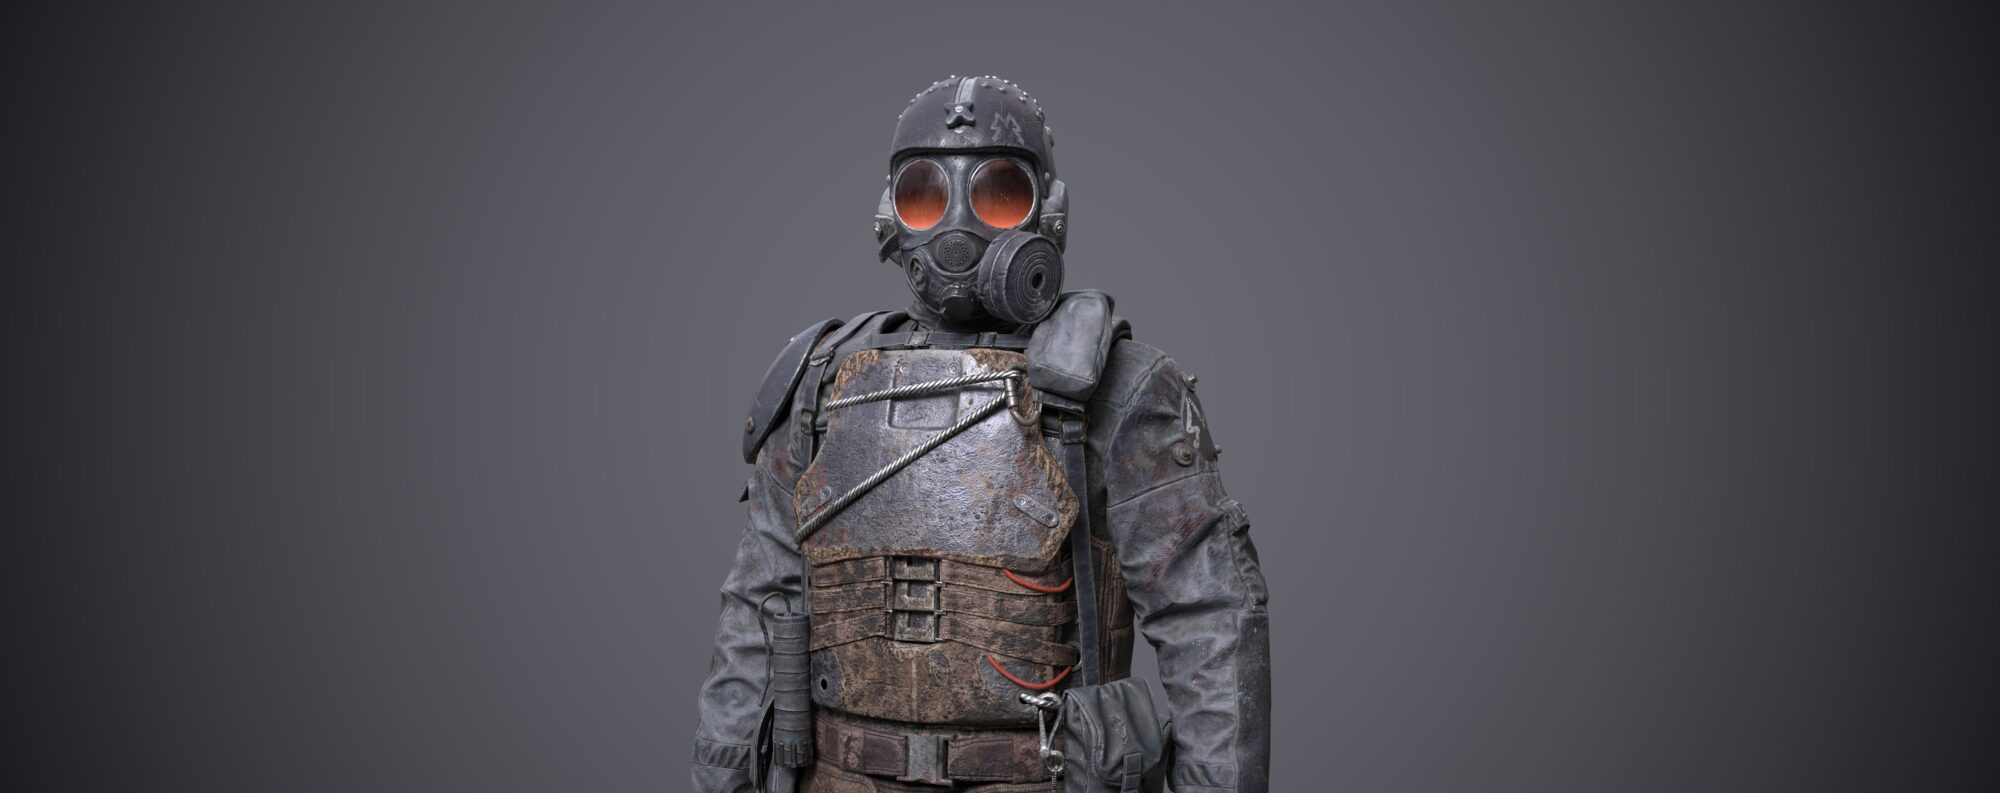
I wanted to make a character that I had not seen done before in 3d, and being a fan of the action-adventure genre with a touch of ancient mystery I thought making Rick O’Connell from the Mummy would be something fun to do.
For references, I started looking for images on gettyimages.com for Brendan Fraser´s face, as well as buying the first two Mummy movies and screen-grabbing a bunch from there.
I actually made a big mistake in the beginning by collecting far too many references for the face from different sources that had very different camera settings, which had me confused for a long time. I ended up mostly using a few images that went into the “curated reference” part of my reference board. Those were images all taken in the same year and had a similar focal length etc.
The screenshots I took from the movie were a great reference for the outfit though.

Marvelous designer
I made all of the clothing for this character in Marvelous Designer. Marvelous turned out to be pretty handy for making boots as well, something I’ve usually sculpted in ZBrush but my mentor recommended I do in Marvelous instead.
The process of doing the boots was a little hard to wrap my head around at first but it works nicely and is a nice addition to my toolbox.
As powerful as Marvelous is, all the clothing got an additional sculpting pass in ZBrush. A lot of people like to make new and clean geometry for what they export out of Marvelous to get a headstart on the retopo and good geometry for sculpting, and I used to do that as well but now I just quadrangulate my mesh in Marvelous and send it straight to ZBrush for sculpting and I find that works better and faster for me.


Modelling
Anything that is not cloth was modeled in Maya/ZBrush. The guns I blocked out in Maya and then brought into ZBrush, creased the edges, dynameshed and polished, a fairly straightforward process, pretty much the process Simon Fuchs shows in his tutorials.
I sculpted the head and body for the character from a sphere in ZBrush and did the retopo for them in Topogun/Maya, the pore detail was made with maps from texture XYZ.


Hair
Game hair has been one of my biggest struggles in 3d so far and for this character, I remade the hairstyle from scratch six times before I got it to where it ended up.
I like trying different tools, so this time I used Coiffure, a plugin for Maya that makes the process of generating hair textures with XGen very smooth.
For placing the hair cards I used another Maya plugin called GS CurveTools, a very handy tool that lets you control your cards with splines. GS CurveTools allows you to organize your splines in layers, and I made heavy use of that.
I discovered the hard way during my first attempts at making the hair that staying organized was pretty important here.
I made clumps out of my cards, bound them to a spline and started placing them from the back of the head and worked my way up the scalp.
Towards the end, I started color-coding my splines so I could more easily spot which clumps I was using and where.


Topology, Uv´s And Baking
For retopo I use Topogun for the most part, for simple things I tend to jump into Maya but for anything more than the most basic probs I prefer Topogun as it has more powerful tools.
Even though this is a personal project, all the topology is made as if it were done for production. I split my UV’s into upper body, lower body, head and guns. So four UV sets excluding the hair and things like eyes.
All my UV’s are made in Maya which has really nice uv tools these days. That being said Rizom UV is on my list of things to try and I’ll probably give that a go soon.
I do all my baking in Marmoset Toolbag. The control it offers by letting you sculpt on the cage is the reason why I love it, although the high-quality bakes and speed are pretty great too.


Texturing
For the head, I started with a base texture from texture XYZ and painted it on top of it in Substance Painter to better match the skin color of the actor.
All the other textures were done from the start in Substance Painter. For this character I didn’t use a whole lot of smart materials or smart masks, instead, I mostly used stencils and hand painting.
Not that the generators are bad but they’re not great for making unique detail, instead they tend to just make everything uniformly worn, which is fine as a starting point but then I always erase some stuff and add unique details on top.

Megascans
I didn’t want my character to just be floating in space so I grabbed some Megascans assets from Quixel Bridge which is capable of sending assets straight into my Unreal project, and used them to make a small scene for more interesting renders. Megascans assets come with materials that allow you to tweak colors, roughness e.t.c to better match assets together so it wasn’t too much trouble to put this together.
For someone who doesn’t make environments, it’s nice to have a resource like this handy.
Posing/Rigging
For the pose I used Mixamo to get a quick rig going, Mixamo is fast and does a pretty decent job if you just need a simple rig for posing, although it usually requires a little bit of weight painting fixes in Maya.
Mixamo is very handy for posing but I also use it when prototyping characters and want to get a feel for how they will move around in the engine.
Shaders
I used this project to learn more about materials in Unreal engine since I’m really interested in them but don’t have a ton of experience working with them.
I used the hair and eye materials from epic since those are the more complicated ones and a bit too much for me to attempt, for now, the rest I made myself.
The skin shader has a lot in common with the one from epic, just suited to my needs.
The roughness is generated from the green channel in the normal map and has masks for regions of the face so I can adjust them via my material on the fly, and the specular information is controlled by a cavity map.
I like having as much control as I can within my materials so I don’t have to leave the engine and make changes in substance if, for example, the forehead is too shiny and then constantly be reimporting maps.


The cloth shader was a bit more of me figuring things out than the skin shader which is heavily based on materials from Epic.
I´m using RGB masks to mark areas where I want different tiling normal maps overlaid on the clothing. I figured three per material would be enough so each material instance has three slots for tiling detail normals that go on top of the normal exported from substance.
I painted RGB masks in substance to mark each area, those are pretty low res. The shirt has tiling cotton normal for example, the leather has tiling leather normal and so on.
Some time ago I saw in a presentation from Naughty dog that they had all their cloth stitches tiling in their materials and so they weren’t bound to the resolution of the cloth textures.
I thought this was really cool and wanted to see if I could do the same in Unreal engine. So I cut strips into my geometry where I wanted to place stitches and made a second UV set in Maya where only those strips existed and aligned them up.
I then made a mask and a normal map for some different types of stitching and so through my material I can tile the stitching as much or as little as I want, change the color or offset it and get a different type of stitching all together.


Lighting
Most of the lights in my scene are spotlights, the only settings I really change apart from the intensity is the shadow bias which I usually lower considerably. The default is 0.5 but I tend to lower it to 0.1 or 0.05.
I started by doing a simple three-light setup with a key light, fill light and rim light. After that, I added a couple more to brighten up some areas that were too dark but I generally try to keep my lights to a minimum and keep things simple#
Conclusion
I´m pretty happy with how this one turned out, although I learned a great deal from it including getting better at making hair, unreal materials and more, I think maybe my biggest takeaway is to not settle for results that I´m not actually proud of, go back and fix my mistakes, which my mentor always made sure I did.
For example with the hair, with every iteration that didn’t turn out good I had a chance to analyze it and try to figure out why it wasn’t good, what wasn’t working and how could I fix it with my next try.
It’s easy to accept mediocre results and to say you´ll do better on your next project but if you don’t analyze the mistakes and figure out how to fix them then you probably won’t do better next time, you´ll just make the same mistakes again.
Thanks to the GamesArtist team for reaching out to me, I appreciate it.
And thank you for reading, I hope something in here was interesting to you. My Artstation.
Finally, if you´re looking for good info on character art, my mentor Georgian Avasilcutei has a Twitch channel which is a gold mine of Character Art information. I’d highly recommend stopping by.
Thanks to Justin for allowing us to have such an in-depth look at their process. If you liked this environment breakdown and want to see more like it from other inspiring artist’s make sure to follow us on:
https://www.artstation.com/gamesartist
Read more articles
You might also like these articles.