Swept Hilt Rapier & Hand Sword


Introduction
Hey everyone, my name is Jonjo Hemmens, and I’m a Senior Environment Artist at That’s No Moon.
I previously worked at Rocksteady studios and Creative Assembly on Suicide Squad: Kill the Justice League, and on Total War WARHAMMER 3


Goals
While creating these swords, I was looking to push my metal sculpting and engraving skills forward, while also working on my metal texturing. I also wanted to have some fun in the process, and I’ve always been fascinated by medieval weapons, especially the more ornate and impractical kind.
Inspiration
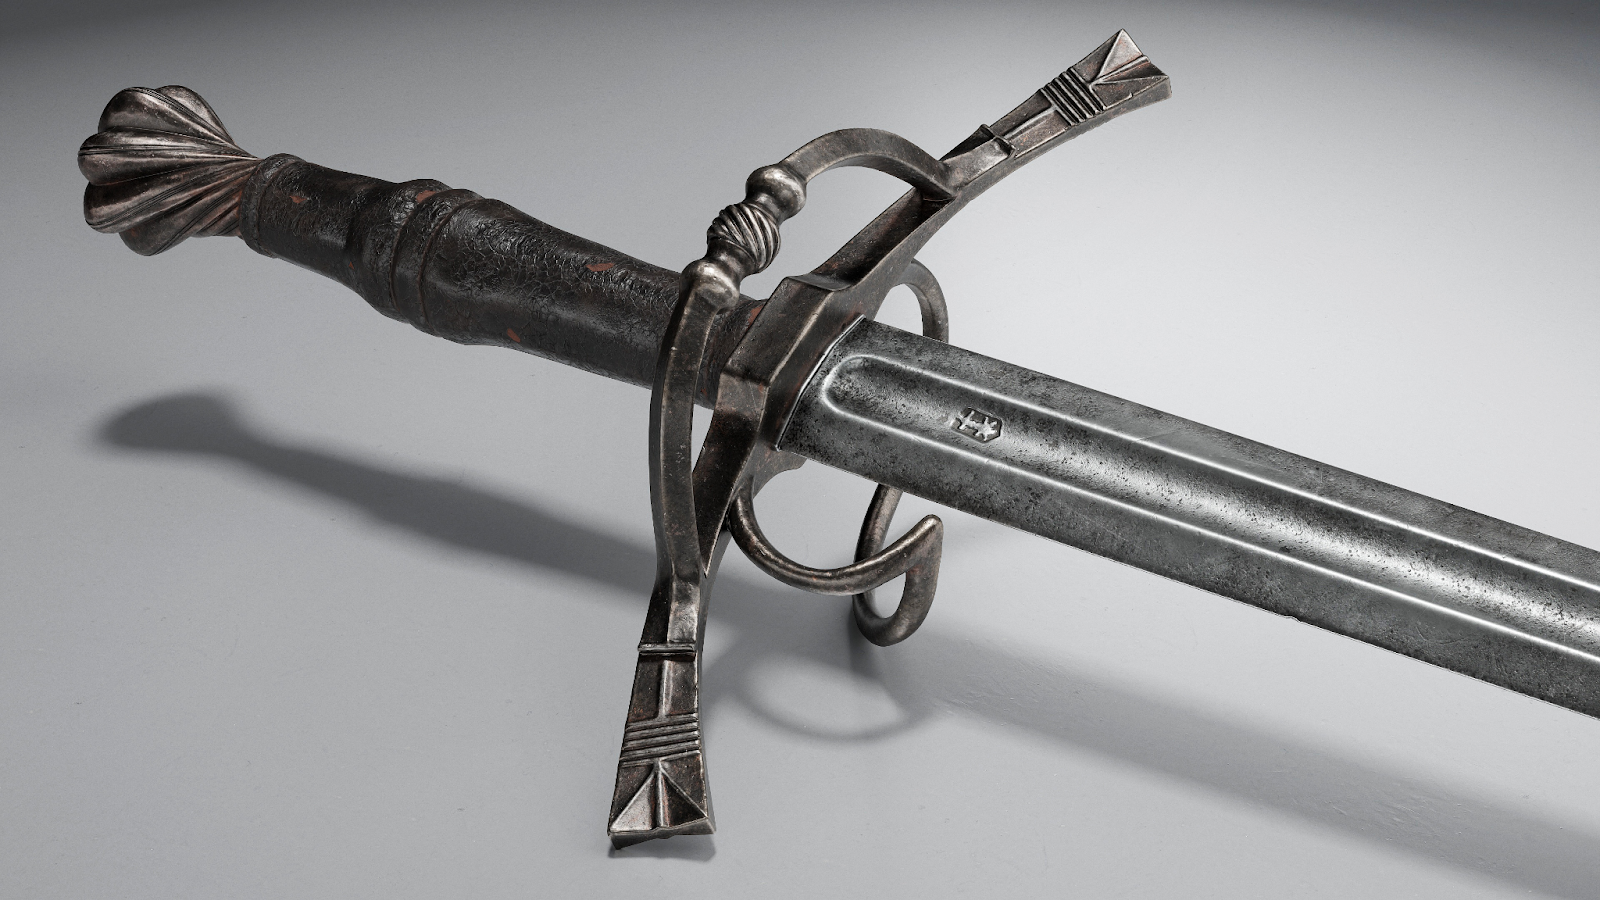
I was inspired to make these specific swords after visiting the Victoria and Albert Museum (The V&A) In London, South Kensington, with some friends. While checking out the medieval armament exhibits, we came across the German Hand and a Half Sword, and, no pun intended, it really gripped me. The twisting hilt was extremely interesting and I was immediately trying to figure out how to model it in 3D.
I had been looking for an asset to work on after completing the Hemlock Forest project last year, and creating a sword had been something I had always wanted to do, but it never worked out when I was a rookie. I took some photos, and then when I got home, I went online and found the exhibit listed on their website which had additional information and shots.
Blocking Out
I often start with Maya to blockout my assets, and this project was no different. For the Hand and a Half Sword I started by grabbing a shot of the full length of the sword and doing some basic box modeling with cylinders and cubes to get the rough forms and slowly began refining it bit by bit. As you can see, I ended up pushing the Maya blockout a bit further than I had originally planned for this sword, but it presented some really interesting sub-d challenges which I’m a bit of a sucker for.

The blockout for this asset ended up developing into a near complete highpoly which needed a bit of attention in Zbrush just to tighten up some details I had rushed. The Swept Hilt Rapier did however need some additional love in Zbrush and therefore had a much less developed blockout.

The Rapier block out had much less detail as the majority of the engraving work would need to be done in a sculpting program. The hardest part of block out for this sword was figuring out the correct proportions for both sides of the swept hilt. Trying to get the curves and joints to join together nicely was extremely difficult and required a lot of revision work.
Rapier Grip
I hadn’t used Blender for my personal work since I was just picking up the ropes with 3D back in 2017, but seeing how it’s changed over the years and how it has been used by professionals in recent years has convinced me I should probably pick it back up again.
I decided to make the Rapiers chain grip in Blender to help me get back into the swing of things and try out some of the array tools I’d seen. To make the chain grip, I started by creating a small mesh I could tile across a spline. Thankfully the chain for this grip is very uniform and only has two styles, so this was pretty easy.

Using the blockout grip I created in Maya earlier, I turned the edge loops into curves. I then used these curves to array the mesh I made earlier equally along the splines.

By using modifiers on those small tiling mesh pieces, I was able to add a curve modifier, which would place the mesh onto the curve, then by using an array modifier I could reference the same curve and set it to array the mesh along the length of the curve.

I did this for both wire parts, then brought it into Zbrush for some additional variety. I used the move brush to subtly move some of the wire bunching up and down, to show the wire slacking in places. I then duplicated some of the wires on the top and bottom, and used the move tool to create some messier wrappings which would help blend the grip into the pommel and guard.

I’ve never worked on an asset with this many separate meshes before, and I learned a lot from the process. Although someone could model this all by hand, using tools like Blender modifiers made this far more accessible and faster. I was really happy with the results of this grip.

Engravings
Instead of retreading old ground on how to sculpt metal, I thought I would focus mostly on the process for sculpting the engravings seen on the Rapier. Once I had brought it into Zbrush and fixed up a few topology issues, and started figuring out what brushes I wanted to use for the engravings.

Here was the main process I used to do pretty much all of the engraved details. It’s a fairly simple and accessible process, but requires a bit of practice to get fast with it. After doing this main pass, I would push some areas further by adding dents, scratches, etc. but didn’t go that far as most of the tertiary detailing could be done in Substance Painter later on.

After repeating the process enough you’ll hopefully have plenty of interesting details to work with. Doing all the engraving work took me about a month as I am not the most experienced with Zbrush and there were a tonne of details to do. In future I think I would tackle this slighting differently by making some brush stamps with details that I notice repeating a lot. That said I feel like the repetitive nature of doing this all manually has built my confidence with the workflow greatly, so it was still very much worth it.
Texturing
Before I dive into the section about texturing, I will yet again push all those who have not yet watched the texturing course by Jason Ord on Artstation Learning to go and do so. Now Learning is free, it really is one of the best tools for intermediate 3D artists to improve their skills in Painter.
Metals
For most swords, the metal materials tend to be the most important as they make up the majoring of the surface area of the asset, and therefore should definitely receive the most attention and time. I spent a long time developing a variety of smart materials in Substance Painter for my metals.
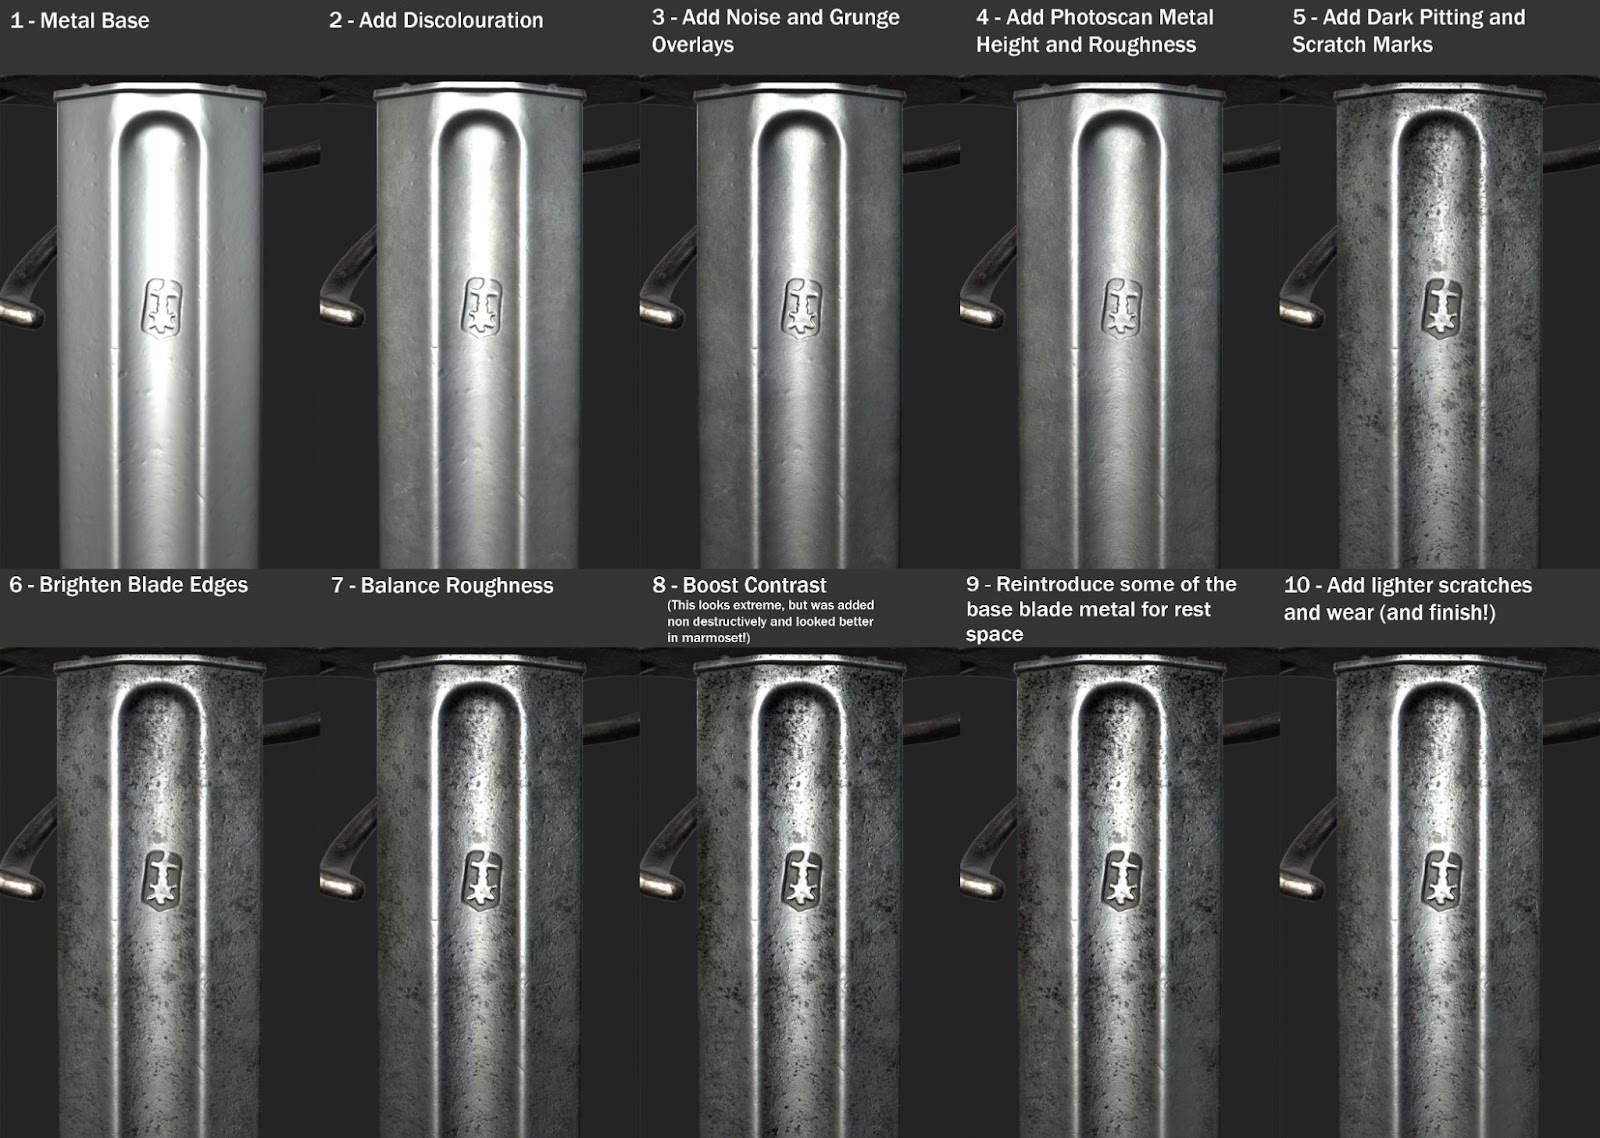
Most of the metals for the swords followed a fairly similar process and set of layers. I try to do most of my work in a non-destructive way and allow generators or custom masks to do the majority of the work, but regardless of this, there will be a fair bit of hand painting of masks to be done on any realistic asset.
Leather
Unlike the metal, I found it pretty difficult to build a decent-looking leather material that matched my reference in Substance Painter.
By building materials in Designer, I would have much more control, even if it would take a bit more time. I am by no means an expert in Designer, so make sure you learn from the professionals instead of just me!
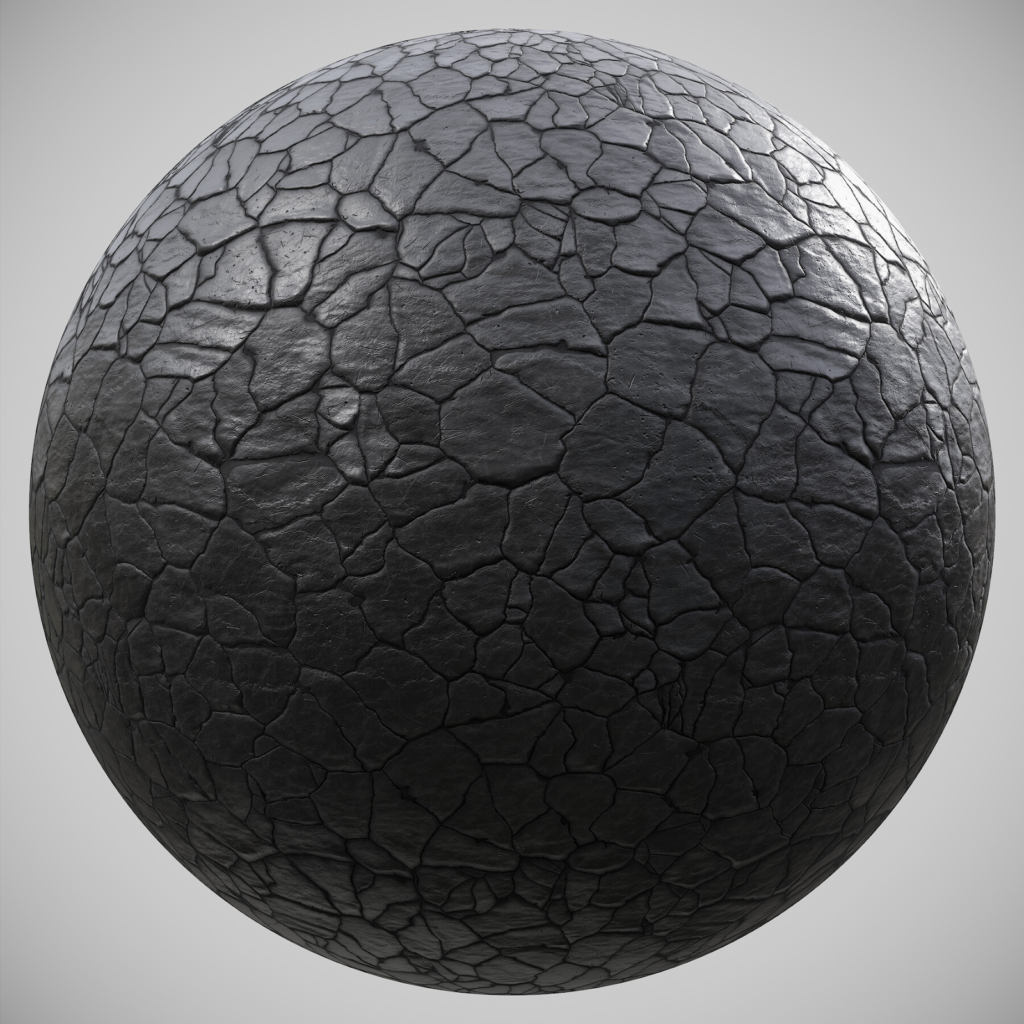


My reference shot for the leather really highlighted how I would probably need a couple of materials to blend between. Some areas of the leather are more cracked than others, and the cracks form these soft rounded shapes. In some of the softer areas you can notice some soft wavy warping of the material.

To generate the cells, I used a tried and true method where you detect edges from a tile sampler which is chaotically splattering paraboloid shapes. The edge detect allows you to create some random cell like shapes, which we will then combine with a flood fill to give these shapes some random grayscale values. We can then plug this into a distance node to get some nice cell generation. I then warp the shapes a bit with a couple of different perlin noise maps at different scales.

Once we have our main cells map, I use a variety of flood fills to shape these cells into something that looks more like our reference. To bulge out the shapes I used the non-uniform blur which can give you some really nice rounded bevels on shapes.

Once I was confident with the main shape, I blended in a variety of different details like cracks, some harsh cuts, and some more gentle leather warping shapes like you can see above. To create these I was just manipulating a Perlin noise with a variety of different maps to match the soft warps I saw in my reference.

I then brought both materials into Substance Painter, using the cell’s material as a base, then blending in the plain leather to match my reference and introduce some areas of rest. The blending in the screenshot above isn’t as clean as it could be, but the focus was to make sure it looked good from the render angles as a priority.

Final Thoughts
Although my day-to-day job is as an Environment Artist, I’ve found that working on individual high-quality assets has been incredibly useful to develop skills with specific tools and push my eye for details. Studying photorealistic assets and re-creating them in high detail, it’s helped me pick out the tertiary details I might have overlooked in other references.
It’s also really important to step out of your comfort zone, but not entirely. The Rapier was a great example of this for me. I was comfortable making the sword, blade, and basic shapes, but the engraving and grip wrap were things I had absolutely no idea how to make and it was just enough discomfort to help me learn and grow.
As always, this is the end. Not my longest piece but hopefully you’ve picked something useful up. If you have any questions, feel free to message me on Artstation and I’ll do my best to help.
Thanks for reading!
Jonjo.
https://www.artstation.com/jonjo
https://www.instagram.com/jonjo3d/
https://twitter.com/jonjo3d
Read more articles
You might also like these articles.